2 Salads & A Salsa

With summer in full swing you are probably heading to quite a few BBQ’s or hosting a few yourself. Today I would like to share with you two salads and a salsa recipe that are super easy & super quick to make for any BBQ you may be hosting or invited to or for those days that you just want to make something quick and easy for dinner that doesn’t involve much effort or thought. With all of these recipes I suggest making them a few hours in advance and refrigerating them so all of the flavors can marinate together.

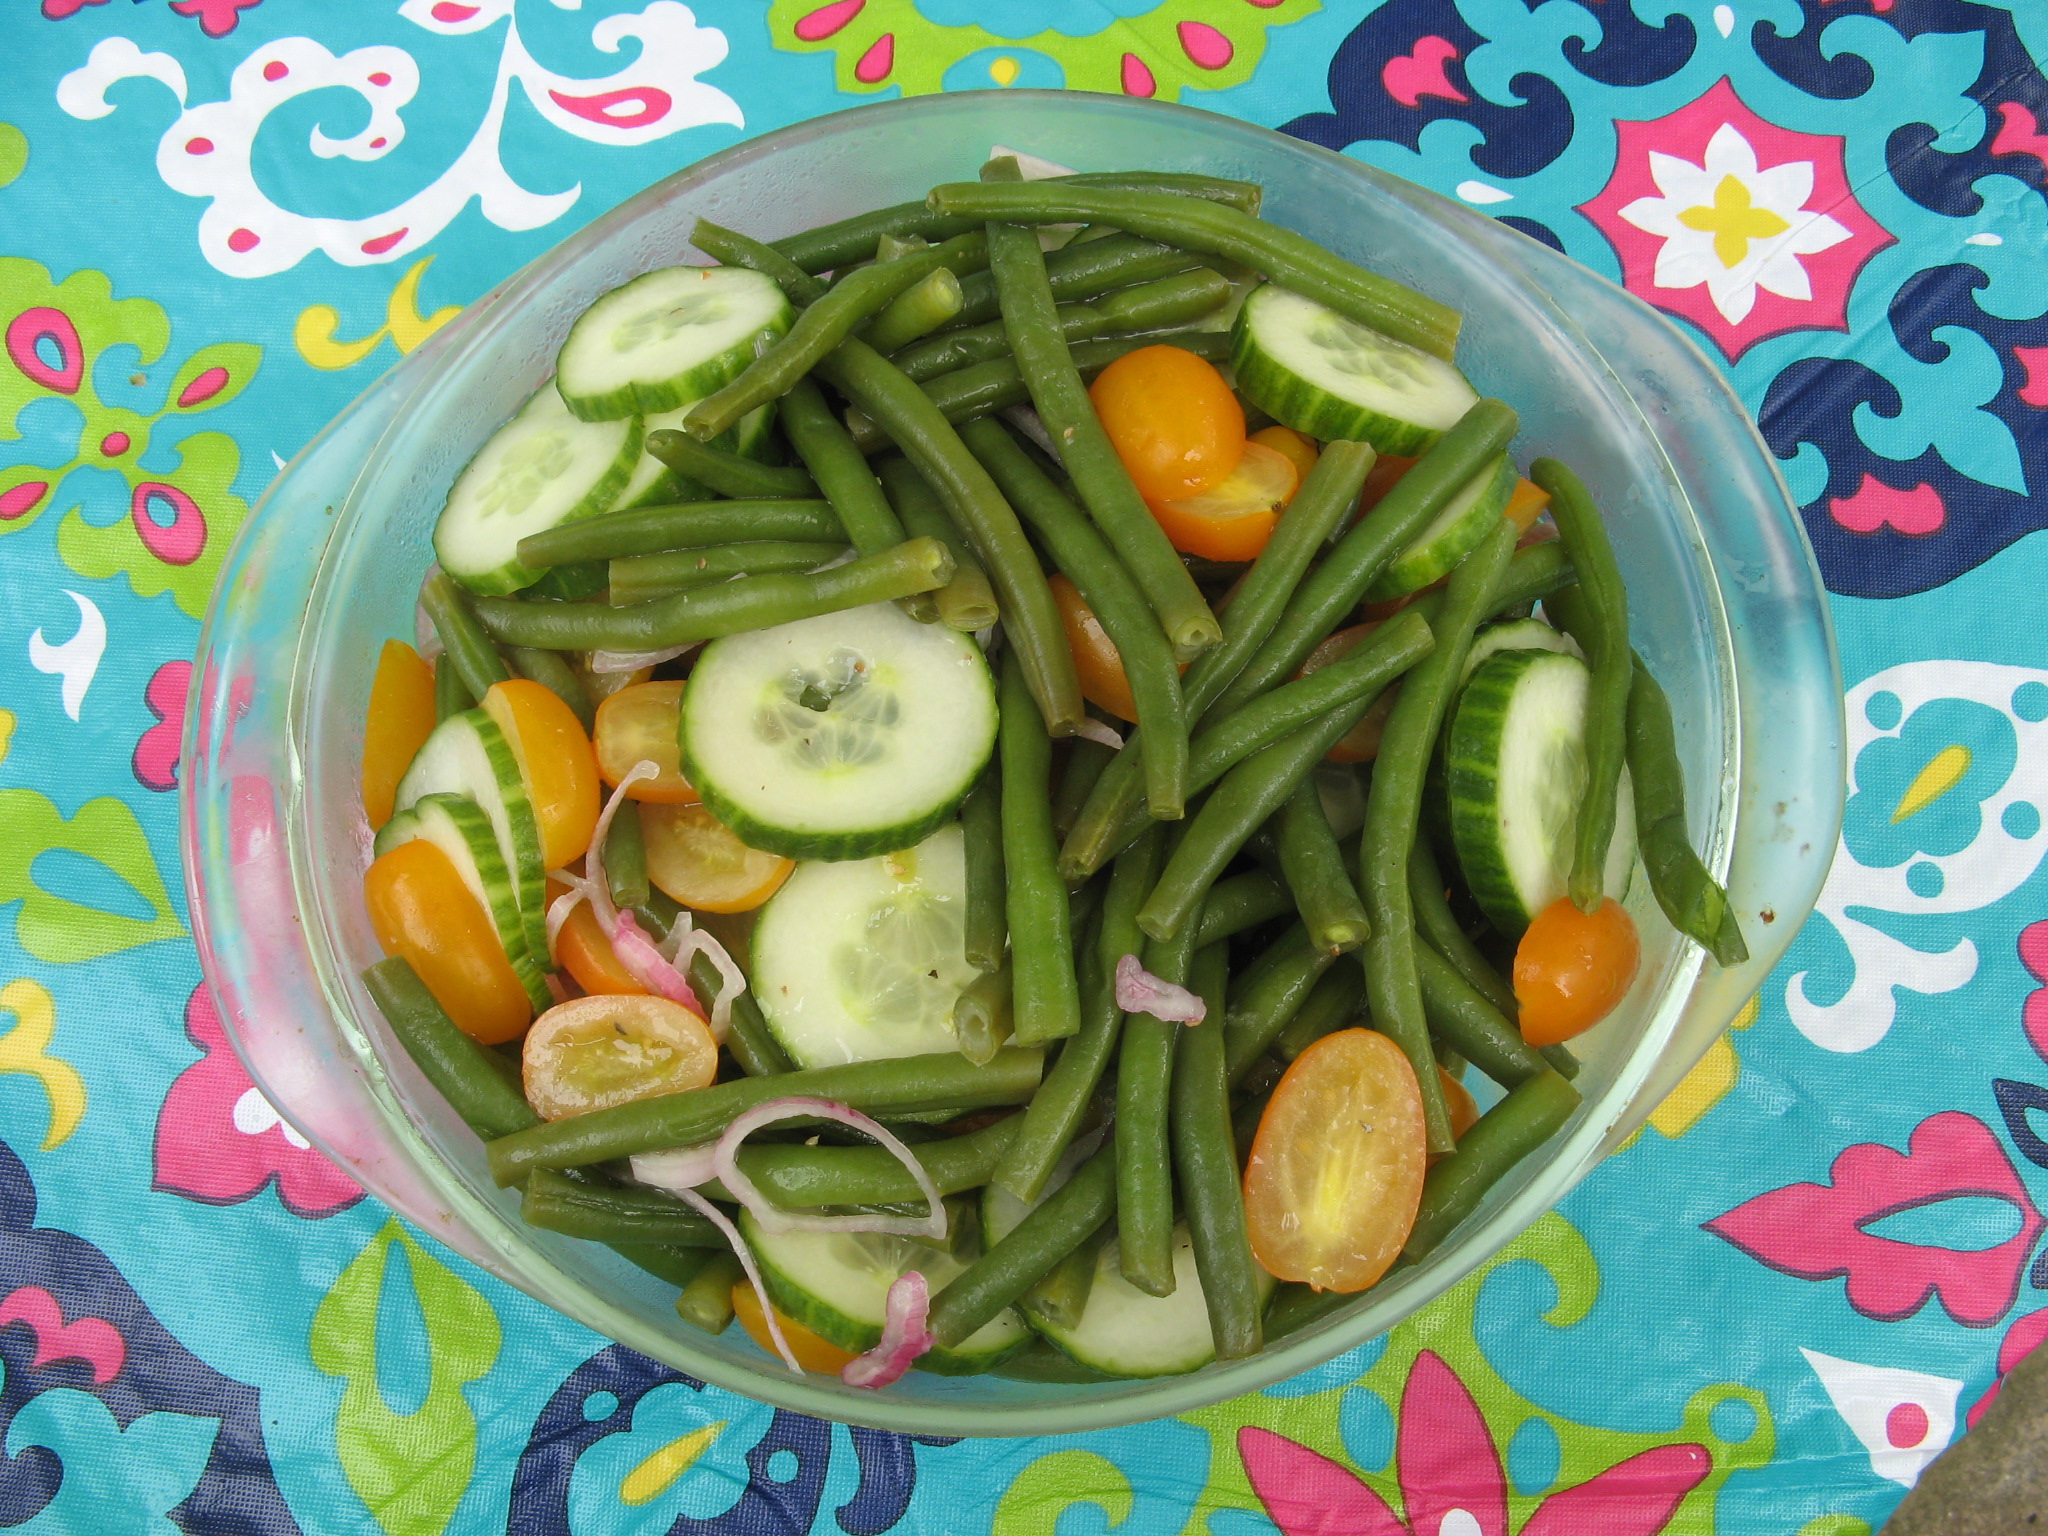
Green Bean – Cucumber Salad

IMG_8395

Ingredients:

1 1/2 lbs. green beans, trimmed

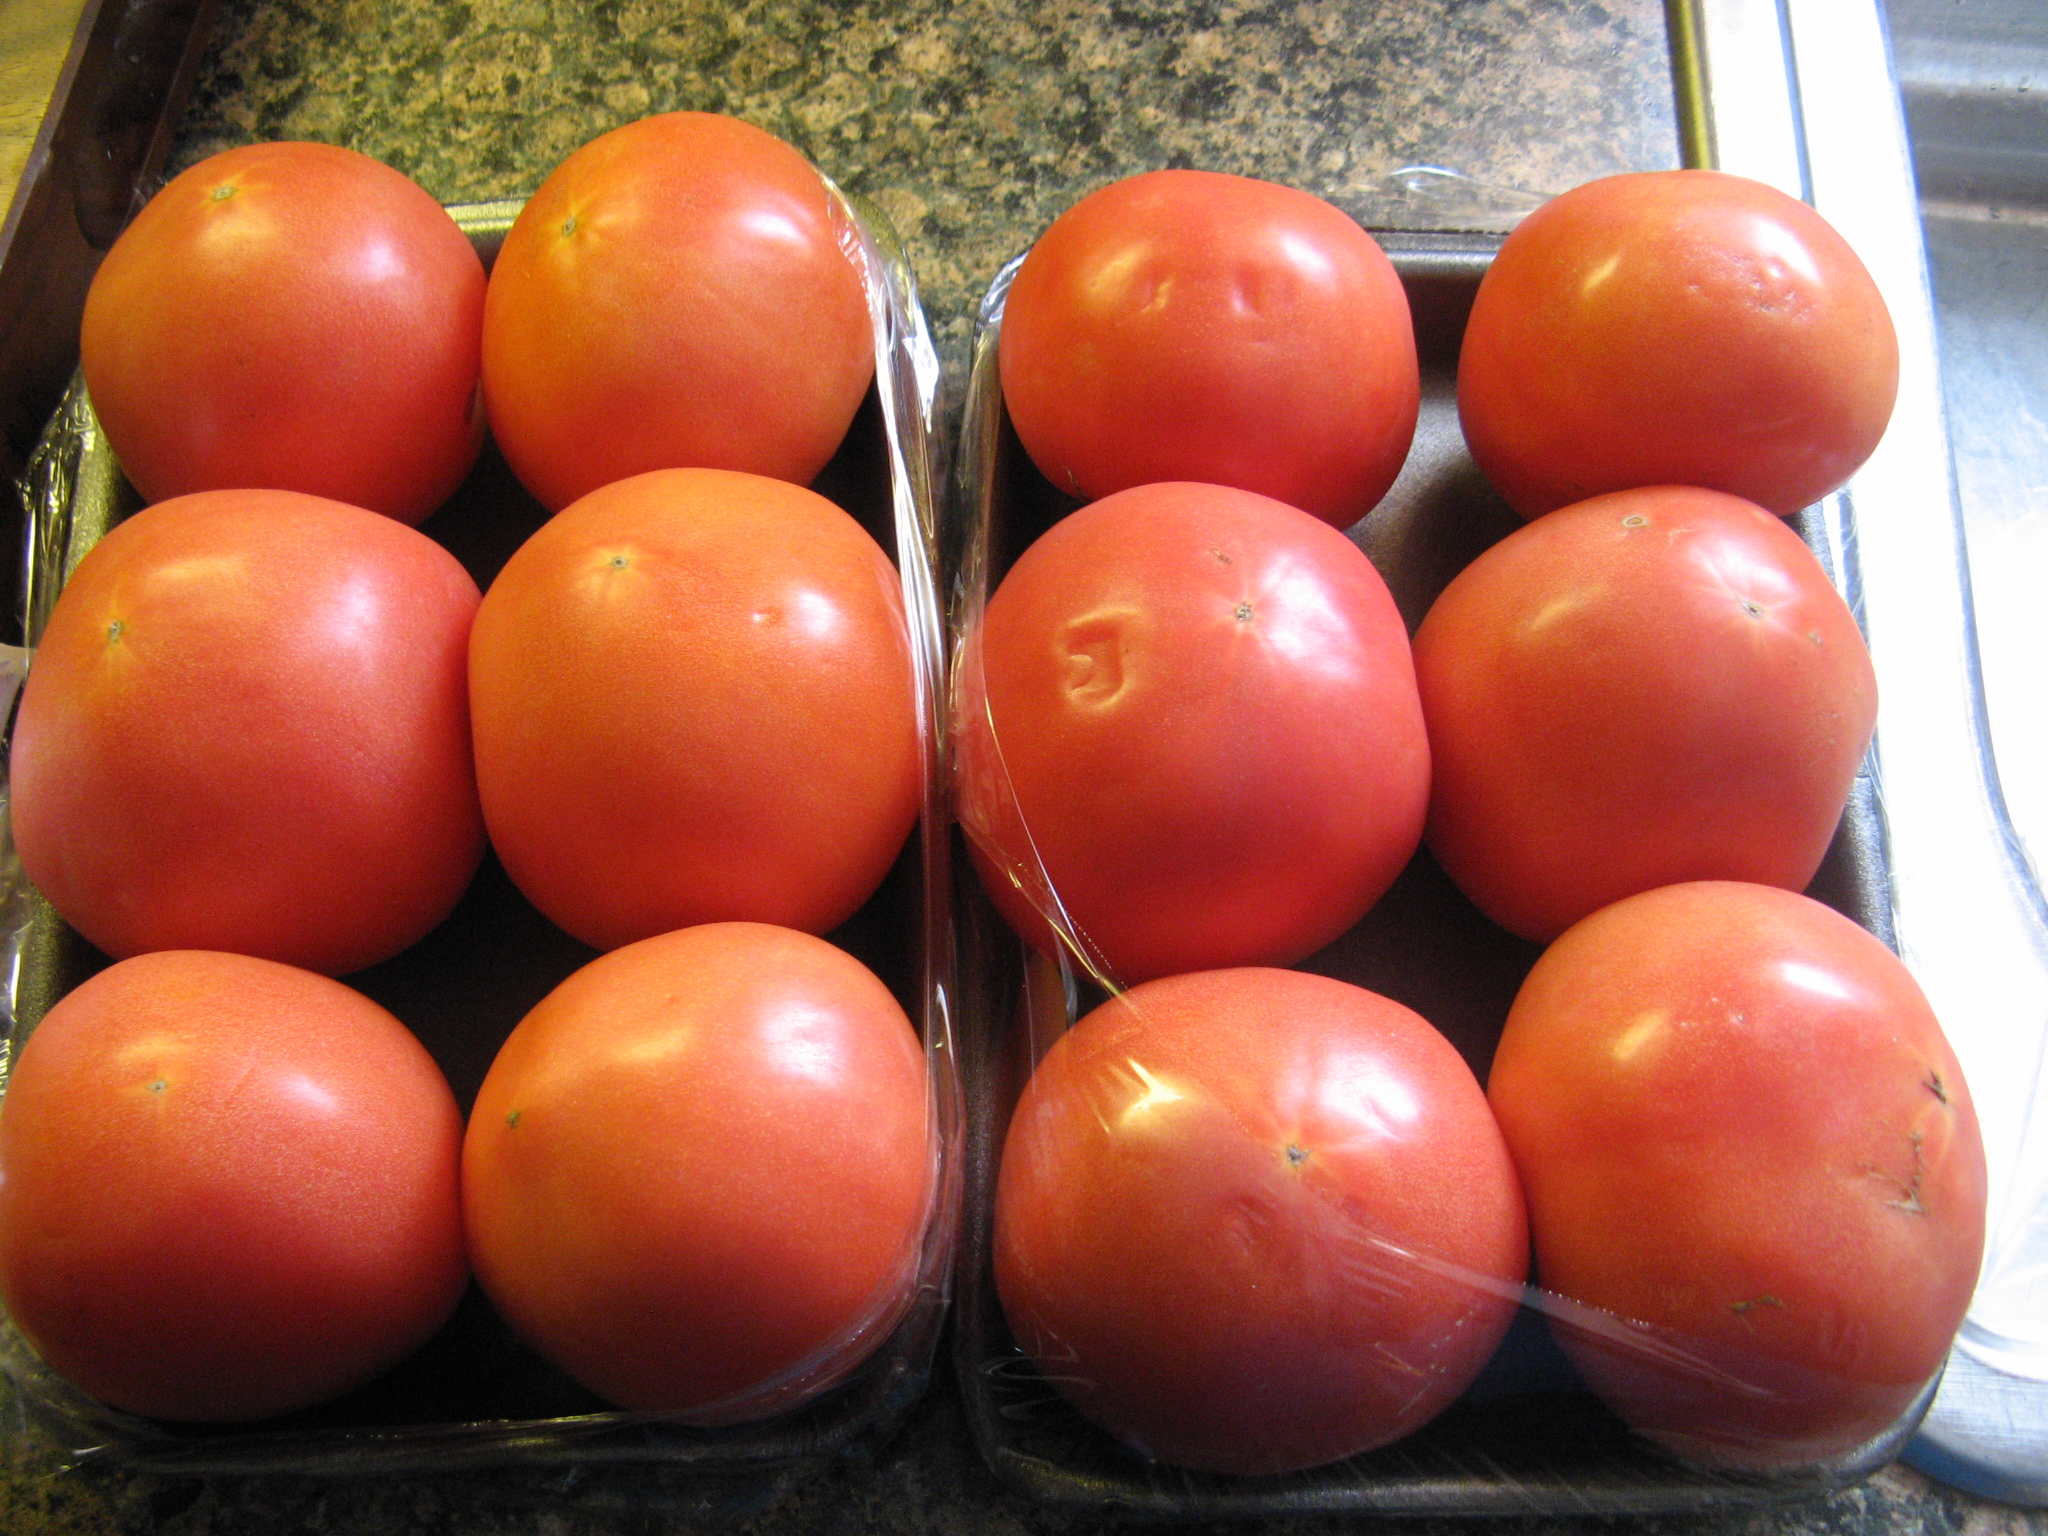
1 pint grape tomatoes, halved

1 English cucumber, sliced

1 shallot, thinly sliced

1/3 cup olive oil

1/4 cup red wine vinegar

salt and pepper

Directions:

1. Bring a pot of water to boil and add green beans. Boil the green beans until they are tender – approximated 7 minutes – and then drain and rinse under cold water.

2.  In a large bowl toss the green beans along with the remaining ingredients and then season with salt and pepper. Transfer to a serving dish and refrigerate until ready to serve.

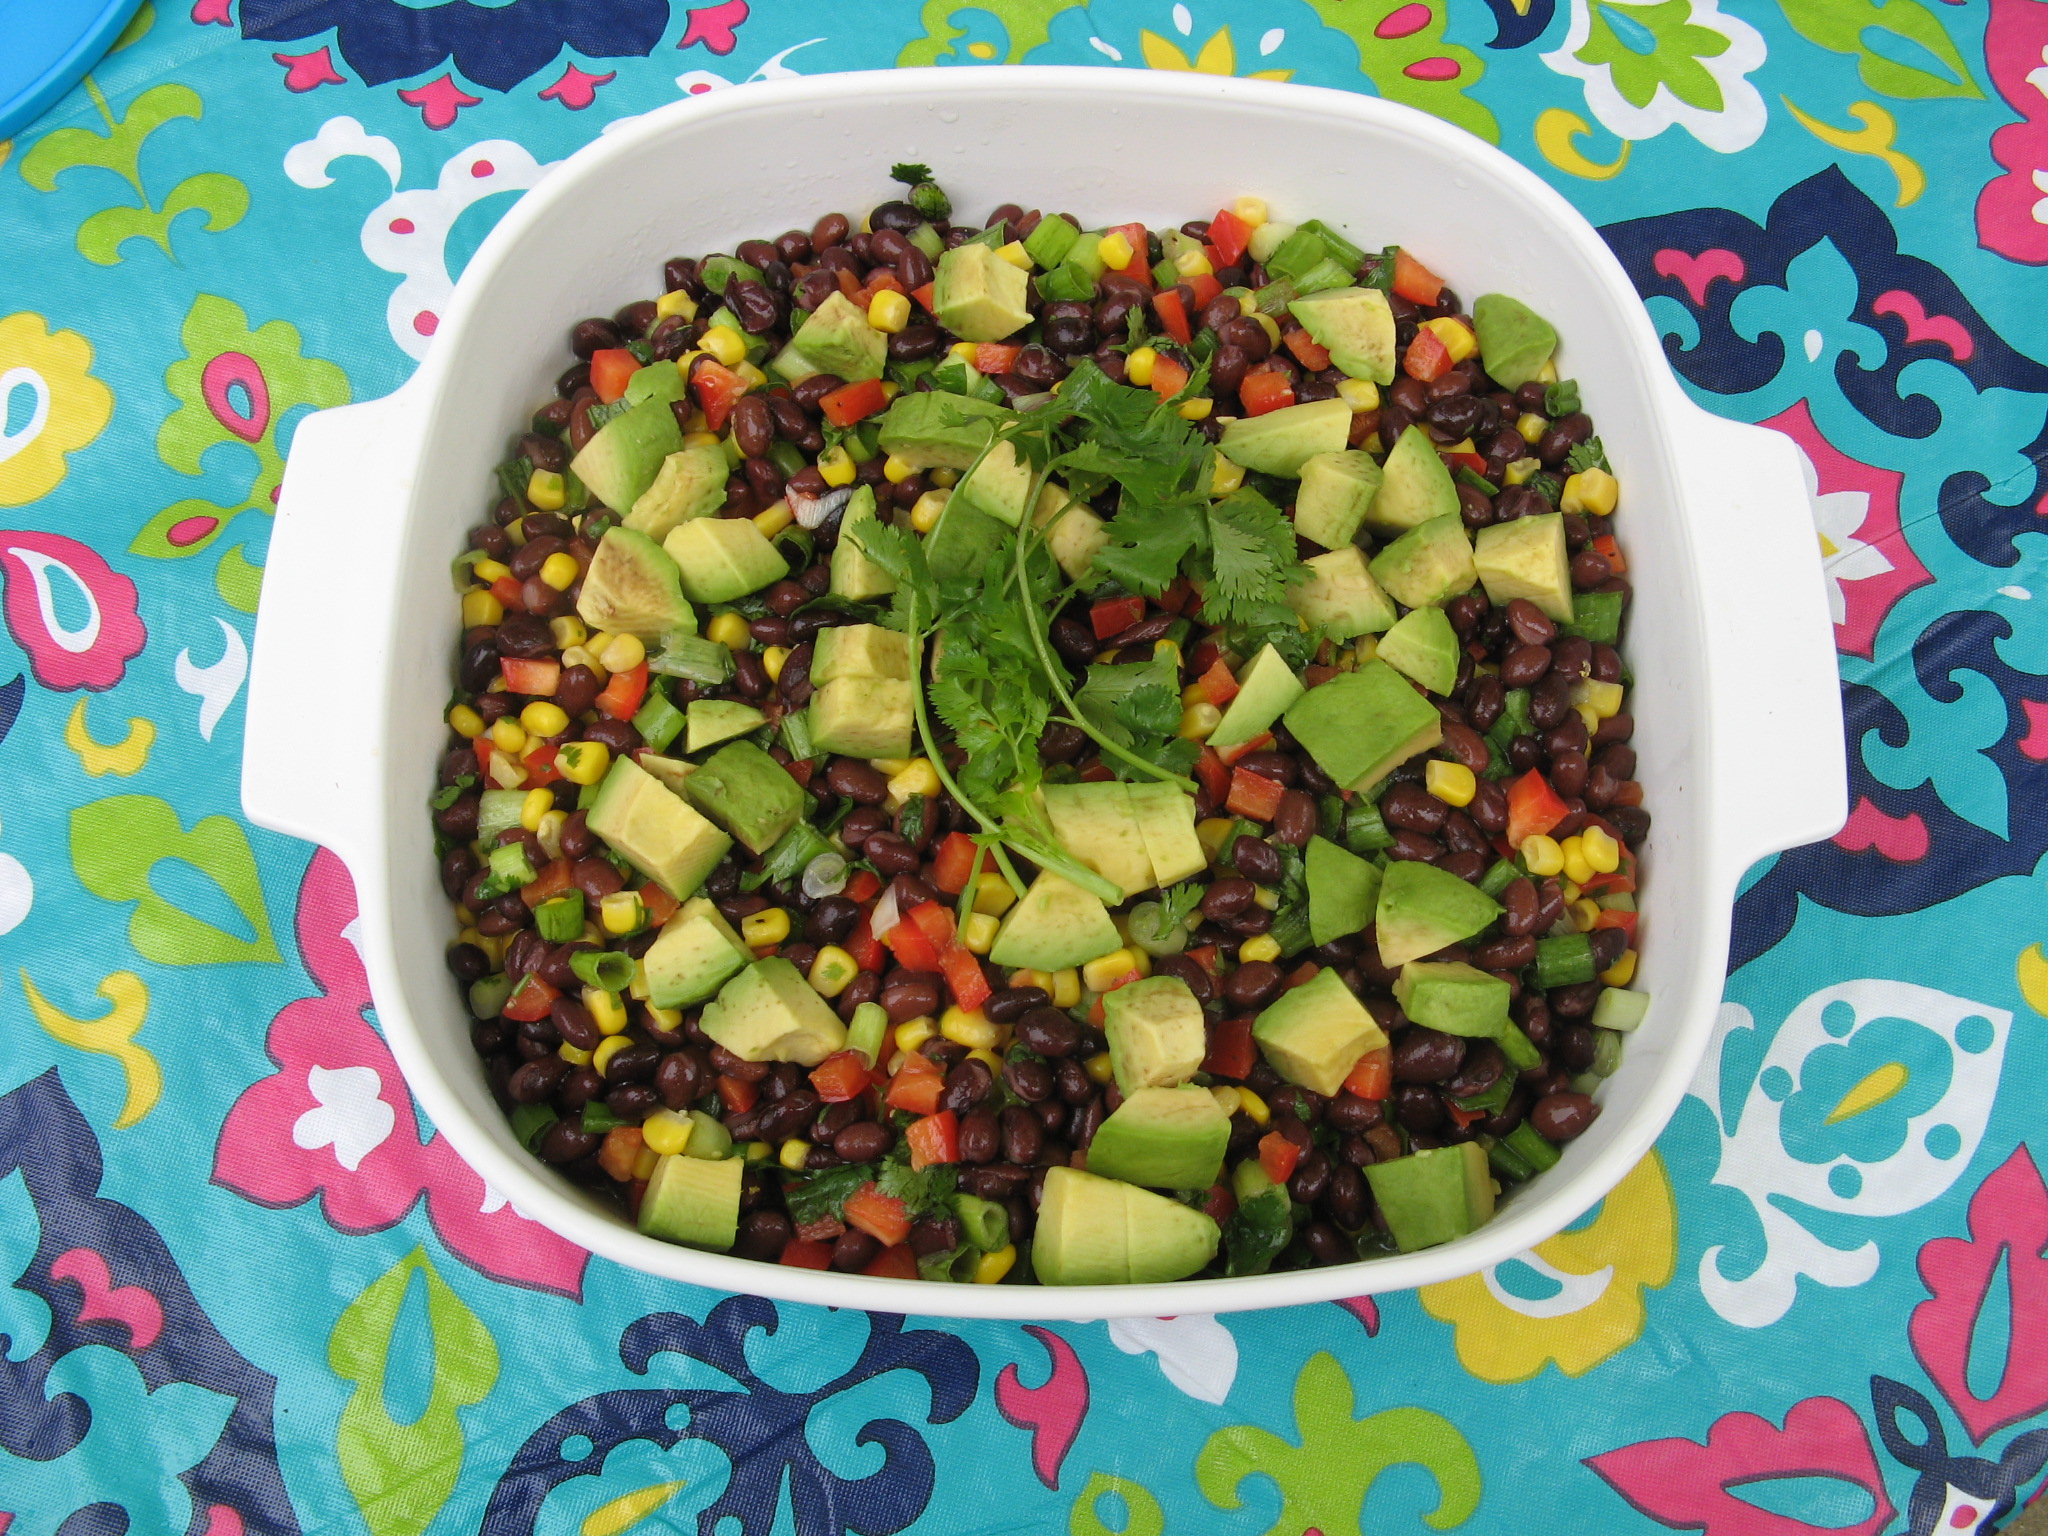
Black Bean – Corn Salad

IMG_8396

Ingredients:

2 15-ounce cans black beans, rinsed

1 cup canned corn

1 red bell pepper, diced

1 bunch scallions, chopped

1/2 cup cilantro, roughly chopped

1/4 cup olive oil

2 teaspoons honey

Juice of 3 limes

salt and pepper

Directions:

1. Whisk together the olive oil, honey and lime juice in a measuring cup.

2.  In a large bowl add the black beans, corn, pepper, scallions and cilantro. Add the olive oil mixture to the black bean mixture and toss all the ingredients together. Transfer to a serving dish and top with the dice avocado. Refrigerate until ready to serve.

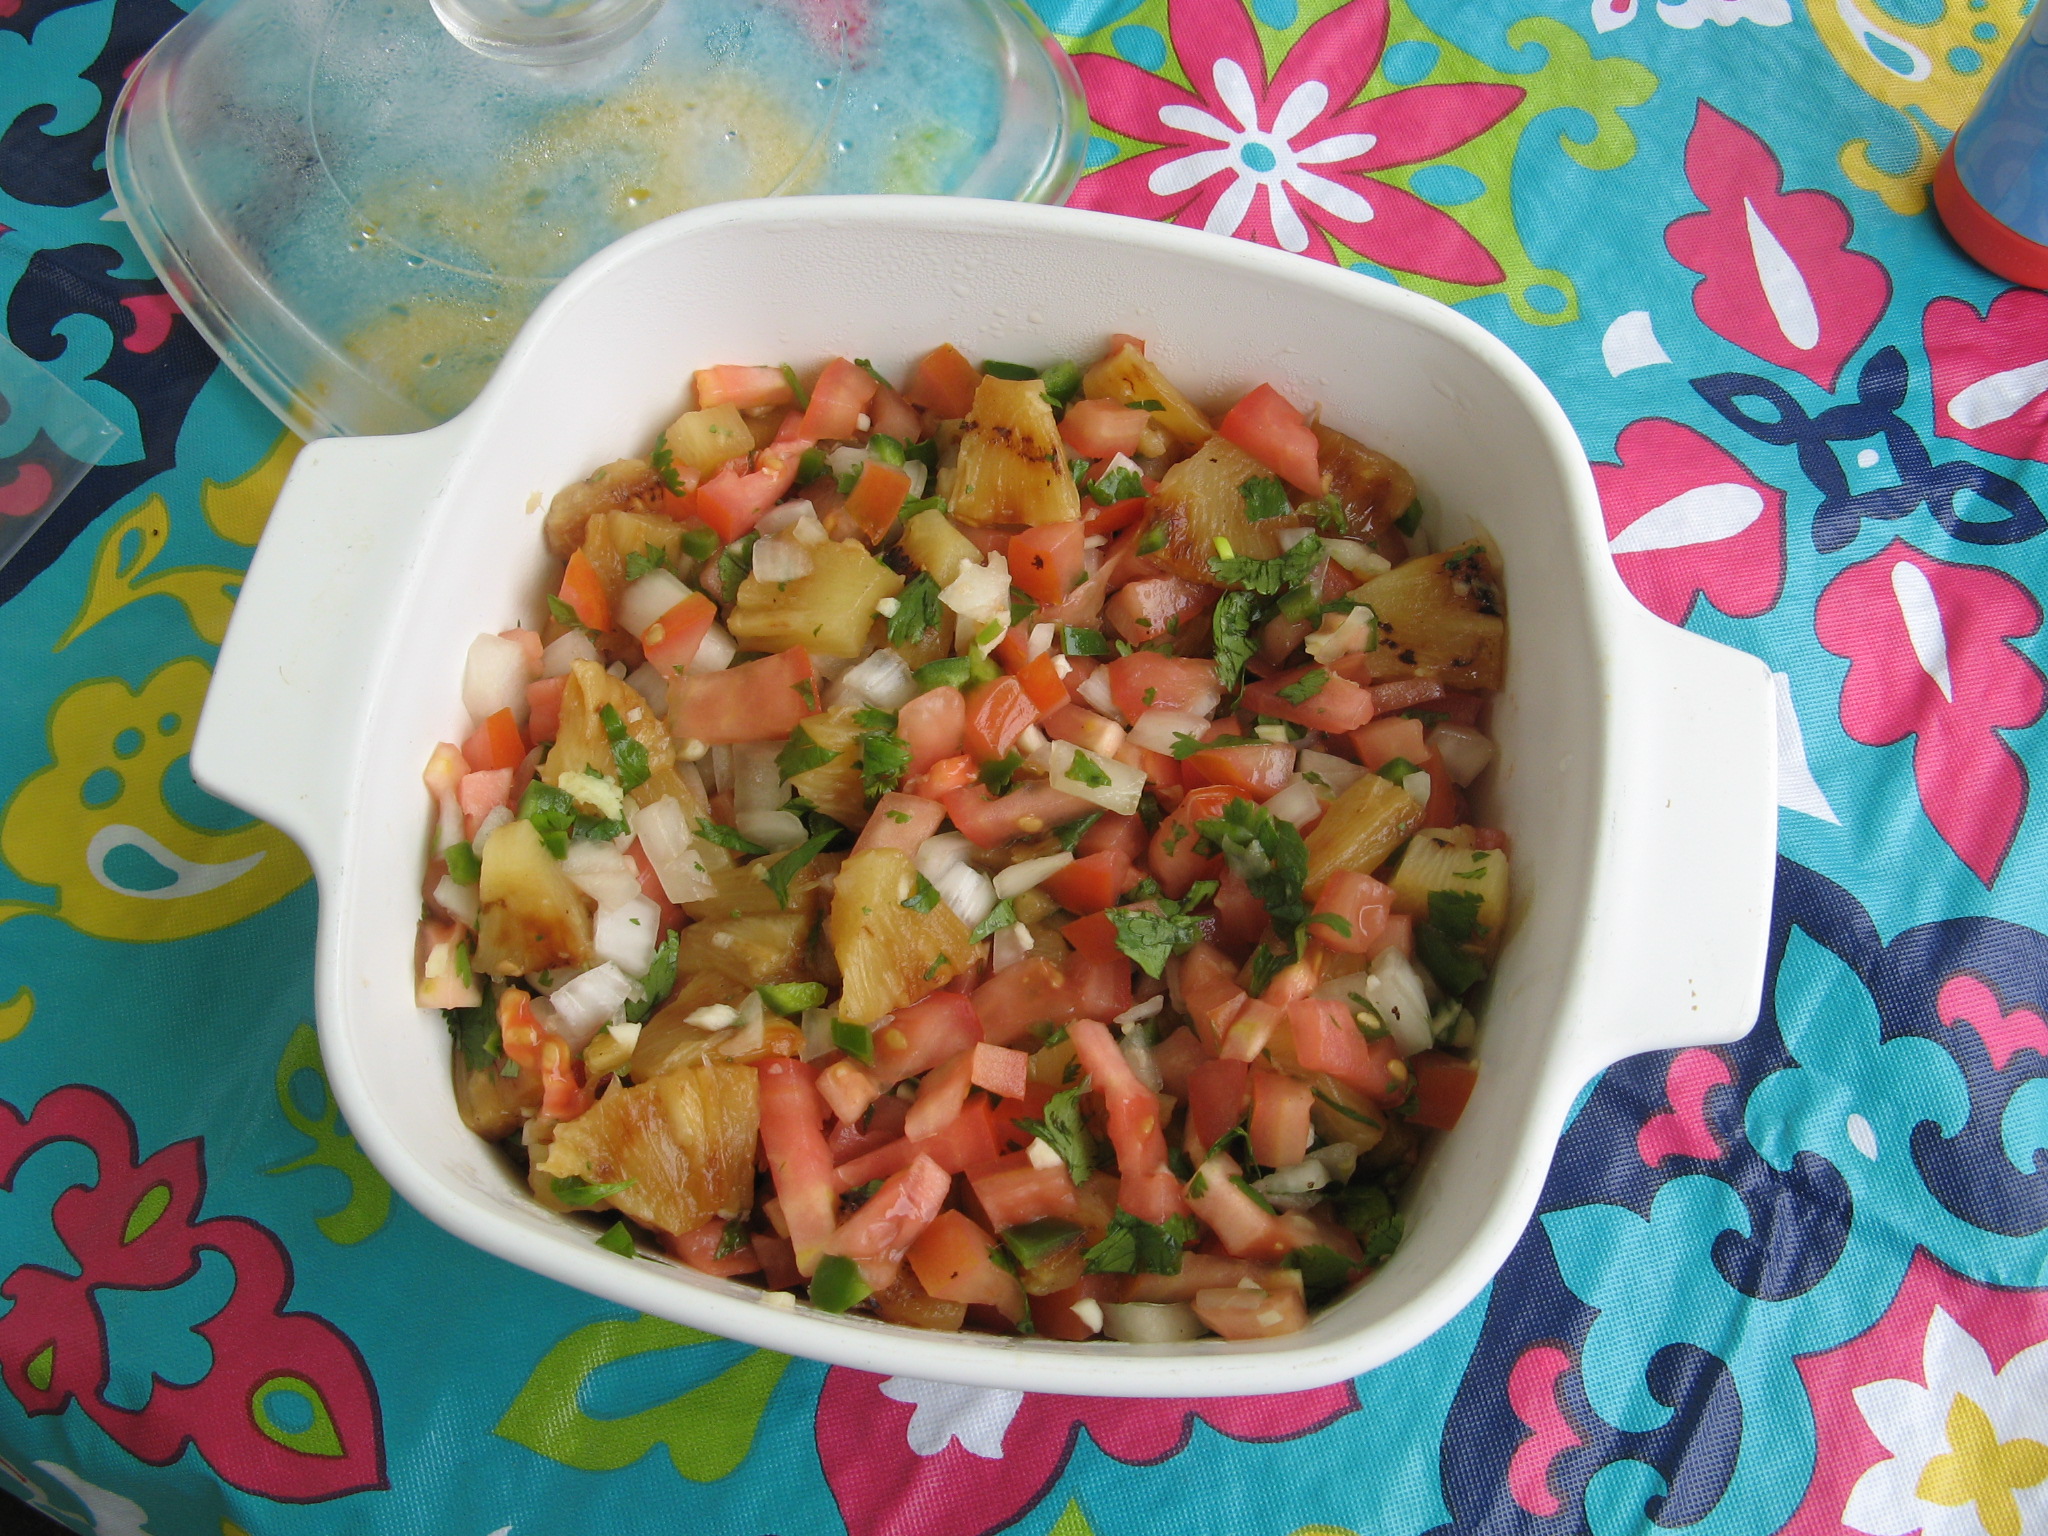
Grilled Pineapple Salsa

IMG_8383

Ingredients:

1/2 cup diced white onion

1 20 oz. can pineapple slices in juice*

2 tomatoes, diced

1 jalapeno pepper, seeded and diced

1 garlic clove, minced

1 teaspoon grated fresh ginger

1/3 cup fresh cilantro, chopped

Juice of 1 lime

Kosher salt

*Alternatively can use 1 pineapple, peeled, cored and cut into rings.

Directions:

1. Soak the onion in cold water for 15 minutes then drain.

2. Preheat an indoor grill pan over medium heat and lightly oil the pan (you could also grill the pineapple on a grill.) Grill the pineapple rings until marked, about 4 minutes per side. Transfer to a cutting board and chop.

3. Combine the pineapple, onion, tomatoes, jalapeno, garlic, ginger and cilantro in a large bowl. Add the lime juice and season with salt then toss. Serve with tortilla chips. This salsa also tastes great over salmon and grilled chicken.

Chicken Pad Thai

Whenever I go to a Thai restaurant my go-to dish is always Chicken Pad Thai. It’s pretty much foolproof and always delicious. A few years ago I attempted to make it myself and was happy with the outcome – it was super simple and tasted awesome. I recently dug out the recipe I used and whipped it up for dinner.

To begin I prepped all of my ingredients; minced garlic and ginger, sliced three thinly sliced chicken breasts into strips and julienned 2 carrots and 1 zucchini.

IMG_7158

Two of my other ingredients were rice noodles and Asian chili paste.

IMG_7162

Next I whisked together soy sauce, water, peanut butter and the chili paste until it was smooth.

IMG_7163

To cook the vegetables and chicken I began by sautéing the garlic and ginger for about a minute and then adding the vegetables and chicken and cooking everything until the chicken was cooked through.

IMG_7166

While I was cooking the vegetables I prepped the rice noodles by soaking them in warm water (I brought a pot of water to boil and then removed it from the heat). Luckily the rice noodles now come in these individual packets (there are four in a box) so I knew exactly how many noodles I needed – 2 packets. The last time I cooked with rice noodles – granted it was some time ago – they didn’t come in these nifty packages so I had to use my best guess as to what was half of the package.

IMG_7164

The noodles soaking…

IMG_7165

Once the noodles were ready (I followed the directions on the package and soaked them for 5 minutes) I added them to the pan with the vegetables and then added in the peanut/soy sauce I made along with light brown sugar and cider vinegar. I tossed all of the ingredients together to distribute the sauce and let everything cook for a few more minutes and then it was time to enjoy my homemade Chicken Pad Thai and it was delicious!

IMG_7168

Chicken Pad Thai – Modified from here

Servings 4

Ingredients:

2 tablespoons soy sauce

2 tablespoons water

1 1/2 tablespoons creamy peanut butter

2 teaspoons Asian chili paste

3 tablespoons canola oil

2 teaspoons minced garlic

2 teaspoons minced ginger

1 zucchini, julienned

2 carrots, julienned

8 ounces chicken breast, sliced into strips

1/4 pound rice noodles, follow directions on package to prepare

1 tablespoons light brown sugar

1 tablespoons cider vinegar

Optional for garnish:

Lime Wedges

Chopped Peanuts

Bean Sprouts

Directions:

1. In a bowl whisk together the soy sauce, water, peanut butter and chili paste.

2. Heat a large sauté pan (or wok) over medium heat and add the canola oil. Once the oil is hot add the garlic and ginger and cook for about a minute. Add the vegetables and chicken and cook until the chicken is browned and cooked through. Add the noodles and toss to coat them.

3. Add the peanut/soy sauce, brown sugar and cider vinegar and toss to distribute. Cook until heated through.

Lemon Ricotta Pancakes

When it comes to pancakes I’m a bit of a traditionalist. I’ll take plain old regular pancakes or buttermilk ones over any flavor (i.e. banana, pumpkin, corn, etc…) or additions (i.e. chocolate chips) – although blueberry pancakes are quite delish! A few years ago though I decided to try Lemon Ricotta Pancakes at a wonderful breakfast spot in Brooklyn – Tom’s Diner – and was instantly hooked. I don’t know what it is about this particular flavor that makes them so delicious – the hint of lemon, the swirl of ricotta cheese, or the combination of both – but they are definitely one pancake everyone should try. And while there are recipes for pancakes made from scratch I opted to make these pancakes using store-bought pancake mix… short-cuts aren’t always a bad thing. And with Easter just around the corner these would be perfect addition or main dish for your Easter breakfast or brunch.

To begin I whisked together pancake mix, milk and lemon oil (I didn’t have any lemons on hand to zest.) Some things to note, I used Aunt Jemima Complete Pancake Mix and while it calls for water to be used with the mix I always opt to use milk for richer tasting and fluffier pancakes. Also, the equivalent of lemon oil to lemon zest is 1/4 teaspoon vs. 1 tablespoon.

IMG_7136

I then folded in the ricotta cheese; folding in the ricotta helps to maintain the texture of the cheese and allows the ricotta to swirl into the batter.

IMG_7137

I’ll admit I’m not the best pancake maker. Usually the first one I pour into the pan is my “test” one that gets thrown out. I just haven’t mastered getting the pan to the right heat. This time around I almost nailed it.

IMG_7140

After topping my short-stack with syrup…

IMG_7142

It was time to enjoy them!

IMG_7143


Lemon Ricotta Pancakes*

Makes 5 4-inch pancakes

Ingredients:

1 cup pancake mix (I used Aunt Jemima complete)

3/4 cup milk (I used 2%)

1 tablespoon lemon zest (or 1/4 teaspoon lemon oil)

1/2 cup whole-milk ricotta cheese

Directions:

1. Whisk together the pancake mix, milk, and lemon oil (or zest) then gently fold in the ricotta cheese.

2. Spoon approximately 1/4 cup (I used an ice cream scoop) of the batter onto a lightly buttered pan or griddle heated over medium-heat.

3. Cook until bubbles form on the surface and then flip and cook for another minute or two until golden.

*This recipe can easily be doubled.

A Quick and Easy Coq au Vin

The first time I had Coq au Vin was at a cooking demonstration class at Williams Sonoma. I purchased the braising base that was used at the class but unfortunately my result was nothing like the one I tasted at the class. I think part of the reason was that I still wasn’t all that comfortable with cooking – I’m more of a baker, but, slowly but surely my cooking ability is starting to even out with my baking ability. Recently I came across a recipe for Coq au Vin in a magazine and decided to try making it once again, this time from scratch, and I had much better results. And in case you are wondering, Coq au Vin is a French dish of braised chicken in red wine and normally contains bacon, garlic, onions and mushrooms.

IMG_7069

Up first I sliced baby bella mushrooms, minced 2 cloves of garlic and chopped some fresh thyme.

IMG_7048

I then cooked three slices of bacon, which I cut into half-inch pieces, in two teaspoons of olive oil until they were brown, but not crispy.

IMG_7051

After removing the bacon from the Dutch oven and setting it aside I browned four chicken thighs which I seasoned with salt and pepper.

IMG_7052

Next I cooked the mushrooms along with a 16 oz. bag of frozen white pearl onions for a few minutes until they began to soften.

IMG_7054

Following that I added in the thyme, garlic and a tablespoon of tomato paste.

IMG_7056

And then red cooking wine. I cooked the mixture for about 5 minutes until the wine reduced by half…

IMG_7058

And then added in chicken stock.

IMG_7059

And finally I returned the chicken to the pot, reduced the heat to low and partially covered the pot and allowed the chicken to cook through and the onions to soften, about 40 minutes.

IMG_7060

And for the final step, I dissolved three tablespoons of cornstarch in an equal amount of water and added it to the cooking liquid after transferring the chicken to a plate. Once the liquid thickened I returned the chicken and bacon to the pot, stirring to coat the chicken. I must say I have used cornstarch to thicken cooking liquids before but I normally just add it directly to the liquid, dissolving it in water is a much better method as it eliminates the possibility of any clumps forming in the liquid.

IMG_7062

Final Verdict… Definitely something I will make again, although I think next time I won’t add the cornstarch.

IMG_7064


Easy Coq au Vin – Slightly modified from here

Ingredients:

3 slices center cut bacon, cut into half-inch pieces

2 tsp. olive oil

4 bone-in, skinless chicken thighs

16 oz. frozen pearl onions

10 oz. baby bella mushrooms, trimmed and sliced

1 tbsp. tomato paste

2 cloves garlic, minced

1 cup red cooking wine

2 cups chicken stock

3 tbsp. cornstarch

Directions:

1. In a 5 to 6 quart Dutch oven, cook the bacon in the oil over medium heat until browned but not too crispy. Transfer the bacon to a small bowl lined with a napkin. Season the chicken with salt and pepper (I used about 1/2 tsp. each). Increase the heat to medium-high and cook the chicken until golden brown, about 5 minutes per side. Transfer the chicken to a plate.

2. Add the onions and mushrooms to the pot and cook, stirring occasionally, until they soften. Stir in the tomato paste, thyme and garlic. Add the wine and cook, scraping up any browned bits, until the wine is reduced by half, about 5 minutes. Add the stock and bring the liquid to a simmer. Return the chicken and any juices to the pot. Reduce the heat to low, partially cover and gently simmer, turning the chicken once or twice, until the chicken is cooked through and the onions are tender, about 40 minutes.

3. In a small bowl dissolve the cornstarch in tbsp. water. Transfer the chicken to a plate. Increase the heat to medium-high and bring the cooking liquid to a bowl. Add the cornstarch mixture and stir until thickened. Season with salt and pepper. Return the chicken and bacon to the pot, stirring to coat.

Roasted Tomato Basil Soup

For me any time is a good time for soup – it’s like ice cream; it can never be too cold or too hot to enjoy it. Especially since there are so many varieties of soups that can be enjoyed either hot or cold. But these days with the temperatures being so cold and every few days there is some sort of wintry mix falling from the skies hot soup is definitely the way to go! The other day while picking up some produce while grocery shopping – this is a common place (the produce section) where I get some of my cooking / baking ideas – the idea of making roasted tomato soup popped into my head. I had no idea what ingredients I needed but I figured tomatoes would be a good start and some basil. I knew I had the other basics at home that I assume I would need – yellow onions and garlic. I didn’t think I needed any specific type of tomato – i.e. plum, beefsteak, etc… – so I picked up a pack of six tomatoes but then when I got home and did some research I soon realized that I needed double that amount so I picked up another pack of six tomatoes the following day and I was ready to go.

IMG_6684

I began by slicing the tomatoes in half and tossing them with olive oil and kosher salt and placing them on a baking sheet.

IMG_6686

I then roasted them in a 400 F preheated oven for about 45 minutes.

IMG_6689

While the tomatoes cooled I chopped two yellow onions and minced four garlic cloves and sautéed both in two tablespoons each of unsalted butter and olive oil over medium heat. The smell of sautéing onions and garlic is probably one of my favorite aromas when it comes to cooking.

IMG_6691

Following that I added a quart of vegetable broth – I used College Inn’s Garden Vegetable Broth – the tomatoes and ten large basil leaves to the onion mixture.

IMG_6693

I brought the soup to a boil by raising the heat to high and then lowered the heat so the soup could simmer uncovered for about thirty minutes. I did a taste test and I already knew that this soup was a winner… The broth had a wonderful taste with a hint of the basil.

IMG_6694

I removed the pot from the heat and used an immersion blender to blend the mixture into a delicious creamy soup that still had bits of the basil in it. I seasoned it with some fresh ground pepper and it was ready to be enjoyed.

IMG_6696

While the soup was meant to be for dinner, I couldn’t wait to try it so I ladled a few spoons into a bowl and topped it with some shredded parmesan cheese and I was very happy with the result. I enjoyed a second bowl a few hours later along with a grilled cheese!

IMG_6704


Roasted Tomato Basil Soup

Makes about 4 to 6 servings

Ingredients:

12 tomatoes (approximately 3 pounds) – halved

2 medium yellow onions, chopped

4 garlic cloves, minced

10 large basil leaves

1 tablespoon kosher salt, plus more for seasoning

1/4 cup olive oil, plus more for sautéing onions and garlic

2 tablespoons unsalted butter

1 quart vegetable broth

Fresh ground pepper for seasoning

Directions:

1. Preheat oven to 400 F. Toss tomatoes with olive oil and salt and spread on a cookie sheet in a single layer and roast in the oven for 45 minutes.

2. Sauté the onions and garlic in 2 tablespoons of olive oil and the butter over medium heat for about 10 minutes, until the onions begin to brown.

3. Add the vegetable broth, tomatoes and basil to the onion mixture and raise the heat to high and bring the mixture to a boil. Lower the heat to low and simmer the soup uncovered for about 25 – 30 minutes, the tomatoes will looked stewed / poached.

4. Blend the soup with an immersion blender, or blend in a blender or a food processor, until the soup is creamy and all of the tomatoes have been blended. Season with salt and pepper.


Roasted Butternut Squash & Sweet Potato Soup

The temperatures have begun to drop and it’s the perfect excuse to make warm and hearty soups, albeit I made this soup last week on a rainy day, which as we all know is also a perfect day for soup. I’ve actually made this soup a few times before after coming across it on a fellow blogger’s blog last year, but, this was the first time that I made the soup by roasting a whole butternut squash as opposed to the prepackaged chopped ones you sometimes see in the produce area and as crazy as it sounds, it made such a difference in the flavor.

IMG_5579

Luckily the butternut squash wasn’t as difficult to slice as the pumpkins were for the homemade puree I made. Granted the two slices weren’t perfectly equal but they were close enough. After I sliced them I cleaned out all of the pulp and seeds and placed the two halves on a baking sheet and drizzled them with olive oil and a pinch of salt and pepper. I roasted them in a 425 F preheated oven for just shy of an hour, until they were fork tender.

IMG_5591

Along with the butternut squash I also roasted a large sweet potato which I peeled and cubed, the roasting time for the potato was considerably less, about 20 minutes. Once the butternut squashed cooled I removed the peel and chopped it into cubes as well. Of course I couldn’t help but trying a piece and it was absolutely delish. Roasting vegetables really brings out their inner sweetness.

IMG_5605

I then gathered all of the ingredients I needed for the soup along with the squash and sweet potato; 2 diced onions, minced ginger, coconut milk and vegetable stock.

IMG_5606

Now on to making the actual soup… I began by sautéing the onion and ginger until the onions were translucent. I then added in the cubed squash and sweet potato and finally the vegetable stock. Once I brought it to a boil over medium heat I reduced the heat to low and let the soup simmer for 20 minutes.

IMG_5621

And finally using a handheld blender (immersion blender) I pureed the soup until it was smooth and then stirred in the coconut milk.

IMG_5624

I cannot say enough good things about this soup… There is sweetness from roasting the squash and the sweet potato and a hint of ginger that makes this soup so delicious. Another plus, it’s great for many who follow different types of diets… Its vegan, gluten-free, dairy-free and all around healthy. Even those of you who are not keen on veggies will find this soup tasty!

IMG_5636

Roasted Butternut Squash & Sweet Potato Soup – adapted from here

Ingredients:

1 butternut squash sliced in half and pulp and seeds removed

1 large sweet potato, peeled and cubed

2 medium-sized onions, peeled and diced

2-inch piece of ginger, peeled and minced

4 cups vegetable stock

3/4 cup coconut milk

Kosher salt and fresh ground pepper

Olive oil

Directions:

1. Preheat oven to 425 F.

2. Drizzle olive oil over squash and sweet potato; add a pinch of salt and pepper. Place squash cut side down onto a baking sheet. On another baking sheet lay out the sweet potatoes. Cook the sweet potatoes for about 20 minutes, or until fork tender. Cook the squash for about 50 minutes, once again until fork tender. Remove from the oven and let cool for a few minutes.

3. In a large pot, heat a tablespoon olive oil over medium heat. Add the onion and ginger and sauté for 5 minutes, or until the onions are translucent.

4. Remove the peel from the squash and roughly cut it into large cubes and add it to the pot with the onions and ginger along with the sweet potato.

5. Add the vegetable stock and bring to a boil. Lower heat and let the soup simmer for 20 minutes, making sure the squash is tender.

6. Using a handheld blender, puree the soup. Add the coconut milk and stir.


Homemade Pumpkin Puree

While at the supermarket a few weeks ago I came across sugar pumpkins on sale, I thought for a second or two of buying them and making my own pumpkin puree but it was just a fleeting thought at the moment and I stuck with the list of items I had in hand. Once I got home though I was curious as to how difficult it would be to turn those small pumpkins into puree and I was pleasantly surprised at how simple it would be, well, minus the elbow grease and patience. So, a few days later I picked up two pumpkins and got to work.

IMG_5173

I began by slicing the top of the pumpkin off. I should say I sawed it off as I did mention it required some elbow grease.

IMG_5264

Next, I sliced the pumpkin in half. This was by far the most difficult part. Since my knives were sharpened I probably just need some refresher tips on knife skills.

IMG_5266

And then scooped out all of the seeds and pulp.

IMG_5268

Following that I sliced the halves into halves – or simply put I cut the pumpkin into quarters. I then repeated these steps with the second pumpkin and placed all of the quarters on a baking sheet.

IMG_5272

I roasted the pumpkin in a 350 F preheated oven for just shy of an hour until the pieces were fork tender. And I must say the smell of pumpkin in my house was heaven during that hour.

IMG_5284

After letting the pieces cool for a few minutes I was easily able to remove the skin from the pumpkin.

IMG_5288

And then it was time for the simplest part – well besides roasting the pumpkin – to making the puree, the blending.  I put a few pieces at a time in the bowl of my food processor and added a few tablespoons of water to help the process along.

IMG_5289

All in all I ended up with about 8 cups of fresh pumpkin puree.

IMG_5290

I refrigerated half of it and froze the other half in sandwich bags – putting a cup of puree in each of the bags.

IMG_5296

And since I didn’t want that refrigerated puree to go bad I was quick to whip up some delicious treats with it.

There was pumpkin pie, which I must say definitely had a much richer taste with the fresh puree.

IMG_5324

Pumpkin Ravioli using wonton wrappers…

IMG_5345 IMG_5344

And my favorite, a homemade Pumpkin Spice Latte. I usually get one or two of these during the Fall at Starbucks but the coffee flavor is such a turn off for me since I am not a coffee drinker that being able to make this at home and control the coffee amount was perfect!

IMG_5415


Pumpkin Ravioli – Adapted from here and here

Ingredients:

1 cup fresh (or canned) pumpkin puree

4 tablespoons unsalted butter

1 shallot minced

3 tablespoons heavy cream

1/3 cup parmesan cheese grated

pinch of nutmeg

salt and pepper

Directions:

1. Melt butter in a large sauté pan over medium heat. Add the shallots and sauté for 1 minute.

2. Add the pumpkin and cook until the pumpkin has absorbed the butter.

3. Season with salt and pepper and stir in the cream.

4. Remove from the heat and add in the cheese and nutmeg and stir until both are incorporated.


Pumpkin Spice Latte – Recipe from October 2014 Food Network Magazine

Ingredients:

3 tbsp. sugar

2 1/2 tablespoons pumpkin puree

1 tablespoon vanilla extract

heaping 1/4 teaspoon cinnamon

heaping 1/4 teaspoon ginger

1/4 teaspoon nutmeg

2 1/4 cup milk (I used whole milk)

1/4 cup espresso (or strong brewed coffee)

whipped cream, for topping

Directions:

1. Combine the sugar, pumpkin puree, vanilla, cinnamon, ginger and nutmeg in a small saucepan.

2. Whisk in milk and espresso and bring to a simmer over medium-high heat.

3. Pour into 2 mugs and top with whipped cream and more nutmeg.


If you would like a more detailed description of how to make you own pumpkin puree check-out the directions I followed here from the Pioneer Woman’s (Ree Drummond) website.


Sweet & Sour Chicken

The past few days I have been on a roll with cooking dinner. It probably helped that I went through my recipe binder and planned out a few meals for the week. Today I am going to share with you a quick and simple recipe for Sweet & Sour Chicken that I got from an issue of Rachael Ray Magazine a while back.

I usually try to do all of my prep-work for whatever I am cooking or baking before getting started, this way I don’t miss anything and I can work smoothly through the recipe. For this Sweet & Sour Chicken recipe I prepped my ingredients by doing the following: cut a pound of boneless skinless chicken thighs into 3/4 inch pieces which I then coated with cornstarch and soy sauce, chopped up a green bell pepper into 3/4 inch pieces, minced up a tablespoon worth of fresh ginger, and finally, drained the pineapple juice of an 8-ounce can of pineapple chunks and set the chunks aside while whisking the juice along with cornstarch, soy sauce, ketchup, sugar, cider vinegar and sugar.

IMG_5231

It was then time to start cooking. I began by cooking the chicken in a large skillet over medium-high heat that I coated with canola oil. Once the chicken was browned I added in the minced ginger.

IMG_5234

Next up I added in the pineapple chunks and the bell pepper and continued cooking the mixture until the peppers were just beginning to get tender.

IMG_5235

And lastly I added in the ketchup mixture and brought it to a boil and cooked it until the sauce thickened. I then lowered the heat to low and continued cooking it for about another 15 minutes to be sure that the chicken was cooked through.

IMG_5238

Then it was time to enjoy my homemade take-out cuisine. I served the chicken with basmati rice and it was the perfect complement. While you do get some hints of the sour components – the soy sauce and cider vinegar – of the chicken the sweet part is definitely the stronger flavor of the two. I am definitely not complaining though… This is one dish I can see myself making quite a few more times.

IMG_5240


Sweet & Sour Chicken

Ingredients:

1 lb. boneless skinless chicken thighs, fat trimmed, then cut into 3/4-inch pieces

6 teaspoons cornstarch

2 tablespoons lower-sodium soy sauce

1/3 cup ketchup

1/4 cup sugar

1/4 cup cider vinegar

1 can (8-oz.) pineapple chinks in juice, drained, juice reserved

2 tablespoons canola oil

1 tablespoon minced ginger

1 green bell pepper, cut into 3/4-inch pieces


Directions:

1. In a medium bowl, combine the chicken, 4 teaspoons cornstarch and 1 tablespoon soy sauce. In a small bowl, whisk the remaining cornstarch and soy sauce, with the ketchup, sugar, cider vinegar, and pineapple juice.

2. In a large skillet, heat the oil over medium-high heat until it shimmers. Add the chicken and cook, turning once, until browned, about 4 minutes. Add the ginger and cook, stirring often, until fragrant, 30 seconds. Add the pineapple chunks and bell peppers. Cook, stirring occasionally, until the pepper is crisp-tender, about 3 minutes. Stir in the ketchup mixture, bring to a boil and cook until sauce thickens, about 1 minute.

Chicken Parm Pizzas

Aaaahhh pizza. What is there not to like about it? I have been a pizza lover since a very young age. I can remember quite a few times when I was younger (I am talking under the age of 10) when I didn’t want to eat whatever my mom cooked for dinner so then dinner for me would be a slice of pizza. When I got to college, pizza was one of the tastiest (and safest) things to eat in the cafeteria. Thankfully they switched it up every day with Hawaiian pizza, pepperoni pizza, white pizza, focaccia pizza and so forth. So, what if you combined pizza – one Italian classic – with another classic, Chicken Parmesan? Well, you would get Chicken Parm Pizzas. And no, it’s not just a breaded chicken cutlet shaped into a circle. The key to this classic combo mash-up is using ground chicken to get that perfectly round pie.

IMG_5201

To begin I mixed a pound of ground chicken with Italian herb blend, salt, garlic and onion powders. I divided the mixture in half and then pressed it into two 8-inch cake plans that I lined with plastic wrap. Following that I covered the two pans with plastic wrap and placed them in the freezer for 4 hours.

IMG_5181

Before removing the ground chicken from the freezer I preheated the oven to 400 F and assembled the three separate coatings I would need for the chicken: Wondra Flour, 3 eggs lightly beaten and a breadcrumb – cheese mixture.

IMG_5186 IMG_5189 IMG_5188

The frozen chicken…

IMG_5190

Which I then coated in the flour, then in the eggs and finally in the breadcrumb – cheese mixture and then placed on a baking sheet.

IMG_5191

I then heated olive oil in a large skillet over medium-high heat and cooked the chicken rounds until they were golden. After draining them on paper towels I transferred them to a wire rack set inside a rimmed baking sheet.

IMG_5193

And then it was time for them to become “pizza.” I topped them with marinara sauce and sprinkled them with mozzarella and Parmesan cheese.

IMG_5195

I cooked them on the wire rack set inside the baking sheet for about 15 minutes, until the cheese was melted and the chicken was fully cooked through.

IMG_5202

While Chicken Parmesan is customarily served with pasta I opted to serve these pizza versions with steamed broccoli.

IMG_5216

Overall, these were quite tasty, but, I didn’t find them to be better than your typical Chicken Parmesan that definitely doesn’t require as much time or work. It’s definitely a nice twist on two classics though. One thing though, if I do make them again I will reduce the salt content in the seasoning for the ground chicken from a teaspoon to 1/2 teaspoon (or even a 1/4) since I did find them to be a bit salty.


Chicken Parm Pizzas

Ingredients:

1 1/4 lbs. ground chicken

1 1/2 teaspoon Italian herb blend

3/4 teaspoon garlic powder

3/4 teaspoon onion powder

3 eggs

1/4 cup Wondra flour

1 cup seasoned Italian breadcrumbs

1/2 cup panko

4 tablespoons grated Parmesan*

4 tablespoons grated pecorino*

1 cup extra virgin olive oil

1 cup shredded mozzarella

1/2 cup marinara sauce

*I didn’t have pecorino so I opted to use 8 tablespoons of Parmesan

 Directions:

1. Line 2 eight-inch cake pans with plastic wrap. In a medium bowl, mix the chicken, 1 tsp. herb blend, 1 tsp. salt, and 1/2 tsp. each garlic and onion powders. Divide chicken mixture and press into the prepared pans. Cover with plastic wrap. Freeze 4 hours.

2. Preheat the oven to 400 F. In a shallow bowl, beat the eggs. Place the flour on a large plate. On another plate, combine the breadcrumbs, panko, 2 tbsp. Parmesan, 2 tbsp. pecorino, and the remaining Italian herb blend and garlic and onion powders. Unwrap the chicken; remove from the pans. Coat the chicken in the flour, then the egg, then the breadcrumb mixture. Transfer to a baking sheet.

3. Set a rack inside a rimmed baking sheet. In a skillet, heat the olive oil over medium high. Cook 1 chicken round, turning once, until golden, about 4 minutes. Transfer the patty to paper towels. Repeat with the second chicken round. Transfer both to the rack.

4. Combine the remaining cheeses. Spread the marinara on the chicken, leaving a 1-inch border; sprinkle with the cheese mixture. Bake until the chicken is cooked through, about 15 minutes.

Last Minute Stuffed Peppers

Baking has always come naturally to me, cooking on the other hand is a whole other ballgame. I’m always apprehensive that I will under season or worse over season things, but lately I have become a bit more confident (or maybe I should say comfortable) with my cooking abilities. There is one thing that still frustrates me though… Figuring out what to cook, especially for dinner. As such was the case one day last week. I really was at a lost as to what to make, then while picking up some produce the light bulb in my head turned on and I thought stuffed peppers…. Hence Last Minute Stuffed Peppers. Customarily for a dish like this I would turn to a recipe, but I decided to wing it and create something on my own and a bit from memory from the last time I made them.

IMG_5113

I began making the filling for the peppers by sautéing sliced mushrooms in olive oil. Once they cooled I chopped them up and placed them in a large bowl.

IMG_5108

In the same pan I used to sauté the mushrooms I then cooked a pound of ground beef which I seasoned with salt, pepper, garlic and onion powder and half a red onion chopped. I then added this to the bowl with the mushrooms.

IMG_5109

I then added in a cup and a half of cooked brown rice to the mushroom meat mixture. To cook the brown rice I opted to use the 30 Minute Cooking Method; you bring a large pot of water to boil, stir in at most 2 cups of brown rice, bring the water to a boil once again and allow the rice to cook uncovered for 30 minutes.

IMG_5111

And finally I added in about 1/3 cup of jarred spaghetti sauce and a 1/2 cup of shredded mozzarella cheese to the rice mixture. I mixed it together well and set it aside.

IMG_5115

Next I prepped the peppers. I sliced the tops off the peppers and cleaned out their insides while I brought a large pot of water to boil. I boiled each of the peppers for about 4-5 minutes. I wanted the peppers to be tender but still a bit rigid so they wouldn’t tear when I stuffed them. I placed them in an 8 x 8 baking dish that I coated with about half of the sauce I had left in the jar.

IMG_5117

I then filled each of the peppers with the rice-beef mixture and topped them with the rest of the sauce and sprinkled each of them with the remaining shredded mozzarella cheese. And for the final touch I topped each of the peppers with their respective sliced tops.

IMG_5123

I placed the dish in a 350 F preheated oven for about 20 minutes, until the cheese was melted and I was sure that the filling had enough time to heat through.

IMG_5124

Prior to enjoying one I sliced it in half and added some of the spaghetti sauce that was in the bottom of the dish. Oh yes, and I added some extra vegetables to this dish by serving it with fresh okra on the side.

IMG_5125

My Last Minute Stuffed Peppers were delish! Definitely something that I will be making again. And best of all, it gave me a small boost in my cooking confidence.


Last Minute Stuffed Peppers

Ingredients:

4 large bell peppers, any color

3 cups (8 oz. package) sliced mushrooms

2 tablespoons Olive Oil

1 lb. lean ground beef (I used 80%)

1/2 red onion, chopped

1/2 teaspoon salt

1/2 teaspoon black pepper

1/2 teaspoon garlic powder

1/2 teaspoon onion powder

1 1/2 cups cooked brown rice

1 jar of spaghetti sauce

1 1/2 cup shredded mozzarella cheese


Directions:

1. Preheat the oven to 350 F.

2. Heat the olive oil in a large skillet over medium-high heat and add the mushrooms. Cook the mushrooms until they are tender and lightly browned, stirring occasionally. Remove them from the skillet and once they cool chop them up and place them in a large bowl.

3. In the same skillet, cook the ground beef along with onion and season with the salt, pepper, onion and garlic powder. Once the beef is cooked add it to the bowl with the mushrooms.

4. Add the brown rice to the bowl with the beef and mushrooms along with 1/3 cup of the spaghetti sauce and 1/2 cup of the shredded mozzarella. Mix the contents together and set aside.

5. Bring a large pot of water to boil. Meanwhile prep the peppers by slicing off their tops (set them aside) and cleaning out their seeds. Once the water is boiling add the peppers and leave them in the water for about 5 minutes; until the peppers are softened but not to the point where they are going to tear when stuffed.

6. Pour about 1/2 of the remaining spaghetti sauce into an 8 x 8 baking dish and then place the peppers in it. Fill each of the peppers with the rice – beef mixture, filling each of the peppers to the top. Pour the remaining spaghetti sauce over the peppers and top each of the peppers with the remaining mozzarella cheese. Cover the peppers with their reserved tops and bake them in the oven for 20 minutes, or until the cheese has melted.