Coconut Macaroon Brownies

If you love chocolate dipped coconut macaroons, Almond Joy candy bars or anything chocolate and coconut, today’s recipe is for you. It’s Coconut Macaroon Brownies!

Up first I made the brownie layer. While the recipe directions called for melting the dark chocolate and unsalted butter in a double boiler, I opted to do in the microwave. I placed the chocolate and butter in a microwave safe bowl and microwaved it in 30 second intervals, stirring between each, until it was completely melted and smooth. I set that aside and in a large bowl whisked together, by hand, eggs, sugar, light brown sugar, cocoa powder, espresso granules, vanilla extract and salt until it was smooth. Next, I folded in coconut flour. The coconut flour helped to make the brownies extra fudgy and dense and also keeps this recipe gluten-free. And finally, I folded in milk chocolate chips. I spread this into a 9 x 13-inch baking pan that I lined with parchment paper, making sure to leave an overhang on all sides to make clean up easy and more importantly removing from the brownies hassle-free. I then place the pan in the refrigerator for an hour.

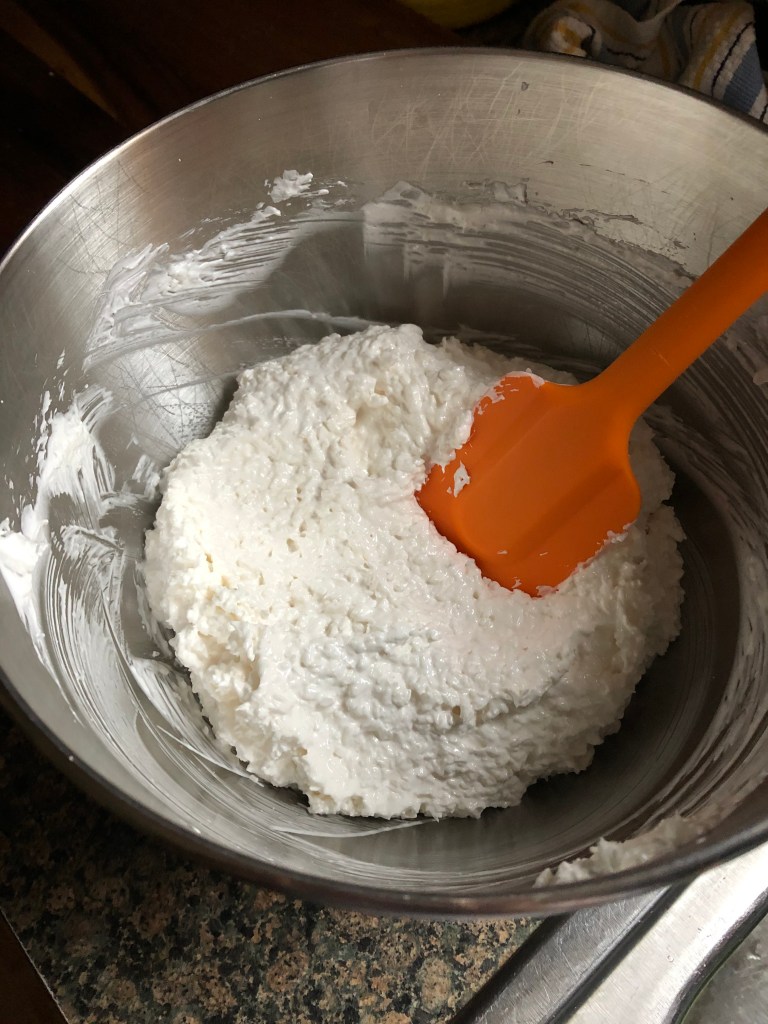
Next up, the macaroon layer. Using my stand mixer with the whisk attachment, I beat egg whites until they were frothy and then slowly added in sugar, vanilla extract and salt until stiff peaks formed. Finally, I added in shredded coconut and my macaroon layer was ready.

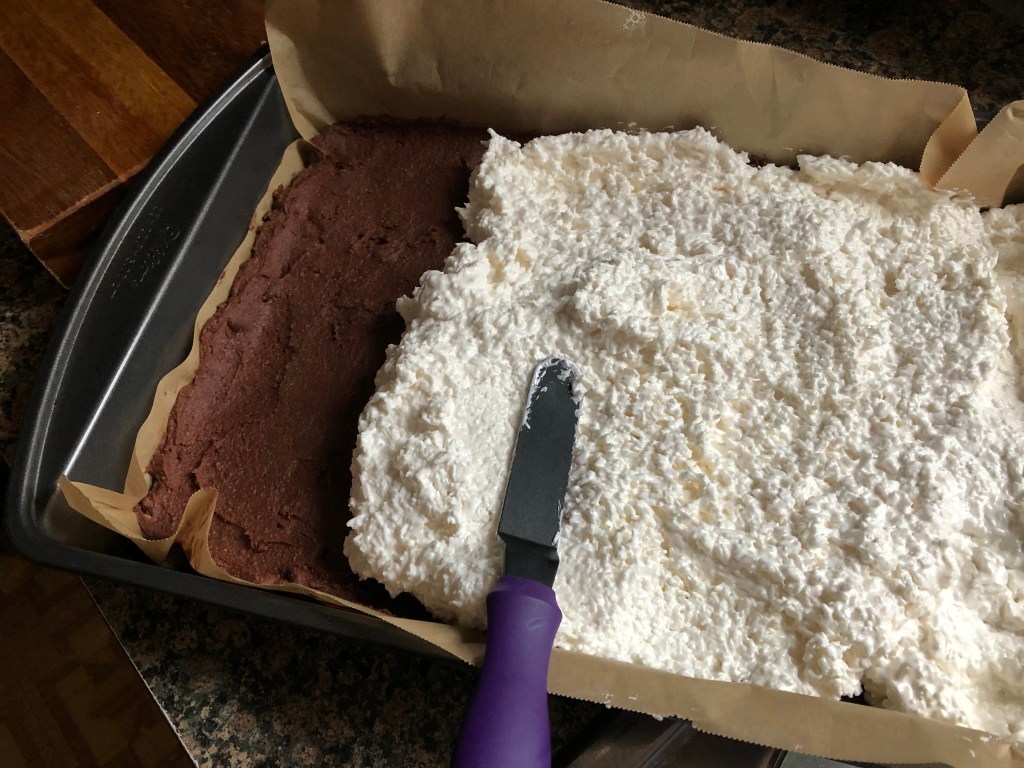
Using a small offset spatula, I spread the coconut mixture over the brownie base.

I baked it in a 375 F preheated oven for about 30 minutes, until the brownies were set and the macaroon layer had a golden-brown color. I let the brownies cool in the pan on a wire rack for about 2 hours.

I then removed them easily thanks to parchment paper and let them cool for about another 30 minutes before slicing.

And even though I did clean my knife between each slice my brownies didn’t slice perfectly clean. Nevertheless, it didn’t take away from how delicious these brownies are. The chocolate layer is the perfect amount of chocolate without being overly sweet. That’s primarily due to using a dark chocolate as the base and also adding those espresso granules. Coffee really enhances the flavor of chocolate. As for the coconut layer, by using unsweetened shredded coconut as opposed to the traditional sweetened version in typical macaroons, the coconut layer isn’t crazy sweet either. You really do get to taste the coconut flavor.

Coconut Macaroon Brownies

Ingredients:

Brownie Layer:

8 oz. dark chocolate (70% cacao), coarsely chopped*

2 sticks unsalted butter, cut into chunks

4 large eggs

1 cup sugar

1/4 cup light brown sugar

2 tablespoons unsweetened cocoa powder

1 tablespoon vanilla extract

1 teaspoon Kosher salt

1 teaspoon instant espresso granules

1 cup coconut flour

1 cup milk chocolate chips

Macaroon Layer:

4 large eggs whites

3/4 cup sugar

2 teaspoons vanilla extract

1/2 teaspoon Kosher salt

4 cups unsweetened finely shredded coconut

*I used Lindt Excellence 70% Cocoa Dark Chocolate Bars found in the candy aisle

Directions:

Make the brownie layer: Line a 9 x 13 – inch baking dish with parchment paper, leaving an overhand on all sides. In a microwave safe bowl add the chopped chocolate and butter. Microwave in 30 second intervals, stirring between each interval until the chocolate and butter are smooth. Set aside.

In a large bowl whisk together the eggs, both sugars, cocoa powder, vanilla extract, salt and espresso granules until smooth. Add in the chocolate/butter mixture and continue whisking until smooth. Fold in the coconut flour and then then the milk chocolate chips. Spread the batter in the prepared pan and refrigerate for 1 hour.

Make the macaroon layer: Preheat the oven to 375 F. Using a stand mixer with the whisk attachment beat the egg whites on medium speed until frothy. Slowly add in the sugar, vanilla extract and salt and gradually increase the speed to high. Beat until stiff peaks form. Reduce the speed to low and add in the shredded coconut and beat until just combined. Spread the coconut mixture over the brownie layer.

Bake in the preheated oven for 25-30 minutes, or until the top is golden. Allow to cool completely in the pan on a wire rack. Remove from pan and cut into 24 brownies.

Recipe from Food & Wine

Cookie Palooza: Peanut Butter Espresso Cookies

It’s that time of year again… Everywhere you look there is sweet treats to be had or you yourself are about to start some holiday baking. Well, I am here to help. It’s my 3rd annual Cookie Palooza and I am kicking it off with Peanut Butter Espresso Cookies. Before you make a face or think I am a little nutty (some pun intended with that one) I will say don’t knock the flavor combination until you try it. It’s actually quite good and the coffee flavor becomes more pronounced – but not in a bad way – by the second day. And if you’re planning on leaving cookies out for Santa these may help him get the jolt of caffeine he needs to deliver all those toys (or for you to put together those impossible toys you just don’t want to deal with on Christmas morning and would rather have assembled and ready to go with a bow on the under the tree).

What’s really nice about these cookies that the recipe only requires one bowl (less clean-up is always a good thing) to come together. No mixing flour and spices in a separate bowl as these cookies are gluten free. So, those of you who have a gluten allergy can partake in your holiday cookie indulgence without worry. The key to these cookies is natural peanut butter. The exact amount is 16 oz. and thankfully that’s an easy sized jar to find at your local supermarket, I used Smucker’s branch. Make sure you read the label on the brand you buy. The first brand I picked up said peanut butter spread and it was labeled as natural peanut butter. Peanut butter spread is not the same as actual peanut butter. It actually contains about 30% less peanuts and that difference can be supplemented with Trans fats that are not healthy.

Natural peanut butter separates so when you open the jar there will be a layer of oil on top. Don’t be concerned with mixing the peanut butter to incorporate the oil. Just pour it into the bowl you’re using to make the dough along with the peanut butter and the remaining ingredients and the oil will incorporate as you mix all of your ingredients together. This is exactly what I did. After making the dough, I then used a cookie scoop to scoop the dough and shaped it into balls that I then rolled in a sugar espresso coating. And for that traditional peanut butter cookie look I flattened the cookies with a crisscross pattern using the tines of a ford. I baked them for 11 minutes in a 350 F preheated oven and then let them cool on the baking sheet for a few minutes before transferring them to a wire rack to cool completely. Definitely allow them to cool for a few minutes before transferring them so the cookies can set. If you transfer them too quickly the cookies will break, you’ll still have delicious cookies, but, they will be more like cookies pieces.

Peanut Butter Espresso Cookies

  • Servings: 28 Cookies
  • Print

Ingredients:

1 16 oz. jar natural peanut butter

1 cup light brown sugar

1/2 cup sugar

2 large eggs, beaten

2 teaspoons vanilla extract

1/2 teaspoon kosher salt

1 tablespoon instant espresso powder*

1/4 teaspoon sea salt

Sugar-Espresso Coating:

1/4 cup sugar

2 teaspoons espresso powder*

*I use Bustelo coffee


Directions:

Preheat the oven to 350 F. Line two baking sheets with parchment paper and set aside.

In a large bowl combine the peanut butter, brown sugar, and sugar and stir with a rubber spatula until combined. Add the eggs, vanilla, salts and espresso powder and continue stirring with the rubber spatula until all of the ingredients are incorporated.

In a small combine the ingredients for the coating.

Using a cookie scoop to scoop the dough and then shape into balls. Rolls the cookies in the sugar-espresso mixture and then transfer to the prepared baking sheets. Place the cookies about 2 inches apart. Using the tines of a fork, flatten each cookie creating a crisscross pattern. Bake in the preheated oven for 10 to 12 minutes. Let cool on the pan for a few minutes before transferring to a wire rack to cool completed.

Recipe from Real Simple

Almond Horns

If you didn’t know, almond is one of my favorite flavors when it comes to dessert. Give me an Almond Croissant for breakfast and I am a happy camper – although that’s not really a dessert item, but, it could be. LOL! Since I am a fan of almond I regularly get the Odense Newsletter that features recipes using their almond paste. In their latest newsletter they had a recipe for Almond Horns that were super simple, I had most of the ingredients on hand and I figured it was time to bake something sweet.

To make the dough I broke the almond paste into small pieces and added it to the bowl of my food processor along with confectioners’ sugar. I mixed the two until it was the texture of fine crumbs. I then added in an egg white (reserving the yolk) and almond flour. I continued mixing the dough until it became a smooth paste.

Next I turned the dough onto my counter that I dusted with confectioners’ sugar and rolled the dough into a 12-inch log and then divided it into 12 equal pieces and rolled each piece into a ball.

img_0485

After that I rolled the balls into 3-inch logs that were slightly tapered toward the ends.

img_0486

I added water to the reserved yolk and beat the two and spread thinly sliced almonds, which I crushed slightly, on a plate.

img_0487

I then dampened the logs in the egg yolk and rolled them in the almonds bending them into crescents and placed them on a parchment lined cookie sheet that I then placed in the refrigerator for 20 minutes.

img_0488

While the Almond Horns were in the refrigerator I preheated the oven to 350F. After the 20 minutes, I baked them for 14 minutes and then let them cool completely on a wire rack.

img_0489

Once they were cooled I melted bittersweet chocolate and dipped the ends of the horns in.

img_0490

These are so good and so easy and quick to make. The outside is crispy while the inside is moist and chewy.


Almond Horns

Ingredients:

1 box Odense almond paste, broken into small pieces

3/4 cup confectioners’ sugar, plus more for dusting

1 large egg, separated and at room temperature

1 tablespoons and 2 teaspoons all-purpose flour*

1 cup thinly sliced almonds, slightly crushed

4 oz. bittersweet chocolate

*Can substitute Almond Flour. Using Almond Flour will make these cookies Gluten Free

Directions:

Line a cookie sheet with parchment paper

Using a food processor or mixer combine the almond paste and 3/4 cup of sugar. Mix until the texture is that of fine crumbs. Add the egg white and flour and continue mixing until the dough becomes a smooth paste, it will be slightly sticky.

Turn the dough out onto a confectioners’ sugar dusted work surface and roll into a 12-inch log. Divide the log into 12 equal pieces and roll each piece into a ball. Roll the balls into a 3-inch log that is slightly tapered at then ends.

Spread the almonds on a plate and beat the egg yolk with 2 tablespoons of water. Dampen the logs in the yolk mixture and then rolls in the almonds shaping the logs into a crescent. Place the crescents onto the prepared cookie sheet 2-inches apart and refrigerate for 20 minutes.

Preheat the oven to 350 F.

Bake 14 to 16 minutes, until lightly golden. Cool the cookie sheet on a wire rack for 5 minutes and then slide the parchment paper off of the cookie sheet and onto the wire rack so the cookies can cool completely.

Once cooled melt the chocolate in a double boiler or in the microwave. Dip the ends into the melted chocolate and return to the parchment paper so the chocolate can set. Layer the cookies between sheets of wax paper in an airtight container for up to 5 days.

Recipe from Odense

Roasted Tomato Basil Soup

For me any time is a good time for soup – it’s like ice cream; it can never be too cold or too hot to enjoy it. Especially since there are so many varieties of soups that can be enjoyed either hot or cold. But these days with the temperatures being so cold and every few days there is some sort of wintry mix falling from the skies hot soup is definitely the way to go! The other day while picking up some produce while grocery shopping – this is a common place (the produce section) where I get some of my cooking / baking ideas – the idea of making roasted tomato soup popped into my head. I had no idea what ingredients I needed but I figured tomatoes would be a good start and some basil. I knew I had the other basics at home that I assume I would need – yellow onions and garlic. I didn’t think I needed any specific type of tomato – i.e. plum, beefsteak, etc… – so I picked up a pack of six tomatoes but then when I got home and did some research I soon realized that I needed double that amount so I picked up another pack of six tomatoes the following day and I was ready to go.

IMG_6684

I began by slicing the tomatoes in half and tossing them with olive oil and kosher salt and placing them on a baking sheet.

IMG_6686

I then roasted them in a 400 F preheated oven for about 45 minutes.

IMG_6689

While the tomatoes cooled I chopped two yellow onions and minced four garlic cloves and sautéed both in two tablespoons each of unsalted butter and olive oil over medium heat. The smell of sautéing onions and garlic is probably one of my favorite aromas when it comes to cooking.

IMG_6691

Following that I added a quart of vegetable broth – I used College Inn’s Garden Vegetable Broth – the tomatoes and ten large basil leaves to the onion mixture.

IMG_6693

I brought the soup to a boil by raising the heat to high and then lowered the heat so the soup could simmer uncovered for about thirty minutes. I did a taste test and I already knew that this soup was a winner… The broth had a wonderful taste with a hint of the basil.

IMG_6694

I removed the pot from the heat and used an immersion blender to blend the mixture into a delicious creamy soup that still had bits of the basil in it. I seasoned it with some fresh ground pepper and it was ready to be enjoyed.

IMG_6696

While the soup was meant to be for dinner, I couldn’t wait to try it so I ladled a few spoons into a bowl and topped it with some shredded parmesan cheese and I was very happy with the result. I enjoyed a second bowl a few hours later along with a grilled cheese!

IMG_6704


Roasted Tomato Basil Soup

Makes about 4 to 6 servings

Ingredients:

12 tomatoes (approximately 3 pounds) – halved

2 medium yellow onions, chopped

4 garlic cloves, minced

10 large basil leaves

1 tablespoon kosher salt, plus more for seasoning

1/4 cup olive oil, plus more for sautéing onions and garlic

2 tablespoons unsalted butter

1 quart vegetable broth

Fresh ground pepper for seasoning

Directions:

1. Preheat oven to 400 F. Toss tomatoes with olive oil and salt and spread on a cookie sheet in a single layer and roast in the oven for 45 minutes.

2. Sauté the onions and garlic in 2 tablespoons of olive oil and the butter over medium heat for about 10 minutes, until the onions begin to brown.

3. Add the vegetable broth, tomatoes and basil to the onion mixture and raise the heat to high and bring the mixture to a boil. Lower the heat to low and simmer the soup uncovered for about 25 – 30 minutes, the tomatoes will looked stewed / poached.

4. Blend the soup with an immersion blender, or blend in a blender or a food processor, until the soup is creamy and all of the tomatoes have been blended. Season with salt and pepper.


Roasted Butternut Squash & Sweet Potato Soup

The temperatures have begun to drop and it’s the perfect excuse to make warm and hearty soups, albeit I made this soup last week on a rainy day, which as we all know is also a perfect day for soup. I’ve actually made this soup a few times before after coming across it on a fellow blogger’s blog last year, but, this was the first time that I made the soup by roasting a whole butternut squash as opposed to the prepackaged chopped ones you sometimes see in the produce area and as crazy as it sounds, it made such a difference in the flavor.

IMG_5579

Luckily the butternut squash wasn’t as difficult to slice as the pumpkins were for the homemade puree I made. Granted the two slices weren’t perfectly equal but they were close enough. After I sliced them I cleaned out all of the pulp and seeds and placed the two halves on a baking sheet and drizzled them with olive oil and a pinch of salt and pepper. I roasted them in a 425 F preheated oven for just shy of an hour, until they were fork tender.

IMG_5591

Along with the butternut squash I also roasted a large sweet potato which I peeled and cubed, the roasting time for the potato was considerably less, about 20 minutes. Once the butternut squashed cooled I removed the peel and chopped it into cubes as well. Of course I couldn’t help but trying a piece and it was absolutely delish. Roasting vegetables really brings out their inner sweetness.

IMG_5605

I then gathered all of the ingredients I needed for the soup along with the squash and sweet potato; 2 diced onions, minced ginger, coconut milk and vegetable stock.

IMG_5606

Now on to making the actual soup… I began by sautéing the onion and ginger until the onions were translucent. I then added in the cubed squash and sweet potato and finally the vegetable stock. Once I brought it to a boil over medium heat I reduced the heat to low and let the soup simmer for 20 minutes.

IMG_5621

And finally using a handheld blender (immersion blender) I pureed the soup until it was smooth and then stirred in the coconut milk.

IMG_5624

I cannot say enough good things about this soup… There is sweetness from roasting the squash and the sweet potato and a hint of ginger that makes this soup so delicious. Another plus, it’s great for many who follow different types of diets… Its vegan, gluten-free, dairy-free and all around healthy. Even those of you who are not keen on veggies will find this soup tasty!

IMG_5636

Roasted Butternut Squash & Sweet Potato Soup – adapted from here

Ingredients:

1 butternut squash sliced in half and pulp and seeds removed

1 large sweet potato, peeled and cubed

2 medium-sized onions, peeled and diced

2-inch piece of ginger, peeled and minced

4 cups vegetable stock

3/4 cup coconut milk

Kosher salt and fresh ground pepper

Olive oil

Directions:

1. Preheat oven to 425 F.

2. Drizzle olive oil over squash and sweet potato; add a pinch of salt and pepper. Place squash cut side down onto a baking sheet. On another baking sheet lay out the sweet potatoes. Cook the sweet potatoes for about 20 minutes, or until fork tender. Cook the squash for about 50 minutes, once again until fork tender. Remove from the oven and let cool for a few minutes.

3. In a large pot, heat a tablespoon olive oil over medium heat. Add the onion and ginger and sauté for 5 minutes, or until the onions are translucent.

4. Remove the peel from the squash and roughly cut it into large cubes and add it to the pot with the onions and ginger along with the sweet potato.

5. Add the vegetable stock and bring to a boil. Lower heat and let the soup simmer for 20 minutes, making sure the squash is tender.

6. Using a handheld blender, puree the soup. Add the coconut milk and stir.


%d bloggers like this: