Etsy Shop Update

My Etsy Shop has been open for just about a month and so far so good. I’ve made three sales, added some bead, crystal & pearl snowflake ornaments and had to adjust how I do my listings. I still haven’t fine-tuned the latter, but I am sure I’ll get it eventually. This is the issue… the necklace from my first sale came in different colors, I thought by listing each of the colors when one was purchased that color would be eliminated from my inventory, unfortunately I had listed my quantity as 1 so the necklace was then sold out, so I had to readjust the listing and the others that I had set- up similarly. I had a similar issue with my following sale of 2 snowflake ornaments… I had to manually remove them from my inventory. So, I have some research to do on listings.

I also ran my first sale over Black Friday weekend and promoted Small Business Saturday. And that’s pretty much where I am.

Here are the Snowflake Ornaments:

If you’re interested in one of the ornaments or are looking for a piece of jewelry for yourself or someone else on your list check out my shop: CraftedByFran

Etsy Shop – CraftedByFran

After making jewelry for a few years and creating pieces to give as gifts, sell to friends and at a few local craft fairs, I finally decided to open an Etsy shop. Truthfully, I’ve been thinking about it for a while but held back because I thought it would be difficult.

So, what did I think it would be difficult? Figuring out shipping costs for one. I did a little research and discovered that this stumps many would-be Etsy sellers. There were a few other things as well: the whole creating a listing, taking good pictures, do I have to give my pieces “names?” And a few other silly little things. In the end, I am opting to offer free shipping and decided not to give most of my pieces a name since they are one-of-a-kind. And after creating my first listing and learning how to navigate the process it became a lot easier and not as daunting. Let’s be honest, trying anything new is a learning process. Soon enough I’ll learn what works and what doesn’t. There is one thing that always gets me… Tagging. Which ones work best and which ones don’t. I have that same issue with my blog posts sometimes.

Below is the link to my shop. Feel free to like a piece, like my shop or maybe you’ll find something perfect for you.

CraftedByFran

Here are some of the pieces available now…


Statement Necklaces

With Summer finally here and temperatures on the rise it’s the perfect time to start wearing amazing necklaces that the world can see. Wearing a beautiful necklace that’s covered by a coat keeping you warm during the colder months is just not cool. I recently made a few necklaces that are worth showing off that I would like to share with you today.

Up first… Statement pendants that I picked up at my local craft store that I accentuated with beads, crystals and metal beads to create one-of-a-kind necklaces that can be worn with a tank top and jeans or dressed up for a more formal occasion.

IMG_7667

Next, two multi-strand necklaces that have instantly become two of most favorite necklaces I have made. I especially love the silver-tone necklace as I used a variety of stones in different colors so the necklaces can be worn with multiple outfits.

IMG_7375

And finally another multi-strand necklace made with Tila beads, seed beads, stones and crystals. I came across this pattern a while back and had been eyeing to make it for a while. I ordered all the beads and stones to make it and then let it sit for a while. I’m happy that I finally got around to making it though as the final piece is definitely not something you see everyday.

IMG_6845

Now onto making more pieces…

Bead & Yarn Project Round-Up

Hope you all had a good weekend! So, as of late most of my posts have mainly been focused on the “spatula” part of the title of my blog, but, I definitely haven’t forgotten about the “bead” nor the “yarn” part. Hence the Bead & Yarn Project Round-Up title of this post. I tend to work on these projects without taking the time to take pictures of the process or the progress so today I will be sharing with you pictures of the final product.
 
Up first two yarn projects…
 
This is a clutch I crocheted following the Candy Color Clutch pattern from Lion Brand Yarn using their Bonbons Yarn in Nature. While the pattern called for using simple buttons that would need a crocheted button cover, I opted to add a little pizazz to the clutch and used gold-toned buttons instead. The pattern was super simple to follow, but, I did find it a little annoying to change the color of the yarn every two rows, but, the final look was worth that extra work.
 IMG_3318
Up next, a baby blanket. The Dreamy Lace Baby Throw – also a Lion Brand Yarn pattern – which I used Pound of Love yarn (also from Lion Brand) in Honey Bee. This pattern was also quick and easy to follow, the one thing that concerned me was adding the shell border, but luckily I was able to add it without incident.
IMG_3907

And now on to the bead pieces…

My new favorite beads to work with are SuperDuo beads. The beads have two-holes so you are able to create some pretty cool earring and bracelet designs.

Like this bracelet…

IMG_3662
These earrings…
IMG_4113
Or this earring and bracelet set…
IMG_4038
Another two-hole bead that’s been fun to work with are Tila beads and CzechMates Two-Hole Tile beads.
IMG_4059 IMG_3375
I’ve also finished a few crystal embellished seed bead bracelets. These are probably one of my favorite bracelets to make because even though they do require a bit of work to complete, you can play with all kinds of color combinations to create a very unique and original bracelet.
IMG_3529 IMG_4137
The cross-weave bracelet using bugle beads, pearls, seed beads and crystals.
IMG_3547
The same bracelet but with an embellished edge comprised of seed beads and drop beads.
IMG_3539
Some ladder stich earrings.
IMG_4076
And finally, a cube and crystal bracelet.
IMG_4167
Hope you enjoyed looking at these items as much as I enjoyed making them. Have a great week!

A Quick Multi-Strand Necklace

During a shopping trip to my local A.C. Moore I came across this pendant while perusing the jewelry section that immediately caught my eye.

IMG_0577

I knew that I wanted to use it as the focal point of a multi-strand necklace. At first I wasn’t sure what type of multi-strand – all chains, a combination of chains and stones or all stones. After attending a bead show and a few trips to A.C. Moore  and Michaels I was able to find strands of stones that perfectly complemented the colors in the pendant.

IMG_0582

I started off by laying out the strands using a multi-strand bead board.

IMG_0610

Once I had them strung on beading wire I haphazardly intertwined the three strands.

IMG_0614

I actually got these three hole end bar links on clearance at Jo-Ann’s (what can I say I’m a craft store junkie) and they ended up being just what I needed for this necklace. It’s not pictured here, but, I attached a toggle using jump rings to the single loop side.

IMG_0616

To attach the pendant to one of the strands I created a messy wire wrapped loop .

IMG_0617

And as simple as that the necklace was done.

IMG_0711

Tiles, Tilas & Triangles

While round seed beads are fun to work with – they are versatile and offer a uniform look to most jewelry pieces – sometimes it’s nice to try out different shapes and sizes to get pieces that are unique and more intricate looking.

One such bracelet is the Tila Token bracelet by Marcia Balonis that was featured in the June 2012 issue of Bead & Button Magazine Bead & Button Magazine. When I started working on this bracelet I went by the material list that came with the pattern; 5mm Miyuki Tila beads, Size 11 Japanese cylinder beads (Delicas) in 2 colors and Size 15 seed beads.

IMG_0564

Things were going well through the first few steps…

IMG_9856

But when I started to add the Tila beads they weren’t lying flat and although it’s not pictured here I was having a hard time keeping the Delicas close together on the sides of the bracelet. I tried restarting the bracelet a few times but in the end decided to try it with different size beads altogether.

IMG_9858

I opted to go with Czech Tile beads, Size 8 seed beads in 2 colors and Size 11 seed beads. Czech Tile and Miyuki Tila beads are similar in that they are square beads with two holes but they differ in that Tila beads are 5mm and Tile beads are slightly larger at 6mm and are more rounded around the edges and corners. Because of that roundness I prefer the look that Tile beads give a bracelet over Tila beads.

IMG_9825 IMG_9785

I started off by working in ladder stitch to create the first two rows of the bracelet.

IMG_9827

I then switched to flat herringbone stitch to create the next few rows and to add the Tile beads throughout the bracelet.

IMG_9828 IMG_9831

This was actually the first time I used the herringbone stitch and while it took a few minutes to get the hang of it once I did the bracelet came together rather quickly.

IMG_9832

To complete the other end of the bracelet I once again worked in ladder and herringbone stitch and then attached a magnetic clasp and the bracelet was done.

IMG_9840

Using the same Czech Tile beads again – along with Size 11 seed beads – I created a bracelet I will call Squared V’s.

IMG_0489

I knew that the bracelet was going to be four tile beads wide so I began by stringing the following pattern for my desired length: one seed bead, one Tile bead, eight seed beads, one Tile bead, one seed bead, one Tile bead, eight seed beads, one Tile bead, etc. Once I reached by desired length I went in the opposite direction and sewed through the Tile beads adding seed beads by one where my starting point was one seed bead and decreasing by one seed bead where my starting point was eight seed beads.

IMG_0490

I kept this pattern going adding the Tile beads where necessary and it wasn’t long before the bracelet was done. FYI… The greatest amount of seed beads between your Tile beads will always be the number wide of Tile beads you want to use times two. For example, if you only want your bracelet to be three Tile beads wide the greatest number of seed beads used would be six, if it was five Tile beads it would then be 10 seed beads. I then added seed beads to the ends to attach the clasp and the bracelet was done.

IMG_0492 IMG_0495 IMG_0516


Since I did have some Miyuki Tile beads sitting in my stash waiting to be used I decided to make a few more of these bracelets.

IMG_0808

And finally I used Triangle beads to create a pair of earrings that I came across in the April 2013 issue of Bead & Button Magazine under the pattern called Triangular Opulence by Ana Rao. To be honest I am still on the fence as to whether or not I like them. I am thinking it has something to do with the color; I opted to buy clear Triangles to make them since I figured I should stick with something neutral. I guess I should have gone with something bold instead. Along with the triangles I also used 11mm crystal drops, Size 11 seed beads, and Size 11 cylinder beads (Delicas) to make the earrings.

IMG_9798

Using the ladder stitch I stitched together six triangles to form one unit and then stitched four more triangles to that unit to add on a second unit. I then added triangles to each of the end units, once again via the ladder stitch.

IMG_9808

Once the base was done it was time to start embellishing it. I started by adding the crystal drop.

IMG_9815

I then stitched a Delica bead to the front of each of the triangles and a Size 11 seed bead to the two centers of the base units. I attached an earring finding to the top and as simple as that the earrings were done.

IMG_9817 IMG_9819 IMG_9847

The Great Gatsby Inspired Bracelet

If you haven’t seen “The Great Gatsby” I highly recommend it. After watching it I actually regretted never having read the book. I was supposed to read it in high school but after reading a page or two I opted to read the cliff notes instead. It’s probably one of the few cliff notes I have ever read as I have always enjoyed reading, but that was just one book that was impossible for me to get in to. I thought for a second of reading it now but that regret soon subsided as my previous sentiments were validated by many… the book is boring. Baz Luhrmann apparently took some liberties in adapting the book to the big screen.

The movie has inspired a new wave of fashion trends especially in jewelry. Just check out the new collection from Tiffany’s, which is gorgeous but out of most peoples price range. I suppose jewelry made by the company 1928 Jewelry will be experiencing a surge in sales now as it’s a little more affordable. The jewelry from that era was more like pieces of art more than anything else. A friend of mine came across a bracelet/hand ornament on M&JTrimming’s blog that was inspired by the piece Carey Mulligan’s character Daisy wore in the movie that she liked and asked me to recreate.

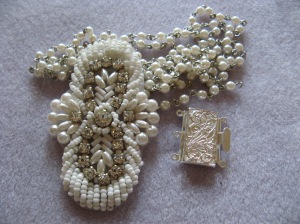
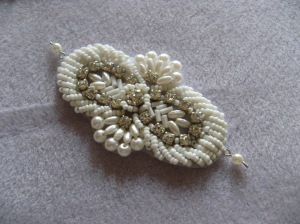
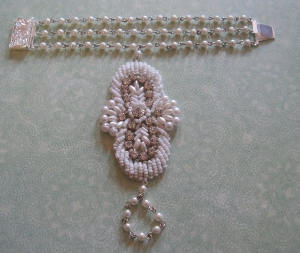
The supplies: a yard of pearl rosary chain, a pearl and rhinestone applique and a clasp.

IMG_0408

To begin I made the actual bracelet part first. Since the pearl rosary chain is connected by interlocking eye hooks I was able to connect the chain to the clasp without the use of jump rings which gave it a much cleaner look.

IMG_0416

Next, I used fireline to sew one section of pearl chain to each end of the applique.

IMG_0417

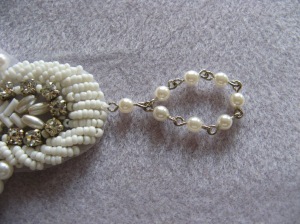
I then made a ring with some of the chain and attached it to one end of the applique.

IMG_0419

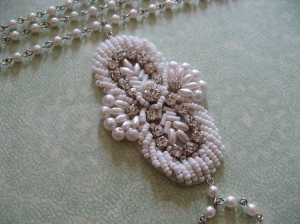
I then attached the other end to the bracelet and voila, as simple as that a Great Gatsby inspired bracelet.

IMG_0487 IMG_0441

Spiraling Pearls, Crystals and Seed Beads

I currently subscribe to Bead & Button  magazine and while I normally rip out a few patterns from each issue that I want to make, I usually find that there is one pattern that I am eager to try over the other ones. From the most current issue that pattern was Sea Strand by Sue Neel. The pictures made it look really intricate and complicated but in actuality it’s quite simple to follow.

From the title of my post you can guess what components I used: 4mm & 12mm glass pearls, 6mm crystal rondelles and Size 11 seed beads.

IMG_0187

To start the necklace I strung alternating rondelles and 12mm pearls on a yard of 6lb fireline – beginning and ending with a rondelle – for my desired length. I then centered the beads on the thread so the two tails would be the same length. I sewed each tail through its corresponding rondelle once so they could essentially be stop beads as I continued to work on the piece.

IMG_0190

Next up, using about a yard and a half of thread I sewed twelve seed beads around alternating sides of the pearls by sewing through the rondelles. Once again I sewed the tails of the thread – which should be the same length as the original thread – through their respective rondelle.

IMG_0192 IMG_0193

And for the final strand I used another yard and a half of thread to sew three 4mm pearls and additional seed beads onto the piece. As with before, the tails of this thread should be the same length as the original thread and sewn through their respective rondelle. To end the necklace I used one thread from each end to connect the clasp – I used the original thread – and I ended the other two threads by weaving them through the path of the clasp and ending them in the necklace.

IMG_0194  IMG_0197

While a bracelet wasn’t part of the pattern I saw in the article, I decided to make one after completing the necklace. I followed the exact same pattern and technique as the necklace just for a shorter length.

IMG_0198

And finally I made the earrings that were included in the pattern to complete the set.

IMG_0199 IMG_0201

IMG_0217

Three Long Necklaces In A Short Amount Of Time

While I do have a few projects sitting on my knitting and crocheting needles, I decided to take a small break this week from working on them to make a few jewelry pieces.

I made this necklace about a year ago and unfortunately the chain I used has started to tarnish. I tried to clean it but it was to no avail, the tarnish is here to stay, so, I decided to remake it.

IMG_9926

To replace the chain sections I decided to use some glass pearls and natural shell beads I had in my collection strung on flexible beading wire. I’m always happy when I can use things I already have. So many times I find myself buying more items to create things as opposed to utilizing what’s in my collection.

IMG_9928

For the first section of the necklace I used three different sizes of the glass pearls arranging them from largest to smallest.

IMG_9931

While the second section remained the same as the original necklace, I updated the third section  – which used to be chain – with more glass pearls and the natural shell beads.

IMG_9932

And here’s the completed necklace. At first I wasn’t sure if I liked it, but, once I tried it on I was much happier with it than I ever was with the original one.

IMG_9969

Up next I worked on a necklace that I got the idea from while I was out shopping one day. I liked the necklace I saw, but wasn’t too keen on the colors it was made with. I wanted something a little brighter and summery. It’s made up of alternating sections of seed beads and chain.

Supplies for this necklace are pretty basic; size 6 seed beads, two different styles of chains, jump rings and eye pins. In lieu of the eye pins you could use a medium gauge beading wire.

IMG_9938 IMG_9948

I started off by creating the sections of seed beads by threading fifteen seed beads onto each eye pin. I had already mapped out the pattern I wanted to follow so I knew I needed eight stacks of the green and white beads and four of the blue beads. The nice thing about using the eye pins is that I only needed to create a loop on one side as opposed to two sides had I used beading wire.

IMG_9944

Following that I used jump rings to combine two stacks of each color. The stacks were about two inches long.

IMG_9945 IMG_9946

Now I was ready to cut the two chain styles into two inch sections and attach four pieces of the chain (two pieces of each chain style) to jump rings.

IMG_9949 IMG_9950

I had a feeling that the necklace was going to be on the long side so I only connected half of it to get an idea how long it was going to be. And I was right, this one half of the necklace was approximately twenty-seven inches long so I knew I had to make some modifications.

IMG_9952

I ended up re-doing the bead stacks by eliminating five seed beads on each one and re-cutting the chain to match the new length of the bead stacks – approximately one and a half inches. The necklace ended up being about forty inches.

IMG_9973

And finally I used some of the bead strands I got at the bead show I went to last month along with some chain I had to create this final piece.

IMG_9962

First off I created the bead portion of the necklace by stringing the beads onto flexible beading wire. I wasn’t sure if I wanted to use spacer beads or daisy spacers between the beads but once I started stringing I realized the daisy spacers were a better fit.

IMG_9963 IMG_9964

Next up I cut the chain into three equal pieces and attached them to the bead sections.

IMG_9965

And voila a new necklace. This was by far the easiest one to make and probably my favorite.

IMG_9976

A Day With Beads & Clay

This past Saturday I finally made it to a bead show that I have wanted to check out for a while. The Whole Bead Show comes to New York City twice a year (March & October) and this time around it worked out perfectly since I was going to be in the city for a pottery class on one of the days it was here- more on that later.

There were beads everywhere but it was important to walk around and make sure you got the best deal possible. There were quite a few vendors who sold identical things but with varying prices. And while there was a vast assortment of beads, gemstones and precious stones strung I was a little disappointed that there wasn’t more of a selection of seed beads and Swarovski crystals. I had a list of things I wanted to get but unfortunately those items were nowhere to be found. I was able to get a great deal on the beads I did pick up and I can’t wait to craft these into bracelets, necklaces and earrings.

IMG_9863

I also picked up a few findings: a toggle, a bag of daisy spacers and a bezel setting ring.

IMG_9868

After the bead show I went to an Introductory Hand Building workshop at La Mano Pottery  thanks to a Groupon deal. My friends and I had a lot of fun molding our slabs of clay into vases. Hopefully my vase will survive the firing and glazing process and then I can pick it up in four weeks. I may be willing to take another class one day, but, I definitely don’t see this becoming a new hobby of mine anytime soon.

Here’s a picture of my pre-finished vase. FYI, I didn’t sketch the pattern into the clay. The instructor had a bunch of molds, stencils and doilies that we could choose from to imprint the clay.

Pottery Class