Marbled Pound Cake

If you can’t choose between a vanilla or chocolate cake, then a marbled cake is for you! And if you are thinking that it might be double the work because you have to make to separate batters that’s not the case at all. With today’s recipe I started off by making the vanilla batter and then dividing it in half and adding cocoa powder to one of them.

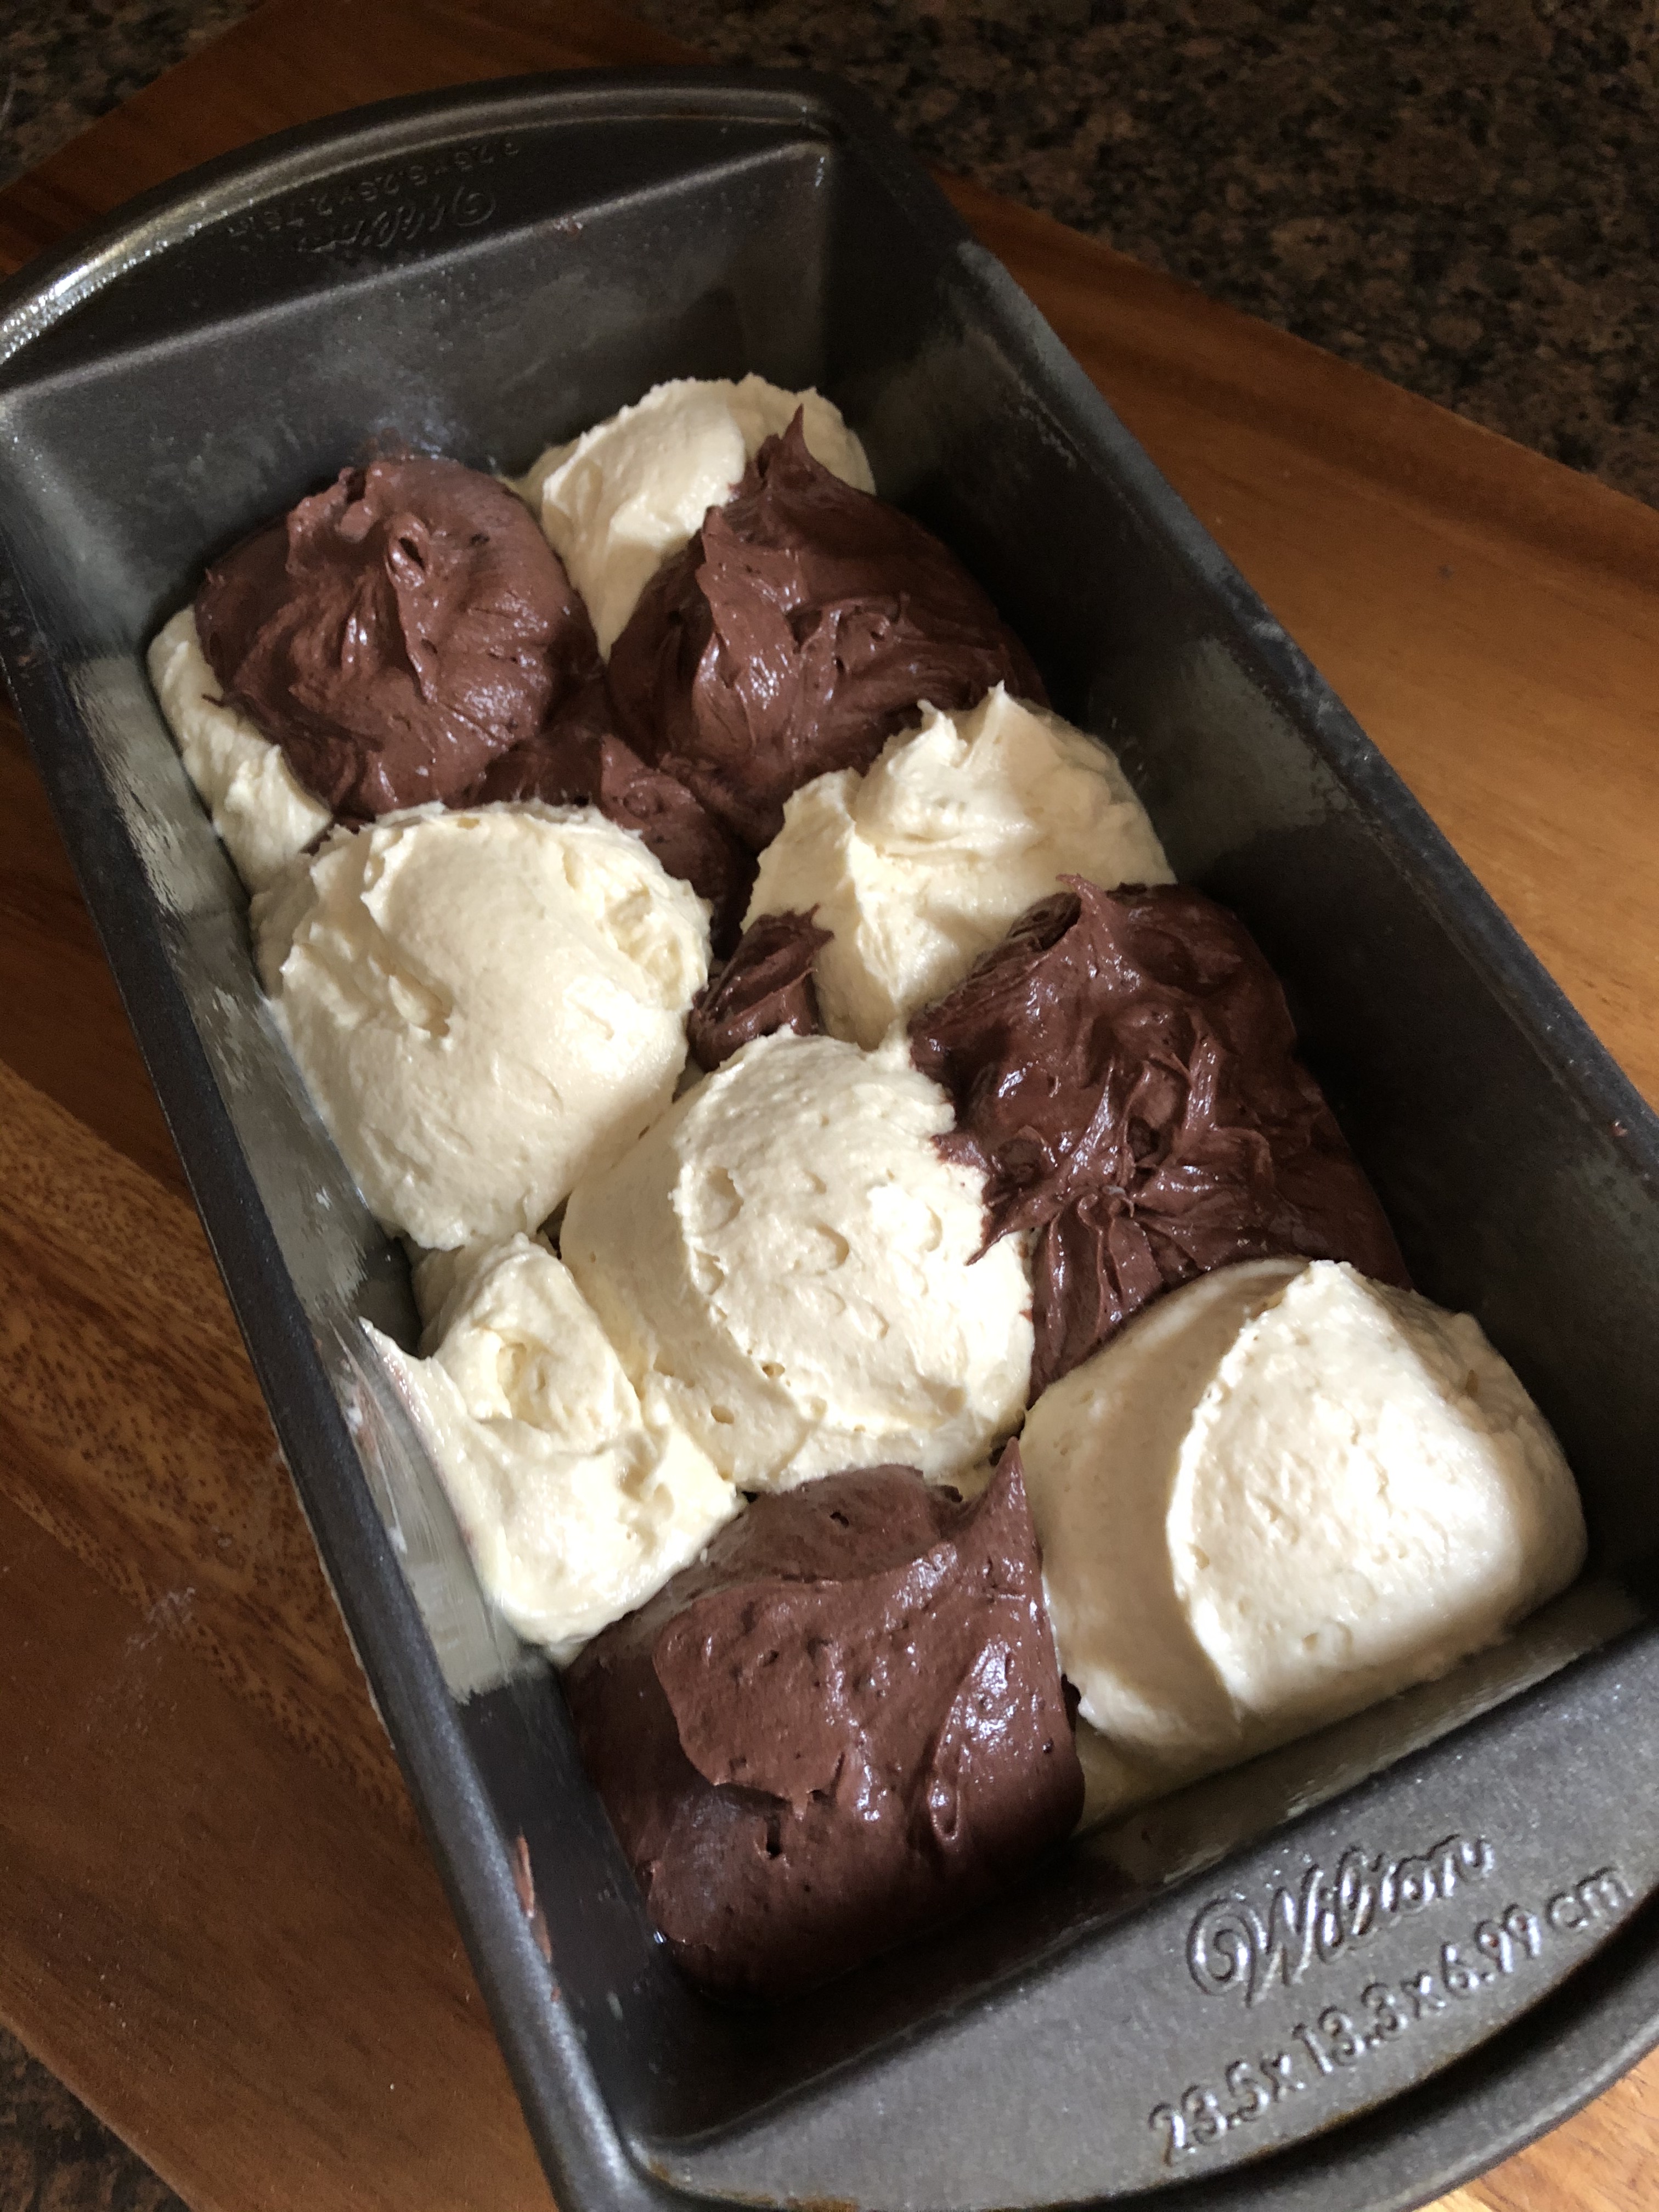
Once I had the two batters ready it was time to fill my prepared pan. I used a cookie scoop and a 1/4 cup measuring cup to drop alternating scoops of the vanilla and chocolate batter in the pan to get the marble effect.

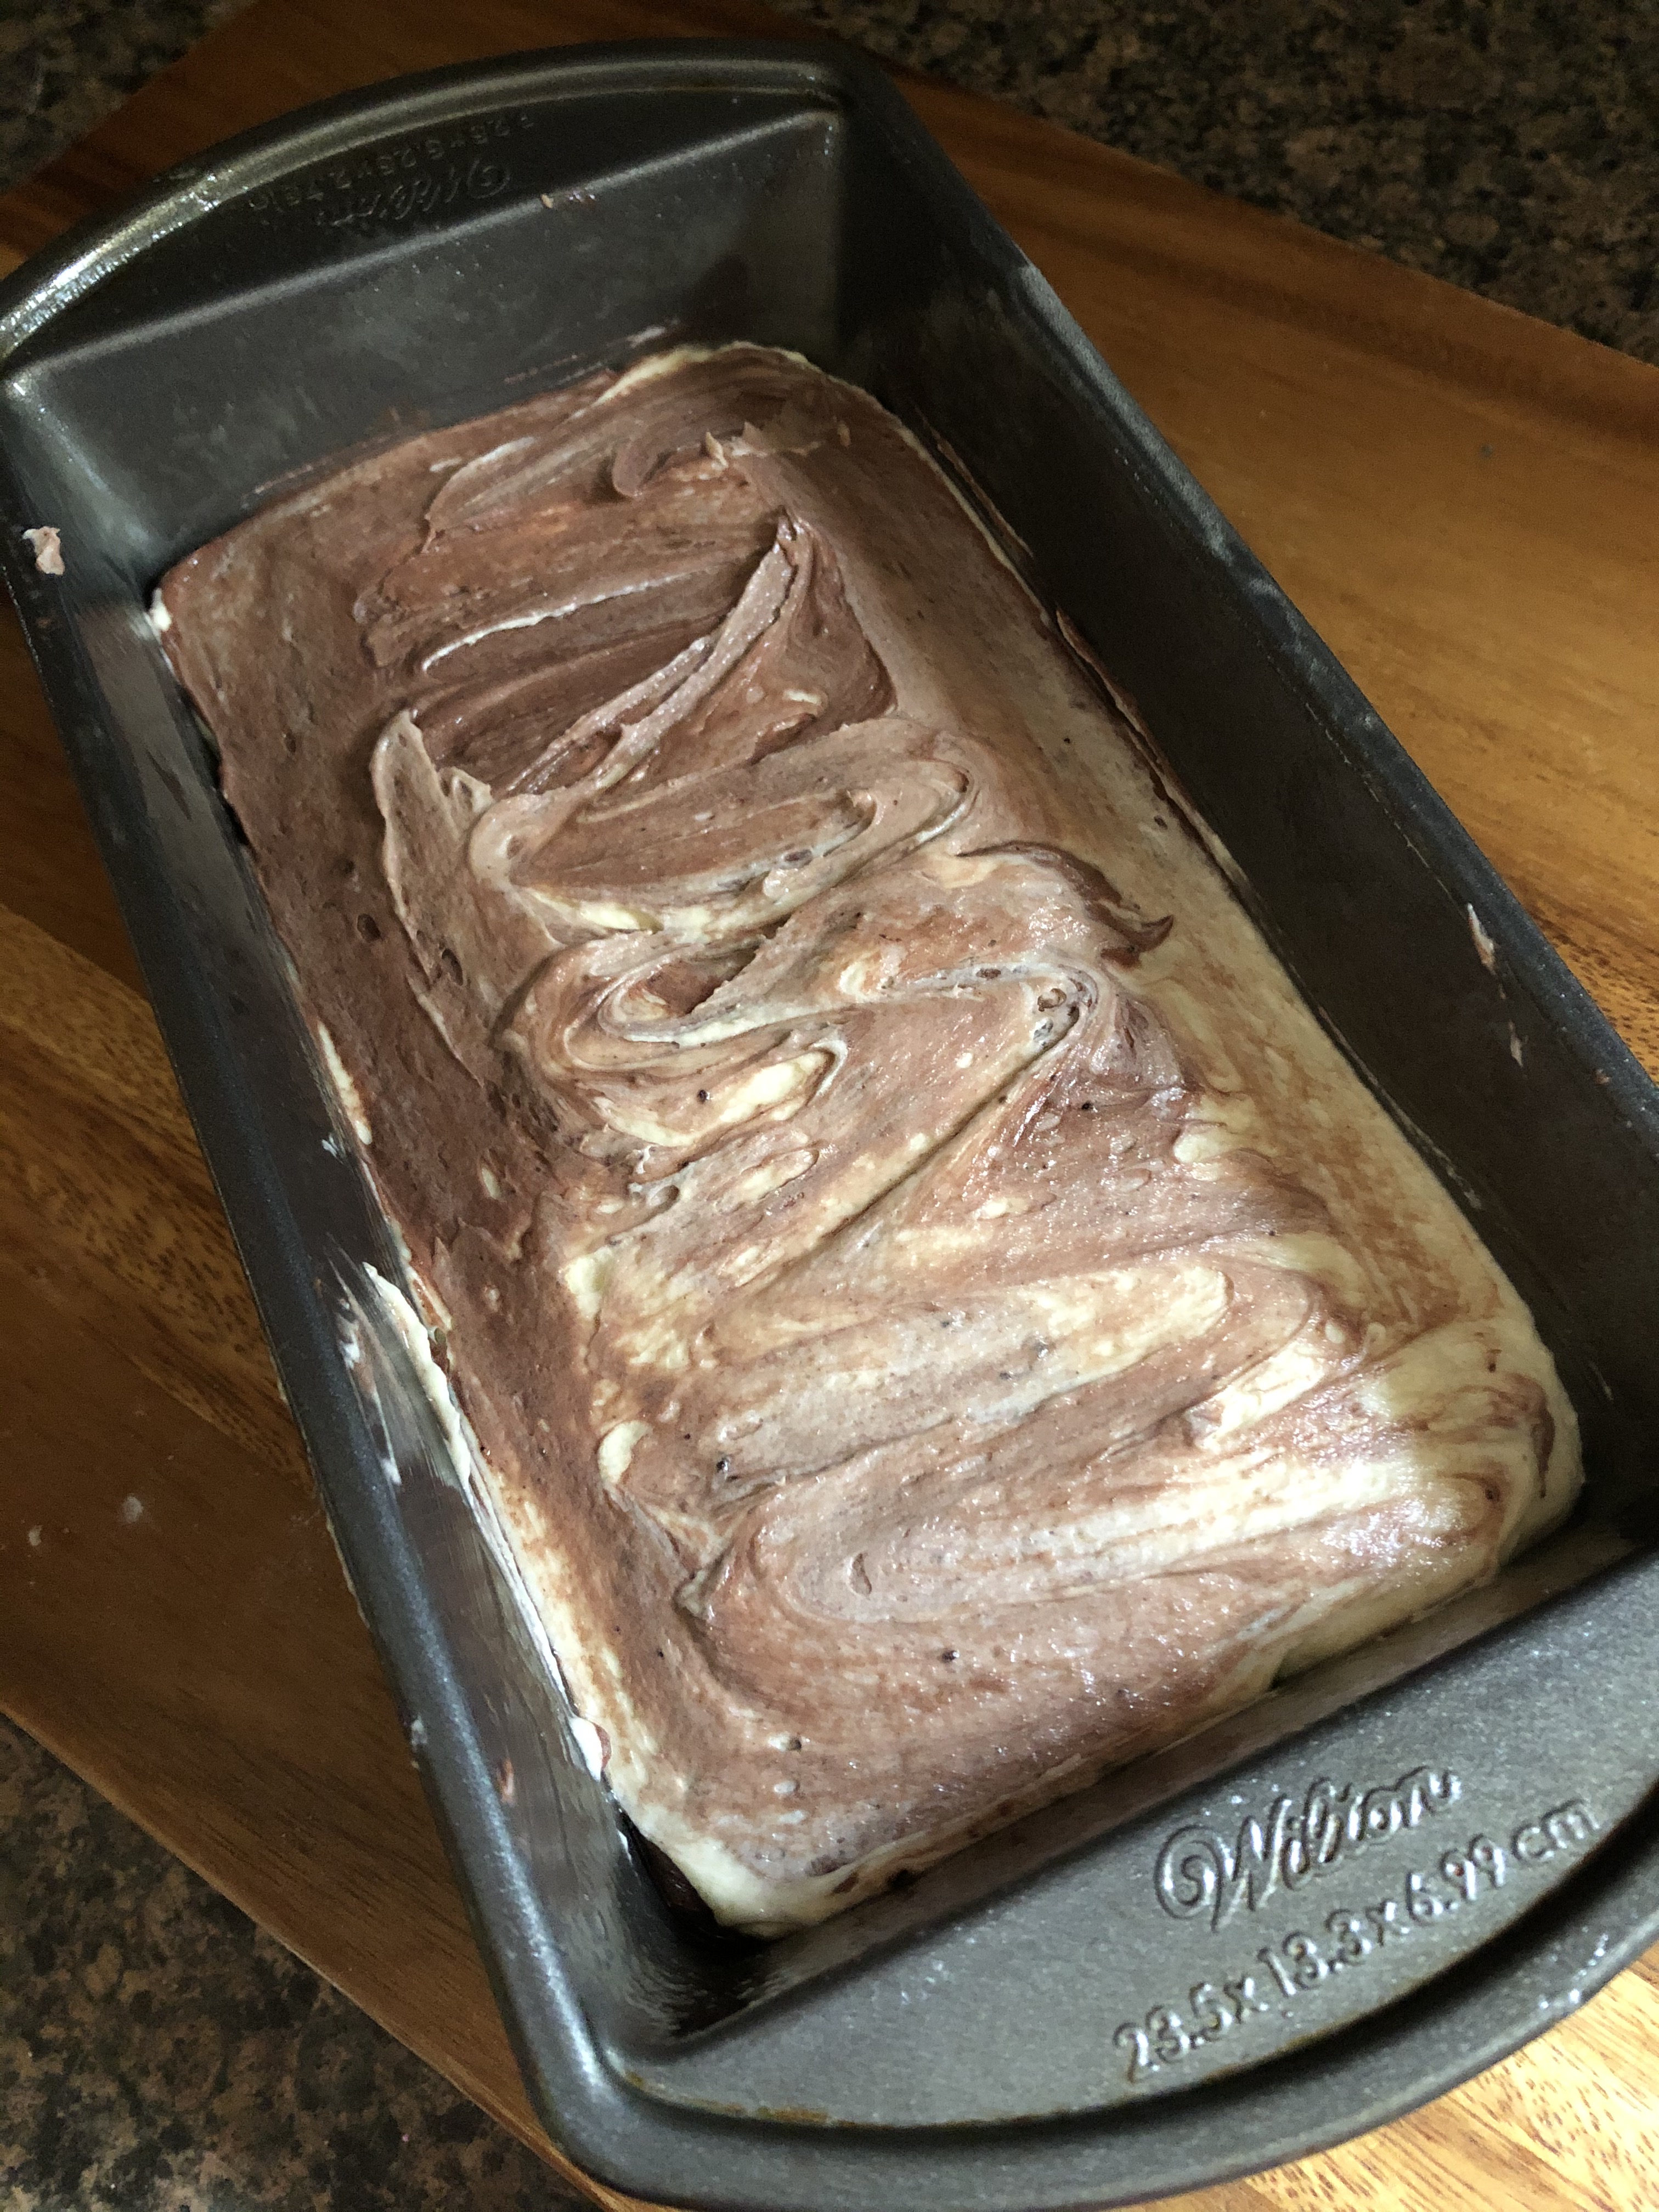
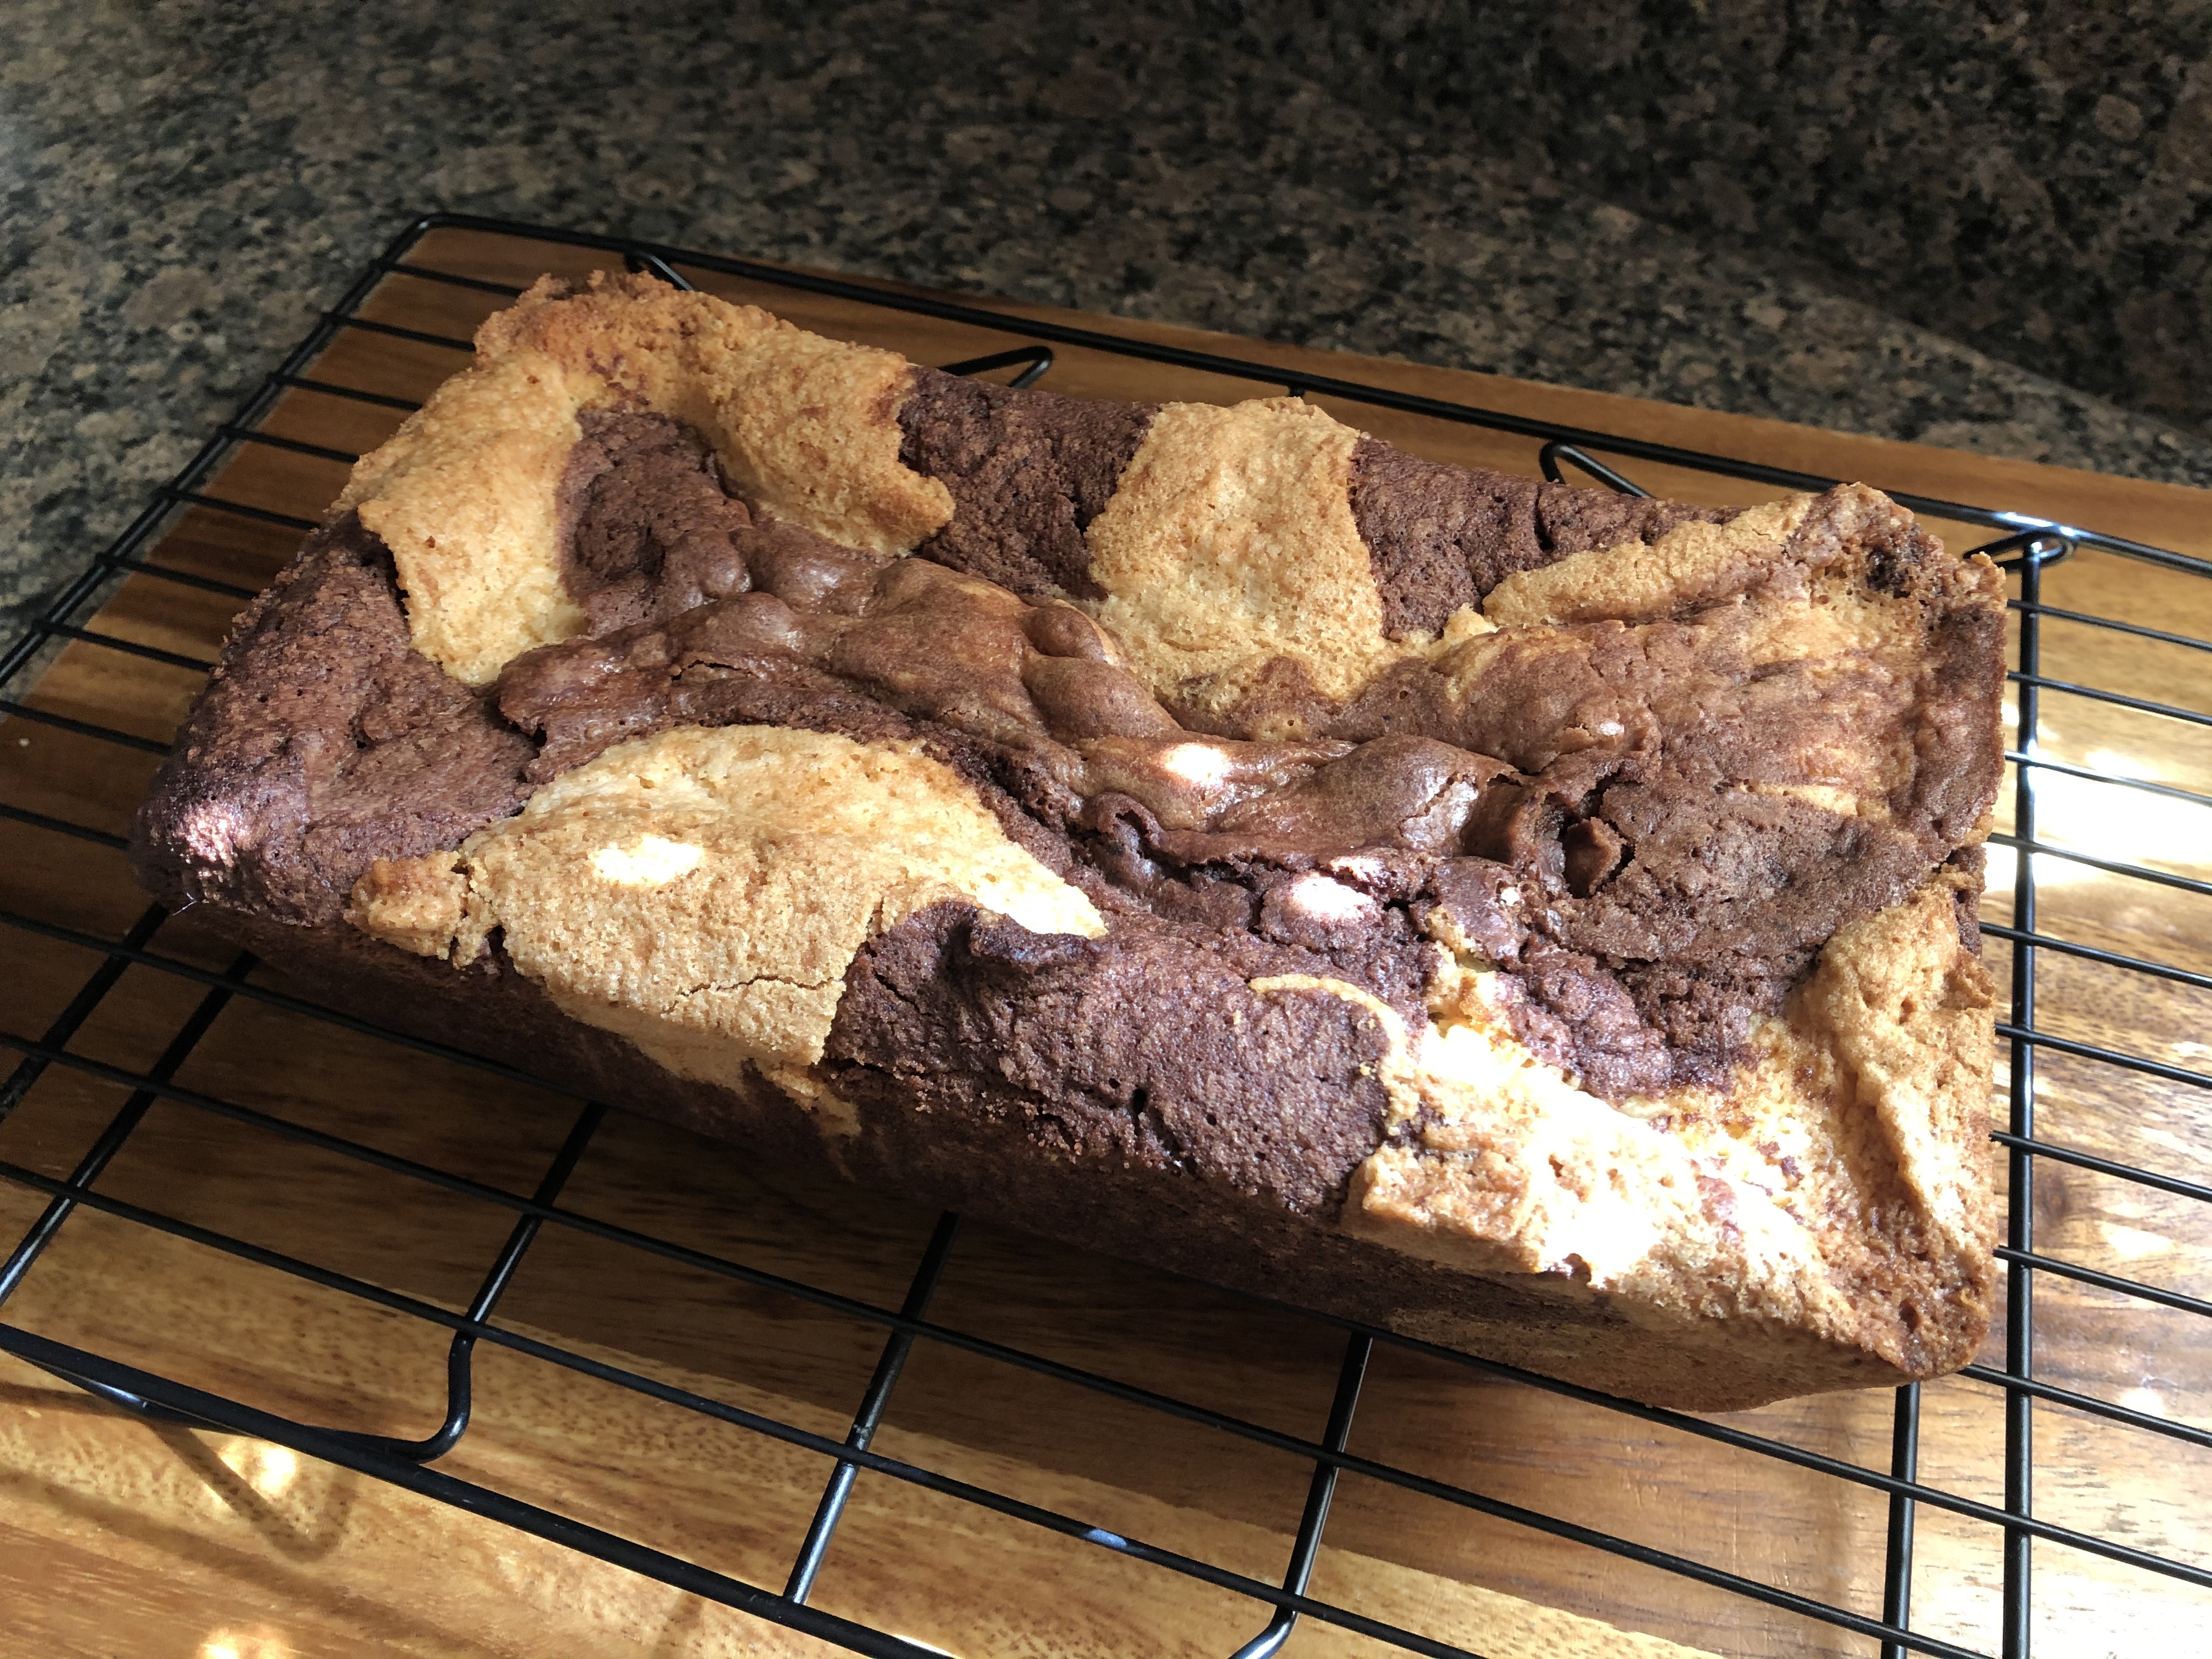
After tapping the pan a few times on my counter to release any air bubbles I used a small off-set spatula to smooth the top of the cake. I then placed it on baking sheet and baked it in a 325 F preheated oven for 70 minutes.

After letting the cake cool in the pan for about 10 minutes, I transferred it to a wire rack to cool completely.  

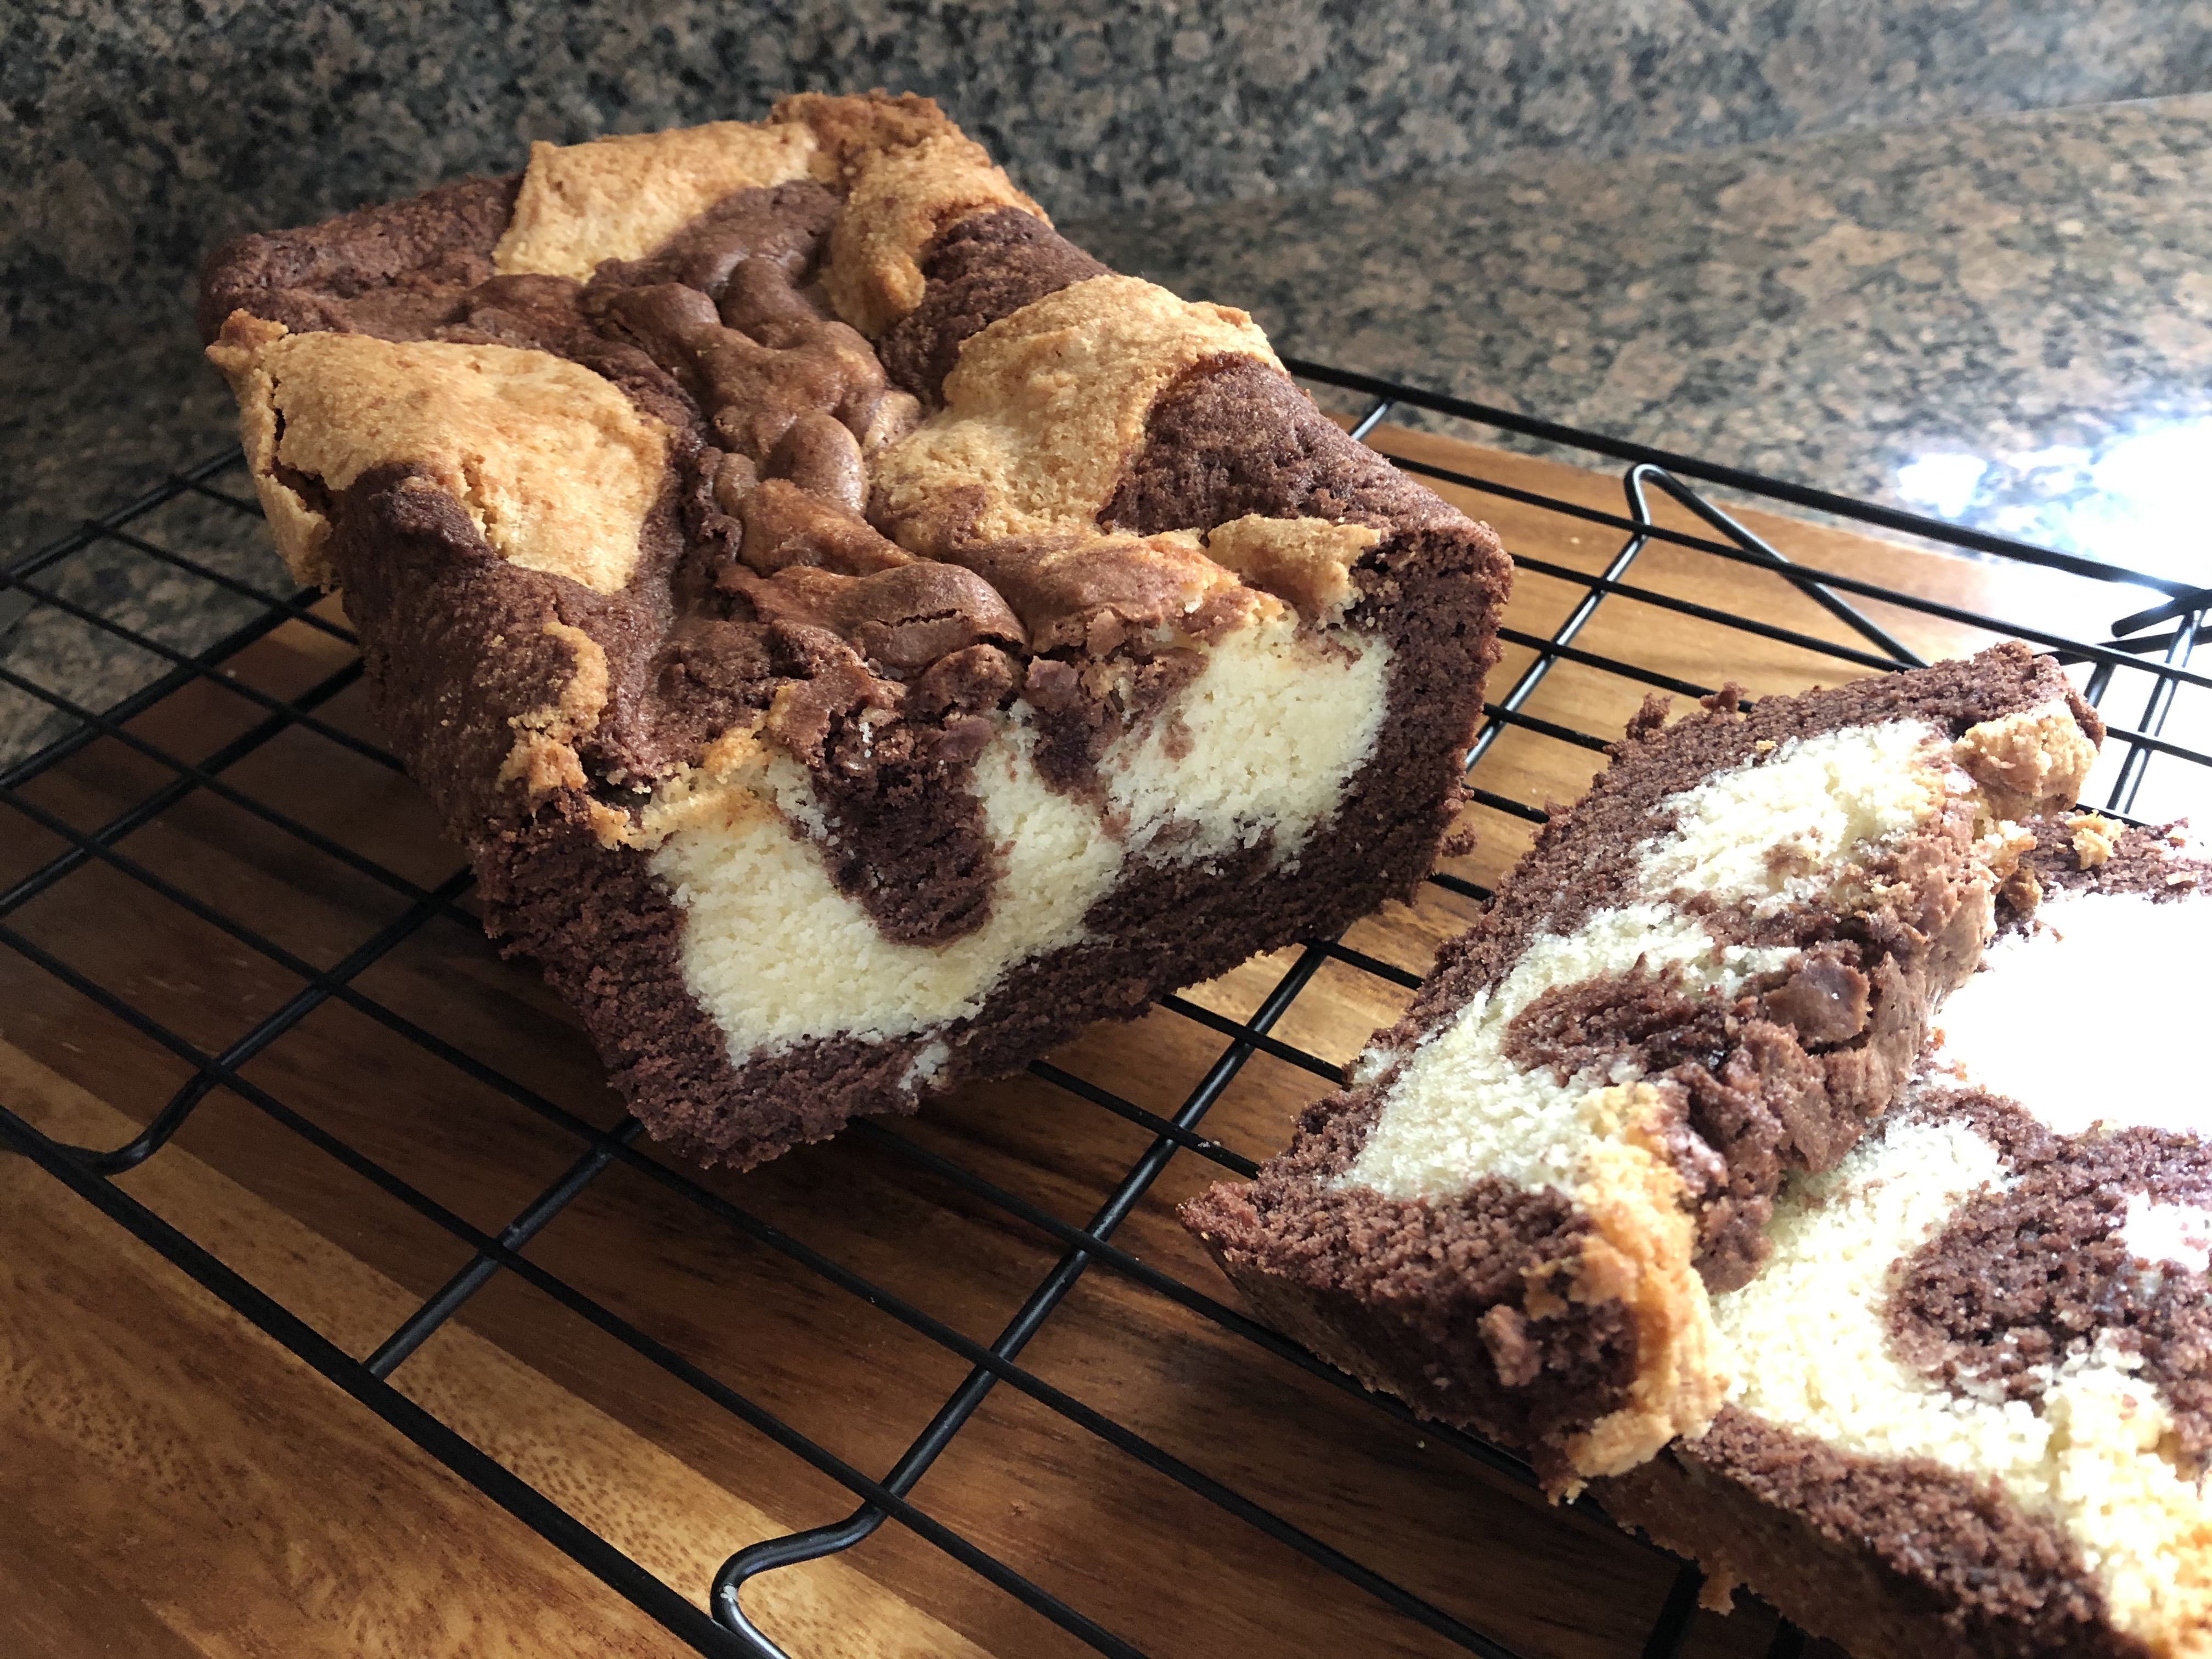
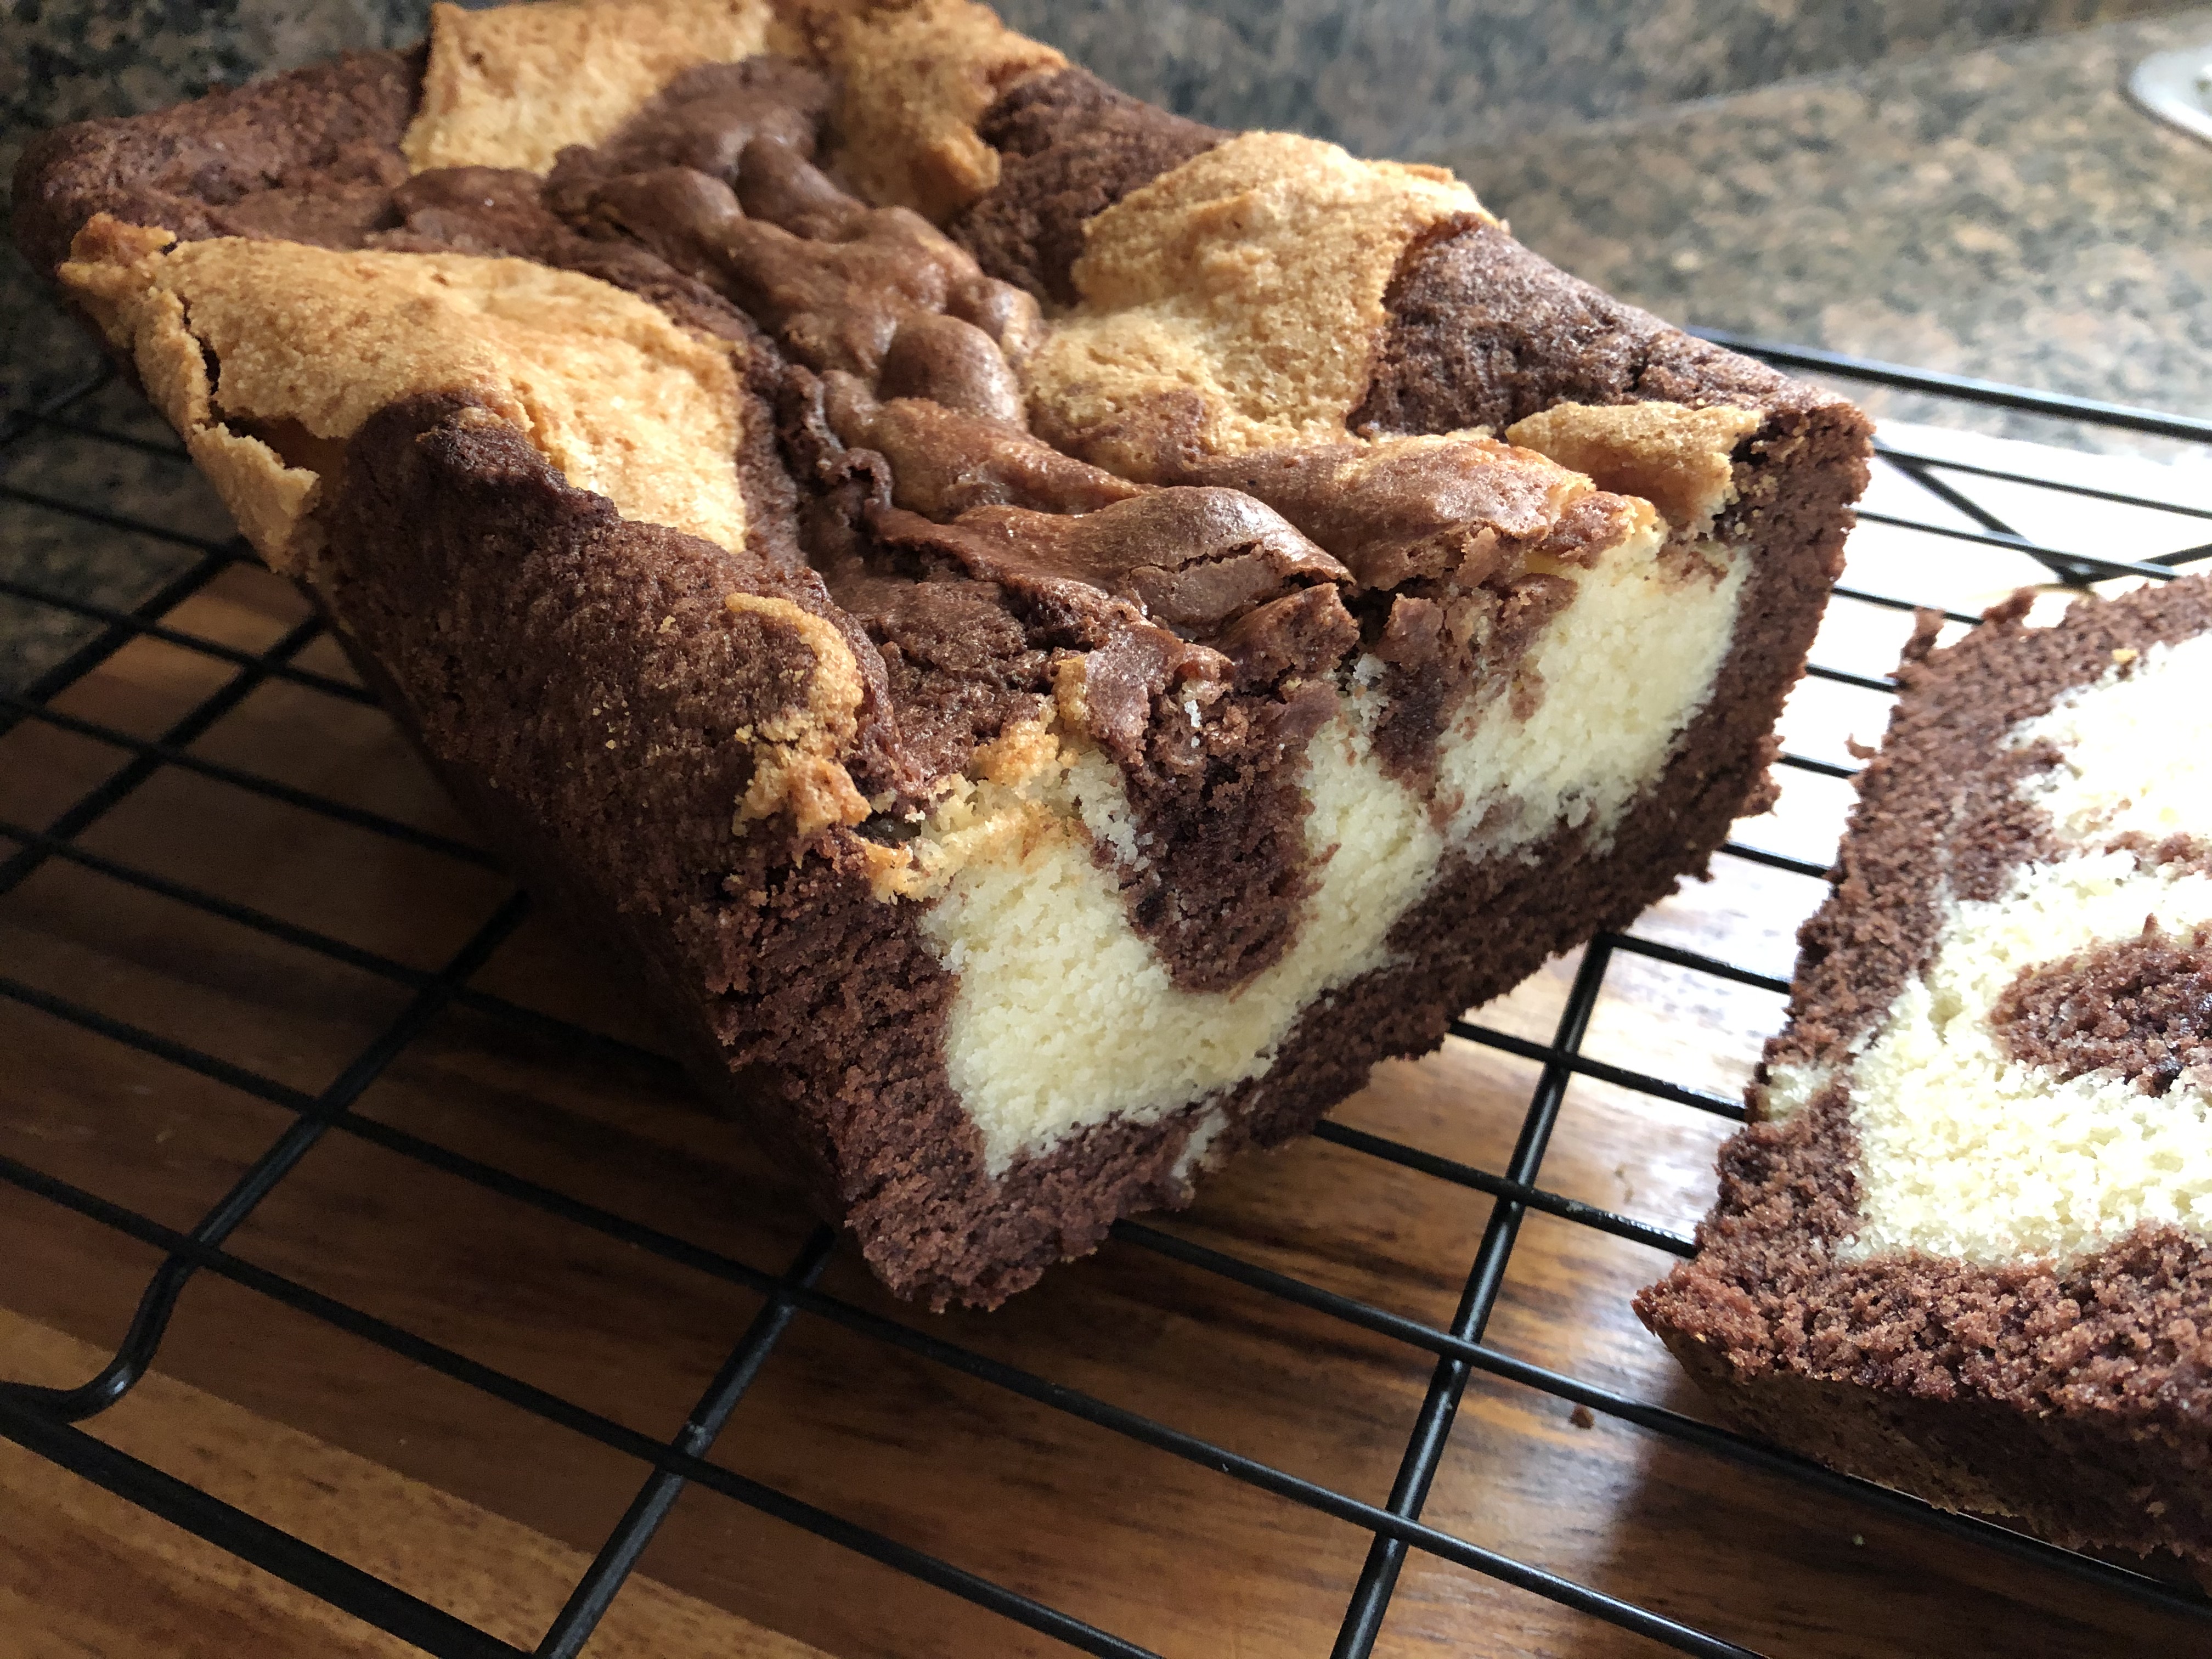
And then it was time to slice it. And as cheesy as it sounds, I get a slight tinge of excitement when I bake a cake that is supposed to have a surprise inside or look a certain way and it works. The joys of baking! As you can see, the marble look was just about perfect with this loaf cake. Even more exciting though, was how delicious the cake was. I used to love the Marble Loaf Cake from Entenmann’s, but I feel like they changed their recipe because it doesn’t take like how I remember. Thankfully I have a replacement now that I can make myself.

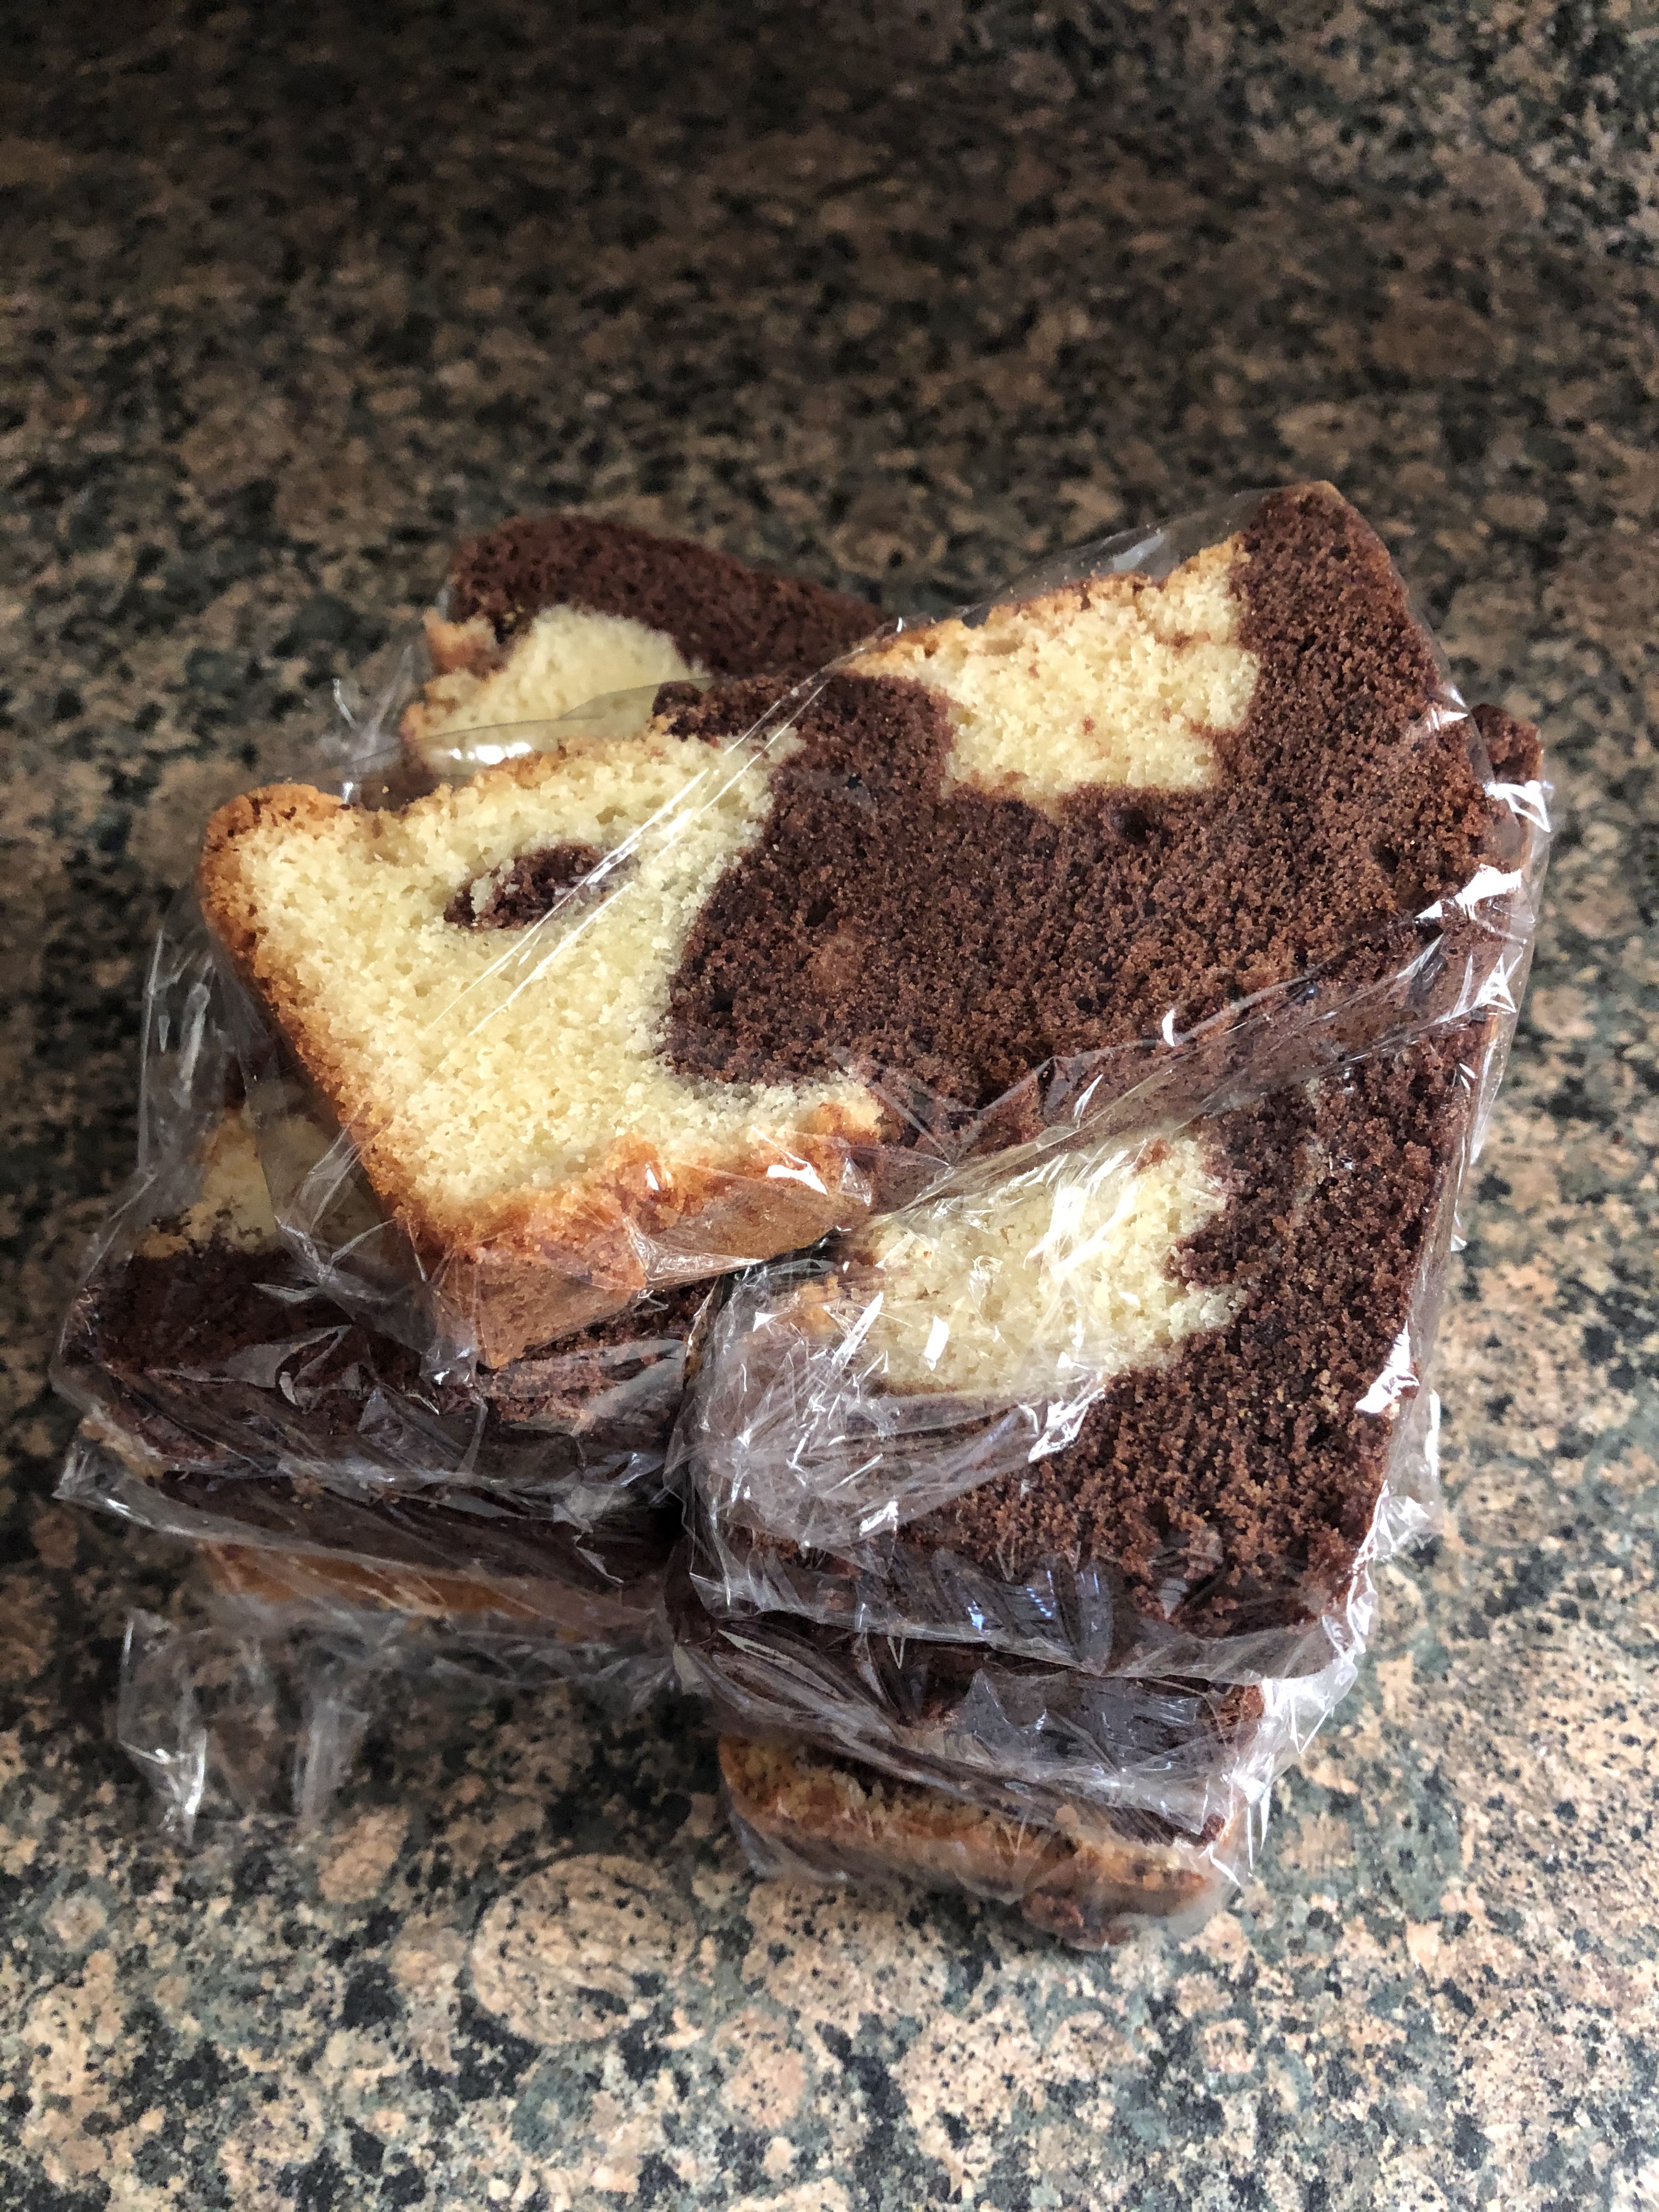
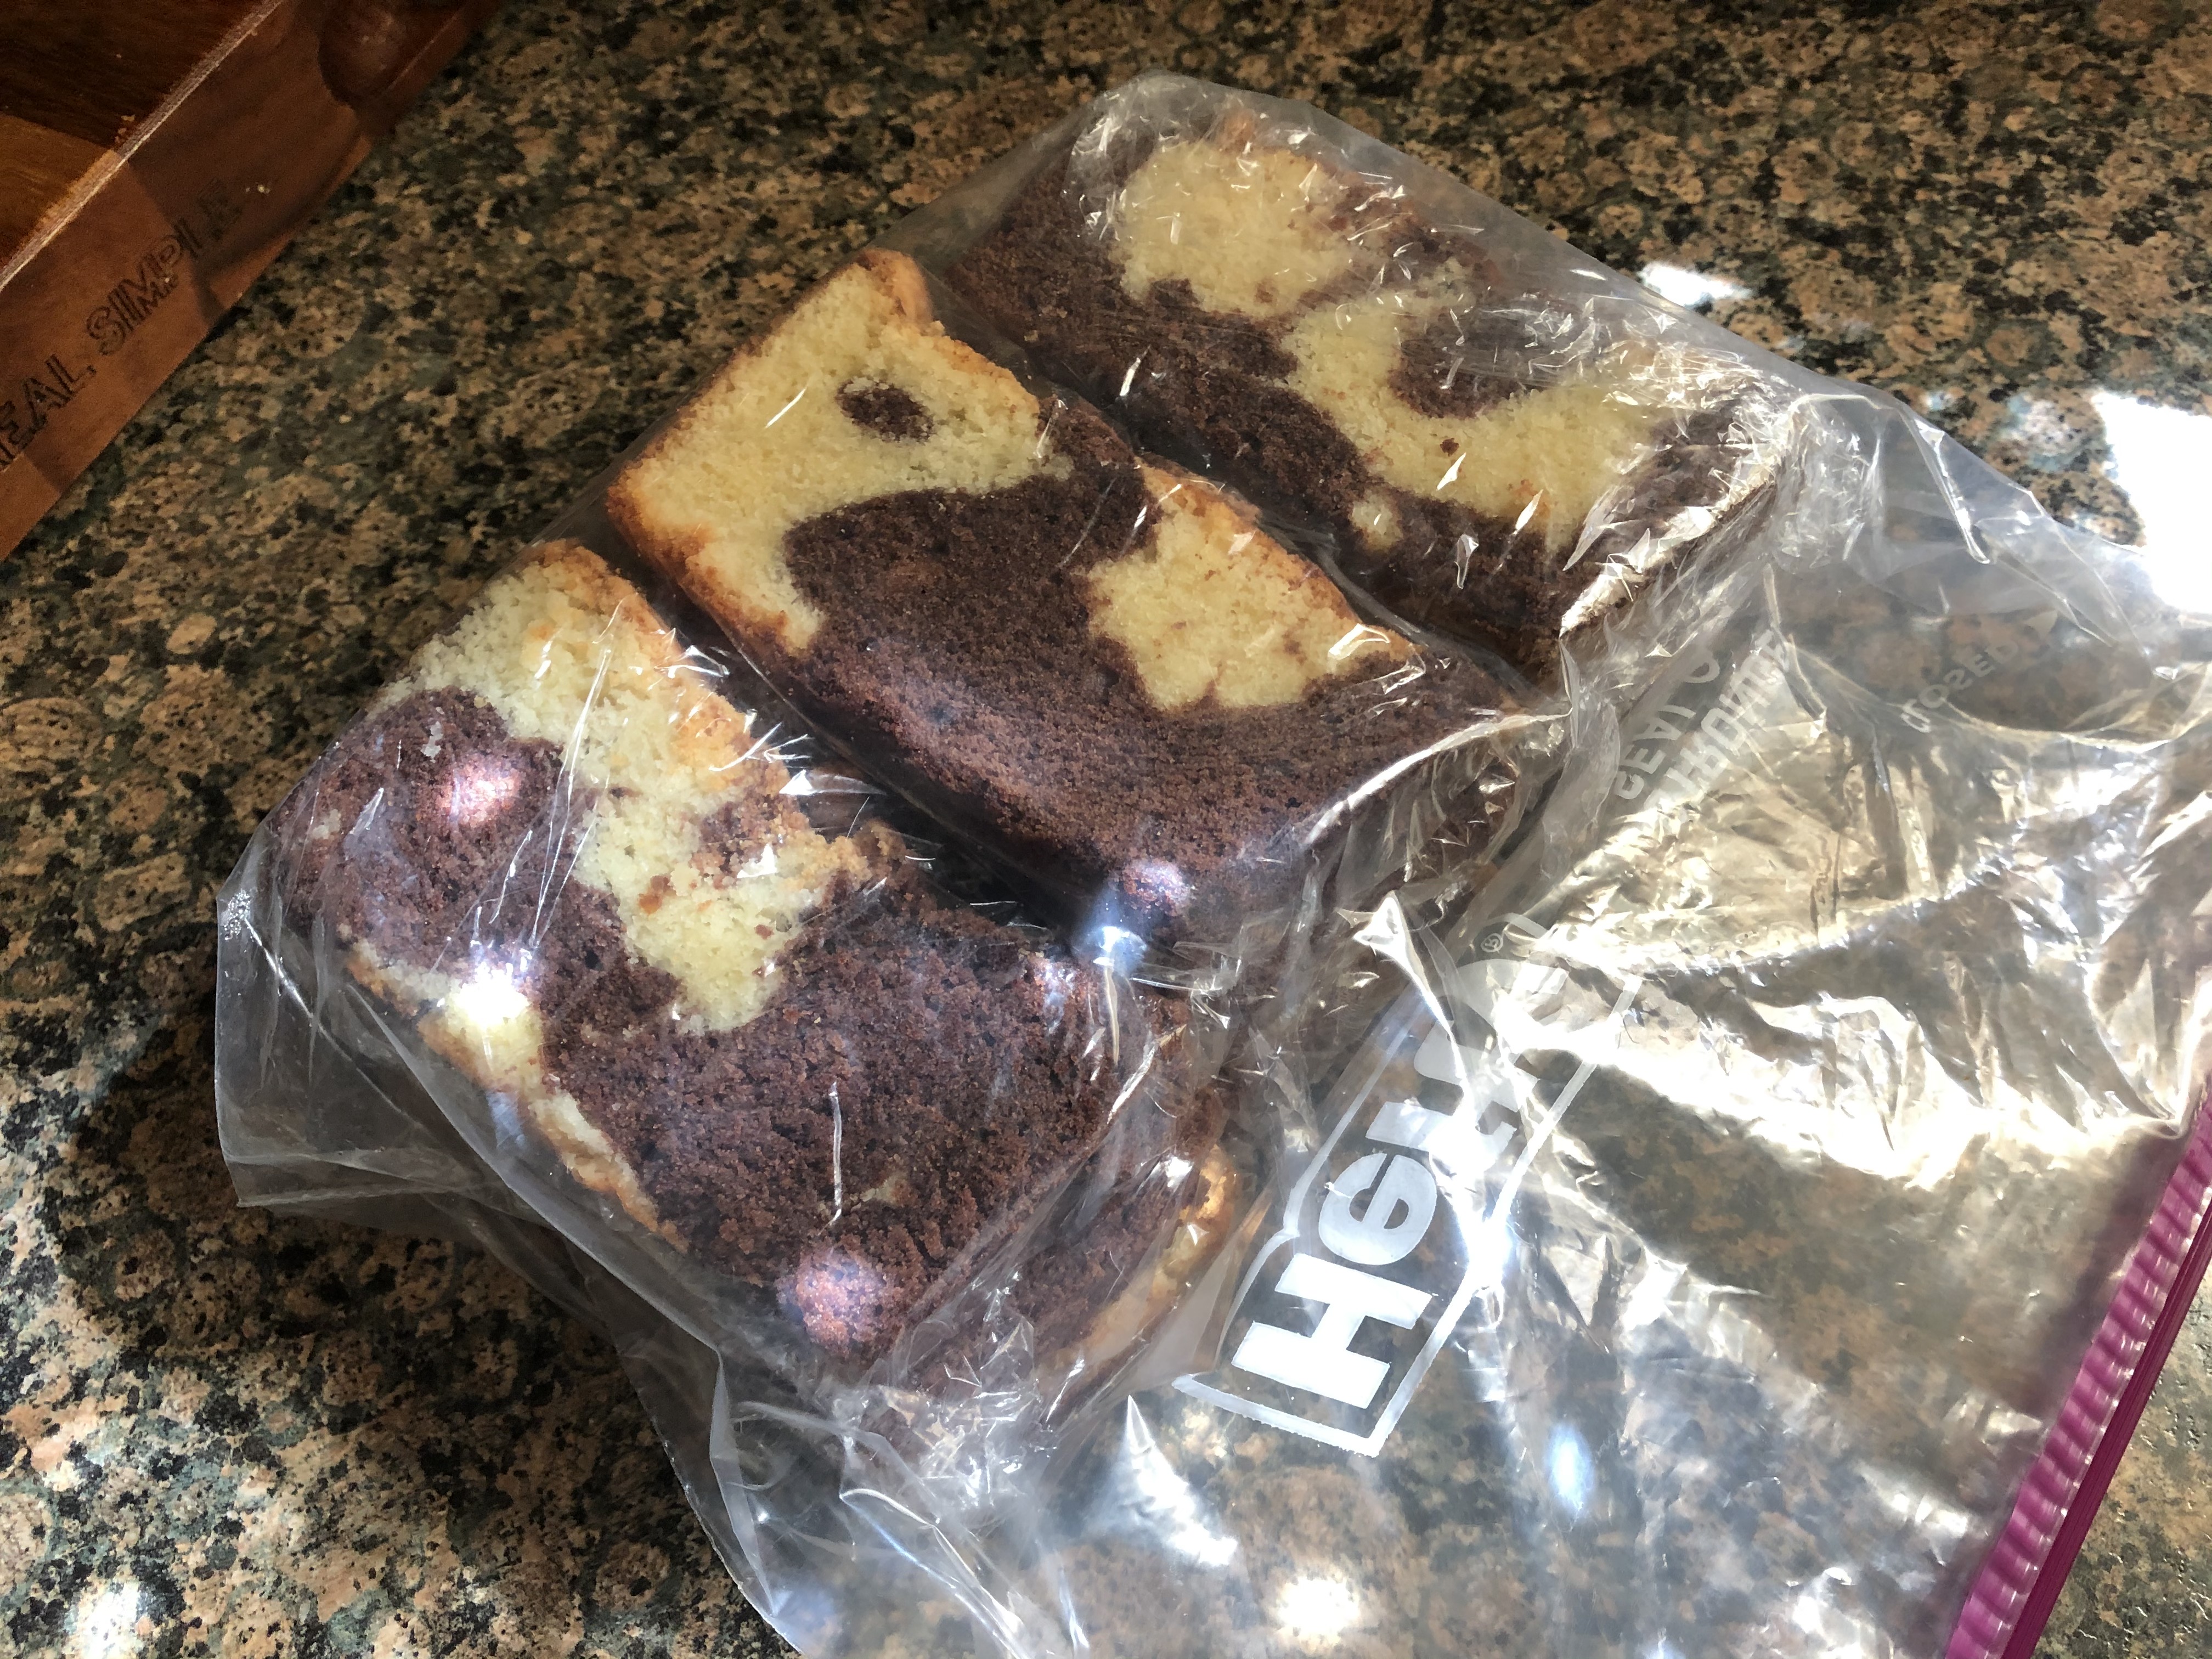
I actually ended up baking two loaves and decided to slice the second one and freeze it. This is the perfect type of cake to freeze, it has no frosting and is moist but dense enough to withstand being frozen and thawed. I wrapped each of the slices in plastic wrap and then placed all of them in a resealable bag in my freezer. When I am ready to eat a slice, I will leave it out on my counter for a few hours so it can defrost.

Marbled Pound Cake

Ingredients:

1 cup flour

1/4 cup cake flour, sifted

1/2 teaspoon Kosher salt

2 sticks unsalted butter, at room temperature

1 1/2 cups sugar

2 tablespoons vanilla extract

3 eggs, at room temperature

1/4 cup buttermilk, at room temperature*

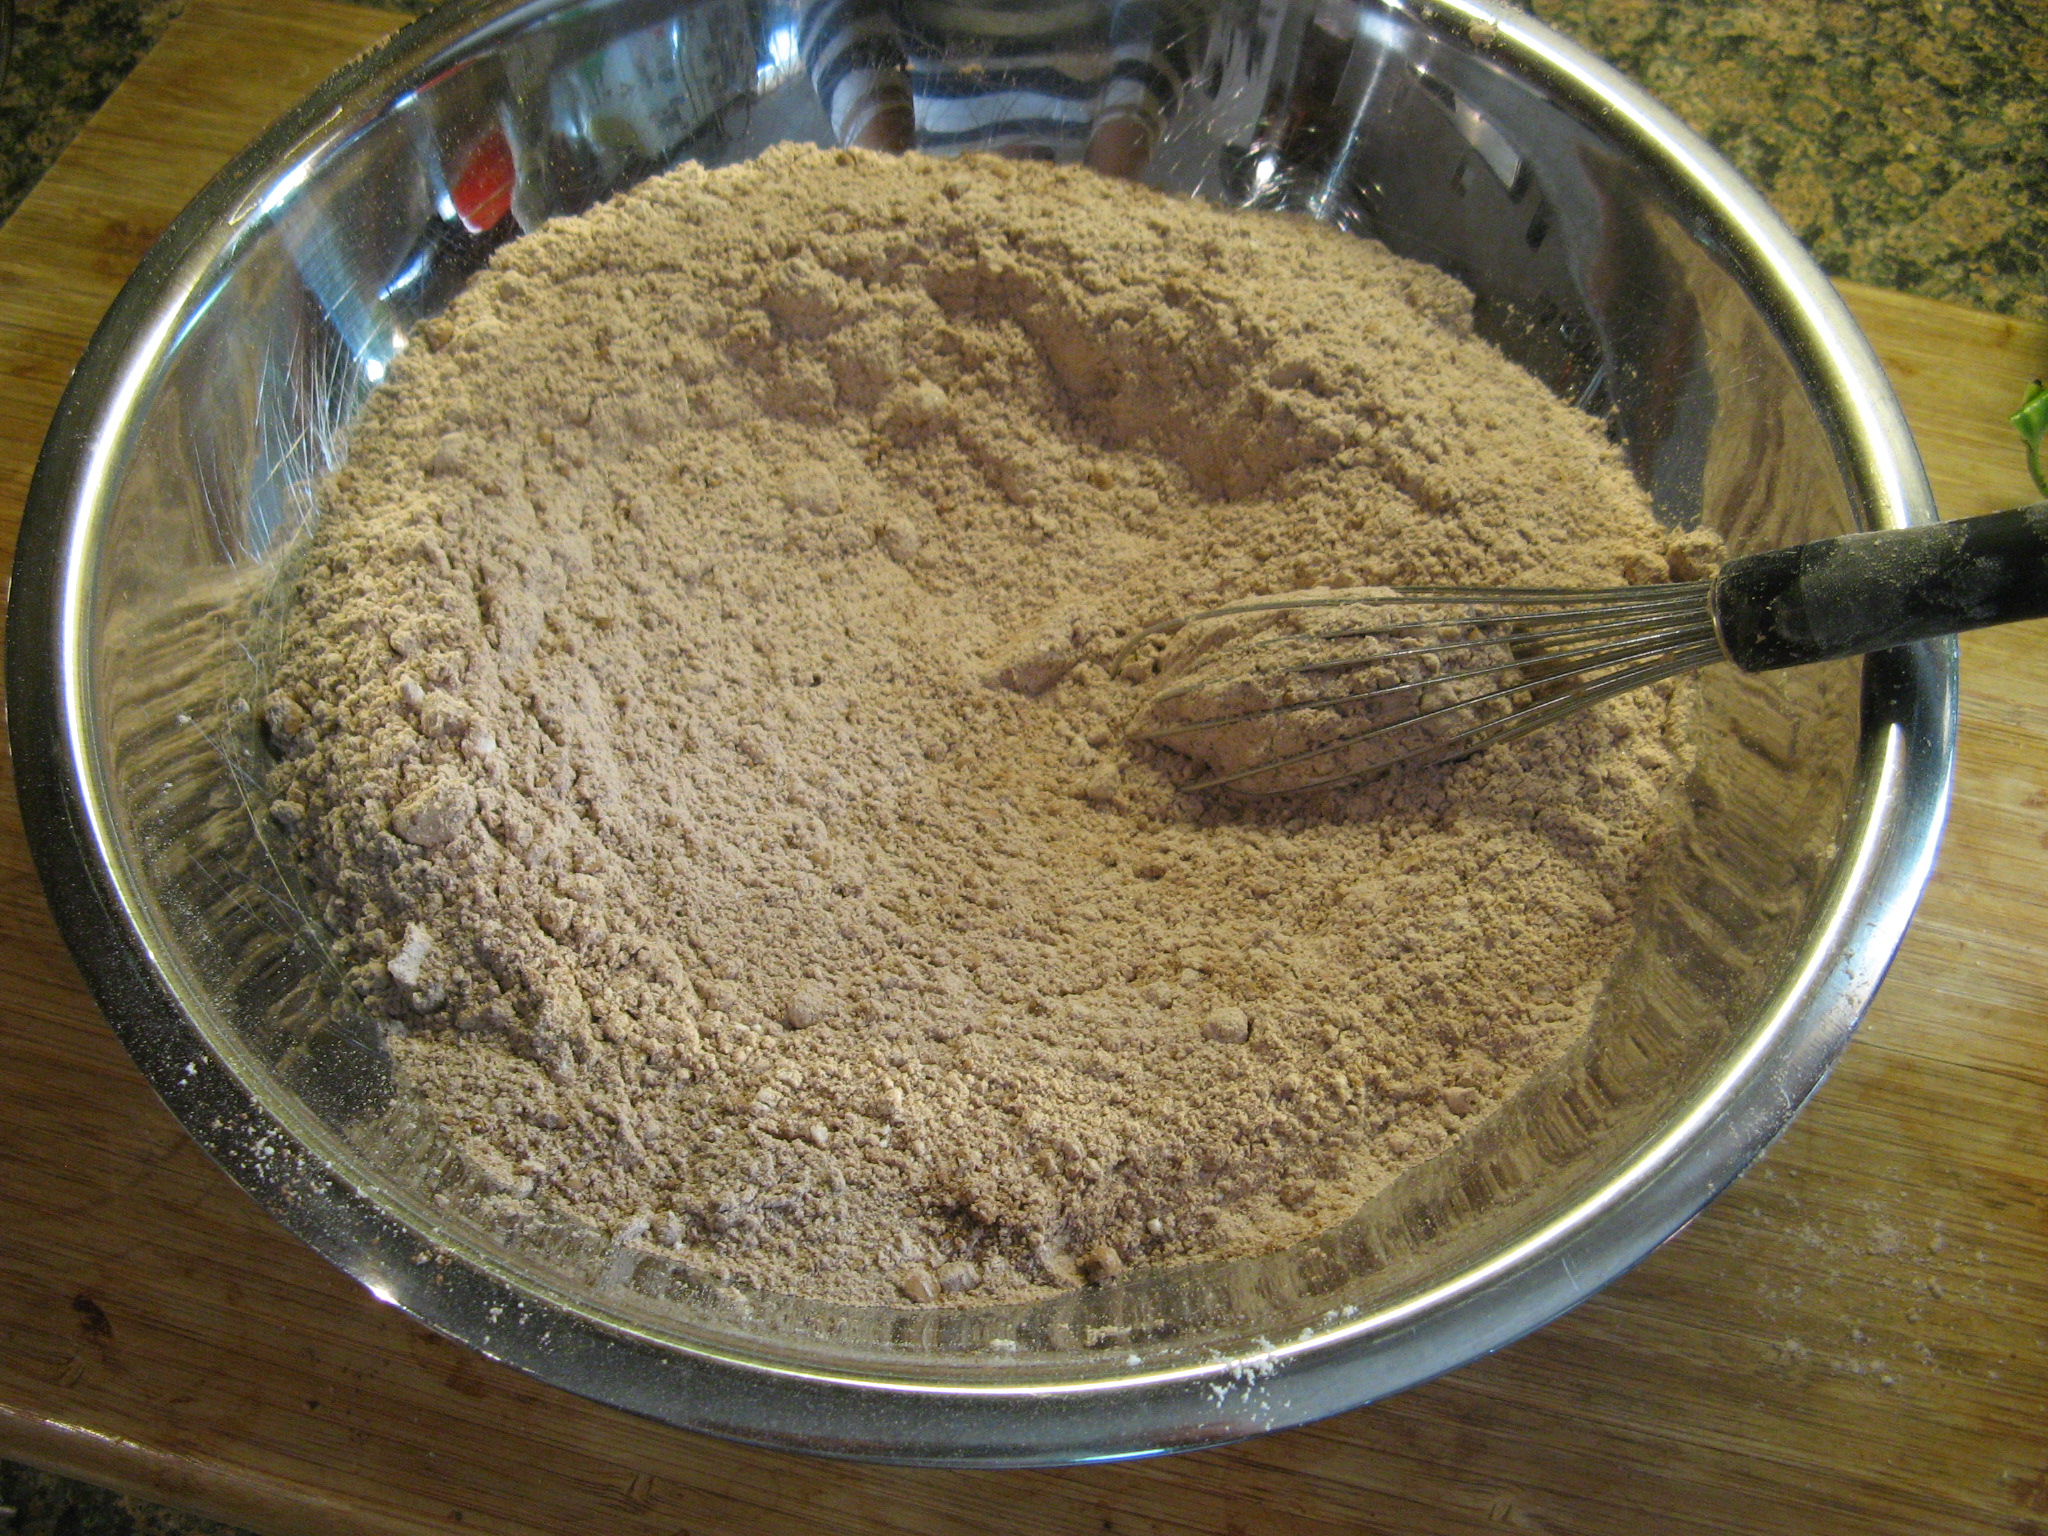
3 tablespoons Dutch-processed cocoa powder

*To make your own combine 1/4 cup whole milk with 1 teaspoon white vinegar. Let sit at room temperature for 15 minutes then stir to combine.

Directions:

Preheat the oven to 325 F. Spray a loaf pan with baking spray, or, lightly grease with butter and then coat with flour.

In a medium bowl whisk together the flour, cake flour and salt, set aside.

In a stand mixer fitted with the paddle attachment beat the butter of medium-high speed until creamy.

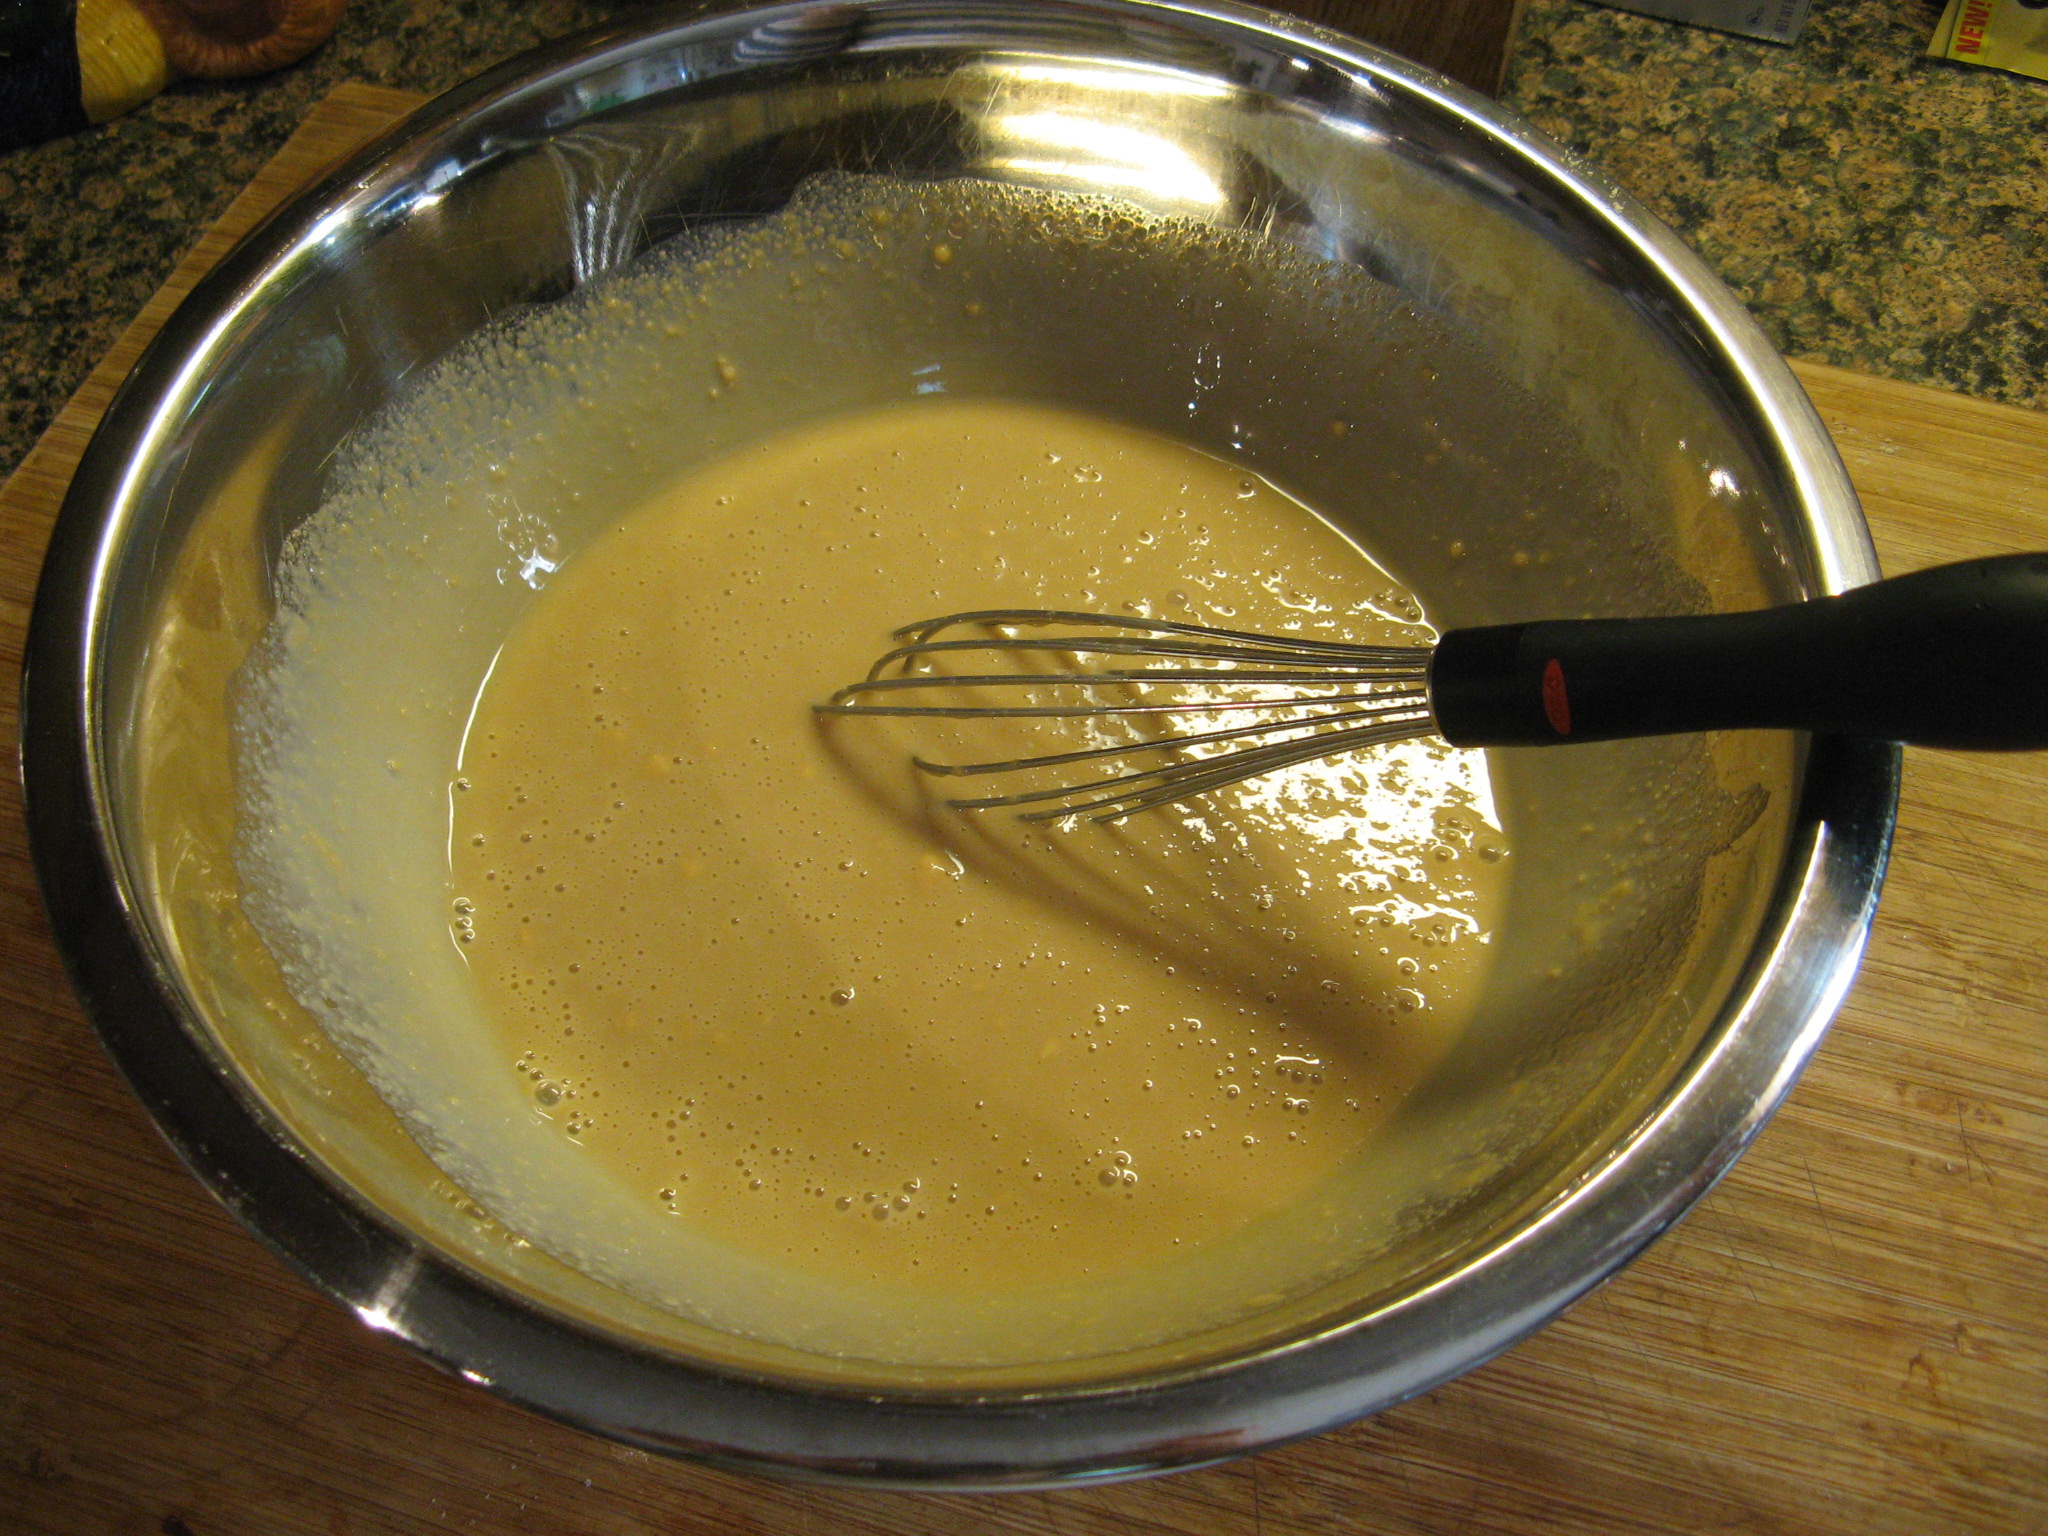
With the mixer on low add in the sugar. Continue mixing on low until the butter and sugar are incorporated. Increase the speed to medium and continue mixing until the mixture has become light and fluffy (about 5 minutes.) Scraping the sides of the bowl as necessary.

Add the vanilla extract. Reduce the speed to medium-low and add the eggs, 1 at a time, beating after each addition until just combined.

With the mixer on low speed, add the flour mixture in three parts alternating with the buttermilk.

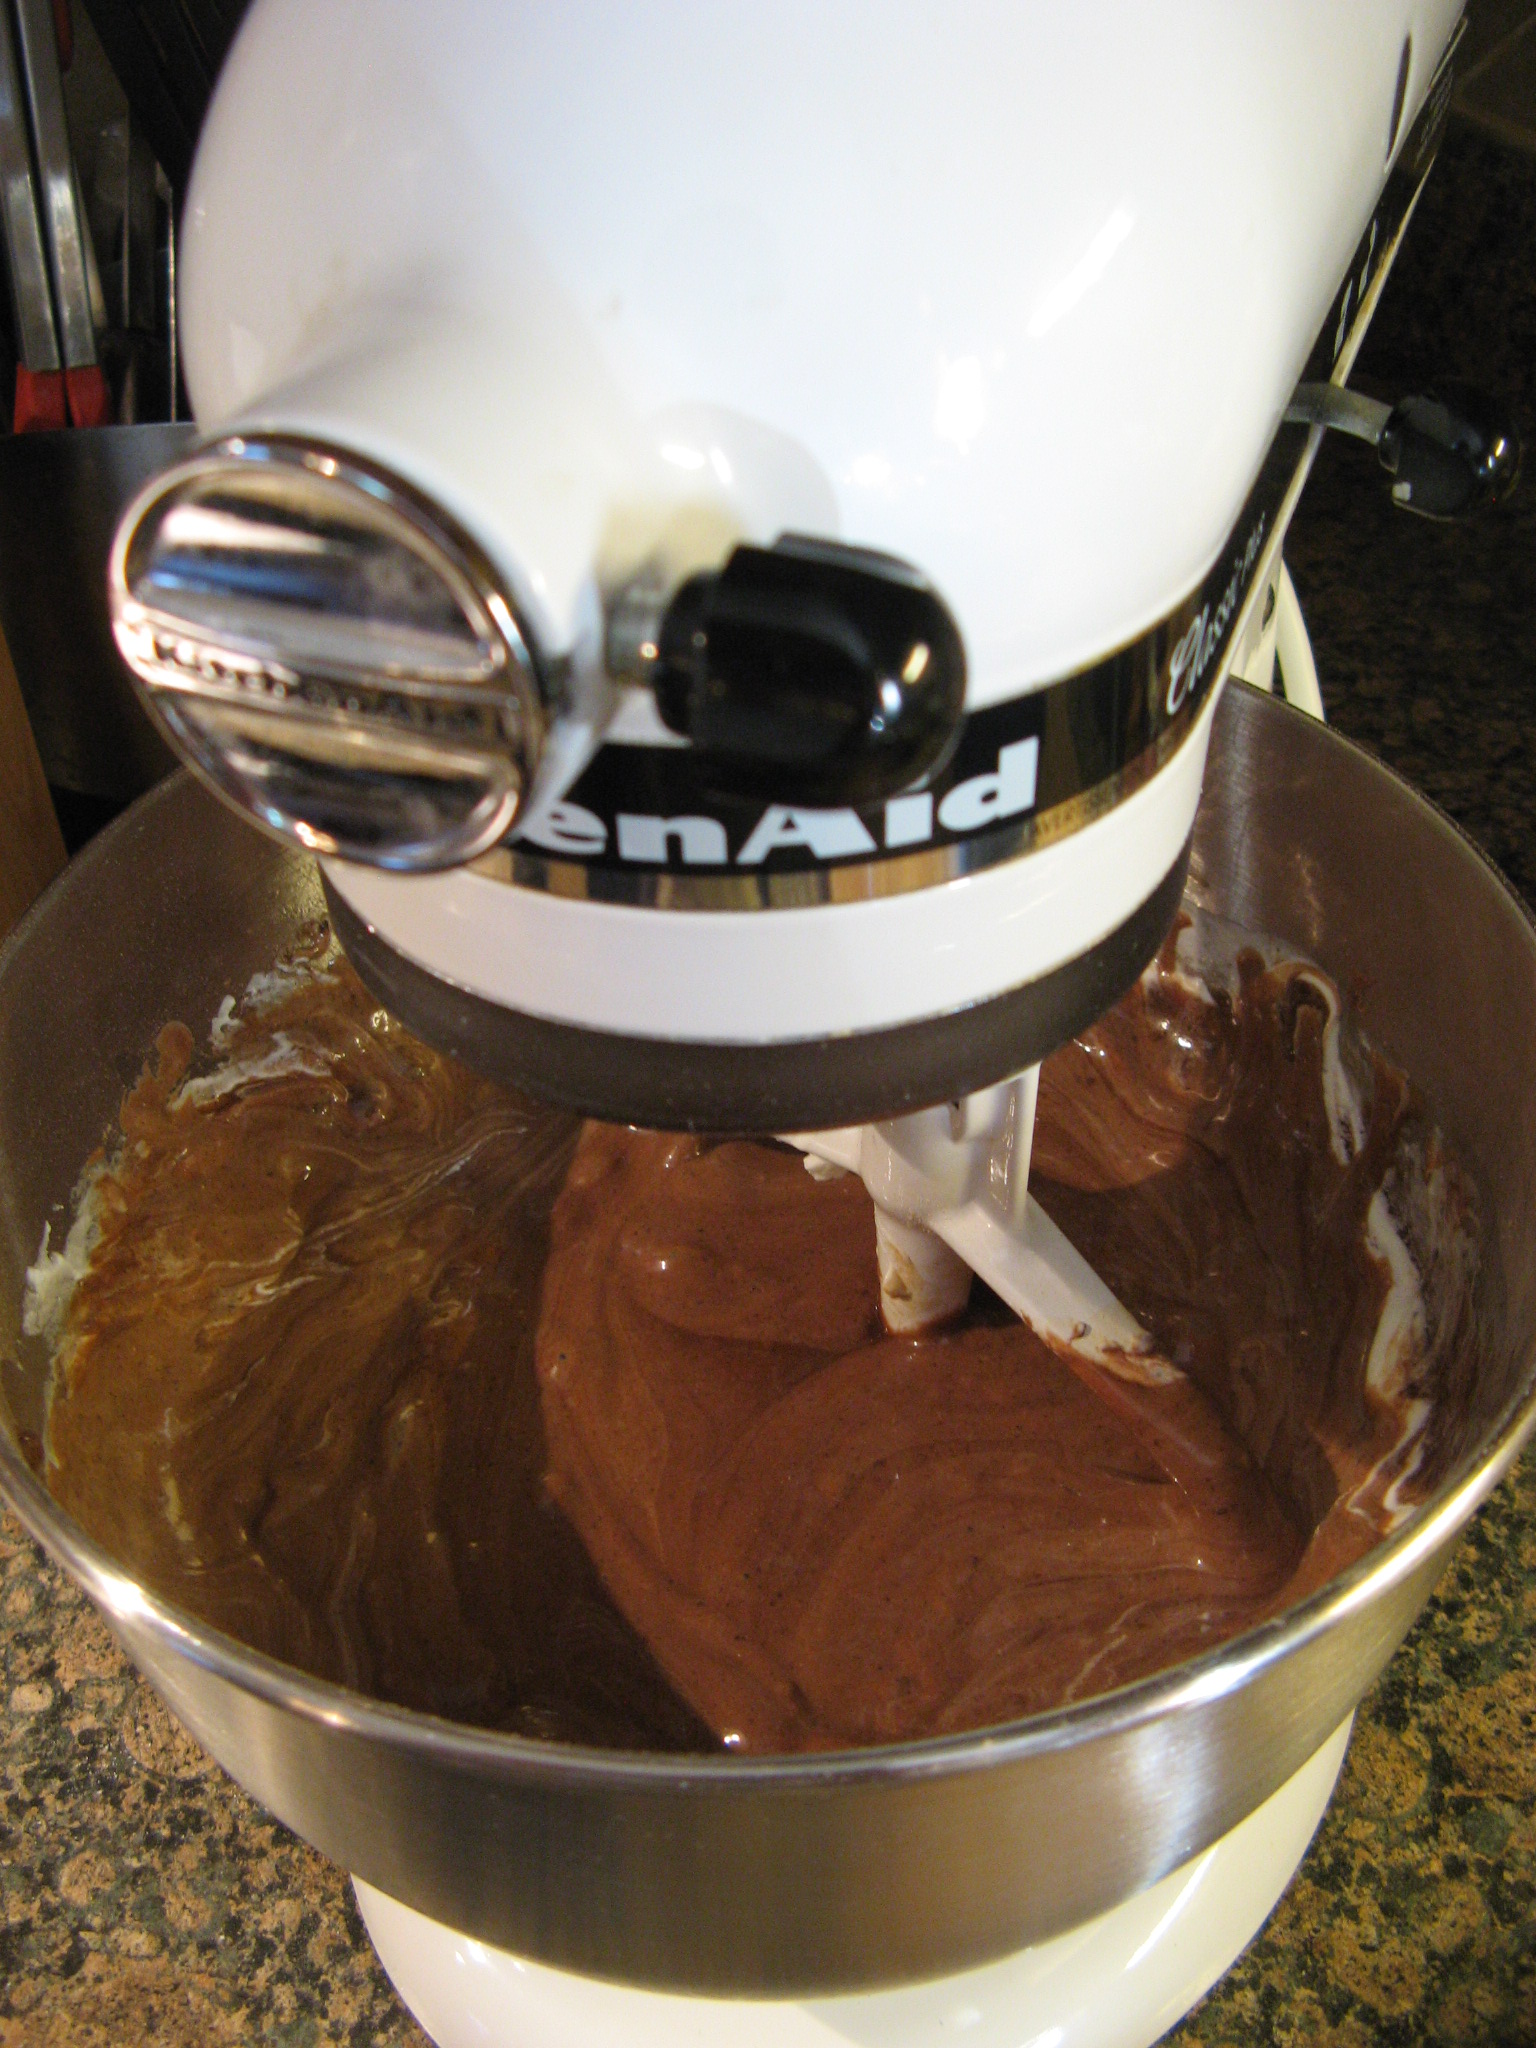
Divide the batter in half and add in the cocoa powder to one half. Mixing well to incorporate it evenly among the batter.

Using a 2 ice cream scoops (or 2 1/4 cup measuring cups, or 1 of each) alternate scoops of the vanilla and chocolate batter into the prepared loaf pan. Tap the pan on the counter a few times to release any air bubbles and using a small off-set spatula or butter knife smooth the top of the cake.

Place the loaf pan on a baking sheet and baked in the preheated oven until a cake tester inserted in the middle comes out clean, about 70 minutes.

Let the cake cook in the pan for 10 minutes and then remove from pan and let cool completely before slicing.

Recipe from Zoe Francois

Sprouting Carrot Cupcakes – Tutorial

With Easter right around the corner I decided to make some fun themed cupcakes to get in the spirit of the holiday. Today I am sharing with you these Sprouting Carrot Cupcakes and later this week I will be sharing with you Bunny Ear Coconut Cupcakes.

I began by baking a batch of chocolate cupcakes. While they cooled, I made the frosting. I made a basic buttercream frosting and then removed a third of it. In this third I stirred in melted unsweetened chocolate until it was fully incorporated. I tinted the remaining frosting orange and then transferred it to a piping bag fitted with a large round tip.

After the cupcakes were cool I used a paring knife to cut a small cone-shaped piece out of the center of each one. I crumbled these small pieces of cake into a small bowl and set it aside.

Next, I spread the chocolate frosting over the cupcakes leaving the holes open. I then patted the crumbled pieces of chocolate cake onto the frosting to resemble dirt.

To make the carrots I piped the orange tinted frosting into the holes and then mounded it a bit above the hole. And finally, I cut small pieces of green sour apple straws and placed them in the piped carrots.

And there you have it… Sprouting Carrot Cupcakes.


While I opted to make my cupcakes and frosting from scratch, you could easily go the time-saving route and use a box chocolate cake mix and store bought chocolate and vanilla frosting. If you opt for store bought frosting I would advise refrigerating the vanilla frosting after tinting it orange for about 10-15 minutes prior to piping the carrots. Store bought frosting tends to be on the softer side so decorating with it can be frustrating since it won’t take shape, refrigerating it helps to stiffen it.


Supplies:

12 chocolate cupcakes

1 cup chocolate frosting

1 1/2 cups vanilla frosting

Orange food coloring

Green sour apple straws

Piping Bag fitted with a round tip


Vanilla Squared Cupcakes

I recently got a request for a basic yellow cupcake with vanilla frosting. No sprinkles, no additional flavors or anything, just plain vanilla. I can understand… One of my favorite desserts is a yellow cupcake with chocolate frosting. It’s such a simple and satisfying combination and sometimes that simplicity is a better dessert than something intricate and complicated in flavor. It’s a comfort and familiarity. For the cupcake, I tried out a vanilla cupcake recipe I got from an issue of Food Network Magazine quite some time ago and for the frosting, I whipped up half a batch of my favorite vanilla frosting from Martha Stewart. Final result, the perfect Vanilla Square Cupcake.


Vanilla Cupcakes

  • Servings: 12 cupcakes
  • Print

Ingredients:

1 1/3 cups flour

1 teaspoon baking powder

1/2 teaspoon salt

1 stick unsalted butter, at room temperature

1 cup sugar

2 eggs

2 teaspoons vanilla extract

1/2 cup milk*

*I used whole milk


Directions:

Preheat oven to 350 F and line a 12-cup muffin pan with paper liners.

Whisk together the flour, baking powder and salt in a medium bowl.

In a large bowl, beat the butter on medium-high speed until smooth, about 1 minute. Add the sugar and continue beating until creamy. Beat in the eggs 1 at a time and then beat in the vanilla extract.

Beat the flour mixture into the butter mixture in three batches, alternating with the milk. Beat until just combine and then divide the batter among the muffin pan.

Bake for 20 to 25 minutes, until a cake tester comes out clean. Transfer the pan to a cool rack and allow to cool for 5 minutes. Remove the cupcakes and transfer them to the rack and allow to cool completely.

Recipe from Food Network Magazine


Fluffy Vanilla Frosting

Ingredients:

1 1/2 sticks unsalted butter, at room temperature

2 cups confectioners’ sugar

1/4 teaspoon vanilla extract


Directions:

In a large bowl, beat the butter with an electric mixer on medium-high speed until pale and creamy, about 2 minutes.

Reduce the speed of the mixer to medium and add the sugar 1/2 cup at a time, beating well after each addition. After adding the first cup and then second cup increase the speed of the mixer to high and beat for 10 seconds to aerate the frosting.

Add the vanilla extract and beat the frosting until its smooth.

Recipe from Martha Stewart

Malted S’mores Ice Cream

Happy National S’mores Day! In honor of the day I am sharing with you a Malted S’mores Ice Cream recipe that I came across in a recent issue of Everyday with Rachael Ray magazine. And best of all… you don’t need an ice cream maker to make it.

To begin, I softened a pint of vanilla ice cream by letting it sit uncovered on my kitchen counter for a few minutes. Meanwhile, I roasted (in actuality lightly toasted, but we gotta go with roasted since this is a s’mores ice  cream) 1/2 cup of mini marshmallows in a 425 F preheated oven by spreading them on parchment lined baking sheet and popping them in for a minute or two. Don’t worry if they stick together while roasting, once they cool just pull them apart.

Once the ice cream is softened, mix it along with a 1/4 cup of malted milk power. Once the two were well blended I folded in the cooled marshmallows and 3 crumbled graham crackers. I used cinnamon graham crackers, but, I am sure that honey graham crackers would be just as good. Once all of the ingredients are incorporated transfer the ice cream to a metal loaf pan (or any other freezer safe container) and freeze until firm, at least an hour.

And you may be wondering, “How is this s’mores ice cream without chocolate?” No need to worry, the chocolate comes in the form of chocolate syrup as a topping. Add as little or as much as you like!

IMG_0216

And there you have it… A quick, easy and delicious way to enjoy your own version of a s’more on this National S’mores Day or any other day!


Malted S'mores Ice Cream

Ingredients:

1 pint vanilla ice cream, softened

1/4 cup malted milk powder

1/2 cup mini marshmallows

3 graham crackers, crumbled

Chocolate syrup, for topping

Directions:

Pre-heat oven to 425 F. On a parchment lined baking sheet spread marshmallows and bake until golden, 1 to 2 minutes.  Let cool.

In a large bowl mix softened ice cream with the malted milk powder.

Using a rubber spatula gently fold in the graham cracker crumbles and marshmallows.

Transfer to a freezer-safe containers and freeze until firm, at least an hour.

Serve topped with chocolate syrup.


Recipe from Rachael Ray Magazine

Blueberry Vanilla Ice Cream

With berries in season there’s so many delicious treats you can make with them… Pies, Cakes, Muffins and probably something that doesn’t come as quickly to mind… ice cream! Ever since I got my ice cream maker a few years ago I am always trying to come up different flavors to make – Pumpkin, Lavender Vanilla, Mint Chocolate Chip – some common and some not so common. I’ve even made Hibiscus Sorbet. So, with a fridge full of blueberries I decided to make a vanilla ice cream base and then swirl in a blueberry compote, hence Blueberry Vanilla Ice Cream.

To make the vanilla ice cream base I combined milk, sugar and salt in a medium bowl and blended it with a hand mixer on low speed until the sugar was dissolved. I then stirred in heavy cream and vanilla bean paste (you could use vanilla extract.) I covered the bowl and refrigerated it for about 5 hours (you could do as little as 1 to 2 hours, you just want to make sure that the mixture is cold.)

Meanwhile, to make the blueberry compote, I combined blueberries, sugar and lemon juice in a small saucepan over medium-low heat and let the mixture simmer until some of the blueberries burst and the mixture began to thicken. I removed it from the heat to let it cool and then covered it and refrigerated it as well.

Once the ice cream and compote were properly chilled it was time to combine them to make the Blueberry Vanilla Ice Cream. Per the instructions of my ice cream maker, I turned it on and poured in the vanilla ice cream base and let it churn for about 15-20 minutes until it had a soft creamy mixture. With the machine still running, I then poured in the compote and let the machine run for about another 30 seconds until the compote had swirled through the ice cream and was lightly incorporated. I then transferred the ice cream to a freezer-safe container and placed it in the freezer so the ice cream could firm up – about an hour.

IMG_0219

And then it was time to enjoy… And one simple sentence sums up the flavor…. There’s nothing like homemade!

But, if you don’t have an ice cream maker here are two quick ideas on how to make your own Blueberry Vanilla Ice Cream. Use the compote as a topping on your favorite vanilla ice cream. Or take it one step further and soften a pint of your favorite vanilla ice cream and then add it to a large bowl and using a rubber spatula fold the compote into the ice cream. Place the ice cream in a freezer-proof container and place it back in the freezer so it can firm up, about 1-2 hours.


Blueberry Vanilla Ice Cream

Ingredients:

For the vanilla ice cream

1 cup whole milk

3/4 cup granulated sugar

Pinch of salt

2 cups heavy cream

1 tablespoon pure vanilla extract*

*can substitute vanilla bean paste


For the blueberry compote

1/2 cup fresh blueberries

2 tablespoons sugar

1 teaspoon lemon juice


Directions:

For the vanilla ice cream; In a medium bowl, use a hand mixer on low speed (or by hand use a whisk) to combine the milk, granulated sugar and salt until the sugar dissolves. Stir in the heavy cream and vanilla extract. Cover the bowl and refrigerate for 1 to 2 hours, or overnight.

For the blueberry compote; In a small saucepan combine the blueberries, sugar and lemon juice and simmer over medium-low heat until the blueberries begin to burst and the sauce thickens. Let cool, cover and refrigerate.

Follow the directions for your ice cream maker to churn the vanilla ice cream. Once the ice cream thickens slowly pour in the compote and continue to churn for about 30 seconds to lightly incorporate the compote into the vanilla ice cream.

Transfer the ice cream to a freezer-proof container and freeze for about 1 to 2 hours to firm.

Vanilla ice cream recipe from Cuisinart


Lavender Vanilla Ice Cream

It’s officially the first day of summer (YAY!) After the epic snow fall from the past winter the warmer days ahead are definitely being welcomed with open arms – although, I could do without the humidity that those days also bring. By far my favorite seasons are spring and fall. But, I digress. I think one treat that most of us can agree on that is a summer staple is ice cream – I particularly can eat it in the dead of winter with no problem though. Hence, me wasting no time in churning out a few batches of ice cream back in January soon after getting my Cuisinart Ice Cream Maker.

A week or so ago while I was doing something on my computer, maybe working on a blog post, I came up with the idea of Lavender Vanilla Ice Cream. I have plenty of dried lavender left over after making Lavender Cupcakes back in April, which is sitting in a container on my counter right in my field of vision while I am cooking so it’s no wonder that it has been on my mind. You always see lavender and vanilla combined in all sorts of home items so I figured that melding the two flavors together in ice cream should be a winner – and fortunately I was right!

To create the ice cream I followed a recipe for Simple Vanilla Ice Cream with one simple modification. I soaked three tablespoons of dried lavender in the one cup of milk the recipe called for for about six hours – this is exactly what I did to get the lavender flavor for the cupcakes. Following that I strained the milk using a fine mesh sieve and then continued with the recipe. Combining the milk with sugar, salt, heavy cream and vanilla paste (I substituted this for vanilla extract to get that authentic vanilla bean flavor along with the black specks of ground vanilla beans.) I refrigerated the mixture overnight and I poured the mixture into the ice cream maker and let it do all the work. And about 20 minutes later it was done!

IMG_4015

I wanted the ice cream to have a firmer consistency so I transferred it to this nifty ice cream container that I recently picked up at my local Home Goods and placed it in the freezer for about another hour or so. Of course I did a quick taste test before freezing it and was very happy with the results.

IMG_4017

After sitting in the freezer for a bit I was finally able to enjoy a nice bowl of my Lavender Vanilla Ice Cream!

IMG_4023

Below is the original recipe for Simple Vanilla Ice Cream and the modifications I made to create Lavender Vanilla Ice Cream.


Simple Vanilla Ice Cream

Makes about 1 quart

Ingredients:

1 cup whole milk

3/4 cup granulated sugar

A pinch of salt

2 cups heavy cream

1 tbsp. pure vanilla extract

Directions:

1. In a medium bowl, use a hand mixer on low speed or whisk to combine the milk, sugar and salt until the sugar is dissolved. Stir in the heavy cream and vanilla. Cover and refrigerate 1 to 2 hours, or overnight.

2. Turn on the Cuisinart ice cream maker; pour the mixture into the frozen freezer bowl and let mix until thickened, about 15 to 20 minutes. The ice cream will have a soft creamy texture. If a firmer consistency is desired, transfer the ice cream to an airtight container and place in freezer for about 2 hours. Remove from freezer for about 15 minutes before serving.

For Lavender Vanilla Ice Cream:

Soak 3 tablespoons of dried lavender in the milk for 6 to 8 hours in the refrigerator. Following that strain the milk through a fine mesh sieve and continue with the recipe substituting vanilla bean paste for the vanilla extract.


Chocolate Malted Cupcakes with Fluffy Vanilla Frosting

I have baked numerous types of cookies in my baking adventures that I have loved, but, by far one of my favorites is a Malted Milk Chocolate Chip Cookie that is the perfect combination of chewiness and chocolate without being overly sweet thanks to the addition of malted milk powder. So, when I was flipping through some cookbooks for baking inspirations and I came across a recipe for a Chocolate Malted Cupcake I knew I had to try it!

To begin I whisked together my dry ingredients (flour, cocoa powder, sugar, light brown sugar, baking soda and salt) in one bowl and malted milk powder and milk in another bowl.

IMG_2867 IMG_2868

Once that was done I combined both of these mixtures along with vegetable oil in the bowl of my stand mixer and mixed it until it was combined.

IMG_2869

To finish the batter I beat in three eggs, sour cream and vanilla.

IMG_2870

I then divided the batter into my prepared muffin tins which I lined with these cupcake liners that I thought were a perfect for these cupcakes. The red and white is reminiscent of old school soda shops where malted beverages were a staple. I actually got these cupcake liners the day after Valentine’s Day at my local Michael’s for less than a $1. You have to love post-Holiday sales!

IMG_2872

After baking for about twenty minutes in a pre-heated 350 F oven my first batch of Chocolate Malted Cupcakes were done!

IMG_2873

The recipe was right on point and I ended up with twenty-eight delicious cupcakes!

After the cupcakes had cooled I whipped up a batch of Fluffy Vanilla Frosting using three simple ingredients: unsalted butter, confectioners’ sugar and vanilla extract. I think this may become my new go-to vanilla frosting!

IMG_2878

As opposed to piping my favorite 1M Swirl on these cupcakes, I frosted them using an offset spatula and then decorating them with chocolate sprinkles.

IMG_2903

Overall they were a hit and just the right amount of sweetness!

Chocolate Malted Cupcakes

From Martha Stewart’s Cupcakes

Makes 28 Cupcakes

2 1/4 cups all-purpose flour

3/4 cup unsweetened Dutch-process cocoa powder

1/4 cup granulated sugar

3/4 cup packed light-brown sugar

1 1/2 tsps. baking soda

1/2 tsp. salt

1 cup milk

1 1/4 cups malted milk powder

1 cup vegetable oil

3 large eggs, room temperature

1 cup sour cream, room temperature

1 tsp. pure vanilla extract

1. Preheat oven to 350F. Line standard muffin tins with paper liners. Whisk together flour, cocoa, both sugars, baking soda, and salt. In another bowl, whisk together milk and malted milk powder until powder is dissolved.

2. With an electric mixer on medium-high speed, beat flour mixture, milk mixture, and oil until combined. Add eggs, one at a time, beating until each is incorporated, scraping down sides of bowl as needed. Add sour cream and vanilla, and beat until just combined.

3. Divide batter evenly among lined cups, filling each halfway. Bake, rotating halfway through, until a cake tester inserted in centers comes out clean, about 20 minutes. Cupcakes can be stored up to 3 days at room temperature, or frozen up to 2 months, in airtight containers.

Fluffy Vanilla Frosting

From Martha Stewart’s Cupcakes

Makes About 4 Cups

1 1/2 cups (3 sticks) unsalted butter, room temperature

1 pound (4 cups) confectioners’ sugar, sifted

1/2 tsp. pure vanilla extract (I used 1 tsp.)

1. With an electric mixer, beat butter on medium-high speed until pale and creamy, about 2 minutes.

2. Reduce speed to medium. Add the confectioners’ sugar, 1/2 cup at a time, beating well after each addition and scraping down sides of bowl as needed; after every two additions, raise speed to high and beat 10 seconds to aerate frosting, then return to medium. This process should take about 5 minutes. Frosting will be very pale and fluffy.

3. Add vanilla, and beat until frosting is smooth. If not using immediately, frosting can be refrigerated up to 10 days in an airtight container. Before using, bring to room temperature, and beat on low speed until smooth again, about 5 minutes.

%d bloggers like this: