Peanut Butter Chai Pie

Happy Pi Day! The day that math lovers celebrate the irrational number Pi (3.14159…) – the ratio of a circle’s circumference to its diameter – and a day others use as an excuse to bake a pie, eat a pie, bake a pizza pie or eat a pizza pie. While I thought about making a pizza this year to honor the day, I decided to go with a pie instead. Mainly because I wanted to try a Peanut Butter Chai Pie recipe I ripped out of an issue of Food & Wine magazine last year. And I must say, it didn’t disappoint.

And yes, you read that correctly… Peanut Butter Chai. While some might scoff at the idea of peanut butter working with the flavors of chai – cinnamon, cardamom, and ginger to name a few – surprisingly they complement each other quite well.  

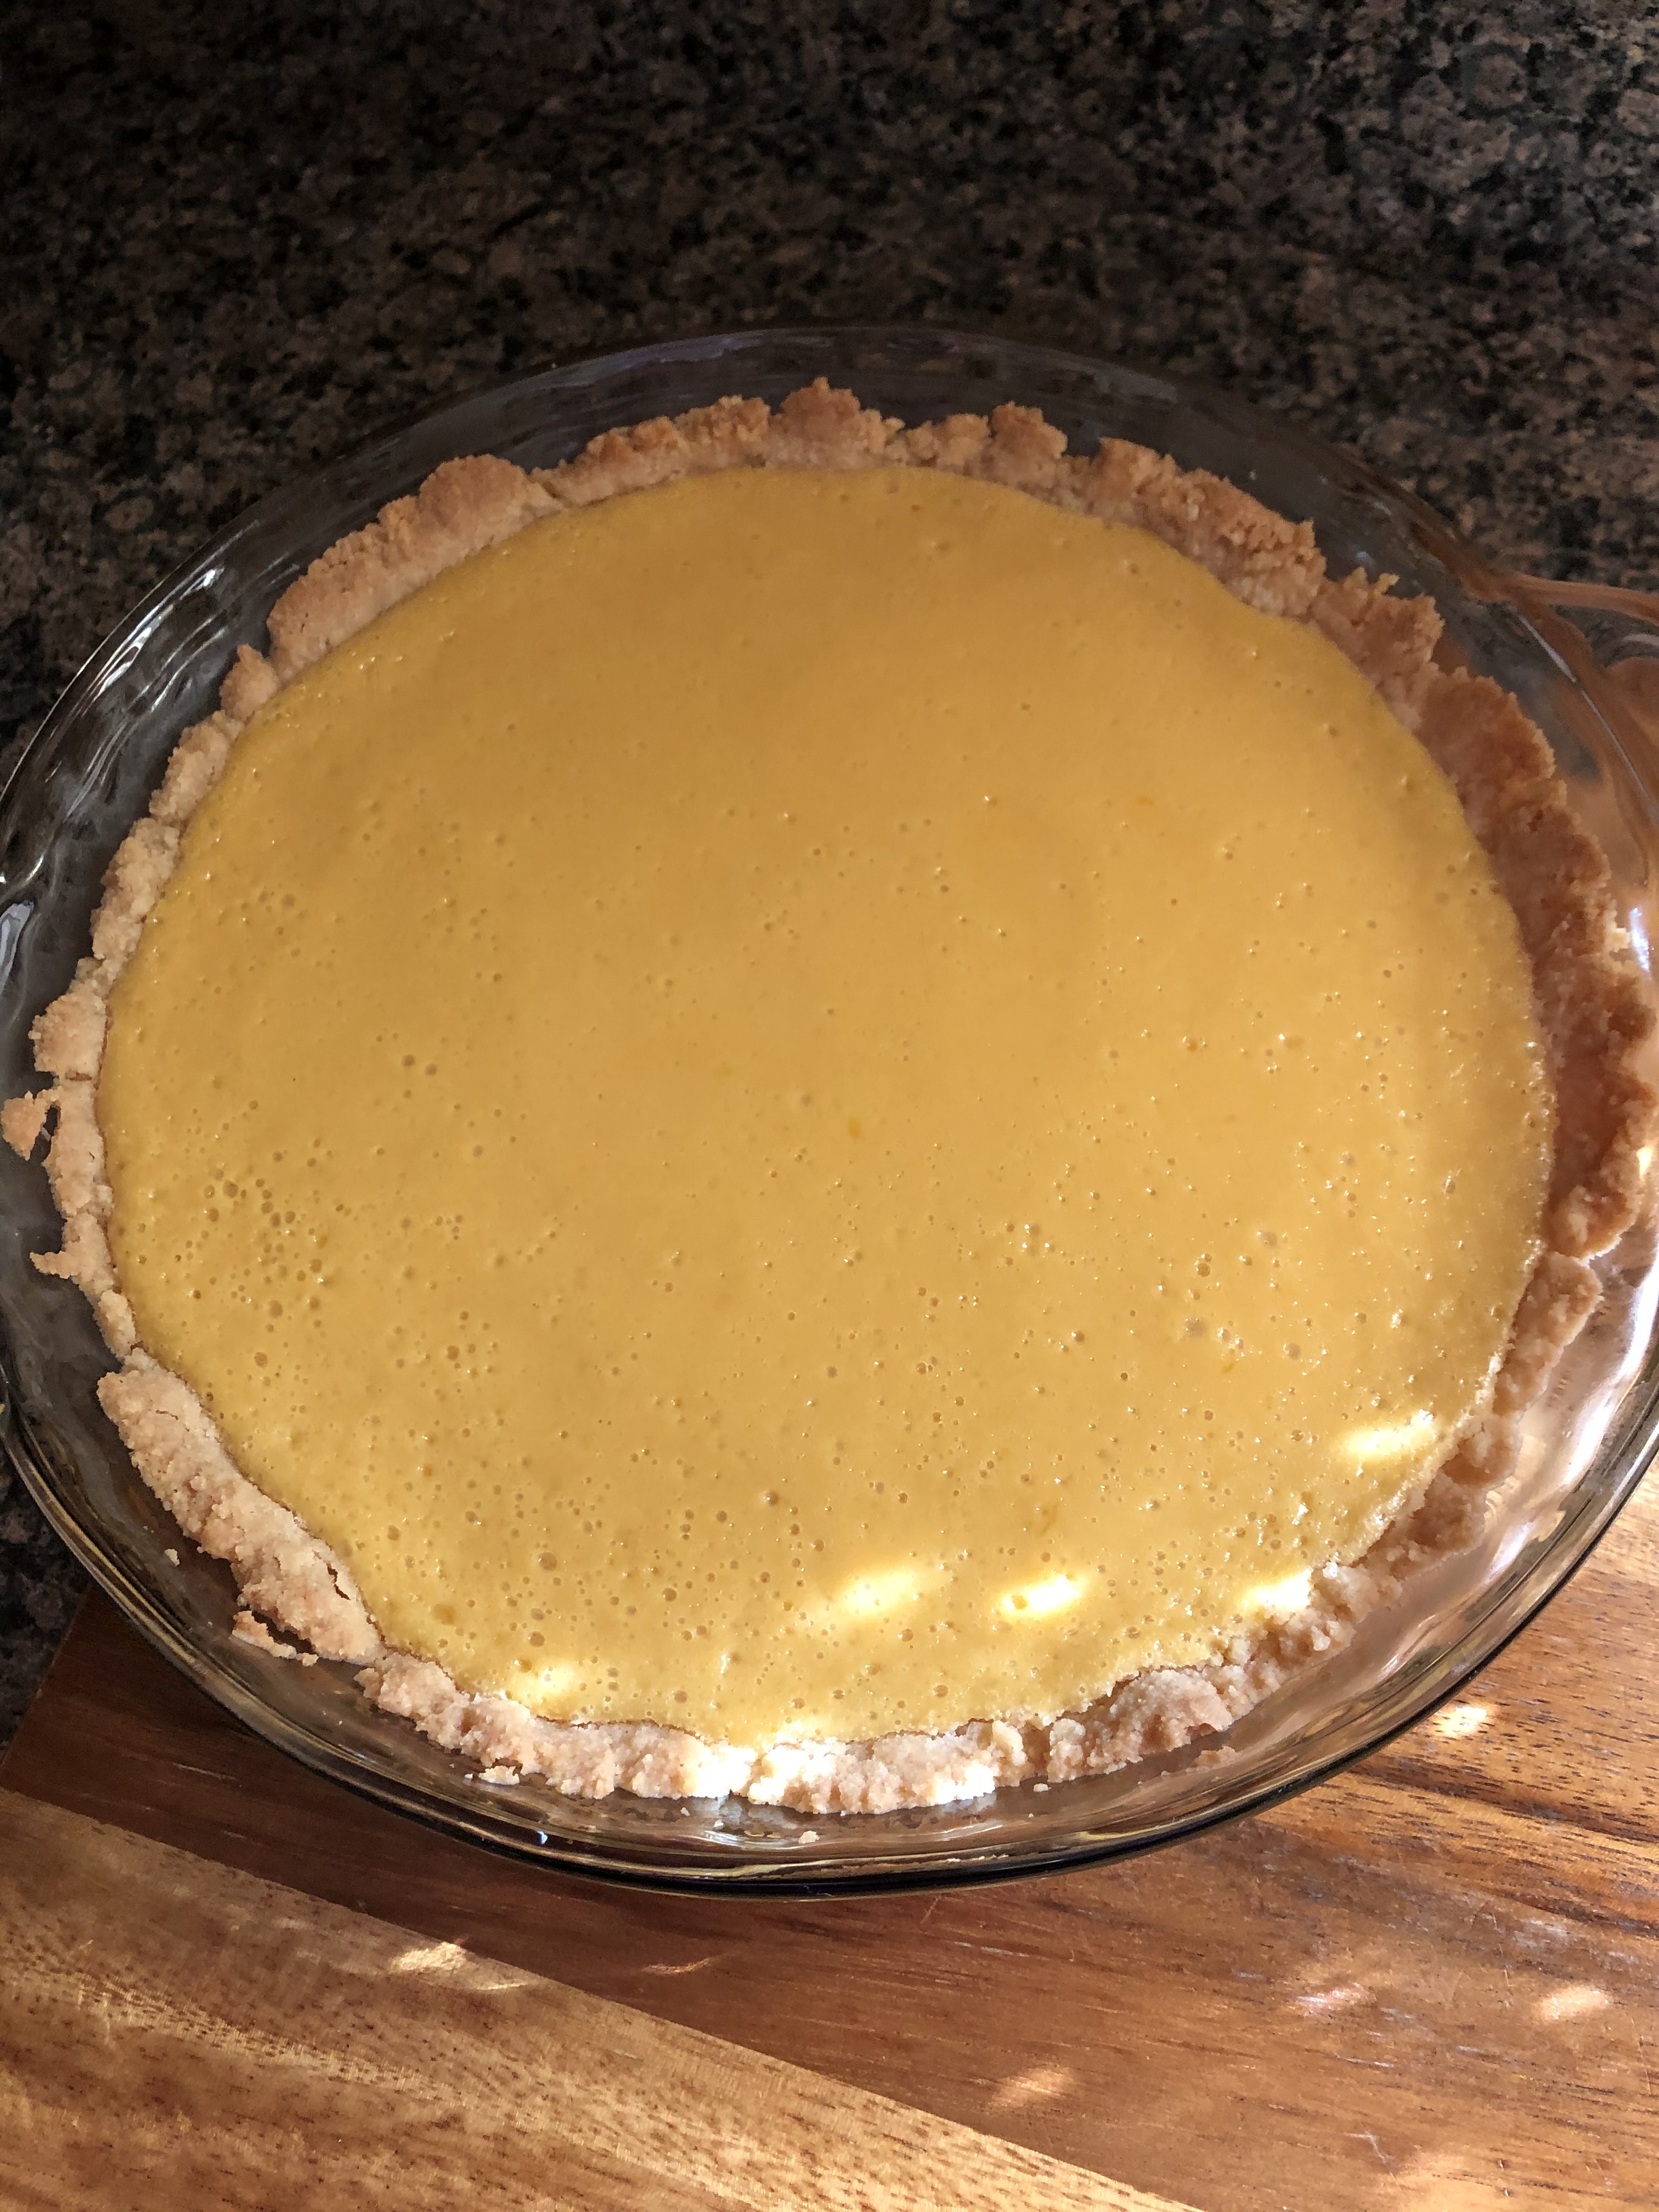
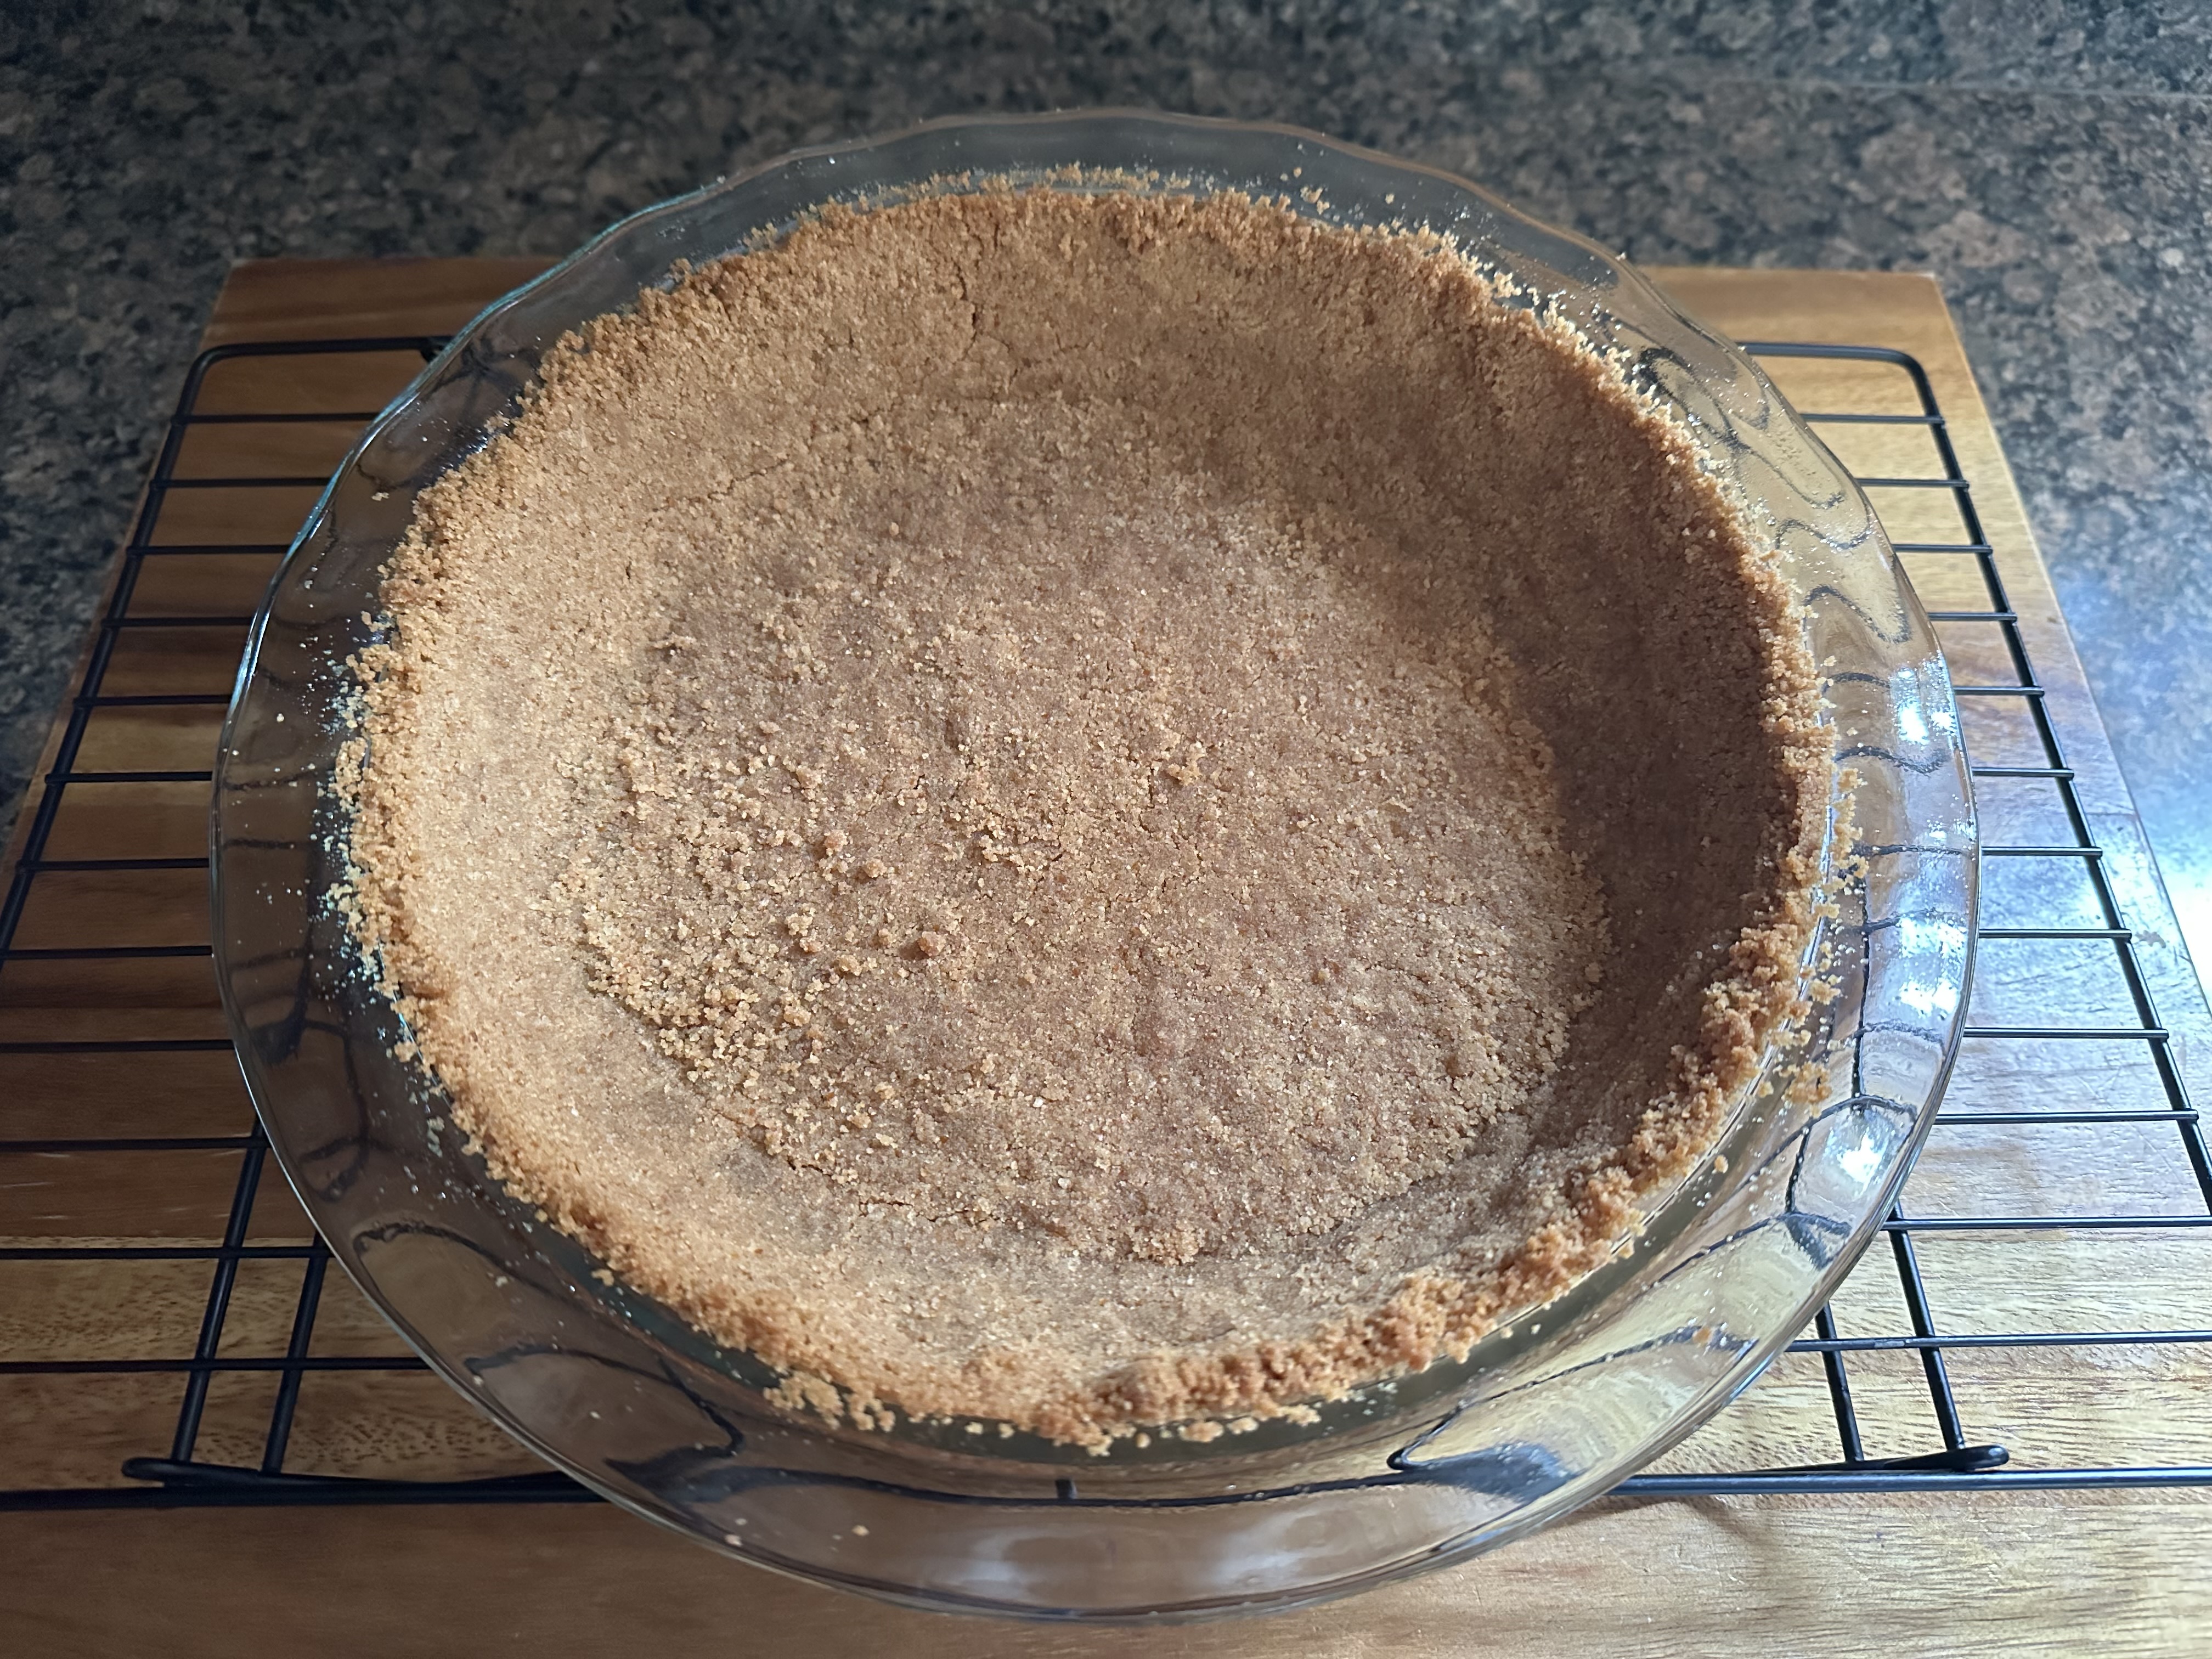
To begin, I made the crust. I opted to make something a little out of the ordinary – a Sweet & Salty Pretzel and Waffle Cone Crust – but, if you want to go with something simple or you just don’t feel like making your crust you could use a store-bought graham cracker crust (I would go with the one that has 2 extra serving just to be sure it’s large enough). To start, I processed miniature pretzels and a few waffle cones along with brown sugar in my food processor until it was finely ground. I then added in a stick of melted butter and processed it a few times until it appeared to be wet sand. Next, I pressed it an even layer along the bottom and up the sides of a 9-inch pie dish I sprayed with cooking spray. After baking and cooling it was ready for the filling.

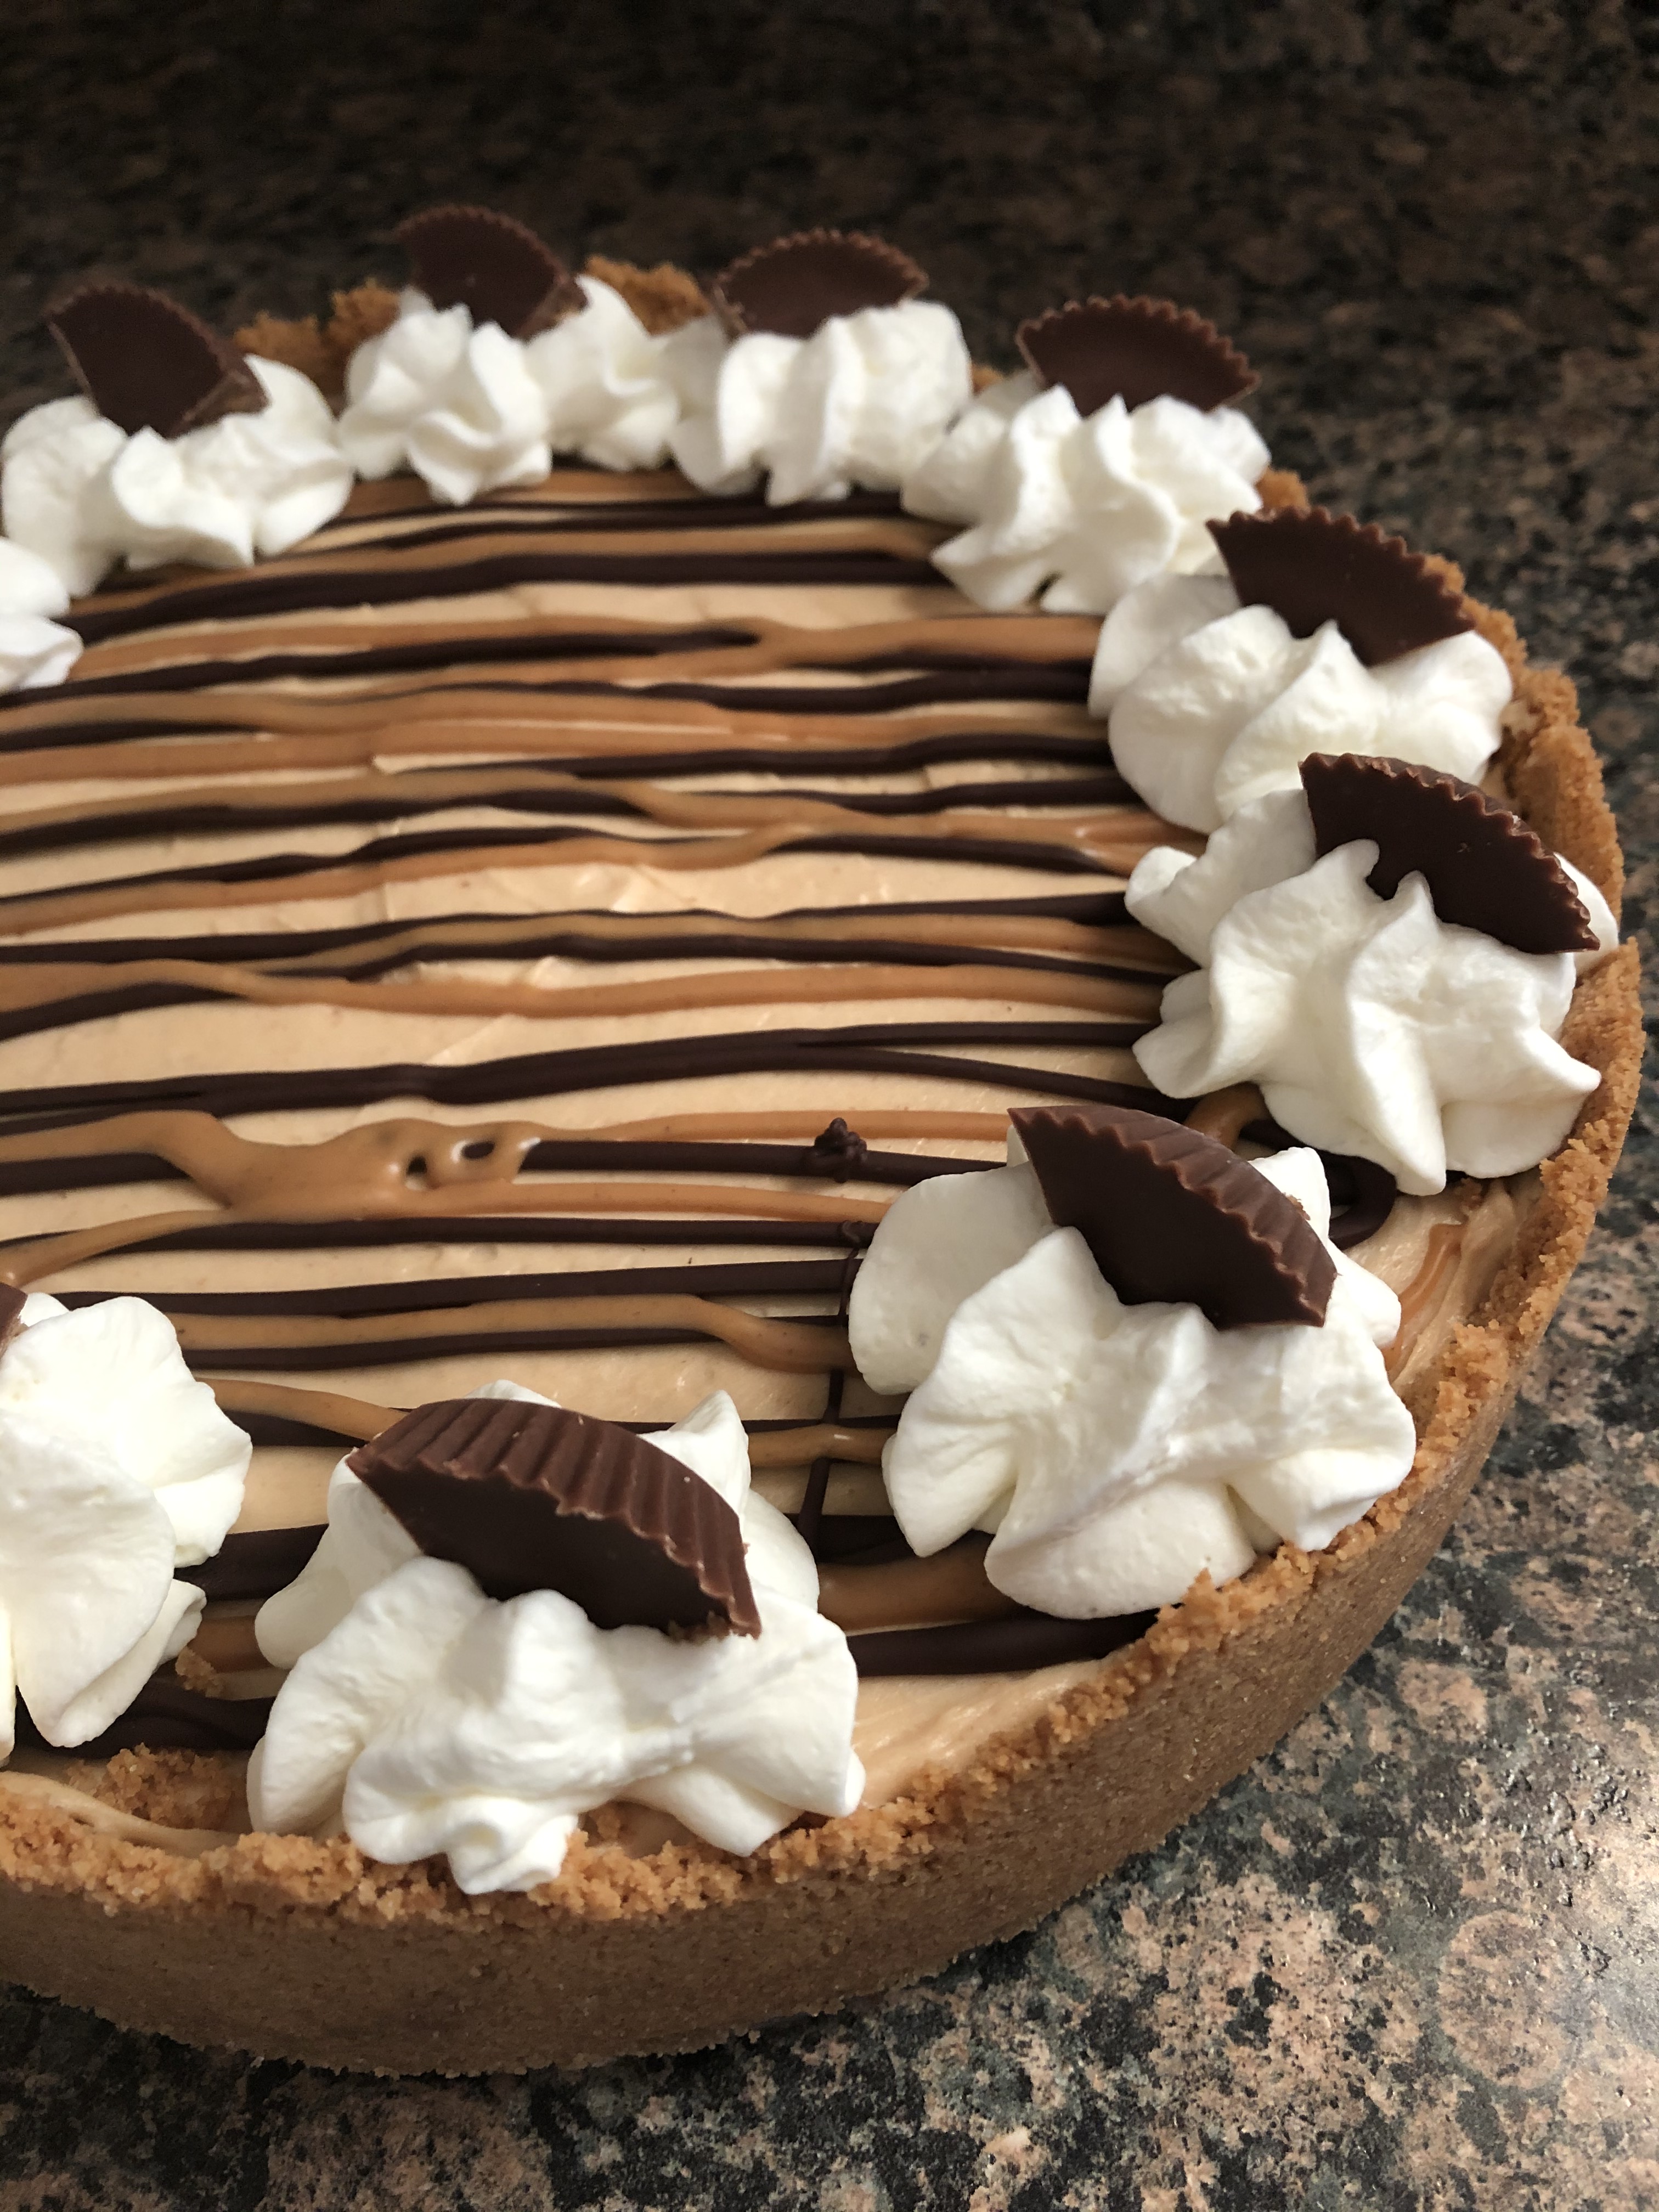
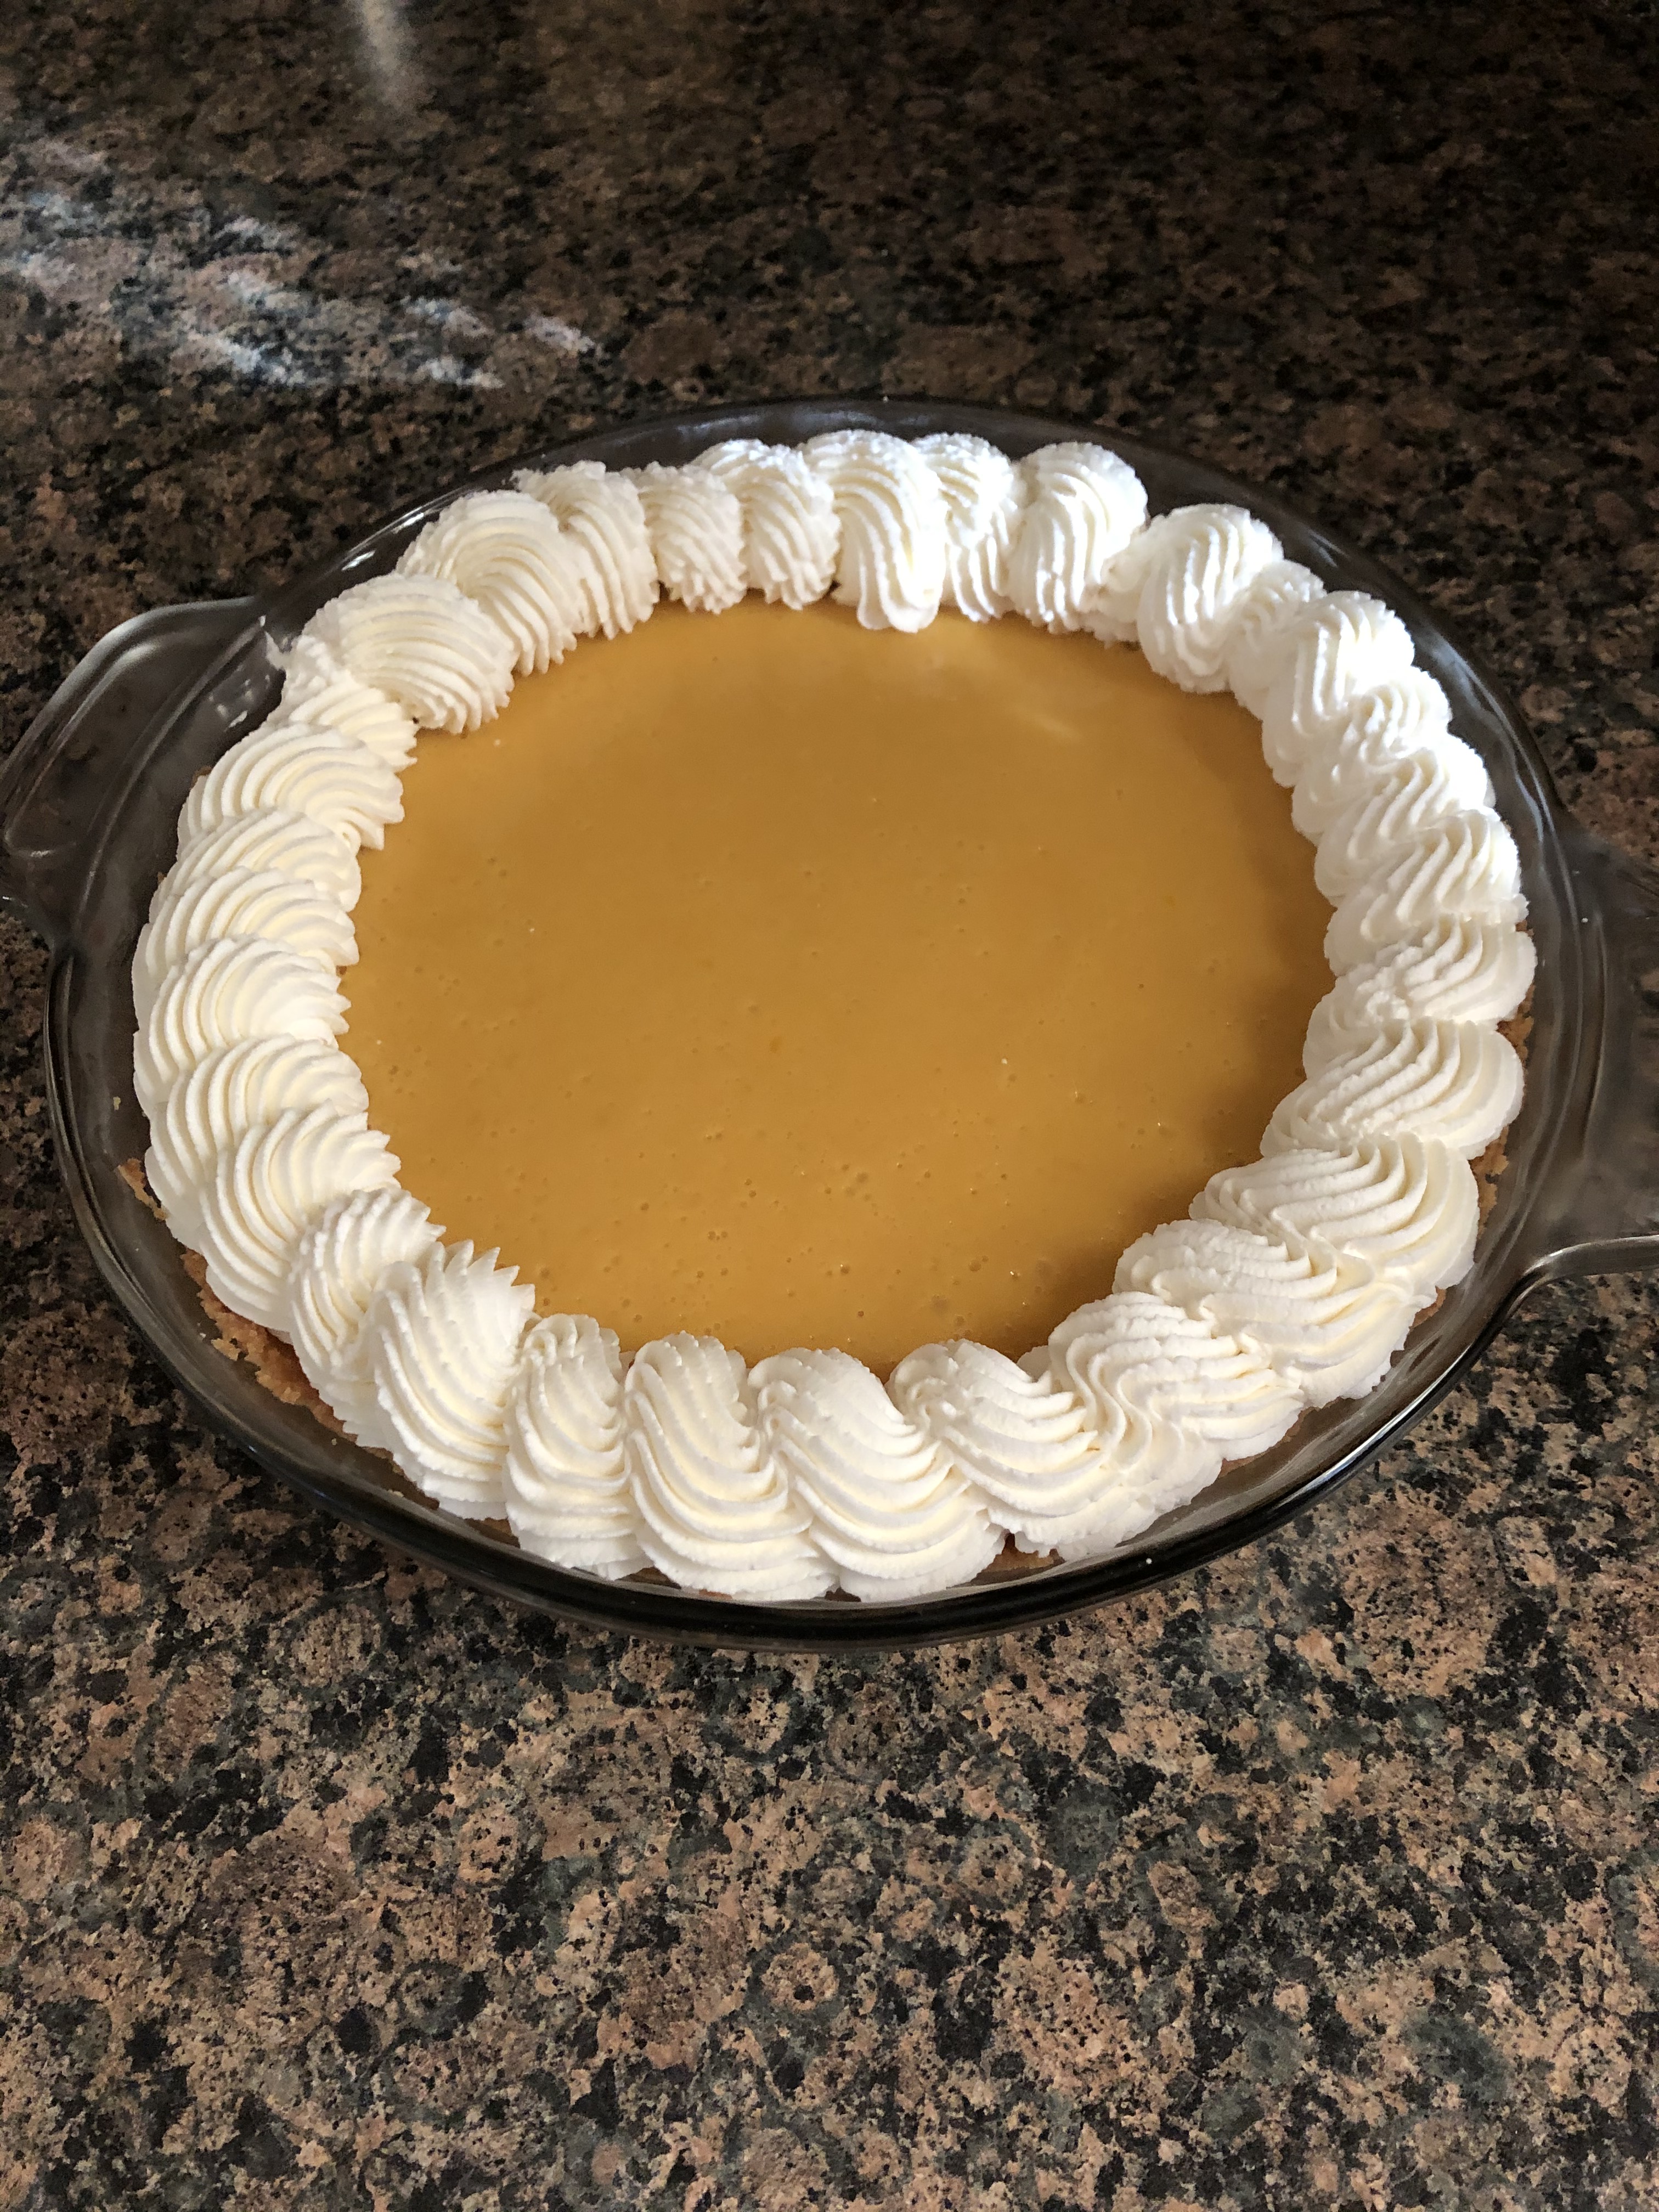
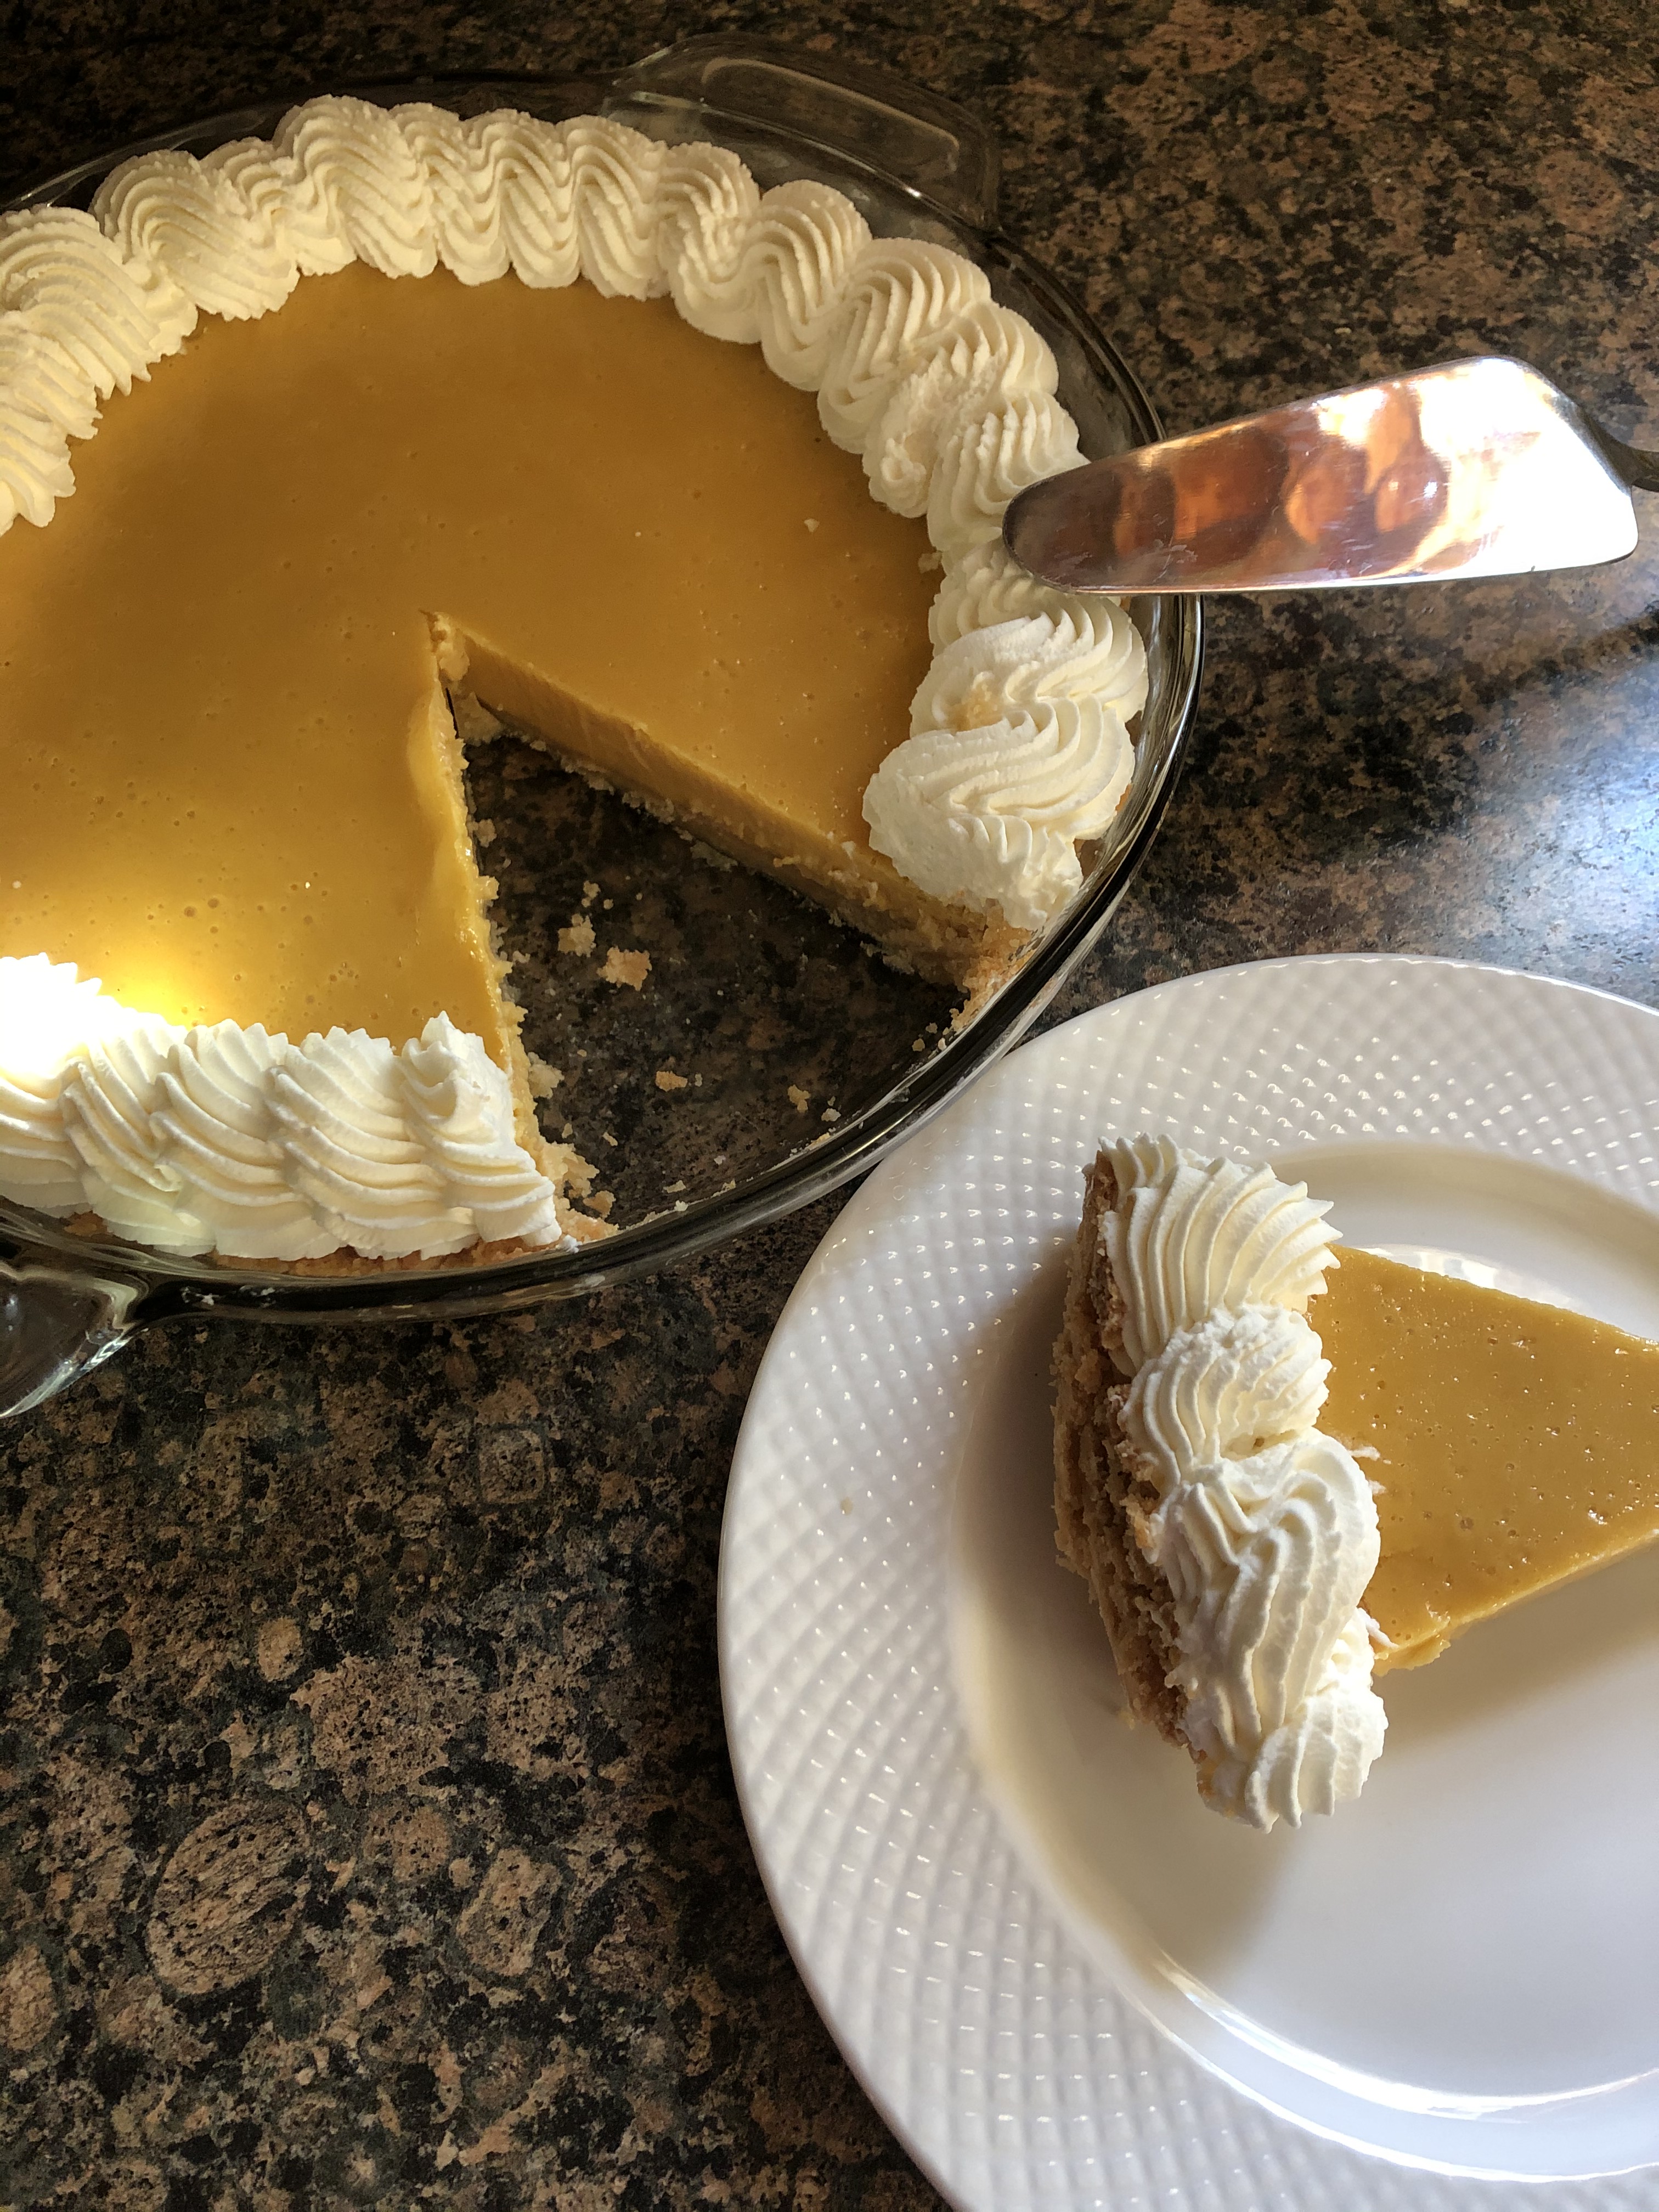
To make the filling, I used my stand mixer to whisk together peanut butter and cream cheese along with a spice mixture, honey, vanilla extract and salt. Once that was well combined, I gradually whisked in heavy cream. I set the peanut butter filling aside and then whipped up a batch of whipped cream sweetened with honey and the remaining spice mixture. I then folded in some of the whipped cream into the peanut butter mixture and then transferred it to the prepared pie crust. Finally, I spread the remaining whipped cream over the filling and then refrigerated the pie overnight.

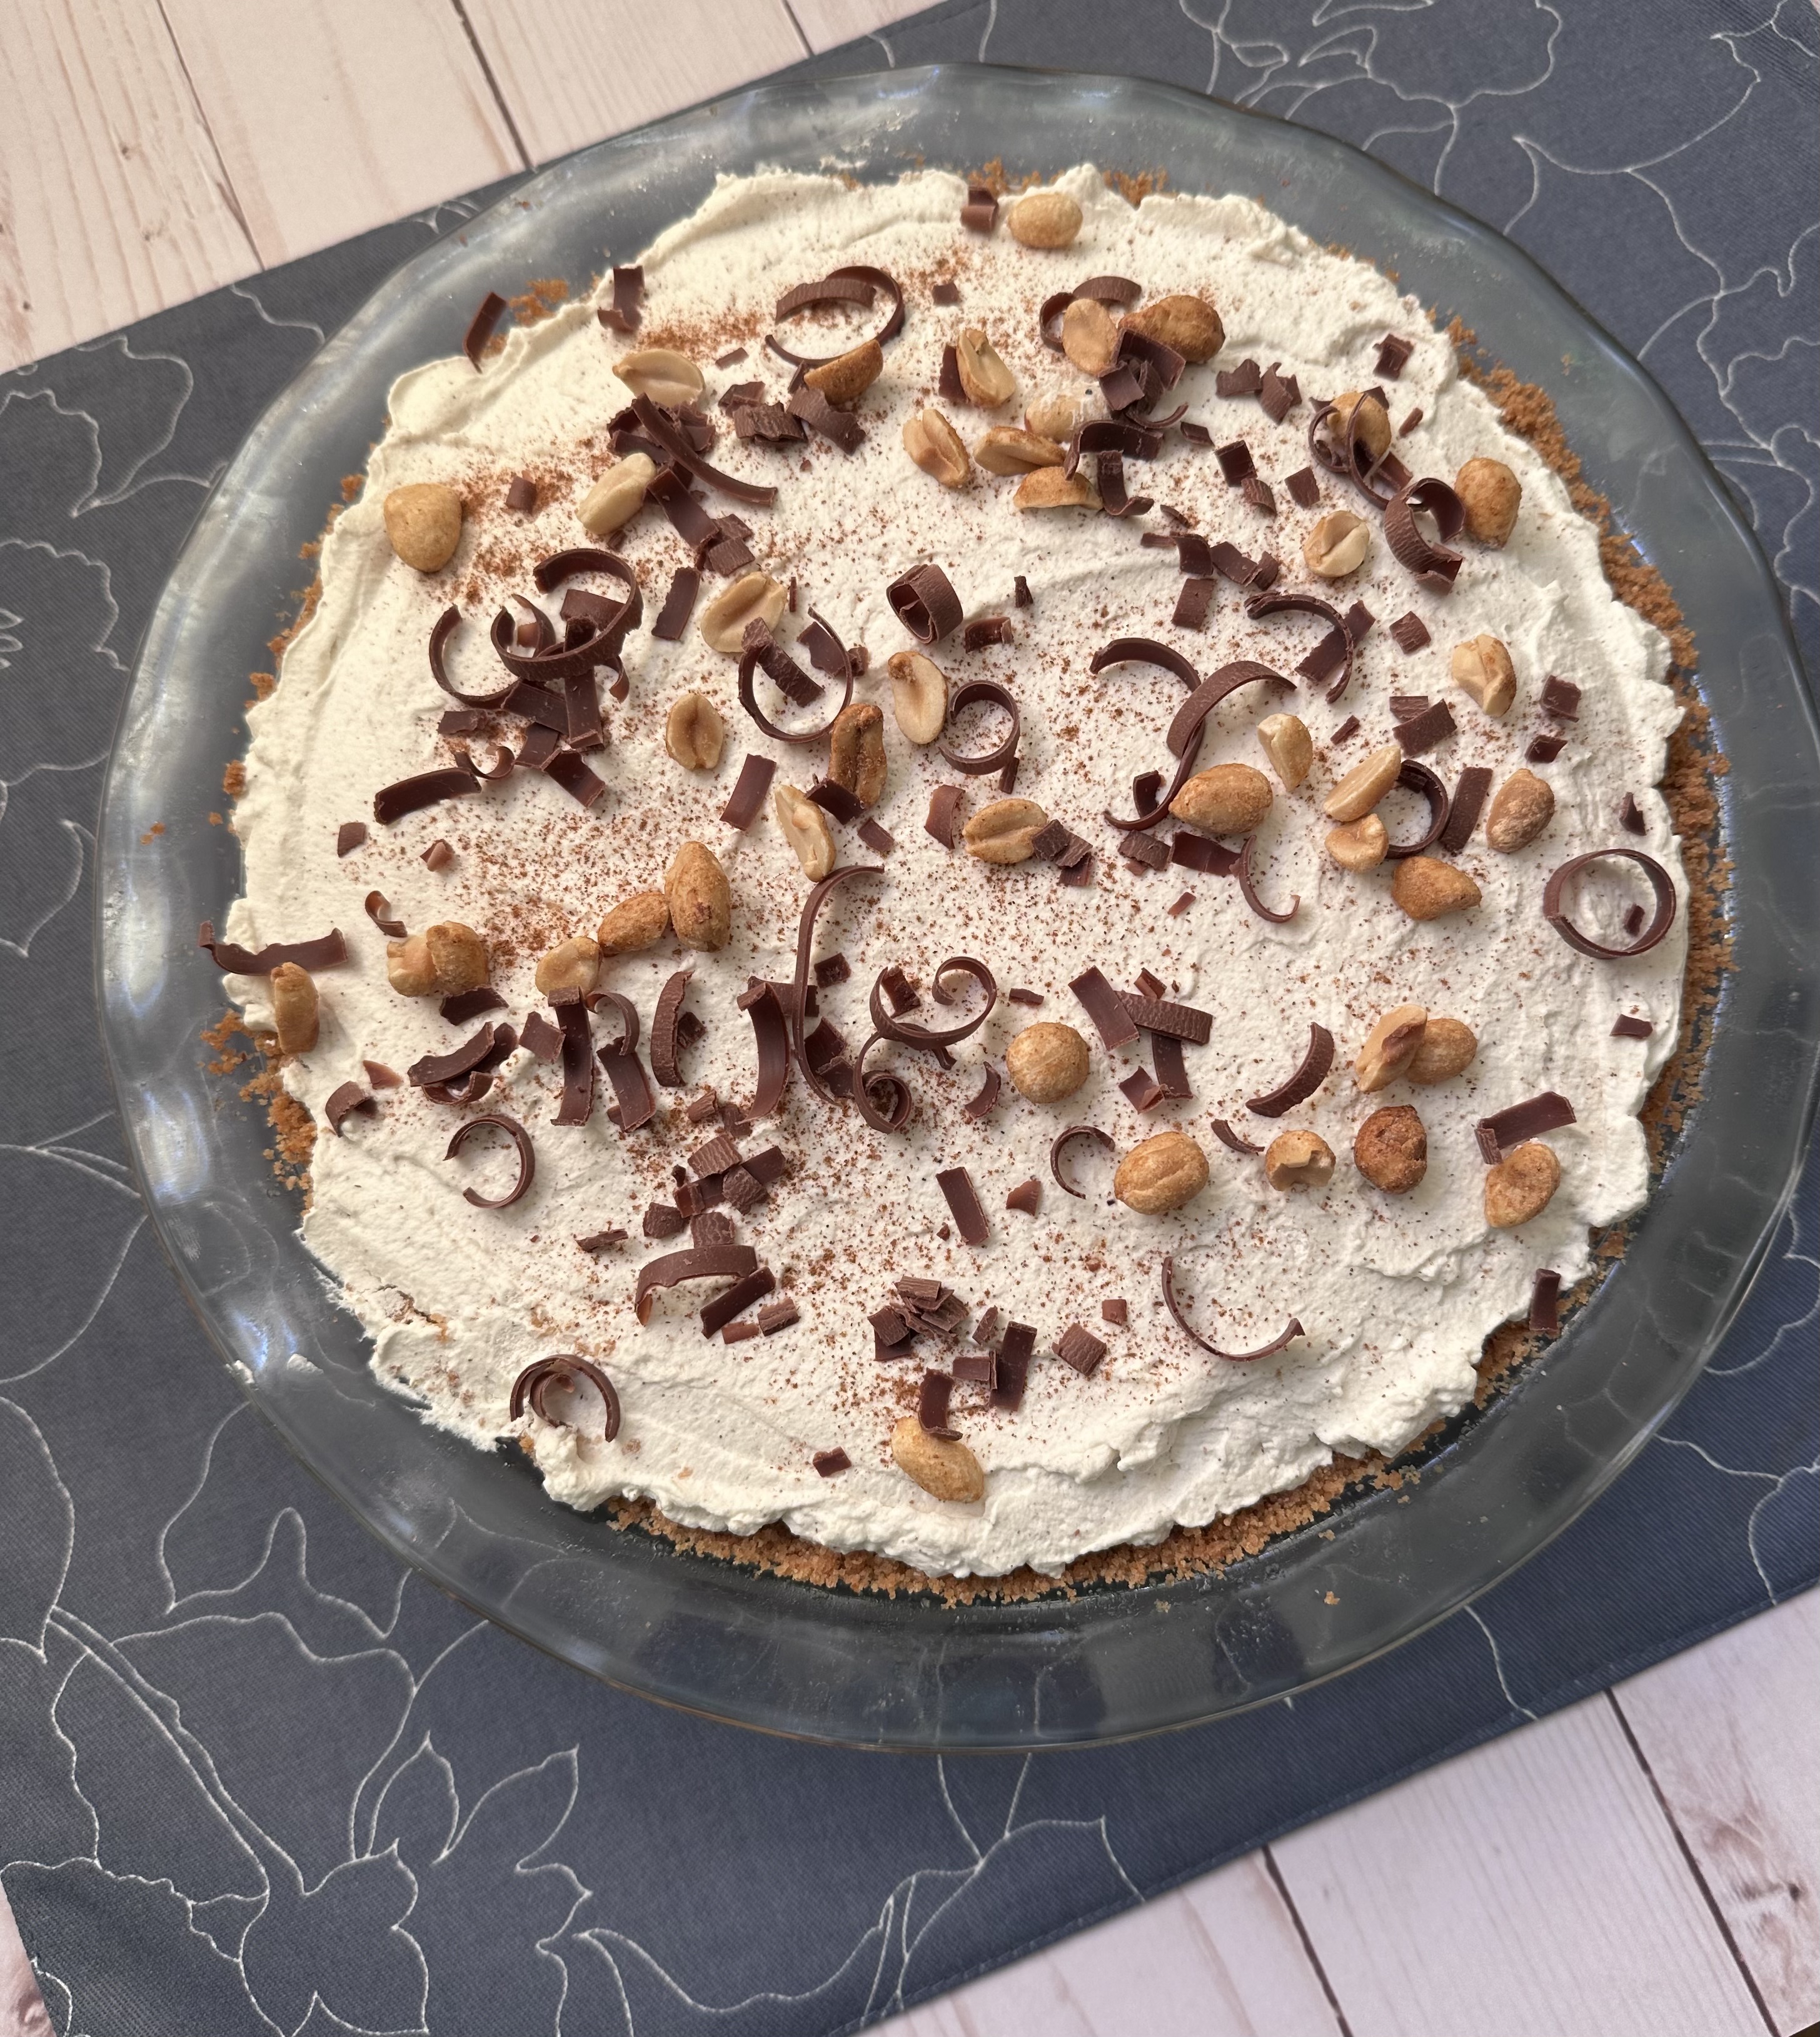
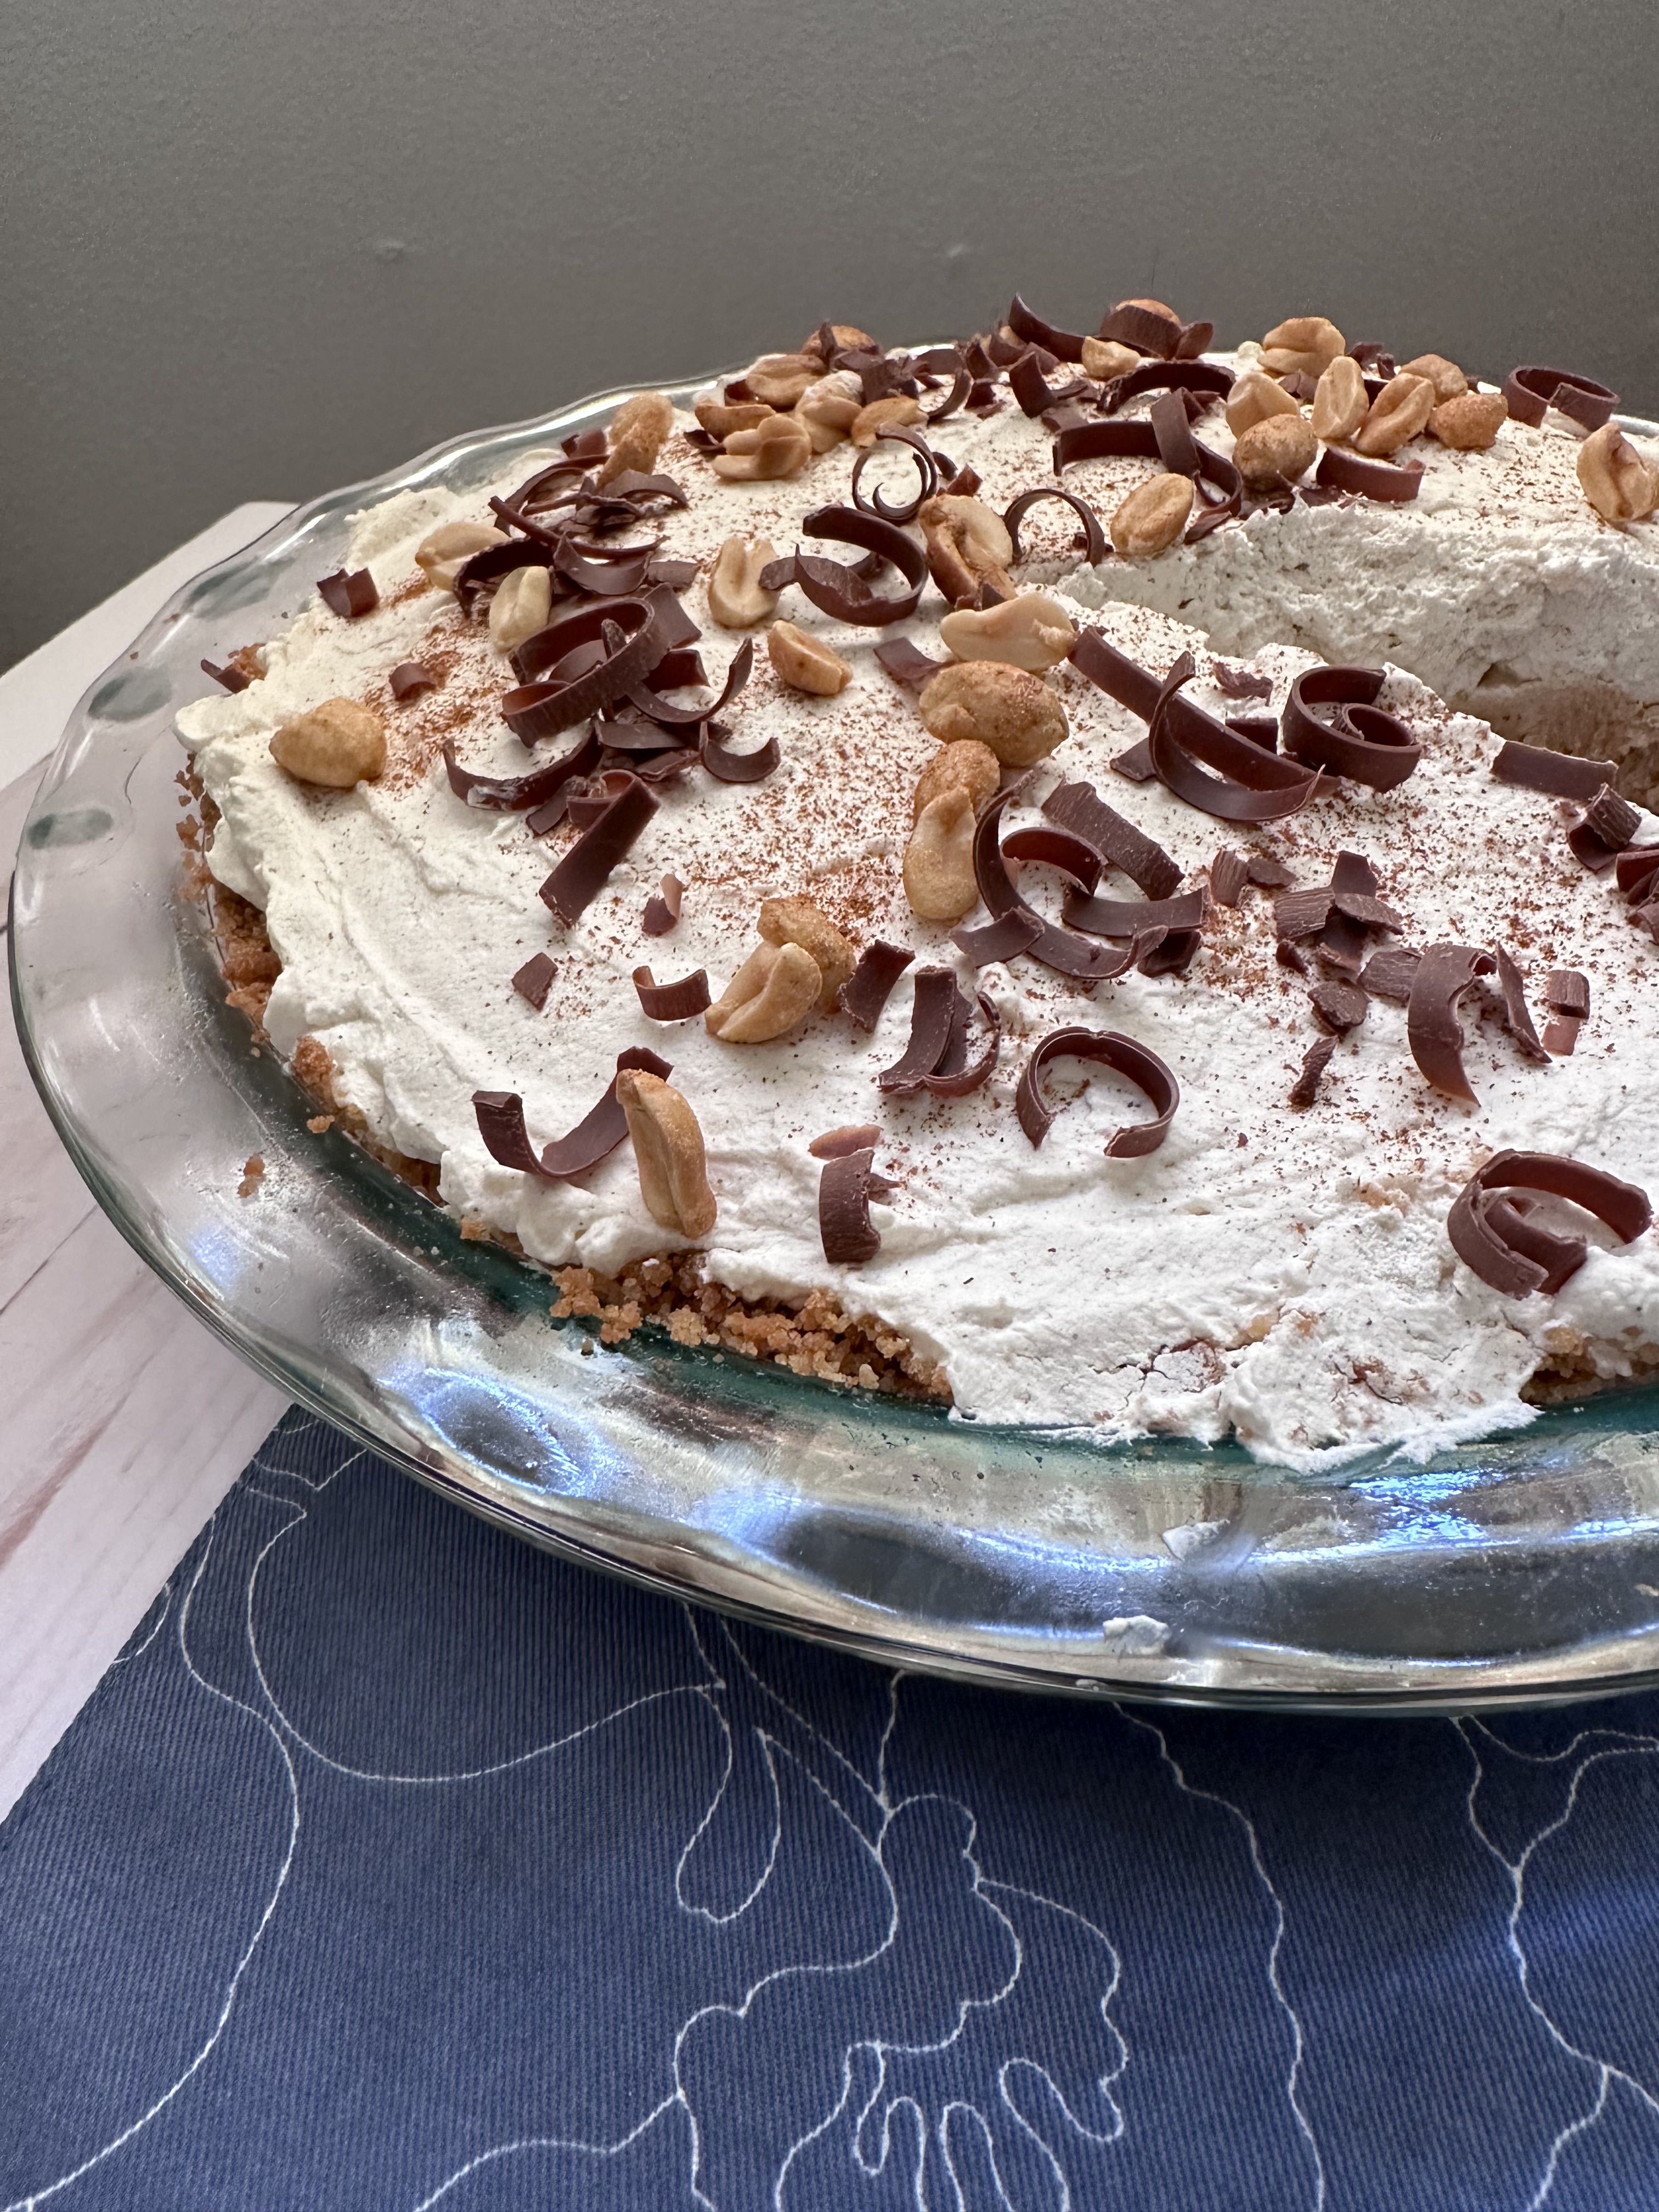
Before serving the pie, I sprinkled cinnamon over the whipped cream along with roasted salted peanuts and chocolate curls. To make the chocolate curls I microwaved a chocolate bar for about 10 seconds in the microwave and then used a vegetable peeler to shave it.

The first thing I noticed about this pie was that it wasn’t sweet, not that I am complaining. But there is definitely a difference when you sweeten anything with honey versus sugar. I like to think it’s a tad but healthier. As for the crust, you get hints of the waffle cones and a slight saltiness thanks to the pretzels. Overall, all the flavors worked well together.

Peanut Butter Chai Pie with a Sweet & Salty Pretzel and Waffle Cone Crust

Ingredients:

For the Crust:

2 cups miniature pretzels

6 (5 ½-inch) waffle cones, broken into pieces (about 4oz.)

1/4 cup light brown sugar

1 stick unsalted butter, melted

For the Filling:

1 1/2 teaspoons cinnamon, plus more for topping

3/4 teaspoon cardamom

3/4 teaspoon ginger

1/4 teaspoon allspice

1/8 teaspoon nutmeg

1 8oz package cream cheese, at room temperature

1 cup creamy peanut butter

1/2 cup plus 2 tablespoons honey, divided

2 teaspoons vanilla extract

1/2 teaspoon Kosher salt

2 1/2 cups heavy cream, divided

For the Topping:

Roasted Salted Peanuts

Chocolate curls

Directions:

For the Crust:

Preheat the oven to 350 F. Spray a 9-inch pie dish with cooking spray and set aside.

Add the pretzels, waffle cones and sugar to the bowl of a food processor and process until finely ground and well combined. Add the butter and pulse a few times until the mixture resembles wet sand.

Transfer the mixture to the prepared pie dish and press into the bottom and up the sides of the dish in an even layer. Bake in the preheated oven for 8 to 12 minutes, until the crust is set and golden brown. Transfer to a wire rack to cool completely before using.

For the Filling:

In a small bowl stir together the spices – cinnamon, cardamom, ginger, allspice and nutmeg – and set aside.

In the bowl of a stand mixer fitted with the whisk attachment, beat together the cream cheese, peanut butter, 1/2 cup honey, vanilla extract, salt and 1 tablespoon of the cinnamon-cardamom mixture on medium-high speed until light and fluffy, about 2 minutes.

With the mixer running, gradually add in a 1/2 cup of the heavy cream. Beat until well combined and fluffy. Transfer the peanut butter – cream cheese mixture to a large bowl.

Clean the mixing bowl and whisk the remaining heavy cream (2 cups), honey (2 tablespoons) and cinnamon-cardamom mixture in the bowl. Beat on medium-high speed until stiff peaks form.

Fold 1 cup of the whipped cream into the peanut butter-cream cheese mixture until no streaks remain. Transfer the mixture to the prepared crust and spread into an even layer. Top with the remaining whipped cream. Refrigerate, uncovered, for at least 4 hours.

Garnish the top of the pie with cinnamon, peanuts and chocolate curls.

To make chocolate curls: Microwave a chocolate bar for about 10 seconds in the microwave – you want it soft but not on the verge of melting. Use a vegetable peeler to shave the chocolate into curls.

Recipe from Food & Wine – Peanut Butter Chai Pie and Sweet & Salty Pie Crust

Happy Thanksgiving!

It’s Thanksgiving week! Do you have your menus set or are you still searching for one of two sides to round things out? Or maybe, you are still looking for that perfect dessert to serve or bring to your get together. Below I’ve assembled 5 of my most favorite pies that I have made over the years. I will personally be making the Apple Crumb Pie.

Apple Cranberry Pie

Peanut Butter & Chocolate Mousse Pie

Honey Pumpkin Pie

Apple Crumb Pie

Brown Butter & Vanilla Pear Pie

Have a wonderful Thanksgiving!

Peach Mango Pie

Summer is a great time to make pies with all kinds of fruit being in season. Although, if you prefer to enjoy your fruit as a snack and want to ensure that you are using the ripest fruit possible there’s nothing wrong with using frozen. That’s just what I did for this Peach Mango Pie. I happened to have frozen peaches (leftover from another recipe) and mangoes (I was planning on making smoothies) in my freezer so I decided to put them to good use.

While you can bake with frozen fruit, I opted to thaw out the peaches and mangoes beforehand. Once they were defrosted, I stirred together flour, cinnamon, ginger and nutmeg in a large bowl and then added in the peaches and mangoes. I gently folded everything together. I always opt to use refrigerated pie crust, it’s a great short-cut and foolproof. After rolling out 1 of the pie crust and extra inch or two I pressed it into a 9-inch pie plate and filled it with the peach mango filled and then drizzled it with fresh lime juice.

I then decided to get a little fancy and cut the other pie crusts into strips to make a lattice design. I used to be a bit intimated by making a lattice pie but after making a few of them I have the pattern down pat.  Finally, I brushed the top of the pie with an egg white wash, sprinkled turbinado sugar over it and placed it on a baking sheet to bake in a 375 F preheated oven. 

Once it cooled a bit it was time to slice into it. The peached and mangoes were a wonderful complement to each other and that squeeze of lime juice over the filling really brightened the flavors of the fruit.

Peach Mango Pie

Ingredients:

1 box refrigerated pie crusts (2 count)*

1 cup sugar

2 tablespoons flour

1/4 teaspoon cinnamon

1/4 teaspoon ground ginger

1/8 teaspoon ground nutmeg

1/4 teaspoon salt

3 cups thinly sliced peeled peaches, fresh or frozen**

3 cups, peeled & sliced mangoes, fresh or frozen**

2 teaspoons fresh lime juice

1 egg white

1 tablespoon water

Coarse sugar

*You can also make your crust from scratch

Directions:

Preheat the oven to 375F. Whether you are using a store bought or homemade pie crust roll out one of the crusts into a 12-inch circle and then place in a 9-inch pie dish. Set aside.

If using frozen fruit, thaw the fruit and then drain. You can thaw the fruit in a colander in the sink to make it easier to drain.

In a large bowl whisk together the sugar, flour, cinnamon, ginger, nutmeg and salt. Add in the frost and toss to coat with the flour mixture. Transfer the mixture to the pie dish and drizzle with the lime juice.

Roll the other pie crust into a 12-inch circle as well and place on top of the filling. Cut slits into the top crust and then trim and crimp edges of the pie. Whisk together the egg white and water and then brush over pie. Sprinkle with the coarse sugar.

Place the pie on a baking and bake in the preheated oven for 50 minutes. If the edges of the pie begin to brown too quickly cover with foil for the last 20 to 25 minutes. Cool on a wire rack.

Recipe from Better Homes & Gardens

White Chocolate Raspberry Mousse Pie

Happy Pi Day! Last year for Pi Day I made a delicious Peanut Butter & Chocolate Mousse Pie, this year, coincidentally, I made another mousse pie in honor of the day, a White Chocolate Raspberry Mousse Pie. So, how did I come up with this flavor? Well, while brainstorming for a pie flavor to make I decided to make a spin on my favorite cheesecake from The Cheesecake Factory, a white chocolate raspberry cheesecake. The end result, a delicious take on my favorite cheesecake that’s much lighter and doesn’t require baking (except for the crust that is).

I will say, I did have some concerns about making this pie. I opted to use gelatin to set the mousse and I was concerned about two things happening; that it would give the pie a weird texture and/or that it wouldn’t work and that the pie wouldn’t set. Neither happened I am happy to say. I did leave the pie out of the fridge for a little too long and it got a little too soft, but, placing it back in the refrigerator solved that problem quickly.

White Chocolate Raspberry Mousse Pie

Ingredients:

For the crust:

24 Oreos

4 tablespoons unsalted butter, melted

For the Raspberry Sauce:

12oz. fresh raspberries

3 teaspoons water, divided

1 teaspoon cornstarch

2 tablespoons sugar

For the White Chocolate Mousse:

2 tablespoons orange juice

1 teaspoon unflavored gelatin

1 1/2 cups heavy cream, divided

6 oz. white chocolate, chopped*

For the whipped cream topping:

1/2 cup heavy cream

1 tablespoon Confectioners’ sugar

1/2 teaspoon vanilla extract

*Don’t use white chocolate chips, they don’t melt the same as white chocolate and you will end up with a mousse that isn’t smooth.

Directions:

Preheat oven to 350F. Spray a 9-inch pie plate with non-stick spray and set aside.

For the Oreo Crust: In the bowl of a food processor, pulse the Oreos until they are fine crumbs. Add the melted butter and pulse a few times to combine. Transfer to the prepared pie dish and press the crumbs in an even layer on the bottom and up the sides of the pie dish. Bake in the preheated oven for 10 minutes. Transfer to a wire rack and let cool completely.

For the Raspberry Sauce: In a small bowl stir together the cornstarch and 2 teaspoons of the water, set aside. In a small saucepan combine the raspberries, the remaining teaspoon of water and sugar over medium heat. Stir and mash the raspberries. Once the mixture begins to simmer stir in the cornstarch mixture. Let the mixture simmer for a few minutes to thicken. Strain through a fine mesh sieve and allow the sauce to cool completely.

For the White Chocolate Mousse: In a medium saucepan add the orange juice and sprinkle the gelatin on top. Let this sit for 5 minutes. Add 3/4 cup of the heavy cream and heat over low heat stirring until the gelatin has dissolved. Add the chopped white chocolate and continue to stir until the chocolate has melted and the mixture is smooth. Transfer to a bowl and let cool for a few minutes before refrigerating. Refrigerate for about 30 minutes, stirring occasionally, until the mixture has thickened but isn’t set. Beat the remaining 3/4 cup of the heavy cream until stiff peaks form and then gently fold into the white chocolate mixture.

To assemble: Spoon half of the white chocolate mousse into the cooled Oreo crust and drizzle with the cooled raspberry sauce. Repeat with the remaining white chocolate mousse and more of the raspberry sauce (you want to leave some of the raspberry sauce to drizzle on top once you top the pie with whipped cream). Using a toothpick swirl the sauce into the mousse. Refrigerate for at least an hour.

Before serving, make the whipped cream. Combine the heavy cream, confectioners’ sugar and vanilla in a medium bowl and beat with a hand mixer on medium speed until stiff peaks form. Transfer to a piping bag fitted with a large star tip (or to a resealable bag and snip off the corner) and pipe dollops of the whipped cream along the edges of the pie. Finish by drizzling the remaining raspberry sauce over the whipped cream.

Keep the pie refrigerated until serving. Store leftovers in the refrigerator.

Apple Cranberry Pie

Are you deep into prepping for Thanksgiving? Or, are you just showing up somewhere with an empty belly and possibly a bottle of wine in hand? Or, maybe you are like me, you bring the desserts? If you are the latter, today I am bringing you a pie that’s quick to prepare and combines two traditional flavors of Thanksgiving… Apples & Cranberries.  Simply stated an Apple Cranberry Pie.

Now, cranberries are not a favorite among many. Most prefer it in the canned jellied form when it comes to eating it with their holiday meal, and don’t get me wrong, I won’t pass up a slice or two of it, but, even though fresh cranberries are tart and not enjoyable to snack on like a blueberry, they can be turned into a delicious sauce. While I don’t go all out and cook a Thanksgiving meal, I will whip a batch or two of cranberry sauce around this time of the year. For this pie, I used some of the same ingredients I use in my cranberry sauce (orange zest & ginger) along with the traditional sugar, cinnamon and nutmeg from apple pie to create a filling that would allow both fruits to complement each other.

When it comes to making pies, I take a major short-cut and use store-bought pie crusts. It’s fool-proof and a great time-saver. The one time I decided to make a pie crust from scratch it didn’t bake evenly and even though my pie filling was delicious the failed crust just took away from it. One day I will attempt to do it again though. For this pie, I opted to use a frozen pie crust as my bottom crust. In a large bowl, I folded all the pie ingredients together and then spooned it into the crust.

Since I was planning on making a decorative top crust I let two refrigerated pie crusts come to room temperature and then lightly rolled them out on a floured surface before slicing them into strips to create a lattice design on the pie. I also cut out a few leaf and acorn designs to apply to the crust. I then brushed it with a beaten egg and sprinkled it with turbinado sugar. I used turbinado sugar since I had it on hand and it gives the crust a nice golden color, but, you could use regular sugar instead. Alternatively, if you are not planning on making a decorative top crust, you can use 2 refrigerated pie crusts to make your pie. Simply roll out one into your pie dish, fill it and then top it with the second pie crust. Seal the edges, cut slits into the top crust, brush with an egg, sprinkle with sugar and then proceed to bake it.

I placed the pie on a baking sheet and baked it in a 400 F preheated oven for 20 minutes. I then lowered the oven temperature to 350 F and tented the pie with aluminum foil so it wouldn’t brown too quickly on top and baked it for an additional 35 minutes. I removed the foil for the last 5 minutes so the pie could get a nice golden color.

After letting the pie cool completely it was time to slice into it and enjoy a piece. And I must say all the flavors worked well together. The orange zest helped to cut the tartness of the cranberries and the sugar, of course, brought out the sweetness of both the apples and the cranberries. I was also about to taste hints of the cinnamon, nutmeg and ginger.

Another great thing, the pie held together perfectly when sliced. No runny messes.

Happy Thanksgiving!!!

Apple Cranberry Pie

Ingredients:

1 box refrigerated pie crusts (2 count)

3 large Granny Smith Apples, peeled & sliced 1/4 inch thick

1 1/2 cups fresh cranberries

3/4 cup sugar

1/2 tablespoon lemon juice

1 teaspoon cinnamon

1/4 teaspoon ground nutmeg

1/4 teaspoon ground ginger

2 teaspoons orange zest

1/3 cup flour

Egg Wash:

1 egg, beaten

Sugar

Directions:

Preheat oven to 400 F.

Place 1 pie crust in an ungreased 9-inch glass pie plate. Press firmly into the dish.

In a large bowl, gently mix the remaining pie ingredients with a rubber spatula until well incorporated. Spoon the filling into the prepared pie dish.

Top the filling with the second pie crust and press the edges together to seal. Cut 4 slits in the center of the top crust. Brush the pie with the beaten egg and sprinkle with sugar.

Place on a baking sheet and bake for 20 minutes. Lower the oven to 350F and tent the pie with aluminum foil and bake for an additional 35-40 minutes. Or until the filling begins to bubble. If desired, remove the foil for the last 5 minutes of baking so the crust can brown a bit more.

Let cool on a wire rack.

Recipe first appeared on Bead Yarn & Spatula

Honey Pumpkin Crumble Pie

So, I am trying to bring you a new pumpkin treat every week. I am hoping up until the week of Thanksgiving. And with the way time has been flying by it will be here before we know it. This week I am bringing you a twist on your traditional pumpkin pie… A Honey Pumpkin Crumble Pie. Don’t worry, it’s not super sweet because of the honey and the crumble topping offers a nice texture and crunch thanks to the addition of walnuts. And while I love pumpkin pie, I will admit that it can be a tad bit dense, but this pie is creamier and lighter.

Honey Pumpkin Crumble Pie


Ingredients:

2 large eggs

1 15oz. can pumpkin

1/2 cup sugar

1/4 cup honey

1 tablespoons pure maple syrup

1 teaspoon cinnamon

1/2 teaspoon salt

1/4 teaspoon ground ginger

1/4 teaspoon ground cloves

1 12oz. can evaporated milk

1 9-inch deep dish frozen pie crust

1/2 cup flour

1/2 cup chopped nuts (pecans or walnuts)

1/4 cup brown sugar

3 tablespoons unsalted butter, softened

Directions:

Preheat the oven to 375 F. Place the pie crust on a large baking sheet.

In a large bowl combine the eggs, pumpkin, sugar, honey, maple syrup, cinnamon, salt, ginger and cloves and using a hand mixer whisk together until just combined. Continue beating while gradually adding the evaporated milk. Pour the mixture into the pie crust and bake in the preheated oven for 25 minutes.

While the pie is in the oven make the crumble topping. In a medium bowl combine the flour, chopped nuts, brown sugar and butter. Using a fork or your hands mix the ingredients together until they are crumbly.

Sprinkle the crumb topping over the pie after the 25 minutes and then continue baking the pie for an additional 20 – 25 minutes. Until the crumble topping lightly browned and a knife inserted in the center of the pie comes out clean.

Cool on a wire rack and then cover and refrigerate until ready to serve.

Recipe from Mixing Bowl Magazine

Blueberry Lattice Pie

Truth be told I am not a big pie eater or baker; I may have mentioned that on here a few times before. I sometimes find them too sweet and pie crust is not one of my favorite things to work with. I always have these ambitious thoughts to make pie crust from scratch, but it never happens. My go-to is always Pillsbury refrigerated pie crusts. It’s been a no-fail for me and why risk a good thing. A bad crust can ruin any pie, even one with a delicious filling. With berries being in season I decided to try my hand at a Blueberry Pie. And this pie was a WINNER! Everyone who had a piece loved it and my niece, who is also not a big pie eater, had two pieces.

To make the filling I combined fresh blueberries, sugar, flour, lemon zest and freshly squeezed lemon juice in a large bowl. Using a store-bought pie crust, I rolled out one of the crusts an extra inch or so and then placed it in a 9-inch pie plate. I then filled the crust with the blueberry filling. I won’t lie, I thought it looked a bit sparse, but I figured the filling would be the perfect amount once the pie was baked.

Next, I worked on the lattice topping. I rolled out another store-bought pie crust an extra inch or so and using a pastry wheel lattice cutter I cut strips of the crust. This small tool makes it super easy to make a lattice pie. Each strip is the same width so there’s no need for measuring and hoping you will cut each piece the same size.

I don’t have a great way of explaining how to make a lattice topped pie and unfortunately, I didn’t take pictures while making this one. It was 90 degrees outside, and my oven was already preheated to 400 F so I wanted to get it done quickly and, in the oven, so I could get out of the kitchen. After cutting all the strips, I placed half of the strips on the pie close together. Next, I weaved in the strips to make the lattice design by folding back every other strip that was on the pie and placed a pie strip perpendicular to the strips folded back and then unfolded the strips I folded down. For the next row I folded back those strips I hadn’t folded back from the first row and then placed another pie strip across. I repeated these steps until my pie was covered with the lattice design.

To finish the pie, I trimmed the edges around the pie and crimped the edge of the pie with a fork and then brushed the entire pie with an egg wash and sprinkled it with sugar.

I placed the pie on a parchment lined baking sheet and baked it in a 400 F preheated oven for about 45 minutes, the blueberry filling was quite bubbly. After about the first 20 minutes of baking I placed a pie shield around the pie so the edges of the pie wouldn’t burn.

Unfortunately, my lattice wasn’t as pretty coming out of the oven as it was going in, but it was delicious!

And as you can see, my filling was the perfect amount. It was also the perfect consistency; it wasn’t runny at all.


Blueberry Pie

Ingredients:

Store-bought pie crust, or your favorite homemade pie crust

4 cups fresh blueberries, washed and dried

1/2 cup sugar, plus extra for sprinkling on the pie

1/2 cup flour

1 teaspoon lemon zest

1/4 cup freshly lemon juice, from two lemons

1 egg beaten with 1 tablespoon milk for egg wash


Directions:

Preheat the oven to 400 F. Line a baking sheet with parchment paper and set aside.

In a large bowl combine the blueberries, sugar, flour, lemon zest and lemon juice. Mix the ingredients together well. Set aside.

Place one of the crusts into a 9-inch pie plate and fill with the blueberry mixture. Lay the second crust on top of the pie, or, use the second pie crust to create a design for the top of the pie. Place the pie on the prepared baking sheet and then brush with the egg wash and sprinkle the top with sugar.

Bake in the preheated oven for 45 – 50 minutes, or until the filling is bubbly and the crust has a nice golden color.

Cool on a wire rack to room temperature and then serve and enjoy!

Passion Fruit Pie

Happy Pi Day! That wonderful day on the calendar, 3/14, were we celebrate the irrational number Pi. Irrational because it cannot be expressed exactly as a simple fraction and therefore is an infinite decimal. What it is exactly though is the ratio of a circle’s circumference to its diameter, and regardless of the size of the circle, it will always be the same number. So, due to this fun math themed day I bring you a new recipe for pie. I am always stumped to come up with a new pie recipe for today. When I start searching for a recipe most of the ones I come across are some sort of variation of an apple or pumpkin pie. Both of which I prefer baking during the Fall months. And of course there are the berry pies, but, I think those are better in the summer months when berries are in season. So I run out of options quickly. This year I started to think about pies I’ve made and flavors that I haven’t come across and I thought to myself what about a Passion Fruit Pie.

I decided to follow the recipe for my go-to Key Lime Pie but switch out the key lime juice for passion fruit pulp. I purchased frozen passion fruit pulp and let it defrost in my refrigerator overnight. I also switched up the crust I use. Normally I make Key Lime Pie with a store bought graham cracker crust, but for this pie I decided to make a shortbread cookie crust. And that was my first step in making this pie.

Using my food processor I pulsed shortbread cookies, I used Keebler Sandies Classic Shortbread Cookies, into fine crumbs and then combined the crumbs with melted unsalted butter. Next, I pressed the crumbs into the bottom and along the sides of a 9-inch pie plate. After baking it in a preheated 350 F oven for 10 minutes I let it cool while I made the filling. While baking the crust beforehand isn’t completely necessary I decided to do so so that the crust would be firmer once the pie was done. This would minimize the chances of it crumbling when cutting a piece of the pie.

In a large bowl, using a handheld mixer, I beat egg yolks until they were light and fluffy. I continued beating the eggs while gradually adding in sweetened condensed milk. And finally, I added in the defrosted passion fruit pulp. Once the mixture was combined I poured it into the shortbread cookie crust and returned the dish to the oven for an additional 20 minutes. When done, the pie filling will be set.

I let the pie cool completely on a wire rack before transferring it to the refrigerator to chill before serving.

Before serving I whipped up a small batch of homemade whipped cream and decorated the top of the pie. To create the swirls I used a Wilton 6B piping tip.

This pie was delicious… It was the perfect texture and a wonderful combination of sweet and tart! And yes, pre-baking the crust did help in preventing it from falling apart when slicing into the pie.

Passion Fruit Pie

Ingredients:

For the crust:

1 3/4 cups shortbread cookie crumbs*

6 tablespoons unsalted butter, melted

For the filling:

4 egg yolks

14oz. can condensed milk

1/2 cup passion fruit pulp**

Whipped cream for decorating and/or serving


* I used about 15 Keebler Sandies Classic Shortbread Cookies. You could also purchase a 9-inch shortbread pie crust. If using a store bought pie crust there is no need to pre-bake it. Just fill it with the pie filling and bake as directed below.

** I purchased a frozen 14oz. package from Goya and left it in the refrigerator overnight to defrost.


Directions:

Preheat the oven to 350 F.

Combine the shortbread cookie crumbs and the butter in a medium bowl and mix them together. Once mixed, transfer to a 9-inch pie plate and press the crumbs in an even layer along the bottom and sides of the dish. Bake in the preheated oven for 10 minutes. Remove from the oven and set aside.

While the crust is cooling make the filling. In a large bowl, using a handheld mixer on medium, beat the egg yolks until they are light and fluffy. Gradually add in the condensed milk and continue beating until combined. Finally, add in the passion fruit pulp and continue beating until combined.

Pour the filling into the pie crust and bake for 20 minutes. The filling will be set.

Transfer to a wire rack to cool completely and then refrigerate for a few hours before serving and/or decorating with whipped cream.


Whipped Cream

  • Servings: About 2 cups
  • Print

Ingredients:

1 cup heavy cream

2 tablespoons confectioners’ sugar

1 teaspoon vanilla extract


Directions:

In a medium bowl combine the heavy cream and confectioners’ sugar and beat with a handheld mixer until soft peaks form. Add in the vanilla extract and continue beating until stiff peaks form. Refrigerate until ready to use.


Apple Crumb Pie

I’m wrapping up my mini apple week today with a pie that would be a perfect addition to your Thanksgiving dessert table… An Apple Crumb Pie. I make my fair share of desserts for Thanksgiving and this year I decided to make things a little easier on myself and forgo making any pies with a decorative pie crust. My baking list for Thanksgiving usually includes about 6 or 7 different desserts so taking that small thing off of my list is definitely going to help me get everything done in a timely fashion. And since I normally head to the city to see the Macy’s Thanksgiving Day Parade balloons get inflated the night before Thanksgiving I have limited time on that day to bake so I normally end up baking one last thing on Thanksgiving morning and I am trying to avoid that this year. Coupled with no decorative pie crusts I am also thinking of baking one or two things ahead of time which should definitely free up some time for me.

To begin this pie I started by making the crumb topping. Once I mixed all of the ingredients together I placed it in the freezer so it could firm up. Next, I covered a large baking sheet with aluminum foil and placed it on the bottom rack of my oven and preheated it to 400 F. And finally I made the filling. I added all of the ingredients for the filling to a large bowl and using a rubber spatula gently folded them together.

Now, I’ve never had much success in making pie crust from scratch so I always opt to either use refrigerated pie crust or my real favorite frozen pie crust. I apologize to those of you who are cringing right now. I just find it fool-proof, especially the frozen one, and since I am usually more concerned with how the filling is going to come out and perfecting a decorative crust it’s just easier for me. To be honest, when I do make a decorative pie crust I use a frozen crust for the filling and a refrigerated pie crust to decorate it. It’s so much easier to make cut outs or cut long strips with pie crust that is already the perfect thickness. If you’re thinking of following my trick here’s another one. If you want to decorate your pie with cut-outs make sure you refrigerate them after cutting them out before placing them on your pie. Same thing goes for the strips you would use for braiding or a lattice design. Handling the pie crust softens it quickly and then when you go to place it on your pie it won’t place as well or may start to break (especially if you are making a lattice design), firming it up again makes it easier to work with and it will bake better. Okay, so back to the pie at hand. I used a frozen 9-inch deep dish pie crust. I kept the pie crust in the freezer until I was ready to fill it. I spooned the filling into the pie crust and then gently topped it with the crumb topping, breaking any pieces of crumb that were too large. I carefully removed the hot pan from the oven and placed the pie on it and then returned it to the oven.

Look at those nice pieces of crumb topping… YUM!!!

I baked it at 400 F for about 25 minutes and then reduced the oven temperature to 350 F and baked it for about another 50 minutes. My apples were a tad soft to begin with (I got them a few weeks ago from apple picking) so my pie was ready rather quickly. About 25 minutes after reducing the heat I covered the top of the pie with a piece of aluminum foil so the crumb topping wouldn’t burn. Once I removed it from the oven the crumb topping was a perfect golden color and the filling had bubbled out just a bit.

After letting it cool completely I placed it in the refrigerator covered with aluminum foil for a few days before cutting into it -I baked it on a Thursday night and sliced it on Sunday. Final verdict… It was the best apple pie I’ve ever made. I would say pie in general, but that distinction belongs to Key Lime Pie. Per requests, I am planning on making two of these for Thanksgiving!


Apple Crumb Pie

Ingredients:

1 Frozen 9-inch deep dish pie crust*

Crumb Topping:

1 cup all-purpose flour

1/3 cup light brown sugar

1/4 teaspoon ground cinnamon

1/4 teaspoon salt

1 stick unsalted butter, cut into 1/2-inch pieces at room temperature

Filling:

3 pounds mixed apples, peeled and sliced 1/4-inch thick

4 tablespoons unsalted butter, melted

1/3 cup granulated sugar

1/4 cup light brown sugar

2 tablespoons all-purpose flour

1 tablespoon fresh lemon juice

1 teaspoon ground cinnamon

1/8 teaspoon salt

*You could also use a homemade pie crust or a refrigerated pie crust. If using either, once you have prepped your pie plate with the crust place the dish in the refrigerator until the crust is firm, at least 1 hour or overnight. If using a frozen pie crust, you can fill the crust right out of the freezer.


Directions:

Make the crumb topping: Mix the flour, brown sugar, cinnamon and salt in a medium bowl. Add the butter to the mixture and use your hands to mix it until crumbs form. Place in the freezer until ready to use.

Line a large baking sheet with aluminum foil and place it in the bottom rack of your oven and then preheat the oven to 400 F.

Make the filling: Mix the apples, melted butter, both sugars, flour, lemon juice, cinnamon and salt in a large bowl. Spoon the filling into the pie crust. Sprinkle the filling with the frozen crumbs. Breaking any large crumbs into smaller pieces and making sure to spread them evenly over the pie and patting them down while doing so.

Place the pie on the baking sheet in the oven and bake until the crumbs lightly brown, about 25-30 minutes. Reduce the oven temperature to 350 F and continue baking until the apples are completely soft when pierced with a knife, about an additional 60 to 80 minutes. If you find the crumb topping is getting too dark cover it loosely with a piece of aluminum foil. Transfer the pie to a wire rack to cool completely.

Recipe from Food Network

Meyer Lemon Shaker Pie

A pie for Pi Day! To celebrate Pi Day this year I am bringing you a Meyer Lemon Shaker Pie. Meyer lemons are a tad sweeter than your traditional lemons. They are a cross between regular lemons and mandarins and tend to be smaller, rounder and smoother than traditional lemons. They also have a deep yellow / orange hue to them.

I began by thinly slicing the lemons, removing the pits.

I then combined the sliced lemons with sugar and salt and set it aside.

In a medium bowl I whisked together 4 large eggs with vanilla extract and then combined that with the lemons. I opted to use refrigerated store-bought pie dough. After letting it come to room temperature I rolled it out about and extra 1/2-inch and then pressed it into a pie dish that I greased with butter. I brushed the crust with a beaten egg yolk and then poured the lemon mixture into the crust.

Next, I rolled out the other half of my pie crust approximately an extra 1/2 inch and then placed it on top of my pie. I attempted to do a decorate crust my crimping the ends. I am not a great pie maker so I was happy with the way this crust looked when I was done. I did my best not to rush through it and I was very happy that I was able to cut slits in the pie that were four individual slits as opposed to four slits that I over sliced and turned into 2. It’s happened. I am telling you, baking pies knocks me off-kilter and I end up doing something wrong. Practice makes perfect though. My plan at this point was to freeze the pie for an hour prior to baking. But, I found out the hard way (when I went to go put the pie in the freezer) that my freezer wasn’t wide enough for me to get the dish in. UGH! So, I ended up refrigerating the pie overnight instead. On a side note, when it comes time for me to purchase a new refrigerator I will be going to the store with a bag of pie dishes and cookie sheets to make sure I get a freezer part that I will be able to fit things in. Not being able to get certain dishes and pans in my freezer can be maddening at times. I didn’t find it to be such an annoyance until I decided to freeze my cookie dough back in December and I was only able to fit one cookie sheet in there from the 10+ that I own. It definitely slowed down my flow of getting things done! Anyhoo…

After refrigerating the pie overnight I baked it the following morning… I was pleased with the golden brown color of the crust and that my decorative edge didn’t fall apart completely while the pie was baking.

I let the pie cool for a bit and then sliced into it… The filling was jammy as it’s supposed to be, but, I found it incredibly sweet. I tried taking a few bites, but, it was just too much for me. If I make this again I will definitely cut back on the amount of sugar I used per the directions (2 cups). While I was scooping the sugar out to combine with the lemons in the back of my mind I was already thinking “this is way too much sugar,” but since other recipes I saw called for that much I followed along.

While the recipe I followed didn’t call for the lemons and sugar to macerate for 24 hours, I found that many recipes called for this step in order to break down the rind and pith of the lemons to eliminate any bitterness.  If I were to make this recipe again I would definitely do that as well as cut back on some of the sugar. While the pie did have a nice taste to it and the bitterness from the rind and pith wasn’t strong, as I mentioned, the sweetness was just too much for me. So, here is what I would do. I would slice the lemons and combine them with the sugar (probably only a cup and a quarter to a cup and a half) and salt in a large bowl. Cover and refrigerate for 24 hours, stirring occasionally. The following day I would then continue with the recipe, whisking together the eggs and vanilla and then combining that with the lemons. And instead of freezing / refrigerating the pie before baking, I would omit this step and go ahead and bake the pie

Meyer Lemon Shaker Pie

Ingredients:

4 to 7 small to medium Meyer lemons

2 cups sugar

1 teaspoon salt

4 large eggs

1 teaspoon vanilla extract

1 store-bought pie crust or homemade


To finish the pie:

1 large egg separated, white and yolk whisked separately

2 teaspoons sugar


Directions:

Thinly slice the lemons, removing any seeds. You will need 2 cups of sliced lemons. Combine the lemon slices with the sugar and salt and set aside to allow the lemon to macerate. Whisk the 4 eggs and vanilla extract together in a separate bowl.

Lightly grease a 9-inch pie dish. Roll out half of the dough to fit in the dish with a 1-inch overhang. Brush the dough with the beaten egg yolk.

Combine the sliced lemons and egg mixture and then spread into the prepared pie crust.

Roll out the other half of the dough. If using store bought dough, roll it out approximately a 1/2 inch more and then place on top of the dough in the pie dish. Trim off any excess dough and pinch the bottom and top crust together and crimp or seal the edges with your finger or fork.

Cut 4 slits on the top and brush with the beaten egg white and sprinkle the sugar on top. Chill in the freezer for 1 hour or in the refrigerator overnight.

Preheat the oven to 450 F. Bake the pie on the lowest rack of the oven for 15 minutes. Lower the temperature of the oven to 375 F and move the pie to the center rack and bake for another 30 minutes. If the edges of the pie begin to brown too quickly, cover with a pie cover or strips of aluminum foil.

Let the pie cool for at least 30 minutes before slicing and enjoying.

Recipe from The Kitchn

%d bloggers like this: