New York Knicks Themed Cake

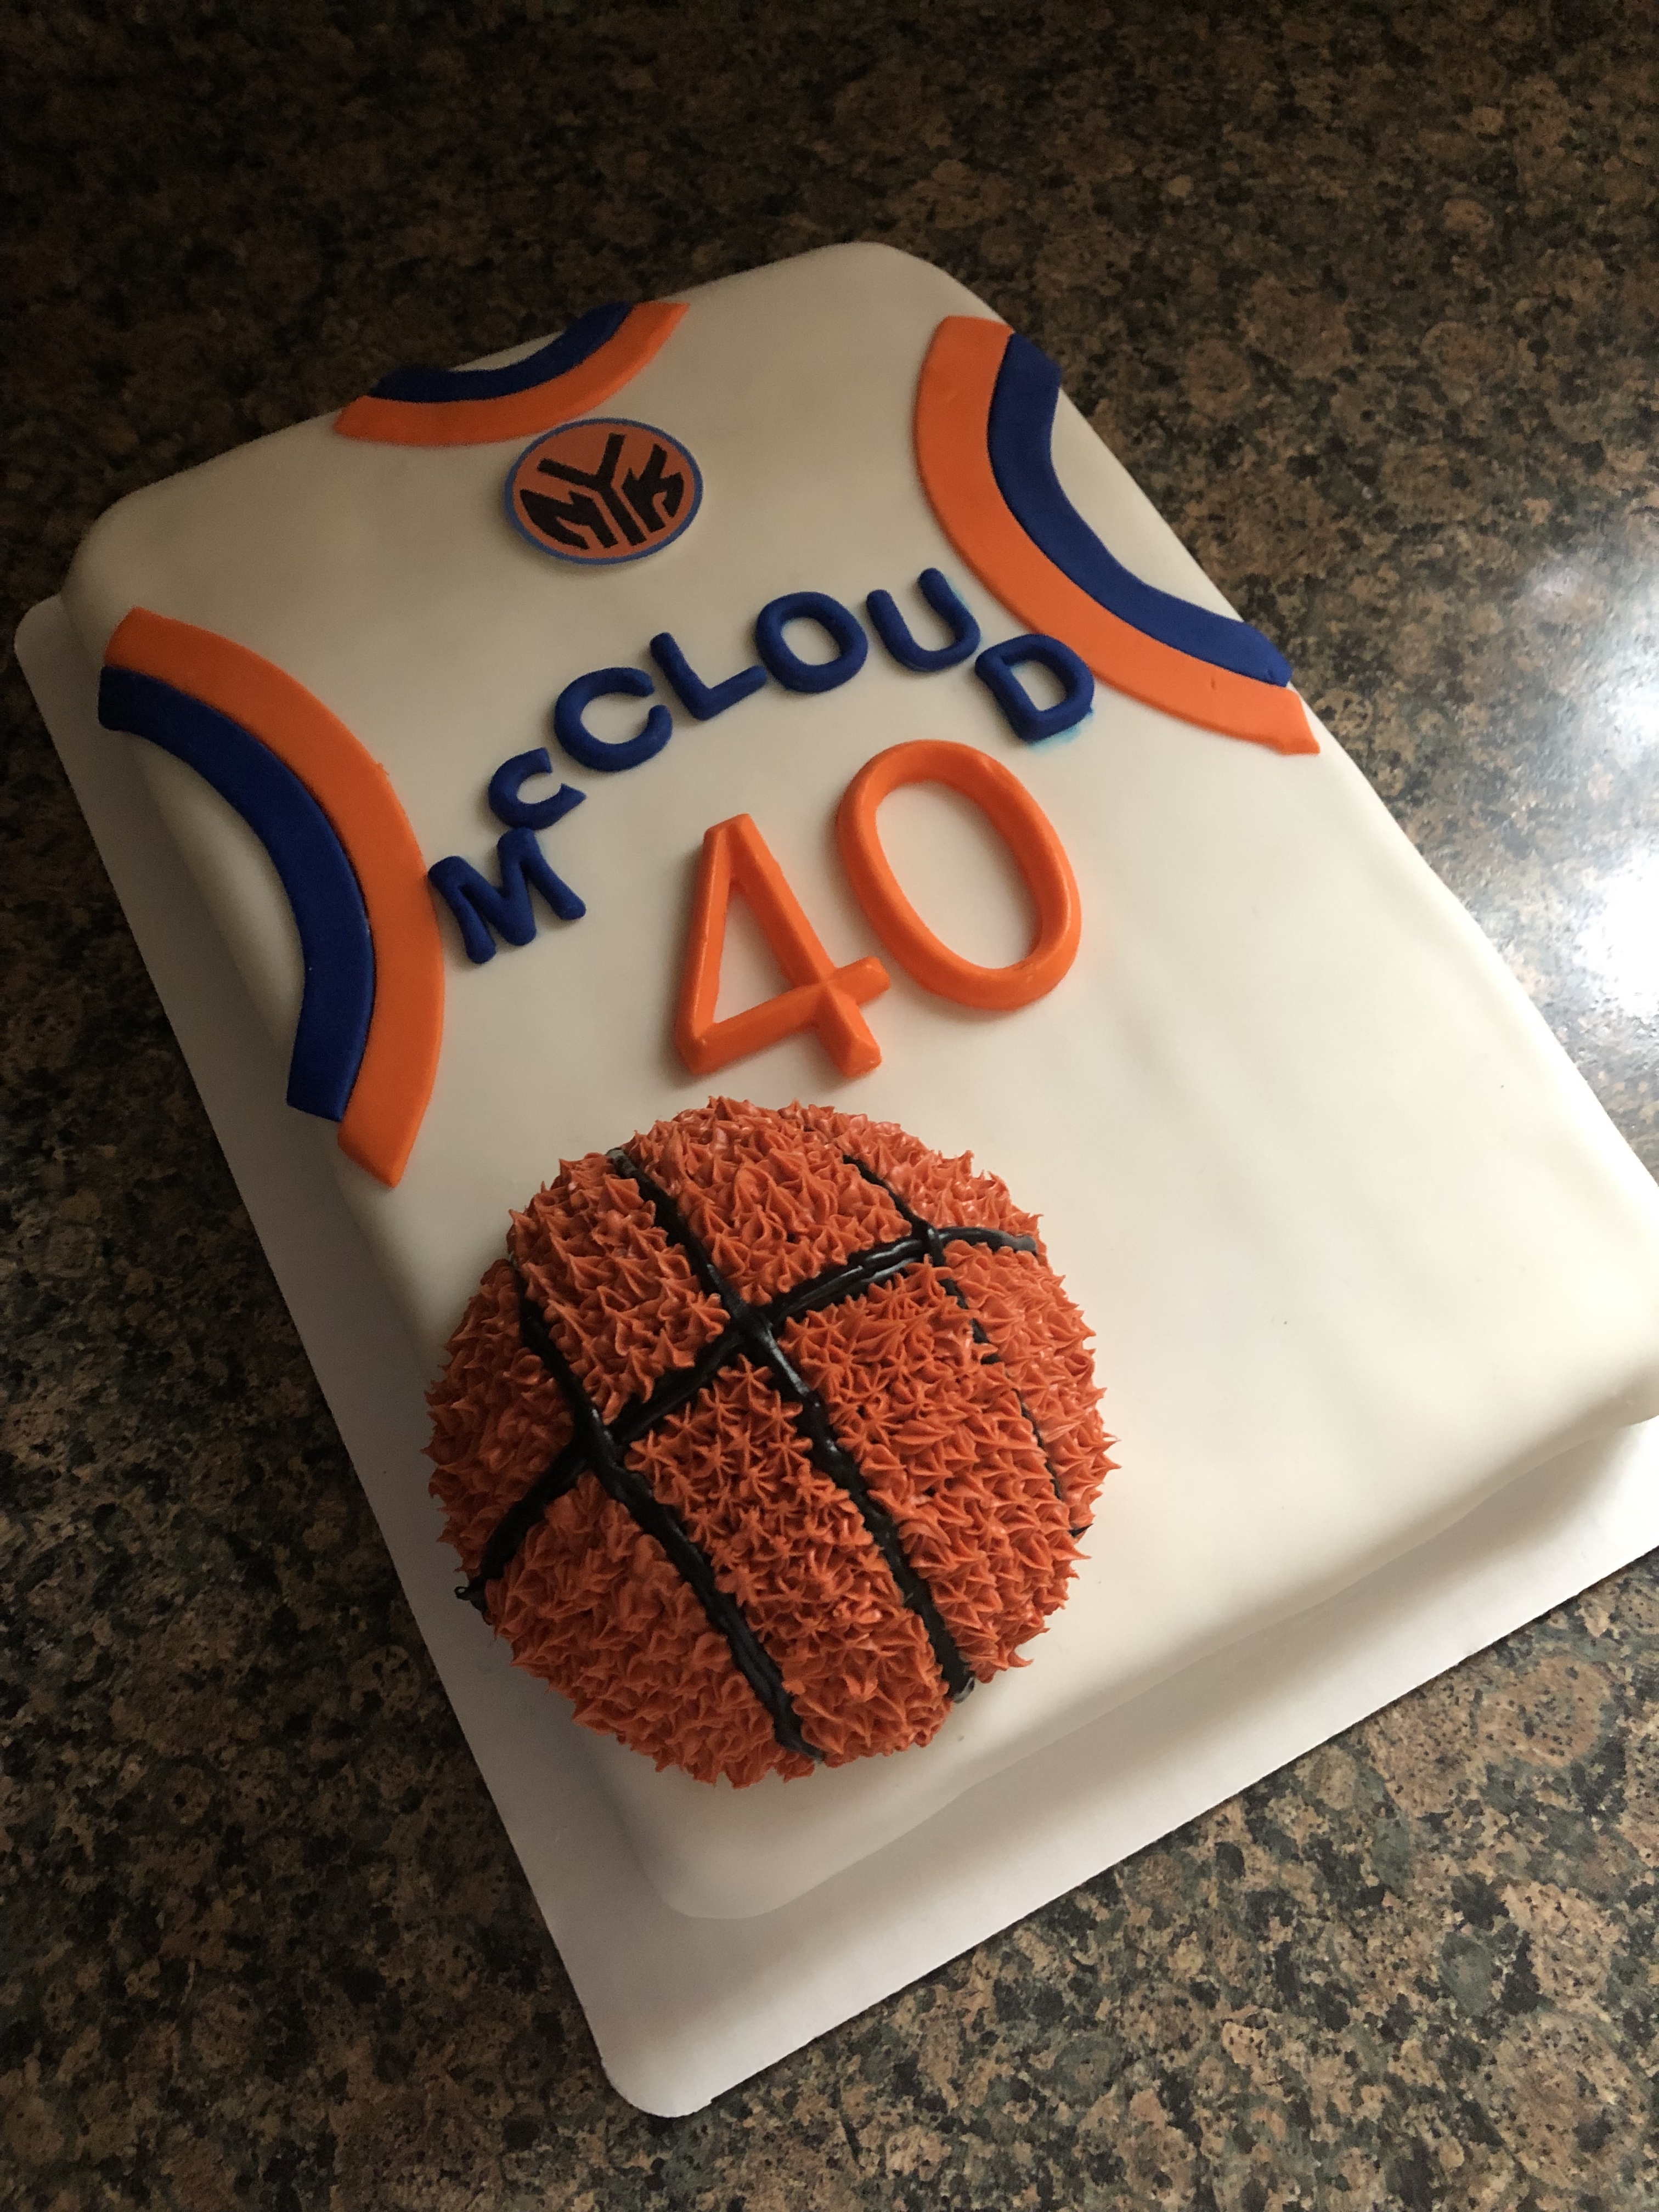
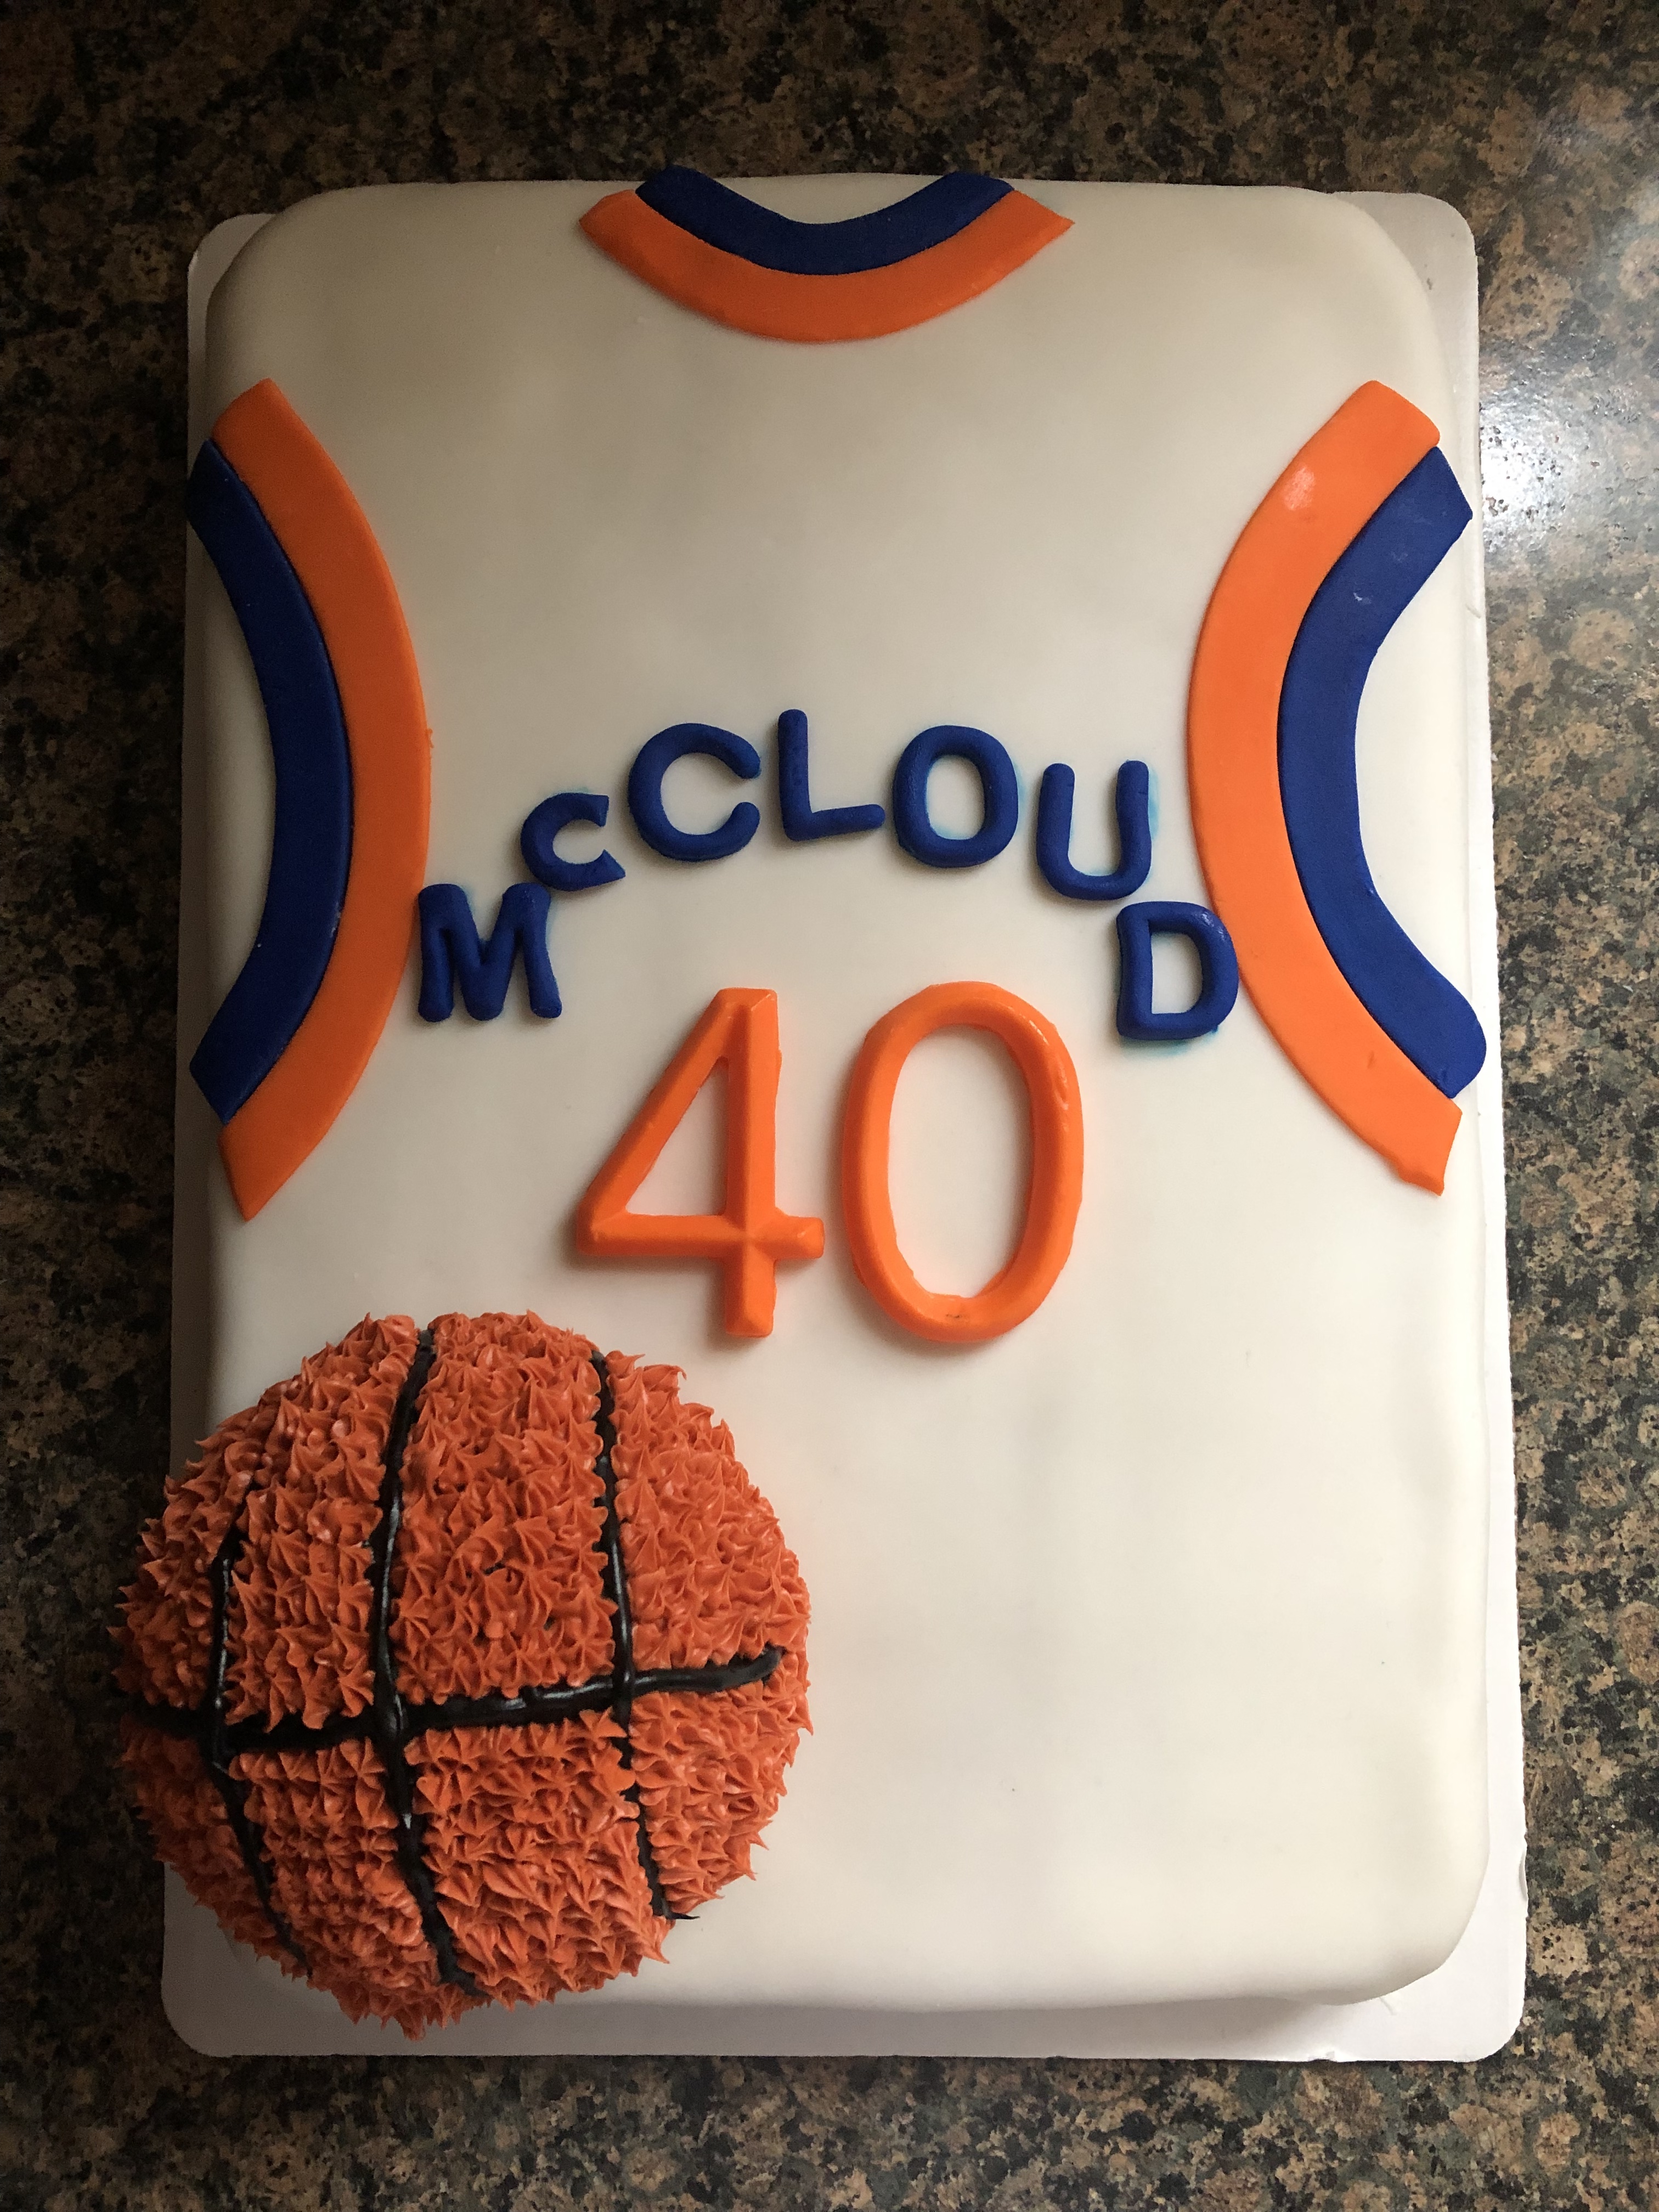
I recently got a request for a basketball themed birthday cake, specifically a New York Knicks themed one. The recipient sent me two pictures of what they wanted… One was simply a round cake with the Knicks logo on top and the other was a jersey themed cake. I opted to go with the latter.

At first I thought I would have to carve the cake on the sides and on the top to replicate the armholes and neck hole, but, after going through some pics on Pinterest and envisioning the cake in my head I realized I wouldn’t have to. Which was a good thing, I have never carved a cake before and I don’t think the first time I attempt it should be for someone’s birthday cake.

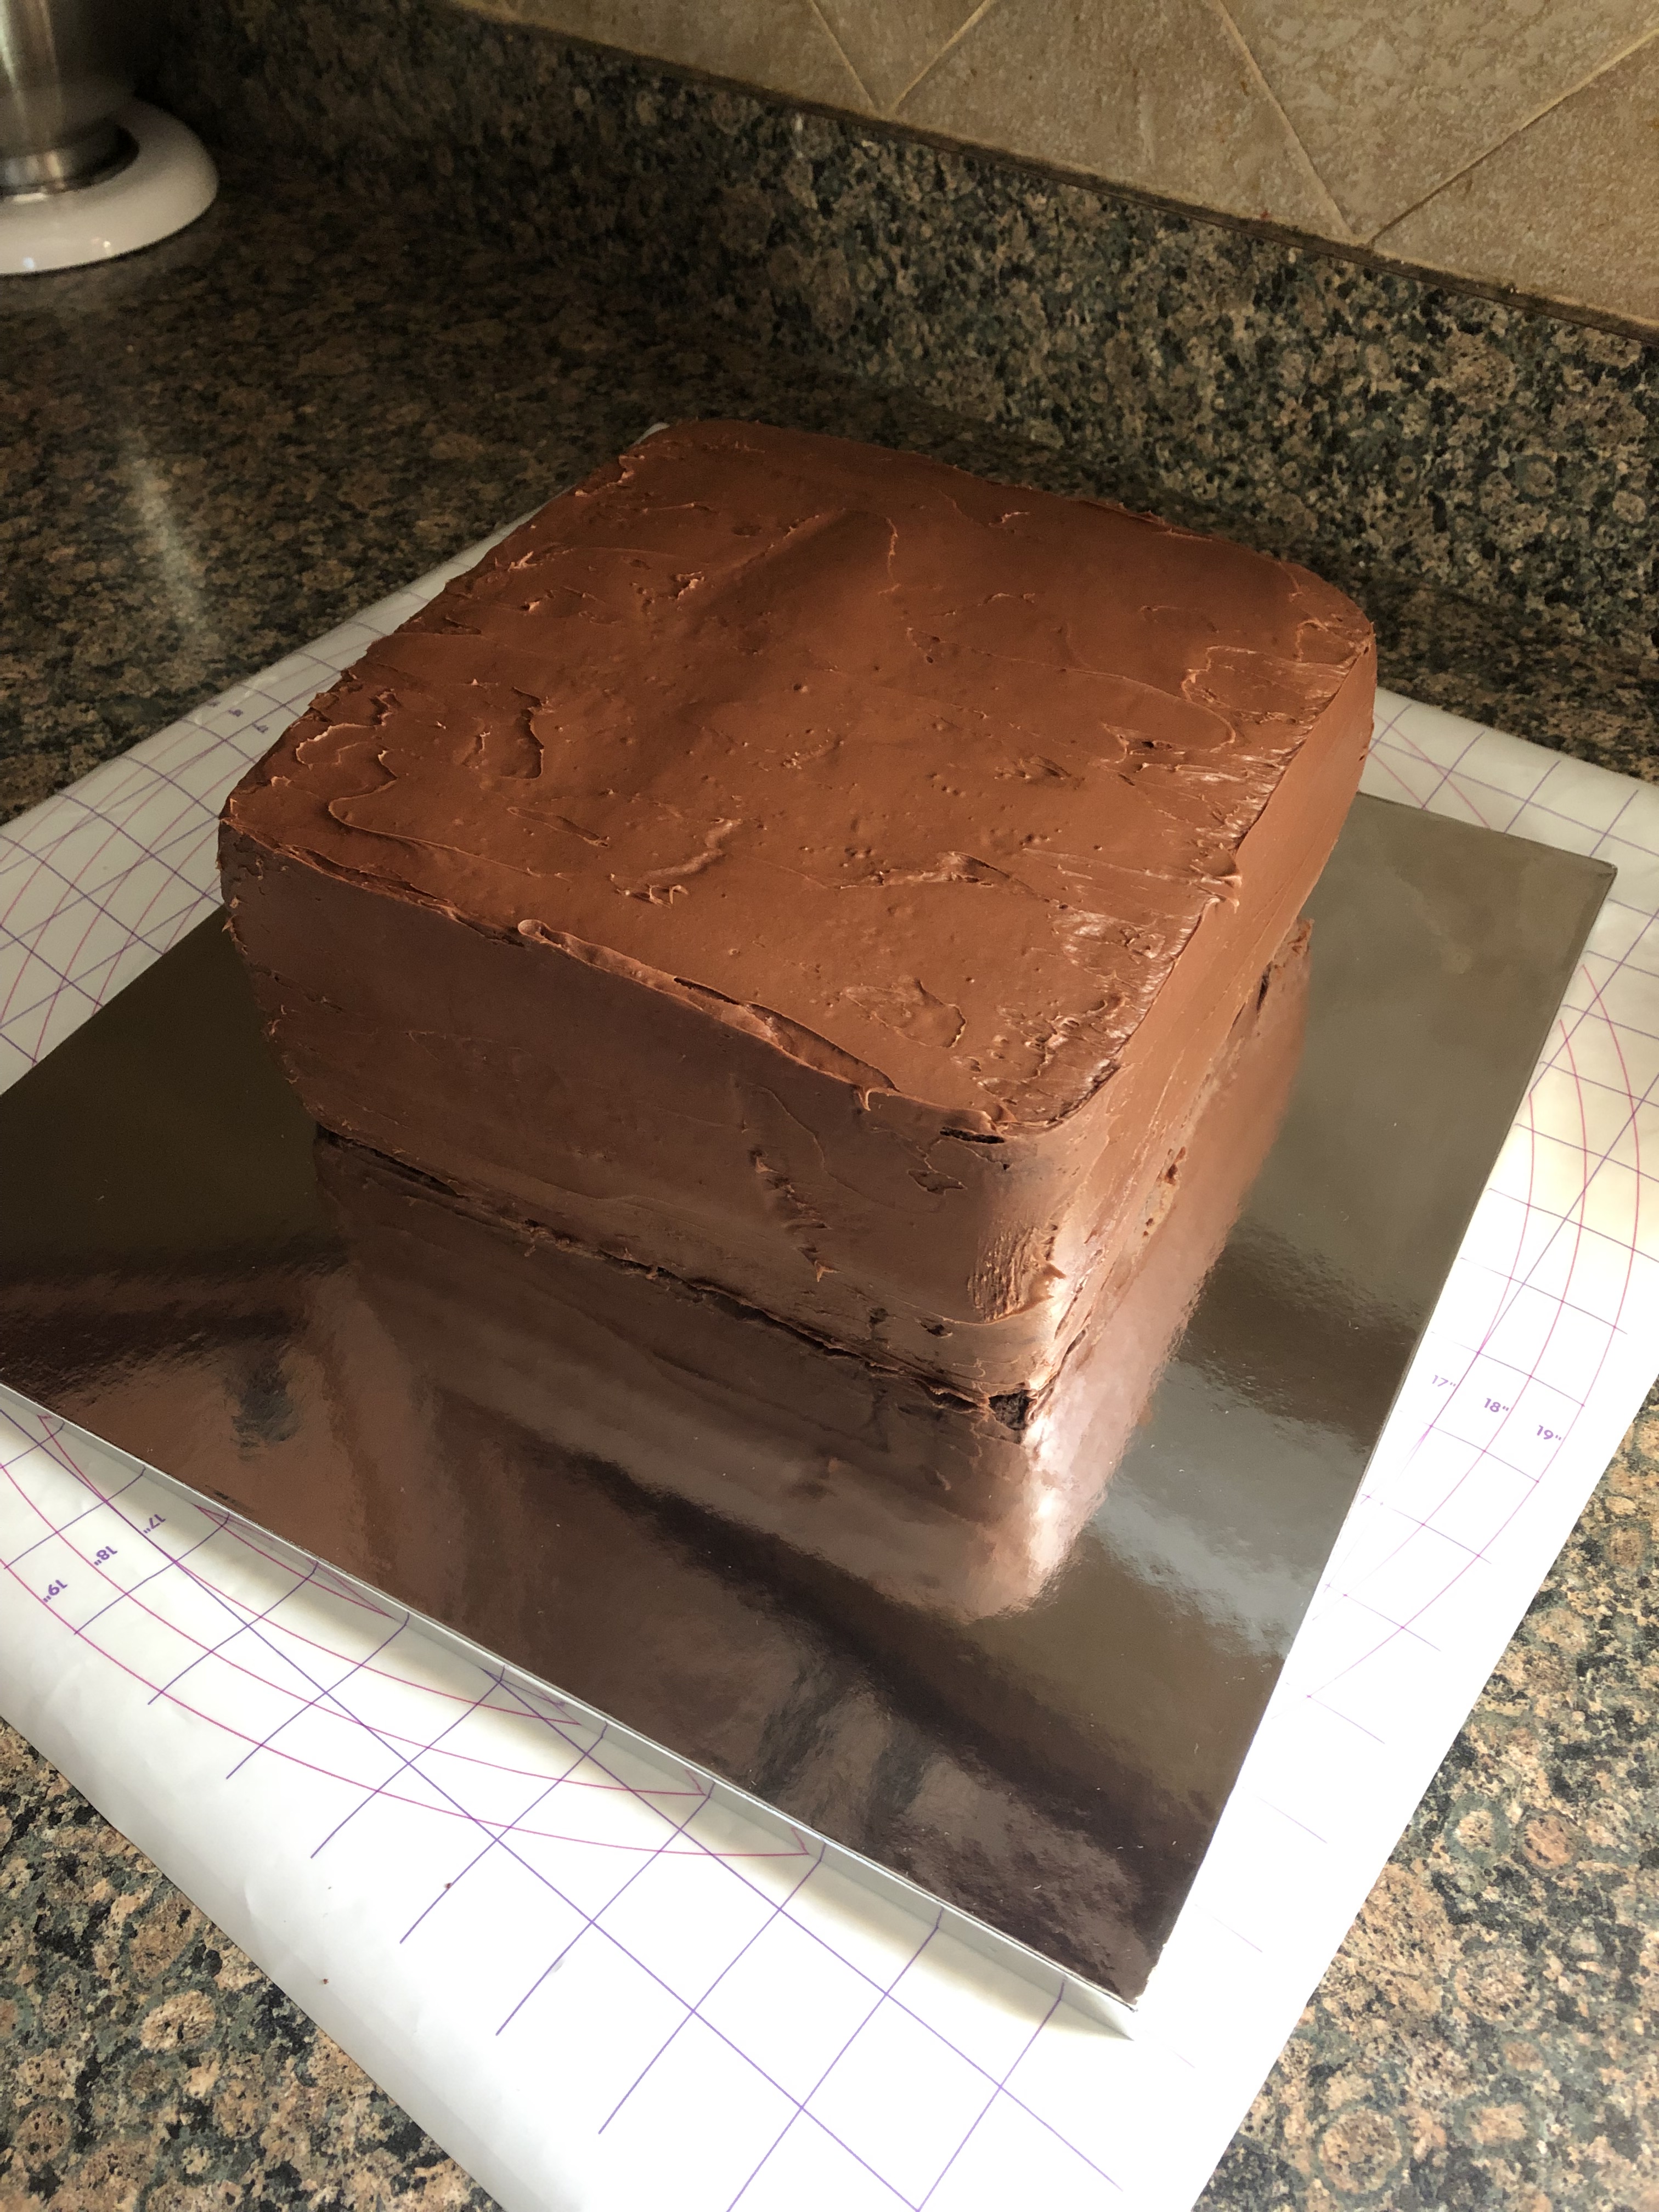
To make things simple I opted to use a box cake mix for the cake. While the directions on the box said one would suffice to make a 9×13-inch sheet cake I wanted to be sure the cake would have some height to it so I opted to use one and a half boxes of mix. I thought using two full boxes would be too much and the cake might overflow while baking and I also had a Halloween theme I wanted to try with the cupcakes – that’s coming in a later post. I prepped the cake mixes per the directions in two separate bowls and then with one I filled the cavities of a 12-cup muffin tin with a 1/4 cup of batter in each. I then poured the remaining batter into the bowl with the full amount and folded the two together before pouring it into a 9×13-inch pan I sprayed with baking spray. Once the cake was done I let it cool in the pan for 15 minutes before inverting it onto a wire rack to cool completely . Once it was cool I wrapped it in plastic wrap and refrigerated it overnight.

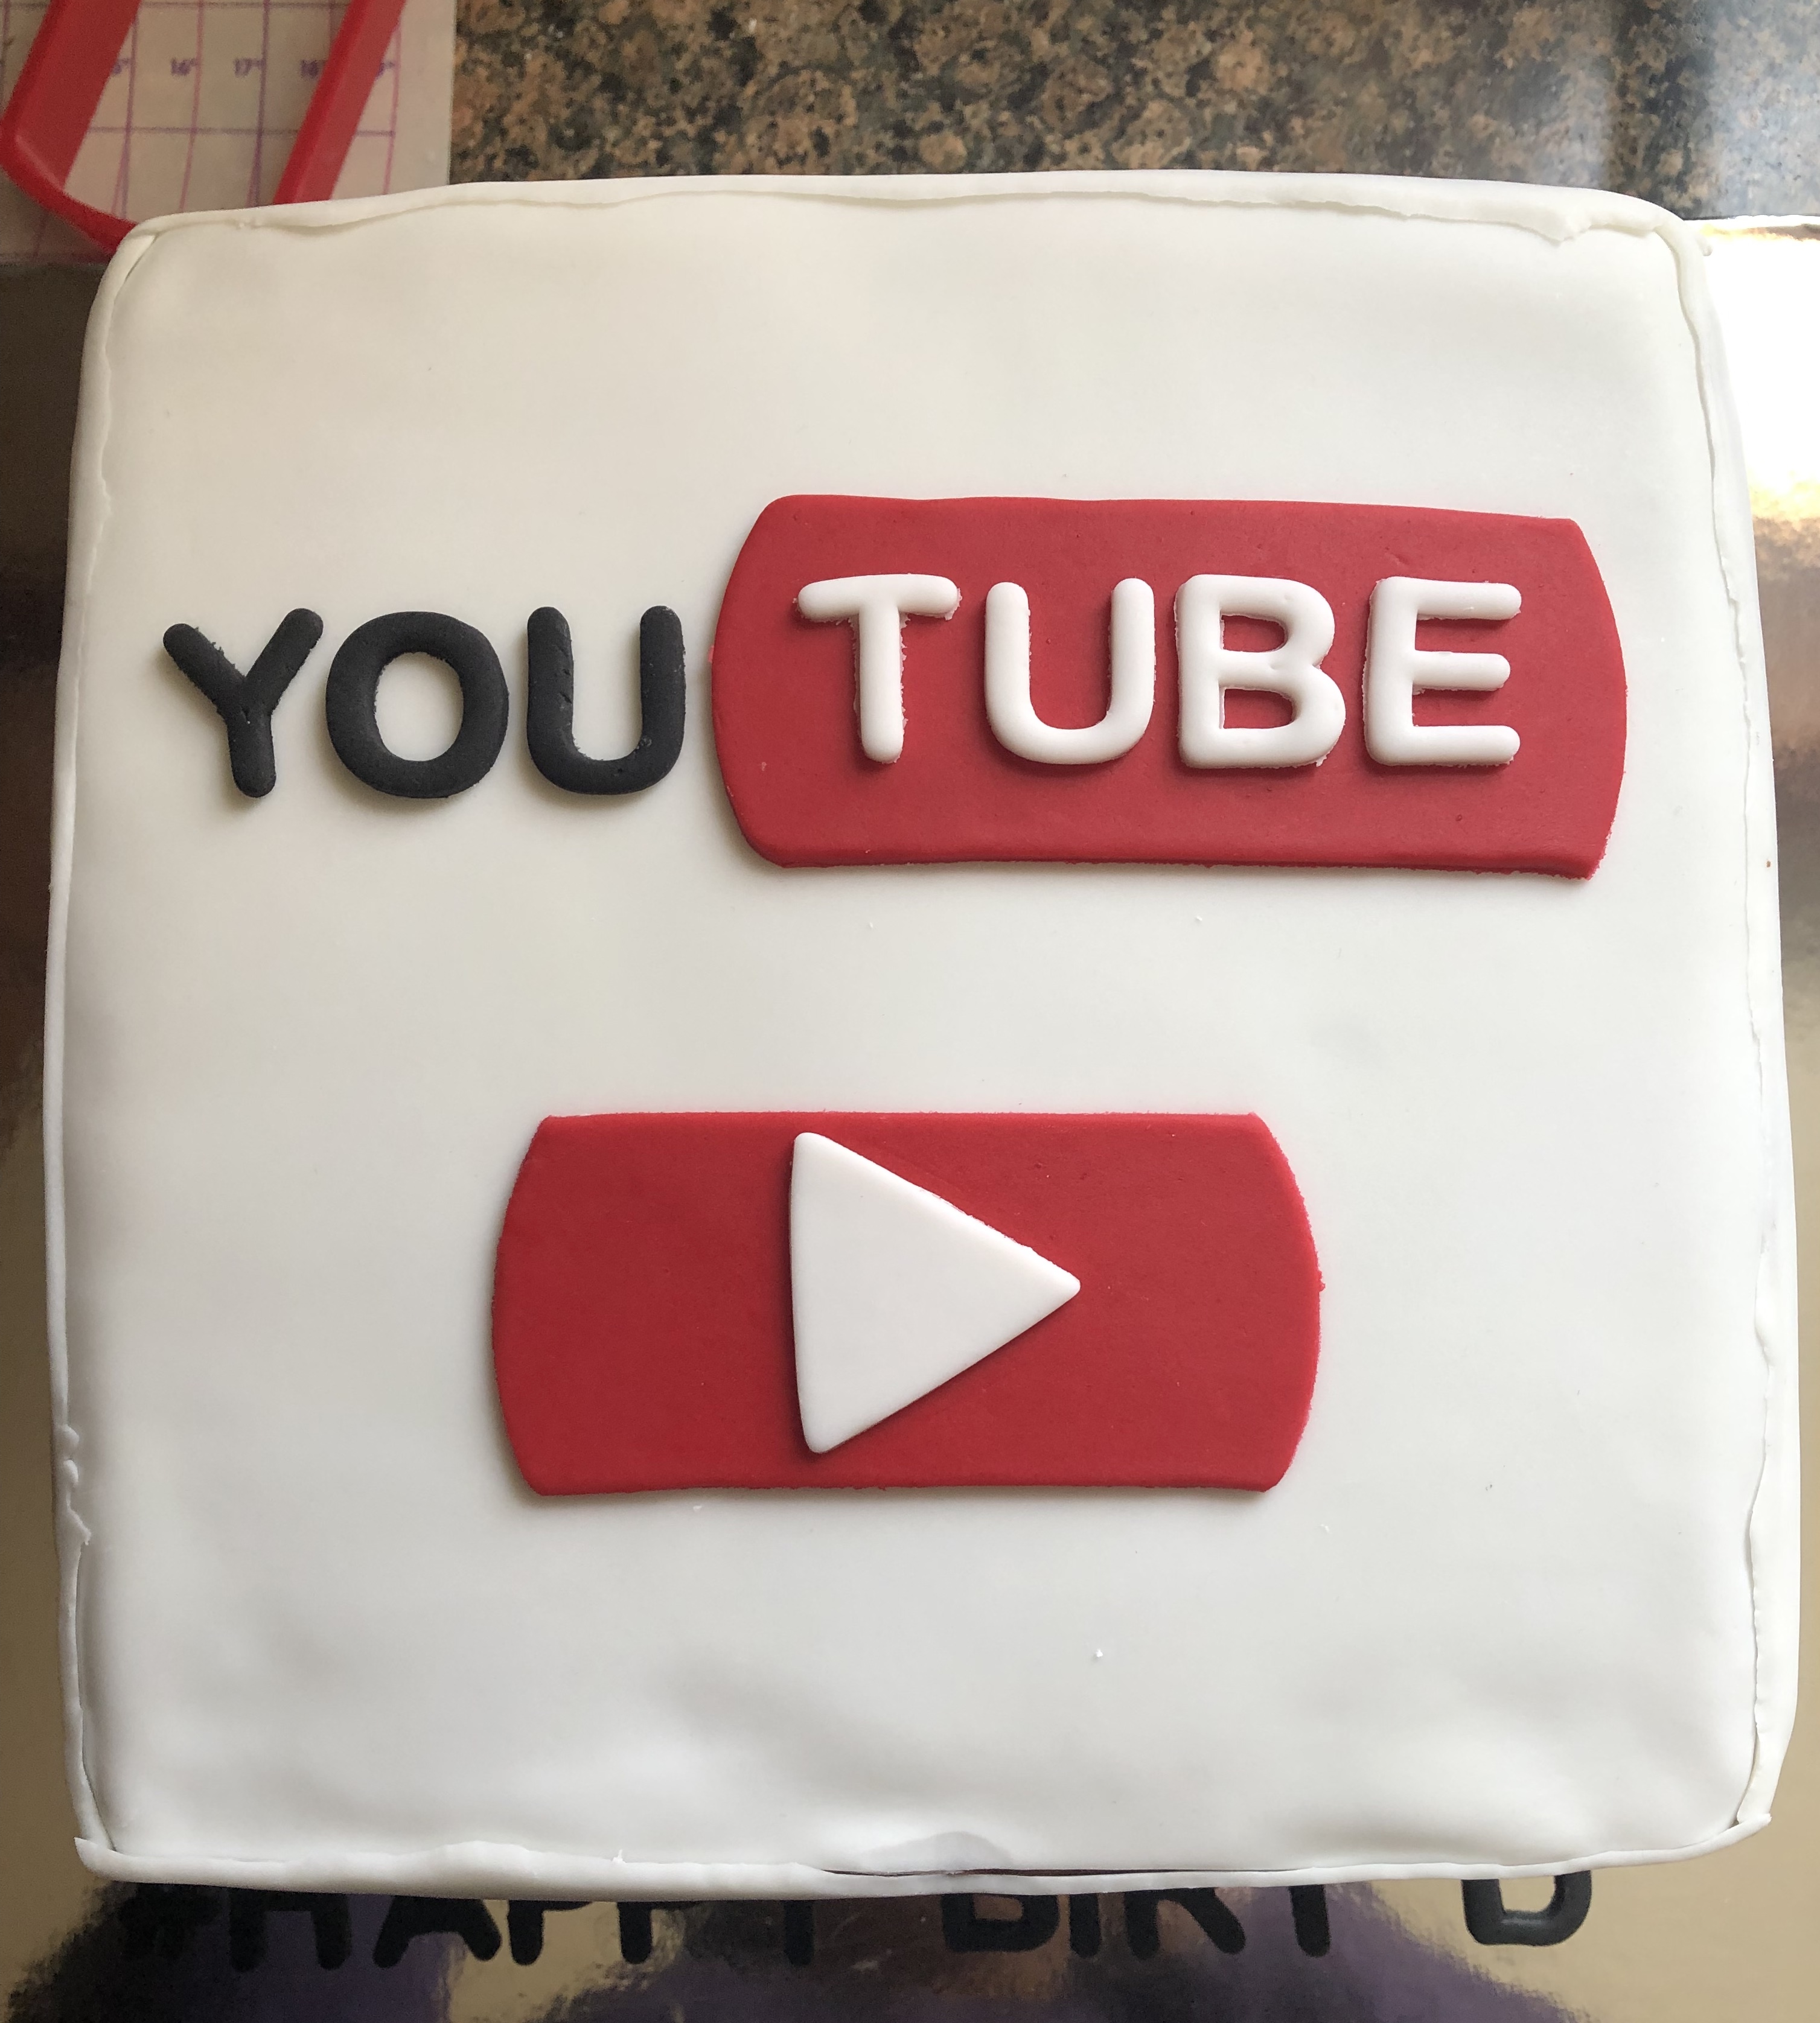
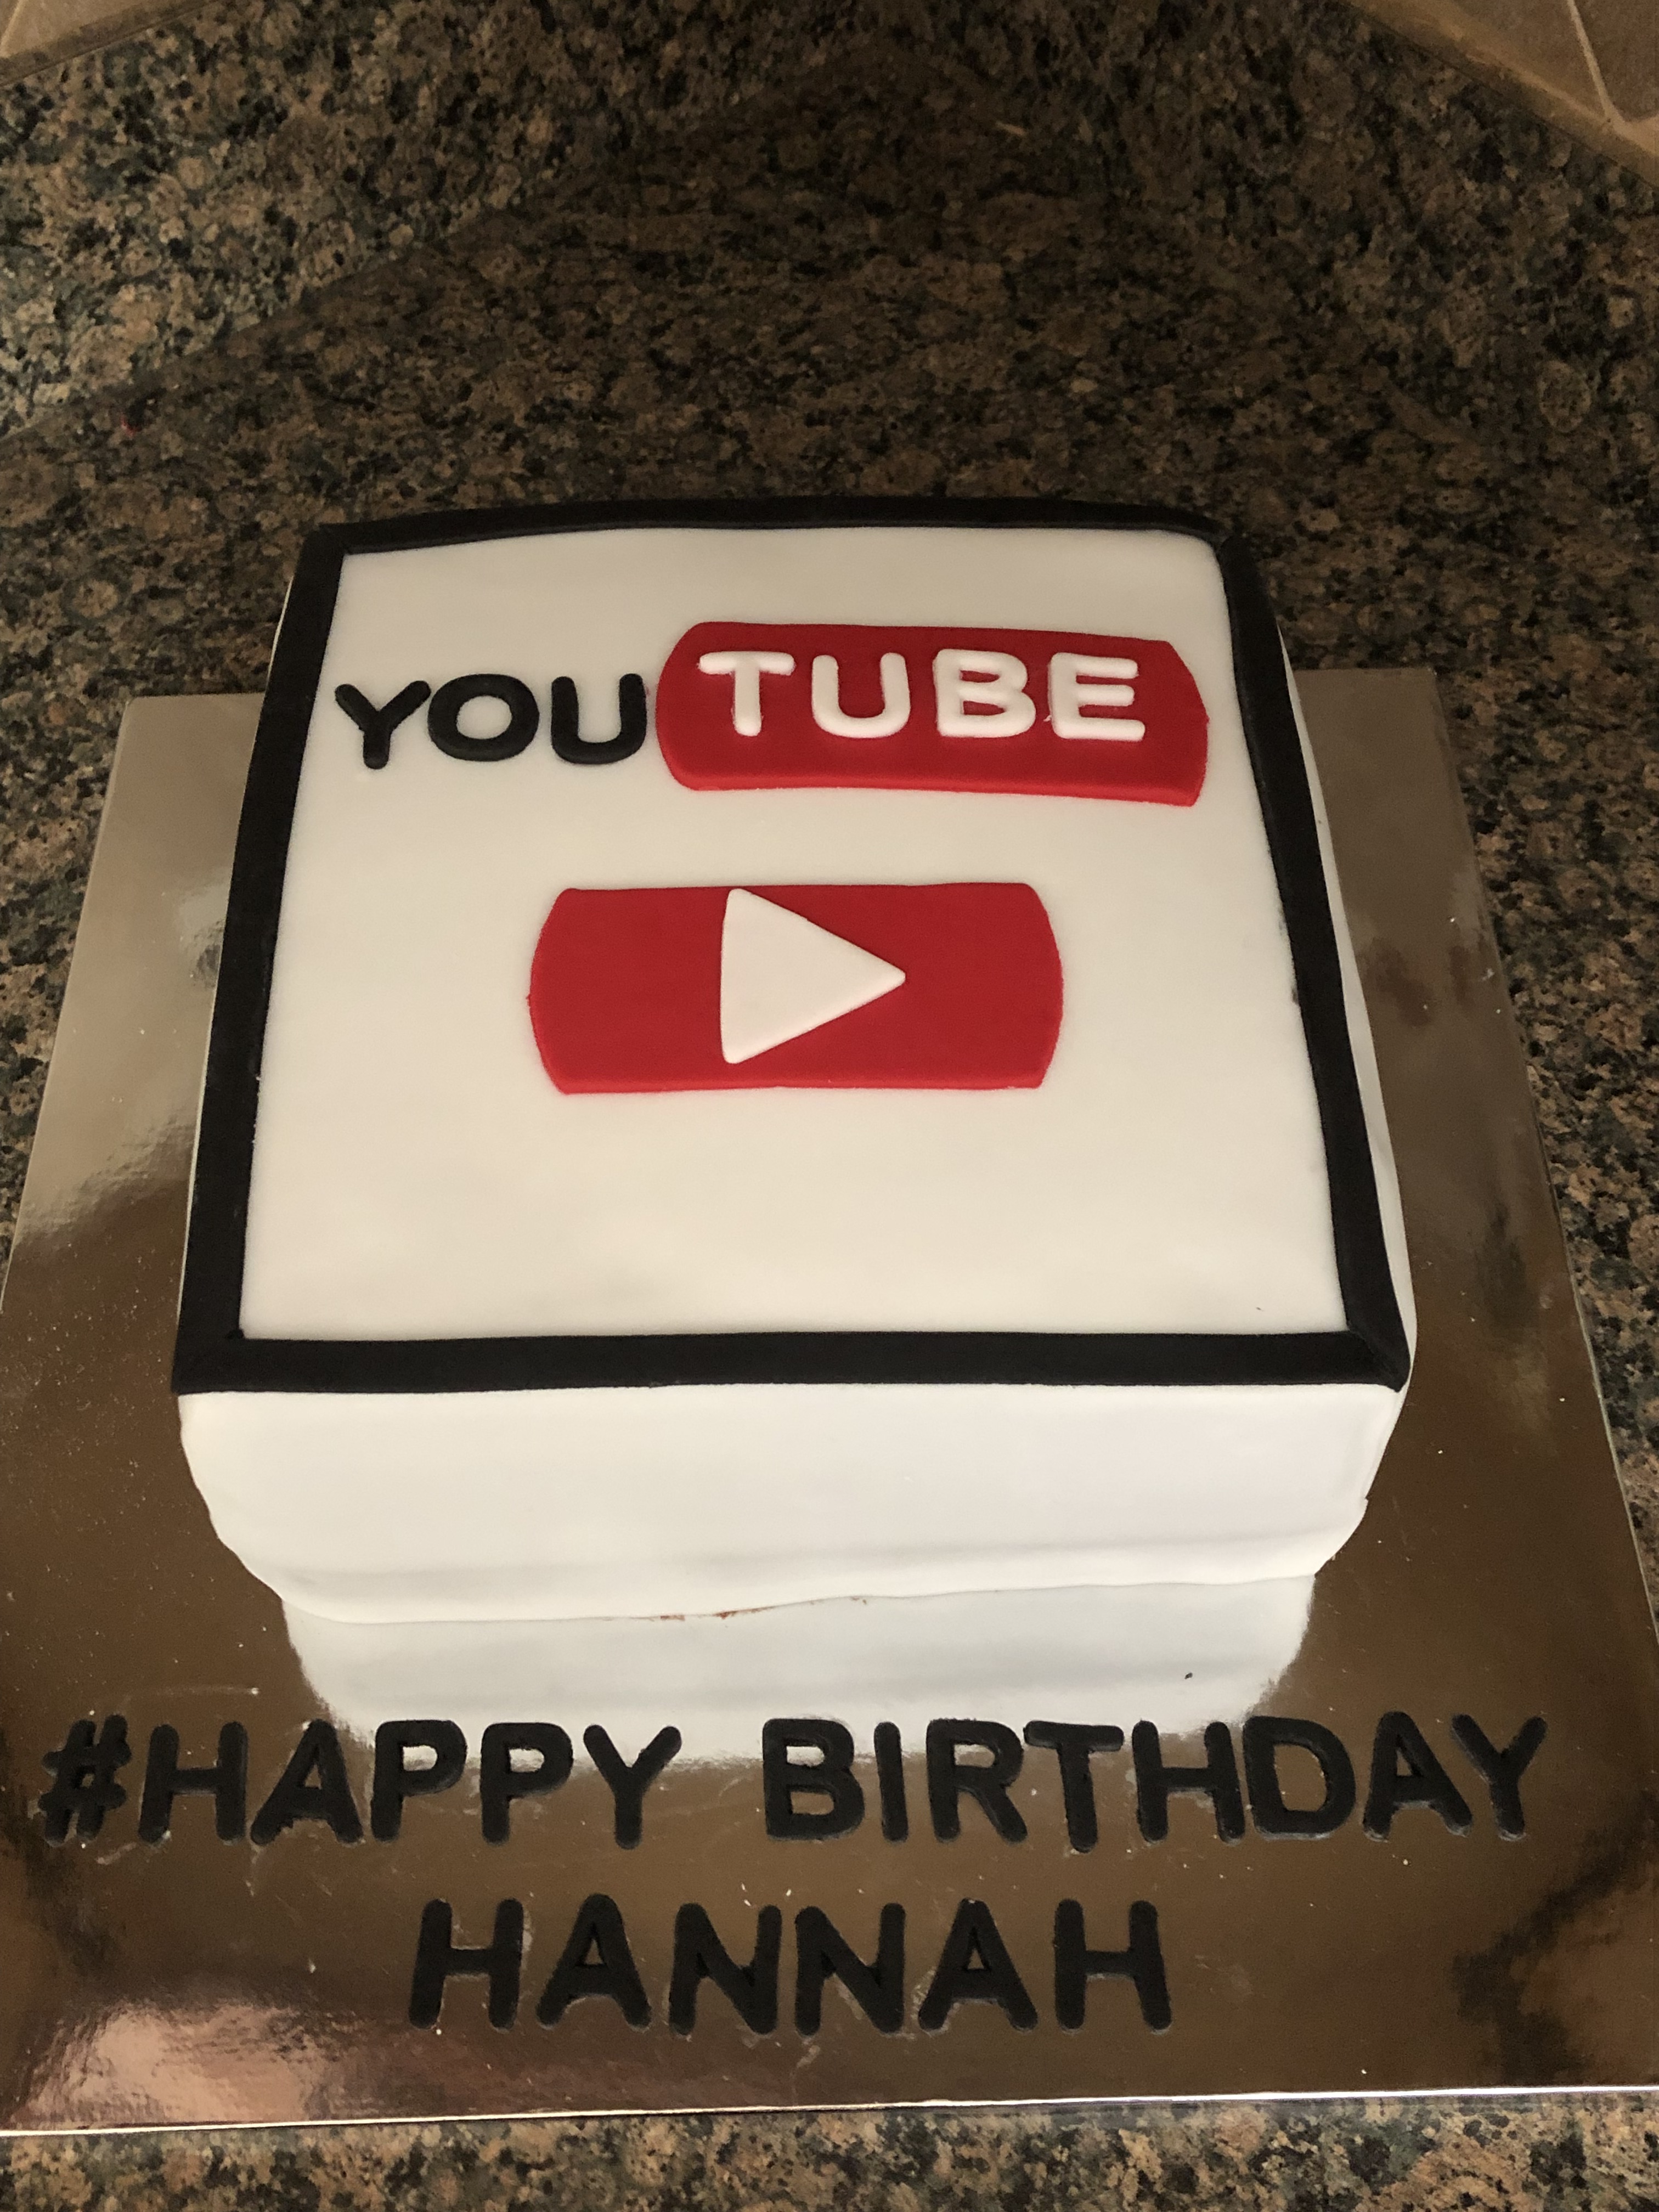
And while I used a box cake mix for the cake, I opted to make the frosting from scratch. I made a simple vanilla frosting that I planned to use for both the cake and cupcakes. After torting the cake, I placed the cut side down on a cake board and spread a thin layer of frosting over the top and sides. Then it was time to decorate. I opted to decorate the cake as the home jersey for the Knicks in white. Initially I was thinking of decorating it by using fondant paneling as I did with the YouTube themed cake I made earlier this year. And I even started doing so by cutting strips of white fondant and placing them on the sides of the cake. But, when it came to placing the top piece on I decided to cut it a little longer and wider than what I needed. And I am actually happy I did so. When you looked at the cake along the sides it almost looked like the jersey was draped and it gave the cake nice round edge.

After getting the white fondant done it was time to decorate with the blue and orange fondant to create the armholes and neck hole. At one point I was thinking of doing this part with frosting, but, I am happy I nixed that idea. The fondant gave it a much cleaner look and it was easier to correct any mistakes in measuring and placing. I rolled the fondant into strips and then cut them to form the curves. I let the pieces sit on the cake for a few minutes so they could take on curved shape while drying out a little to make it easier to adhere them to the cake with a dab of water. Next, I added the last name, which was a little tricky since I had limited space for all of the letters, but, I was able to make it work. At this point I took a break from decorating and placed the cake in the refrigerator to continue working on it the next day.

To create the numbers for the cake I purchased Wilton fondant molds. At first I had no clue how to use them. I knew I couldn’t use them as regular cookie cutters but I tried to anyway and it was a fail. I had a feeling that I would have to get the fondant into the crevice and then freeze it, but, just to be sure I did a quick Google search and my suspicions were correct. So, I pressed small amounts of fondant into the crevices and then placed the molds in the freezer for about a half hour. Once the fondant had frozen it was easy to remove it from the molds and I had a perfect 4 and 0.

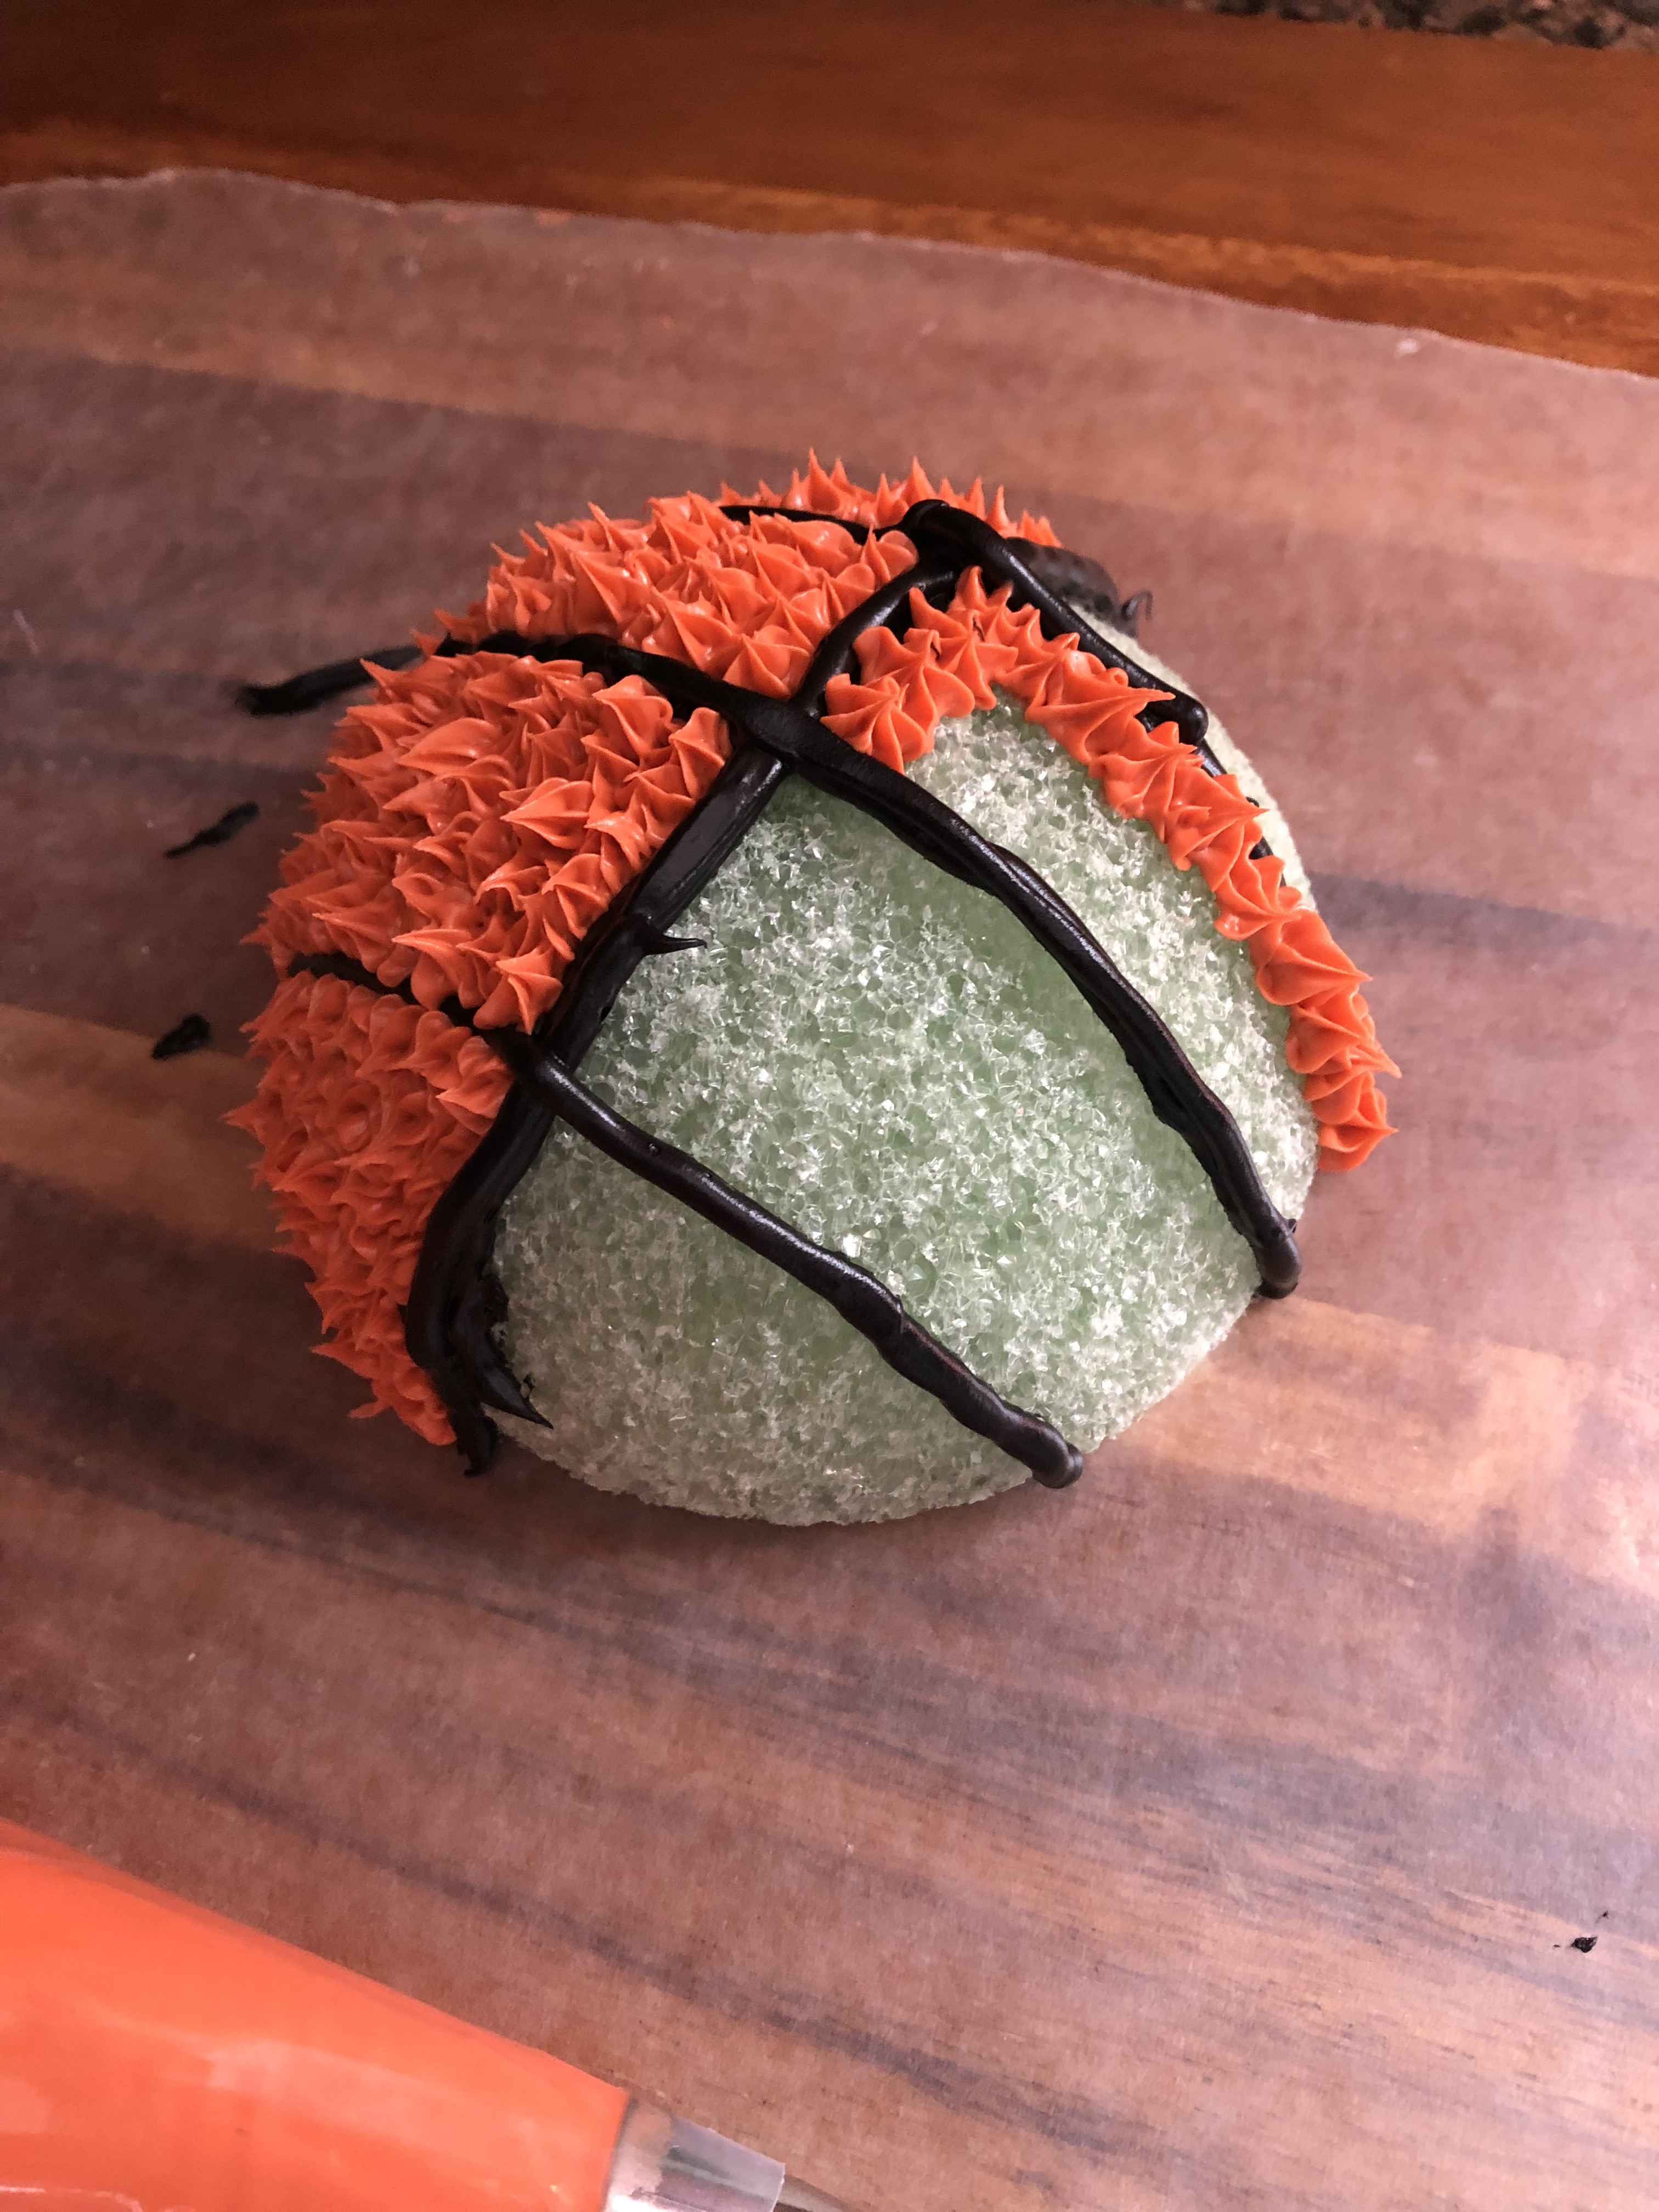
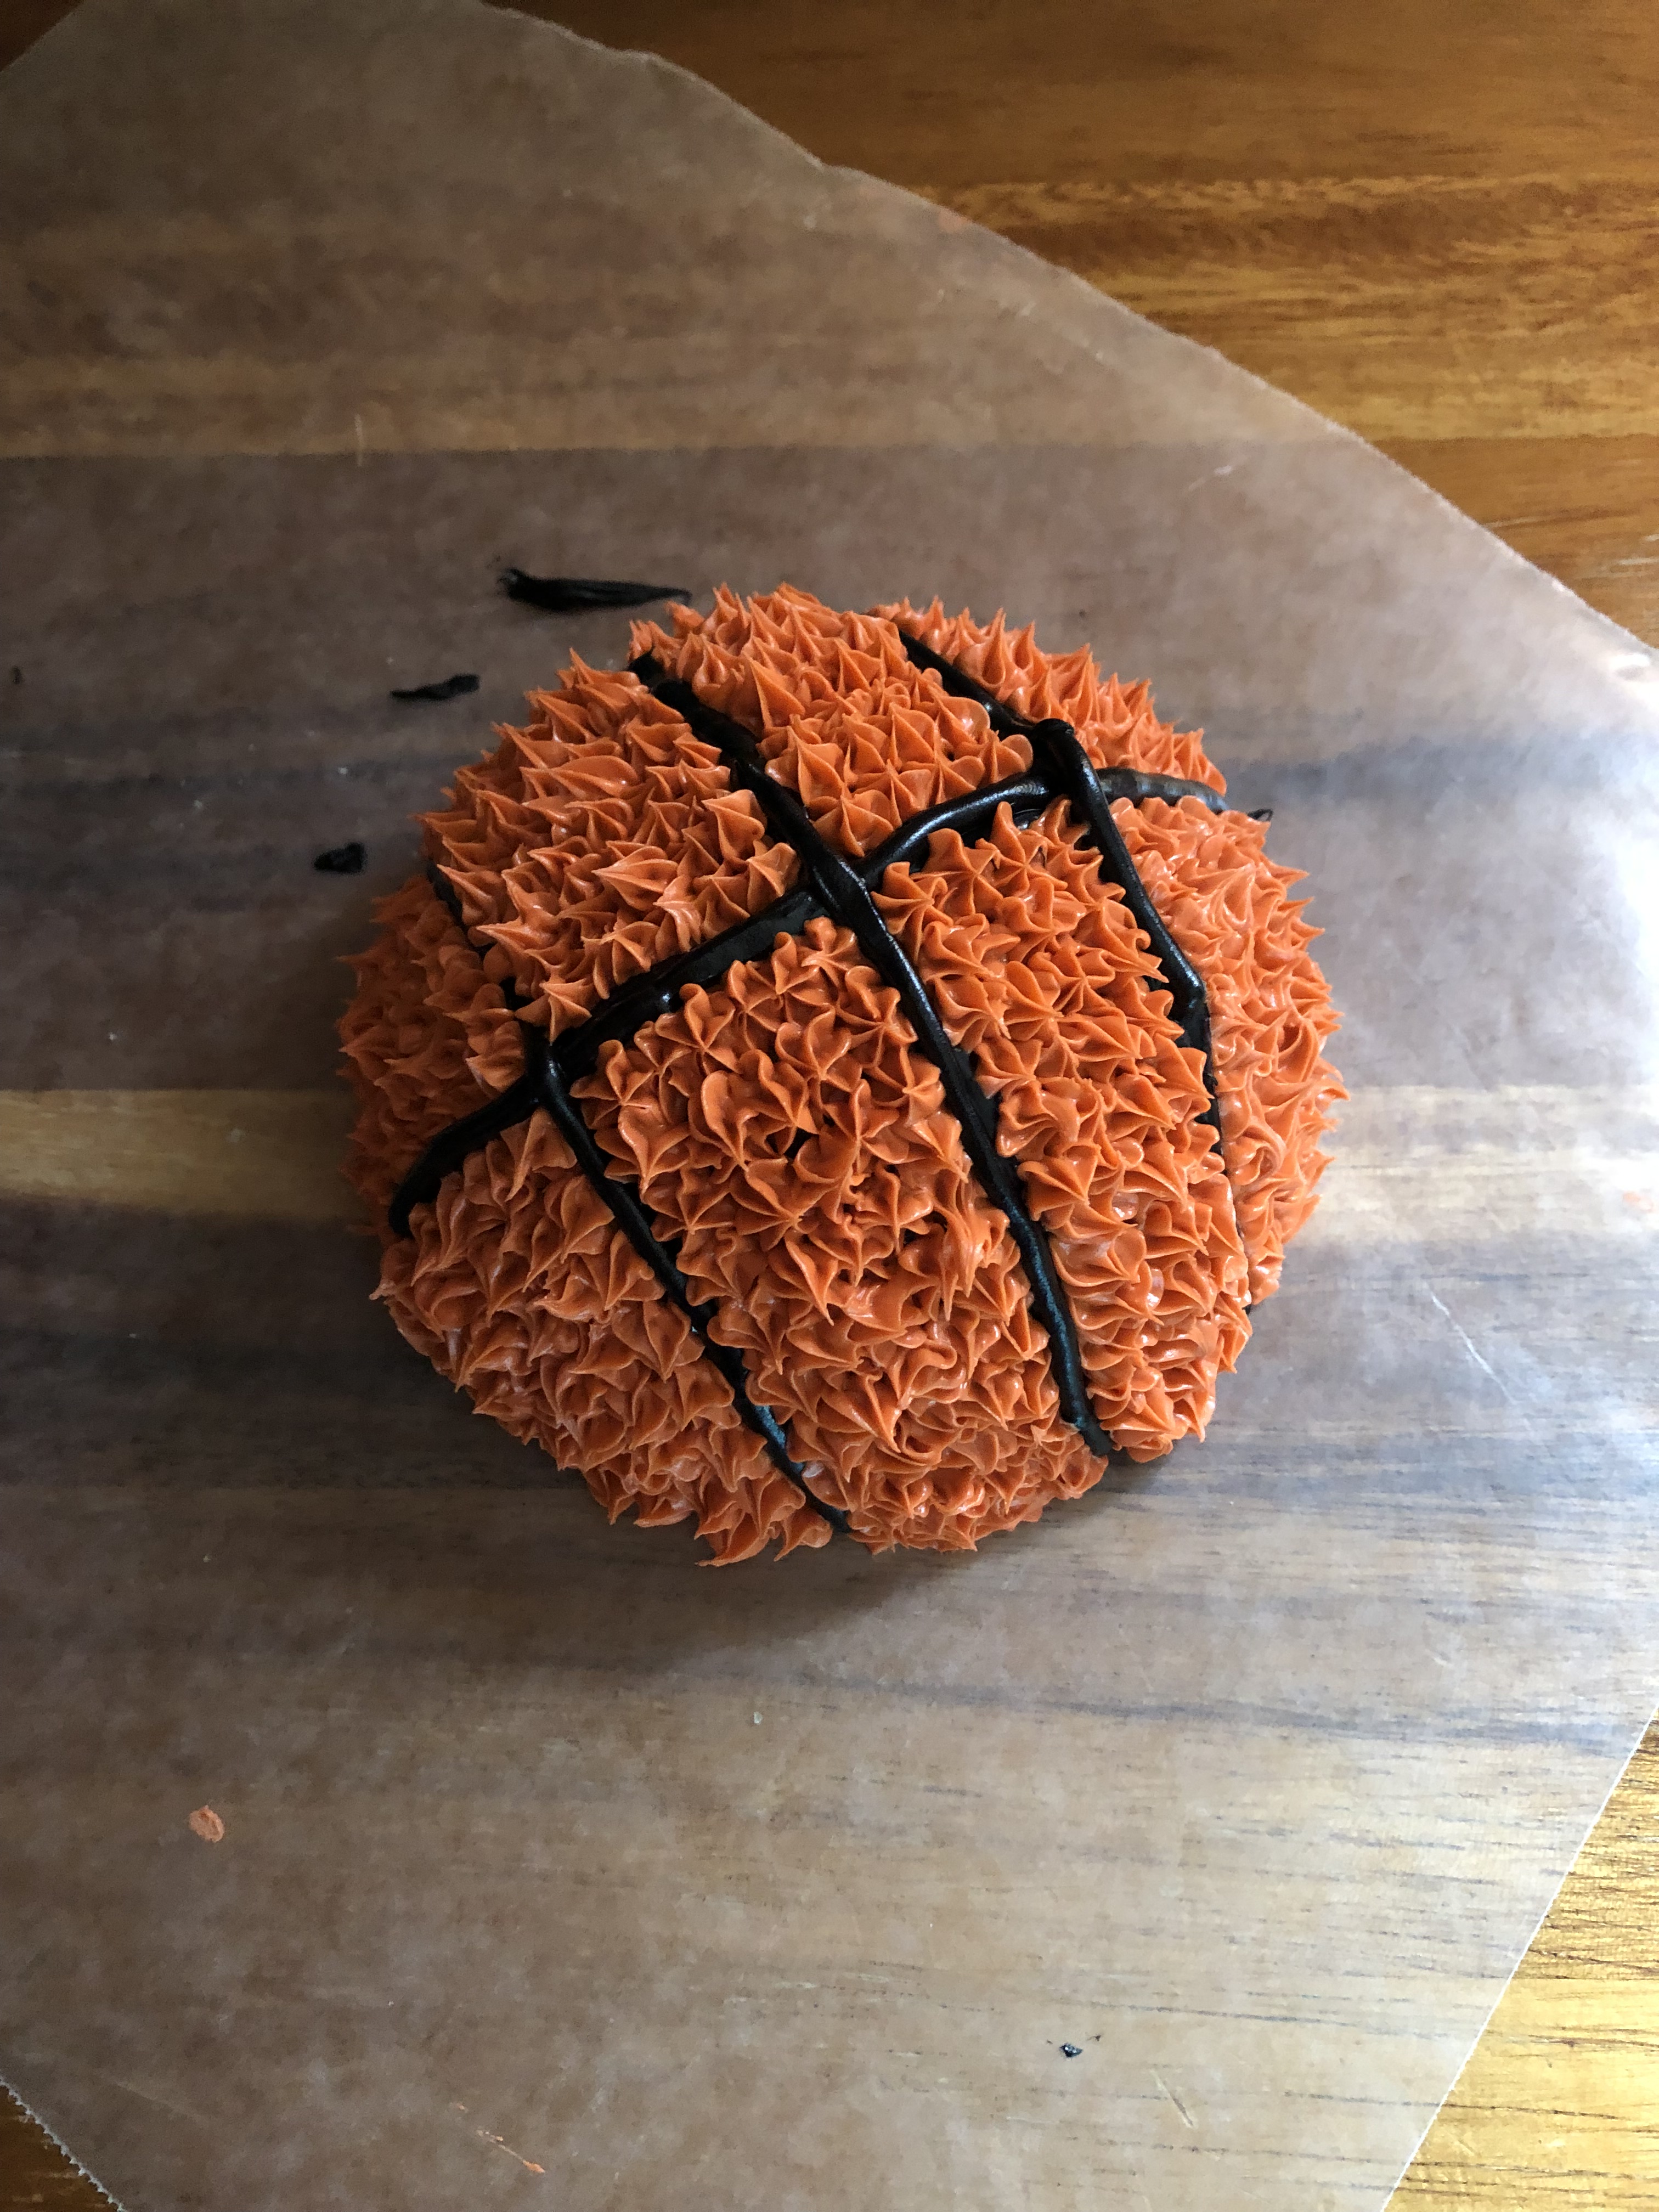
Now, to create the basketball on the cake I got pretty creative. I could have just done it with a mound of frosting, or shaped one of the cupcakes I made, but, while at the craft store picking up supplies for the cake I though why not cut a Styrofoam ball in half to create the perfect round shape. I was pretty sure I had Styrofoam balls at home from other craft projects, but, I wandered over to the aisle anyway and found something even better, a half round ball Styrofoam that I wouldn’t have to cut.

I began decorating it by creating the lines on the basketball. I tinted chocolate frosting with black food coloring (it’s much quicker and easier than using vanilla frosting) and simply piped the lines onto the Styrofoam. Next, I tinted about a cup of vanilla frosting with copper gel food coloring and using a small star tip I filled in the Styrofoam ball between the black lines with small stars. I decorated it on wax paper and then placed it in the fridge for an hour or so so the frosting could firm up before transferring it onto the cake.

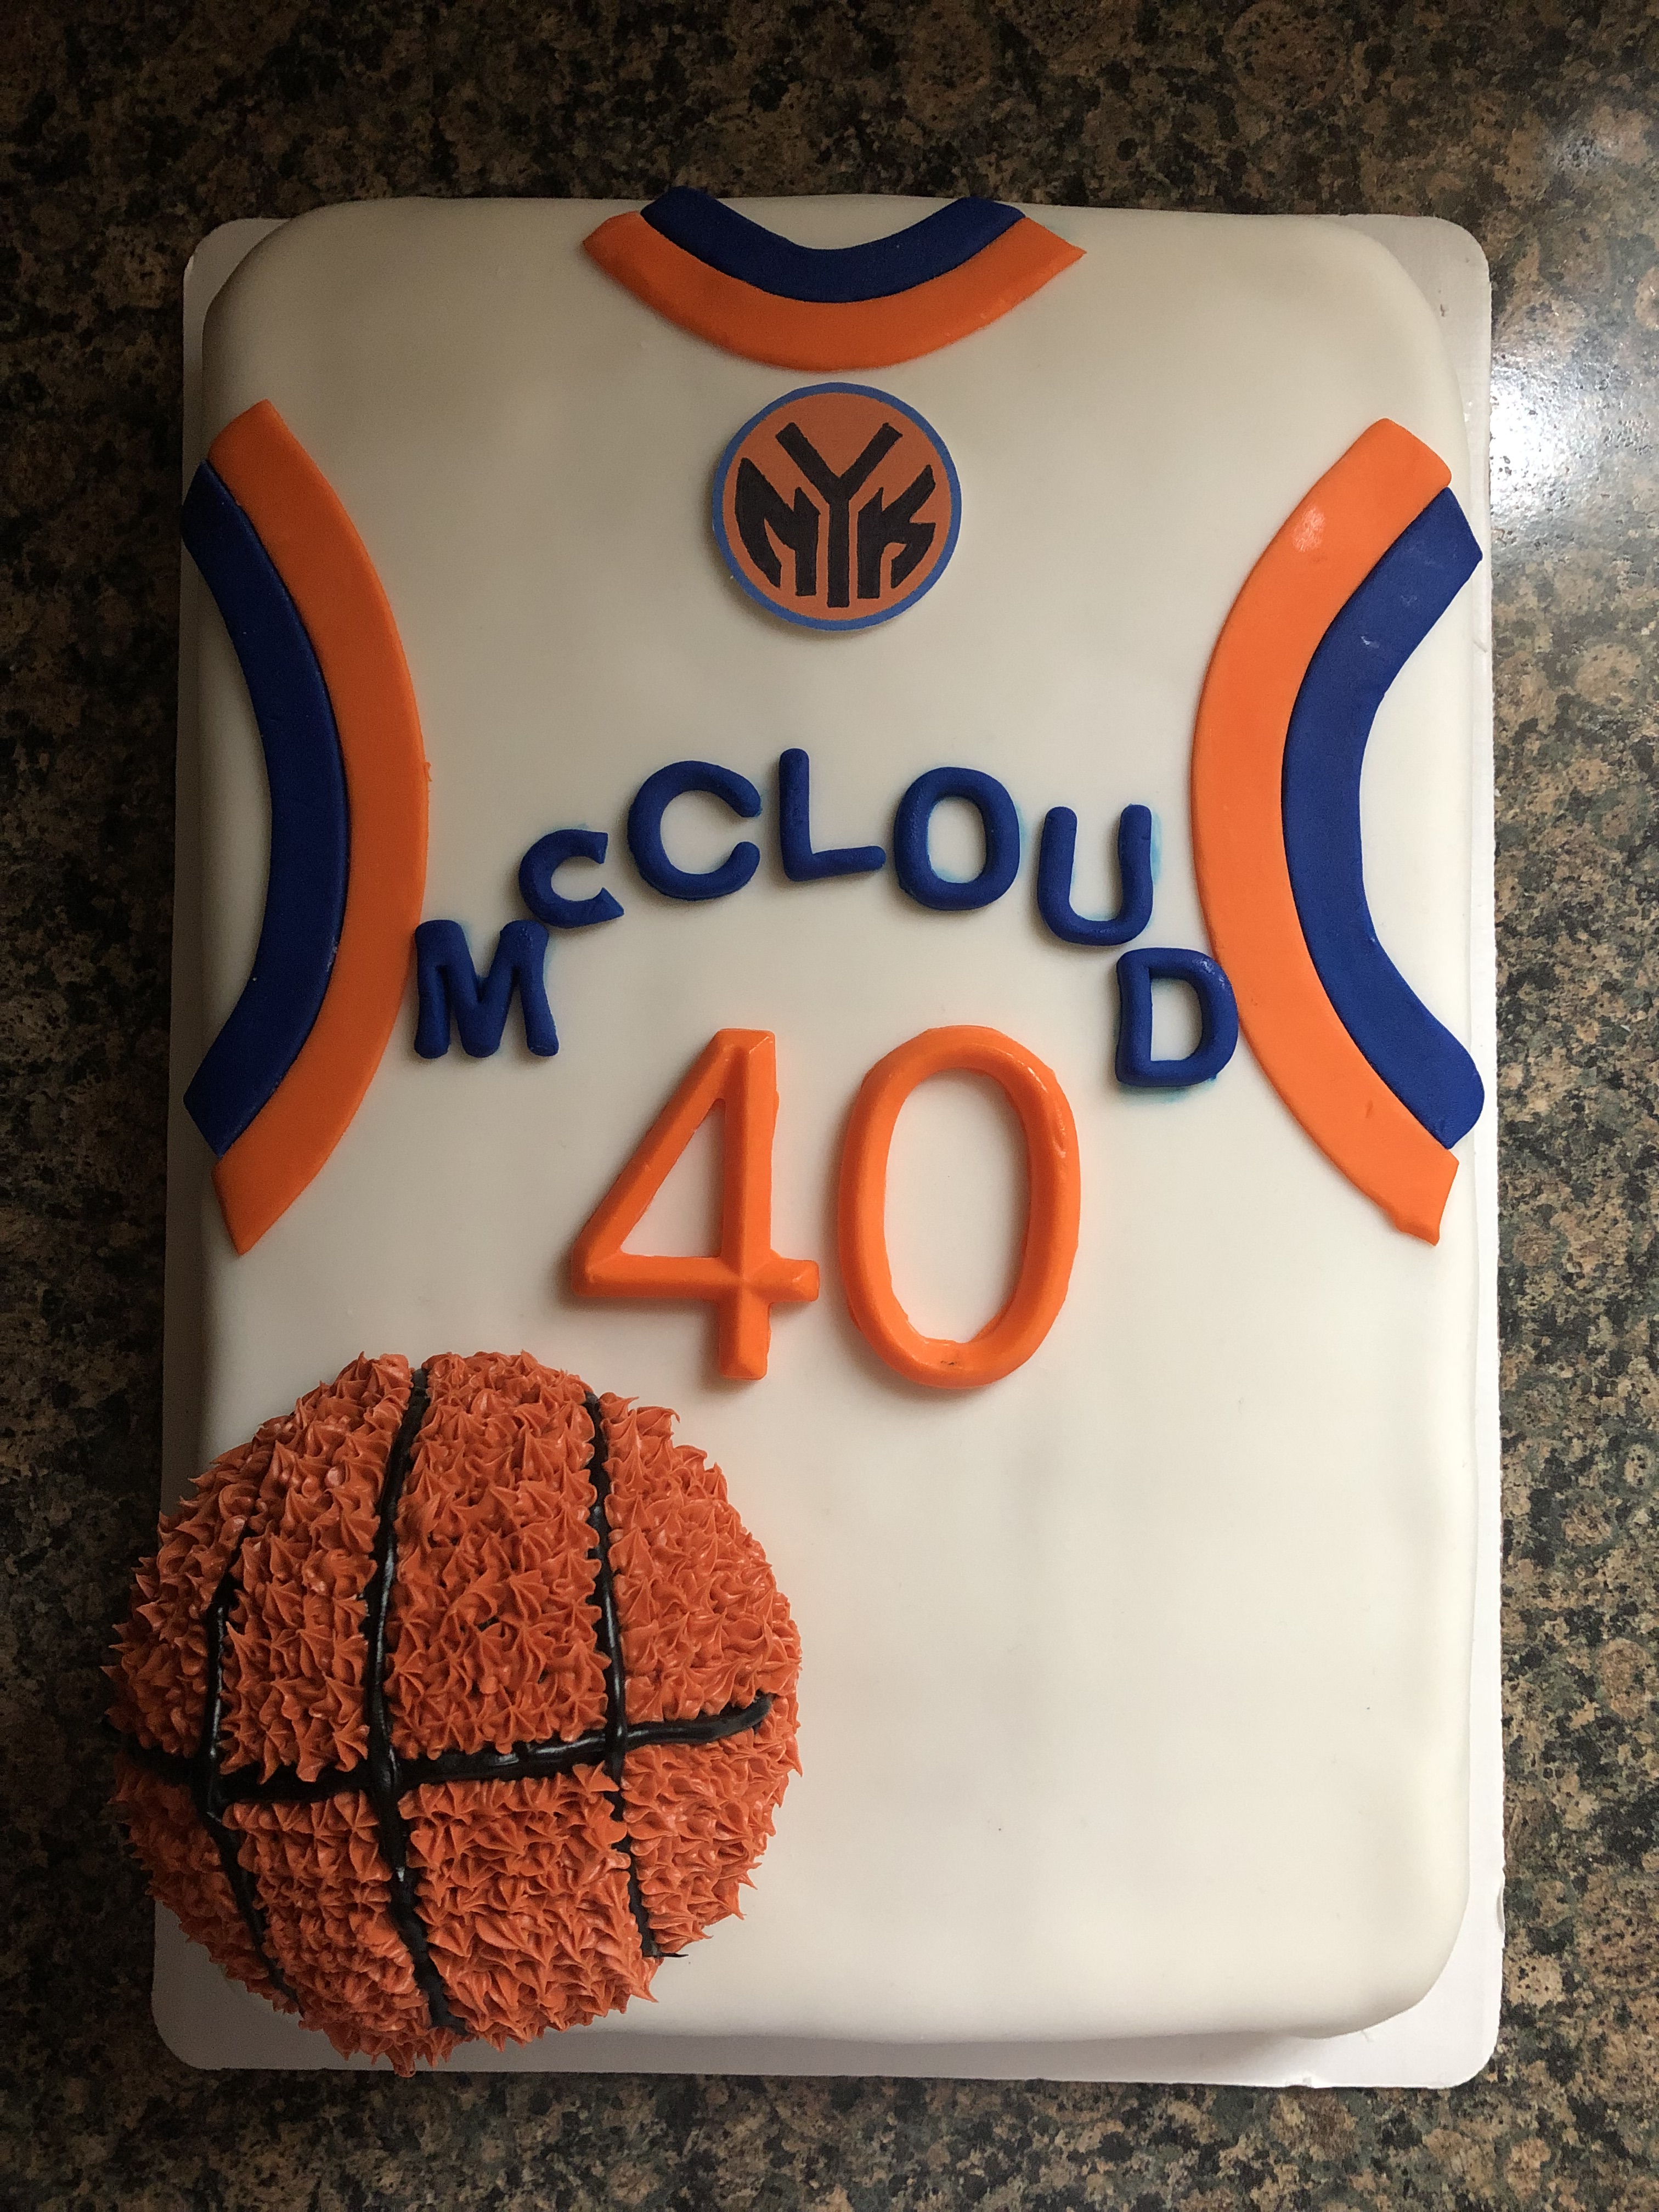
So, I had the numbers on the cake and the basketball, but, I felt like it needed something more..

To finish the cake I added the New York Knicks logo to the top. I could have been super creative and made it myself using fondant, but, I made it myself by printing it off the internet and then cutting it out. I definitely think that was the finishing piece the cake needed.

Everyone loved it and can I just say, there I something that is so delicious and comforting about a simple yellow cake.


YouTube Themed Cake

My blog started with an Elmo Cake for my niece’s birthday, and throughout the years there have been other character themed cakes, Minnie Mouse, Frozen, Trolls and last year’s Descendants. As you can see the themes aged as she did and by whatever was popular at the time. Well, fast forward 7 years and for her 9th birthday she requested a YouTube Cake. Initially she said she wanted the Cookies and Cream Cake I made a few months back (her younger sister will only eat Oreos in mini form thanks to that cake) but I guess she wasn’t ready to let go of a themed birthday cake just yet. Who knows what next year will bring, or what I will be making for my younger niece come June. I am thinking she’ll still want some sort of character.

Now, a YouTube cake sounded easy enough. It didn’t require any special decorations, the colors were simple (white, black and red) and I pretty much had all of the tools I needed to make it. But, there was one thing. While looking at some cakes on Pinterest and Instagram, I noticed that people opted to make their YouTube themed cakes round, but, I felt it really should be a square cake. Not that that was an issue, but then I wondered, how would I cover it in fondant? I sometimes have mishaps when covering round cakes (they seem to always tear) so I could only imagine that covering a square cake would be even more difficult. Especially trying to get the edges sharp. So, I thought, isn’t there a way I could panel the fondant. And of course a quick Google search assured me that yes, fondant paneling was possible and from the looks of it easier – I am actually thinking of trying the technique on the next round cake I make that needs to be covered in fondant. I decided to watch a few videos just to pick up a few tips and tricks. And I quickly learned that one of the keys to fondant paneling is to freeze the fondant for a few minutes after rolling and cutting it so it’s firm and easier to trim and place on the place.

I began by baking two 9-inch square chocolate cakes. After letting the cakes cool, I wrapped them in plastic wrap and left them on my kitchen counter. The following day I made a chocolate mousse filling for the cake and I took a major short-cut and used store bought chocolate frosting. I haven’t quite mastered making chocolate frosting myself. Anyone have a good foolproof recipe they can share? I leveled, filled and frosted the cake and then placed it in the refrigerator overnight.

The next day it was time to cover the cake in fondant. Normally I use confectioners’ sugar to dust my rolling mat and pin, but, opted this time to use cornstarch and what I found was that the fondant didn’t get as soft. I began by cutting a square piece for the top of the cake. To leave room for error, I cut the fondant about a quarter of an inch larger than what I needed it to be. To place it on the cake, I matched it to one corner of the cake so all I would have to trim was two sides. Now, I didn’t place this piece in the freezer since I thought it would be easy to trim it since it was just lying flat on the cake, a mistake. While I was able to trim it, it would have been easier had it been frozen.

Next, I covered the sides of the cake. Before I started though, I decided which sides of the cake would be the front, back and sides. This is important as you cover the sides of the cake first before the front and back. Since the cake is a square, all of the sides were the same length and width. I rolled and cut two pieces for the sides and placed them in the freezer on a cookie sheet for 5 minutes. After the 5 minutes I removed them and before placing them on the cake, I lightly brushed the cake with water so the fondant would adhere better. As I did with the top piece, I lined the fondant piece with one bottom corner of the cake and then used my fondant smoother to smooth (and stick) the fondant onto the cake. I then trimmed the fondant. I used a small knife that I sharpened. I think next time I will purchase an X-Acto knife to get a cleaner and closer cut. I repeated this three more times and was pretty happy with my end result. It wasn’t perfect, but, I was happy that I didn’t have any mishaps and that my fondant actually stuck to the cake and that I had clean edges and no fondant tears! I would have benefitted from trimming my cake prior to frosting it so it would have sharper and cleaners sides. Each time is a learning experience so I am sure next will be better.

Then it was time to make this square into a YouTube cake. I cut out letters and a triangle (for the play button) using white and black fondant. For the red pieces, I actually used a band aid cookie cutter I purchased to make a Doc McStuffins themed cake a few years back.

And to cover up the unfinished edges around the cake, I decided to put a black trim over it. To adhere all of these pieces I lightly brushed the back of them with a little water. And that was it. This cake was a hit with the Birthday girl and everyone who saw it!

This is the recipe I used for the chocolate cake. I have been using it for years now and haven’t had any issues or complaints. As for the chocolate mousse, I used the mousse recipe I made for the Spice Cupcakes and instead of using a box of pumpkin spice Jell-O mix I used chocolate.

Sugar Skull Cake

Feliz Dia De Los Muertos! Today is the final day of the three-day celebration to remember and honor loved ones who have died. If you want a little more info on the holiday check out my Dia De Los Muertos Cupcakes blog post. In celebration of the day I am sharing with you a Sugar Skull Cake. Sugar Skulls, or Calaveras, are often used to decorate the ofrendas (offerings) & gravestones during the three-day celebration. They got their name because they are traditionally made of clay molded sugar and then decorated with colorful adornments. The sugar skull I created definitely has sugar in it, but, not molded sugar. I opted to make a chocolate cake, frosted it with buttercream frosting and then decorated it with fondant and confetti sprinkles.

To begin, using the same skeleton pan I used to make my Mummy Cake, I baked a chocolate cake – I used a box cake mix. After letting the cake cool I covered it in plastic wrap and refrigerated it overnight.

The next day, I made a batch of Brenda’s Bakery Buttercream – also the same frosting I used for the Mummy Cake. After removing the cake from the refrigerator, I used a large circle cookie cutter to cut out larger eyes for the skull. I used the cookie cutter to make an indentation in the cake and then used a butterknife to carve out the eyes.

Next, I crumb coated the cake and placed it back in the refrigerator so the frosting could set, about a half hour.

After 30 minutes I finished frosting the cake. I added a little extra frosting in the cheek area so the skull would have a more defined look. I then placed it back in the refrigerator so the frosting could firm up.

Once the frosting was firm, I removed the cake from the refrigerator and attempted to smooth the spatula swipe marks by laying a piece of paper towel on sections of the cake and then gently rubbed the sections with my fingers. This worked for the most part, except I then had the imprint of the paper towel on my cake.

Then, the fun part began. I brought my skull to life using fondant & sprinkles. Luckily, I had left-over fondant from the Trolls Cake I made last year. Don’t worry, the fondant was un-opened and still good. Using black fondant and the same round cookie cutter I used to widen the eyes I cut out eye sockets. For the mouth, I actually had a band aid cookie cutter from a Doc McStuffins themed cake I made last year that was the perfect size. You could easily cut out a rectangle using black fondant though. For the nose socket, I cut out a pink heat and then placed it on the cake upside down. And for the rest of the cake I used daisy cutters to cut out different sizes to decorate around the cake along with confetti sprinkles. This was probably one of the simplest cakes I decorated (I feel like I say that about a lot of cakes these days!)

For a more detailed instruction on creating your own Sugar Skull cake check out The Cake Girls


Descendants Themed Cake

It’s my Blogiversary! I started this blog 6 years ago and my very first post was an Elmo Cake I created for a friend’s daughter, aka my niece. Since then the cakes have gotten a bit more elaborate and 3 years ago they turned into fondant creations. I normally ask her a month or so in advance of her birthday what theme she’s thinking of. When she told me Descendants for this year I was stumped. I had only heard of Descendants, but had no clue what the deal was behind them. So, it was off to Pinterest to get some ideas. Once I had my idea down it was time to get my supplies and test out a few.

I needed to make sure that the icing was easily pipeable and also to test how thick the piping would be with the tip it came with. I opted to go with a smaller tip.

I also needed to make sure that the flower cut-out I purchased would make nice roses. Thankfully it did.

One more thing, I opted to purchase a dummy cake for the top tier of the cake. I normally do bake the cake, but, it usually doesn’t get eaten because it’s too much cake, so, to avoid waste and a little bit of stress on my part I purchased a dummy cake. In case you are wondering, it’s made out of Styrofoam. No one knew it was a dummy cake once it was covered and decorated.

To prep the dummy cake I covered it in frosting

I then covered it, as well as the actual cake, in fondant.

And after some piping, fondant rolling and cutting the cake came together. I have definitely learned with making these cakes that it’s important to walk away for a few minutes and then come back to truly appreciate the way it looks. So, I take a lot of mini-breaks, if not, I would probably drive myself crazy. One thing I did decide, I am going to avoid covering a cake with black fondant. I find that it tends to dry out fast and inevitably it always breaks. I had a few challenges trying to cover up the imperfections from it.

So, what will my next themed cake be…? Not sure yet. I’ll have to ask my other niece what’s she’s thinking of for her June birthday!


Happy Blogiversary and a Trolls Inspired Cake

It’s my 5 year Blogiversary and I am celebrating with a Trolls inspired cake. Okay, not really. But, it truly is the 5-year anniversary of Bead Yarn & Spatula. Boy, where does the time go? And I’ll be honest I wish my blog was further along and had more exposure than it currently does but I know I am part to blame for that. I definitely need to be more consistent with the posting. Hopefully this year I’ll be better with that. As for the Trolls inspired cake, I really did create one. But, it was for a friend’s daughter’s Birthday.

This cake was a three day process. And can I say I am always apprehensive to work with fondant because you just don’t know what’s going to happen. It’s not as consistent as buttercream that’s for sure. But, it does make for a beautiful cake and is worth the extra work. On the first day, which only took about a half hour or so I created the rainbow that was going to sit on top of the cake. I made it a few days early to ensure that the fondant would harden and hold the arch shape. I rolled each color of the fondant about the same width and stuck them together by brushing the fondant with a little water, not too much as I didn’t want the colors to run. I used a 2-inch round cookie cutter as my base for the first arch and continued from there with the other colors. Once the rainbow was complete I stuck toothpicks into the bottom of it so I would be able to stick it on to the cake.

img_0367img_0371

The night before I was to cover the cakes with fondant I baked them. I don’t like baking my cakes too early because I want them to still be fresh when they are cut into. The bottom portion of this two-tier cake was a three-layer chocolate cake with a chocolate mousse filling and chocolate frosting. While the top portion was a yellow cake that I filled and frosted with chocolate frosting. After letting the cakes cool overnight I frosted and filled them the following morning and then placed them in the refrigerator so they could settle.

That afternoon I removed both cakes from the refrigerator and let them come to room temperature. You don’t want to place fondant on a cold cake because fondant is at room temperature and if you place it on a cold cake you will end up with a bunch of air bubbles; that can be quickly remedied with a pin but, why go through that if need not be.

For the bottom tier of the cake I covered it with yellow fondant and then with neon colored fondant I cut out flower designs to adhere to the cake. And to cover up any fondant imperfections along the bottom of the cake I opted for a half circle design around it in pink fondant…

img_0373

Which matched the top tier of the cake that I decorated to mimic the headband that the Poppy troll wears in her hair.

img_0374

I placed both of the tiers back in the fridge until the following afternoon when I completed the top tier of the cake by placing the rainbow on top of it and used marshmallows to mimic clouds. They stuck together and to the cake with just a few drops of water. That’s also how I stuck all the flowers and such to the cake. Once again though with not too much water so the colors don’t begin to run.

img_0375

And this cake wasn’t complete until a few trolls were placed on it. Of course Poppy and Branch, the main characters from the Trolls movie and a few of their friends. And if you haven’t seen the movie I highly suggest you do so. The message behind it is good for all ages to learn or to be reminded of.

img_0389

And there you have it… My 5-year anniversary post and an adorable – if I do so say myself – Trolls inspired cake. The Birthday Girl loved it and that’s really all that matters to be honest!


1 Week, 3 Cakes & 48 Cupcakes!

Recently I was elbow deep in flour, sugar and butter for the better part of a week creating some lovely cakes for some momentous occasions – a friend’s daughters’ first birthday and her older daughters’ pre-k graduation.

To kick off my week of cake baking & decorating I made a 3-tier 9-inch white cake layered with vanilla mousse and covered with pink tinted vanilla frosting. I didn’t just simply frost the cake though; I opted to decorate it with buttercream ruffles. To create the ruffles I used a No. 125 Wilton Tip, which is considered a petal tip. Unfortunately I didn’t take any pictures of the process, only the final product. I began by applying a thin layer of frosting to the cake so the ruffles would be able to stick to it. To ensure that the ruffles would be evenly spaced and the same width throughout I used a straight-edge to score the cake. Since I had placed the cake on a cake board that had half-circles around it I used that as my guide to create the lines. Once that was done I scored lines along the top of the cake towards the center. I made those lines double the width of those along the sides of the cake. I then filled my pastry bag that was fitted with the tip and began creating the ruffles. With the thicker side of the tip against the cake I began making the ruffles starting and ending the ruffle when I hit one of the score lines. This video shows the process I used.

IMG_7895

And once I got the cake to its intended destination I topped it with a cake banner topper I made. I did receive one complaint about this cake… It was too nice to cut. I was very happy with how it came out; it looked just like how I envisioned it. But, more importantly it was delicious. The Vanilla Mousse filling was perfect and the frosting wasn’t too sweet, and lastly the cake was incredibly moist and light.

IMG_7917

Next up was another cake to celebrate that first birthday. This time it was a two-tier fondant covered Mickey & Minnie Mouse themed cake. I actually had a bit of anxiety to make this cake. You never know what’s going to happen when you are working with fondant – mainly will it tear!?!? Thankfully there were no tears whatsoever, but, there was an air bubble here and there that was quickly remedied with a needle.

IMG_7976

And to go along with the cake there were cupcakes that followed along with the Mickey & Minnie Mouse theme. These cupcakes actually did cause me some stress. Initially I was planning on using Mickey Mouse themed liners, actually I did use them to bake the first batch of 48 cupcakes but those liners were on the smaller side so my cupcakes all looked like they had been nibbled a little around the edges once I took them out of the cupcake pan. Definitely not something that was presentable and couldn’t be masked with frosting. So, I baked another 48 cupcakes (this blog title should really read 96 cupcakes!) using white cupcake liners that I picked up at a restaurant supply store quite some time ago. It’s a package of 500, so I’ll be using them for quite some time. But, thankfully they turned out perfect cupcakes that I then topped with vanilla buttercream frosting – the same frosting I used for the first cake. I then topped them with Mickey Mouse picks and Mickey Mouse sticker button picks (I made these) to ensure the theme traveled through to the cupcakes. Oh, and since not everyone is a sprinkle lover like myself, I only covered have of the cupcakes with sprinkles.

IMG_7965

The cake and cupcakes together…

IMG_8001

And finally, a cake to celebrate a Pre-K graduation. The young graduate requested chocolate, so I made a Triple Death by Chocolate Cake – Chocolate Cake, Chocolate Mousse and Chocolate Frosting. It was a lot of chocolate but delicious nonetheless. To decorate this cake I opted to cover it with rosettes using a No. 22 Wilton Tip. Initially I was going to use a 1M Tip, but my rosettes just looked too sloppy so big. And to finish it off I topped it with another cake banner topper that I made.

IMG_8088

After a week like this I think I’ll take a break from cakes and cupcakes and stick to cookies for a bit!


%d bloggers like this: