Cookies and Cream Cake

If you love Oreos then this is the cake for you… A Cookies and Cream Cake that has crushed Oreos baked into the batter as well as folded into the buttercream.

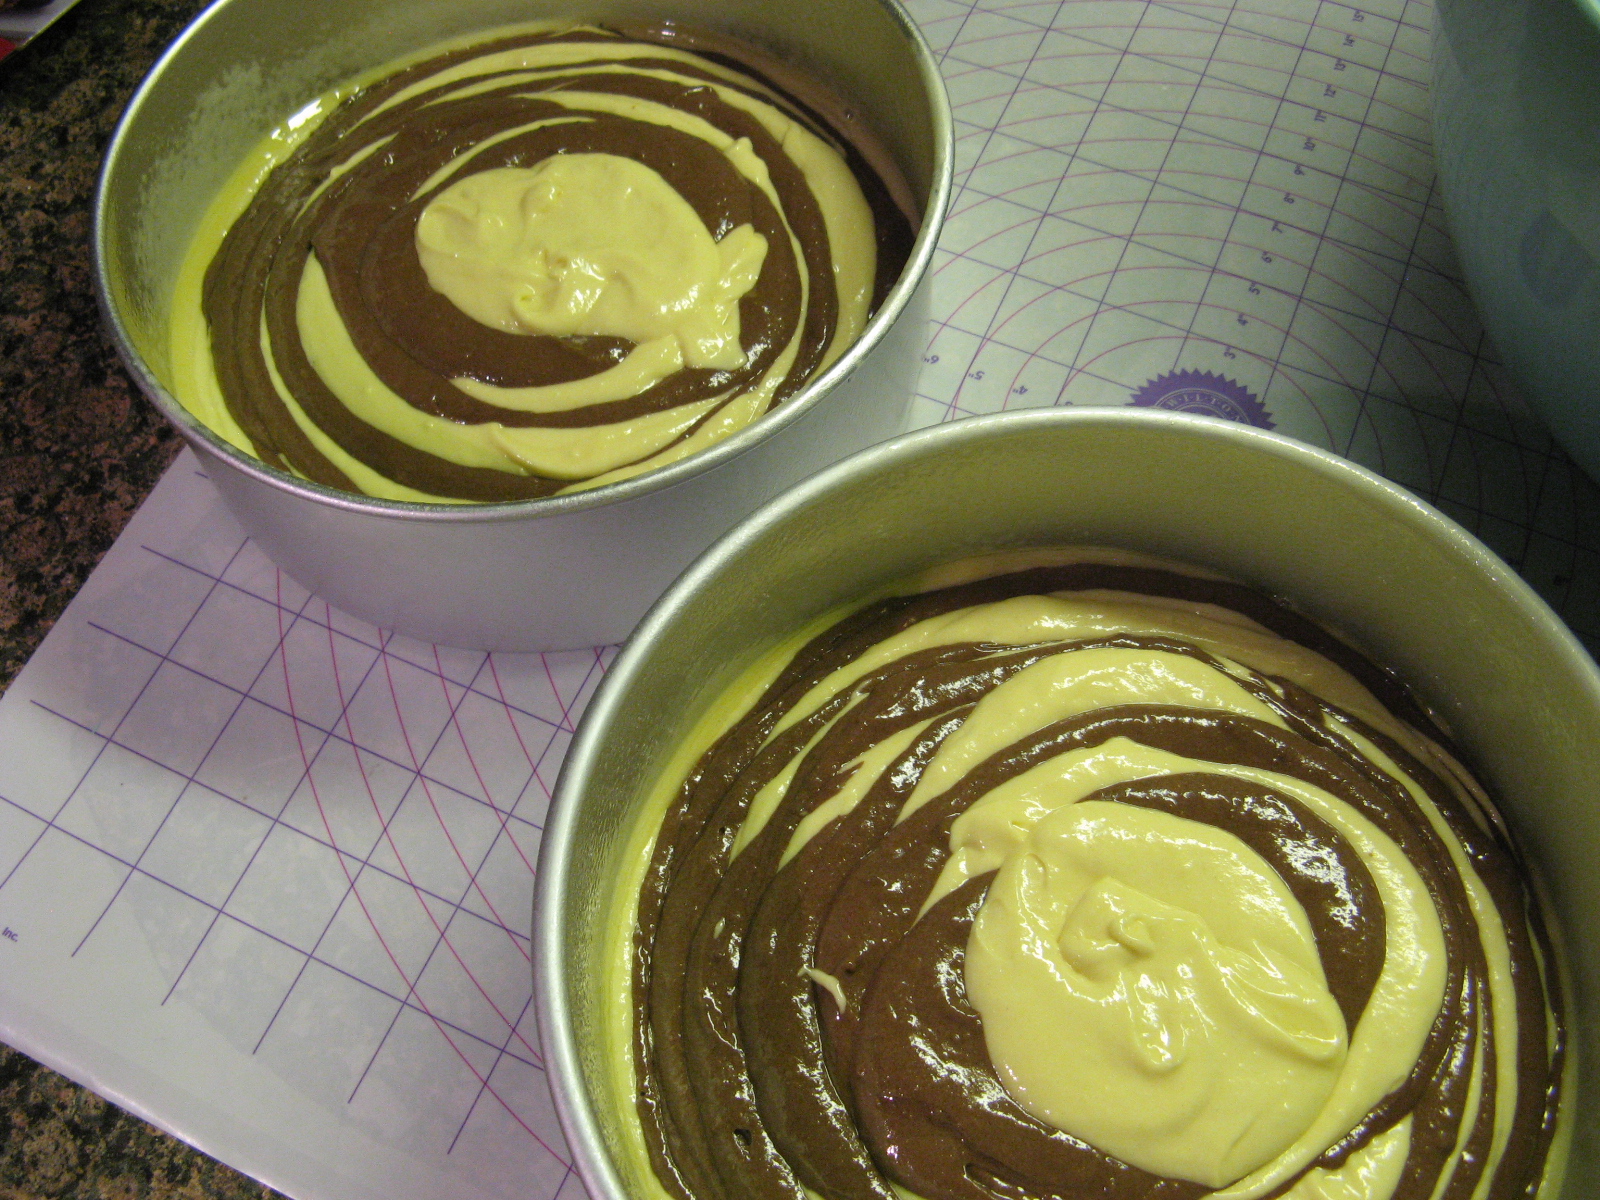
I took the easy route and opted to use a box cake, a Duncan Hines Classic White Cake Mix to be exact. I made one minor adjustment to the batter, I added in an extra 1/4 cup of water so that the Oreo crumbs wouldn’t thicken the batter too much. Once the batter was ready, I then folded in a cup of Oreo crumbs. To create the crumbs I placed a bunch of Oreos in a Ziploc bag, sealed it and then rolled it with a rolling pin. I left some of the Oreos in fairly large crumbs so that the cake wouldn’t just be speckled with little pieces of Oreos, but have some noticeable pieces. I then divided the batter between two 8-inch round pans that I sprayed with baking spray and baked it in a350 F preheated oven until a cake tester inserted in the middle came out clean, about 25 to 30 minutes. I let the cakes cool for a few minutes and then inverted them on wire racks to cool completely.

Meanwhile, I made the frosting. My go-to frosting is a Fluffy Vanilla Frosting that I got from a Martha Stewart cookbook and have been using for quite some time now when it comes to decorating my cakes. It tastes good (not overly sweet) and holds up well to piping and tinting. If frosting is too soft when you tint it it will only get softer and when you try to pipe it it inevitably droops. While I love using the frosting, I am not a fan of making it. It involves adding the confectioners’ sugar 1/2 cup at a time and raising and lowering the speed of my stand mixer. What ultimately happens, even though I cover the mixer with a kitchen towel, is sugar dust gets everywhere on my counter. I was also concerned that the recipe wouldn’t yield enough frosting to fill, frost & decorate the cake. So, while doing a little research for this cake – I couldn’t decide in the beginning if I should make the cake from scratch or use a box mix – I came across a buttercream frosting that incorporated crushed Oreos that I decided to try. I began by beating the butter in my stand mixer until it was light and fluffy and then added in confectioners’ sugar and heavy cream and mixed it on low speed until the sugar was incorporated and then slowly raised it to medium until everything was well blended. Using a rubber spatula I folded in Oreo cookie crumbs. You may be tempted to make the frosting in advance and then store it in the refrigerator. I suggest not doing that. Doing so will allow the cookie crumbs to soften and when you go to use it your frosting may end up looking more gray than speckled with Oreos.

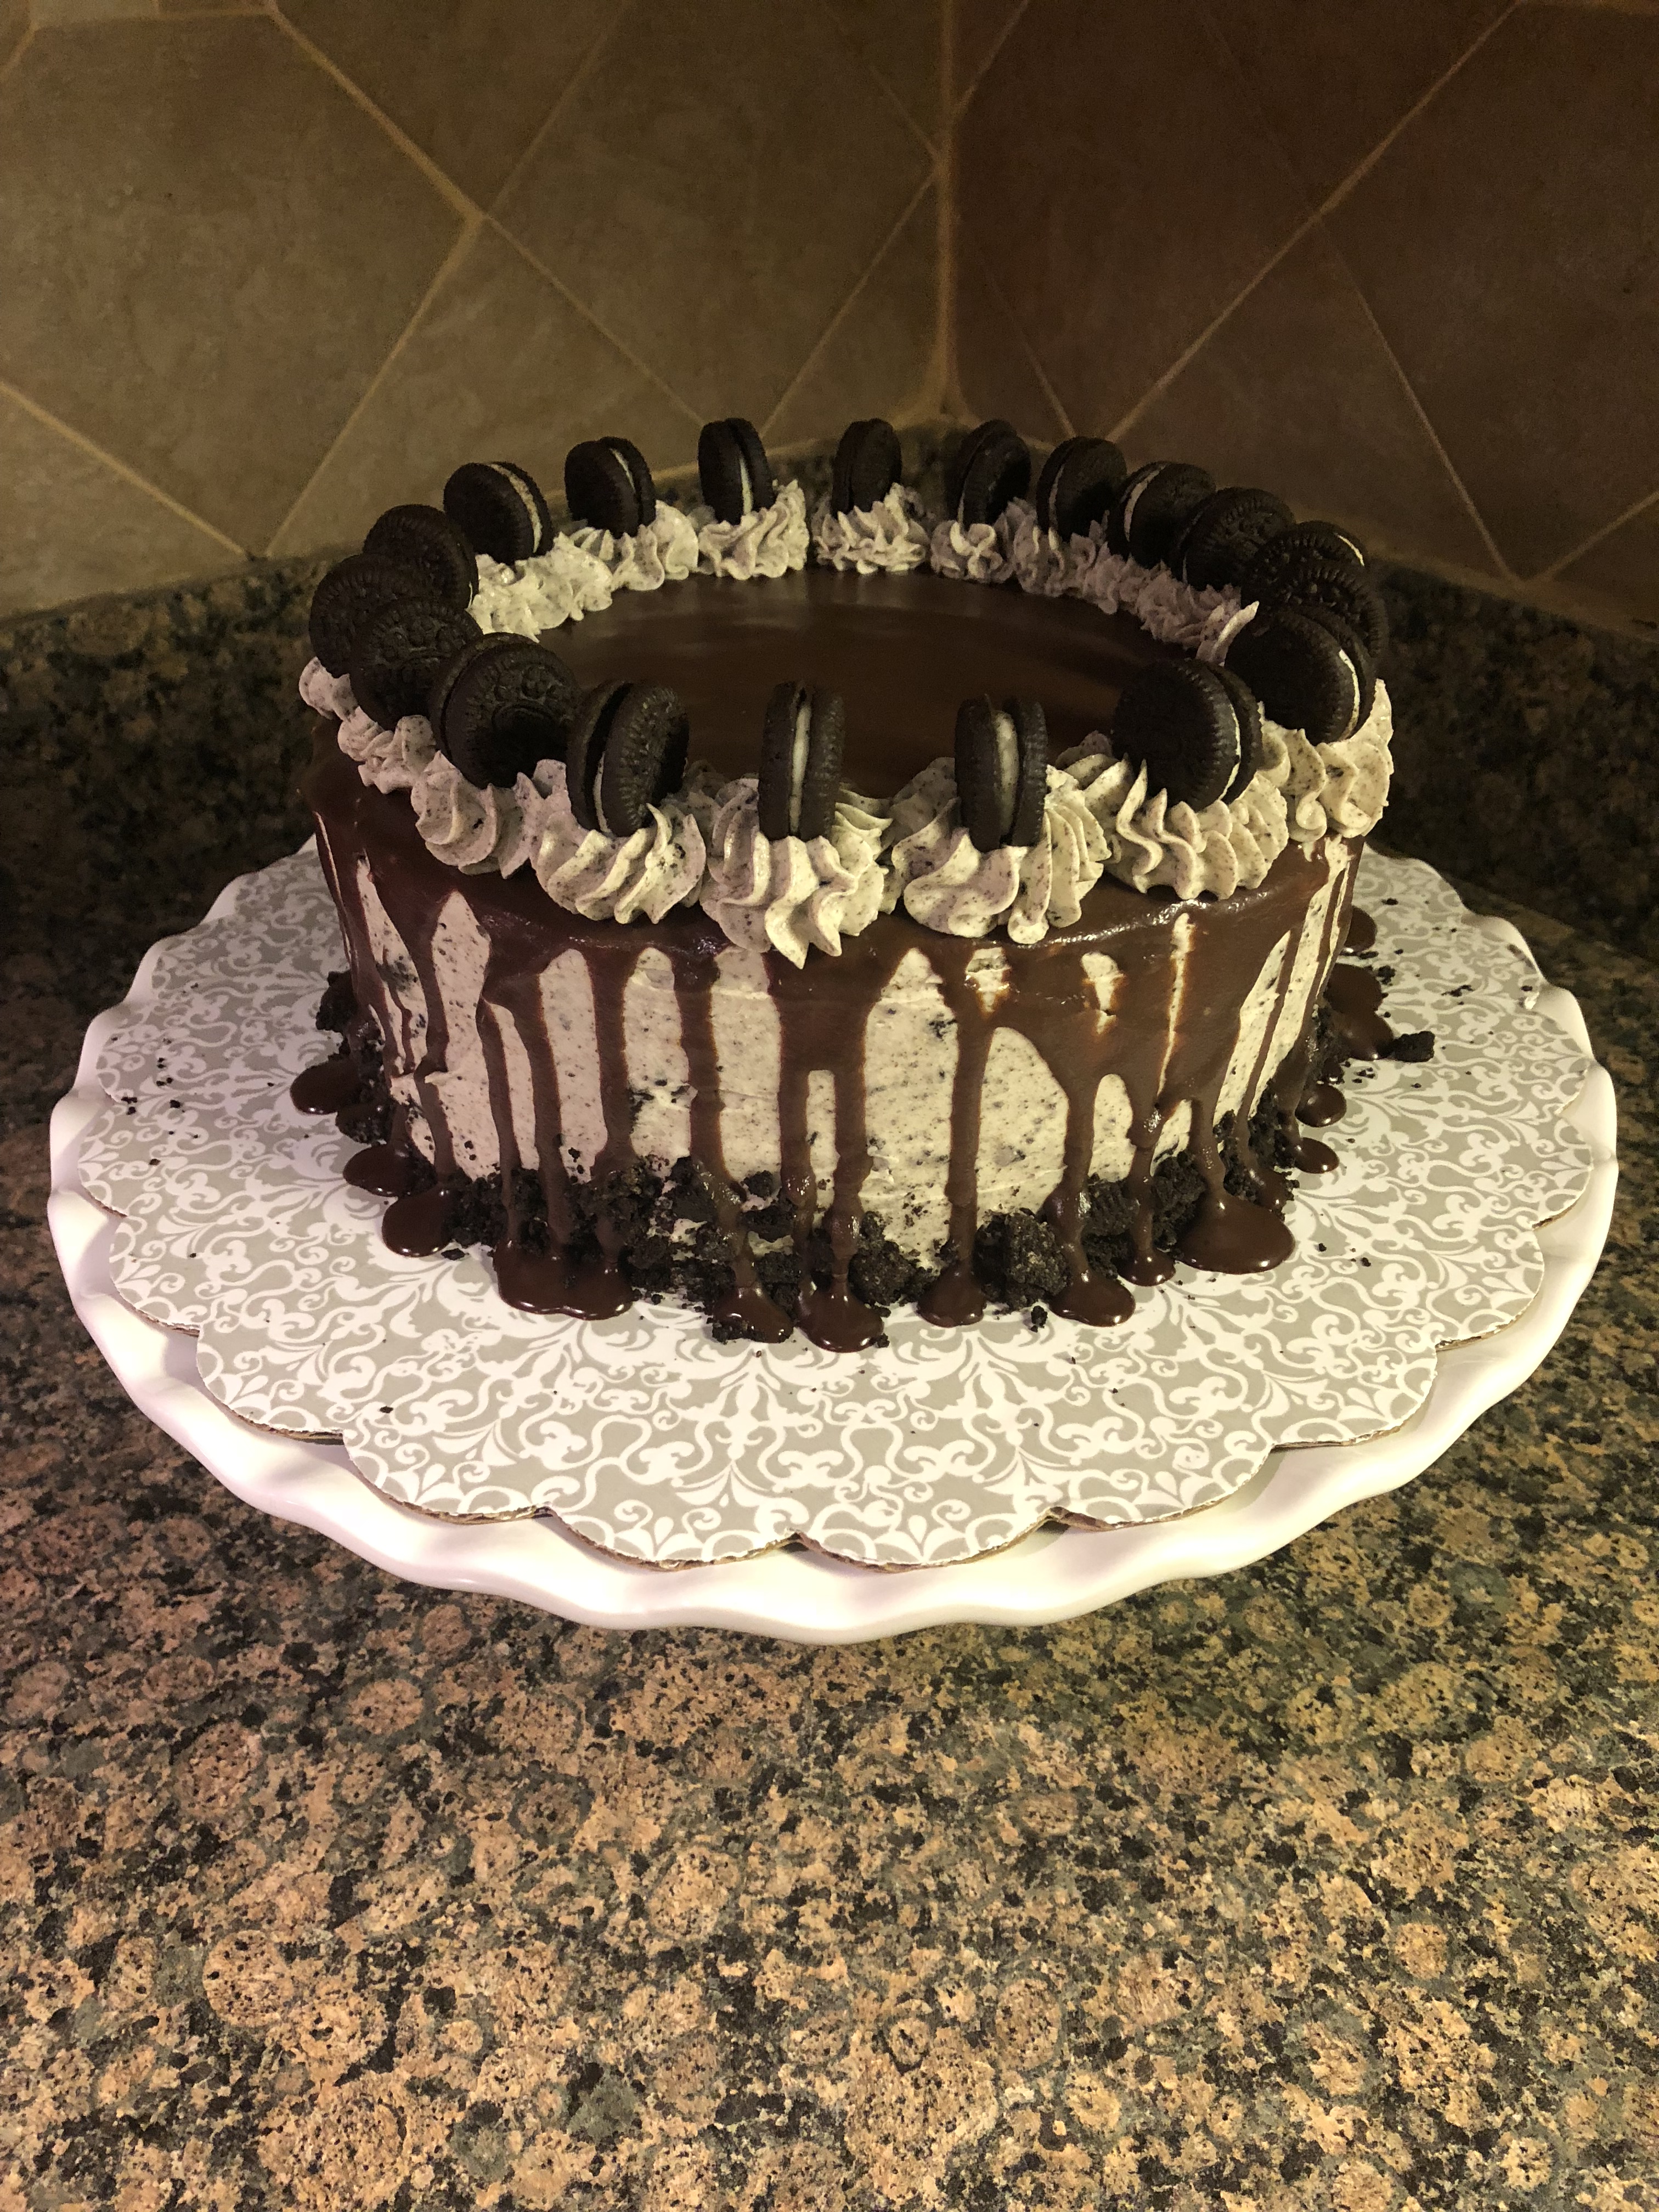
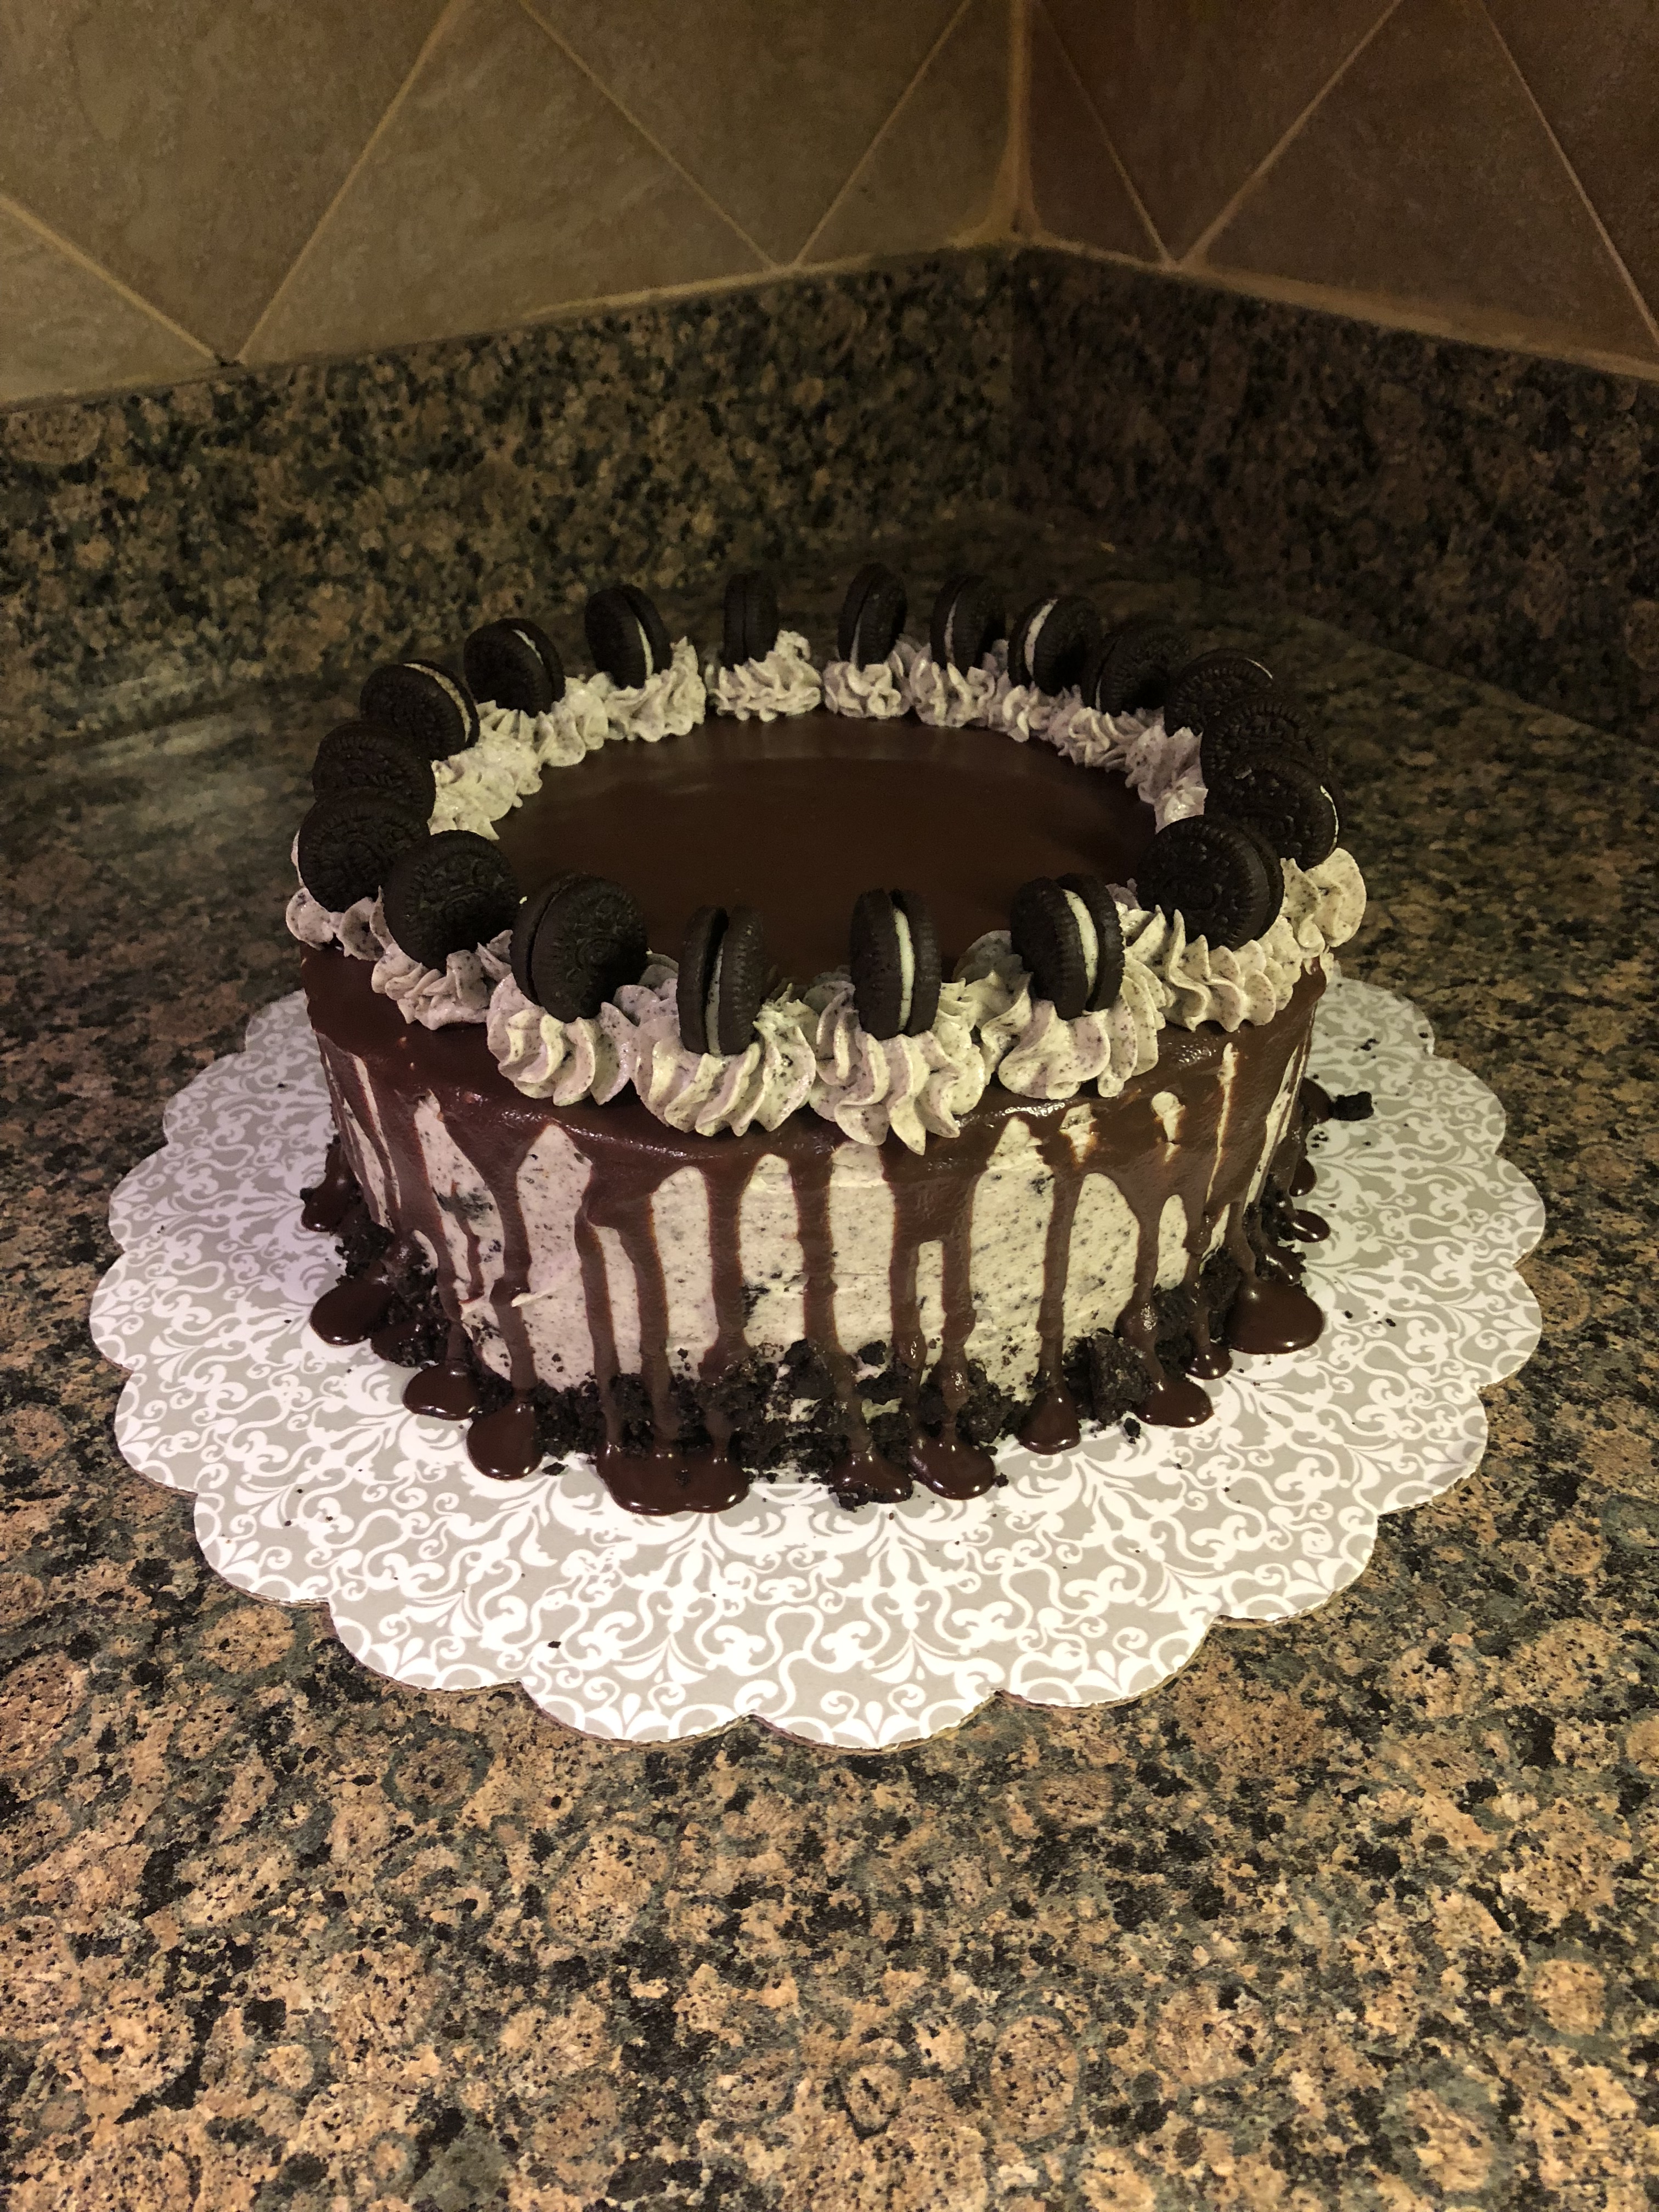
Once the cake cooled I torte both to remove the small dome that formed during baking and then spread some of the frosting on one the cakes and then topped it with the other. I then crumb coated the cake and refrigerated it for about 15 minutes so the frosting could set and then finished frosting it. I had some remaining Oreo crumbs so I pressed them along the bottom of the cake.

Next, I made the chocolate ganache that I poured on top of the cake and spread around. Using a squeeze bottle I tried to create a chocolate drip around the cake. Unfortunately it was a bit warm in my house so the chocolate didn’t set well (even after refrigerating it for a few minutes) so it was a bit runny, hence the chocolate drizzle running down the sides of the cake. Oh well! Finally, using a Wilton 1M tip I piped dollops with the remaining frosting on top of the cake and place a mini Oreo in each one. A little tip, if you plan on piping frosting that has crumbs in it make sure your tip is large enough for the crumbs to pass through. I actually had a few instances of the crumbs getting stuck.

And there you have it… A Cookies and Cream Cake.


Cookies and Cream Cake

Ingredients:

For the Cake:

1 15.25 oz. white cake mix

3 large egg whites

1 1/4 cups water

1/3 cup vegetable oil

1 cup Oreo crumbs


For the Frosting:

3 sticks unsalted butter, at room temperature

5 cups confectioners’ sugar

1 1/3 cups Oreo crumbs

1/4 cup heavy cream


For the Chocolate Ganache:

1 cup (8 ounces) semi-sweet chocolate (can use chocolate chips or a baking bar chopped)

1/2 cup heavy cream


*You will need 1 package of Oreos and 1 small container of mini Oreos


Directions:

Preheat the oven to 350 F. Spray two 8-inch round cake pans with baking spray or butter and flour.

In a large bowl combine the cake mix, egg whites, water and oil. Prepare according to box directions then fold in the Oreo crumbs. Divide the batter among the two pans and bake in the preheated oven for 25 to 30 minutes, until a cake tested inserted in the middle comes out clean. Let the cakes cool in the pans for 15 minutes and then invert them on a wire rack to cool completely.

While the cakes are cooling make the frosting. Beat the butter on medium speed until light and fluffy. Add in the confectioners’ sugar and heavy cream and beat on low speed until incorporated and then raise the speed to medium and continue beating until well blended. Using a rubber spatula fold in the Oreo crumbs.

Once the cake has cooled, torte, fill and apply a crumb coat. Refrigerate the cake for about 15 minutes.

While the cake is in the refrigerator make the chocolate ganache. Place the chocolate in a bowl. Warm the heavy cream in a small saucepan over low heat until steaming and then pour over the chocolate. Let sit for 5 minutes and then stir until smooth. Set aside until ready to use.

Remove the cake from the refrigerator and finish frosting. If you have Oreo crumbs remaining press them along the bottom of the cake. Once the ganache has thickened, transfer to a squeeze bottle and squeeze some of the ganache on the center of the cake. Using an off-set spatula gently spread the ganache towards the outside of the cake, careful not to let it spill over. Add more ganache is necessary. With the remaining ganache in the squeeze bottle drip the chocolate the chocolate along the sides of the cake. Place in the refrigerator so the chocolate can set.

Once chocolate has set use the remaining frosting to pipe dollops on top of the cake. Add mini Oreos to the dollops or cut larger Oreos in half and add those to the dollops.

Frosting Recipe from the Preppy Kitchen

Spice Cupcakes with a Pumpkin Mousse Filling & Cream Cheese Frosting

Happy Fall! My favorite time of the year is upon us. Although, while in my kitchen the other day looking in my backyard I noticed that my least favorite part of the season had already begun… the falling leaves. I am not a fan of raking leaves. And since I have quite a few trees in my backyard that are a welcome blessing in the hot summer they become the complete opposite when the cooler temps of the fall roll in. Oh well! In honor of the first full day of fall I am sharing with you cupcakes that tie together the flavors of fall deliciously, a spice cupcake with a pumpkin mousse filling and topped with a cream cheese frosting. I actually made these cupcakes while visiting a close friend in Virginia who happens to enjoy pumpkin spice items as much as I do. We actually text each other different food items we come across in pumpkin spice flavor, come to think of it, we text each other for a lot of out of the ordinary flavors we come across… Especially with Oreos.

I began by baking the cupcakes…

As they were cooling I prepped the pumpkin mousse. Now, I cheated a bit to make the mousse. For most of my cakes I use Jell-O Instant Pudding Mix combined with a cup each of whole milk and heavy cream and beat it until it’s smooth and thick. I’ve done it with vanilla and chocolate flavored Jell-O and I finally tried it with their Pumpkin Spice flavor. You should be seeing it on store shelves soon as fall is right around the corner. I purchased a few boxes last year that haven’t expired yet. Now, the nice thing, you can actually eat this mousse as dessert all by itself, so if you choose to make the entire box of pudding you will have some extra to enjoy. If you don’t want extra, use half the pack and only 1/2 cup each of whole milk and heavy cream. You can also omit filling the cupcakes and just top them with the cream cheese frosting… They will be just as delicious.

Once the cupcakes had cooled I cored the center of the cakes and filled them with the pumpkin mousse and then topped them with a small piece of the removed cupcake.

Next, I whipped up some cream cheese frosting and piped it on top of the cupcakes. Finally, I crumbled some of the cupcake crumbs left over from coring and sprinkled them on top of the cupcakes.

Finally verdict… DELISH! Just might be the perfect cupcake for the fall!

Spice Cupcakes with a Pumpkin Mousse Filling & Cream Cheese Frosting

Ingredients:

Cupcakes:

1 1/4 cups flour

1/2 teaspoon baking powder

1/2 teaspoon baking soda

1/2 teaspoon salt

1/2 teaspoon ground cinnamon

1/4 teaspoon ground ginger

1/4 teaspoon ground allspice

1 stick unsalted butter

1/2 cup sugar

1/2 cup light brown sugar

1/2 cup sour cream

2 eggs

1 teaspoon vanilla

Pumpkin Mousse:

1 3.4oz. package of Pumpkin Spice Jell-O Pudding Mix

1 cup whole milk

1 cup heavy whipping cream

Cream Cheese Frosting:

1 stick unsalted butter, at room temperature

12 ounces cream cheese, at room temperature

4 cups confectioners’ sugar

2 teaspoons vanilla extract

1/4 teaspoon salt

Directions:

Preheat oven to 350 F and line a 12-cup muffin with liners.

In a medium bowl whisk together the flour, baking powder, baking soda, salt, cinnamon, ginger and allspice and set aside. In a separate bowl whisk together the melted butter, both sugars, sour cream, eggs and vanilla. Whisk the flour mixture into the egg mixture until just combined.

Divide the batter among the muffin cups, about 1/4 cup in each. Bake for 18 to 20 minutes, until a cake tested inserted in the middle comes out clean. Let cool in the pan for 5 minutes and the transfer the cupcakes to a wire rack to cool completely.

While the cupcakes are baking and cooling make the mousse & frosting.

To make the mousse, combine all of the ingredients in a medium bowl and beat with a hand mixer on medium speed until thick and smooth. Refrigerate until ready to use.

For the frosting, beat the butter, cream cheese, vanilla extract and salt on medium speed until cream. Gradually beat in the confectioners’ sugar on medium-low speed until smooth and then beat on medium-high speed until thick and fluffy. Set aside until ready to use. If not using immediately refrigerate until ready to use. You may need to bring to room temperature before using it.

Core the cupcakes and spoon the mousse to just about level and then top with the removed piece and then frost with frosting.

Recipe from Food Network

Blueberry Peach Buckle

Labor Day… Today marks the unofficial end to the summer for most, calendar-wise though we have until the 22nd. And with temps planning to hit the high 80’s in New York this week, it doesn’t seem like summer is letting go that easy! So, if you’re craving a dessert that’s reminiscent of summer flavors and you’re still able to get fresh peaches in your neck of the woods (although frozen would work, or you could sub the peaches for apples) this Blueberry Peach Buckle is for you!

Now, you may be wondering what exactly a buckle is. I know I was when I saw this recipe. Well, it’s a fruit cake, usually made with blueberries, that has a streusel topping. When the cake bakes the batter will rise whereas the blueberries and streusel topping will weigh it down, the surface of the cake will then buckle. Truth be told, I didn’t really see this happen with the one I made.

Overall this cake was good, but, there are two things I would do different next time. I found the streusel topping to be a bit sweet so I think I would cut back on the granulated sugar and have an even amount of both sugars. Also, add in another chopped peach. I could barely taste the peach pieces in the cake. Oh, and there is a third, either omit the orange zest or add in another 1/4 teaspoon. I really didn’t get the orange essence.

A scoop of vanilla ice cream on the side did make this cake extra yummy though regardless!


Blueberry Peach Buckle

For The Cake:

4 tablespoons unsalted butter, at room temperature

1 2/3 cups flour

1 1/2 teaspoons baking powder

1/4 teaspoon salt

3/4 cup granulated sugar

1/4 teaspoon orange zest

1 large egg

1/2 cup milk*

2 cups blueberries

1 large peach, chopped


*I used whole milk


For the Streusel Topping:

1/4 cup granulated sugar

2 tablespoons light brown sugar

3 tablespoons flour

1/4 teaspoons freshly grated nutmeg

2 tablespoons unsalted butter, at room temperature

Pinch of salt

Vanilla ice cream, for serving


Directions:

Preheat the oven to 375 F. Grease an 8×8 baking dish with butter or spray with cooking spray.

Whisk the flour, baking powder and salt in a medium bowl and set aside. In a large bowl beat the butter, sugar and orange zest together on medium-high speed until light and fluffy. Beat in the egg and then gradually beat in the milk with the mixer on low. Your batter may look curdled due to the milk and zest interacting. Add the flour mixture and continue to meat until well incorporated. Your batter will be thick. Fold in the blueberries and chopped peach and spread in the prepared dish.

To make the streusel, in a medium bowl combine the sugars, flour, nutmeg and salt. Work the butter in with your fingers until clumpy. Scatter it over the batter.

Bake in the preheated oven for about an hour, until a cake tested inserted in the middle comes out clean. Let cool for at least 30 minutes and then serve with the ice cream.

Recipe from Food Network

Cauliflower Mac and Cheese

Cauliflower has become the rage in recent years. People have been using it to make pizza crust, rice, and it’s a great substitute for pasta, especially in Mac and Cheese. Hence the recipe I am sharing with you today.

I’ll go out on a limb and say that I actually enjoyed this Cauliflower Mac and Cheese more so than the traditional Mac and Cheese I normally make. Using cauliflower as opposed to pasta makes the dish a lot lighter and the cheese sauce was much lighter as well since the base is heavy cream and cream cheese as opposed to milk and flour.

I began by cutting a large head of cauliflower into small florets. I then boiled them in salted boiling water for 5 minutes until the cauliflower was crisp tender. You don’t want to boil them too long as you don’t want your Mac and Cheese to become mushy. After draining the cauliflower I patted it dry with a few paper towels and then transferred it to a greased 8 x 8 baking dish. You could use frozen cauliflower and steam it in your microwave oven. Once again, don’t overcook it.

Next, I made the cheese sauce. In a small saucepan I simmered heavy cream and then added in cream cheese and mustard, whisking it until it was smooth. I then stirred in cup of cheddar cheese, salt, pepper and garlic powder until the cheese melted. Not a fan of cheddar, try mozzarella, Monterey jack cheese for a little kick, or a combination of your favorite cheeses. I then poured the cheese sauce over the cauliflower, stirred it together and then topped it with more shredded cheddar cheese. I baked it in a preheated 375 oven for about 15 minutes and it was ready to enjoy.

This recipe would also be delicious with broccoli!

Cauliflower Mac and Cheese

Ingredients:

1 large head cauliflower, cut into small florets

1 cup heavy cream

2 ounces cream cheese, cut into small pieces

1 1/2 teaspoons Dijon mustard

2 cups shredded cheddar cheese

1/4 teaspoon ground black pepper

1/8 teaspoon garlic powder

Kosher salt

Directions:

Preheat oven to 375 F. Butter an 8 x 8 baking dish with butter, or spray with cooking spray.

Bring a large pot of water to boil and season with salt.

Cook the cauliflower in the boiling water until crisp tender, about 5 minutes. Drain and then pat dry between paper towels. Transfer the cauliflower to the prepared baking dish.

In a small saucepan bring the heavy cream to a simmer and then whisk in the cream cheese and mustard until smooth. Stir in 1 1/2 cups of the cheese, salt, pepper and garlic powder and continue whisking until the cheese melts. Pour the cheese sauce over the cauliflower and stir to combine.

Bake in the preheated oven until browned and bubbly, about 15 minutes.

Recipe from Food Network

Lemon Mascarpone Crepe Cake

I’ve been wanting to make this Lemon Mascarpone Crepe Cake for over a year now. Somehow it just got away from me last summer and it almost did the same this summer. I truly feel the flavors of this cake are ideal for the summer months. This isn’t my first crepe cake though, last fall I made a Chocolate-Pumpkin Crepe Cake which was quite delish.

Unfortunately this crepe cake wasn’t a hit amongst my friends who tried it. Not because of the taste but because they weren’t keen on the crepes. They agreed that the lemon curd cream filling between the crepes was good but the crepes themselves not so great. Not so much the flavor, but, the texture. Which I can completely understand. Eating a cake of crepes is nothing like eating a fluffy moist cake. I myself enjoyed it, but, I’m a texture person. In other words, I like sprinkles on my ice cream, nuts in brownies and cookies and so forth. Oh well… You can’t always bake something that everyone will rave about.

One thing I have to point out… This very apropos cake stand I used for this cake. It has a glass lemon as the stem between the base and the plate. I got it from a dear friend’s mom a few days before I made this cake and it made making this cake a little more fun!


Lemon Mascarpone Crepe Cake

Ingredients:

Lemon Curd*:

6 tablespoons unsalted butter, at room temperature

3/4 cups sugar

1 large egg

3 large egg yolks

3/4 cup freshly squeezed lemon juice, from 5 to 6 lemons


Crepes:

1 3/4 cup whole milk

4 large eggs

1/2 stick unsalted butter, melted and cooled

1 cup flour

6 tablespoons finely ground cornmeal

1 teaspoon sugar

1/2 teaspoon salt

An additional 3 tablespoons of butter to cook the Crepes


Assembly:

2 1/2 cups heavy cream

6 tablespoons confectioners’ sugar

5 ounces mascarpone cheese

1 teaspoon pure vanilla extract

Crushed amaretti cookies, for garnish (optional)**


*If you opt to use store bought lemon curd, you will need 1 cup.

**I used Stella D’oro Breakfast Treats


Directions:

Lemon Curd: Beat together the butter and sugar on medium-high speed until light and fluffy. Reduce the speed to low and add the whole egg. Once well combined, gradually add in the egg yolks, then the lemon juice. The mixture may appear curdles. Transfer the mixture to a small saucepan and cook over medium heat, stirring constantly until the mixture is thick enough to coat the back of a wooden spoon, about 5 to 6 minutes. Transfer to a bowl and place a piece of plastic wrap directly on the surface and refrigerate until cool. You can keep the lemon curd in the refrigerator up to 1 week.

Crepes: Combine all of the ingredients in a blender and puree until smooth, about 1 minute. Transfer to a bowl, cover and refrigerate for at least 2 hours and up to overnight. Once the batter is cold, stir it the batter until smooth again. Melt 1/2 teaspoon butter in a 10-inch skillet over medium heat. Pour about 1 ounce of batter on the skillet and tilt it to even distribute the batter. Cook until the edges on the crepe turn golden and then carefully flip and cook until just set. Transfer to a paper towel lined plate. Melt another 1/2 teaspoon of butter and continue cooking the crepes in the same manner. Mix the batter between each crepe. Stack the crepes on top of one another and let cool for 30 minutes. You will have between 16-20 crepes.

Assembly: Beat 1 1/4 cups heavy cream with 3 tablespoons of confectioners’ sugar until soft peaks form. Fold a third of the whipped cream into the lemon curd with a rubber spatula until combined. Then fold the cream-curd mixture into the remaining whipped cream until completely combined.

Place 1 crepe on the center of a cake stand and spread 3 tablespoons of the curd mixture evenly over the crepe. Repeat layering with remaining crepes and curd mixture, ending with a crepe.

Whisk together the remaining cream and confectioners’ sugar with the mascarpone and vanilla extract until soft peaks form. Spread the mascarpone cream on the top and the sides of the cake. Refrigerate until set, about 2 hours. Let stand at room temperature for 30 minutes and garnish with crushed cookies before serving.

Recipe from Martha Stewart

Lemon Blueberry Snack Cakes

I don’t have enough space in my kitchen to store all of my baking supplies so I keep them nicely organized on a shelving until in my basement. Not long ago while grabbing my Bundt pan to make a pound cake I thought it was about time I use my snack cake pans again. I’ve only used them once to make these Chocolate Snack Cakes. So, the wheels started turning to come up with a flavor. Initially I was thinking of making a Raspberry Cake with a Lime Curd Filling, then, it became a Raspberry Cake with a Lemon Curd Filling, next, a Lemon Raspberry Cake with a Pastry Cream filling, but, since blueberries were on sale the week I decided to make them it ended up being a Lemon Blueberry Snack Cake. Maybe another day will try out one of those other flavors. Oh, and in case you are wondering what a snack cake pan is, it’s essentially a pan that will make cakes that look like Twinkies. I have this one from Fat Daddio, which I believe isn’t available anymore, but, Wilton makes a similar one.

I tweaked the recipe that I used to make this Lemon Cake a few years back and then gently folded in blueberries that I dredged in flour (a little trick to ensure the blueberries won’t sink to the bottom of the batter while baking). I then divvied the batter among my snack cake pans and baked them in the oven. If you don’t have snack cake pans, you can use the batter to make cupcakes. They are delicious on their own, but, it you opt to make the cupcakes top them with cream cheese frosting and decorate with lemon zest and a few more blueberries for a little extra wow.


Lemon Blueberry Snack Cakes

Ingredients:

1 stick unsalted butter, at room temperature

1 1/2 cups flour

1/2 tablespoon baking powder

1/2 teaspoon baking soda

1/4 teaspoon salt

1 cup sugar

2 large eggs, at room temperature

5 oz. buttermilk*

3/4 teaspoons pure vanilla extract

Zest of 1 lemon

1/2 cup blueberries, dredged in flour


*I made my own buttermilk by stirring together 4 1/2 teaspoons of white vinegar and 1 cup whole milk and let it sit for 10-15 minutes until it curdled. You can refrigerate the leftovers.


Directions:

Preheat the oven to 350 F. Spray a snack cake pan with baking spray. If making cupcakes, line a cupcake tin with liners.

Sift together the dry ingredients (flour, baking powder, baking soda & salt) and set aside.

In a large bowl beat the butter and sugar on medium speed until light & fluffy, 3 to 5 minutes. Add the eggs 1 at a time, beating well after each addition.

Add the flour mixture in 3 batches, alternating with the buttermilk and beat until just combined. Add in the lemon zest and vanilla extract.

Fold in the blueberries and pour batter into the pan. For the snack cake pan use about 3 tablespoons of batter per cavity, for cupcakes 1/4 cup of batter.

Bake for 18 – 20 minutes, or until a cake tester inserted in the middle comes out clean. Let cool in the pan for 5 minutes before transferring to a wire rack to cool completely.

S’more Brownie Bites

Happy National S’mores Day! Will you be enjoying the campfire treat today? Truth be told, I had my first actual s’more last year and I must admit it was pretty good. I am not a big marshmallow fan so I think that’s why I never tried one, also, I’ve never been camping. Although you don’t have to go camping to have a s’more. Last year friends and I made them for dessert after a BBQ by roasting the marshmallows over sterno gel chafing fuel. Believe it or not, it actually worked! For today’s s’more treat I made S’more Brownie Bites.

I started by making the brownie batter. I melted a stick of butter in a small saucepan and then added in mini chocolate chips and whisked it until it was melted and smooth. I transferred this a medium bowl and stirred in sugar, eggs and vanilla extract. Using a hand mixer I then beat in all-purpose flour. And finally I stirred in mini chocolate chips. Now, the recipe called for quinoa flour along with all-purpose flour. I decided to omit the quinoa flour and just used all-purpose flour. I honestly didn’t want to spend money on quinoa flour which I probably wouldn’t use again and it didn’t seem necessary to the outcome of the recipe. I even researched making my own quinoa flour, but, it just didn’t seem worth the time and effort. Sorry if I sound so negative, but, I’ve finally learned that tweaking a recipe to the ingredients you have on hand is obviously much easier but also builds one’s confidence in the kitchen and you truly learn what works and doesn’t work. Back in the day, I would avoid a recipe if it included an ingredient not readily available or a bit on the pricier side, but, now I look for ways to make the recipe work with what I have on hand.

Once the batter was ready, using a small cookie scoop, I filled a mini cupcake pan, which I lined with liners, with the batter. Next, I pressed three mini marshmallows into each of the brownie bites and then topped them with crushed graham crackers. Here’s my simple trick for crushing graham crackers… Break them up a little and add them to a quart-size Ziploc bag. Seal the bag, removing the air, and then using a rolling pin, roll the graham crackers to crush them to your desired consistency. I opted to leave the graham crackers with little pieces to give the tops of the brownie bites a little texture to them.

After baking in a 350 F preheated oven for about 12 minutes they were ready! One downfall of baking marshmallows is that they melt considerably, so removing the brownie bites from the pan wasn’t as easy as just removing basic cupcakes. I let them cool for a few minutes before removing them so that could have been part of the problem, but, I also didn’t want to remove them right out of the oven since I wanted the brownies to settle a little before removing them. Removing them too soon could have resulted in smooshed brownie bites. Regardless, they still tasted yummy! The extra mini chocolate chips in the batter really added another level chocolate goodness to the brownie part and the marshmallows were perfectly melted into the brownies.


S’more Brownie Bites

  • Servings: 24 Brownie Bites
  • Print

Ingredients:

3-4 large graham crackers, finely crushed

1 stick unsalted butter

1 ¼ cups mini chocolate chips

½ cup sugar

2 large eggs, at room temperature

2 teaspoons pure vanilla extract

1 cup all-purpose flour*

Mini Marshmallows

*Original recipe called ½ cup all-purpose flour & ½ cup quinoa flour

Directions:

Preheat the oven to 350 F. Line a mini cupcake pan with papers liners and set aside.

In a small saucepan, melt the butter over low heat. Remove from the heat and add in ¾ cup of the mini chocolate chips. Whisk until the chocolate chips have melted and the mixture is smooth. Transfer to a medium bowl and whisk in the sugar, eggs and vanilla. Using a handheld mixer, gradually beat in the flour until the mixture is smooth and thick. Finally, whisk in the remaining ½ cup of mini chocolate chips.

Using a small cookie scoop, fill each paper line with the batter. Press 3 mini marshmallows into the center of the batter and then sprinkle with graham cracker crumbs. Bake in the preheated oven for 10 to 12 minutes, the marshmallows will be puffed and lightly golden. Let cool for 20 minutes and enjoy!

Recipe From Food Network

Malted Oatmeal Cream Pies

Have you been doing a lot of baking this summer? Unfortunately I haven’t. I did my fare share for a July 4th celebration, including the cake below, but, other than that baking has been to a minimum. It’s primarily due to the fact that it’s been a little warm and humid and that coupled with the fact that I don’t have air conditioning does not make for the ideal recipe to turn on my oven.

I did make some Banana Walnut Chocolate Chip Cookies and while they were good, they were a bit too cakey for my liking. And that brings me to the recipe I am sharing with you today… Malted Oatmeal Cream Pies, a la Little Debbie Oatmeal Cream Pies. Truth be told, I have never had a Little Debbie Oatmeal Cream Pie, but, when I saw this in an issue of Food Network Magazine last year (yes, it’s taken me that long to finally make them) I knew I wanted to try them.

One of the things I liked about this recipe is that you got the oatmeal texture of the cookie without the actual pieces of oatmeal because the recipe calls for you to pulse the oatmeal along with almonds. I think the next time I make a batch of oatmeal cookies I will try that out. What I didn’t like… The size of the pies. The recipe called for the dough to be scooped out in 1/4-cup balls, a little too much for my liking especially since the cookies were pretty thick. I think next time I make these I will keep them on the smaller size, maybe just use a cookie scoop. The cream part though was delish and I wouldn’t change a thing about it.


Malted Oatmeal Cream Pies

Ingredients:

For the Cookies:

1 1/2 cups flour

1 tablespoon malted milk powder

1 teaspoon baking soda

1 teaspoon cinnamon

1/2 teaspoon salt

3 cups old-fashioned oats

1/2 cup sliced almonds

2 sticks unsalted butter, at room temperature

3/4 cup dark brown sugar

1/2 cup sugar

2 large eggs

1 teaspoon pure vanilla extract


For the Filling:

5 tablespoons butter, at room temperature

2 cups confectioners’ sugar

1 tablespoon malted milk powder

2 tablespoons whole milk

1/4 teaspoon pure vanilla extract


Directions:

Begin by making the cookies. Whisk the flour, malted milk powder, baking soda, cinnamon and salt in a medium bowl and set aside. In the bowl of a food processor, pulse together the oats and almonds until coarsely ground, set aside.

In a large bowl (or using a stand mixer) beat the butter and both sugars on medium speed until light and fluffy. Add the eggs, one at a time, then beat in the vanilla. With the mixer on low, add in the flour mixture until just combined and then add in the oat mixture and beat until just combined.

Line 2 baking sheets with parchment paper. Scoop 1/4-cup balls of dough and place on the prepared sheets about 2 inches apart. Freeze until firm.

Preheat the oven to 350 degrees and bake the cookies until just golden and crisp around the edges, about 15 to 17 minutes. Let cool on the sheets for 5 minutes and then transfer to a wire rack to cool completely.

Make the filling. In a large bowl beat the butter, confectioners’ sugar and, malted powder on medium speed until well combined. Reduce the speed to low and add in the milk and vanilla extract until just combined. Increase the speed to high and beat until light and fluffy. If the filling is too thick add more milk, too thin, add more confectioners’ sugar. Spread the filling on half of the cookies and then top with another and enjoy!

Recipe from Food Network

Zebra Cake

It’s one thing when a cake is appealing to the eye on the outside, but, when you cut into a cake and reveal a hidden surprise on the inside your eyes widen in wonder and delight. That’s the excitement behind a Piñata Cake. Who wouldn’t want to cut a slice of cake to only have sprinkles and candy come cascading out? A smile (and squeals from little one’s) is sure to follow. The same can be had when the cake itself reveals a pattern or design. Think of a Checkerboard Cake (Sorry for the pictures in both of those posts – Nighttime baking is not a blogger’s friend when it comes to taking pictures.)

I recently made a cake to celebrate a friend’s daughters (aka my nieces) dance recital performance – it was their first. Since I was making a cake for one of their birthdays the day before I didn’t want to make another chocolate cake for their recital celebration. And since I was making a themed cake for that birthday I also didn’t want to make a cake that I would have to heavily decorate – I was actually able to find doll-sized versions of their dancing shoes to top the cake with so I figured that was perfect enough decoration. So, I figured I should do something special with the inside. After a little thought I decided to make a zebra cake with a Nutella mousse filling since they both like the hazelnut spread.

To make things super easy I went with box cake mix – a yellow cake mix and a chocolate cake mix. I prepared both per the box directions. Whenever I use cake mix I normally use Duncan Hines. One of the reasons, and it will sound silly, is because it has a Wilton approved emblem on it. Truth be told though, Duncan Hines is perfect for making a zebra cake because they do not have pudding in the mix which can make the cake batter thick and not ideal for making this cake.

Once my batters were prepared, I poured a ¼ cup of the yellow cake batter in the center of two 8-inch cake pans that I sprayed with baking spray. Next, I poured a ¼ cup of the chocolate cake batter in the center of the yellow cake batter, and then a ¼ cup of the chocolate cake mix in the center of the previously poured yellow cake mix. I continued in this pattern until the pan was about 2/3 full. You won’t use all of the batters, but, just about.

I gently tapped the pans down and then baked them in a preheated 350 F oven for about 45 minutes, until a cake tester inserted in the middle came out clean. I let the cakes cool in the pans for about 15 minutes and then inverted them on cooling racks to cool completely.

One cooled, I torte the cakes to remove the dome that formed on both. The zebra pattern was instantly visible and I was quite excited that it worked.

The pattern was even more visible once the cake was layered and cut into.

You could really customize this cake. Use a white cake mix and tint it colors to show your team spirit, someone’s favorite colors or even a gender reveal cake.

And here’s a pic of the birthday cake I made the same weekend – An Elena of Avalor themed cake.

Pineapple Upside Down Cake

I recently made a Pineapple Upside Down Cake for a birthday celebration. Secretly I was happy to make it because it meant I wouldn’t have to make frosting to decorate the cake and I could final try a Pineapple Upside Down Cake. Yes, I have never had it before. Not really sure why… I like pineapples and obviously I like cake, but, it never crossed my mind to make one.  Well, as they say, there’s no time like the present.

This cake is super simple to make, especially if you use a box yellow cake mix. After preheating my oven to 350 F, I melted a stick of unsalted butter directly in a 9×13 inch pan in the oven. I checked on the butter every so often to make sure it didn’t burn and also to tilt the pan so the butter wouldn’t melt in one spot. Once the butter had melted I removed the pan from the oven and sprinkled 1 cup of light brown sugar over the butter. Next, I arranged 12 pineapple slices – I used pineapple slices in pineapple juice and I reserved the juice to make the cake – and then place a maraschino cherry inside of each pineapple.

Next, I prepared the cake mix per the box directions. The cake mix called for 1 cup of water and I opted to use ½ cup of the reserved pineapple juice and ½ of water. You could also use an entire cup of pineapple juice. Since this was my first time make the cake I didn’t want to go overboard with the pineapple flavor, next time though – yes, there will be a next time for this cake – I will use the entire cup. Once the batter was ready I poured it over the pineapples and cherries in my prepared pan. I was concerned that the cake might end up sticking to the sides of the pan, but, once I added the batter to the pan some of the melted butter rose up to the sides so I didn’t have to worry about that. I spread the batter a little to even it out and then baked it for about 40 minutes – until a cake tester inserted in the center of the cake came out clean.

I let the cake cool for a few minutes in the pan and then inverted it onto a cake board and platter. I was initially just going to use the cake board, but, was concerned that the syrup that was created by the butter and sugar would spill over so I went with the platter as well. After inverting it, I let the pan rest on the cake for a few minutes to make sure that all of yumminess had dripped down. I easily removed the pan and a few pineapple stuck to the pan, I removed them and placed them on the cake.

I can’t wait to make this cake again. It only took about an hour from start to finish and while I was concerned that it would be overly sweet and that the cake would be very thin, the outcome couldn’t have been farther from the truth. The cake was just the right height and was fluffy and light and the sweetness was right on point with the cake, pineapples and light brown sugar. One other thing that’s nice, thanks to the pineapples it’s so easy to cut this cake into 12 equal portions!


Pineapple Upside Down Cake

Ingredients:

1 stick unsalted butter

1 cup light brown sugar

12 pineapple slices in pineapple juice, reserve the juice*

12 maraschino cherries

1 box yellow cake mix, plus ingredients listed on box to make cake**


*I used a 20 oz. can & an 8 oz. can. The 20 oz. can had 10 slices and the 8 oz. had 4.

**Substitute the water with the pineapple juice


Directions:

Preheat the oven to 350 F.

Place the stick of butter in a 9×13 inch pan and place in the oven to melt. This will take a few minutes.

Remove the pan from the oven and sprinkle the brown sugar evenly over the butter. Arrange the pineapple slices over the sugar and then place a cherry in the center of each pineapple slice. Set aside.

Prepare the cake mix per the box instructions and then pour over the pineapple slices. You can tap the pan down or use a spatula to even out the batter.

Place in the oven and bake 35 – 45 minutes, until the cake has browned and pulled away from the sides of the pan.

Let the cake cool for a few minutes and then invert on a platter. Let the pan sit on top of the cake for a few additional minutes so all of the syrup can drain out and then remove the pan. If any pineapples or cherries remain on the pain just remove them and place them on the cake.

Enjoy warm or at room temperature.