Cookie Palooza – No Bake Peppermint Chocolate Cookies

I hope you’ve enjoyed this week of cookies. I’m ending Cookie Palooza 2017 with an easy no bake cookie that only requires three ingredients, four if you count the sprinkles… Peppermint Chocolate Wafers.

First ingredient… Melted semi-sweet chocolate. I melted the chocolate using a double-boiler. You could melt the chocolate in the microwave (which was always my preferred method,) but I find melting the chocolate in a double boiler minimizes the chance of scorching the chocolate and you can keep it warm while you’re working so it will stay smooth and thin. Whereas when you melt it in the microwave after a few minutes the chocolate begins to thicken. Creating a double boiler is quite simple… fill a medium saucepan about a little less than halfway with water – you don’t want to fill it too much because then when you place the bowl in the water it will spill over. Bring the water to a boil and then reduce the heat so the water is simmering. Place a heatproof bowl in the water, add chopped chocolate and stir occasionally until the chocolate has melted. Once the chocolate has melted, reduce the flame to low to keep the chocolate warm and add in the peppermint extract (the second ingredient), stir to mix in.

Dip the Nilla Wafers (third ingredient) in the chocolate and flip them over to get them fully covered. The process will go much easier if you have candy dipping tools, but if not a fork will work well. Once cookies are covered lift the cookies out of the chocolate and let the excess drip and then place them on a wax paper lined baking sheet and sprinkle them with festive sprinkles or crushed peppermint candy/candy canes (fourth ingredient.)


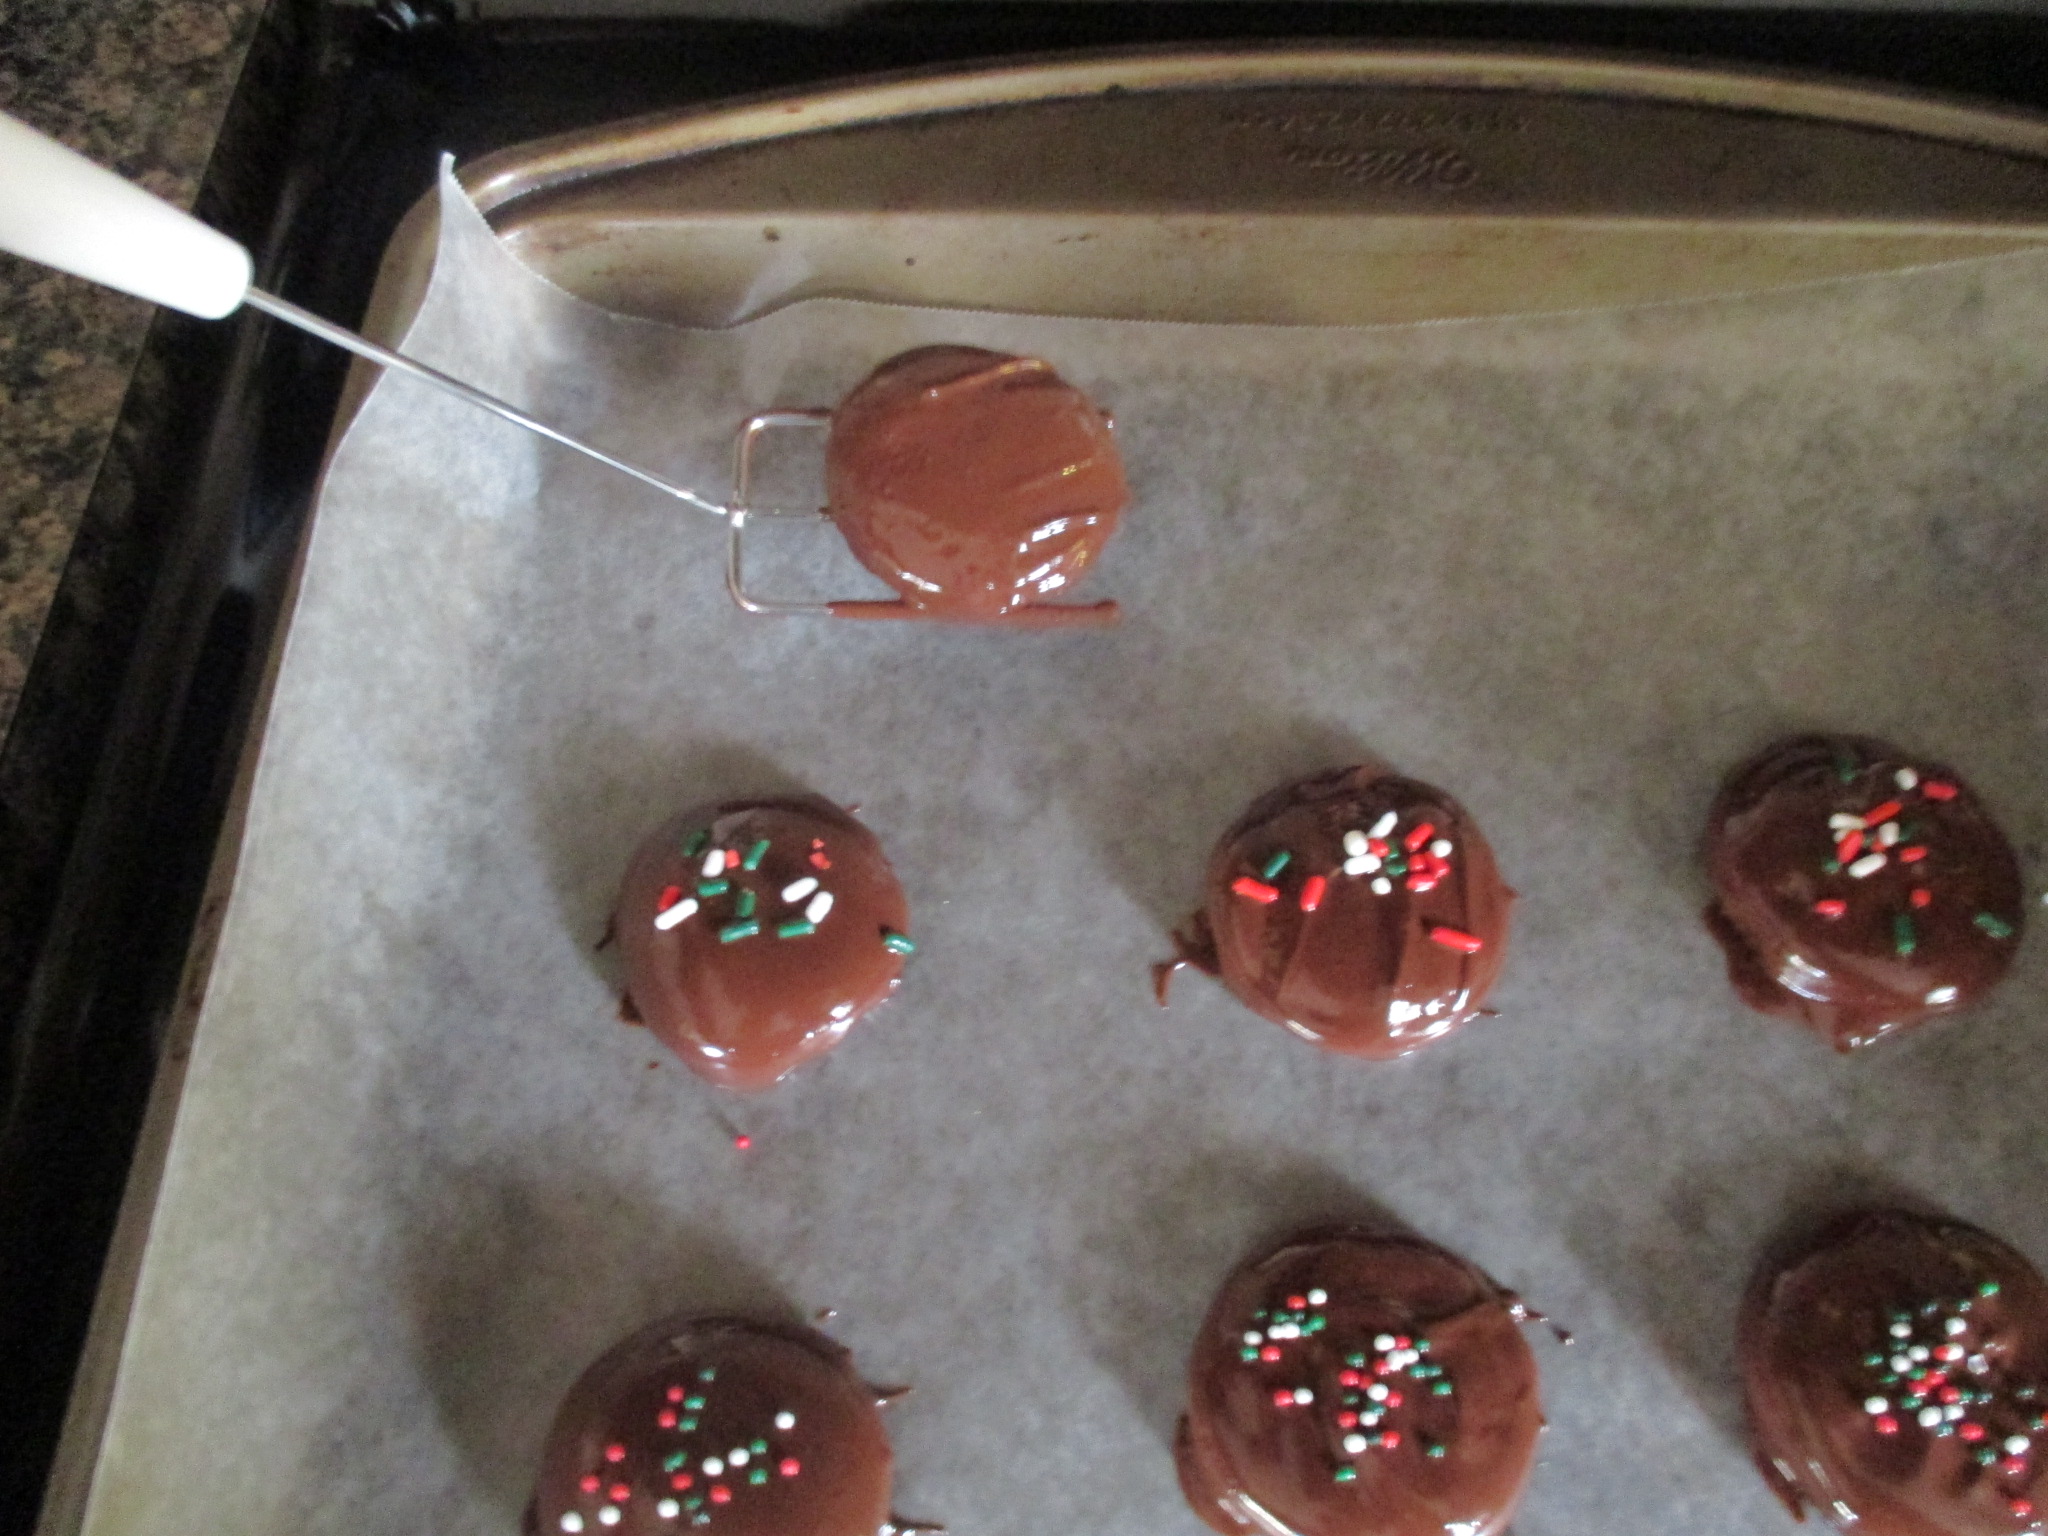
Once you are done dipping the cookies place them in the refrigerator for about 10-15 minutes so the chocolate can harden.

And that’s it! A simple cookie that’s perfect for the season and best of all, doesn’t require you to turn on your oven.

Happy Holidays!!!

Peppermint Chocolate Dipped Cookies

Ingredients:

8 oz. semi-sweet chocolate, chopped*

1/2 teaspoon peppermint extract

30 – 36 Nilla Wafer cookies

Sprinkles, optional

Directions:

Melt the chocolate using a double boiler on medium to medium low heat. Once the chocolate has melted add the peppermint extract and stir well to combine. Keep the heat on low for the double boiler so that the chocolate will remain smooth and thin.

Dip the wafers in the chocolate one at a time, making sure to coat the entire cookie. Remove from the chocolate and let the excess drip off before placing on a wax paper lined baking sheet to set.

Sprinkle with sprinkles or crushed peppermint candy. Or let the chocolate set for a few minutes and then drizzle with the left-over melted chocolate. Place in the refrigerator so the chocolate can harden. Store in an airtight container.

*You could also use chocolate chips

**The ratio of peppermint extract to chocolate I used was 1/4 teaspoon per 4 oz.

Cookie Palooza – Lemon Ricotta Cookies

Lemon Ricotta… A flavor combination I first had in the form of pancakes and was instantly hooked so when I saw a cookie recipe using the two I knew I had to try it. A few things to note, these cookies are soft, almost cake-like. They kind of remind me of muffies – aka the top of a muffin. And while I am not one for glazes, I usually leave my baked good unglazed when a recipe calls for it, these cookies definitely need the glaze. Not because they are not delish without it – I tried one before glazing and it was good as is – but when I added the glaze the lemon flavor was kicked up a notch, but, not to the point that it was overbearing.

Lemon Ricotta Cookies Lemon Glaze

  • Servings: 40 cookies
  • Print

Ingredients

2 1/2 cups flour

1 teaspoon baking powder

1 teaspoon salt

1 stick unsalted butter, softened

2 cups sugar

2 eggs

1 15 oz. container whole milk ricotta cheese

3 tablespoons fresh lemon juice (juice of 1 lemon)

1 lemon, zested


Glaze:

1 1/2 cups confectioners’ sugar

3 tablespoons fresh lemon juice

1 lemon, zested


Directions:

Preheat the oven to 375F.

In medium bowl combine the flour, baking powder and salt. Set aside.

In a large bowl combine the butter and sugar. Beat on medium speed until light and fluffy, about 3 minutes. Add the eggs 1 at a time, beat the mixture well so all of the ingredients are incorporate.

Add the ricotta cheese, lemon juice & zest. Beat to combine and then stir in the dry ingredients (the flour mixture.)

Line baking sheets with parchment paper. Spoon the dough – about 2 tablespoons for each cookie – onto the baking sheets. Bake for about 15 minutes, until the edges of the cookies are golden. Remove from the oven and the cookies cool on the baking sheets for 20 minutes.

During the 20 minutes make the glaze: Combine the all of the ingredients in a small bowl and stir until smooth. Spoon about 1/2 teaspoon onto each cookie and use the back of the spoon to smooth the glaze over the cookie. Let the cookies sit for 2 hours so the glaze can harden.

Recipe from Food Network

Cookie Palooza: Key Lime Pie Tassies & Pistachio Cookie Cups

These are definitely not your typical cookies, they’re more like mini tarts, but are cookies nonetheless. I tried to do some research as to how a tassie got its name and what the difference was between a tassie and a cookie cup, but, I came up empty handed… Oh well. If anyone knows feel free to share it in the comments sections below!

These weren’t on my original list of cookies for this week, originally I was planning on an Earl Gray Tea Cookie that called for cardamom. Cardamom became the main flavor of the cookie as opposed to the titled earl gray and while that was fine as the cookie tasted good, after making the cookie 2 different times – following the directions exactly the first time and making some variations the second time – both times the cookie came out too dense. I knew then that the recipe was a fail and searched for something else. Hence these tassies and cookie cups, both of which turned out to be a major hit. On a side note, I had a second fail with another cookie recipe as well. It was for a Maple Pecan Chocolate Cookie that called for maple sugar. I had to do some searching for the maple sugar and while the cookie dough – yes, I eat raw cookie dough from time to time – tasted delish with a maple flavor the cookie itself lost the maple flavor and was flat, chewy in the middle and crispy along the edges. Not at all what I was expecting. I read the directions numerous times afterwards to make sure I added the right amount of ingredients and such and I had. I wonder if anyone tests some of these recipes before publishing them sometimes.

Back to the cookies at hand. When I initially made them I didn’t want to make too many – each recipe calls for 24 – just in case this was another fail. But, after friends tried them it was evident that I needed the full amount so I made them again for Thanksgiving and once again they were a hit.

Here are some tips to make these…

To help divide the dough into 24 somewhat evenly balls I formed the dough into a 6×4-inch rectangle on a lightly floured surface and cut it into 24 squares. I began by scoring it with a pizza cutter and then actually cut it once it had all been scored.

For the Pistachio Cookie Cups to save money, but not time, I opted to buy roasted unsalted pistachios in their shells and shelled and chopped them myself.

Which I then mixed with an egg, confectioners’ sugar and chopped dried apricots for the filling.

Since key limes aren’t always available in my area and I do love key lime pie, I usually have key lime juice in my fridge. You can find it in the juice aisle or oddly enough at some supermarkets they have it in the baking aisle. I can’t say for sure if using the juice from key limes as opposed to regular limes alters the flavor of the tassies since there are other ingredients involved, but, I do know that there is a difference in the flavor between the two of them. It’s all about preference and authenticity to the recipe when it comes to which lime or lime juice you choose.

The Pistachio Cookie Cups are baked filled while the Key Lime Pie Tassies pastry cup is baked first and then filled with the key lime filling and then baked again. Don’t worry, the pastry cup won’t burn or dry out… that’s what I initially thought would happen. Both of these are delicious and it’s hard to choose a favorite and thankfully they are easy enough and quick enough to bake that you could bake them both to enjoy them at the same time.

And while the Key Lime Pie Tassies are good on their own, I decided to add a little homemade whipped cream and lime zest to some of them for a little more sweetness.

Pistachio Cookie Cups

  • Servings: 24 Cookie Cups
  • Print

Ingredients:

1/2 cup butter, softened

3 oz. cream cheese, softened

2 tablespoons sugar

1 cup flour

1/2 teaspoon orange zest

1 egg, lightly beaten

1 cup confectioners’ sugar

1/2 cup finely chopped pistachios

2 tablespoons finely chopped dried apricots

Directions:

Preheat oven to 350 F. In a medium bowl beat the butter, cream cheese and sugar with a mixer on medium speed until smooth. Beat in the flour and orange zest. Shape the dough into 24 balls and press onto the bottom and sides of mini muffin pan.

To make the filling: In a small bowl combine the egg, confectioners’ sugar, 1/3 cup pistachios and the dried apricots. Spoon into the pastry-lined mini muffin tin. Sprinkle remaining chopped pistachios over them.

Bake 18 to 20 minutes or until the pastry is golden brown and the filling set. Cool in the muffin tin on a wire rack for 10 minutes. Remove from the pans and cool completely.

Recipe from Better Homes & Gardens

Key Lime Pie Tassies

  • Servings: 24 Tassies
  • Print

Ingredients:

1/2 cup butter, softened

3 oz. cream cheese, softened

1 cup all-purpose flour

1/2 teaspoon lime zest

1/4 cup key lime or lime juice, but bottled or the juice from 5 to 6 key limes or 2 to 3 regular limes

2 egg yolks

2/3 cup sweetened condensed milk

Sweetened whipped cream for topping, optional

Directions:

Preheat oven to 325 F. In a medium bowl beat the butter and cream cheese with a mixer on medium speed until smooth. Beat in the flour. Shape the dough into 24 balls and press onto the bottom and sides of mini muffin pan. Bake 20 to 25 minutes, or until the edges are golden brown. Cool slightly in the muffin tin on a wire rack.

Make the filling: In a medium bowl beat the eggs with a whisk. Gradually whisk in the condensed milk. Next, whisk in the lime zest and lime juice. Spoon about 1 tablespoon of the filling into each pastry-lined cup.

Bake about 10 minutes, or until filling is set. Cool in muffin tin on a wire rack. Cover and chill for 2 to 3 hours. If desired, top with sweetened whipped cream and additional lime zest.

Sweetened Whipped Cream: Beat 1/2 cup heavy, 1 tablespoon confectioners’ sugar and 1/4 teaspoon vanilla extract with a mixer on medium speed until soft peaks form.

Recipe adapted from Better Homes & Gardens

Cookie Palooza: Dulce De Leche Thumbprint Cookies

Cookie Palooza continues today with these Dulce De Leche Thumbprint Cookies. Thumbprint cookies offer a delicious double-punch… The cookie itself is great and the filling adds additional flavor to it. Not a fan of dulce de leche, try these with your favorite jam or a chocolate filling.

Dulce De Leche Thumbprint Cookies

  • Servings: 36 cookies
  • Print

Ingredients:

1 cup (2 sticks) unsalted butter, at room temperature

2/3 cup granulated sugar

1 large egg yolk

1 teaspoon vanilla extract

2 1/4 cups all-purpose flour

1/2 teaspoon kosher salt

6 oz. dulce de leche


Directions:

Preheat the oven to 375 F. Line two baking sheets with parchment paper.

Beat together the butter and sugar until light and fluffy, on medium-high speed. Beat in the egg yolk and vanilla extract. Add in the flour and salt and mix until well-blended and dough comes together in a ball.

Form the dough into 1-inch balls and arrange on the prepared baking sheet. Flatten the balls with the palm of your hand and then using a 1/2 teaspoon or your thumb make an indentation in the center of each cookie. Bake for 8 to 10 minutes.

Remove the pan from the oven and gently press the indentation once again to redefine it. Fill each indentation with about 1/2 teaspoon of dulce de leche and return to the oven for 3 minutes. Transfer the cookies to a wire rack to cool completely.

Recipe from Love and Olive Oil


Cookie Palooza: Peanut Butter Crinkles

It’s the first week of December! Are you even remotely ready for the holidays? Have you thought about what you are baking? If not, I am here to help this week. Welcome to my 2nd Cookie Palooza. A week full of cookies… Kicking it off are Peanut Butter Crinkles. A twist on the more popular Chocolate Crinkles.

Made with peanut butter – of course – and mini chocolate chips these cookies are rolled in granulated and confectioners’ sugar for a little extra sweetness prior to baking. If you’re craving more chocolate in your cookie opt to use regular size chocolate chips as opposed to the mini ones. You do get a chocolate taste with the mini ones, but, it’s more of a hint so little so that you wouldn’t miss it if you omitted them from the batter completely.

Peanut Butter Crinkles

  • Servings: 36 cookies
  • Print

Ingredients:

1 1/3 cups flour

1 teaspoon baking soda

1/4 teaspoon baking powder

1/2 teaspoon salt

1 stick unsalted butter, at room temperature

1 cup light brown sugar

3/4 cup creamy peanut butter

1 large egg

1 teaspoon vanilla extract

1/3 cup mini chocolate chips

1/3 cup granulated sugar

1/2 cup confectioners’ sugar, plus more for dusting

Directions:

Position racks in the upper and lower thirds of the oven and preheat to 350 F. Line two baking sheets with parchment paper.

Whisk the dry ingredients – flour, baking soda, baking powder and salt – in a medium bowl.

In another bowl, beat the butter, brown sugar and peanut butter with a mixer until creamy on medium speed. Increase the speed to medium high and beat until fluffy. Add the egg and vanilla extract and continue beating until combined. Reduce the speed to low and add the flour mixture, beat until well blended. Add the chocolate chips and beat until combined.

Put the granulated and confectioners’ sugar in separate bowls. Roll tablespoonful of dough into balls and then roll in the granulated sugar and then the confectioners’ sugar. Place on the prepared baking sheets 2 inches apart.

Bake 15 to 18 minutes, switching the pans halfway through, until the cookies are firm around edges and cracked on top. Let cool a few minutes on the baking sheets before transferring them to a wire rack to cool completely. Dust the cookies with more confectioners’ sugar if desired.

Recipe from The Food Network

Slow Cooker Sunday: Chicken and Sausage Gumbo

So, funny thing, pretty much the only reason why I made this was because I had celery in my fridge and I didn’t want it to go to waste. That always happens when I buy celery. I use a few a few stalks and then the rest gets thrown out. I was determined not to let that happen again. So, I knew I wanted to make something in my slow cooker but wasn’t sure what and then came across this recipe in my favorite slow cooker cookbook.

What was even better, this is one of my favorite types of slow cooker recipes – throw it in there and let it cook. I know that doesn’t sound to proper considering we are talking about food, but, I will assume that you know what I mean. In my slow cooker I added in chicken, andouille sausage, okra, green bell pepper, celery, onion, cayenne pepper, salt, can of diced tomatoes, and chicken broth. Now, it may look like there isn’t enough liquid in there….

But, after cooking on low for about 4 hours there was more than enough liquid. One thing I didn’t do that the recipe called for was adding a cornstarch-water mixture after 3 hours to thicken the liquid. I find that I am not too keen on thickening the liquid because it tends to look congealed after refrigerating it. Granted, all is well once it is warmed up, but, since I am cool with the thinner liquid I stick with that. One more thing, this was delicious, but, if you don’t like spice, I suggest using less cayenne pepper. To go along with the gumbo I made white rice and it’s the perfect accompaniment to soak up all the juices.

Slow Cooker Chicken and Sausage Gumbo

Ingredients:

1 1/2 lbs. boneless chicken thighs, cut into 1 1/2-inch pieces

1/4 lb. andouille sausage, cut into 1-inch pieces

1/2 pound okra, sliced into 1/2-inch pieces

1 green bell pepper, chopped

3 celery stacks, chopped

1 yellow onion, chopped

1/2 teaspoon cayenne pepper

1/2 teaspoon salt

1 14.5 ounce can diced tomatoes

2 cups chicken broth

1/4 cup cornstarch

White rice, for serving (optional)

Directions

In a slow cooker combine the chicken, sausage, okra, pepper, celery, onion, cayenne pepper and salt. Add the diced tomatoes, along with their juices, and the chicken broth and give everything a few good stirs to combine. Cover and cook on high for 3 hours.

In a small bowl, whisk the cornstarch along with 1/4 cup water. Stir into the gumbo to thicken it, cover and continue cooking for an additional hour or until the chicken is cooked through. Season with salt and pepper if necessary. Serve with white rice.

Recipe from Slow Cooker Family Favorites

Etsy Shop Update

My Etsy Shop has been open for just about a month and so far so good. I’ve made three sales, added some bead, crystal & pearl snowflake ornaments and had to adjust how I do my listings. I still haven’t fine-tuned the latter, but I am sure I’ll get it eventually. This is the issue… the necklace from my first sale came in different colors, I thought by listing each of the colors when one was purchased that color would be eliminated from my inventory, unfortunately I had listed my quantity as 1 so the necklace was then sold out, so I had to readjust the listing and the others that I had set- up similarly. I had a similar issue with my following sale of 2 snowflake ornaments… I had to manually remove them from my inventory. So, I have some research to do on listings.

I also ran my first sale over Black Friday weekend and promoted Small Business Saturday. And that’s pretty much where I am.

Here are the Snowflake Ornaments:

If you’re interested in one of the ornaments or are looking for a piece of jewelry for yourself or someone else on your list check out my shop: CraftedByFran

Apple Streusel Dump Cake

I’ve made dump cakes before, but, this one is slightly different because it uses fresh fruit as opposed to canned ones. Specifically Granny Smith Apples. Those are my go-to apples when it comes to baking since they are not overly sweet and are the perfect texture for baking. This cake is a great alternative if you don’t like dealing with pie crust, but, still want something that is akin to apple pie.

To begin, I peeled, cored and sliced Granny Smith apples that I then tossed with lemon juice, cinnamon and salt. I then scattered them in a baking dish that I sprayed with baking spray.

Next, I made the cake mix by combining flour, sugar, rolled oats, baking powder & soda, cinnamon, ginger and salt. I sprinkled this over the apples and then grated a stick and a half of unsalted butter over the cake mix.

And finally, I mixed flour, light brown sugar, sugar, cinnamon, ginger, salt with a stick of melted butter with my hands to form clumps and then sprinkled this over the cake.

I baked the cake for about 40 minutes and let it cool before digging in. While the apples were not overly sweet the topping and cake portion of the cake made up for it.

Apple Streusel Dump Cake

Ingredients:

For the base:

3 pounds Granny Smith Apples (or other sweet-tart apples) peeled, cored and thinly sliced (about 7)

1/4 cup lemon juice

1/2 teaspoon cinnamon

1/4 teaspoon kosher salt


For the cake mix:

1 1/4 cups flour

2/3 cup granulated sugar

1/2 cup old fashioned rolled oats

2 teaspoons baking powder

1/2 teaspoon baking soda

1/2 teaspoon cinnamon

1/2 teaspoon ginger

1/4 teaspoon kosher salt

1 1/2 sticks cold unsalted butter


For the streusel:

1 3/4 cups flour

1/3 cup light brown sugar

1/2 cup granulated sugar

1 teaspoons cinnamon

1/2 teaspoon ginger

1/4 teaspoon kosher salt

1 stick unsalted butter, melted


Directions:

Preheat the oven to 350 F. Grease a 9×13 baking dish with butter or nonstick spray

Make the base: In a large bowl toss the apples with the lemon juice, cinnamon and salt. Transfer to the prepared baking dish.

Make the cake: In a medium bowl combine all of the ingredients except the butter and sprinkle over the apples. Using the largest holes on a box grater grate the butter over the cake.

Make the streusel: In a medium bowl whisk together all of the ingredients except the melted butter. Once the dry ingredients are combined pour in the melted butter and stir. Using your hands squeeze the mixture together forming clumps and then sprinkle over the cake.

Bake until the cake is golden, about 30 to 45 minutes. Let cool 30 minutes before slicing.

Enjoy on its own or with a scoop or two of vanilla ice cream.

Recipe from Real Simple

Chocolate Cream Pie

How was your Thanksgiving? Have you eaten the last of your leftovers? At some point were you suffering from a food coma? Mine was good. I was in charge of dessert, and along with a traditional pumpkin pie and the Brown Butter Vanilla Pear PieI posted a few weeks ago I also made an Apple Streusel Dump Cake (come back tomorrow for that recipe) and today’s Chocolate Cream Pie. This pie was a HIT! Not too sweet… The perfect amount of chocolate! The recipe yields more mascarpone whipped cream than needed, don’t toss it, enjoy it with some berries. Use it to top off some hot chocolate. Or, spread it in a thin layer, freeze it and then use small cookie cutters to cut it into shapes to use in lieu of marshmallows in your hot chocolate.

And here’s my trio of pies from Thanksgiving…


Chocolate Cream Pie

For the crust:

1 disk homemade or store-bought pie crust

4 ounces bittersweet chocolate, chopped

Flour, for dusting


For the Filling:

2 1/2 cups whole milk

4 ounces unsweetened chocolate, chopped

1 cup sugar

3 tablespoons cornstarch

2 tablespoons flour

3/4 teaspoon kosher salt

4 large egg yolks, lightly beaten

2 tablespoons unsalted butter

2 teaspoons vanilla extract


For the Whipped Cream

1/2 cup mascarpone cheese

5 tablespoons confectioners’ sugar

1 tablespoon vanilla extract

1 1/2 cups cold heavy cream

Shaved chocolate for decorating


Directions:

Make the crust: Preheat the oven to 375 F. Roll out the pie dough into a 12-inch round on a lightly floured surface then fit into a 9-inch pie plate. Fold the overhang dough under itself and crimp the edges. Place a piece of parchment paper inside the pie crust and fill with dried beans or pie weights and bake until the crust is starting to set and brown, about 20 minutes. Remove the parchment paper and the beans/weights and bake for another 5 minutes, until the crust is golden and crisp looking. Let it cool completely.

Melt the bittersweet chocolate in heatproof bowl over a saucepan of simmering water. Using a pastry brush, brush the inside of the pie crust with the melted chocolate in a thin layer, place in the refrigerator to harden.

Make the filling: Pour 2 cups of the milk into a heatproof bowl and set over the pan of simmering water. Heat the milk until it’s almost boiling. Add the unsweetened chocolate and stir until melted. Remove from the heat.

In a large bowl whisk the sugar, cornstarch, flour and salt. Whisk in the remaining 1/2 cup milk and then add this mixture to the hot chocolate milk mixture. Raise the heat of the simmering water to medium-high and return the chocolate mixture over the water. Whisk in the egg yolks and cook, whisking constantly until the mixture is very thick. Remove from the heat and stir in the butter and vanilla until smooth. Let the filling cool slightly and then pour into the pie shell. Place a piece of plastic wrap directly on top of the surface of the filling and refrigerate until cold, at least three hours,

Before serving make the mascarpone whipped cream: Beat the mascarpone, sugar and vanilla extract in a large bowl with a mixer until creamy. Add the heavy cream and continue beating until it holds stiff peaks. Add the cream to a pastry bag fitted with a large star and pipe it on top of the pie. Sprinkle with shaved chocolate.

Recipe from Food Network

Slow Cooker Sunday: Herbed Turket Breast

Have you ever thought about cooking your Thanksgiving turkey in a slow cooker? Well, unfortunately you can’t put a whole turkey in there, but, you can cook a turkey breast. Believe it or not, they actually say slow cooker friendly on the wrapper, well, at least the one I picked up did. My friends and I had our 2nd Annual Friendsgiving Celebration last weekend, and when I offered to bring the turkey in my mind I was already thinking of a slow cooker turkey breast since there wasn’t going to be that many of us. I decided on a turkey breast that was 7.5 lbs. Now, when I brought him home and tested him out in my slow cooker I freaked out a little bit because he didn’t fit. Well, he fit I just couldn’t put the cover on the slow cooker. But, I thought to myself that once he thawed out he should just fine.

On the day of the get together I got up early just in case it took longer than directed and in case of any other mishaps. I began by placing a chopped carrot, onion and celery in the bottom of my slow cooker. I then placed the turkey breast on top of the vegetables and sprinkled him – oh, and yes, I always refer to my turkey as him or he, it’s because of Tom The Turkey – with an herb and spice mix and then drizzled melted butter over him. If you don’t have the specific spices that I used below feel free to create your own spice mix.

After a little coercion I was able to get the cover snug on top and I set him to cook on low. I was planning on him being done between 6-7 hours.

While the pop-up time did pop out at 6 hours I decided to leave him in there a little longer just to be sure. I figured he wouldn’t dry out in a slow cooker. And unfortunately the one downfall of cooking a turkey in a slow cooker is not getting that nice browned skin.

But, that was nothing that a few minutes under the broiler couldn’t resolve.

So, would I make a turkey breast like this again? Yes! It’s stress-free and pretty much guarantees that you will have a juicy turkey. I am tempted to go my usual route of brining the turkey beforehand next time though. Oh, one thing I was able to make with this turkey that I had never been able to do before was gravy. There was a decent amount of drippings left in the slow cooker and I must say, homemade gravy from the drippings beats anything you buy in the store hands down.


Slow Cooker Herbed Turkey Breast

Ingredients:

1 carrot, peeled and chopped into 1-inch pieces

1 onion, chopped into 1-inch pieces

1 celery stalk, chopped into 1-inch pieces

3 tablespoons onion powder

1/2 teaspoons sage

1/2 teaspoon celery seed

1 teaspoon dried parsley

1 teaspoon salt

1/2 teaspoon freshly ground black pepper

1 6 to 7 lb. bone-in turkey breast

2 tablespoons unsalted butter, melted

2 tablespoons cornstarch


Directions:

In the slow cooker toss together the carrot, onion and celery.

In a small bowl mix the herbs and spices.

Place the turkey on top of the vegetables and sprinkle with the spice mixture. Try to get some of the mixture under the skin of the turkey as well. Drizzle with the melted butter. Cover and cook on low for 6 to 7 hours, or until fully cooked – 165 F

When the turkey is done, preheat the oven to broil and place the turkey in a roasting pan and broil for a few minutes to brown the skin. Don’t leave it in the oven too long or the turkey could dry out.

Combine the cornstarch with 2 tablespoons of water.

Strain the remaining liquid in the slow cooker into a medium saucepan. Bring to a bowl over medium-high heat. Whish in the cornstarch mixture and cook until the gravy thickens.

Slice the turkey and serve with the gravy.


Recipe from Slow Cooker Family Favorites