Blackberry Mille-Feuille

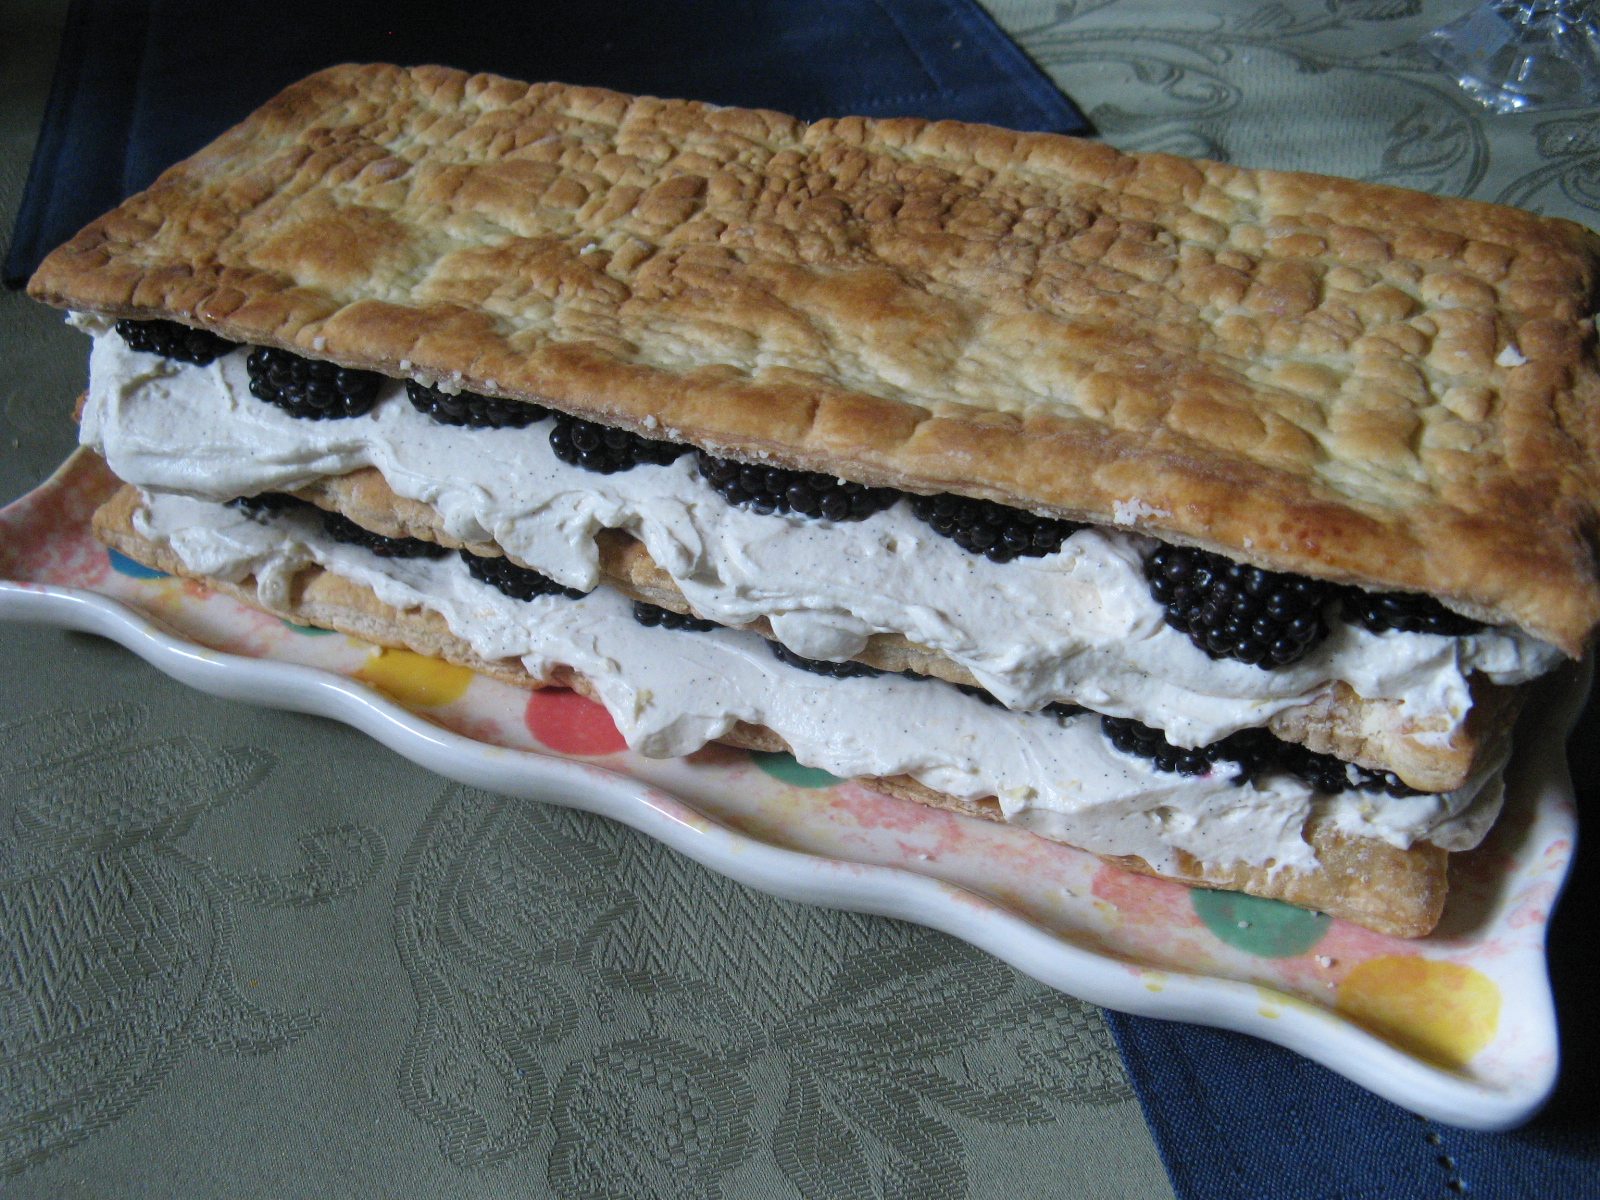
So, you may be wondering what exactly a Mille-Feuille is? I know I was wondering that when a friend tagged me in an Instagram post for Ree Drummond’s Marvelous Mille-Feuille. Translated from French it means one thousand sheets, layer, or leaves. Still wondering? Well, it’s a dessert consisting of layers of puff pastry and cream… Think a Napoleon. For this version though I added in some blackberries along with a custard made with mascarpone cheese… YUM! A slight variation from Ree Drummond’s as she used raspberries. Why did I use blackberries? Well, it was because the recipe called for raspberry liqueur and since I still had some blackberry liqueur from last year’s White Chocolate Blackberry Tiramisu I decided to swap out the berries.

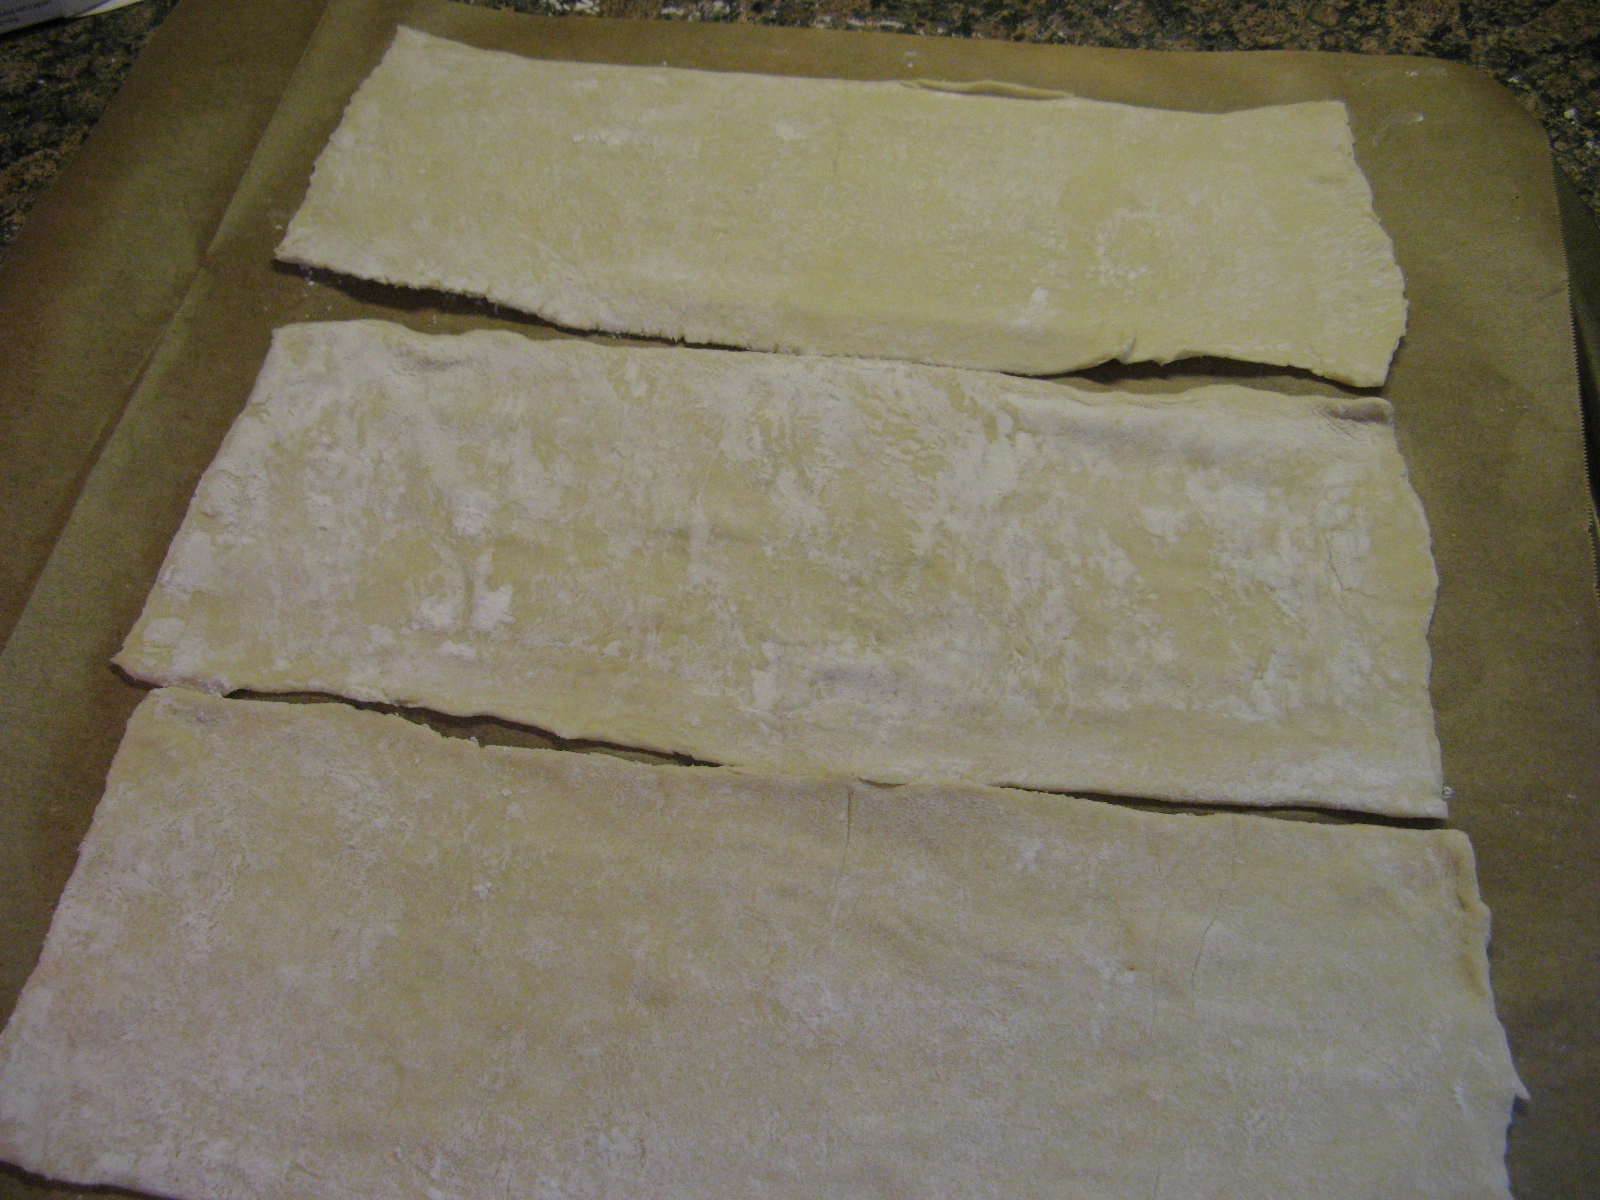
I began by thawing a frozen sheet of puff pastry according to the package directions – I used Pepperidge Farm’s Frozen Puff Pastry. Once it was defrosted I rolled it into a 12 x 15 inch rectangle and then cut it into three 12 x 5 inch rectangles. I placed the three pieces on a parchment lined baking sheet and pricked it with a work and then placed it in the refrigerator for 20 minutes (alternatively you could place it in the freezer for 10 minutes.

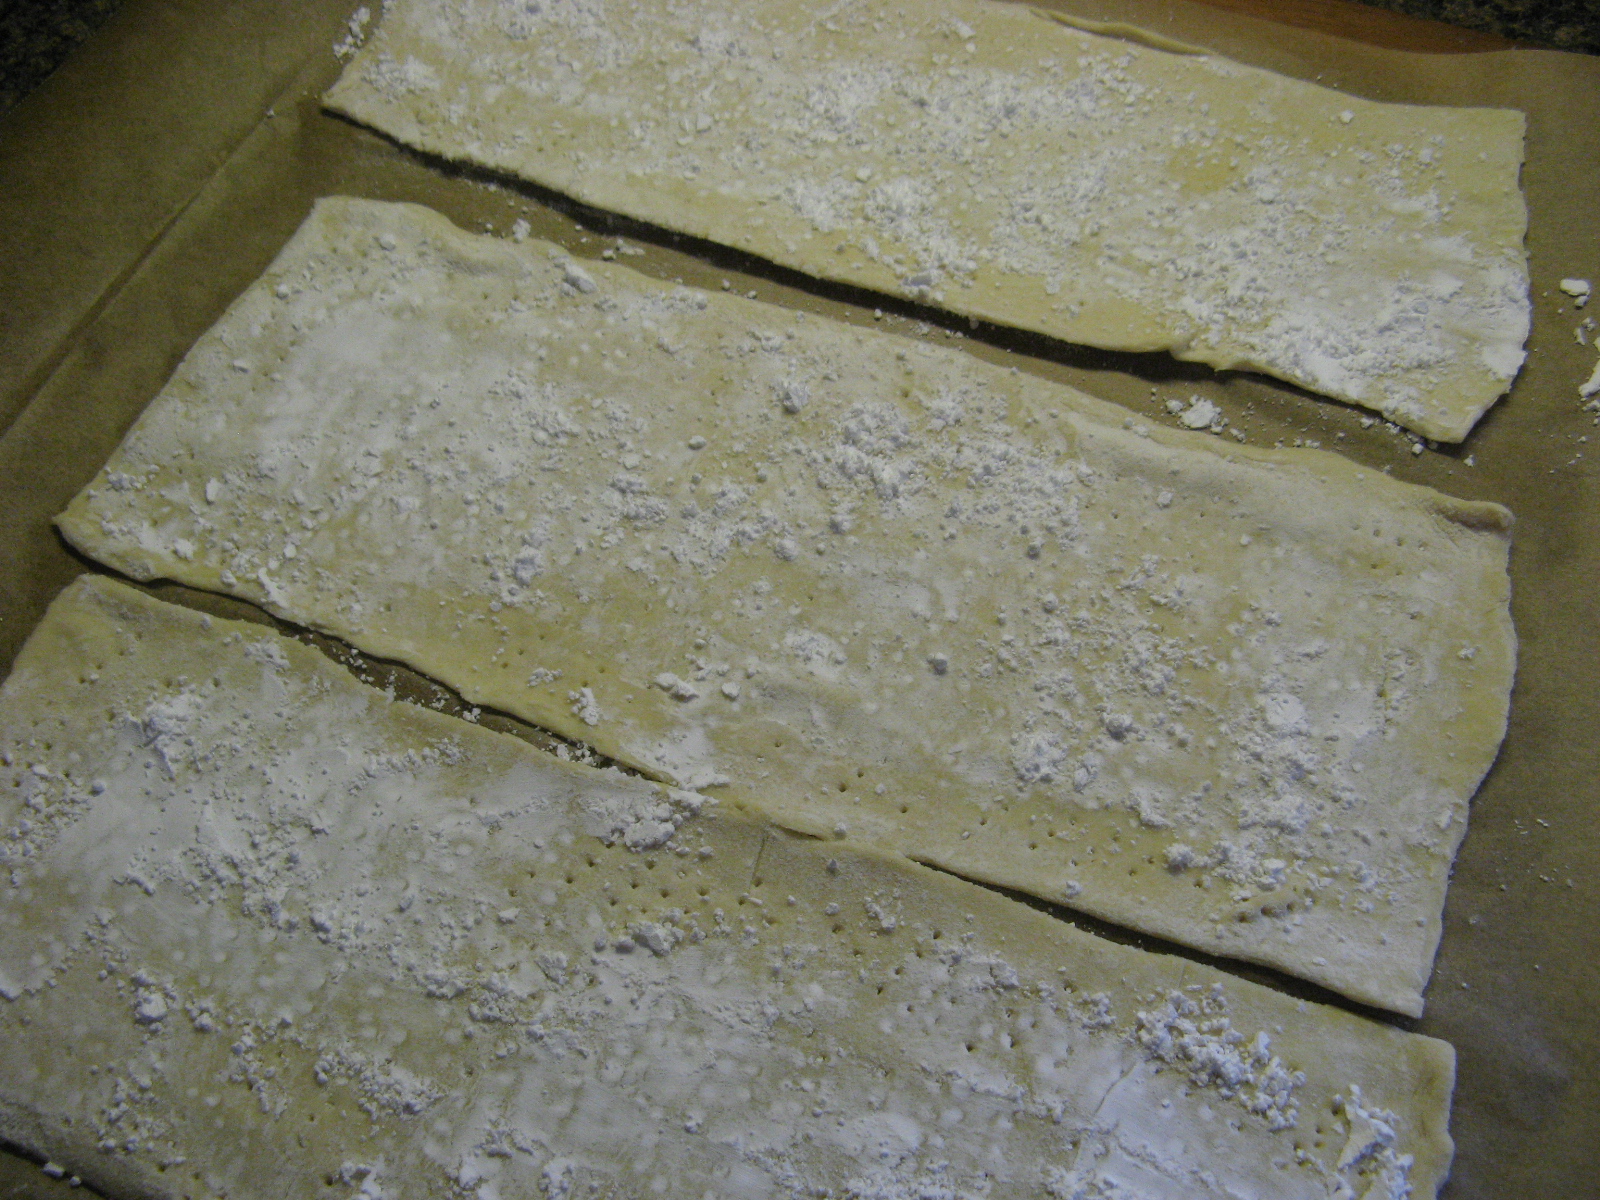
While the puff pastry was in the fridge I preheated the oven to 425 F. Once the puff pastry was perfectly chilled, I sprinkled each rectangle with confectioners’ sugar…

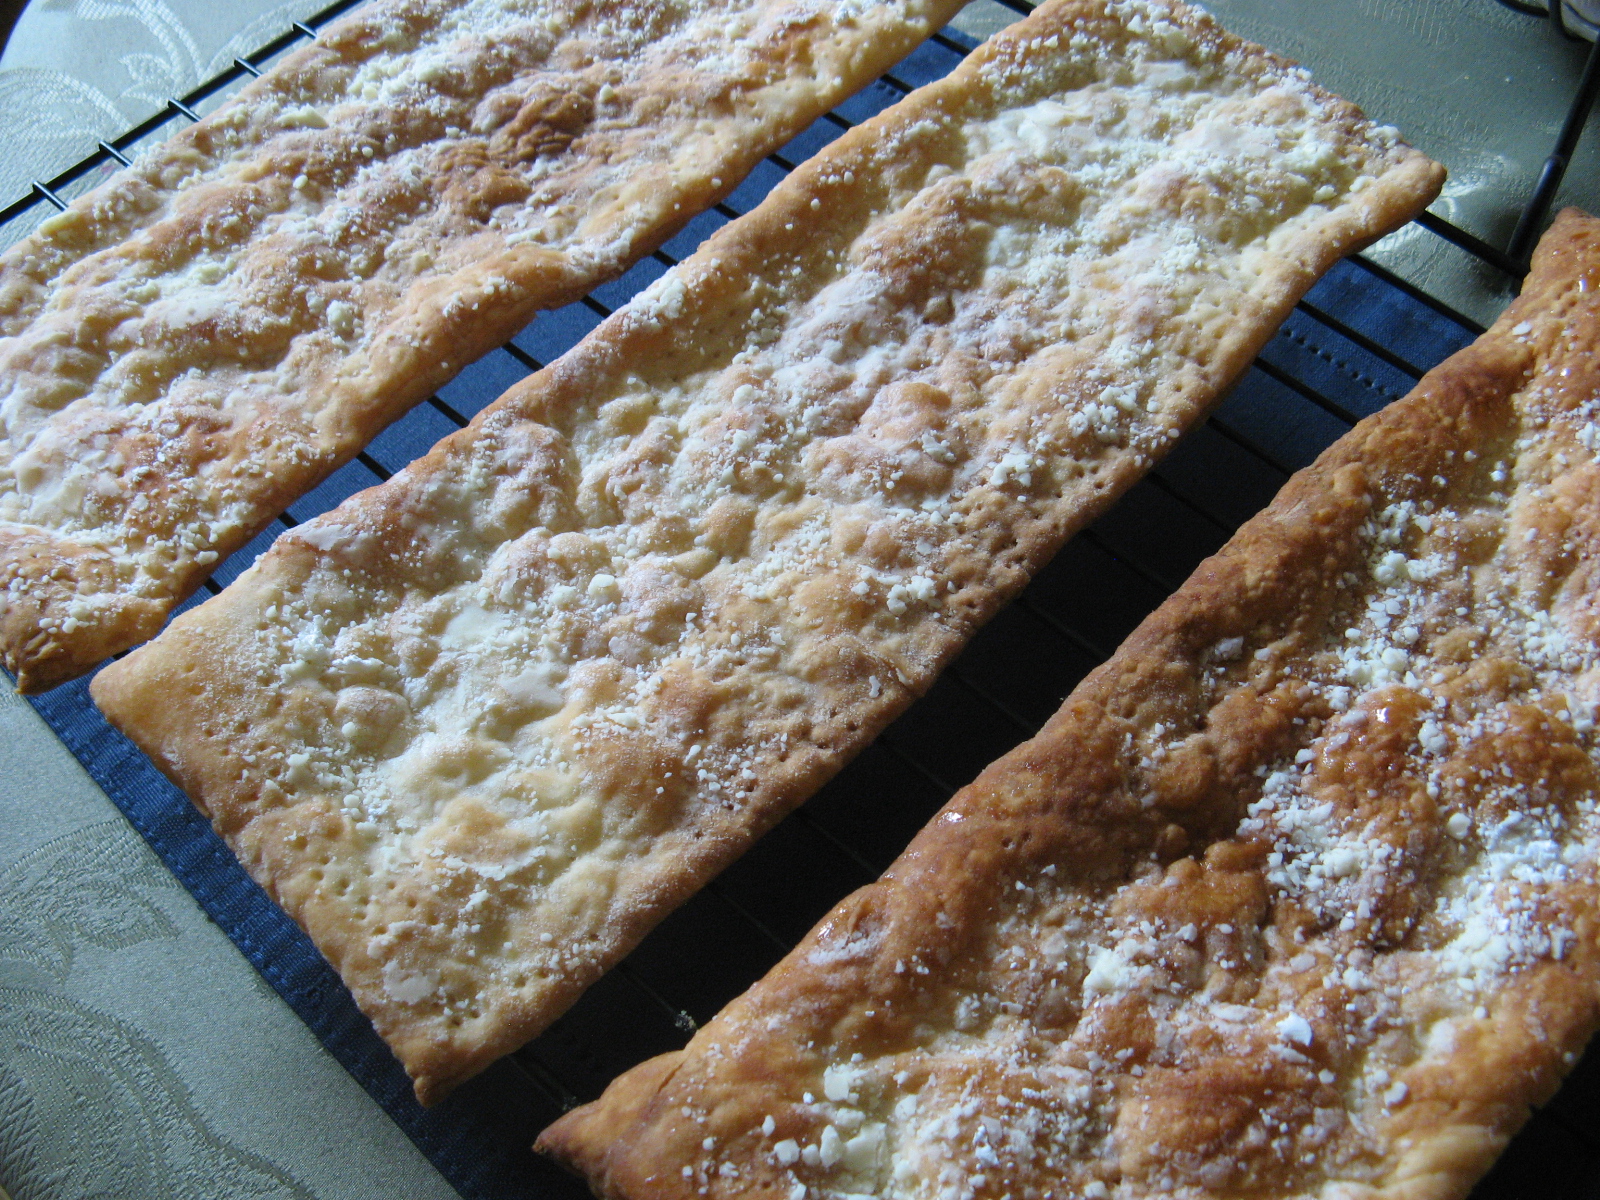
And baked it in the oven from about 15 minutes. Until the puff pastry was a golden brown and puffy. I the transferred them to a wire rack to cool.

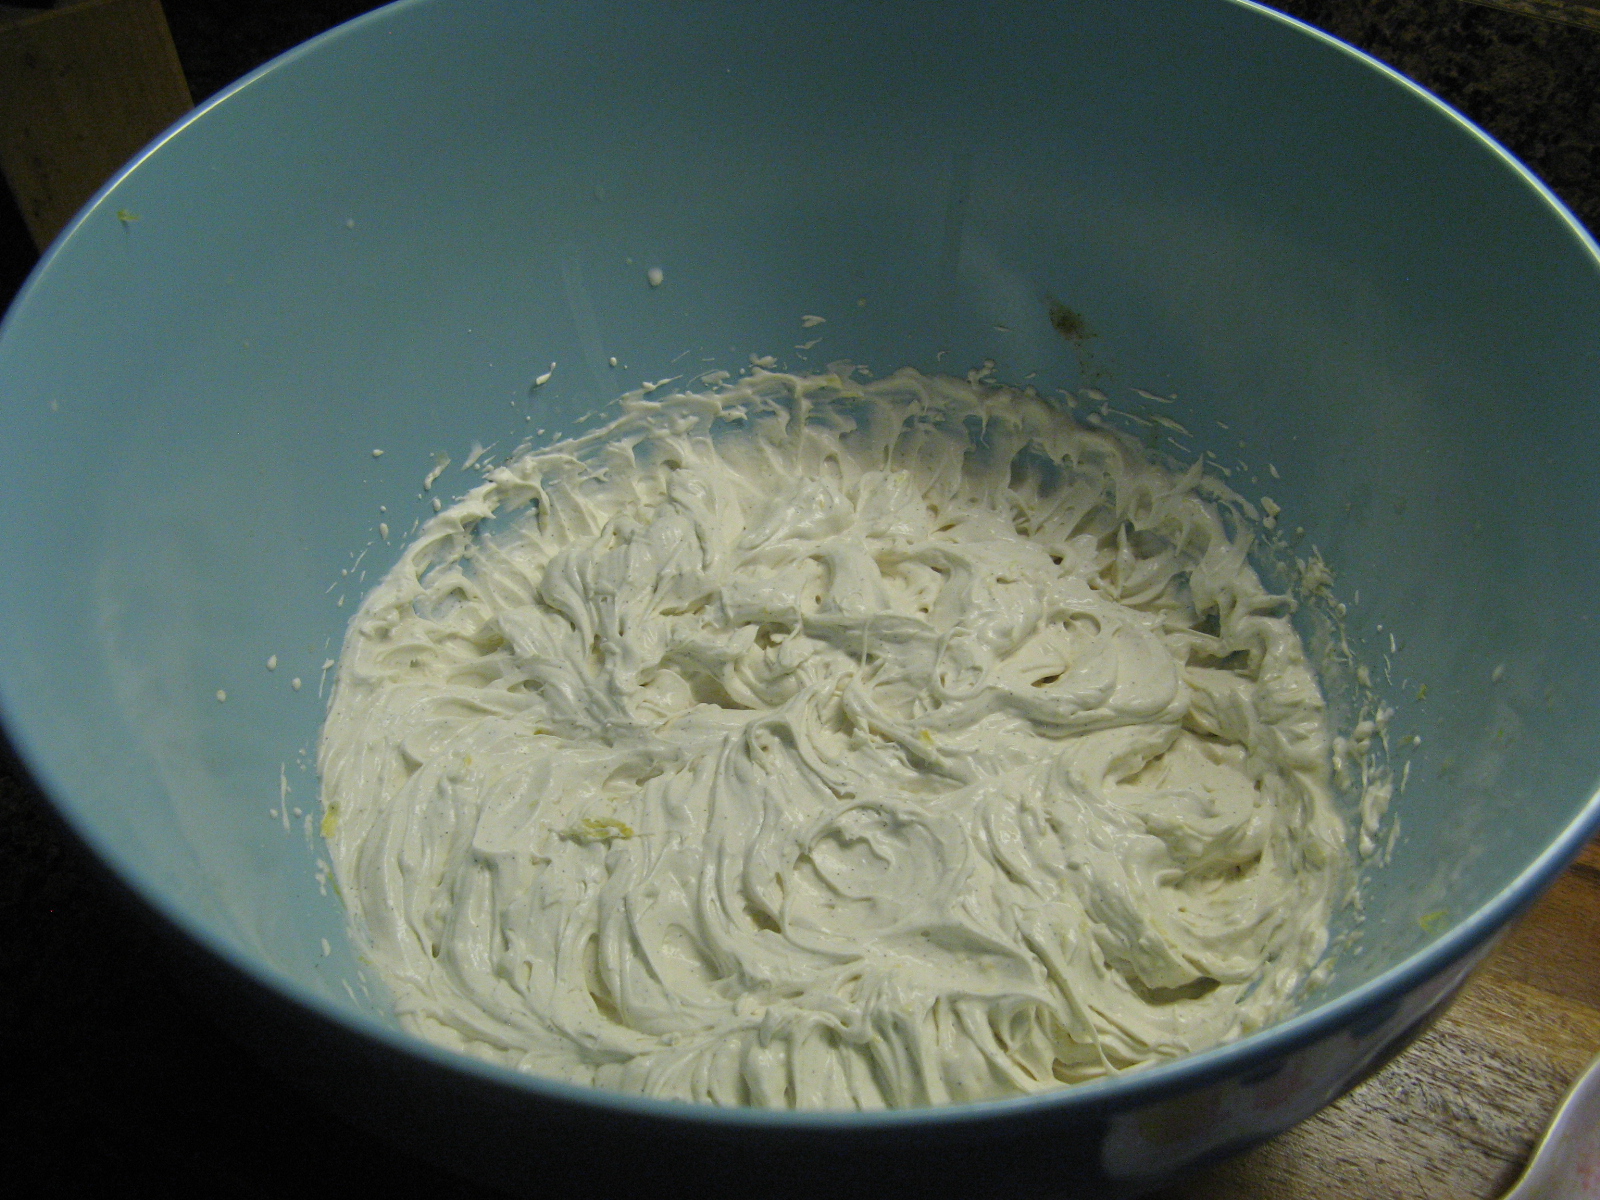
While the puff pastry cooled, I made the filling. In the bowl of my stand mixer I added confectioners’ sugar, mascarpone cheese, heavy cream and vanilla paste and whisked it until soft peaks formed. I then added in the blackberry liqueur and lemon zest and whisked for a few more second until the ingredients were combined.

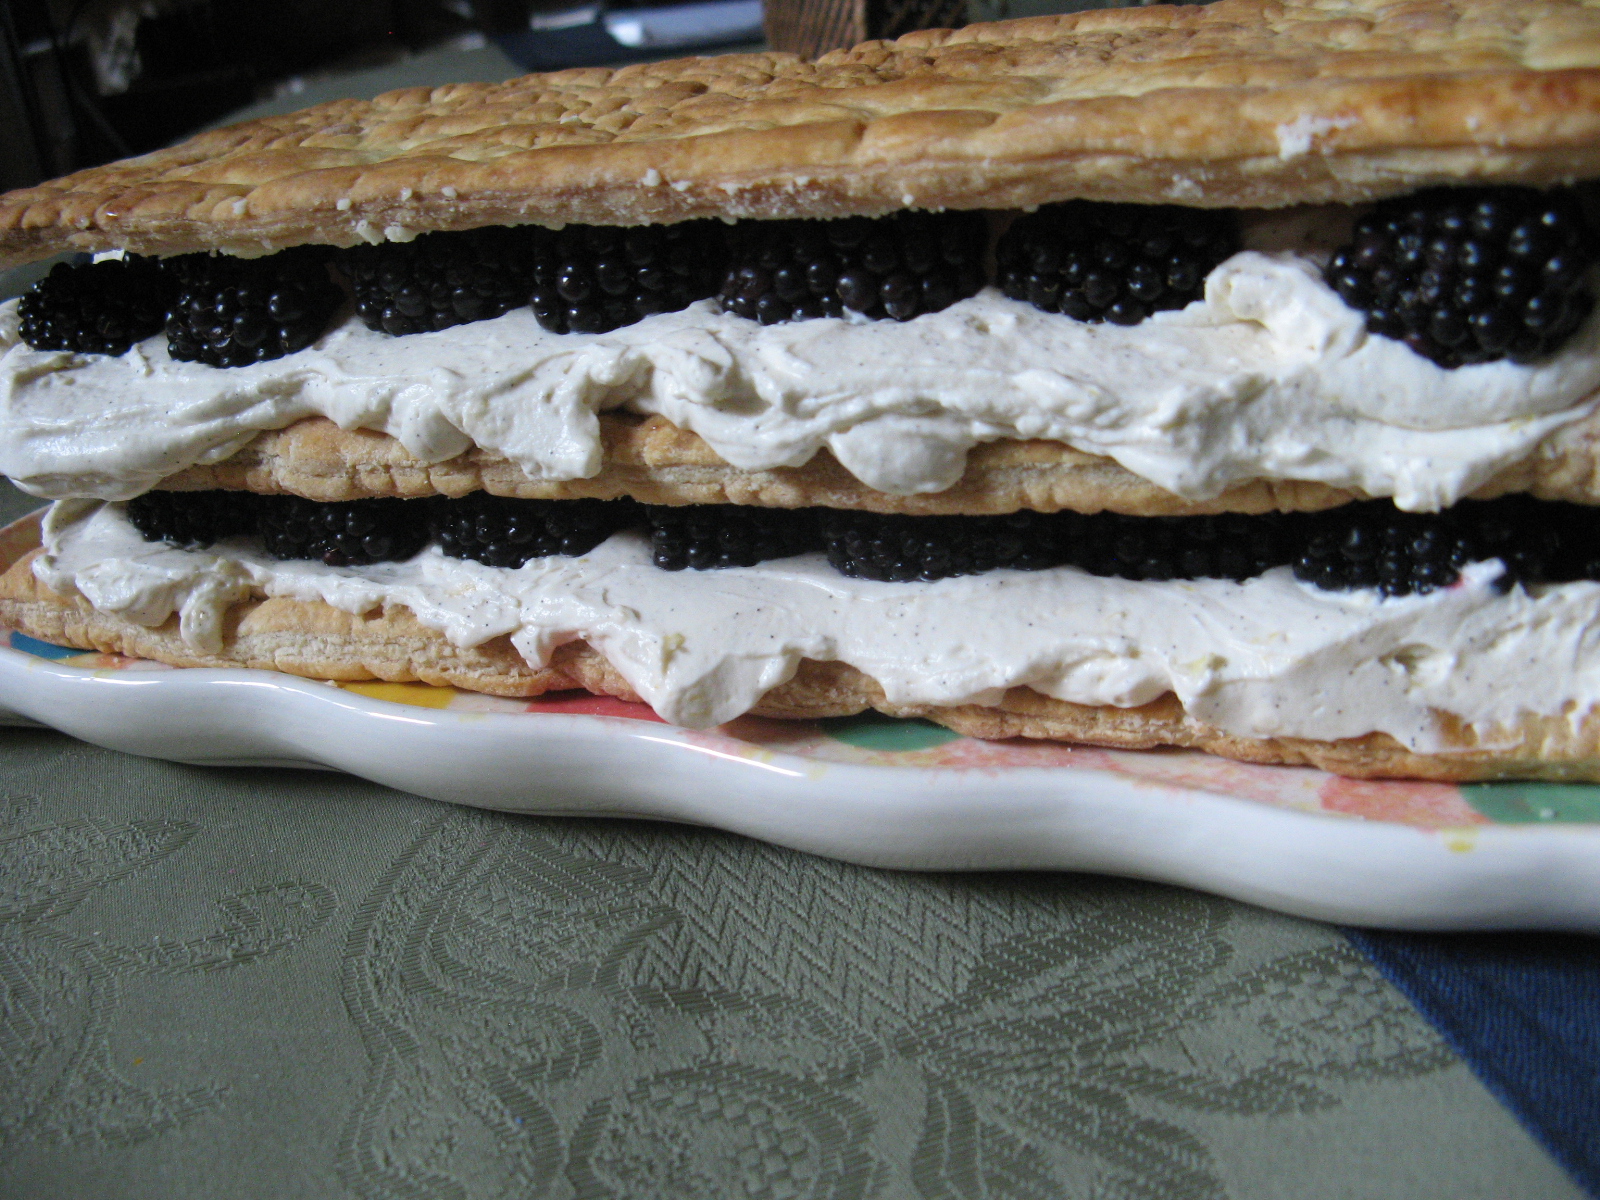
It was then time to assemble. I placed a dab of the whipped mixture on a serving plate and place one of the puff pastry’s on the plate glaze-side down. I spread half of the mascarpone mixture over the puff pastry and then arranged half of the blackberries on top.

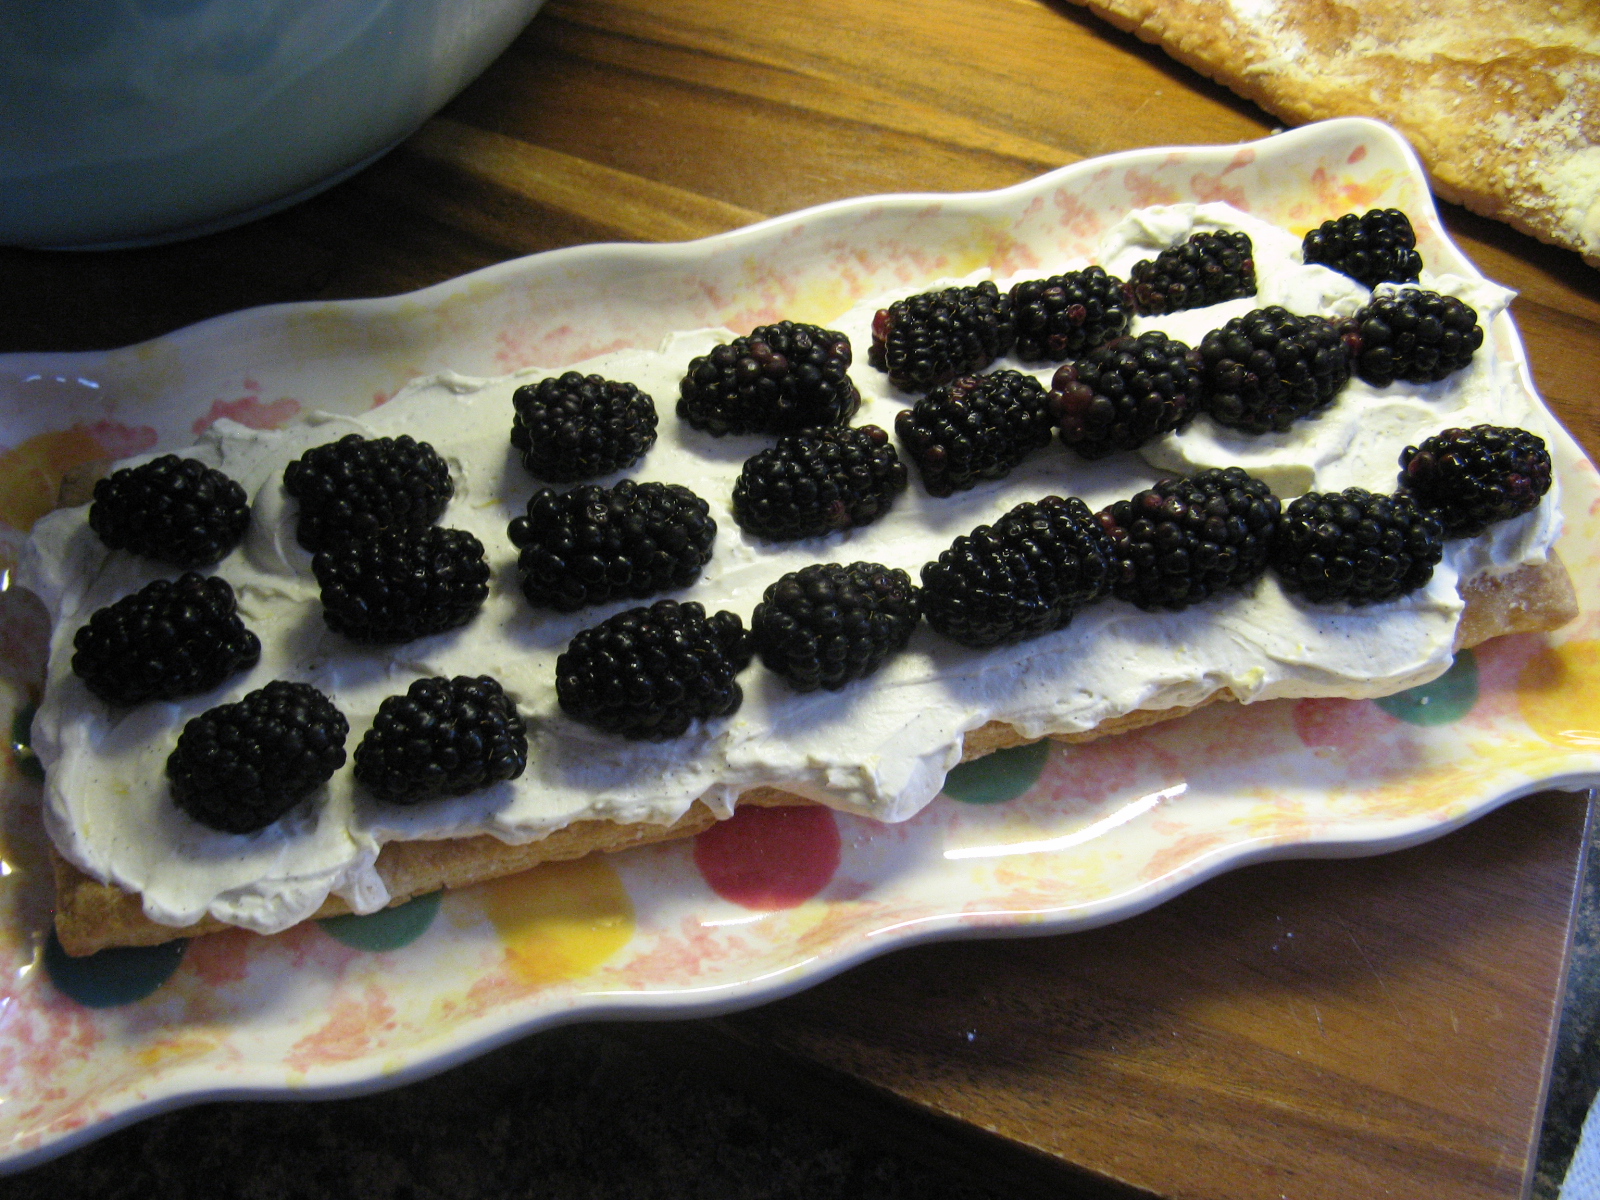
I repeated this with another puff pastry rectangle and the remaining mascarpone mixture and berries. I then topped it with the remaining puff pastry rectangle and before serving I dusted it with more confectioners’ sugar.

Verdict… It was a hit! I can’t wait to make it again using freshly picked berries… Maybe I’ll try making it with raspberries next.

Blackberry Mille-Feuille

Ingredients:

1 14-oz. sheet frozen all-butter puff pastry, thawed

2 tablespoons confectioners’ sugar, plus more for dusting the pastry and the finished dish

8 ounces mascarpone cheese

1 cup heavy cream

2 tablespoons vanilla extract or vanilla bean paste

2 tablespoons blackberry liqueur

zest of 1 lemon

3 – 4 cups fresh blackberries


Directions:

Line a baking sheet with parchment paper.

Unfold the pastry and roll it to a 12 x 15 inch rectangle and then cut into three 12 x 5 inch rectangles. Transfer to the prepared baking sheet and prick the pastry with a fork and chill for 10 minutes in the freezer or 20 minutes in the refrigerator.

Preheat the oven to 425 F.

Dust the pastry with confectioners’ sugar and bake until golden brown and puffy, about 15 minutes. All to cool for about 15 minutes on a wire rack.

In a bowl add the confectioners’ sugar, mascarpone, heavy cream and vanilla paste/extract, beat until soft peaks form – If using a stand mixer use the whisk attachment. Add the blackberry liqueur and lemon zest and continue mixing for an additional 10 seconds to ensure the ingredients are all combined.

To Assemble: Dab a dollop of the mascarpone mixture on the serving plate and place one piece of the pastry on the plate – glaze-sized down (the side you sprinkled the sugar on). Spoon half of the mascarpone mixture on the pastry and smooth it out evenly. Arrange half of the blackberries on top and repeat with another piece of pasty and the remaining mascarpone mixture and blackberries. Top with the remaining pastry piece and dust with confectioners’ sugar.

Recipe adapted from Ree Drummond

S’mores Icebox Cake

Happy National S’mores Day! Isn’t it insane how there’s a day for everything?!?! Today is also National Lazy Day so if you feel like doing nothing you have a decent excuse. And if you want to prepare yourself for tomorrow… August 11th is National Son’s and Daughter’s Day, National President Joke Day and National Raspberry Bombe Day. And if you are so incline to go further than that check out the National Day Calendar website. So, would you believe that even though I have been sharing s’mores related desserts on my blog for the past couple of years I had never had a s’more until this past weekend? I can’t really say why, maybe it’s because I have never been camping, but, that’s not a good excuse. Truth is, I don’t care for marshmallows that much. But, after making this cake I realized that I like toasted marshmallows! I guess it’s like toasting bread, somehow it just tastes better that way.

Before assembling the cake I made ganache, chocolate whipped cream and marshmallow whipped cream. In case you are wondering at the moment and you can’t wait to get to the directions, to make the marshmallow whipped cream I roasted marshmallows in the oven under the broiler, let them cool and then whipped them with heavy cream. I am beginning to learn that you can make any type of whipped cream. I recently came across a recipe with coconut whipped cream using just the coconut solids from a refrigerated can of coconut milk. It’s essentially a vegan version of whipped cream, but, nonetheless I really want to try it.

Next, I assembled the cake. After lining a 9×5 loaf pan with plastic wrap – leaving an overhang on the long sides – I placed a single layer of chocolate graham crackers along the bottom. Breaking the pieces as necessary. Now, I am sure if you want more of an “authentic” s’mores flavor you could swap out the chocolate graham crackers for honey (or cinnamon) flavored ones. Truth be told, these chocolate graham crackers aren’t available everywhere. And did know they make vanilla ones now? I am really hoping this isn’t going to become like M&M’s or Oreos where there are more flavors than you can name or remember. Back to the cake though… Once I had a layer of graham crackers I then spread half of the marshmallow whipped cream over them and drizzled it with a few tablespoons of the chocolate ganache.

I repeated the layers again this time with the chocolate whipped cream, and then another with the marshmallow whipped cream and one last one with the chocolate whipped cream. Finally, I topped it with a layer of the graham crackers. I folded the overhanging plastic wrap over the cake and refrigerated it overnight. I also placed the remaining ganache in the fridge as well. And, I placed 2 whole graham crackers in a Ziploc bag and crushed them with a rolling pin until they were fine crumbs.

The next day, before removing the cake from the fridge, I heated the ganache in the microwave until it was pourable and let it cool for an hour. I also cut 9 marshmallows in half and placed them on a greased baking sheet in a tight 3-by-6 rectangle and broiled them until they were toasted and bubbling. I also let this cool for an hour.

To finish the cake, I inverted it onto a platter and then pressed the chocolate crumbs onto the sides of it. I poured the leftover ganache over the top and spread it into a thin layer – allowing the excess to fall over the sides of the cake. And finally, I removed the marshmallow rectangle from the baking sheet and placed it on top of the cake. And there you have it, a S’mores Icebox Cake.

And you can see after slicing it the layers were distinct. This cake was a hit… especially those roasted marshmallows. My favorite part! I think if I make this again I will opt to use the honey or cinnamon graham crackers just so that the chocolate isn’t the focal point of the cake.

Here are some more s’mores related desserts:

S’mores Stuffed Chocolate Chip Cookies

S’mores Brownies 

Malted S’mores Ice Cream


S'mores Icebox Cake

Ingredients:

4 ounces milk chocolate, finely chopped

2 1/2 cups heavy cream

24 marshmallows

3 tablespoons unsweetened Dutch-process cocoa powder

3 tablespoons confectioners’ sugar

16-18 whole chocolate graham crackers

unsalted butter, for the baking sheet


Directions:

Preheat the broiler.

Make the ganache: Put the chocolate in a small bowl. Bring 1/2 cup of heavy cream to a simmer in a small saucepan. Pour over the chocolate and let stand for 5 minutes until stirring until smooth. Set aside to cool.

Butter a baking sheet, then arrange 15 marshmallows on the baking sheet. Broil until toasted and bubbling, 30 second to 1 minute. Set aside to cool.

Combine 1 cup heavy cream, the cocoa powder and confectioners’ sugar in a large bowl and beat with a mixer on medium speed until stiff peaks form.

Combine the remaining 1 cup heavy cream and the broiled marshmallows in another medium and beat with a mixer on medium speed until stiff peaks form. Don’t worry if bits of marshmallow remain.

Line a 9×5-inch loaf pan with plastic wrap, leaving a 4-inch overhang on the long sides. Line the bottom of the pan with a single layer of chocolate graham crackers, break the crackers to fit as needed. Spread half of the marshmallow mixture over the graham crackers and drizzle with 2 tablespoons of the chocolate ganache. Repeat this step, but using the chocolate whipped cream instead of the marshmallow one.  Repeat again using the marshmallow whipped cream and then finally the chocolate whipped cream. Top with a layer of graham crackers and then wrap the overhanging plastic wrap over the cake and refrigerate for at least 6 hours or overnight.

Crush the remaining graham crackers into finely ground crumbs by placing them in a resealable plastic bag and rolling them with a rolling pin, set aside. Place the remaining ganache in the refrigerator.

About an hour before serving preheat the broiler. Warm the reserved ganache in the microwave until pourable and set aside for an hour to cool. Butter a baking sheet and cut the remaining 9 marshmallows in half and arrange them on the baking sheet in a tight 3 x 6 rectangle – the marshmallows should be touching. Broil until toasted and bubbling and then let cool for an hour.

Invert the cake onto a platter, discard the plastic wrap and press the graham cracker crumbs onto the sides of the cake. Pour the ganache over the cake and spread into a thin layer letting the it drip down the sides. Finally, remove the toasted marshmallow rectangle in one piece and place on top of the cake.

Recipe from Food Network

Ice Cream Cone Cupcakes

While scrolling through my Instagram feed I saw a picture of Ice Cream Cone Cupcakes and immediately thought… “I want to try that!” This happens a lot when I am looking at pictures on Instagram. It could be a recipe, a cake idea or a craft project. I recently purchased the supplies for a paint pouring project I saw on AC Moore’s page. I am sure it’s going to be a messy one so I am waiting for a decent weather day to make that outside. I initially thought that the cupcakes were baked in a mini muffin tin and then placed inside of the cupcake cones (silly me!) but after a Google search I learned that no, the cupcakes are actually baked in the cones (even better!) And what was even better than that, I decided that since these were a “fun cupcakes” I would use Funfetti cake mix and lo and behold on the side of the Pillsbury box on Funfetti cake mix were the instructions to make these.

I began by placing flat-bottom ice cream cones in a muffin pan…

Next, after preparing the batter, I poured about 3 tablespoons of batter into each cone. You don’t want to overfill the cones, if you do, you’ll end up with a cupcake spilling out of the cone once baked.

I then baked them in a preheated 350F oven for approximately 25 minutes.

I allowed them to cool completely on a wire rack…

And then piped frosting on each cupcake using a large star tip (I used Wilton size 1M) to resemble a soft serve ice cream cone. And no ice cream cone is complete without sprinkles.

There you have it… Ice Cream Cone Cupcakes. While they are fun and delicious (and probably the perfect treat for a kids party) they do have a downfall, they are top-heavy. Which means transporting them can be a challenge. I dropped a few of them while trying to balance them on a cake stand while walking. Lesson learned!

Black Forest Cupcakes

So, I had never baked with cherries before until this Cherry Pie and here I am making another sweet treat with cherries… Black Forest Cupcakes. With chocolate, cherries & whipped cream how could they not be delicious!

I began by making the cherry filling. Unfortunately this isn’t the most appetizing looking picture of the cherry filling, but, it definitely tasted whole a lot better than it looked.

While the cherry filling cooled in the refrigerator I made the cupcakes.

And once the cupcakes and the filling had cooled I cored the cupcakes and filled them with the cherry filling.

And finally, I topped them with whipped cream frosting, some chocolate shavings and a cherry.

Surprisingly these cupcakes were incredibly light and not overly sweet.


Black Forest Cupcakes

  • Servings: 15 cupcakes
  • Print

Ingredients:

Chocolate Cupcakes:

1/2 cup (1 stick) unsalted butter, at room temperature

1 cup sugar

2 eggs

1/2 teaspoon vanilla extract

6 tablespoons unsweetened cocoa powder

1 cup flour

1/2 teaspoon baking soda

1/4 teaspoon salt

6 tablespoons milk*

*I used 2% milk


Cherry Filling:

1/4 cup sugar

2 tablespoons corn starch

2 tablespoons water

1 2/3 cups pitted and quartered cherries


Whipped Cream:

1 1/2 cups heavy whipping cream, cold

3/4 cup confectioners’ sugar

2 teaspoons vanilla extract

chocolate, for grating

cherries, for topping


Directions:

Cupcakes:

Preheat the oven to 350 F and line a cupcake pan with liners.

Beat the butter and sugar on medium speed until light and fluffy, about 3-4 minutes.

Add the eggs, one at a time, beating until just blended.

In a separate bowl combine the vanilla extract, water and cocoa powder and whisk until smooth. Add this to the sugar mixture and beat until combined.

In another bowl whisk together the flour, baking soda and salt. Add the flour mixture to the sugar mixture alternating with the milk. Add half of the flour mixture, then all of the milk and then the remaining flour mixture, mix until the batter is smooth.

Fill the cupcakes liners about 3/4 way (about 1/4 cup) and bake for 15-17 minutes, until a cake tester inserted in the middle comes out clean.

Let the cupcakes cool a few minutes in the pan and then remove them to a wire rack to cool completely.


Cherry Filling:

Combine the sugar, cornstarch and water in a saucepan over medium heat and stir to combine. Heat until the sugar begins to melt

Add the cherries and stir to coat them with the sugar mixture. Cook the mixture until the cherries begin to soften and they let out their juices.

Remove from the heat once the juice has begun to thicken. Pour the mixture into another bowl and refrigerate until cool.


Once the cupcakes and the cherry filling has cooled remove the centers of the cupcakes using a cupcake corer or a knife and fill the centers with the cherry filling.


Whipped Cream:

Add the heavy cream, confectioners’ sugar and vanilla extract to a large bowl and whip on high speed until stiff peaks form.

Pipe swirls of the whipped cream on top of the cupcakes. Then top them with grated chocolate and a cherry. Refrigerate until ready to serve.

Recipe from The Cake Blog

Slow Cooker Sunday: Rice Pudding

For today’s Slow Cooker Sunday recipe I am bringing you dessert. Rice Pudding… One of my favorite desserts. And this is probably the simplest Slow Cooker item I have ever made hence this super short blog post.

In the bowl of my slow cooker I added all of my ingredients: Arborio rice, whole milk, water, sugar, salt and a cinnamon stick. Now, the true title of this rice pudding recipe was for a Moroccan Rice Pudding, but, since I opted not to use the orange water that was listed in the ingredient list I am assuming it’s just a plain rice pudding. I gave everything a good stir and then set it to cook on low…

img_0362

And after a short 4 hours my rice pudding was ready. Now, you might be tempted to leave it on longer since the rice will be tender, but, there will still be a considerable amount of milk left, but don’t. As the rice pudding cool it continues to absorb the liquid and it will be creamier.

img_0363

You can opt to top it with ground cinnamon or nutmeg or toasted walnuts or almonds. I opted to eat mine as is and I must say it’s one of the best rice puddings I have ever had. I feel that using a cinnamon stick as opposed to ground cinnamon allowed for a cinnamon flavor that wasn’t as pungent and more of an essence. If that makes any sense… I hope it does! I hope you try it and that you like it as much as I did.


Slow Cooker Rice Pudding

Ingredients:

1 cup short grain rice, such as Arborio

2 cups water

1/2 teaspoon salt

3 tablespoons butter*

3 1/2 cups milk**

2/3 cups sugar

1 cinnamon stick

*I used unsalted butter

** I used whole milk

Directions:

In the bowl of a 4-Quart slow cooker add all of the ingredients. Stir well. Cover and cook on high for 2 1/2 hours or on low for 4 hours.

Top with your favorite topping: cinnamon, nutmeg, toasted almonds or walnuts.

Recipe from Crock-Pot

Carrot Cake For Two…

Or dessert for One for two days! I love carrot cake, but, truth be told it’s a lot of work to make for just me alone to eat. Okay, it’s really not a lot of work; it’s a lot of cake for me alone. But, I recently came across a recipe for carrot cake that resulted in two perfect-sized slices of cake, which would be great as a dessert for two or in my case dessert for one for two days… Yum! Who doesn’t love a delicious dessert two days in a row?

To make the batter I began by whisking together flour, baking powder, salt, cinnamon and nutmeg in a medium bowl. I then created a well in the center of the flour mixture and added in eggs and sugar and mixed the two together. Next I added in oil and vanilla extract and continued mixing it with a fork.

img_0153

I then incorporated the flour mixture and egg mixture and folded in shredded carrots and pecans to the batter. Once the batter was well combined I transferred it to a 9-inch round pan that I sprayed with baking spray.

img_0154

After baking the cake in a 350 F preheated oven for about 25 minutes I removed it from the oven and allowed the cake to cool in the pan on a wire rack for about 20 minutes.

img_0158

After the 20 minutes, I removed the cake from the pan and allowed it to cool completely on the wire rack. Once it was completely cooled I cut the cake into 4 equal parts and frosted the top of each piece with cream cheese frosting.

img_0164

I then stacked the four pieces and frosted the back curve of the cake.

img_0167

After refrigerating the cake for half an hour I then sliced it in half and was left with 2 perfect sized slices of cakes.

img_0173


Carrot Cake For Two

Ingredients:

For the Cake:

2/3 cup all-purpose flour

1 teaspoon baking powder

1/2 teaspoon ground cinnamon

1/4 teaspoon Kosher salt

Pinch freshly grated nutmeg

1/2 cup granulated sugar

1 large egg, at room temperature

1/4 cup vegetable oil

1/2 teaspoon pure vanilla extract

5 ounces carrots (about 3 small), finely grated (about 1 cup)

1/4 cup pecans


For the Frosting:

8 ounces cream cheese, at room temperature

1 stick unsalted butter, at room temperature

3/4 cup confectioners’ sugar

1/2 teaspoon pure vanilla extract


Directions:

For The Cake:

Preheat the oven to 350 F. Spray a 9 -by- 2 inch round cake pan with baking spray.

Whisk together the dry ingredients – flour, baking powder, cinnamon, salt and nutmeg – in a medium bowl. Make a well in the center of the flour mixture. Working within the well, use a fork to mix together the eggs and sugar until well combined. Add the oil and vanilla to egg mixture and continue mixing with a fork until well combined once again. Stir the wet and dry ingredients together with the fork until just combined. Fold in the carrots and pecans.

Transfer the batter to the prepared pan and bake for 20 to 25 minutes, until a cake tester comes out clean. Let the cake cool in the pan for 20 minutes on a wire rack. Turn out the cake and let it cool on the wire rack for about an hour until completely cool.

For The Frosting:

Using a handheld mixer or stand mixer on medium, beat together the butter and cream cheese. Slowly add the confectioners’ sugar and continue beating until well incorporated. Finally add in the vanilla extract.

To Assemble the Cake:

Cue the cake into 4 equal wedges. Frost the top of each wedge with about 3 tablespoons of frosting. Stack the wedges on top of each other and with the remaining frosting frost the back curve of the cake, and leave the 2 sides of the cake open. Refrigerate for about 30 minutes, then cut the cake wedge in half and serve.

Recipe from The Food Network

Ricotta Pound Cake

Hey Everyone! So, I took a bit of a break from blogging, but, not from baking and crafting. If you follow me on Instagram or if you look down on the right hand side of this page you can see what I was up to during the holidays. How has the New Year been treating you? Hopefully good thus far. And for those of you who make resolutions, how’s it going? I may have mentioned this before, but, I don’t make resolutions. The way I see it, every day is a good day to set a goal or to make a change. So, for my first post of the New Year I bring you a Ricotta Pound Cake. Yeah, I know not too exciting, but, definitely a yummy treat nonetheless. It came about because I had about 2 cups of ricotta cheese in my fridge that was about to expire and I didn’t want to throw out.

This was a quick and easy pound cake to make. In one bowl I sifted together the dry ingredients (flour, baking powder and salt) and in the bowl of my stand mixer I creamed together the ricotta, butter, sugar, eggs and vanilla bean paste before incorporating the flour mixture into the mix. I then poured the batter into a 9-inch loaf pan that I sprayed with baking spray and baked it in a preheated oven for about 50 minutes.

And after letting it cool on a wire rack…

img_0351

It was time to slice it and enjoy! This cake is definitely good for any time of the day… If you’re not into your typical breakfast foods it’s a nice accompaniment to your morning coffee or tea, as an afternoon snack or for dessert after dinner.

img_0353


Ricotta Pound Cake

Ingredients:

1 1/2 cups cake flour

2 1/2 teaspoons baking powder

1 teaspoon kosher salt

3/4 cup unsalted butter, at room temperature

1 1/2 cups whole milk ricotta

1 1/2 cups granulated sugar

3 large eggs

2 teaspoons pure vanilla extract*

*I used vanilla bean paste

Directions:

Preheat the oven to 350 F. Prep a 9-inch loaf pan by spraying it with baking spray or by greasing and flouring it.

Sift the flour, baking powder and salt in a medium bowl.

In the bowl of a standing mixer, or in large bowl to using a hand mixer, cream together the butter, ricotta and the sugar. Add the eggs, one at a time, incorporating each egg before adding the next one. Add the vanilla.

On low speed, gradually add in the flour mixture. Once added, mix the batter for 30 seconds.

Pour the batter into the prepared pan and smooth the batter.

Bake the cake on the center rack for 15 minutes, then lower the heat to 325 F and bake for an additional 25-60 minutes. It will all depend on how wet the ricotta cheese is. The cake will be done when it springs back from touch and has slightly pulled away from the pan sides and a cake tested come out clean.

Cool the cake inside the pan for 15 minutes, before removing and letting it cool completely on wire rack before slicing.

Recipe from Epicurious

Pumpkin Cake with Goat Cheese Frosting

So, what happens when you bake a cake late at night and then frost it early the next morning? You don’t take pictures! But, that’s okay. I don’t need pictures to tell you how delicious this cake is. I do have this lovely final picture though…

img_0144

With Thanksgiving this week this Pumpkin Cake with Goat Cheese Frosting is my final pumpkin dessert of the season. I can’t say it’s the best as that title goes to the Pumpkin Tiramisu I posted about last month, but, it’s definitely a close second, and I am sure would be a welcome addition to your Thanksgiving dessert table. I actually made it for a Friendsgiving celebration I had with some wonderful friends last weekend. If you’ve never had your own Friendsgiving celebration I strongly advise you to have one next year. There’s absolutely no drama and you get to spend some time with people who are just as important or in some cases more important to you than your own family!

Here are some quick notes about this cake though… Definitely go with the freshly grated nutmeg and don’t try to substitute ground ginger for the freshly grated ginger, trust me, these two things make a huge difference in the flavor. I speak from experience. Make your own buttermilk by combining vinegar (or lemon juice) and milk (for this cake, I used 1/2 tablespoon of vinegar and 1/2 cup 2% milk to make the buttermilk.) And finally, if you’re not a fan of goat cheese go with a simple cream cheese frosting. You can never go wrong with cream cheese frosting.

So, however you’re spending your Thanksgiving I hope it’s one with delicious food, sweet desserts and great company. And remember, no matter what has happened in life there is ALWAYS something to be grateful for!


Pumpkin Cake

Ingredients:

2 sticks unsalted butter, at room temperature

2 3/4 cups all-purpose flour

1 1/2 teaspoons baking powder

1 teaspoon baking soda

1 1/2 teaspoons ground cinnamon

3/4 teaspoon freshly grated nutmeg

1/2 teaspoon salt

2 cups light-brown sugar

3 large eggs

1 1/2 cups solid-pack pumpkin

1 teaspoon pure vanilla extract

3/4 teaspoon grated peeled fresh ginger

1/2 cup buttermilk*

*To make your own combine 1/2 tablespoon vinegar (or lemon juice) with 1/2 cup milk – I used 2%. Let stand for 5-10 minutes at room temperature. When the milk is ready it will have thickened and you will see small curdled bits.

Directions:

Preheat oven to 350 F. Prep two 8-inch round pans, either by spraying them with baking spray (what I did) or brush the pans with butter, line the bottoms with parchment paper, butter the parchment paper then dust the pans with flour, tapping out the excess.

In a medium bowl whisk together the flour, baking powder, baking soda, cinnamon, nutmeg and salt.

With an electric mixer (or stand mixer) beat the butter and brown sugar on medium speed until pale and fluffy, 3 to 4 minutes. Beat in the eggs, 1 at a time. Then beat in the pumpkin and finally the vanilla and ginger. Reduce the speed to medium and add the flour in the batches alternating with 2 batches of the buttermilk, beating until just combined, scraping down the sides of the bowl as necessary.

Divide the batter evenly between the prepared pans. Bake until the cakes are golden brown, the edges pull away from the sides of the pan and a cake tested comes out clean, about 30 -35 minutes. Transfer the pans to a wire rack to cool for 15 minutes. Turn out the cakes onto the racks to cool completely.

Place the bottom layer of the cake on a cake stand (or board) and spread half of your desired frosting evenly over the cake. Top with the second layer and evenly spread the remaining frosting over the cake.

Recipe from Martha Stewart


Goat Cheese Frosting

Ingredients:

1 pound (2 – 8oz bars) cream cheese, at room temperature

8 ounces soft goat cheese, at room temperature

1/2 cup confectioners’ sugar

Directions:

Beat cheese until combined, then gradually add sugar and continue beating until smooth and creamy.

Recipe from Martha Stewart

Mocha Chocolate Icebox Cake

The unofficial end of the summer is upon us! A bittersweet time… the lazy days of summer are coming to an end, kids go back to school (yay for crazy morning traffic – that being said in my most unenthusiastic and sarcastic voice) and temperatures begin to drop. Granted, that last fact is a welcome change to me. Fall is upon us! If you didn’t know, it’s my favorite season! There’s pumpkin everything (I’m actually eating a Chobani Flip Pumpkin yogurt as I write this), apple picking, the crisp air in the morning, the leaves changing color and so many other wonderful things. It also leads us to my other favorite time of the year… The Holiday Season! You know, that time between Thanksgiving and Three Kings Day. Well, that’s what I personally consider the Holiday Season to be, I know for some it ends with the New Year. But, before we get to all that and our ovens working overtime baking wonderful holiday treats, I have a dessert for you that’s perfect for any BBQ’s you’ll be heading to this holiday weekend and for any of those random 90+days that are sure to come… An icebox cake, more specifically a Mocha Chocolate Icebox Cake.

I first saw this recipe on Food Network’s Instagram feed. It’s from Ina Garten aka “The Barefoot Contessa” and I knew I had to make it. And then a few weeks later it was featured in their magazine. Its super simple, only requires 1 bowl for mixing and you have don’t have to bake it. You assemble it and let it set overnight in your fridge – hence icebox cake.

In a large bowl combine heavy cream, mascarpone, sugar, Kahlua, cocoa powder, espresso powder & vanilla extract. Using a hand mixer, mix on low speed until combined and slowly raise the speed until stiff peaks form. Before using this mocha cream of course I had to try it and it tasted similar to the cream used in Tiramisu… Delish!

IMG_0234

Once the cream is made it was time to assemble the cake. I arranged a layer of thin & crispy chocolate chip cookies flat in an 8-inch springform pan. I used Tate’s cookies, which are famous for their thin & crispy texture. If you can’t find Tate’s or you just don’t feel like ordering them, you can try Chips Ahoy’s new Thins Chocolate Chip Cookie. So, after arranging the first layer of cookies, I spread about a fifth of the cream evenly over the cookies. Next, another layer of cookies and then the cream. I continued this layering pattern until I had 5 layers of each, ending with the cream. I then smoothed the top, covered it with plastic wrap and refrigerated it overnight.

IMG_0235

IMG_0240

The following day to unmold the cake I ran a sharp knife along the sides and then removed the ring and topped the cake with chocolate shavings.

IMG_0264

Delicious is an understatement for how good this cake is! The cookies soften due to the cream, but, are left with enough texture that you don’t feel like you’re eating mushy cookies… Which would be gross! And the combination of the mocha cream and the chocolate chip cookies is just perfect!

IMG_0266


Mocha Chocolate Icebox Cake

Ingredients:

2 cups heavy cream, cold

12 ounces mascarpone cheese

1/2 cup sugar

1/4 cup Kahlua liqueur

2 tablespoons unsweetened cocoa powder

1 teaspoon instant espresso powder

1 teaspoon pure vanilla extract

24 ounces thin & crispy chocolate chip cookies, about 35

Shaved semi-sweet chocolate, for garnish


Directions:

In a large bowl combine the heavy cream, mascarpone, sugar, Kahlua, cocoa powder, espresso powder & vanilla extract. Using a hand mixer mix on low speed until all ingredients are combined, gradually increase the speed until firm peaks form.

To assemble to the cake, arrange the chocolate chip cookies flat in an 8-inch springform pan, breaking the cookies as necessary to completely cover the bottom of the pan. Spread a fifth of the mocha cream evenly over the cookies. Place another layer of cookies lying flat and then another fifth of mocha cream. Continue this layer pattern until there are 5 layers of each, ending with the mocha cream. Cover with plastic wrap and refrigerate overnight.

To unmold, run a sharp knife along the edges and remover the ring. Sprinkle with shaved chocolate and serve cold.

Recipe from Food Network


Dump Cakes

Memorial Day Weekend is upon us- the unofficial start of the summer – and with the official start right around the corner and the inevitable warmer temperatures, you may be looking for desserts that will satisfy your sweet tooth but won’t take too long to put together and don’t require a slew of ingredients. If so, today I have the recipe for you… A Dump Cake! And trust me, it tastes a whole lot better than the images the name may conjure up for you.

I wish I could say that I came up with this genius idea of a dessert myself, but the credit goes to Pioneer Woman: Ree Drummond. Warning… If you are adverse to box cake mix, can pie filling / canned fruit and butter stop reading now and deprive yourself of the opportunity to make something super simple and delicious. Hey, you have standards to keep. And yes, it only takes those three ingredients to make this cake.

To begin, in a 9×13-inch baking dish pour out a can of cherry pie filling and a can of crushed pineapple (okay, this version of the cake requires four ingredients, but, you could easily omit the pineapple.) Mix the two together well.

IMG_0107

Next, evenly pour the cake mix over the fruit… Make sure you get the corners.

IMG_0108

And finally, top it with a stick and a half of unsalted butter sliced into tablespoons, making sure to space the butter evenly over the cake.

IMG_0111

Bake it in a preheated 350 F oven for 45 minutes – 1 hour; until the top is browned and the fruit filling is bubbling.

IMG_0114

Let it cool for a few minutes before digging in. Enjoy slightly warmed with a scoop or two of vanilla ice cream or a dollop or two of whipped cream.

This cake was so delicious that I soon made another one along with a peach version.

IMG_0132


Dump Cake

Ingredients:

Cherry and Pineapple

1 21oz. can cherry pie filling

1 20oz. can crushed pineapple

1 box white cake mix

12 tablespoons unsalted butter, sliced


Peach

1 29oz. can sliced peaches in syrup

1 box yellow cake mix

12 tablespoon unsalted butter, sliced


Directions

Preheat oven to 350 F.

Pour fruit into a 9×13-inch baking dish. For the cherry and pineapple version mix both fruits together well.

Top evenly with the cake mix, making sure to get the corners.

Space the butter evenly over the cake and bake in the oven for 45 minutes – 1 hour, until the top is browned and the fruit is bubbling.

Let it cool for a few minutes before slicing so the cake can “set.”

Enjoy with ice cream, whipped cream or on its own.

Recipe from Food Network