Blueberry-Almond Quick Bread

Today’s post prompted me to do a little research on the difference between a quick bread (i.e. pumpkin or zucchini) and a loaf cake (i.e. a marble loaf cake) and what I ended up finding was some conflicting information. A few articles said quick breads are usually savory and often call for buttermilk (not entirely true) and then there was some baking science information regarding baking soda. What it comes to in basic terms is that quick breads are denser than loaf cakes. Something I completely agree with!

One of the best things I found about making this quick bread, a Blueberry-Almond Quick Bread that is, is that I didn’t have to break out my hand mixer or pull my stand mixer out from the corner of my kitchen counter. I simply used one whisk to whisk together the dry ingredients in one bowl and the wet ingredients in another and then used a rubber spatula to fold everything together. It doesn’t get easier than that.

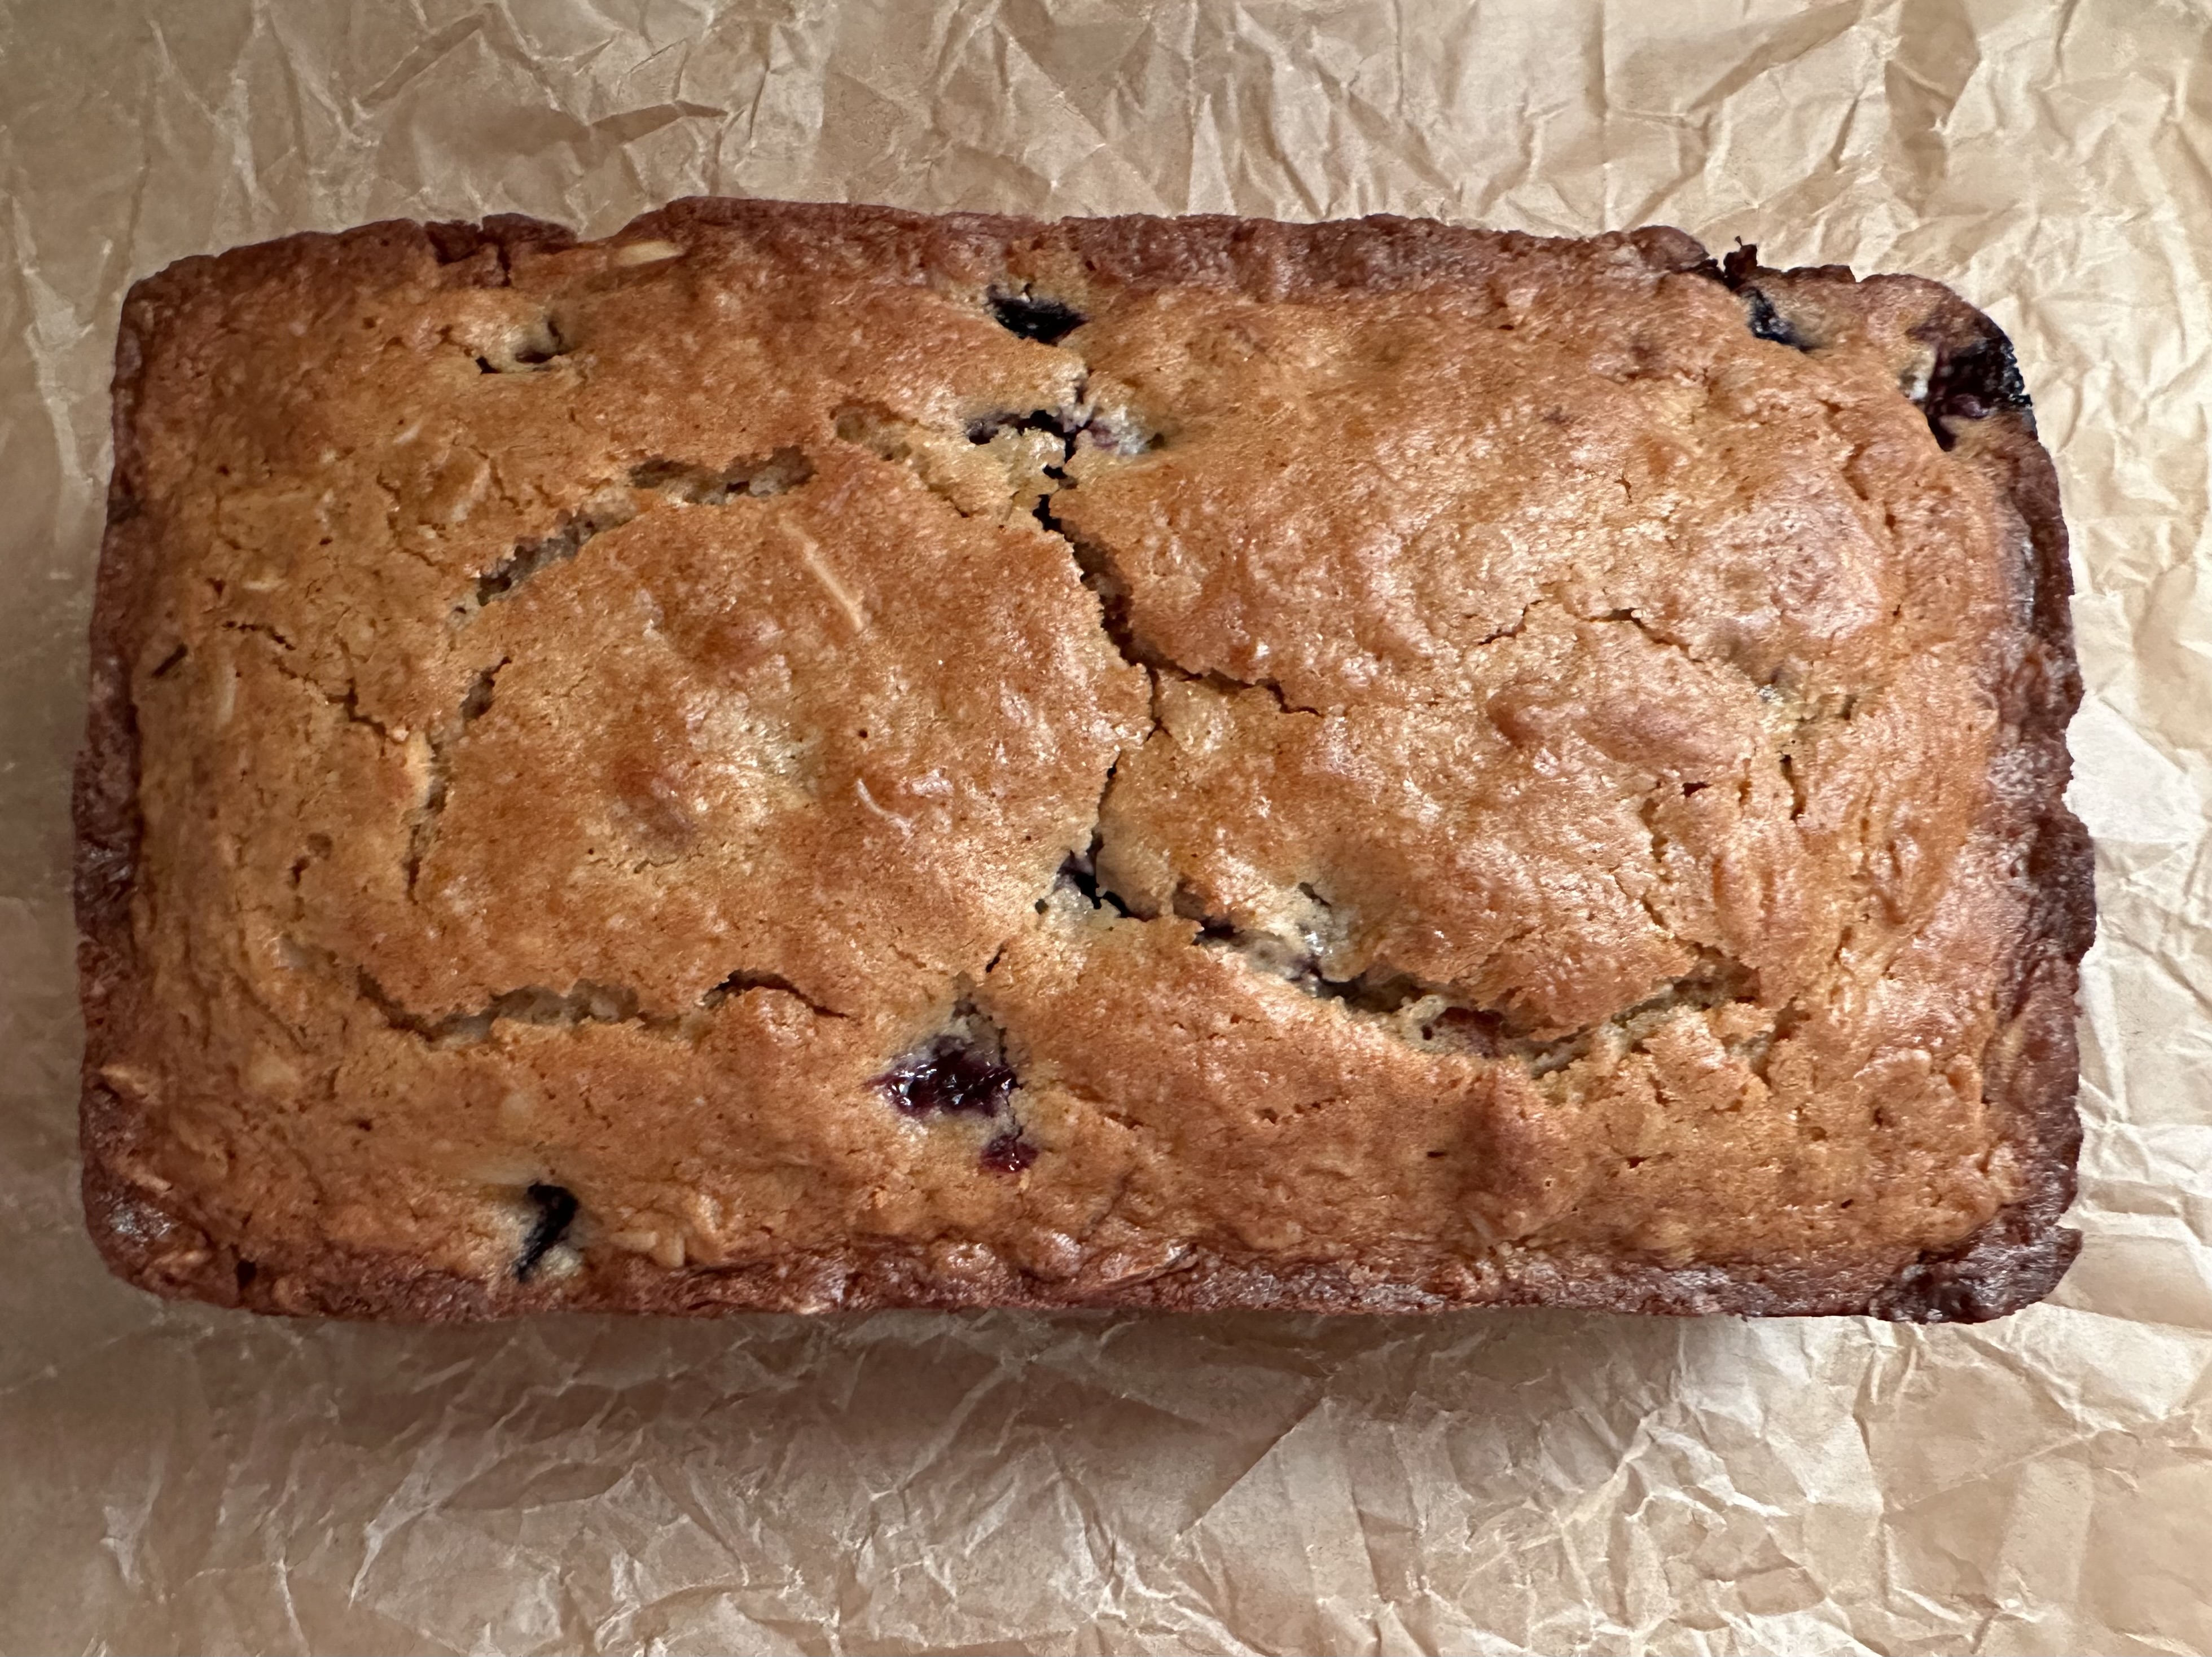
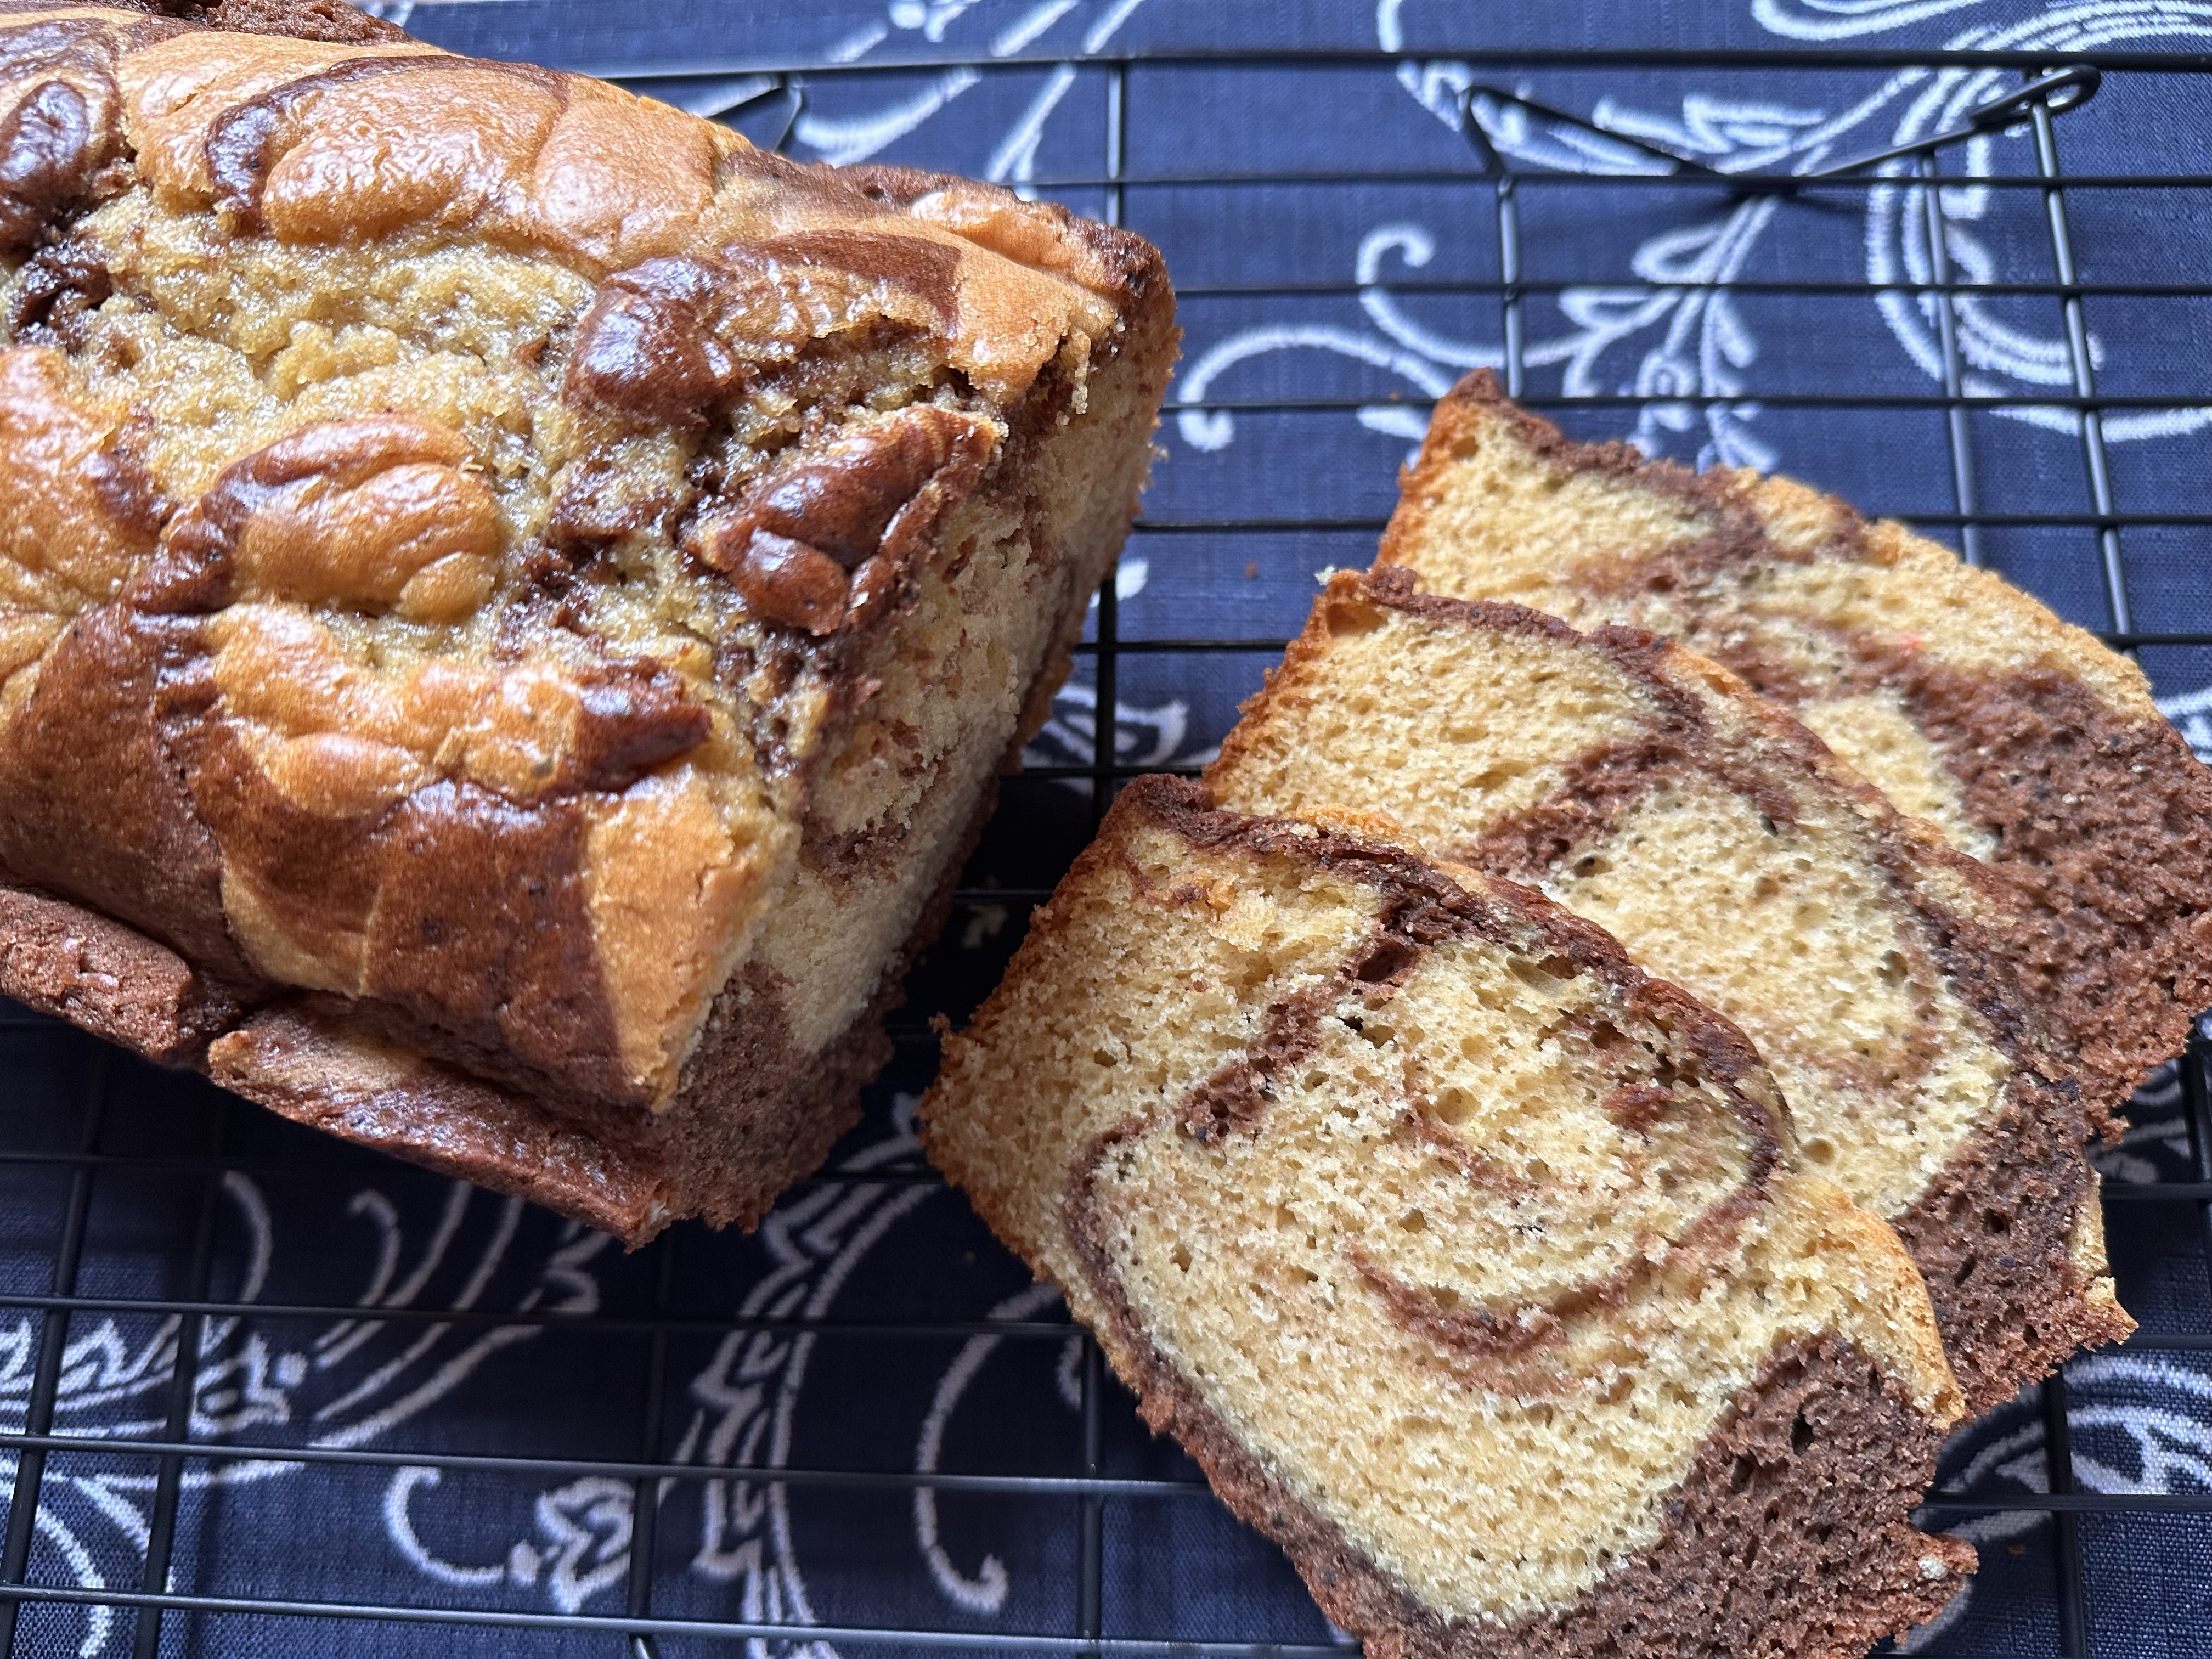
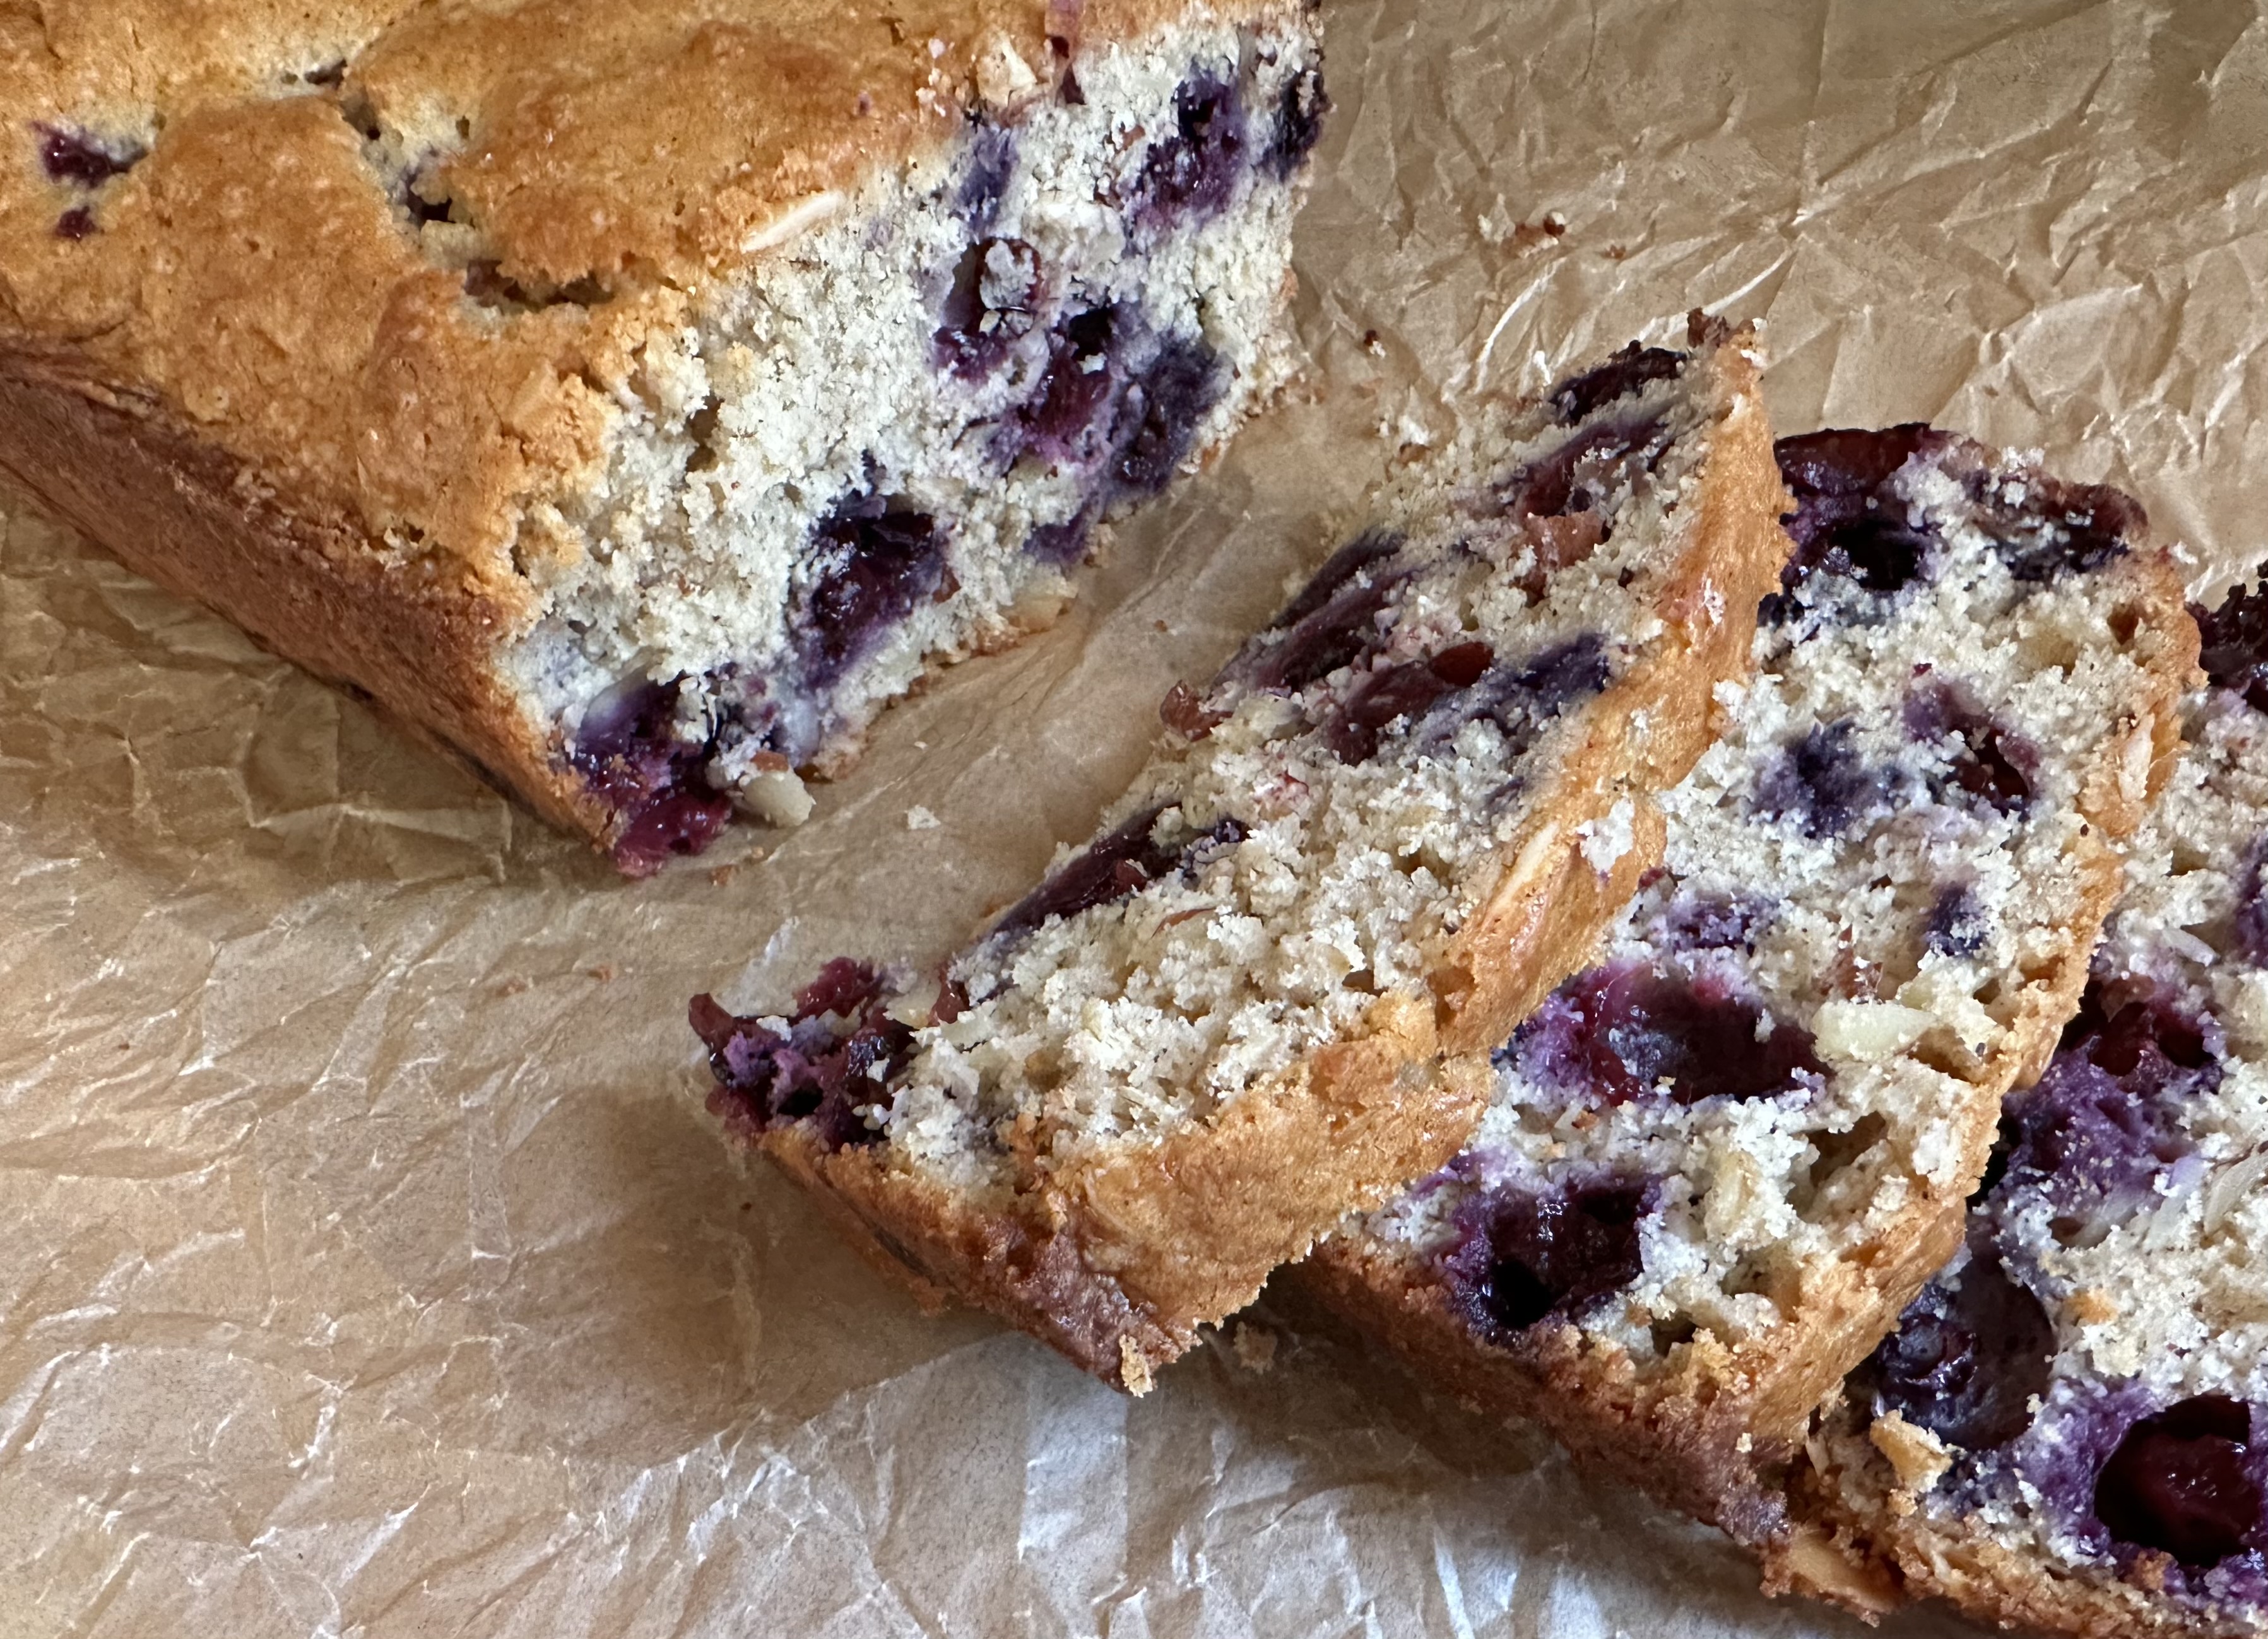
Initially I thought the recipe may have called for too many blueberries as the first few slices were heavily laden with them and there was barely any bread/cake, but after a few more slices the blueberries appeared to be more evenly dispersed.

And while this bread is dense, it is incredibly moist. The reason for both of those things, using oil instead of butter in the batter. Oil tends to result in a cake that has a more even crumb that can stay moist for days. So, why aren’t all cakes made with oil then? Well, because cakes made with butter tend to taste better. That should in no means deter you from making cakes with oil though. You just have to balance the flavors and add a little extra of this and that (spices, extracts and nuts) to get the flavor you want.

One last thing about this quick bread, it’s the perfect treat for any time of the day. Be it breakfast, brunch, an afternoon treat or a yummy dessert! Personally I had a piece for breakfast one day and dessert on another.

Blueberry Almond Quick Bread

Ingredients:

1/2 cup vegetable oil

1/2 cup plain yogurt

2 large eggs

1 teaspoon vanilla extract

1 1/2 cups plus 1 tablespoon flour

3/4 cup sugar

1/2 cup sliced almonds

1/2 cup old-fashioned oats

1 teaspoon baking powder

1 teaspoon ground cinnamon

1/2 teaspoon salt

1/4 teaspoon baking soda

1/4 teaspoon ground cinnamon

1 1/4 cups fresh blueberries

Directions:

Preheat oven to 350 F. Spray a 9 x 5 – inch loaf pan with cooking or baking spray.

In a large bowl whisk together the flour (1 1/2 cups), sugar, almonds, oats, baking powder, cinnamon, salt, baking soda and nutmeg.

In a medium bowl whisk together the vegetable oil, yogurt, eggs and vanilla extract until well combined and then fold into the flour mixture until just combined.

Toss the blueberries with the remaining tablespoon of flour and then fold into the batter.

Transfer the batter to the prepared loaf pan and bake in the oven for 55 to 65 minutes, or until a cake tester inserted in the center comes out clean.

Let the cake cool in the pan for 1 hour and then remove and place on a wire rack to cool completely.

Recipe from Food Network

Chocolate Salted Caramel Chip Cookies

You may have noticed that I have been experimenting with cake mixes recently. I posted three recipes in a row that used cake mixes as their base – a Banana Chocolate Marble Loaf Cake, a Chocolate Crumb Cake and a Peanut Butter Chocolate Marble Loaf Cake – and today I am sharing with you a recipe for cookies that uses a cake mix as their base. A Chocolate Salted Caramel Chip Cookie.

Cake Mix Cookies aren’t anything new. If you do a quick Google search for “Cake Mix Cookies” you will have your choice of recipes to try. I remember trying a recipe years ago and I just didn’t like it. I followed a recipe from a fellow blogger who ranted and raved about them, and I found the cookies to be flat and lacking flavor (they quickly went into the trash). Granted, from what I recall they didn’t do much to alter the “cake mix” flavor or texture. In other words, no add-ins like chocolate chips, vanilla extract, sprinkles, etc. Those small things go a long way in flavor and texture!

So, what made me want to try my hand at these cookies again? Well, not too long ago I bought two bags of Caramel Sea Salt Chips from Trader Joe’s. I knew I wanted to make a chocolate cookie with them, but I didn’t really want to follow the recipe that was on the bag. I am making a conscious effort to create recipes myself for the different things that pop into my head – I am still trying recipes I rip out of magazines and come across on social media and online that I will be sharing though. So, I did some brainstorming and decided to try my hand once again with cake mix cookies. I added in vanilla extract and coffee to help bring out the chocolate flavor. And I ended up with a cookie that was flavorful and thick. Definitely one that I will be making again and now that I have a good ratio of what to mix with the cake mix, I may experiment with other cake mix flavors!

A quick note, if you cannot find sea salt caramel chips you could use butterscotch chips instead and sprinkle the top of each cookie with sea salt prior to baking. One of my friends loved these cookies because of the sweet and salty combination but I told him not to get too attached since I did purchase the caramel chips from Trader Joe’s and things get discontinued there out of nowhere (I went to buy some spices a few weeks ago and all of a sudden they are no longer carrying ground ginger – HUH!?!). Thankfully Hershey’s makes their own version and butterscotch is a good alternative. 

Chocolate Salted Caramel Chip Cookies

  • Servings: 2 Dozen Cookies
  • Print

Ingredients:

1 15.25 oz. box chocolate cake mix (I used Duncan Hines Devil’s Food)

1 1/2 teaspoons instant coffee

1/3 cup vegetable oil

2 eggs

1 teaspoon vanilla extract

1 cup salted caramel chips**

*I used Cafe Bustelo Instant Espresso.

**I used Trader Joe’s Caramel Sea Salt Chips. Hershey’s brand also sells Sea Salt Caramel Chips.

Directions:

In a large bowl combine the cake mix, instant coffee, vegetable oil, eggs and vanilla extract. Using a hand mixer on medium speed and beat until well combined. Stir in the caramel chips.

Refrigerate the dough for 1 hour. This will help to prevent the cookies from spreading while baking since the dough will be soft after mixing it together.

Preheat the oven to 350 F. Line 2 baking sheets with parchment paper.

Use a cookie scoop (1 1/2 tablespoons) to drop the dough onto the prepared baking sheets 2 inches apart.

Bake 10-11 minutes, until the cookies are set. The center of the cookies will look underbaked, but they will firm up as they cool. Let the cookies cool on the baking sheets for 5 minutes before transferring to a wire rack to cool completely.

Store in an airtight container.

Notes:

If you cannot find Salted Caramel Chips, you could use Butterscotch Chips and sprinkle the top of the scooped cookie dough with sea salt prior to baking.

Recipe first appeared on Bead Yarn & Spatula.

Yarn WIPs & Yarn Stashes

I’ve seen quite a few jokes about crocheters/knitters and their WIPs (works in progress) and yarn stashes.  I used to be guilty of both of those things. As for the latter, I’m sure my stash wasn’t (and isn’t) as big as others, but I did have a lot of scrap balls – yarn that isn’t enough to do anything with but enough to wind into a ball. And then there was yarn that I didn’t like working with or couldn’t for the life of me remember why I ever bought it. I didn’t want to get rid of any of it because I thought the perfect project would come along for it. Ultimately, I got into a purging mood (I get those from time to time when things begin to feel and look too cluttered) and I realized that holding onto these yarns that served no purpose was hindering me from seeing and organizing the yarn I did want to keep. I can now easily close the two extra-large bins I keep my yarn in and have room to buy more yarn that hopefully won’t become a victim of one of my purges.

As for WIPs, I’ve always been pretty good about working on one project at a time (except maybe around the holidays), but there have been quite a few times where I just didn’t like the project I was working on. It could have been because the yarn wasn’t easy to work with (too thin, unraveling, etc.…) or the pattern itself wasn’t one that I liked. I used to muddle through for longer than I should and would finally throw in the towel after being thoroughly frustrated by the project. I used to feel guilty about it but recently when I gave up on a project using a yarn that I had wanted to try for a while but ended up not working up the way I thought it would I realized that there was nothing to feel guilty or bad about. That hobbies aren’t supposed to annoy and frustrate us – challenge us yes, but those things aren’t the same. You should feel happy about the item you’re creating when working on your given hobby, but, if that feeling turns negative it’s time to reevaluate and realize it’s okay to let it go and move on to the next thing. We’re taught that we shouldn’t give up on things but sometimes we must do that in order to learn something new and find joy in what we’re doing. Whether I’m making jewelry, cards, decorating a cake, crocheting or knitting I like to take a few moments while doing so to appreciate what I am making. And if I am feeling frustrated by it that’s not going to happen.

As I mentioned I recently gave up on a project I was working on because the yarn was just not working for me. It was a simple scarf, and I was following a pattern I had used before. I must have started the scarf 3 or 4 times each time casting on a different number of stitches in hopes that the scarf would start to look like what I had envisioned in my head. It never happened. So instead of giving it another go I decided to scrap it. I thought about saving the yarn, but it had annoyed me so much I ended up tossing it. Thankfully it wasn’t expensive. I tend to stick with yarns that I can purchase at my local craft stores so they are all affordable (especially when they are on sale, or I can use a coupon!). Hence me not being that upset about my yarn purge! I still had the itch to knit something, so I headed to a local craft store, and I found a different yarn that I had wanted to try was on sale. O’Go yarn! It’s been around for a few years, but it wasn’t until recently that this particular craft store started carrying more colors and varieties of it. What’s special about this yarn is that instead of it being wound into the typical ball/skein it’s shaped like an “O” and has a plastic string through it. When you open it, you just snip the fastener of the plastic, pull the yarn and start working. It’s a yarn that is tangle-free and provides a quick start. It you have ever had to stop mid project to work out a tangle or knot in your yarn you will greatly appreciate this yarn. It also eliminates the need to wind your yarn into a ball prior to working with it. I ended up picking up a few colors of the O’Go yarn since the sale was too good to pass up. I’ve been wanting to make an infinity scarf in a cream color (thanks to a blue coat I bought back in the Fall) and as luck would have it, I was able to get that color. I am still working on that scarf and probably won’t get to use it until next winter, but I did finish an infinity scarf in different shades of purple for a dear friend. When I am working on something for myself, I tend to drag it on for a bit since I know there’s no real rush in getting it done. Once I am finally done with my scarf, I will probably start working on some Fall projects, specifically Bobble Stitch Pumpkins. I’ve learned (the hard way) that it’s never too early to work on something for the following season.

Cheesecake Marbled Carrot Loaf Cake

With Easter a few days away, you may be dusting off your recipe for Carrot Cake to bake for the holiday. I did a little research to figure out why carrots in general are popular this time of the year. And while I didn’t get a concrete answer it’s pretty much what I figured (and what I have possibly written before), it’s because of the Easter Bunny. Children would leave carrots out for the Easter Bunny to thank the bunny for their Easter Baskets usually filled with chocolate treats. Not a bad trade off if you ask me. And while I do like carrot cake itself – that wasn’t always the case, a few office birthdays turned by taste buds – I will admit the best part is the cream cheese frosting. So, when I came across a recipe for a carrot loaf cake that was layered with a cheesecake filling in the recent issue of Food Network Magazine, I knew I had to try it ASAP!

Now, normally when I make carrot cake, I grate the carrots using the shredding disc of my food processor. For this recipe it specifically stated that the carrots needed to be finely grated and I just didn’t feel like doing it by hand using a box grater (which the recipe suggested), so, I grated the carrots first using the shredding disc and then inserted the s-blade (the standard blade of most food processors) and pulsed the carrots a few times to get them finely grated. This saved me a lot of time and pain. One other extra step for this cake was toasting the pecans. If you like, you could swap the pecans for walnuts. I normally use walnuts when I make carrot cake, but I had some pecans in my refrigerator that I wanted to use before they expired.

Once the carrots were shredded and the pecans toasted, it was time to make the cake. I started by making the cheesecake filling. I whisked together cream cheese, an egg, confectioners’ sugar, vanilla extract and salt until smooth and refrigerated it until I was done making the batter. I made the batter by whisking together the dry ingredients in one bowl, the wet ingredients in another and then combining them and finally folding in the carrot and pecans. One thing I left out from the original recipe was crushed pineapple. I was concerned that leaving it out would result in my cake being a bit dry but that wasn’t the case at all. To get the marbled effect I alternated layers of the carrot cake batter and cream cheese filling in a 9 x 5 – inch loaf pan.

After baking and cooling the cake it I topped it with a cream cheese drizzle. And then it was time to enjoy a slice and it didn’t disappoint. It’s a quick and yummy alternative to your traditional carrot cake.

Looking for a more traditional carrot cake recipe, check these out:

Carrot Cake

Carrot Cake for Two

And a recipe for Carrot Cake with a Moroccan flair:

Spice Market Carrot Cake

Cheesecake Marbled Carrot Loaf Cake

Ingredients:

For the Cake:

3/4 cup chopped pecans

1/2 cup vegetable oil

1 1/2 cups flour

2 teaspoons baking powder

2 teaspoons cinnamon

3/4 teaspoon baking soda

1/2 teaspoon salt

1 cup dark brown sugar

1/2 cup sugar

2 large eggs, at room temperature

2 teaspoons vanilla extract

1 1/2 cups finely grated peeled carrots

For the Filling:

1 8oz package cream cheese, at room temperature

1/3 cup confectioners’ sugar

1 large egg

1 teaspoon vanilla extract

Pinch of salt

For the Icing:

2oz cream cheese, at room temperature

2 tablespoons unsalted butter, at room temperature

1/4 cup confectioners’ sugar

1/2 teaspoon vanilla extract

Pinch of salt

Directions:

Preheat the oven to 350 F. Spray a 9 x 5 – inch loaf pan with cooking/baking spray and then line with parchment paper leaving an overhang on all sides.

Spread the chopped pecans on a baking sheet and toast in the oven for 8-10 minutes, until the pecans are a shade or two darker. Allow to cool completely.

For the Filling:

In a medium bowl whisk the cream cheese until fluffy. Add in the confectioners’ sugar, egg, vanilla and salt and continue whisking until the mixture is smooth. Refrigerate until ready to use.

For the Cake:

In a medium bowl whisk together the dry ingredients – flour, baking powder, cinnamon, baking soda and salt. Set aside.

In a large bowl whisk together both sugars, oil, eggs and vanilla until smooth.

Add the flour mixture to the sugar mixture and mix everything together with a rubber spatula until mostly combined. Add in the carrots and pecans and fold until just combined.

Spread a third of the cake batter (about 1 cup) into the prepared loaf pan. Dollop and spread half of the cream cheese filling over the batter stopping about a 1/2-inch from the edges. Repeat with another layer of the carrot cake batter and the remaining cream cheese filling and then top with the remaining carrot cake batter. Tap the pan on the counter a few times to remove any air bubbles and then bake in the preheated oven for 75 to 90 minutes, or until a cake tester inserted in the center comes out clean.

Place the pan on a wire rack and let the cake cool for 1 hour inside of the pan and then use the parchment paper to remove the cake and place on the wire rack to cool completely.

For the Icing:

Whisk the cream cheese and butter in a medium bowl until smooth and fluffy. Add in the confectioners’ sugar, vanilla and salt and continue to whisk until the mixture is smooth. Transfer to a piping bag (or a resealable bag with a corner snipped) and pipe the icing on the cooled cake.

*The original recipe also called for an 8oz can of crushed pineapple (drained) added to the cake batter which I omitted.

Recipe from Food Network 

No-Knead Roasted Garlic & Rosemary Bread and Roasted Tomato Soup

Today’s blog post is a two-for-one special. A bread & soup pairing. And with the rainy days of April just around the corner this may be exactly what you will want to eat.    

I’ve made quite a few No-Knead breads that have turned out to be delicious. When you can take the guesswork and work out of how much to knead your dough it’s hard to end up with something inedible. For today’s version, I am sharing with you a No-Knead Roasted Garlic and Rosemary Bread (YUM!) and for something warm and tasty to dunk it into a Roasted Tomato Soup (Double YUM!).

I started by making the bread. First up I roasted a head of garlic in the oven. I trimmed about a 1/2-inch of the head off and removed some of the papery outer layers. I placed the garlic in an aluminum foil packet and drizzled it with olive oil and sprinkled it with salt. I then sealed the aluminum foil and placed on a baking sheet and roasted it in the oven for about an hour. After letting it cool completely, I squeezed the cloves out and mashed them.

I then added the garlic with chopped rosemary into my dough. After letting the dough rest for about 12 hours – which is the key to No-Knead Bread – it was time to bake it. I ended up with a perfectly golden crust on the outside and soft bread on the inside.

While the bread cooled, I made the soup. I roasted the tomatoes in the oven along with garlic cloves. I opted to remove the seeds from the tomatoes prior to roasting this way I wouldn’t have to worry about straining the soup afterwards to remove them.

I added the tomatoes to the pot where I caramelized the onions along with basil and some vegetable broth and used an immersion blender to blend everything together. I immediately regretted not using my food processor instead. No matter how careful I was there was splatter!

But the mess was worth it. The soup was delicious, and it paired perfectly with the bread.

No-Knead Roasted Garlic and Rosemary Bread

Ingredients:

3 cups flour

1 1/2 teaspoons Kosher salt

1/2 teaspoon instant dry yeast

1 head of garlic, roasted & mashed

2 tablespoons fresh rosemary, chopped

1 1/2 cups warm water, 95F-100F

Olive oil and additional salt to roast garlic

Directions:

To roast garlic: Preheat oven to 400 F. Trim the head of the garlic about 1/4 to 1/2 inch and remove the papery outer layers of the bulb. Place on a piece of aluminum foil and drizzle with olive oil and sprinkle with Kosher salt. Seal the aluminum foil to create a packet and then place on a baking sheet. Roast in the oven for 45 minutes – 1 hour. Let the garlic cool and then squeeze the cloves out of the bulb. Mash the cloves prior to adding to the dough.

In a large bowl stir together the flour, salt, yeast, garlic and rosemary. Add in the water and continue to stir together until the dough forms. It will be sticky. Shape the dough into a ball and then tightly cover the bowl with a piece (or two) of plastic wrap and let the dough rest at room temperature for 12-18 hours. The dough will double in size and be covered with air bubbles.

Once the dough is ready, preheat the oven to 450 F and turn your dough out onto a workspace lightly dusted with flour and with floured hands shape the dough into a ball. Transfer the dough to a piece of parchment paper – large enough to fit inside of the Dutch oven – and then place in a bowl – one that won’t allow the dough to spread much – and cover with plastic wrap and let rest for 30 minutes.

While the dough is resting place your Dutch oven in the oven for the 30 minutes. After the 30 minutes, carefully remove the Dutch oven from the oven and place the dough along with the parchment paper inside and cover. Bake for 25-30 minutes and then remove the lid and bake for additional 10-15 minutes, until the bread is golden brown.

Remove the bread and parchment paper from the pot and place on a wire rack to cool for 30 minutes prior to slicing.

Store leftovers in an airtight container at room temperature.

Notes:

Make sure to check the highest temperature your parchment paper can safely be used in the oven.

If you don’t have a Dutch oven, you can use a heavy-duty pot instead.

Recipe first appeared on Bead Yarn & Spatula.

Roasted Tomato Soup

Ingredients:

For the Roasted Tomatoes:

3 lbs. plum tomatoes, sliced in half and seeds removed

8 garlic cloves

3 tablespoons olive oil

salt & pepper

For the Caramelized Onions:

2 yellows onions, thinly sliced

1/2 tablespoon olive oil

Remaining Ingredients:

1/4 cup basil leaves

1/2 teaspoon dried oregano

2 cups vegetable broth

Additional salt & pepper

Directions:

For the Roasted Tomatoes:

Preheat the oven to 400 F. Line a baking sheet with parchment paper. Place the tomatoes & garlic cloves on the parchment paper cut side up, drizzle with olive oil and sprinkle with salt & pepper. Roast in the oven for 40-45 minutes. Allow to cool for 10 minutes.

For the Caramelized Onions:

In a large pot heat the oil over medium heat. Lower the heat to medium-low and add the onions. Cook for 20 minutes, stirring occasionally. Allow to cool for 10 minutes.  

To Make the Soup:

Transfer the tomatoes, onions and basil to the bowl of a food processor (or a large pot if using an immersion blender) and process until everything is smooth and combined.

Transfer the mixture to a large pot or use the same pot if blended with an immersion blender, add in the vegetable broth, oregano and salt & pepper to taste and simmer on medium low heat for 10 minutes to heat through.

Almond Ricotta Cheesecake

I tend to buy ricotta cheese when it’s on sale with the idea that I am going to make baked ziti or possibly stuffed shells. I check the date and usually it’s not expiring for a month or two, so I think to myself “I have time.” What ends up happening is I remember that said ricotta cheese is in the fridge usually a week or two before it’s going to expire, and I start racking my brain on what to make with it. And of course, I am not in the mood to make anything Italian at that time. You would think I would have learned my lesson by now, but of course not. But it is how I came up with the recipe for today’s post, a quick and easy Almond Ricotta Cheesecake.

After combining six simple ingredients and pouring the batter into a 9-inch graham cracker crust I popped the cheesecake in the oven. Unfortunately, it did crack. I probably left it in the oven just a few minutes too long.

It didn’t ruin the taste though and some toasted sliced almonds covered up any imperfections. As well as a dusting of confectioners’ sugar. Now, if you’ve never had a ricotta cheese-based cheesecake, I should note that it’s not as smooth and creamy as a cream cheese one. Some may even say it’s a bit granular, but it is delicious nonetheless and the almond flavor in this one really stands out. So, if you find yourself with an extra two cups of ricotta cheese or happen to see a small container on sale, you have the perfect recipe for it.

Almond Ricotta Cheesecake

Ingredients:

9-inch graham cracker crust

2 cups whole milk ricotta cheese

1 8oz. block cream cheese, at room temperature

1/2 cup sugar

1/2 tablespoon almond extract

1/2 teaspoon vanilla extract

2 large eggs, at room temperature

1/3 cup slice almonds, toasted*

Confectioners’ sugar, for dusting

*To toast the almonds, spread on a baking sheet and bake in a 350 F oven for 8 minutes. Cool before using.

Directions:

Preheat oven to 325F. Place the graham cracker crust on a baking sheet.

In a large bowl beat together the ricotta cheese, cream cheese, sugar, almond and vanilla extracts with a hand mixer on medium speed until blended. Add the eggs and continue beating until the eggs are well incorporated and the mixture is smooth.

Pour the batter into the graham cracker crust and bake for 45-55 minutes. Until the cheesecake is set around the edges and still slightly jiggly in the center.

Cool on a wire rack and then refrigerate for at least 2 hours.

Prior to serving spread the toasted almonds on top of the cheesecake and then sift confectioners’ sugar on top.

Store leftovers in the refrigerator.

Recipe first appeared on Bead Yarn & Spatula.

Peanut Butter Chai Pie

Happy Pi Day! The day that math lovers celebrate the irrational number Pi (3.14159…) – the ratio of a circle’s circumference to its diameter – and a day others use as an excuse to bake a pie, eat a pie, bake a pizza pie or eat a pizza pie. While I thought about making a pizza this year to honor the day, I decided to go with a pie instead. Mainly because I wanted to try a Peanut Butter Chai Pie recipe I ripped out of an issue of Food & Wine magazine last year. And I must say, it didn’t disappoint.

And yes, you read that correctly… Peanut Butter Chai. While some might scoff at the idea of peanut butter working with the flavors of chai – cinnamon, cardamom, and ginger to name a few – surprisingly they complement each other quite well.  

To begin, I made the crust. I opted to make something a little out of the ordinary – a Sweet & Salty Pretzel and Waffle Cone Crust – but, if you want to go with something simple or you just don’t feel like making your crust you could use a store-bought graham cracker crust (I would go with the one that has 2 extra serving just to be sure it’s large enough). To start, I processed miniature pretzels and a few waffle cones along with brown sugar in my food processor until it was finely ground. I then added in a stick of melted butter and processed it a few times until it appeared to be wet sand. Next, I pressed it an even layer along the bottom and up the sides of a 9-inch pie dish I sprayed with cooking spray. After baking and cooling it was ready for the filling.

To make the filling, I used my stand mixer to whisk together peanut butter and cream cheese along with a spice mixture, honey, vanilla extract and salt. Once that was well combined, I gradually whisked in heavy cream. I set the peanut butter filling aside and then whipped up a batch of whipped cream sweetened with honey and the remaining spice mixture. I then folded in some of the whipped cream into the peanut butter mixture and then transferred it to the prepared pie crust. Finally, I spread the remaining whipped cream over the filling and then refrigerated the pie overnight.

Before serving the pie, I sprinkled cinnamon over the whipped cream along with roasted salted peanuts and chocolate curls. To make the chocolate curls I microwaved a chocolate bar for about 10 seconds in the microwave and then used a vegetable peeler to shave it.

The first thing I noticed about this pie was that it wasn’t sweet, not that I am complaining. But there is definitely a difference when you sweeten anything with honey versus sugar. I like to think it’s a tad but healthier. As for the crust, you get hints of the waffle cones and a slight saltiness thanks to the pretzels. Overall, all the flavors worked well together.

Peanut Butter Chai Pie with a Sweet & Salty Pretzel and Waffle Cone Crust

Ingredients:

For the Crust:

2 cups miniature pretzels

6 (5 ½-inch) waffle cones, broken into pieces (about 4oz.)

1/4 cup light brown sugar

1 stick unsalted butter, melted

For the Filling:

1 1/2 teaspoons cinnamon, plus more for topping

3/4 teaspoon cardamom

3/4 teaspoon ginger

1/4 teaspoon allspice

1/8 teaspoon nutmeg

1 8oz package cream cheese, at room temperature

1 cup creamy peanut butter

1/2 cup plus 2 tablespoons honey, divided

2 teaspoons vanilla extract

1/2 teaspoon Kosher salt

2 1/2 cups heavy cream, divided

For the Topping:

Roasted Salted Peanuts

Chocolate curls

Directions:

For the Crust:

Preheat the oven to 350 F. Spray a 9-inch pie dish with cooking spray and set aside.

Add the pretzels, waffle cones and sugar to the bowl of a food processor and process until finely ground and well combined. Add the butter and pulse a few times until the mixture resembles wet sand.

Transfer the mixture to the prepared pie dish and press into the bottom and up the sides of the dish in an even layer. Bake in the preheated oven for 8 to 12 minutes, until the crust is set and golden brown. Transfer to a wire rack to cool completely before using.

For the Filling:

In a small bowl stir together the spices – cinnamon, cardamom, ginger, allspice and nutmeg – and set aside.

In the bowl of a stand mixer fitted with the whisk attachment, beat together the cream cheese, peanut butter, 1/2 cup honey, vanilla extract, salt and 1 tablespoon of the cinnamon-cardamom mixture on medium-high speed until light and fluffy, about 2 minutes.

With the mixer running, gradually add in a 1/2 cup of the heavy cream. Beat until well combined and fluffy. Transfer the peanut butter – cream cheese mixture to a large bowl.

Clean the mixing bowl and whisk the remaining heavy cream (2 cups), honey (2 tablespoons) and cinnamon-cardamom mixture in the bowl. Beat on medium-high speed until stiff peaks form.

Fold 1 cup of the whipped cream into the peanut butter-cream cheese mixture until no streaks remain. Transfer the mixture to the prepared crust and spread into an even layer. Top with the remaining whipped cream. Refrigerate, uncovered, for at least 4 hours.

Garnish the top of the pie with cinnamon, peanuts and chocolate curls.

To make chocolate curls: Microwave a chocolate bar for about 10 seconds in the microwave – you want it soft but not on the verge of melting. Use a vegetable peeler to shave the chocolate into curls.

Recipe from Food & Wine – Peanut Butter Chai Pie and Sweet & Salty Pie Crust

Peanut Butter & Chocolate Marble Loaf Cake

This cake is very similar to the Banana & Chocolate Marble Loaf Cake I recently posted about. The only difference, you guessed it, is that I swapped peanut butter for banana. I think we can all agree that peanut butter and chocolate go together perfectly, if not, Reese’s Peanut Butter Cups would have been off the market years ago. That reminds me, my favorite Reese’s Peanut Butter Cups are back in stores, the Easter Egg ones. I don’t know what it is about those, but they just taste better. Maybe it’s because they don’t have the ridges that typical peanut butter cups have due to the wrapper they are in. Who knows! Back to today’s cake…

Once again, I used a yellow cake mix as the base for this loaf cake. After prepping the batter I divided it in half and mixed cocoa powder in one half and creamy peanut butter in the other. I used a 1/4 cup of peanut butter, but if you want a stronger peanut butter flavor, I suggest using a 1/3 cup. I then spooned the batter into my prepared loaf pan to create the marble effect.

After baking it I let it cool in the pan for a few minutes before transferring it to a wire rack to cool completely. And then it was time to slice and enjoy!

Peanut Butter & Chocolate Marble Loaf Cake

Ingredients:

1 15.25 box yellow cake mix (I used Duncan Hines)

eggs, water & oil per directions on box

1/4 cup creamy peanut butter*

2 tablespoons cocoa powder

*If you want a stronger peanut butter flavor use 1/3 cup

Directions:

Preheat the oven to 350 F. Spray a 9×5-inch loaf pan with baking spray and set aside.

Prepare the cake mix per the instructions on the box.

Divide the batter in half and stir the peanut butter in one half and the cocoa powder in the other.

Spoon the batters into the prepared one, alternating between each one. Use a butter knife to swirl the two batters together and tap the pan on the counter a few times to remove any air bubbles.

Bake 45-50 minutes in the preheated oven, or until a cake tester inserted in the center comes out clean.

Cool the cake in the pan for 15 minutes before removing and transferring to a wire rack to cool completely.

Store leftovers in an airtight container at room temperature.

Recipe first appeared on Bead Yarn & Spatula

Chocolate Crumb Cake

I think we can all agree that the best part of any crumb cake is the crumb! All crumb is not the same though. Leave it in the oven a tad too long and instead of it being delicious and sweet it’ll be burnt and dry. If you don’t mix the ingredients in just the right order your consistency will be off. I once made a batch of muffins with a crumb topping that ended up melting into the muffins while in the oven. And regardless of what the recipe says, I always refrigerate (or freeze) my crumb topping before using it. I think this helps it stay together better while in the oven. After all this talk about crumbs it should come as no surprise that today’s cake has a crumb topping… It’s a Chocolate Crumb Cake.

I’ve had the idea for this cake for quite some time. Years ago, I would get something similar at a bakery I would go to from time to time. In my mind it was a Chocolate Crumb Pound Cake, but that’s not what it was called on the menu. Truth be told, I have no idea what it was called. Whenever I ordered it, I would just point to it and get it (the best way to order things!). Ultimately the bakery closed but I never forgot about that cake. I have a list of things I want to bake / try to make, and that cake was always on there, but it would always get neglected. I finally decided that it would be a nice addition to this week since I was posting two recipes using a yellow cake mix for two different variations of marble cake to make with it. 

For this cake I started with a box chocolate cake mix. To make it taste a bit more homemade and to enhance the chocolate flavor I swapped out the water for coffee and I used vegetable oil and sour cream for the fat. I also added in vanilla extract. After making the batter I poured it into a 9-inch square pan I lined with parchment paper. It’s important to leave an overhang with the parchment paper so you can remove the cake from the pan easily. You really don’t want to flip it out of the pan as you would a regular cake because of the crumb topping. In doing so you could end up cracking the crumb topping or worse the cake itself. After the batter was in the pan, I used my hands to spread the crumb topping over the cake.

Once the cake was baked and completely cooled, I dusted the top of it with confectioners’ sugar – you can’t have crumb topping without it in my opinion.

Overall, the cake was DELISH! It was a hit with everyone I shared it with. Definitely something to make again!

Chocolate Crumb Cake

For the Crumb Topping:

1/4 cup sugar

1/3 cup light brown sugar

1 teaspoon cinnamon

1/4 teaspoon nutmeg

1/2 cup butter (1 stick) butter, melted

1 1/3 cups flour

For the Cake:

1 15.25 oz package chocolate cake mix (I used Duncan Hines Devil’s Food)

3 large eggs

1 cup coffee, cooled

1/2 cup vegetable oil

1/2 cup sour cream

1 teaspoon vanilla extract

Confectioners’ sugar, for topping

Directions:

Preheat oven to 350 F. Spray a 9-inch square pan with baking spray and then line with parchment paper leaving an overhang on all sides. Spray the parchment paper with baking spray and set aside.

Make the crumb topping: In a medium bowl whisk together both sugars, cinnamon and nutmeg. Stir in the melted butter and finally the flour. Continue mixing until the mixture clumps together. Refrigerate for 10-15 minutes.

Make the cake batter: In a large bowl combine the cake mix, eggs, coffee, vegetable oil, sour cream and vanilla extract. Beat with a hand mixer on low speed for 30 seconds to combine all of the ingredients and then increase the speed to medium and continue beating until everything is well combined.

Transfer the batter to the prepared pan and then using your hands sprinkle the chilled crumb topping over it.

Bake in the preheated oven for 40-45 minutes, or until a cake tester inserted in the center comes out clean.

Cool in the pan for 15 minutes and then use the parchment paper to carefully lift the cake out of the pan and place on a wire rack to cool completely.

Dust with confectioners’ sugar prior to serving.

Store leftovers in an airtight container at room temperature.

Recipe first appeared on Bead Yarn & Spatula.

Banana & Chocolate Marble Loaf Cake

Not too long ago I posted a recipe for a Peanut Butter & Banana Chocolate Chip Bread. That got me thinking about making a marble cake using two of the flavors. After some brainstorming I thought that a super simple way to do so would be to use a yellow cake mix as the base and altering the flavor with some add-ins. Now, I know some people have issues with using box cake mixes, but it really is possible to alter them to make them taste more homemade and they are fool proof! This all led me to creating a few recipes that use cake mixes as their base. And I will be sharing them with you over the next week… Up first, a Banana & Chocolate Marble Loaf Cake.

For the base of this loaf cake I used a yellow cake mix. After prepping the batter per the directions on the box I divided it in half. And to be precise, even though I have made plenty of box cake mixes in the past and had a rough idea of how much it was, I measured out the batter using a measuring cup. In total it was 4 cups, so I transferred 2 cups to a bowl and stirred in a mashed banana and in the other half I stirred in 2 tablespoons of cocoa powder.

Next, I dropped alternating scoops of each batter into a loaf pan I sprayed with baking spray. To get the marble effect I swirled the two batters together by dragging a knife through them.  

After baking and cooling the cake, it was time to enjoy a slice (or two!) As for the flavor, the chocolate and the banana really stood out without either overpowering the other. A nice twist on your typical marble cake.

A few takeaways… To make chocolate cake from a yellow cake mix you can add a few tablespoons of cocoa powder and to make a super simple banana cake add mashed banana to a yellow cake mix. More specifically, 4 tablespoons of cocoa powder for a chocolate cake and 2 mashed bananas for a banana cake.

Banana & Chocolate Marble Loaf Cake

Ingredients:

1 15.25 box yellow cake mix (I used Duncan Hines)

eggs, water & oil per directions on box

1 ripe banana, mashed

2 tablespoons cocoa powder

Directions:

Preheat the oven to 350 F. Spray a 9×5-inch loaf pan with baking spray and set aside.

Prep the cake mix per the instructions on the box.

Divide the batter in half and stir the mashed banana in one half and the cocoa powder in the other.

Spoon the batters into the prepared pan, alternating between the two. Use a knife to swirl the batters together. Tap the pan on the counter a few times to remove any air bubbles.

Bake for 40-45 minutes, or until a cake tester inserted in the center comes out clean.

Let the cake cool in the pan for 15 minutes then transfer to a wire rack to cool completely.

Store leftovers in an airtight container at room temperature.

Recipe first appeared on Bead Yarn & Spatula.