Paint Pouring

One thing I will never be.. A painter. I’m great at visualizing things but not so great at putting them to paper. I’ve done quite a few paint nights and for me it’s more about the social aspect than the end result. But recently I discovered and tried a type of painting I can do without feeling inadequate about my painting abilities – or should I say inabilities -… Paint Pouring. It’s basically what it sounds like, pouring paint on a canvas to create a picture.

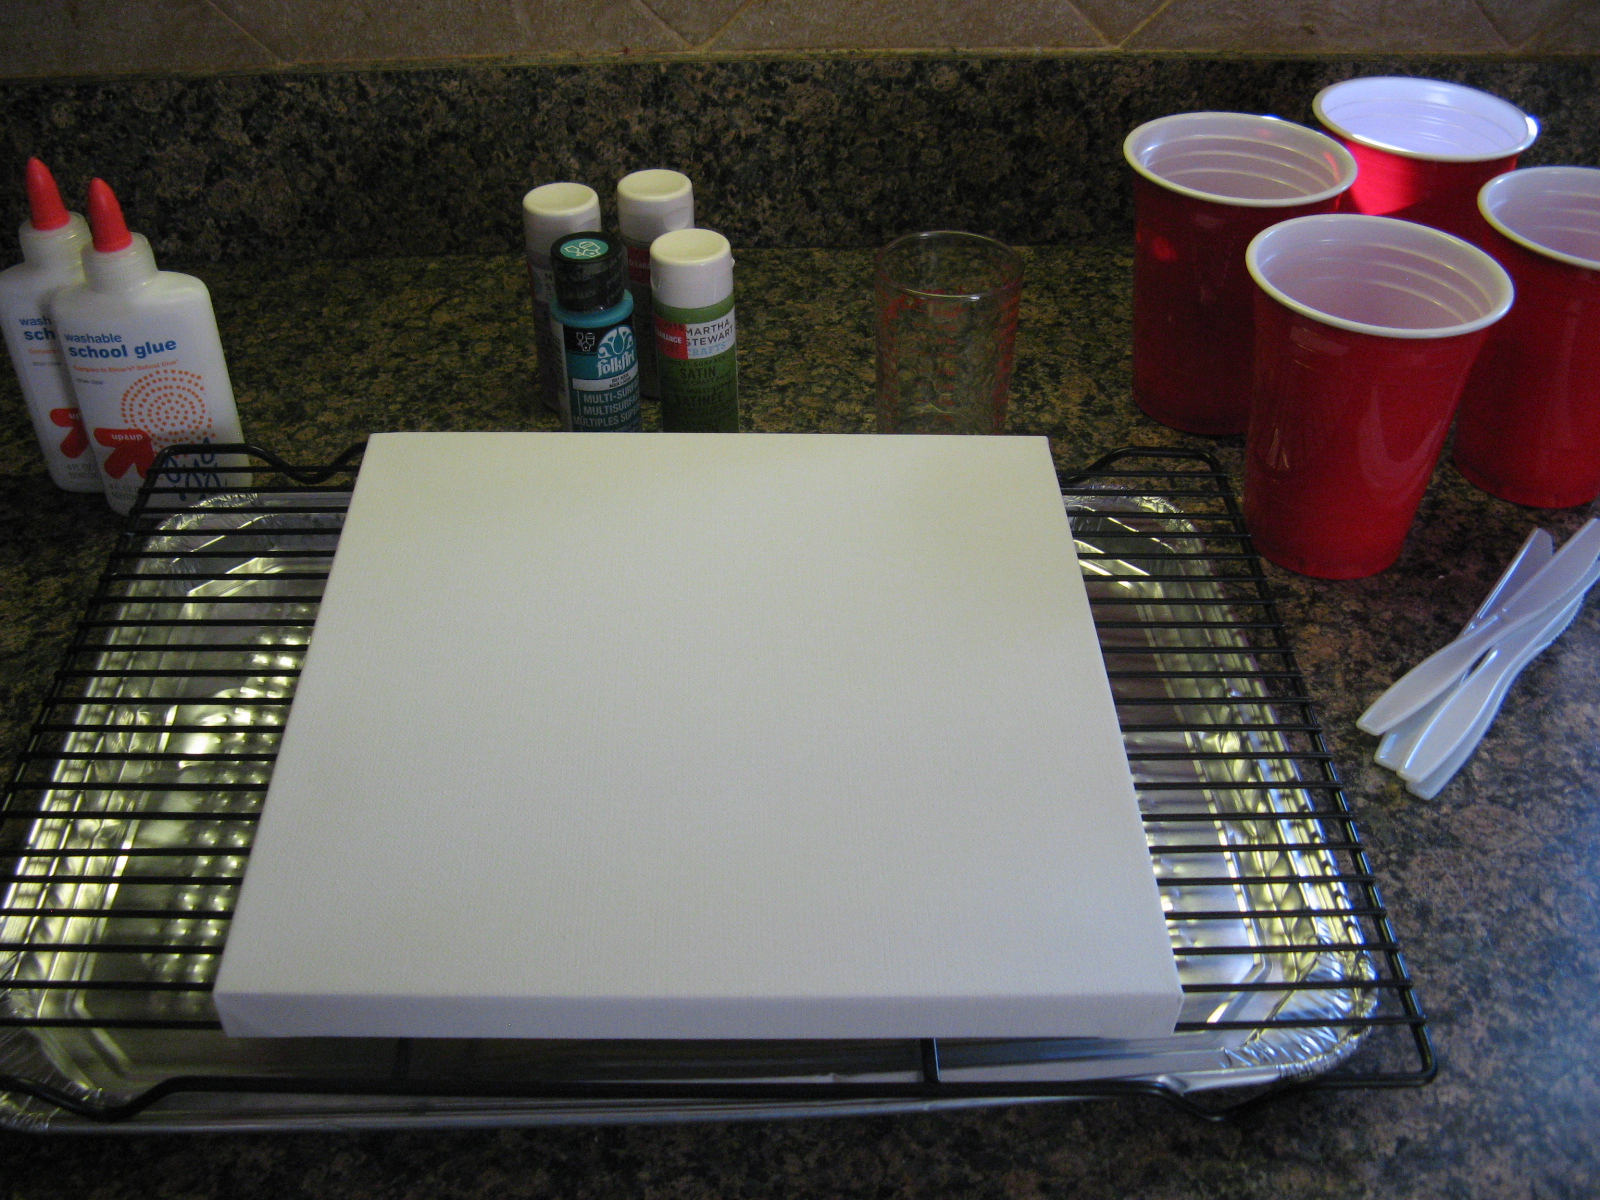
To create your paint pouring masterpiece you will need a canvas (I used an 8 x 8 and 10 x 10 inch canvas – anything bigger and you might need more paint), 2 oz. bottles of acrylic paint (I used 4 different colors), white school glue, disposable cups, a wire rack, an aluminum pan for the wire rack to sit in, disposable gloves and craft sticks. In lieu of craft sticks I actually used plastic knives; disposable cutlery has a lot more uses than just eating.

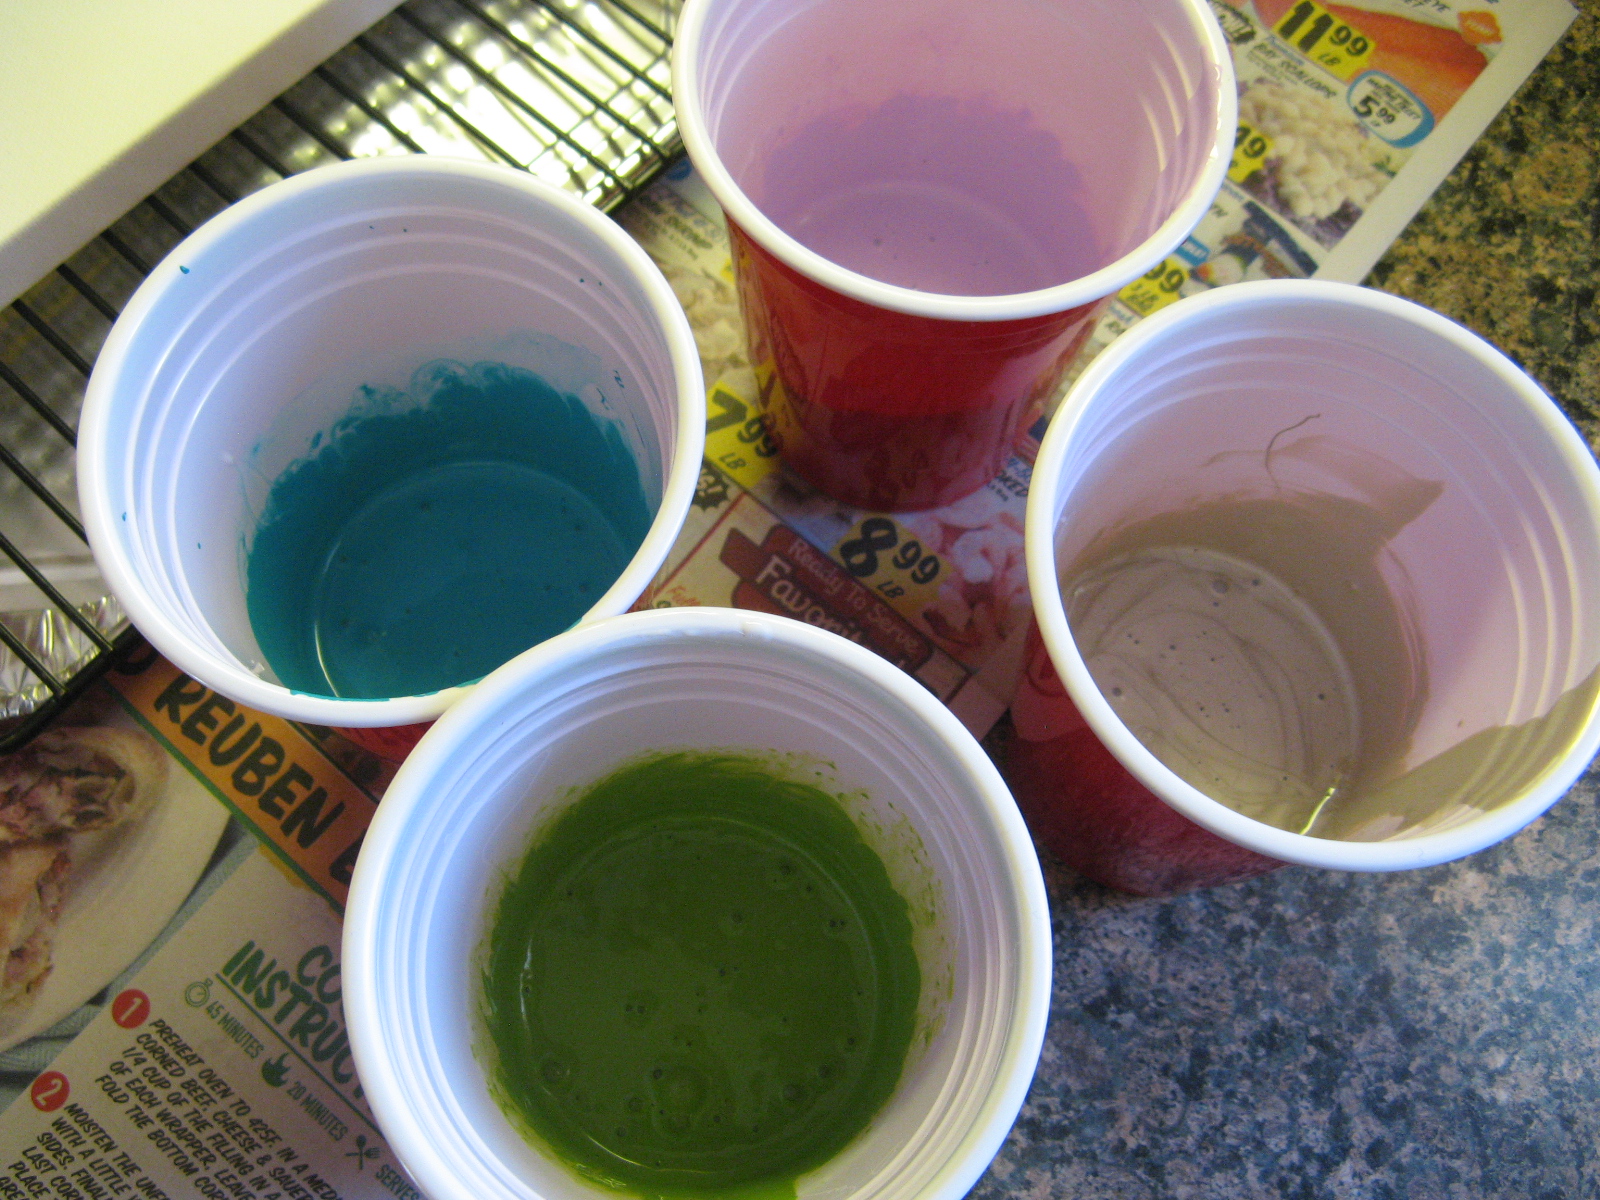
And while this is a paint pouring project, you can’t just pour the paint on the canvas, you have to mix them with water and glue which will allow the paint to flow easier and bind to the canvas without flaking and also allows the different layers of paint to stick together. To create the mixture you will mix two parts glue with one part water in the disposable cups and then add an equal amount of paint. My ratios were a bit off, I used .75 oz. of water, 1.5. oz. of glue and 2 oz. of paint, just so I could use the entire bottle of paint without having to measure it out. I don’t think my slightly off measurements made that much of a difference. A small hint, I used the same measuring cup for the water and glue, so I measured the water for each of my cups first and then the glue. After adding the water, glue and paint to each of my cups I stirred them together well.

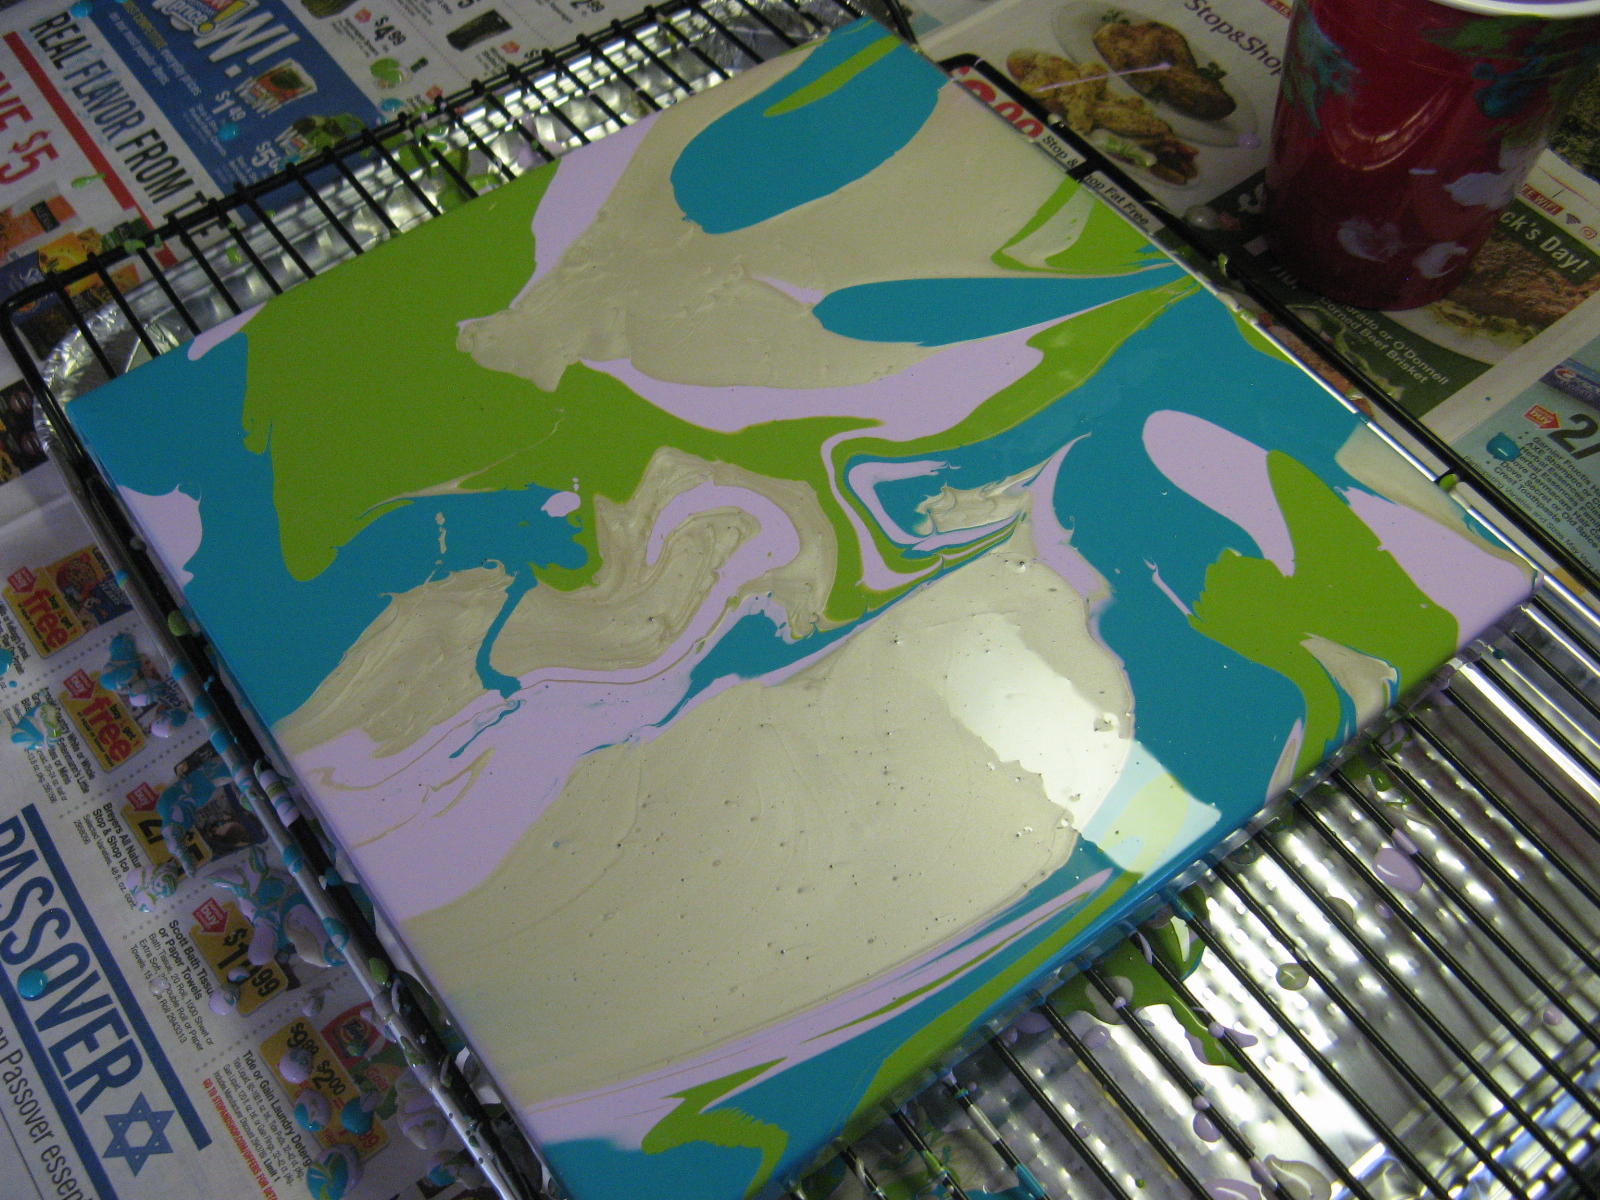
Now it’s time to paint pour. Wearing disposable gloves pour puddles of the paint on different parts of the canvas. Tilt the canvas in different directions to spread the paint. You can use the craft sticks (or disposable cutlery) to create swirls in the paint. Continue to pour the paint and tilt the canvas until you have reached your desired “picture.” Make sure to get the corners and sides of the canvas as well. Place the canvas on the wire rack and allow it to dry completely – about 24 hours.

Hang and enjoy you quick and easy masterpiece.

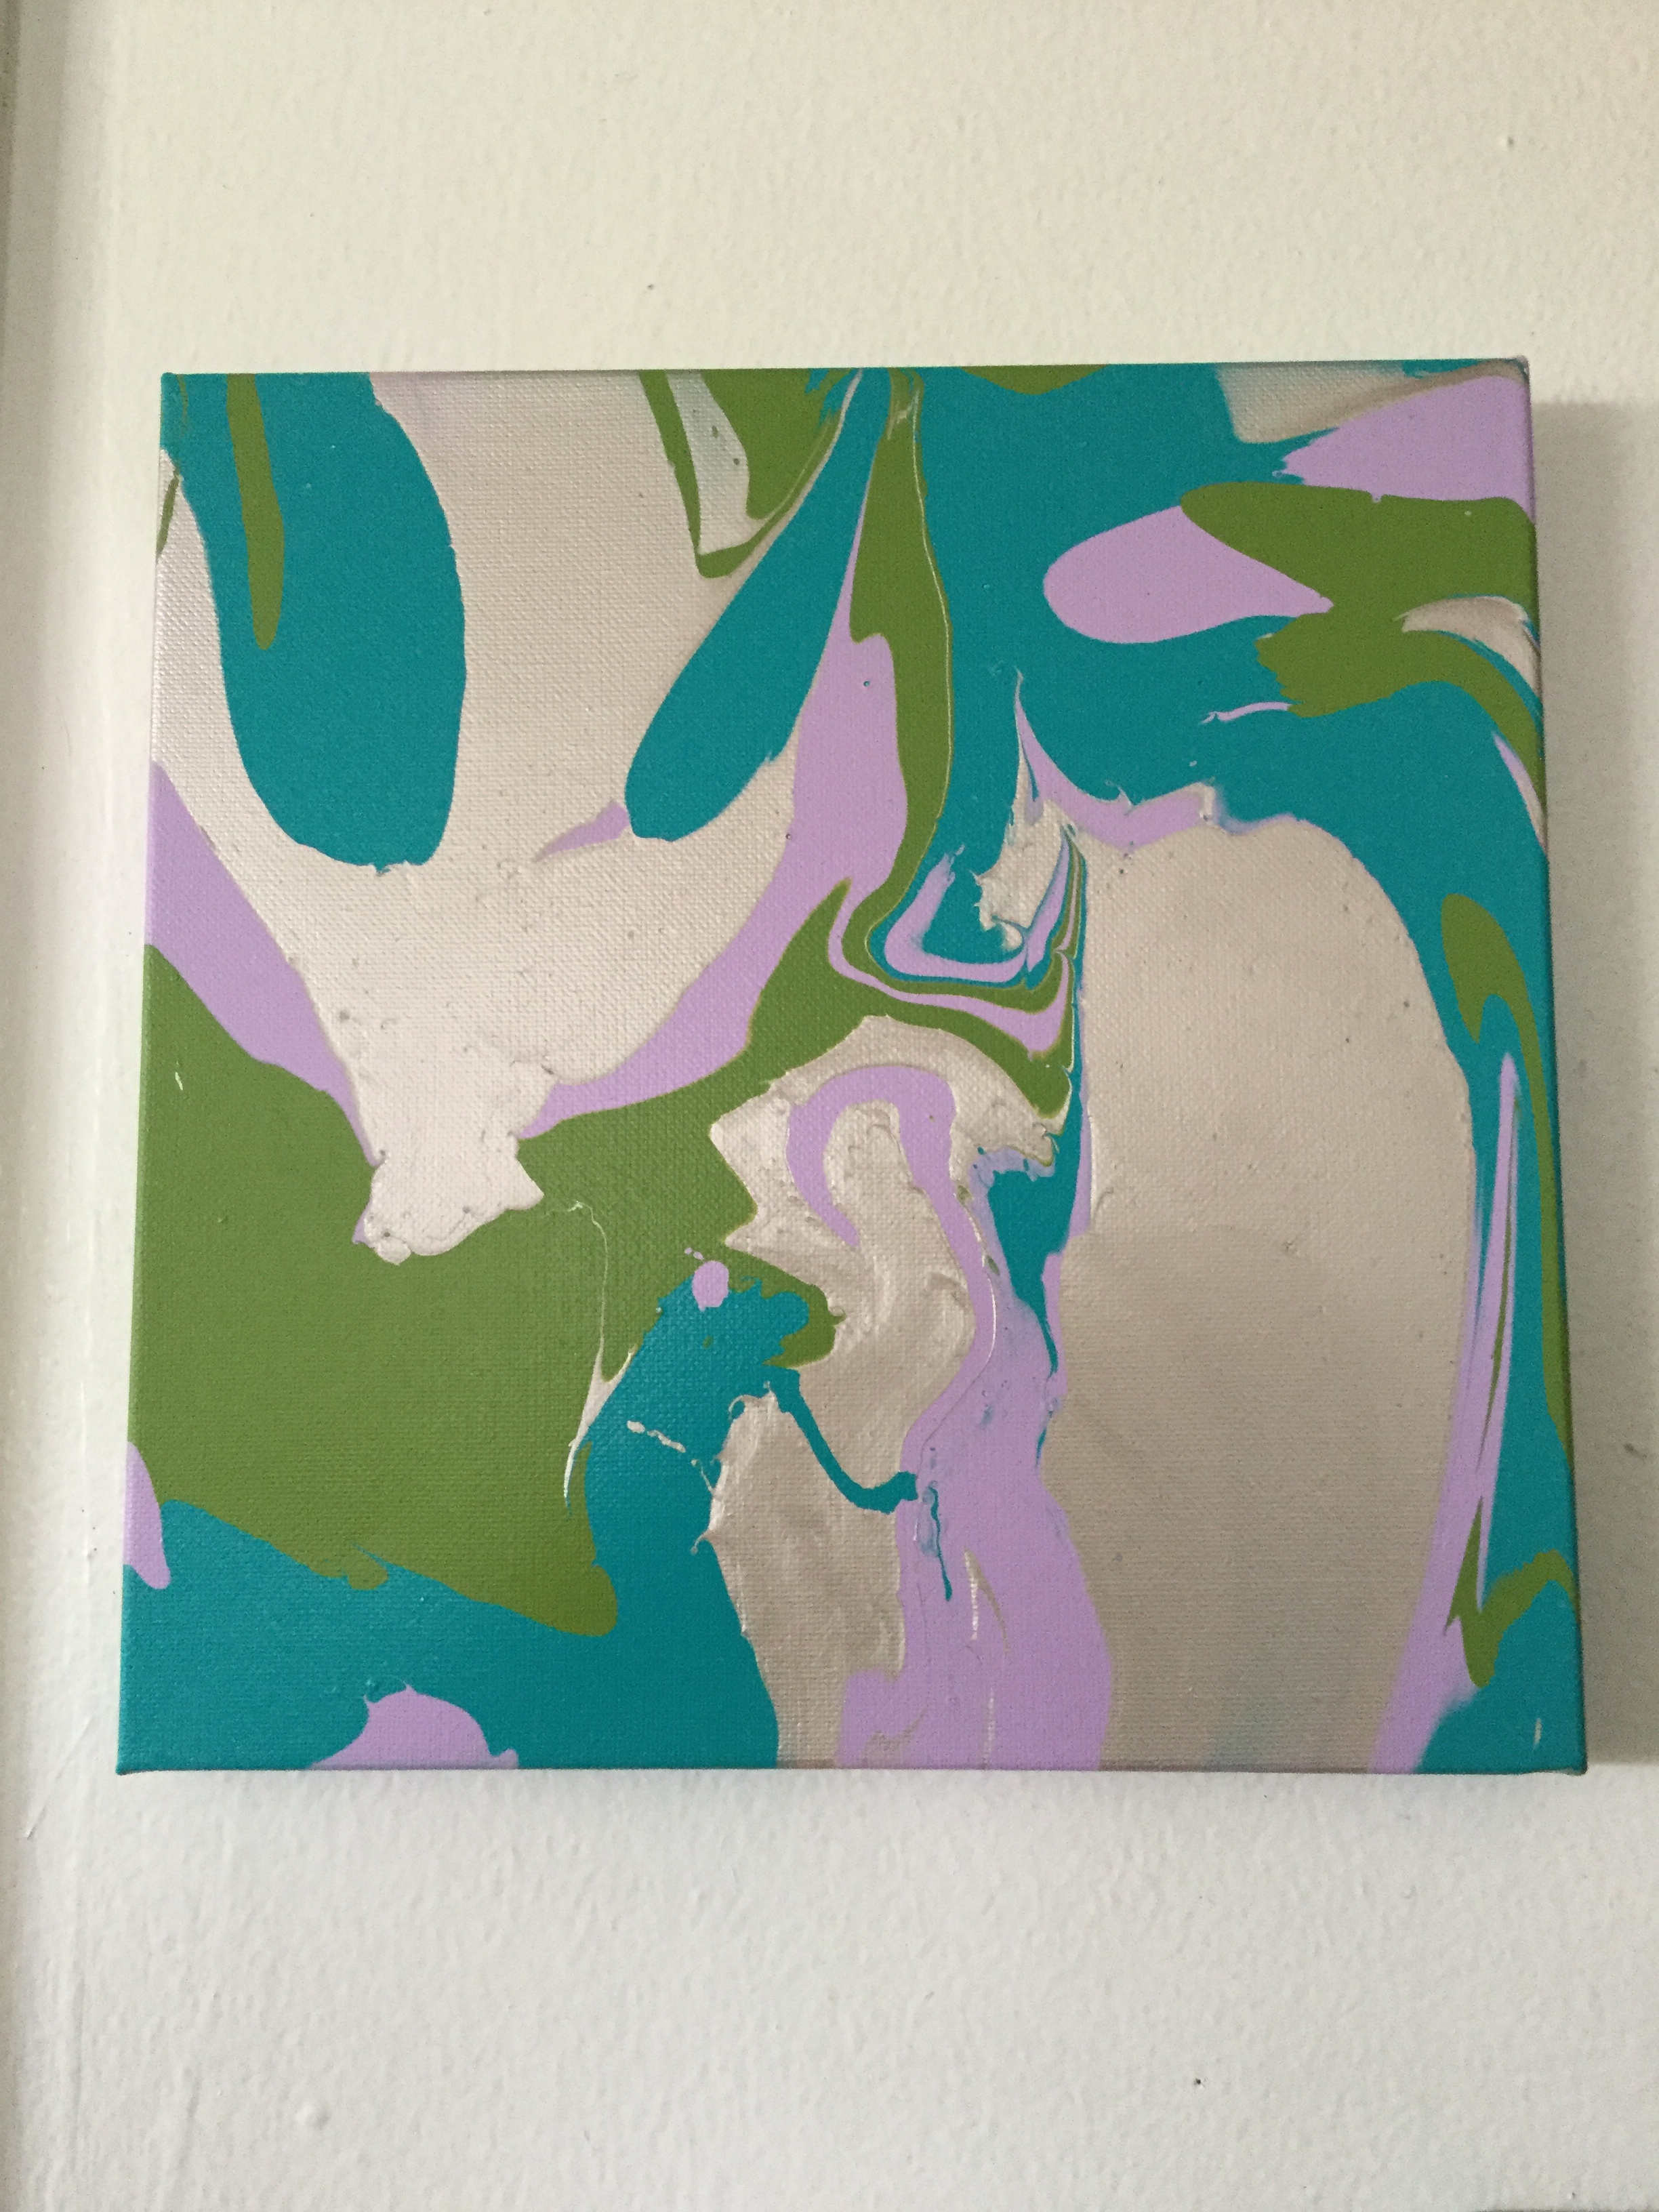
I’ve made a few of these and I am happy with how each of them has turned out. These are fun pieces that can be personalized and would make great gifts.


Happy Painting!

Paint Pouring

Supplies:

Canvas

School glue

Acrylic paint

Water

Cooling tray

Deep pan

Plastic cups

Craft sticks

Disposable gloves

Directions:

Mix two parts glue with one part water in the plastic cups. Add an equal amount of pain and mix together well. Repeats for all the colors. Place the cooling rack inside of the pan and the canvas on top of the cooling rack. Feel free to lay newspaper below the pain in case of paint splatter.

Pour puddles of the paint in different spots of the canvas and begin tilting the canvas in different directions to spread the paint around. Use a craft stick to swirl the paint. Continue pouring, tilting and swirling until you are happy with the outcome. Make sure the pain reaches all of the corners and the sides of the canvas.

Place on the wire rack and let dry completely.

Rainbow Cookie Donuts

Happy National Donut Day! In honor of the day I decided to make Rainbow Cookie Donuts.

If you do a Google search for Rainbow Cookie Donuts you normally see a rainbow cookie – the tri-color cookie separated by raspberry jam and then covered in chocolate – shaped like a donut. A bit much if you ask me. I really wanted to make one similar to the one a coworker brought me from a local donut shop by her – Honey Pig Donuts. Instead of the donut being layered the colors were marbled together.

I knew that my go-to Rainbow Cookie recipe wouldn’t be right for these cookies… It’s not light enough and I would end up with a donut that would be quite dense. I was going to try and tweak the recipe to get the right texture, but, then I came across a Rainbow Cookie Cake recipe that would be perfect, once I halved the recipe.

Once I made the batter I divided it in three and tinted each of them. I normally only tint the green and pink layer when I make the cookies, but, since I was making them in donut form I decided to tint the natural color layer with a bit of yellow so each part of the rainbow donut could stand out. Next, I transferred the batter to piping bags and snipped a small portion of the tip off and then piped the batter into donut pans that I sprayed with baking spray. I filled the cavities about 3/4 full and then baked them in a 350 F preheated oven for about 15 minutes.

After the donuts had cooled I melted a few tablespoons of seedless raspberry jam in a small saucepan over medium-low heat to melt it. Once melted I used a brush to brush the tops of the donuts with the melted jam.

While the jam settled I made the chocolate glaze. In a small saucepan over medium-low heat I combined chopped semisweet chocolate with heavy cream, vanilla extract and salt and stirred the mixture until it melted. Once melted and smooth I removed it from the heat and let it cool for about 5 minutes. I gave it a few more stirs and then dipped the tops of the donuts into the melted chocolate. After dipping them I placed them on a cooling rack that I set on a wax paper lined cookie sheet so the chocolate could set.

And there you have it… Rainbow Cookie Donuts. While I enjoy the cookie version, I really love the lightness of these donut versions. The almond flavor really shines through as opposed to the cookies where the raspberry jam flavor stands out more for me. Truth be told, the donuts are delicious on their own without the melted raspberry and chocolate glaze. I kept the sans raspberry and chocolate glaze version in an airtight container at room temperature for three days and they still tasted delicious and I kept the raspberry chocolate glaze versions in the fridge for a day or two longer and they still tasted good – I let them come to room temperature before enjoying.

Rainbow Cookie Donuts

Ingredients:

Donuts:

1 1/2 (12 tablespoons) unsalted butter, at room temperature

3/4 cups sugar

3 large eggs, at room temperature

7 oz. almond paste, grated

1/2 tablespoon almond extract

1/2 cup while milk

1 1/2 cups flour

1 1/2 teaspoons baking powder

red, green & yellow food coloring

Raspberry Glaze:

4-5 tablespoons seedless raspberry jam

Chocolate Glaze:

4 ounces semisweet chocolate, chopped

1/2 cup heavy cream

1 teaspoon vanilla extract

pinch of salt

Directions:

Spray two donut pans with baking spray and preheat the oven to 350 F degrees.

Using a hand mixer or a stand mixer, cream the butter and sugar together on medium speed until light and fluffy, about 5 minutes. Add the eggs and continue beating for a few more minutes until combined. Add in the grated almond paste, almond extract and milk and beat well until combined, making sure the almond paste is completely incorporated.

In a separate bowl sift together the flour and baking powder and gradually add it to the butter batter while mixing on low. Continue mixing until the two mixtures are well combined.

Divide the batter among three bowl and tint it with the food coloring. Transfer the batter to three piping bags and snip the ends off. You could also use Ziploc bags and snip one of the corners off. Pipe the batter into the cavities of the donut pan haphazardly to create a marbled effect. Fill the cavities about 3/4 full. Tap the pans down before placing the oven to even the batter down. Bake for about 12-15 minutes, or until a cake tester inserted comes out clean.

Let the donuts cool in the pans for a few minutes and then transfer to a wire rack to cool completely. Rinse and spray the pans again before piping in the next batch of batter.

Once the donuts have cooled, melt the raspberry in a small saucepan over medium-low heat, do not let it boil. Using a pastry brush, brush the tops of the donuts with the raspberry jam.

As the jam settles make the glaze by heating the chocolate, cream, vanilla and salt in a small saucepan over medium-low heat, stirring, until melted and smooth. Remove from the heat and let cool for 5 minutes. Give the mixture a few good stirs. Place a cooling rack on a wax-lined cookie sheet and then dip the tops of the donuts into the melted chocolate and place on the cooling rack so the chocolate can cool and set.

Recipe for Donuts adapted from Always Order Dessert

Russian Decorating Tips

If you’ve been perusing decorated cakes on Instagram or Pinterest lately you may have noticed an influx of cakes decorated with some fancy and elaborate looking flowers. You may have thought to yourself that they require some advanced skill in cake decorating to create, but, the truth is, they only require specific types of decorating tips, a little patience and the right frosting consistency to replicate.

When I first started seeing them I did a little research and discovered that the flowers were being created with decorating tips known as “Russian Decorating Tips.” After a little more research I discovered that these tips have nothing to do with Russia. So, how did they get their name? Per another blogger, I Am Baker, they got their name because they were being sold by a company called Ali Express and they named them “Russian Tips.” At the time I didn’t feel like ordering a set over the internet, but, not too long ago I discovered that my local AC Moore began selling a set of 8 (along with an extra-large coupler to use with them) for less than $10. Truth be told, you don’t need the coupler. You can just cut your decorator bag and drop the tip in. I would suggest using a 16-inch decorator bag with these tips as opposed to a 12-inch one.


Unlike traditional decorating tips from Wilton & Ateco, these tips do not have numbers on them. The tips have a laser cut design on the end that allows the frosting to be piped through and form the different flowers. I will say that some of the tips are easier to use than others. Some of the designs, especially those that have detailed centers meant to emulate the stamen & stigma part of the flower, take a little more practice to master. One other thing that is different is the way you pipe them. With your usual tips you sometimes have to add a little wrist twist to get the flower design, or, you have to hold the bag at a 45 degree angle. But, with these tips you hold the bag at a 90 degree angle about an inch or so from your cake (or cupcake) and squeeze for a few seconds to form the flower. Before piping the next flower I would suggest wiping the tip clean to get a nice flower for the next pipe.

Like I mentioned earlier I purchased a set of these tips from my local AC Moore store. I can’t remember how I knew they carried them; I probably saw something on their Instagram feed. I decided to hold off on using them until I made my Mother’s Day cake. I did test them out using store bought vanilla frosting and as I had suspected and had read a little bit about, the frosting was too thin to get a well-formed flower. All of my test flowers looked like little blobs of frosting as opposed to a flower.

So, using my go-to Fluffy Vanilla Frosting that I then tinted in 4 different colors I began decorating the top of my cake. I was soon a bit frustrated with some of the tips. The flowers weren’t piping well and even though the frosting was a stiffer consistency the centers of the flowers weren’t looking nice. So, I decided to switch the tips I had chosen to use. Soon enough I got the hang of it and ended up with a flower topped cake I was content with. It wasn’t until I added in leaves (using a Wilton 352 tip) that I piped around the cake and in between the flowers to fill in the gaps that I was truly happy with the outcome.


Lemon Ricotta Bars

So, even after I made the Ricotta Orange Pound Cake I posted about last week, I still had ricotta cheese left-over and I didn’t want to toss it. So, I decided to make Lemon Ricotta Bars. Lemon & ricotta go together so well… If you don’t believe me try making these bars, these pancakes I posted about a few years ago or these cookies I posted right before the holidays last year. All were delish!

Lemon Ricotta Bars

Ingredients:

For the crust:

2 cups graham cracker crumbs (15 crackers)

2 tablespoons sugar

1 stick unsalted butter, melted

For the filling:

1 cup whole-milk ricotta

4 large eggs, beaten

1 1/3 cups sugar

3 tablespoons all-purpose flour

2 tablespoons lemon zest

2/3 cup lemon juice, from 3 to 4 large lemons

1/4 teaspoon salt

Directions:

Preheat the oven to 350F. Spray a 9x13x2 baking dish with nonstick cooking spray.

For the crust: Combine the ingredients for the crust in a medium bowl and mix until moistened. Press the mixture evenly in the prepared pan and about 1/4 inch up the sides of the dish. Bake in the preheated oven for 8-10 minutes, until set, and then set aside to cool.

Reduce the oven to 325F.

For the filling: Whisk the ricotta, eggs, sugar and flour in a bowl until well combined. Stir in the lemon zest, lemon juice and salt and blend well. Pour the filling into the crust and bake until filling is firm, about 30 minutes.

Let the pan cool on a wire rack, at least 2 hours. Cut into desired sized bars with a knife, wiping the knife between cuts.

Recipe adapted from Food Network and Food52

Mexican Brownies

Happy Cinco De Mayo! Do your plans include guacamole or a margarita today? Or maybe a sweet dessert? These Mexican Brownies are the perfect sweet treat for today. Unlike traditional brownies, these flavor in these brownies are enhanced by the addition of cinnamon and chili powder in the batter. Don’t worry, they aren’t spicy or anything. It actually offers a nice balance to the chocolate and they are super moist and fudgy.


If you are looking for some other desserts for today check out some of my past Cinco De Mayo treats.

Sopapilla Cheesecake and Mexican Wedding Cookies

Tres Leches Cupcakes and Churros

Coconut & Lime Cupcakes

Tres Leches Cake

Horchata Treats


Mexican Brownies

Ingredients:

2 sticks unsalted butter

2 cups granulated sugar

4 large eggs

2 teaspoons vanilla extract

2/3 cup unsweetened cocoa powder

1 cup all-purpose flour

1 teaspoon ground cinnamon

1/4 teaspoon chili powder or cayenne pepper

1/2 teaspoon kosher salt

1/2 teaspoon baking powder

Directions:

Preheat oven to 350 F. Line a 9 x 13-inch baking pan with parchment paper, leaving an overhang on the long edges of the pan. Press the paper into the corners of the pan and spray with cooking spray or lightly grease with butter.

Melt the butter in a medium saucepan over medium heat, do not boil. Remove from the heat and let cool for a few minutes.  Add the sugar, eggs and vanilla extract and stir until well combined.

Add the remaining ingredients and continue mixing until smooth. Transfer the batter to the prepared pan and bake for 20 to 25 minutes, until a tester inserted in the middle comes out fudgy. Transfer the pan to a wire rack to cool. Once cooled, use the parchment paper to lift out the brownies and then slice.

Recipe from Food Network

Ricotta Orange Pound Cake

I always have a container of ricotta cheese in my fridge just in case I want to make a baked ziti, a cheesecake or something or other. Unfortunately what ends up happening is, it sits in my fridge, I know it’s there, but I don’t get around to using it until it’s about to expire and then I’m scrambling to make something because I don’t want to throw it out. When this recently happened I decided to make something I made a few years ago, but didn’t come out quite right the first time… a Ricotta Orange Pound Cake. This cake has a nice orange taste and is quite moist thanks to the ricotta cheese.

Ricotta Orange Pound Cake

Ingredients:

1 1/2 sticks unsalted butter, at room temperature

1 1/2 cups cake flour*

2 1/2 teaspoons baking powder

1 teaspoon kosher salt

1 1/2 cups whole-milk ricotta cheese

1 1/2 cups plus 1 tablespoon sugar

3 large eggs

1 teaspoon pure vanilla extract

1 orange, zested

2 tablespoons amaretto

*If you don’t have cake flour, use this method to substitute with all-purpose flour and cornstarch.

Directions:

Preheat the oven to 350 F. Grease a loaf pan with butter, or spray with cooking spray.

In a medium bowl combine the flour, baking powder and salt. Stir to blend.

With a mixer, cream together the ricotta cheese, butter, and sugar until light and fluffy. Add the eggs, one at a time, beating well after adding each one. Add the vanilla, zest and amaretto and beat until well combined. Add the dry ingredients, a little at a time, and mix until just incorporated.

Pour the batter into the prepared pan and bake until a cake tester or toothpick inserted in the middle comes out clean and the cake pulls away from the sides of the pan, about 45 to 50 minutes. If you find you need to bake it a little longer, you may want to lower the temperature of the oven to ensure that you don’t burn the cake. Let the cake cool in the pan for 10 minutes and then transfer to a wire rack to cool completely.

Recipe from Food Network

Rigatoni with Sausage & Peas

I may have mentioned this once or twice before, but, I’m always on the search for quick and easy meals that flavorful, don’t require a slew of ingredients and gives me enough leftovers for a few days. This pasta dish checks all of those boxes.

I started by cooking the pasta. Then, I sautéed garlic, browned the sausage, added frozen peas and finally heavy cream and butter. After bringing it to a boil I added in the pasta and that was it. You can’t top something as simple as that.

Rigatoni with Sausage & Peas

Ingredients:

1 pound rigatoni

2 tablespoons olive oil

1 garlic clove, minced

1 pound sweet Italian sausage meat or sausages with casings removed

12 ounces frozen green peas

1 1/2 cups heavy cream

4 tablespoons butter

Parmesan cheese

Directions:

Bring a large pot of salted water to boil, add pasta and cooking for 8 to 10 minutes, until al dente and then drain.

In a large skillet heat oil over medium heat and sauté garlic. Add the sausage and brown. Then add the green peas and simmer for 5 minutes. Slowly add the heave cream and butter and bring to a slight boil. Cook for 5 minutes and then toss with cooked pasta and top with parmesan cheese.

Recipe from allrecipes

Vanilla Squared Cupcakes

I recently got a request for a basic yellow cupcake with vanilla frosting. No sprinkles, no additional flavors or anything, just plain vanilla. I can understand… One of my favorite desserts is a yellow cupcake with chocolate frosting. It’s such a simple and satisfying combination and sometimes that simplicity is a better dessert than something intricate and complicated in flavor. It’s a comfort and familiarity. For the cupcake, I tried out a vanilla cupcake recipe I got from an issue of Food Network Magazine quite some time ago and for the frosting, I whipped up half a batch of my favorite vanilla frosting from Martha Stewart. Final result, the perfect Vanilla Square Cupcake.


Vanilla Cupcakes

  • Servings: 12 cupcakes
  • Print

Ingredients:

1 1/3 cups flour

1 teaspoon baking powder

1/2 teaspoon salt

1 stick unsalted butter, at room temperature

1 cup sugar

2 eggs

2 teaspoons vanilla extract

1/2 cup milk*

*I used whole milk


Directions:

Preheat oven to 350 F and line a 12-cup muffin pan with paper liners.

Whisk together the flour, baking powder and salt in a medium bowl.

In a large bowl, beat the butter on medium-high speed until smooth, about 1 minute. Add the sugar and continue beating until creamy. Beat in the eggs 1 at a time and then beat in the vanilla extract.

Beat the flour mixture into the butter mixture in three batches, alternating with the milk. Beat until just combine and then divide the batter among the muffin pan.

Bake for 20 to 25 minutes, until a cake tester comes out clean. Transfer the pan to a cool rack and allow to cool for 5 minutes. Remove the cupcakes and transfer them to the rack and allow to cool completely.

Recipe from Food Network Magazine


Fluffy Vanilla Frosting

Ingredients:

1 1/2 sticks unsalted butter, at room temperature

2 cups confectioners’ sugar

1/4 teaspoon vanilla extract


Directions:

In a large bowl, beat the butter with an electric mixer on medium-high speed until pale and creamy, about 2 minutes.

Reduce the speed of the mixer to medium and add the sugar 1/2 cup at a time, beating well after each addition. After adding the first cup and then second cup increase the speed of the mixer to high and beat for 10 seconds to aerate the frosting.

Add the vanilla extract and beat the frosting until its smooth.

Recipe from Martha Stewart

Lemon Pudding Cakes

It’s the first day of spring and unfortunately the temperatures aren’t spring-like and there’s snow in the forecast for tomorrow. Too bad the weather doesn’t automatically switch with the seasons – of course people would only enjoy that for the warmer months. Not many people would be too keen on frigid temps and snow the first day of winter, although it would make for a white Christmas! I’m welcoming spring today with a lemon treat. I’m not all that sure that lemon is synonymous with spring – I think it more of a summer flavored dessert – but, when I Googled Spring desserts a bunch of lemon ones were the first to come up. So, the lemon treat I settled on was Lemon Pudding Cakes.

I started by making the lemon base of the cakes by mixing together egg yolks, buttermilk, lemon juice and zest. Once those ingredients were well combined, I sifted in flour, sugar and salt and mixed these ingredients until combined.

Next I beat the egg whites until stiff peaks formed. Now, we all have those kitchen tasks we’re not fond of doing. I used to dislike having to mince garlic until I purchased a garlic mincer. Another task I dislike, beating egg whites into stiff peaks, well by accident, well not really accident, I finally realized what I was doing wrong… I was using the wrong bowl. I would normally beat them in a wide stainless bowl and I guess it would take long because of the larger surface of the bowl. I didn’t feel like grabbing that bowl when making these pudding cakes so I grabbed a smaller stainless bowl instead and my egg white were ready in half the time. I apologize to those of you who are like “Duh.” Sometimes we get so used to doing things a certain way we don’t stop to think of a more efficient way to do it.

After the egg white were ready I folded them – a small amount at a time- into the lemon mixture. I then divvied up the batter among 4 ramekins and baked them in a water bath. After letting them cool, I inverted them on a dish and topped them with fresh strawberries and confectioners’ sugar.  I knew these were going to be delicious, but, I was surprised by just how good they are. The cake texture was reminiscent of a ricotta cheesecake and there was a nice layer of lemon pudding on top… Hence, a Lemon Pudding Cake. This was a quick dessert if you are looking for a nice dessert for a small get together or, you just want a dessert that will remind you of the warmer temps that are sure to come.


Happy Spring!!!


Lemon Pudding Cakes

Ingredients:

2/3 cup superfine sugar, plus more for dusting

2 eggs, separated

2/3 cup reduced fat buttermilk

2 tablespoons lemon juice*

1 tablespoon lemon zest*

1/4 cup flour

1/4 teaspoon salt


Topping

Fresh berries

Confectioners’ sugar


Directions

Preheat the oven to 325 F. Butter and lightly sugar 4 ramekins.**

In a large bowl add egg yolks, buttermilk, lemon juice and lemon zest and using a hand mixer beat until well combine on medium speed. Sift in flour, sugar and salt into the mixture and beat on low until well combined.

In a separate bowl, beat egg whites until stiff peaks form. Gently fold the egg whites into the lemon mixture a little at a time until completely incorporated.

Divide the batter evenly among the ramekins and bake in a water bath. Place the ramekins in a large roasting pan and fill hallway with water.

Bake for 45 minutes until the top springs back when gently pressed. All the cakes to cool slightly and then invert onto a plate and garnish with fresh berries and confectioners’ sugar.

**I sprayed my ramekins with cooking spray then sprinkled sugar in them.

Recipe from Food Network

Food Network


Slow Cooker Sunday: Vegetarian Minestrone

While spring may be a few days away the weather is still cold enough for some hearty soup. And while this soup may not have any meat in it, it’s still filling thanks to the array of vegetables. I was a bit intimidated by the amount of ingredients – I tend to avoid recipes that have too many ingredients – but, they are all pretty simple and some I actually had on hand.

I added most of my ingredients to my slow cooker and then set it to cook on low for 8 hours. I began checking on it after 5.5 hours as I didn’t want my vegetables to over-cook and break down, especially the zucchini. Ultimately my soup was ready in 6 hours, my vegetables were tender and still intact.

I then cooked the elbow macaroni in pot of boiling salted water and added it to the soup along with chopped baby spinach. I cooked it on low for an additional 15 minutes and it was done.

The Minestrone was flavorful and as I said earlier hearty and, the leftovers tasted even better the next day and even better the day after that.

Slow Cooker Vegetarian Minestrone

Ingredients:

6 cups vegetable broth

1 28 ounce can crushed tomatoes

1 15 ounce can kidney beans, drained and rinsed

1 large onion, chopped

2 ribs celery, diced

2 large carrots, diced

1 cup frozen green beans

1 small zucchini, cut into quarter moons

3 garlic cloves, minced

1 tablespoon fresh parsley, minced

1 1/2 teaspoons dried oregano

1 teaspoon salt

3/4 teaspoons thyme

1/4 teaspoon black pepper

1/2 cup elbow macaroni

4 cups chopped fresh spinach

Parmesan Cheese

Directions:

Combine all ingredients from the broth through the black pepper in a 6-quart slow cooker and cook on low for 6-8 hours, until vegetable are tender.

Bring a large pot of salted water to boil and cook the elbow macaroni for about 8 minutes, until cooked through but still firm, drain.

Add the macaroni and spinach to slow cooker and cook for another 15 minutes. Top with parmesan cheese.

Recipe from allrecipes