Hidden Heart Cake

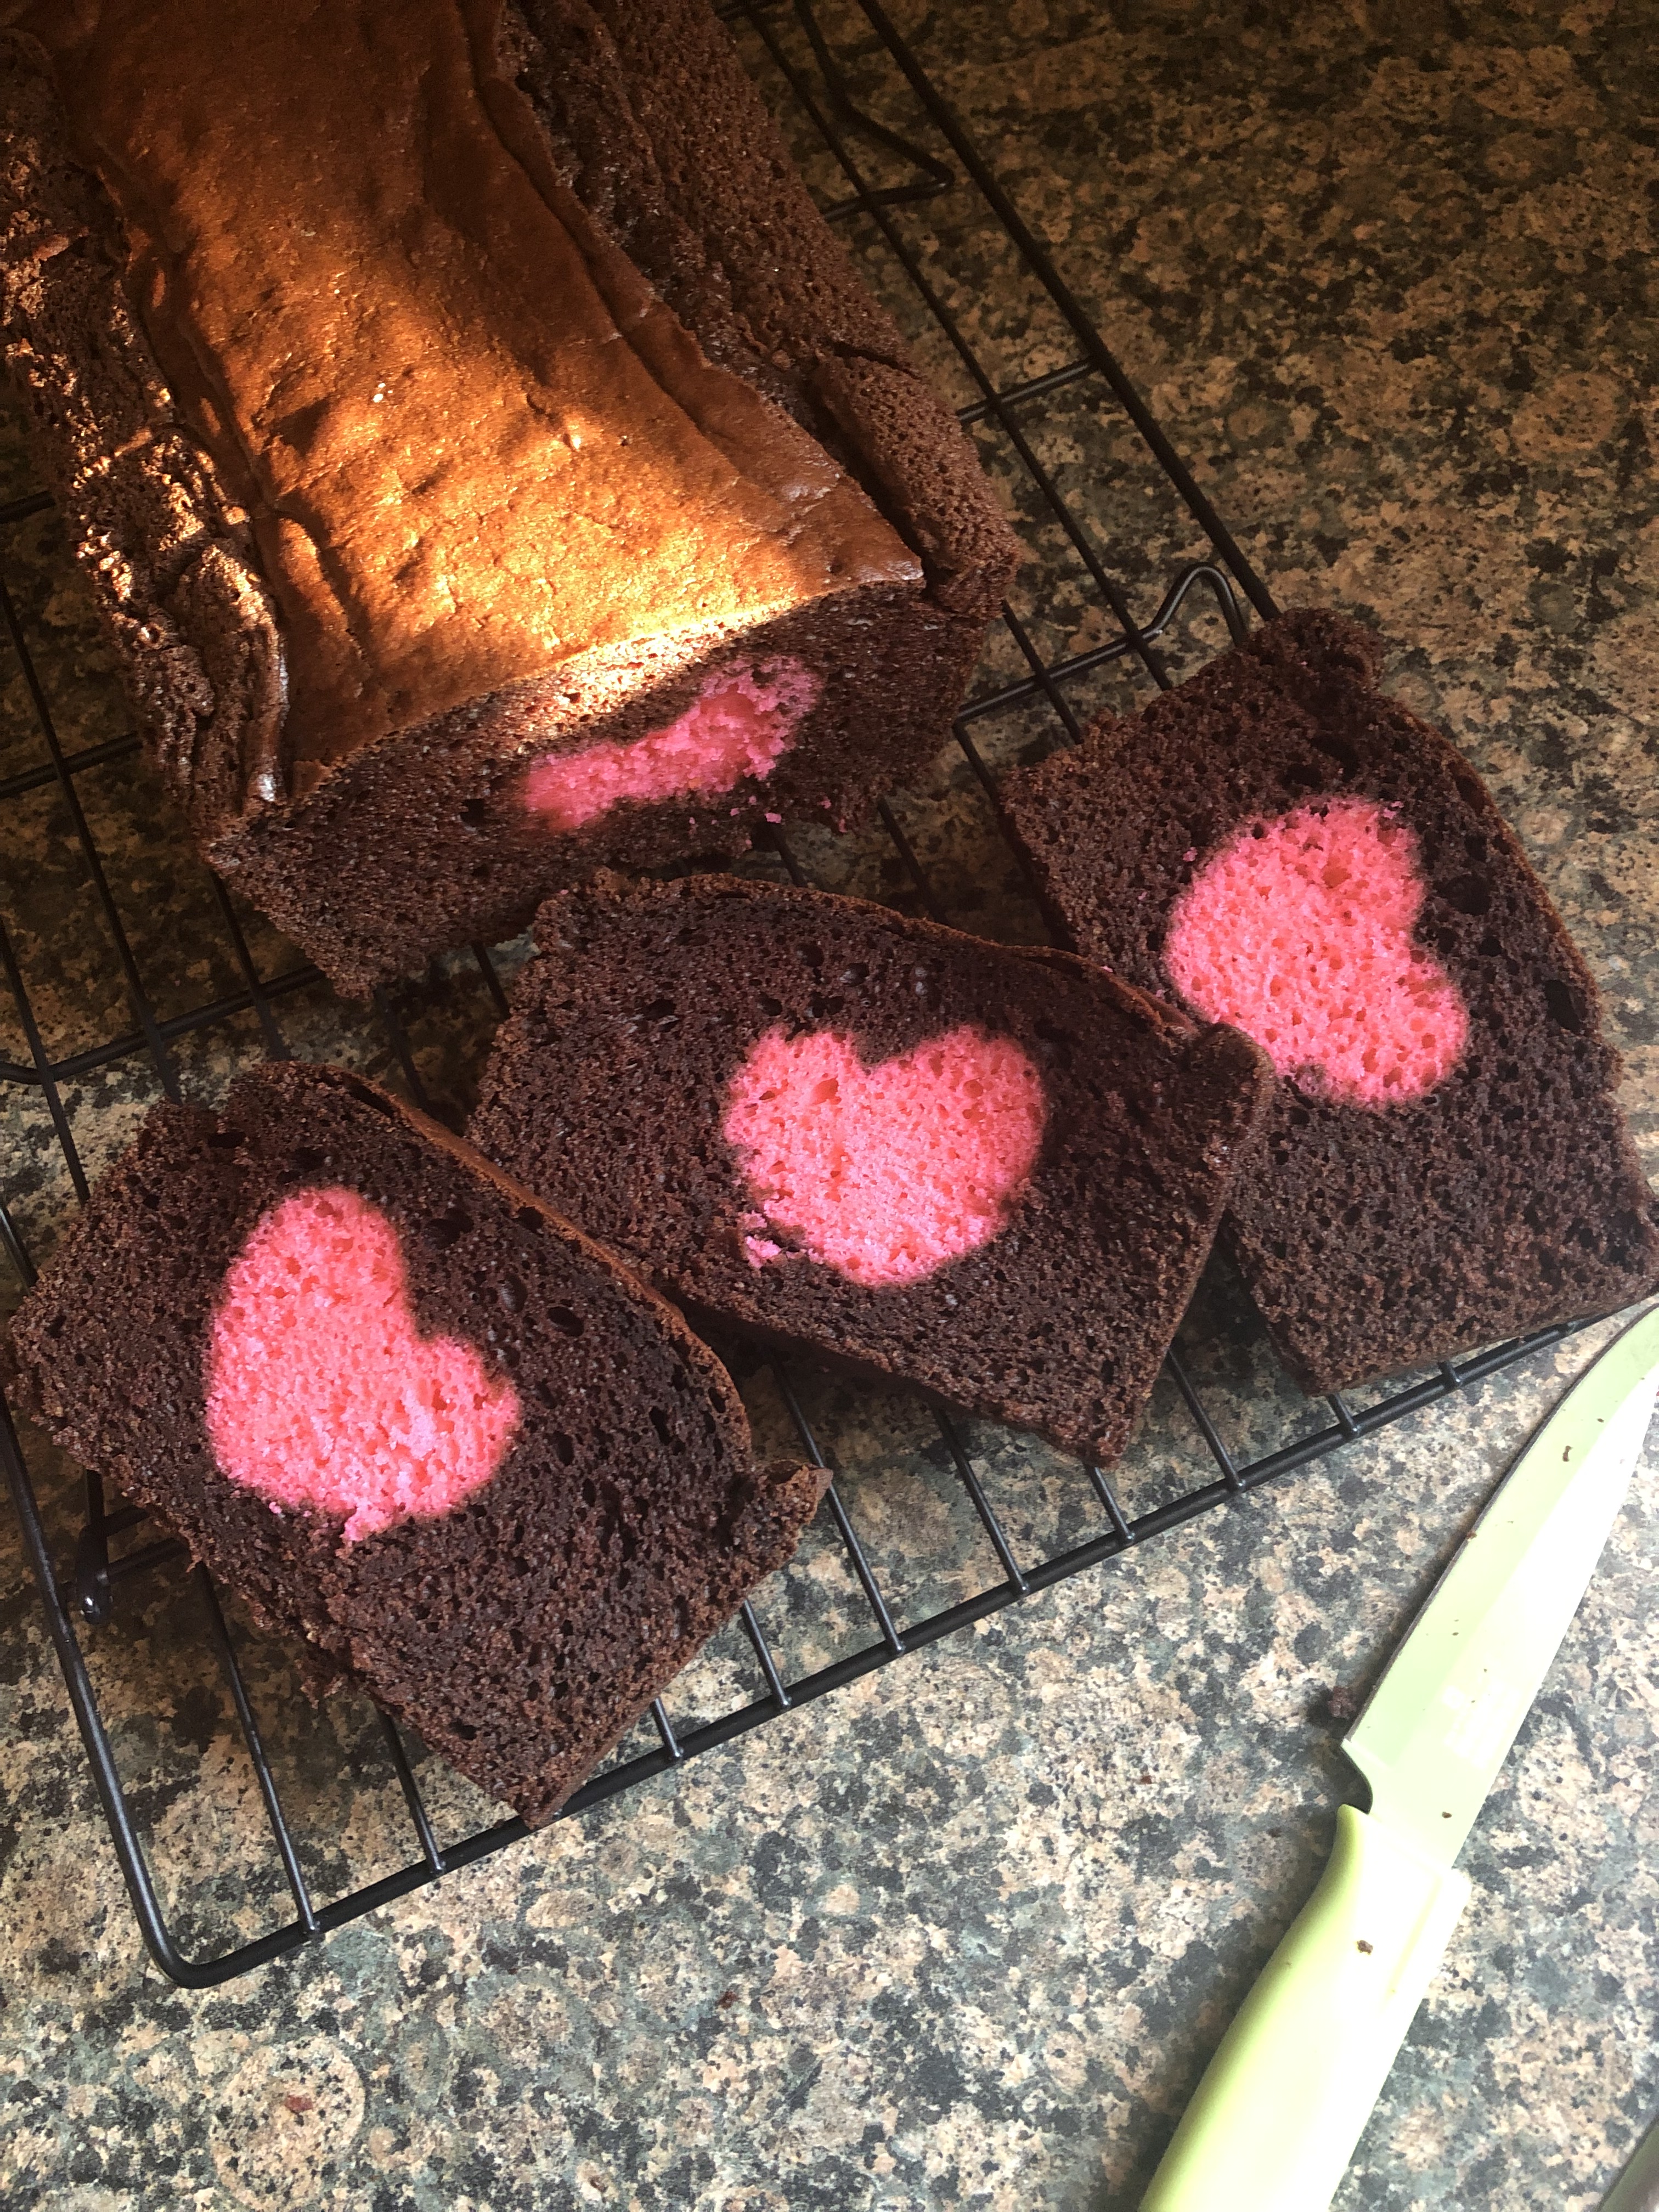
Are you looking for something fun to bake for Valentine’s Day but are thinking that it’s too late? Well, this may just be the cake for you. All you need is 2 boxes of cake mix (I used white & chocolate), a loaf pan, a 2-inch heart cookie cutter and pink (or red) food coloring. While I used a white cake mix tinted pink for the hearts inside of a chocolate cake, you could try pink hearts inside of a white cake, red hearts inside of a white cake, red hearts inside of a yellow cake and so forth. It’s really up to you.

To begin, I prepped a box of white cake mix per the directions and then tinted it pink with a few drops of gel food coloring. I then poured it into a loaf pan that I sprayed with baking spray and baking it in a 350 F oven for 40 minutes, the cake wasn’t quite done but was browning considerably along the top so I dropped the temperature to 325 F and baked it for another 10 minutes. I let the cake cool for about 20 minutes in the pan and then transferred it to a wire rack to cool completely.

After the cake cooled I sliced it into approximately 1 inch slices. Some of the slices were a little thicker, some a little thinner. In the end, it didn’t matter.

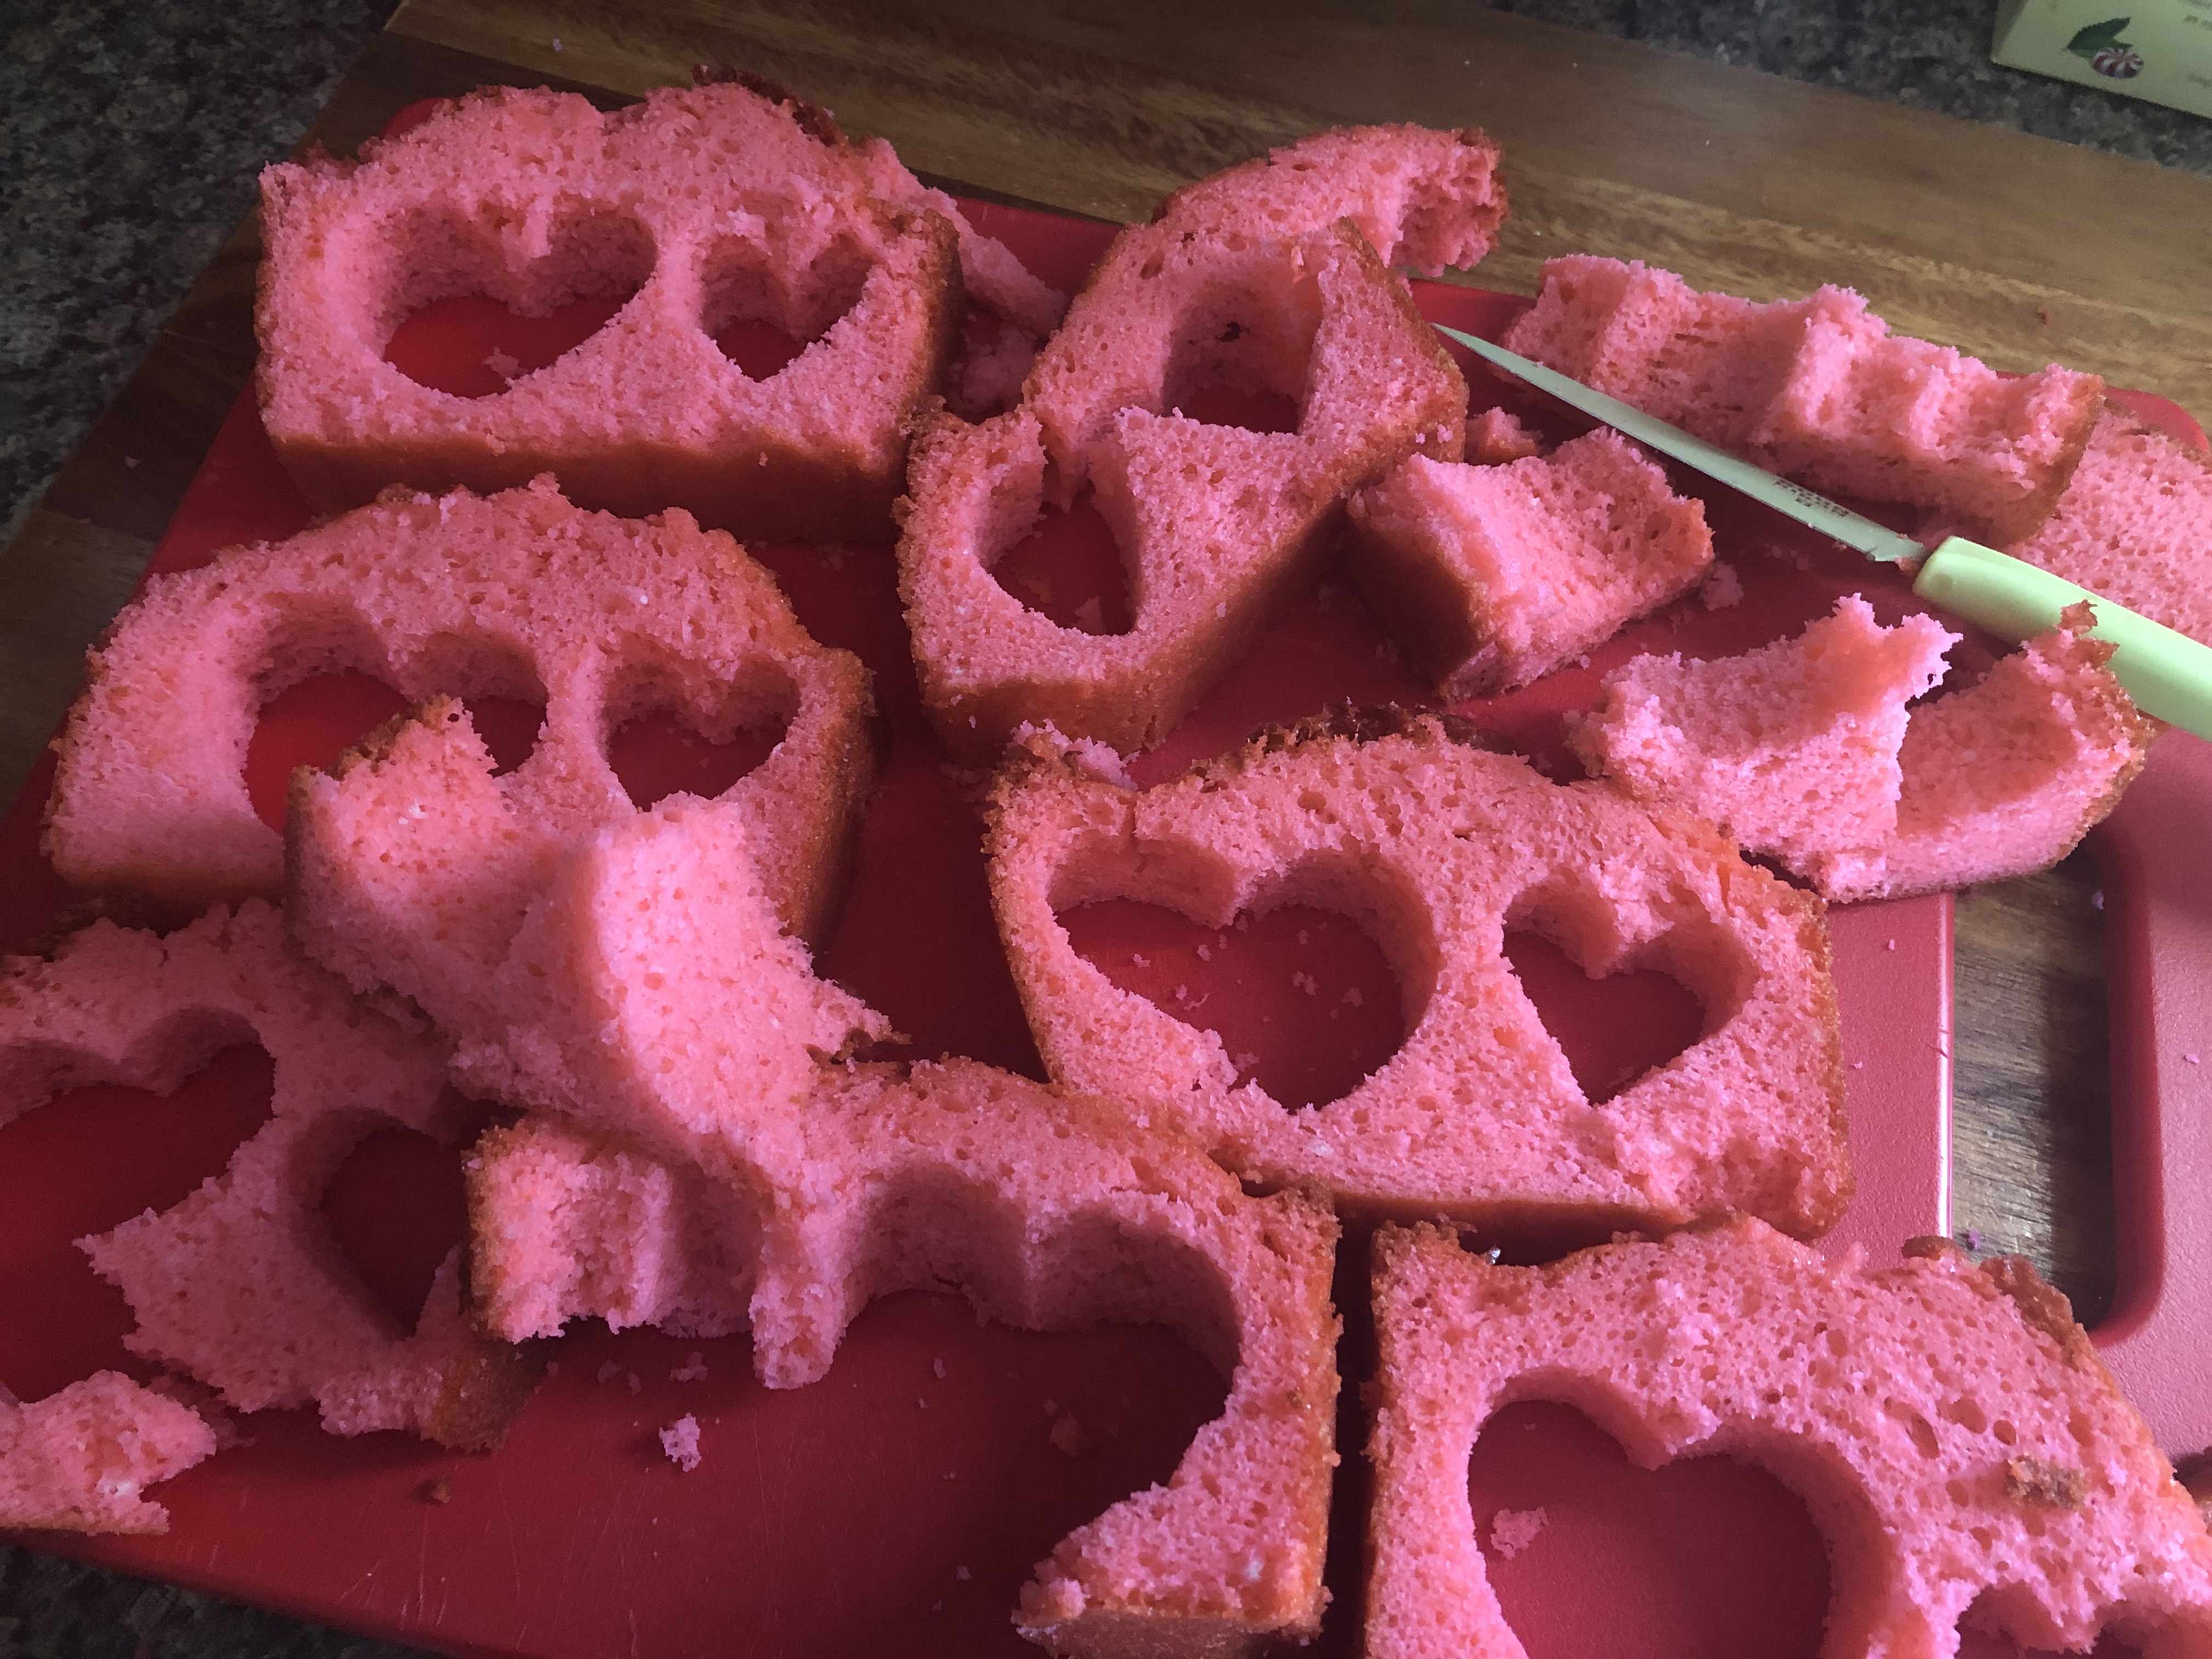
Next, using a 2-inch heart cookie cutter I cut hearts from the slice of cake and set them aside. Those mini heart were for a different project that turned out to be a fail… Oh Well.

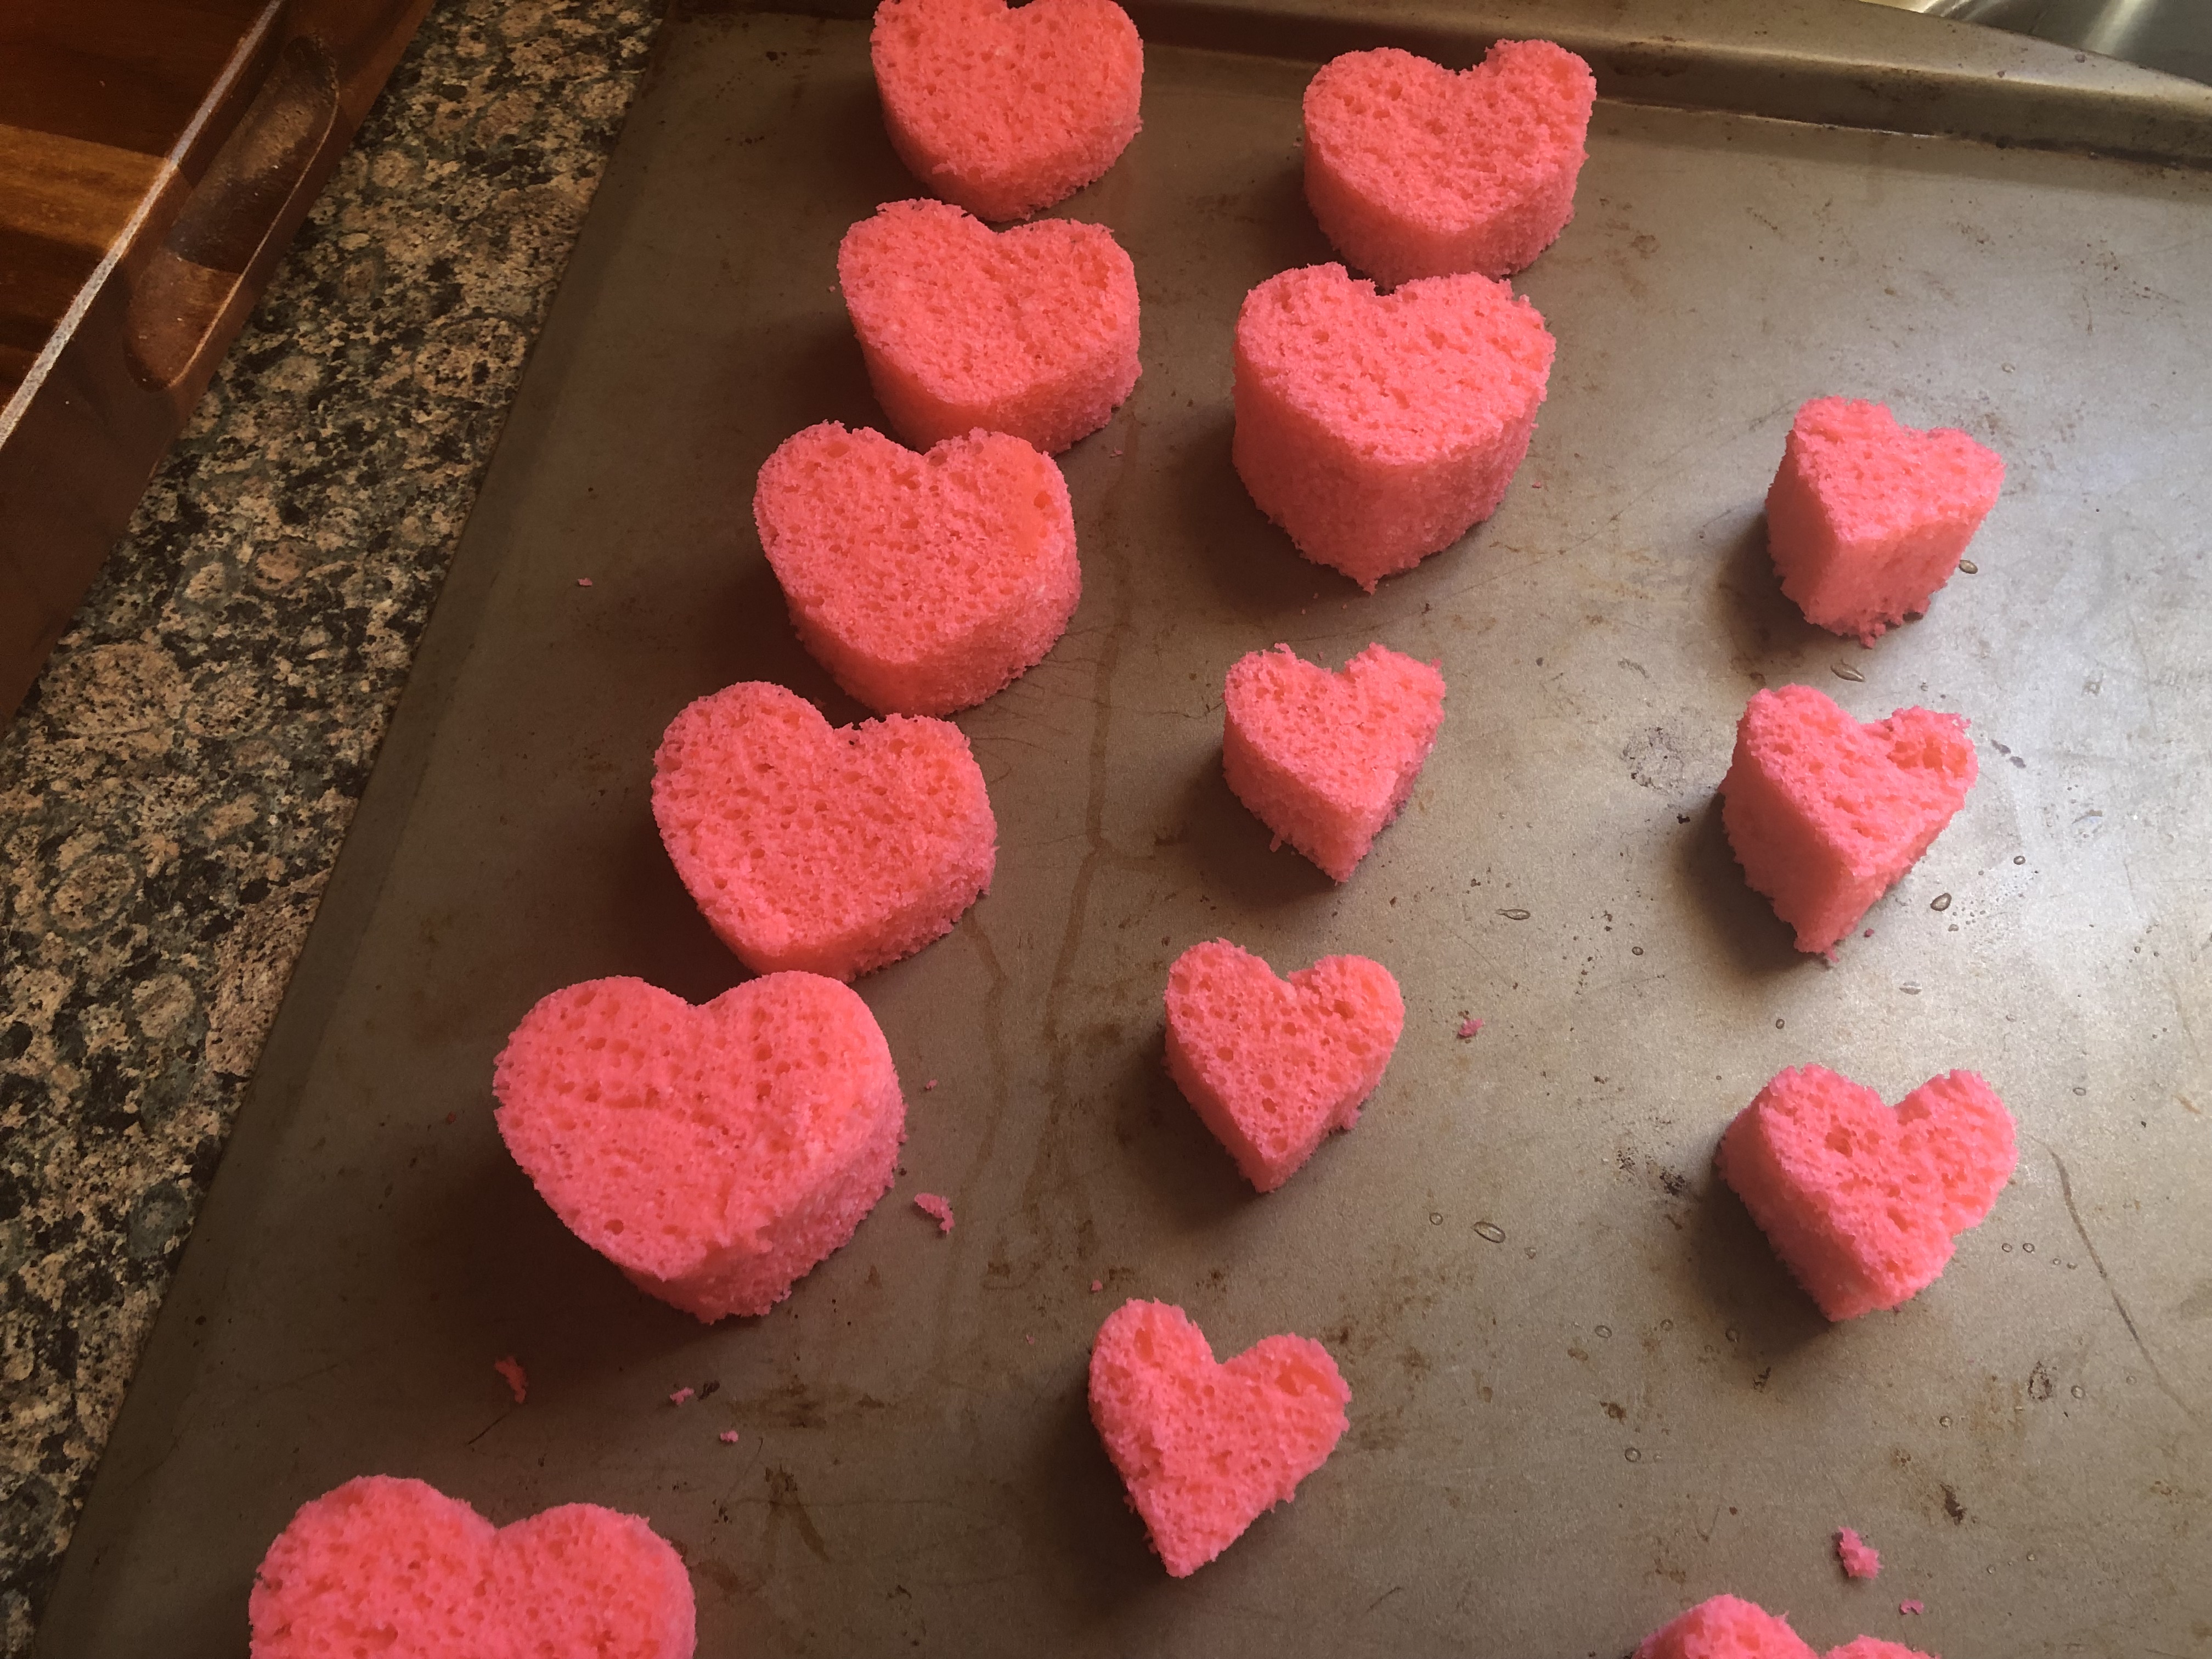
You will have a bunch of cake scraps left, I ended up snacking on a few pieces and then tossing the rest. If you make cake pops, or have been wanting to make pops, save these scraps for that.

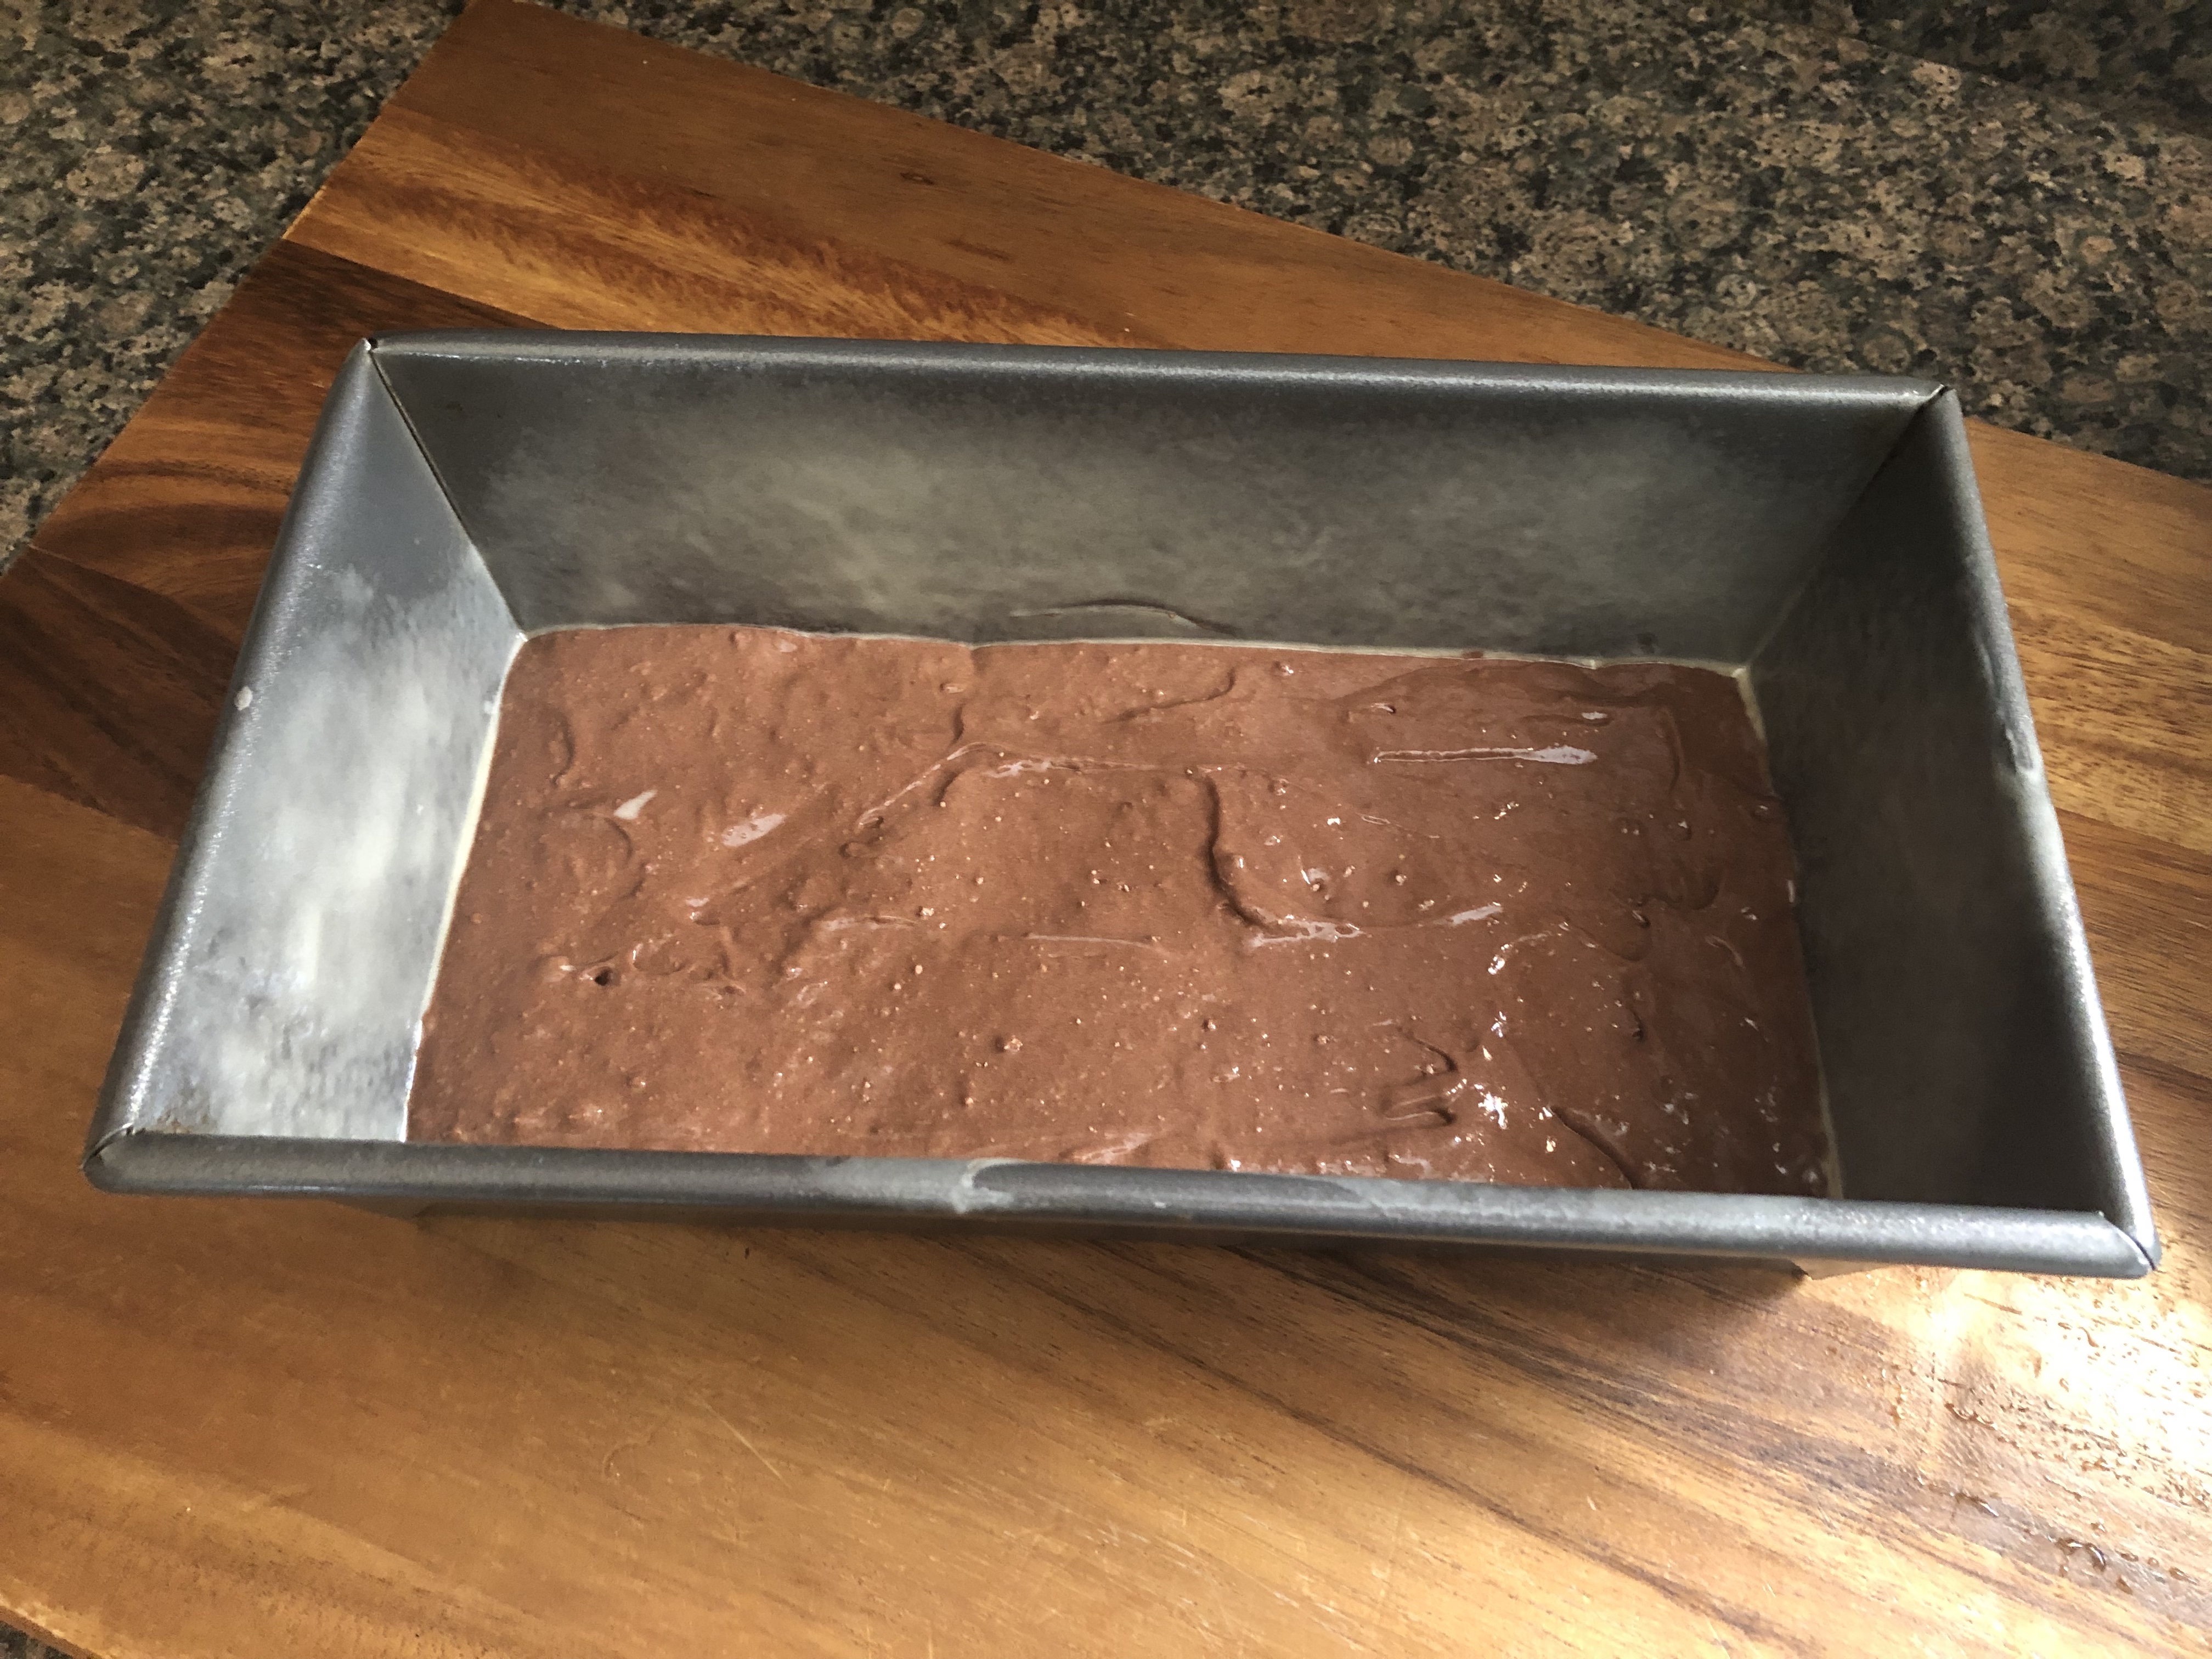
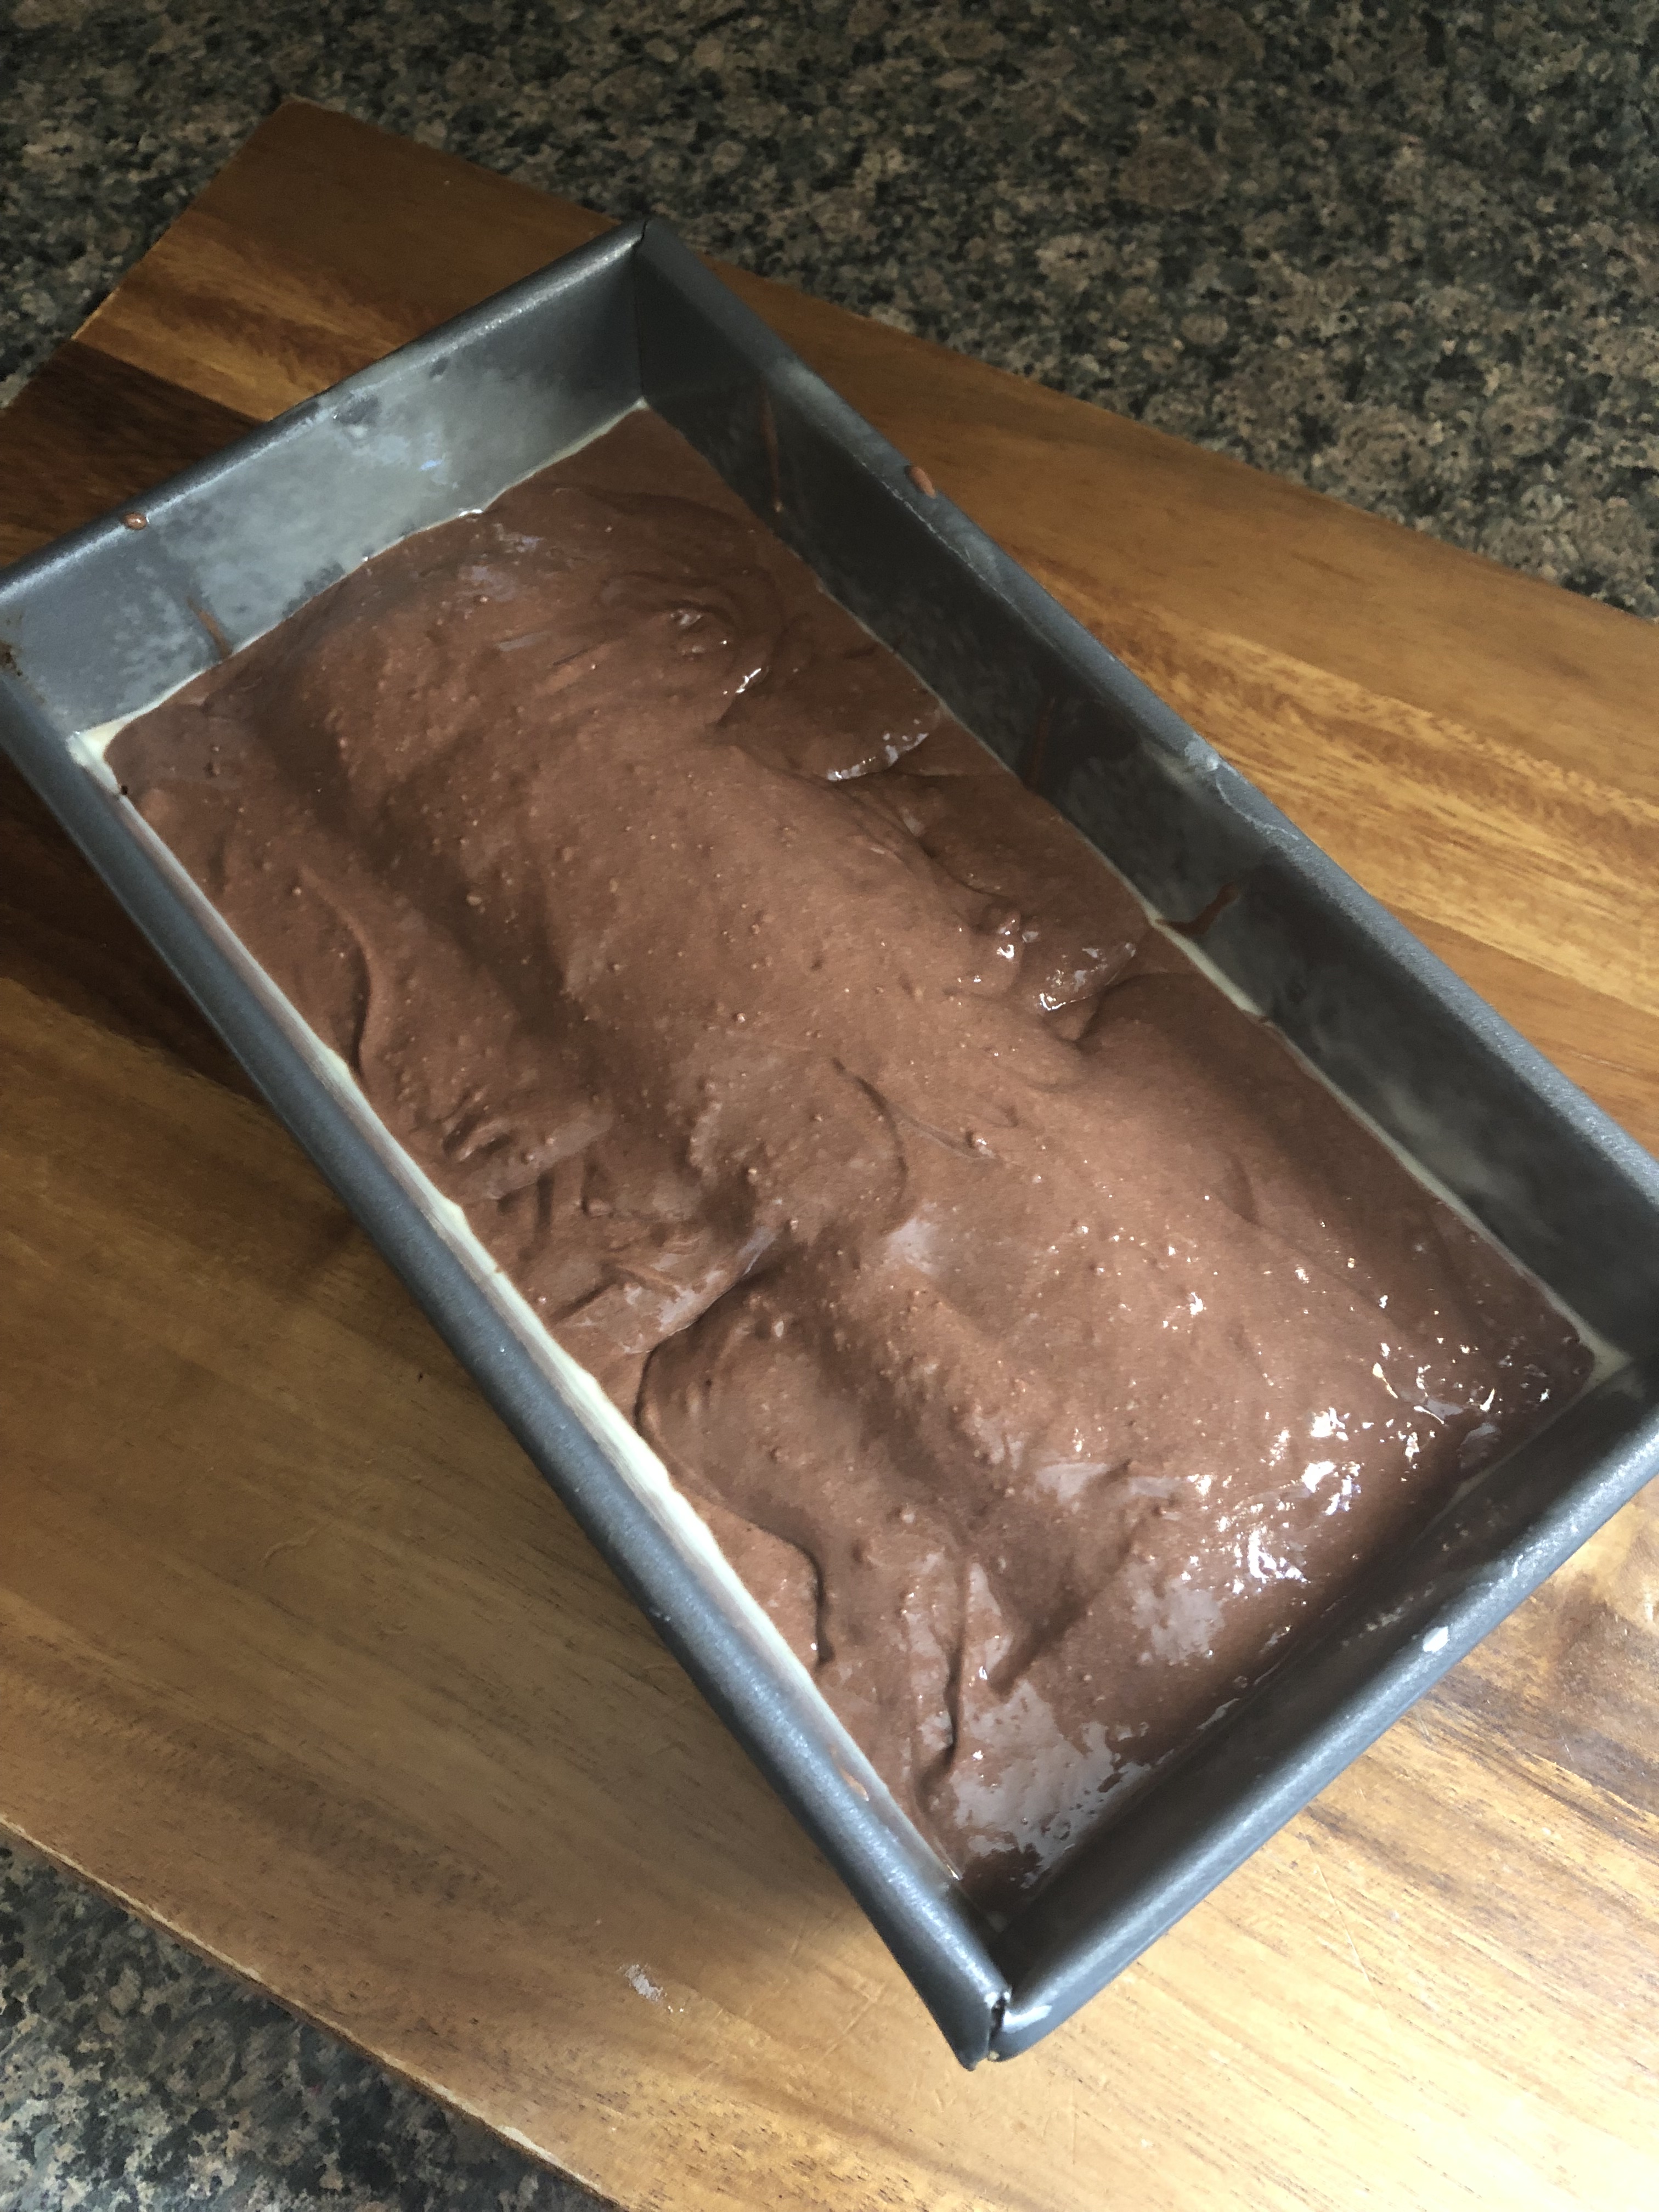
I then prepped the chocolate cake mix per the directions on the box. I spread about a 1/2 inch later of the batter onto the bottom of my loaf pan that I prepped with baking spray.

Next, I arranged the 2-inch hearts in a row down the middle of the pan, leaving a small space between the first and last heart and then pan, while making sure the hearts in the middle were as close together as possible. This is why I said that if your slices aren’t exactly 1-inch thick it won’t matter. Once you line them together it will all be good.

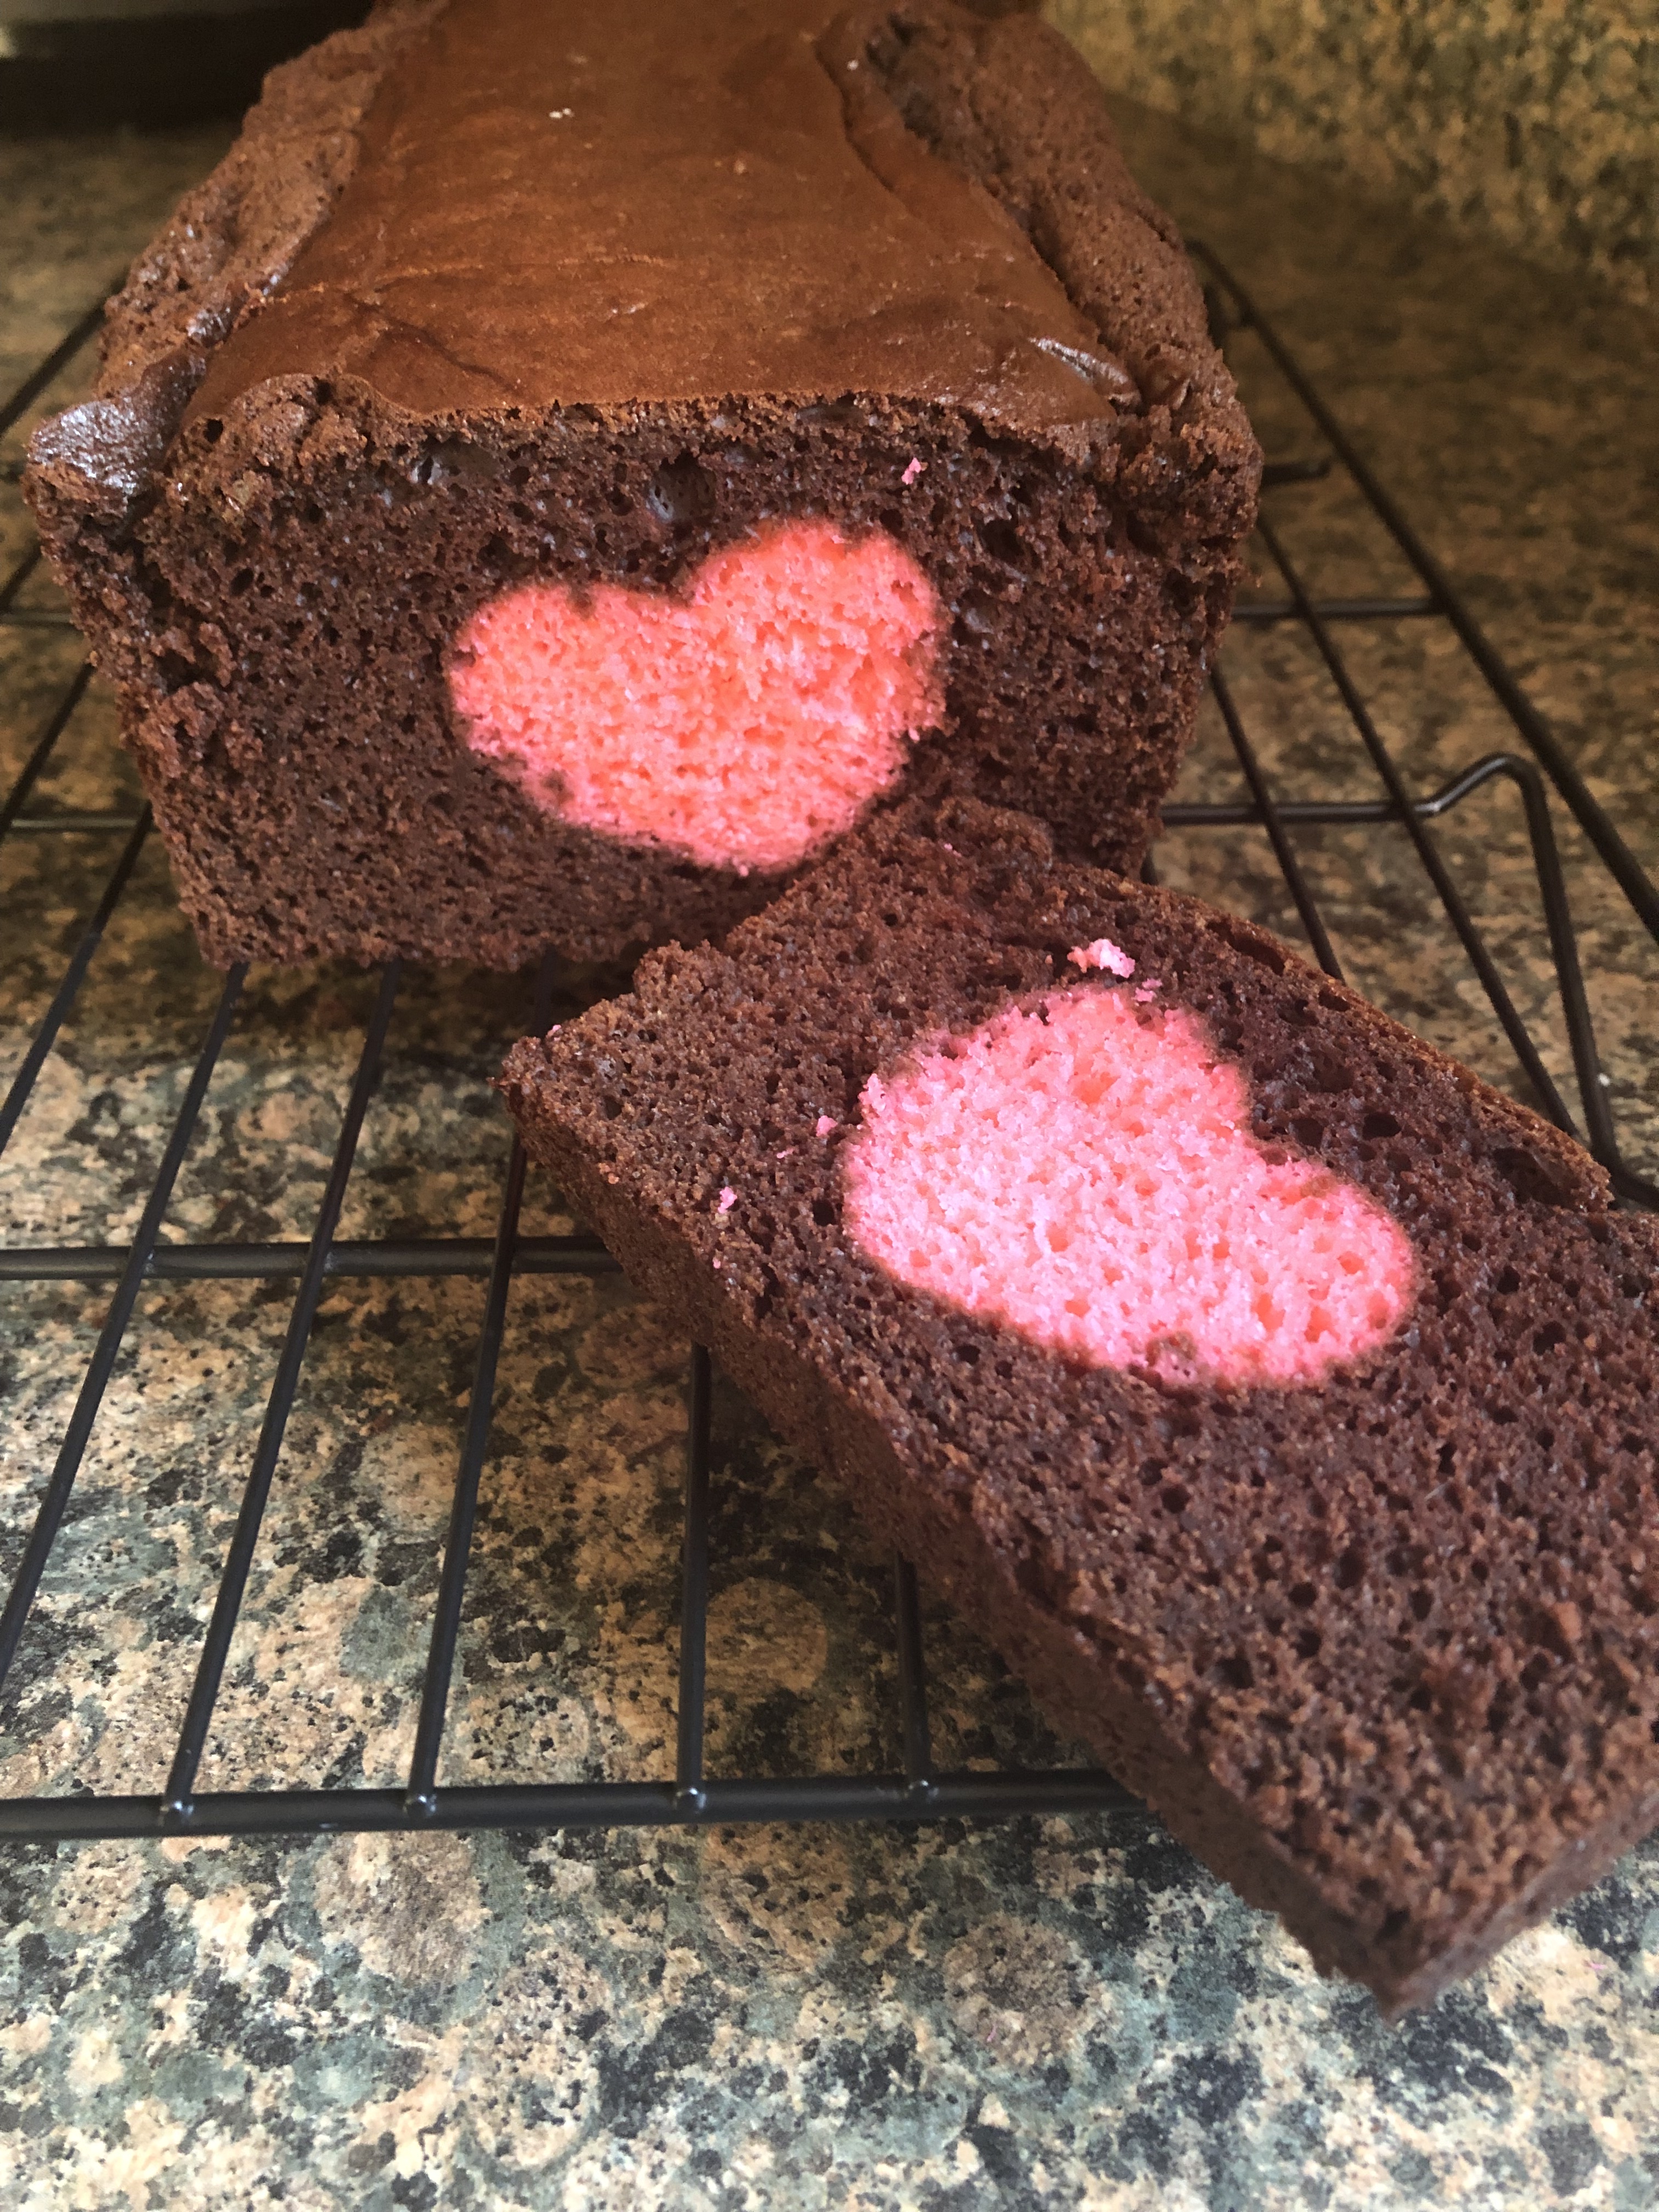
I used a ladle to slowly pour the rest of the batter along the sides and on the top of the hearts. You don’t want to just pour the batter into the pan, this could disturb the hearts and you could end up with chocolate in between them. I did make sure that the hearts were completely covered with the batter. You don’t want a heart peeking out of the top of the cake… that would ruin the surprise.

I then baked it in a 350 F preheated oven for about 40 minutes. I inserted a cake tester and the inside was a still a little underdone so I lowered the oven temperature to 325 F and baked it for an additional 10 minutes, similar to what I did with the pink cake. Once again, I let the cake cool for about 20 minutes in the pan then removed it and let it cool completely on a wire rack.

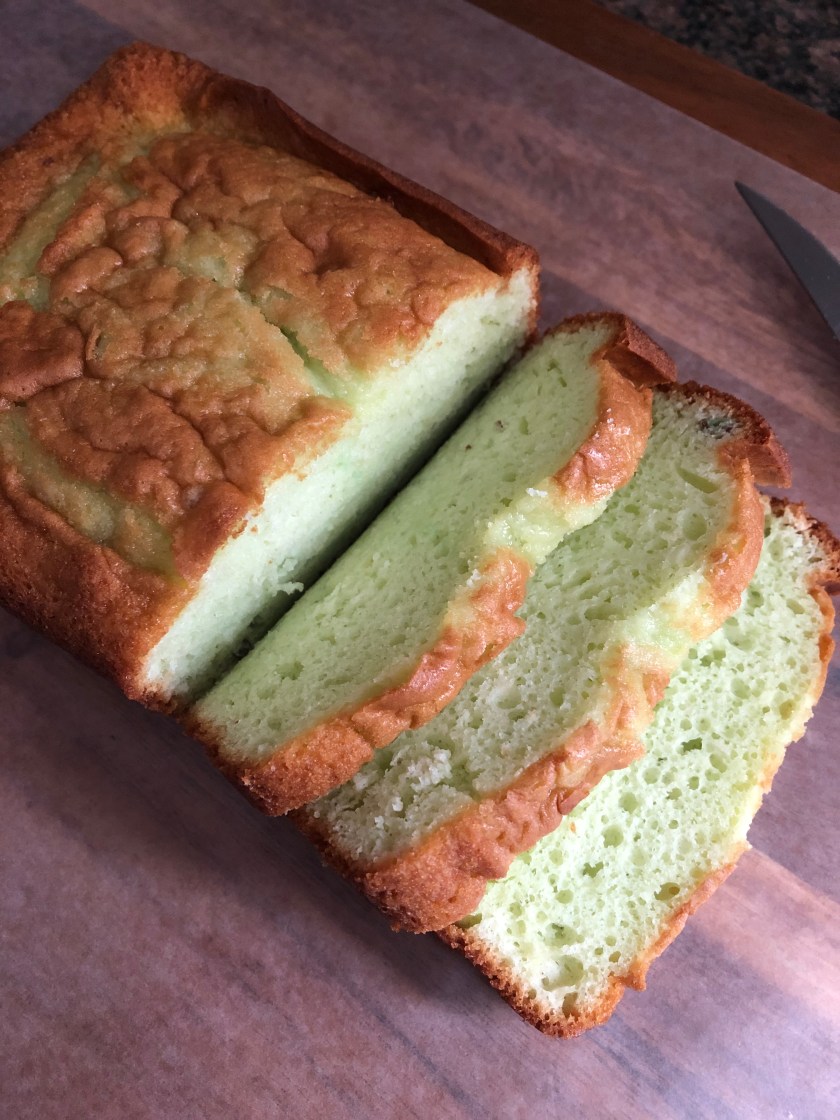
Once it was cool it was time to slice and see if my hidden heart cake was a succes… And it was!!!

Pink Hot Chocolate

An all-natural Pink Hot Chocolate just in time for Valentine’s Day! How you may ask, well, instead of using red or pink food coloring to get the pink hue, you use a few tablespoons of beet juice. And before you cringe your face because beets are not your favorite vegetable or something you are willing to try once or again, just know that you will not be able to taste the beet flavor whatsoever. But, if you are still intrigued by the idea of making Pink Hot Chocolate for your Valentine this week (or for yourself) but are completely against the beet juice, I will give you a few options to get the pink color that might sound more appealing.

The base of this hot chocolate is white hot chocolate. You start off by bringing milk (I used whole milk) and salt to a simmer over medium heat. Then remove it from the heat and add in grated white chocolate and vanilla extract. Grating the chocolate allows it to melt easier and quicker. Once the chocolate has melted then stir in a few tablespoons of beet juice. But, if you are not inclined to use beet juice, you could substitute it with cherry juice or the juice from maraschino cherries. Just be aware that either of those options could make your hot chocolate a tad bit sweeter. Now, if none of those options work for you, you could tint the hot chocolate with a few drops of either pink or red food coloring. And finally, top the hot chocolate with a healthy topping of whipped cream and then sprinkle with cinnamon. YUM!

Pink Hot Chocolate

Ingredients:

2 cups milk

Kosher salt

1/2 teaspoon vanilla extract

2 ounces white chocolate, grated*

2 tablespoons beet juice**

Whipped cream, for topping

Cinnamon, for topping


*I used Baker’s White Chocolate

**substitute with cherry juice, maraschino cherry juice, food coloring


Directions:

In a small saucepan combine the milk and a pinch of the kosher salt and bring to a simmer over medium heat.

Remove the saucepan from heat and add in the vanilla extract and grated chocolate, stirring until the chocolate has completely melted. Stir in the beet juice.

Diving among mugs and top with whipped cream and cinnamon.


Recipe from Real Simple


Slow Cooker Sunday: Chicken Enchilada Chili

When it comes to chili the possibilities are endless. I’ve posted quite a few on this blog, traditional, vegetarian, beef and today I am bringing you a chicken one. A Chicken Enchilada Chili that is easily made in a slow cooker. And not surprisingly it’s one of my favorites, set it in the slow cooker and forget it. Lately with these types of recipes I’ve been cooking the recipes overnight in my slow cooker. I am apprehensive to leave my slow cooker on if I’m not home but somehow I am okay with sleeping while it’s on. It’s the best though, I place all of the ingredients in around 12m and by 8am it’s done. I’m an early riser so this actually works out best for me.  My food is done in the morning and I can attend to other things during the day. Since I usually do this on a Saturday night my Sunday then consists of cleaning, laundry and all those other fun Sunday things to do.

One of the great things about this chili is that it gets better each day. I would suggest heating your leftovers on the stove as opposed to the microwave. Because of the cream cheese, which makes this chili super creamy, you may find that your chilled leftovers become quite thick and I personally think heating the chilled leftovers on the stove re-melts the cream cheese perfectly as opposed to the microwave. Either way, make sure to add some toppings before enjoying. I enjoyed mine with avocado and shredded cheddar and it was perfect! Squeeze some fresh lime juice to really bring out the flavors.

img_1289

Oh, one more thing. Per the directions it says to cook the chili on low for 6 to 8 hours until the chicken shreds easily, don’t worry about overcooking. As I said, I cooked this overnight and left it for the full 8 eight hours without checking it prior and my chicken was perfect for shredding by then and the rest of my ingredients hadn’t suffered because of the extra time in the slow cooker.


Slow Cooker Chicken Enchilada Chili

Ingredients:

1 10 oz. can red enchilada sauce

1 14.5 oz. can of petite dice tomatoes with green chilies*

1 16 oz. can of chili beans in mild chili sauce**

1 15 oz. can of black beans, drained and rinsed

1 15 oz. can of corn, drained

1 1/2 pounds boneless chicken breasts

2 cups chicken broth or stock

1/2 teaspoon ground cumin

3/4 teaspoon ground paprika

1 teaspoon salt

1/4 teaspoon black pepper

1 1/2 tablespoons chili powder

1 8 oz. package of cream cheese, at room temperature

Toppings: sour cream, grated cheddar cheese, avocado, lime, cilantro


*I used a can of Rotel

**Available from Bush’s beans


Directions:

In the insert of your slow cooker add the enchilada sauce, tomatoes, chili beans, black beans, corn and chicken. Add in the chicken broth (or stock) and the seasonings and give everything a good stir.

Cover and cook on low for 6-8 hours, until the chicken will shred easily.

Remove the chicken and shred using two forks. Set aside.

Cube the softened cream cheese and add to the slow cooker. Stir well and cover. Switch the temperature setting to high and let the chili sit for five minutes. Use a whisk to whisk the cream cheese to melt into the chili.

Return the shredded chicken to the slow cooker and cover. Continue cooking on high until the cream cheese has completely melted and then stir again.

Serve with your desired toppings.

Recipe from Chelsea’s Messy Apron

YouTube Themed Cake

My blog started with an Elmo Cake for my niece’s birthday, and throughout the years there have been other character themed cakes, Minnie Mouse, Frozen, Trolls and last year’s Descendants. As you can see the themes aged as she did and by whatever was popular at the time. Well, fast forward 7 years and for her 9th birthday she requested a YouTube Cake. Initially she said she wanted the Cookies and Cream Cake I made a few months back (her younger sister will only eat Oreos in mini form thanks to that cake) but I guess she wasn’t ready to let go of a themed birthday cake just yet. Who knows what next year will bring, or what I will be making for my younger niece come June. I am thinking she’ll still want some sort of character.

Now, a YouTube cake sounded easy enough. It didn’t require any special decorations, the colors were simple (white, black and red) and I pretty much had all of the tools I needed to make it. But, there was one thing. While looking at some cakes on Pinterest and Instagram, I noticed that people opted to make their YouTube themed cakes round, but, I felt it really should be a square cake. Not that that was an issue, but then I wondered, how would I cover it in fondant? I sometimes have mishaps when covering round cakes (they seem to always tear) so I could only imagine that covering a square cake would be even more difficult. Especially trying to get the edges sharp. So, I thought, isn’t there a way I could panel the fondant. And of course a quick Google search assured me that yes, fondant paneling was possible and from the looks of it easier – I am actually thinking of trying the technique on the next round cake I make that needs to be covered in fondant. I decided to watch a few videos just to pick up a few tips and tricks. And I quickly learned that one of the keys to fondant paneling is to freeze the fondant for a few minutes after rolling and cutting it so it’s firm and easier to trim and place on the place.

I began by baking two 9-inch square chocolate cakes. After letting the cakes cool, I wrapped them in plastic wrap and left them on my kitchen counter. The following day I made a chocolate mousse filling for the cake and I took a major short-cut and used store bought chocolate frosting. I haven’t quite mastered making chocolate frosting myself. Anyone have a good foolproof recipe they can share? I leveled, filled and frosted the cake and then placed it in the refrigerator overnight.

The next day it was time to cover the cake in fondant. Normally I use confectioners’ sugar to dust my rolling mat and pin, but, opted this time to use cornstarch and what I found was that the fondant didn’t get as soft. I began by cutting a square piece for the top of the cake. To leave room for error, I cut the fondant about a quarter of an inch larger than what I needed it to be. To place it on the cake, I matched it to one corner of the cake so all I would have to trim was two sides. Now, I didn’t place this piece in the freezer since I thought it would be easy to trim it since it was just lying flat on the cake, a mistake. While I was able to trim it, it would have been easier had it been frozen.

Next, I covered the sides of the cake. Before I started though, I decided which sides of the cake would be the front, back and sides. This is important as you cover the sides of the cake first before the front and back. Since the cake is a square, all of the sides were the same length and width. I rolled and cut two pieces for the sides and placed them in the freezer on a cookie sheet for 5 minutes. After the 5 minutes I removed them and before placing them on the cake, I lightly brushed the cake with water so the fondant would adhere better. As I did with the top piece, I lined the fondant piece with one bottom corner of the cake and then used my fondant smoother to smooth (and stick) the fondant onto the cake. I then trimmed the fondant. I used a small knife that I sharpened. I think next time I will purchase an X-Acto knife to get a cleaner and closer cut. I repeated this three more times and was pretty happy with my end result. It wasn’t perfect, but, I was happy that I didn’t have any mishaps and that my fondant actually stuck to the cake and that I had clean edges and no fondant tears! I would have benefitted from trimming my cake prior to frosting it so it would have sharper and cleaners sides. Each time is a learning experience so I am sure next will be better.

Then it was time to make this square into a YouTube cake. I cut out letters and a triangle (for the play button) using white and black fondant. For the red pieces, I actually used a band aid cookie cutter I purchased to make a Doc McStuffins themed cake a few years back.

And to cover up the unfinished edges around the cake, I decided to put a black trim over it. To adhere all of these pieces I lightly brushed the back of them with a little water. And that was it. This cake was a hit with the Birthday girl and everyone who saw it!

This is the recipe I used for the chocolate cake. I have been using it for years now and haven’t had any issues or complaints. As for the chocolate mousse, I used the mousse recipe I made for the Spice Cupcakes and instead of using a box of pumpkin spice Jell-O mix I used chocolate.

Slow Cooker Sunday: Beef Ragu with Pappardelle

I’ve said it before and I’ll say it again, my favorite type of slow cooker recipe is the dump it in and forget about it kind. This beef ragu is just that. I added all of my ingredients to my slow cooker…

Set it to cook on low for 7 hours, shredded the meat, added it to some cooked pasta…

And had a delicious meal to pack for lunch.


Slow Cooker Beef Ragu with Pappardelle

Ingredients:

1 lb. beef chuck roast

1 15oz. can of crushed tomatoes

1/4 cup dry red wine

1 tablespoon of tomato paste

3 garlic cloves, sliced

1 sprig of rosemary

1 3-inch piece of Parmesan rind

Kosher salt

Black pepper

12 oz. fresh pappardelle

Directions:

Add the tomatoes, wine, tomato paste, garlic cloves, 1/2 teaspoon of salt to a slow cooker and whisk together. Add the rosemary spring and Parmesan rind. Season the beef with salt and pepper and add to the slow cooker. Cook on low for 7 hours, or until the meat is very tender. Shred the meat with two forks, discard any fat, the rosemary and Parmesan rind and set the slow cooker to warm while you cook the pasta.

Bring a large pot of salted water to boil. Add the past and cook according to label directions. Reserve 1/2 cup of cooking water then drain the pasta. Return the pasta to the pot and add the meat and sauce from the slow cooker as well as the reserved cooking water. Cook on medium high heat until the sauce begins to thicken. Season with salt and pepper. Drizzle each serving with olive oil.

Recipe from Food Network

The Elusive Magic Ring in Crochet

I have been crocheting for quite a few years now and I still get stumped when it comes to certain stitches and I’ll admit that I will avoid certain patterns if it includes an unfamiliar stitch. Like those FPDC that I see sometimes, which simply stands for Front Post Double Crochet. HUH? I just pass those over. Eventually I will break down and try it, but, for now, I will stick to simple stitches that still create beautiful pieces. I am more apt to try these different stitches when it comes to knitting. Which is kind of a little backwards since with knitting if you mess up it is a bit more complicated to remove all the loops from the needles to rip out the yarn from the “bad” part of the pattern and then reinserting the needles once again. With crocheting you simply remove the one loop from your hook, pull the yarn and then reinsert the one loop back on to your crochet hook. Maybe I just like to do things the hard way. Although, some will argue that knitting is the easier of the two because it involves only two stitches, knit and purl, whereas crochet has more. For example that FPDC I mentioned before, as well, SC (single crochet), dc (double crochet), hdc (half-double crochet) and so forth.

I recently came across a pattern that I wanted to make that I am a bit off season for now. Well, a season late you can say. It’s a Christmas Tree Skirt. I have been wanting to make one for a while, but, I just didn’t care for the patterns I saw. And then, right before the holidays I found one that I thought would be perfect. It was a bunch of hexagons stitched together to form the skirt. I figured hexagons I could handle, although the stitching them together not so much. It’s not that I can’t handle it, but, if you read my A New Year post you will know that I still have a shrug I made over three years ago that I haven’t stitched together. I’m a procraftinator who doesn’t like stitching things together. But, I figured if I start now I have a solid 9-10 months to get it done. And then I started and instantly ran into problems. I’ve crocheted shapes before so I was fine with that, but, the starting point was to create a Magic Ring and that’s where I hit a major hiccup. I watched tutorials online and finally thought I had gotten it, but, it just didn’t seem right. I felt like I had too much yarn in the ring and then that the ring wasn’t “thick” enough for me to stitch my other stitches around. The advantages of the magic ring is that you are able to pull the yarn so you end up with a closed circle in the center, as opposed to the open one you get if you crochet a short chain (about 6 chains) and then join it with a slip stitch. Which is perfect if you are crocheting in the round and/or making amigurumi – the Japanese art of making small yarn creatures. I thought, is a small hole in my hexagon worth this headache. No it’s not. So, I decided to ditch the magic ring and went the chain and slip stitch route instead and found a better pattern for the hexagons and am about a third of the way done crocheting them. I still have to get the yarn for the other two colors. I want a certain shade of red and green to go along with the silvery gray I got and of course since its right after the holidays the colors are out of stock at my local craft stores. Well, they did have some but, they all weren’t the same lot numbers and I already learned my lesson about lot numbers! Quick story, I knitted a blanket for a friend’s baby and one of the yarns wasn’t the same lot number as the other ones. So, when I finished the blanket that one section of the blanket stood out from the rest. That’s when I went and checked the labels and saw that one of the labels had a different number from the rest although was the same color, hence, me learning the hard way about lot numbers. Thankfully she loved the blanket and didn’t notice the difference until I pointed it out to her. That was my first big knitting project actually!

So, maybe I will master the Magic Ring one day, just like those FDPC’s, but, for now, I am happy with my simple method of a chain and a slip stitch to start my crocheting in the round. Besides, I don’t think my hexagons are looking all that bad with the small hole in the middle.

Pistachio Quick Bread

I’ve been using Jell-O pudding mixes for quite some time now as a base to make mousse fillings for my cakes. I’ve actually started picking up different flavors of the boxes to switch up my filling flavor. While there is nothing wrong with vanilla and chocolate of course, a chocolate cake with either a caramel or banana mousse flavor wouldn’t be too bad either. I sometimes wonder though what other desserts they can be turned into and then recently I found the perfect recipe to use a box of pistachio pudding, a Pistachio Quick Bread. Combined with a package of white cake mix and a few other ingredients you have two delicious loaves in less than an hour. For a little more texture and crunch add in a cup of chopped of pistachios to the batter, or scatter them along the top of the batter before baking. I’m looking forward to trying this recipe with a box pumpkin spice Jell-O (I finally found them at the supermarket, as you may recall I used my last box to make a Chocolate Roll Cake with a Pumpkin Mousse Filling) and a box of yellow cake mix. Baking from scratch is great, but, taking short cuts and sprucing up a box of store bought cake mix is never a bad thing.

img_1285


Pistachio Quick Bread

Ingredients:

1 Box White Cake Mix

1 3.4 oz. package of pistachio pudding mix

4 large eggs

1 cup sour cream

1/4 cup water

1/4 cup canola oil


Directions:

Preheat the oven to 350 F. Spray 2 8×4-inch loaf pans with baking spray (or grease with butter) and set aside.

In a large bowl combine the cake mix and pudding mix. Add the eggs, sour cream, water and oil. Beat on low for 30 seconds to combine and then raise the speed to medium and continue mixing until well blended (the batter will be thick)

Divide the batter amongst the two prepared pans and bake in the oven for 35-40 minutes, until a cake tester inserted in the middle come out clean.

Allow to cool in the pan for 10 minutes and then remove from pans and cool completely on a wire rack.

The original recipe included a cinnamon sugar swirl which I decided to omit. The link for the recipe with the swirl is below.

Recipe from Taste of Home

Slow Cooker Sunday: Mushroom Spinach Tortellini

This is one of my favorite type of slow cooker recipes… set it and forget it. I actually made it overnight and then woke up in the morning and finished it. Granted, the one downfall of making something in a slow cooker overnight is that you are awoken by the smell of something delicious cooking. The downfall isn’t the deliciousness, but, the interrupted sleep of course. Especially on the weekend when you are trying to get the few extra minutes you can’t afford to get during the week because of work, school, life, etc.

To start, cook mushrooms and onions in a greased slow cooker insert (I sprayed mine with cooking spray) along with butter, vegetable broth and spices for about 7 to 8 hours, until the veggies are tender. Next, stir in refrigerated tortellini and cubed cream cheese and cook, covered, for an additional 30 minutes, stirring once halfway through. Stir in the spinach and let it stand (covered) for an additional 5 minutes. After the 5 minutes, stir in parmesan cheese and fresh parsley and enjoy!

If you plan on reheating this, add some vegetable broth to it prior to doing so. Doing so will give you a creamier sauce. The first time I heated it up I didn’t and while it was delicious, it didn’t have the same creaminess it did when it was done cooking initially. So, the second time I added a little broth and that did the trick.

Slow Cooker Mushroom-Spinach Tortellini

Ingredients:

8 oz. Mushrooms (I used baby bella)

1 medium onion, thinly sliced

1 1/2  teaspoons salt

3/4 teaspoons onion powder

3/4 teaspoons garlic powder

3/4 teaspoons dried parsley

1/4 teaspoon black powder

4 tablespoons unsalted butter, melted

2 cups vegetable broth

20 oz. package refrigerated tortellini (I used Buitoni three-cheese)

8 oz. package cream cheese cubed, at room temperature

6 oz. bag of baby spinach

1/2 cup shredded parmesan cheese

1/4 cup fresh parsley, chopped


*Original recipe called for 1 teaspoon of salt and 1 tablespoon of Garlic & Herb Seasoning (Mrs. Dash)


Directions:

Spray the insert of a slow cooker with cooking spray. Add the mushrooms, onion, spices, butter and vegetable broth. Give everything a good stir and cover and cook on low for 7 to 8 hours, or until the vegetables are tender.

Stir in the tortellini and cream cheese and continue to cook on low, covered, for an additional 30 minutes. Stirring once halfway through.

Stir in the spinach and let stand for an additional 5 minutes, covered. Sprinkle with the cheese and parsley then serve.

Recipe slightly modified from Tiny Kitchen Capers

Slow Cooker Sunday: Vegetarian Chili with Sweet Potatoes

I’ve posted a fair amount of chili recipes and today I am bringing you one more… A Slow Cooker Vegetarian Chili with Sweet Potatoes. This chili is loaded with kidney beans, black beans and chunks of sweet potato. And if you are not keen on spicy chili then this is the chili for you.

While I normally do most of my slow cooking on Sunday’s I ended up making this chili in my slow cooker overnight Saturday to Sunday since I had plans to go apple picking on this particular Sunday. I like to be home when my slow cooker is on, I know it’s completely safe and all, but, I just don’t like leaving it unattended. Also, if there happens to be a power outage I can always switch the dish to cook in the oven or on the stove as opposed to my entire meal being ruined because it didn’t cook properly, especially with a meat dish. I once read that if you do leave your slow cooker unattended and there happens to be a power outage and you’re cooking meat the best bet is to toss the food since you can never be sure of bacteria growing. And yes, I know it’s not any safer to have it on while I am sleeping, we can all recall how Jack died on “This Is Us” (even though the slow cooker wasn’t on but had a switch malfunction), in the back of my mind it’s safer thanks to my smoke detector and my keen nose. Speaking of my keen nose, the delicious aromas of this chili woke me prior to the 7-hour cooking mark and I couldn’t go back to sleep, so, I decided to check on it and happily discovered that the sweet potatoes were fork tender so I was able to turn it off and go back to sleep. If it had been on any longer the sweet potatoes would have turned to mush, but, as you can see from the picture below the sweet potato was intact.

Slow Cooker Vegetarian Chili with Sweet Potatoes

Ingredients:

1 medium red onion, chopped

1 green bell pepper, chopped

4 garlic cloves, chopped

1 tablespoon chili powder

1 tablespoon ground cumin

2 teaspoons unsweetened cocoa powder

1/4 teaspoon ground cinnamon

Kosher salt and black pepper

2 14.5 ounce cans of diced fire roasted peppers

1 15.5 ounce can of black beans, rinsed

1 15.5 ounce can of red kidney beans, rinsed

1 medium sweet potato, peeled and cut into 1/2 inch pieces

Options for serving: sour cream, sliced scallions, shredded cheddar cheese, tortilla chips

Directions:

In the insert of your slow cooker combine the onion, pepper, garlic, chili powder, cumin, cocoa, cinnamon, 1 teaspoon salt and 1/4 teaspoon black pepper. Add the tomatoes (and their juices), beans, sweet potato and 1 cup of water.

Cover and cook until the sweet potatoes are tender and the chili has thickened, 7-8 hours on low and 4 to 5 hours on high.

Serve with your favorite toppings or eat on its own.

Recipe from Real Simple


A New Year…

The holidays are officially over! Yes, I believe in the 12 days of Christmas and that the holidays officially end on January 6th. Too bad I can’t gifts like the song though, not necessarily 5 golden rings, but maybe 5 skeins of yarn and 4 pairs of shoes as opposed to the calling birds. You catch my drift. All in all though my holidays were good. Filled with good times with friends and family and delicious food and treats. I am planning on getting my house back to “normal” this week. I unplugged my Christmas lights this morning, I never want to be the house with the lights on after the fact, and will start taking down decorations today. Not like it’s a lot, but, I don’t want to just rip it all down and throw it back in the box. I like to take my time.

How has the New Year been treating you thus far? A week in and I have no complaints. Although one could complain but it doesn’t mean anything will change overnight. I am not one to make resolutions. If you want to make a change then make it. I read an article recently that said we sometimes make these grand resolutions without truly giving thought as to how to accomplish them. You can’t simply say I am going to lose weight this year. There has to be something behind it. For example, I will walk/jog/run x amount of days per week, or I will watch my intake of certain foods, and so forth. I think making small life changes like that can have a bigger impact on one that some broad goal. I do apologize if that is your resolution and I just burst your bubble. By no means was that my intention. And while I don’t make specific resolutions I think what I am trying to keep in mind this year is Einstein’s definition of insanity… Doing the same thing over and over and expecting different results. I know I want certain things to happen and other things to change but hoping they will happen without doing anything differently isn’t going to get my anywhere near those goals. I hope you will all get something out of that one. It’s definitely an important life lesson that can drive us to take chances and push us out of our comfort zones, which I have found always leads to a rewarding experience. There’s nothing like finding out you are a lot stronger physically, mentally and emotionally than what you think.

One thing I need to stop doing this year is being a procraftinator. Yes, you read that correctly, a procraftinator. I have numerous projects lying around that need to be finished. Just how bad am I? Well, I have a shrug that I finished knitting 3 years ago that I still haven’t stitched together. Don’t ask me why, I can’t really give you an answer on that one. Maybe it’s because finishing my yarn projects is my least favorite activity. But, I am sure once I start and finish I will be so happy I did. I also have a scarf I started over the summer (or maybe it was sooner) that I put down and just never picked up again. This seems to a recurrent problem of mine… LOL! I just put something else on my knitting needles that I am determined to finish, especially since it’s a small project, a coffee cozy. A friend gave me a cup for Christmas that needs one if I plan on drinking hot tea from it. I began to think that just maybe I could make them and sell them on my Etsy shop. Yes, I still have my Etsy shop (CraftedByFran). I haven’t mentioned it, but, it’s still there. I have actually found it a bit frustrating because getting sales is such a challenge, well, getting traffic to my shop is the main challenge. I have updated my keywords and still nothing. Not really sure how some people have it so easy. If any of you can offer some tips and tricks I am all ears!

And just maybe this year I will work on creating my own baking recipes. Cooking is a lot easier and forgiving, but, baking not so much. I have dabbled with it and have had success but I definitely need to delve more into it. I always have recipe ideas swirling around in my head, but I just need to build the confidence to come up with the ingredient list on my own and not depend on Google so much. I have baked enough that I should be able to do so. Who knows, maybe one day I will write my own cookbook. It would definitely be a mish mosh of different things… LOL! Did I just throw something out into the universe? Oh wait, I didn’t explain that one. Some people believe that in order for things to come to fruition you need to say them to the universe. I guess the universe needs to hear you in order to answer you.

Hopefully I will be blogging more often and including more posts like these. A little rambling, a little insight, a little more about me. I’ve been doing this for about 7 years now so I figured it’s about time. So, I welcome 2019 and whatever it has to offer and teach me.