Peppermint Spoons

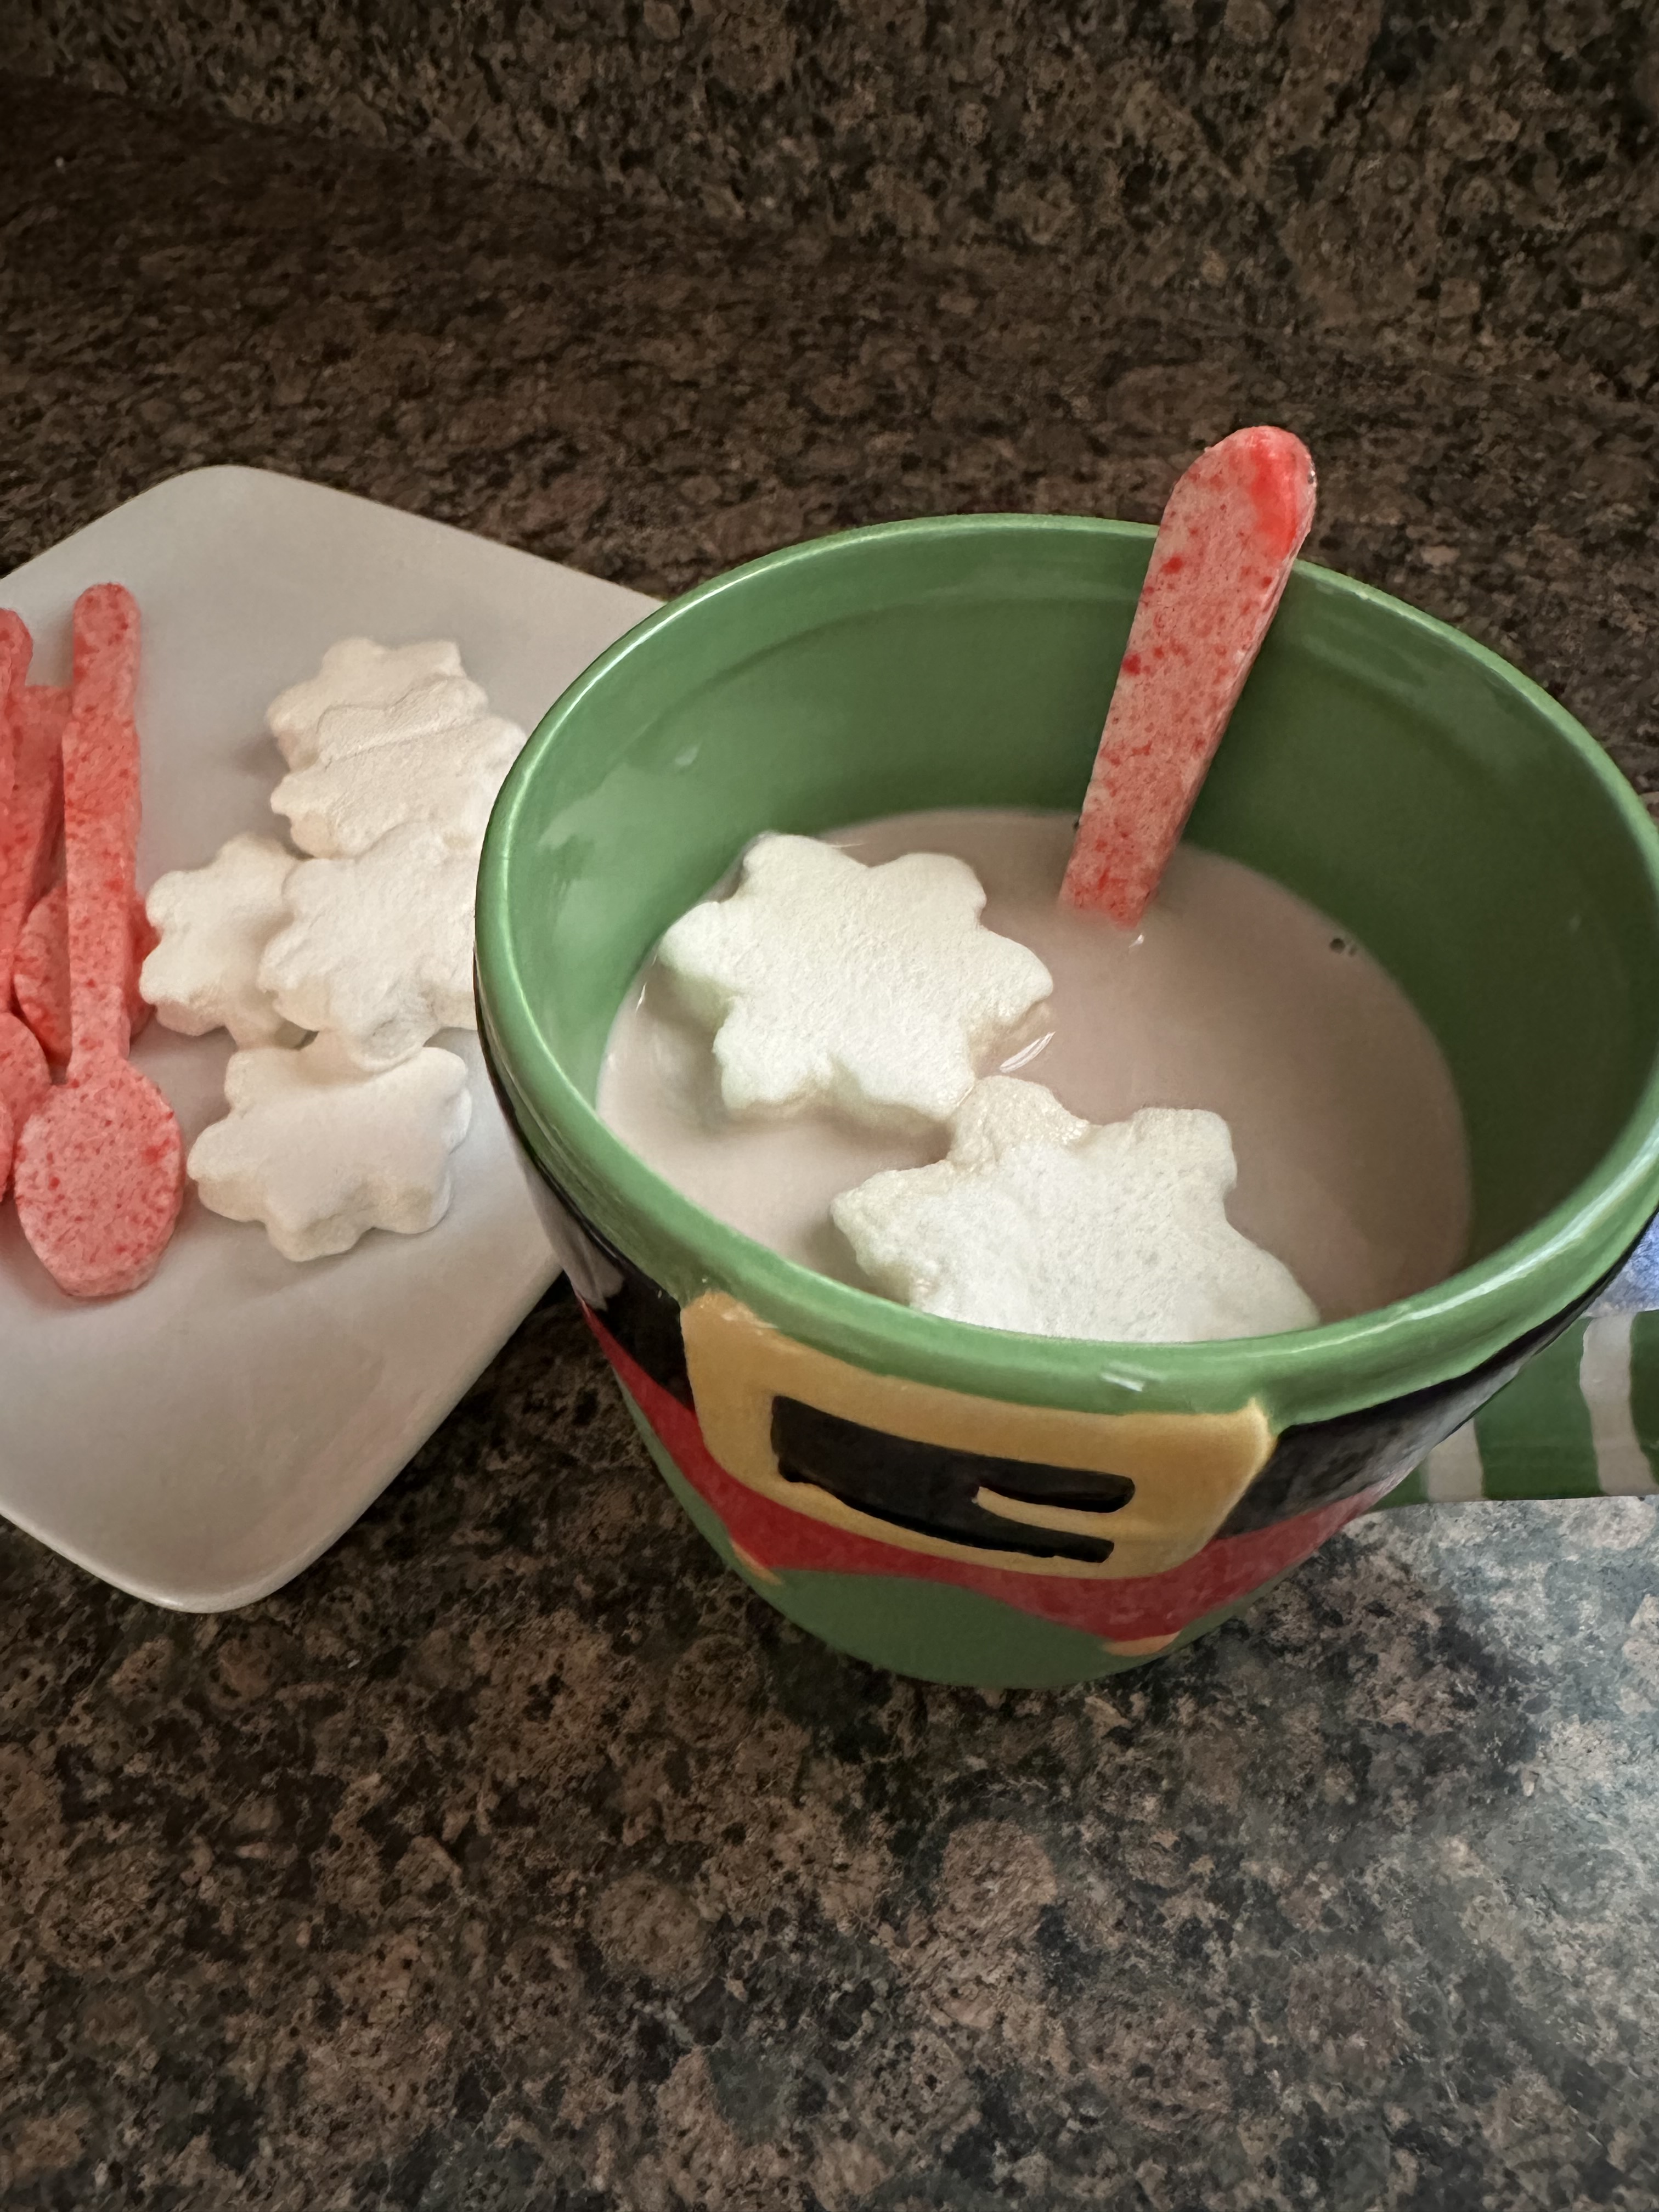
‘Tis the season for hot chocolate! Whether you are building the perfect hot chocolate bar to share with others or just enjoy a piping hot mug yourself hot chocolate is the perfect drink for the season. And there are so many ways to enjoy it, just plain, with an avalanche of marshmallows, a mound of whipped cream, or as I prefer it, peppermint flavored. And while you can get peppermint flavor using a  syrup or stirring it with a candy cane another fun and creative way to do so is by making peppermint spoons.

First things first, you are going to need a silicone spoon mold. I recently purchased this one from JoAnn’s. They are also available at different craft stores (i.e Michael’s & Hobby Lobby) and they all seem to be the same size and have 8 cavities.

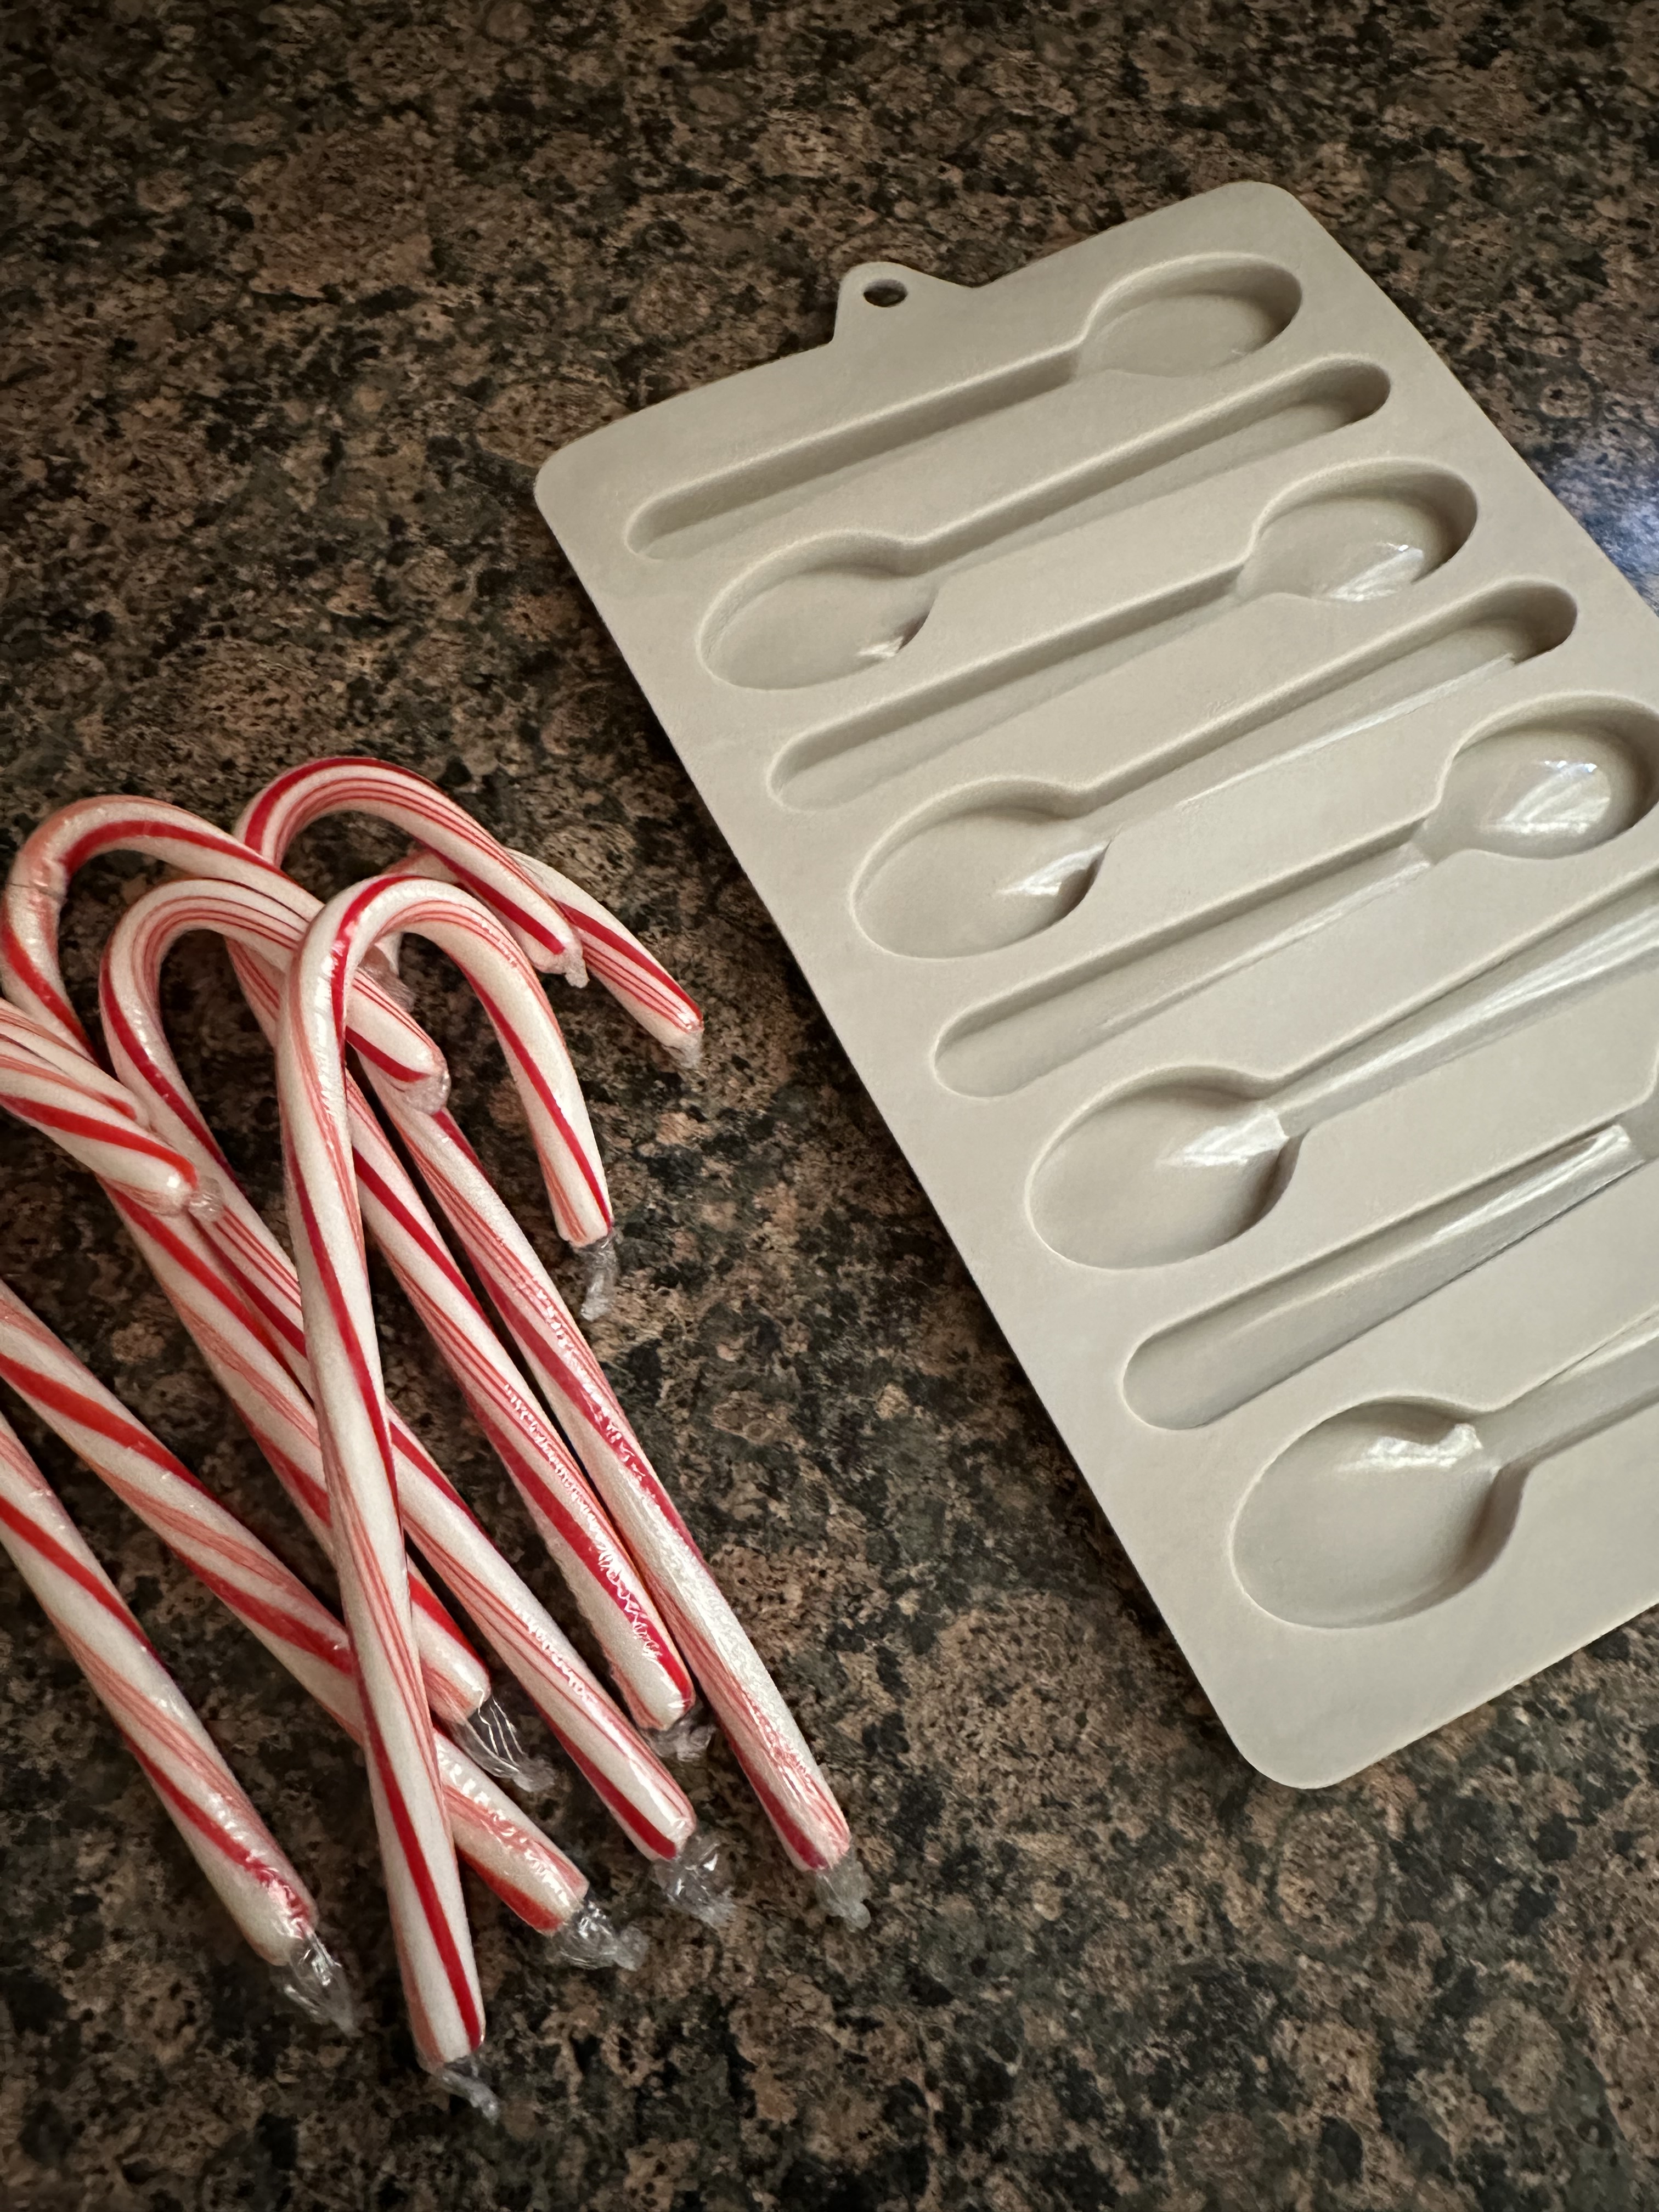
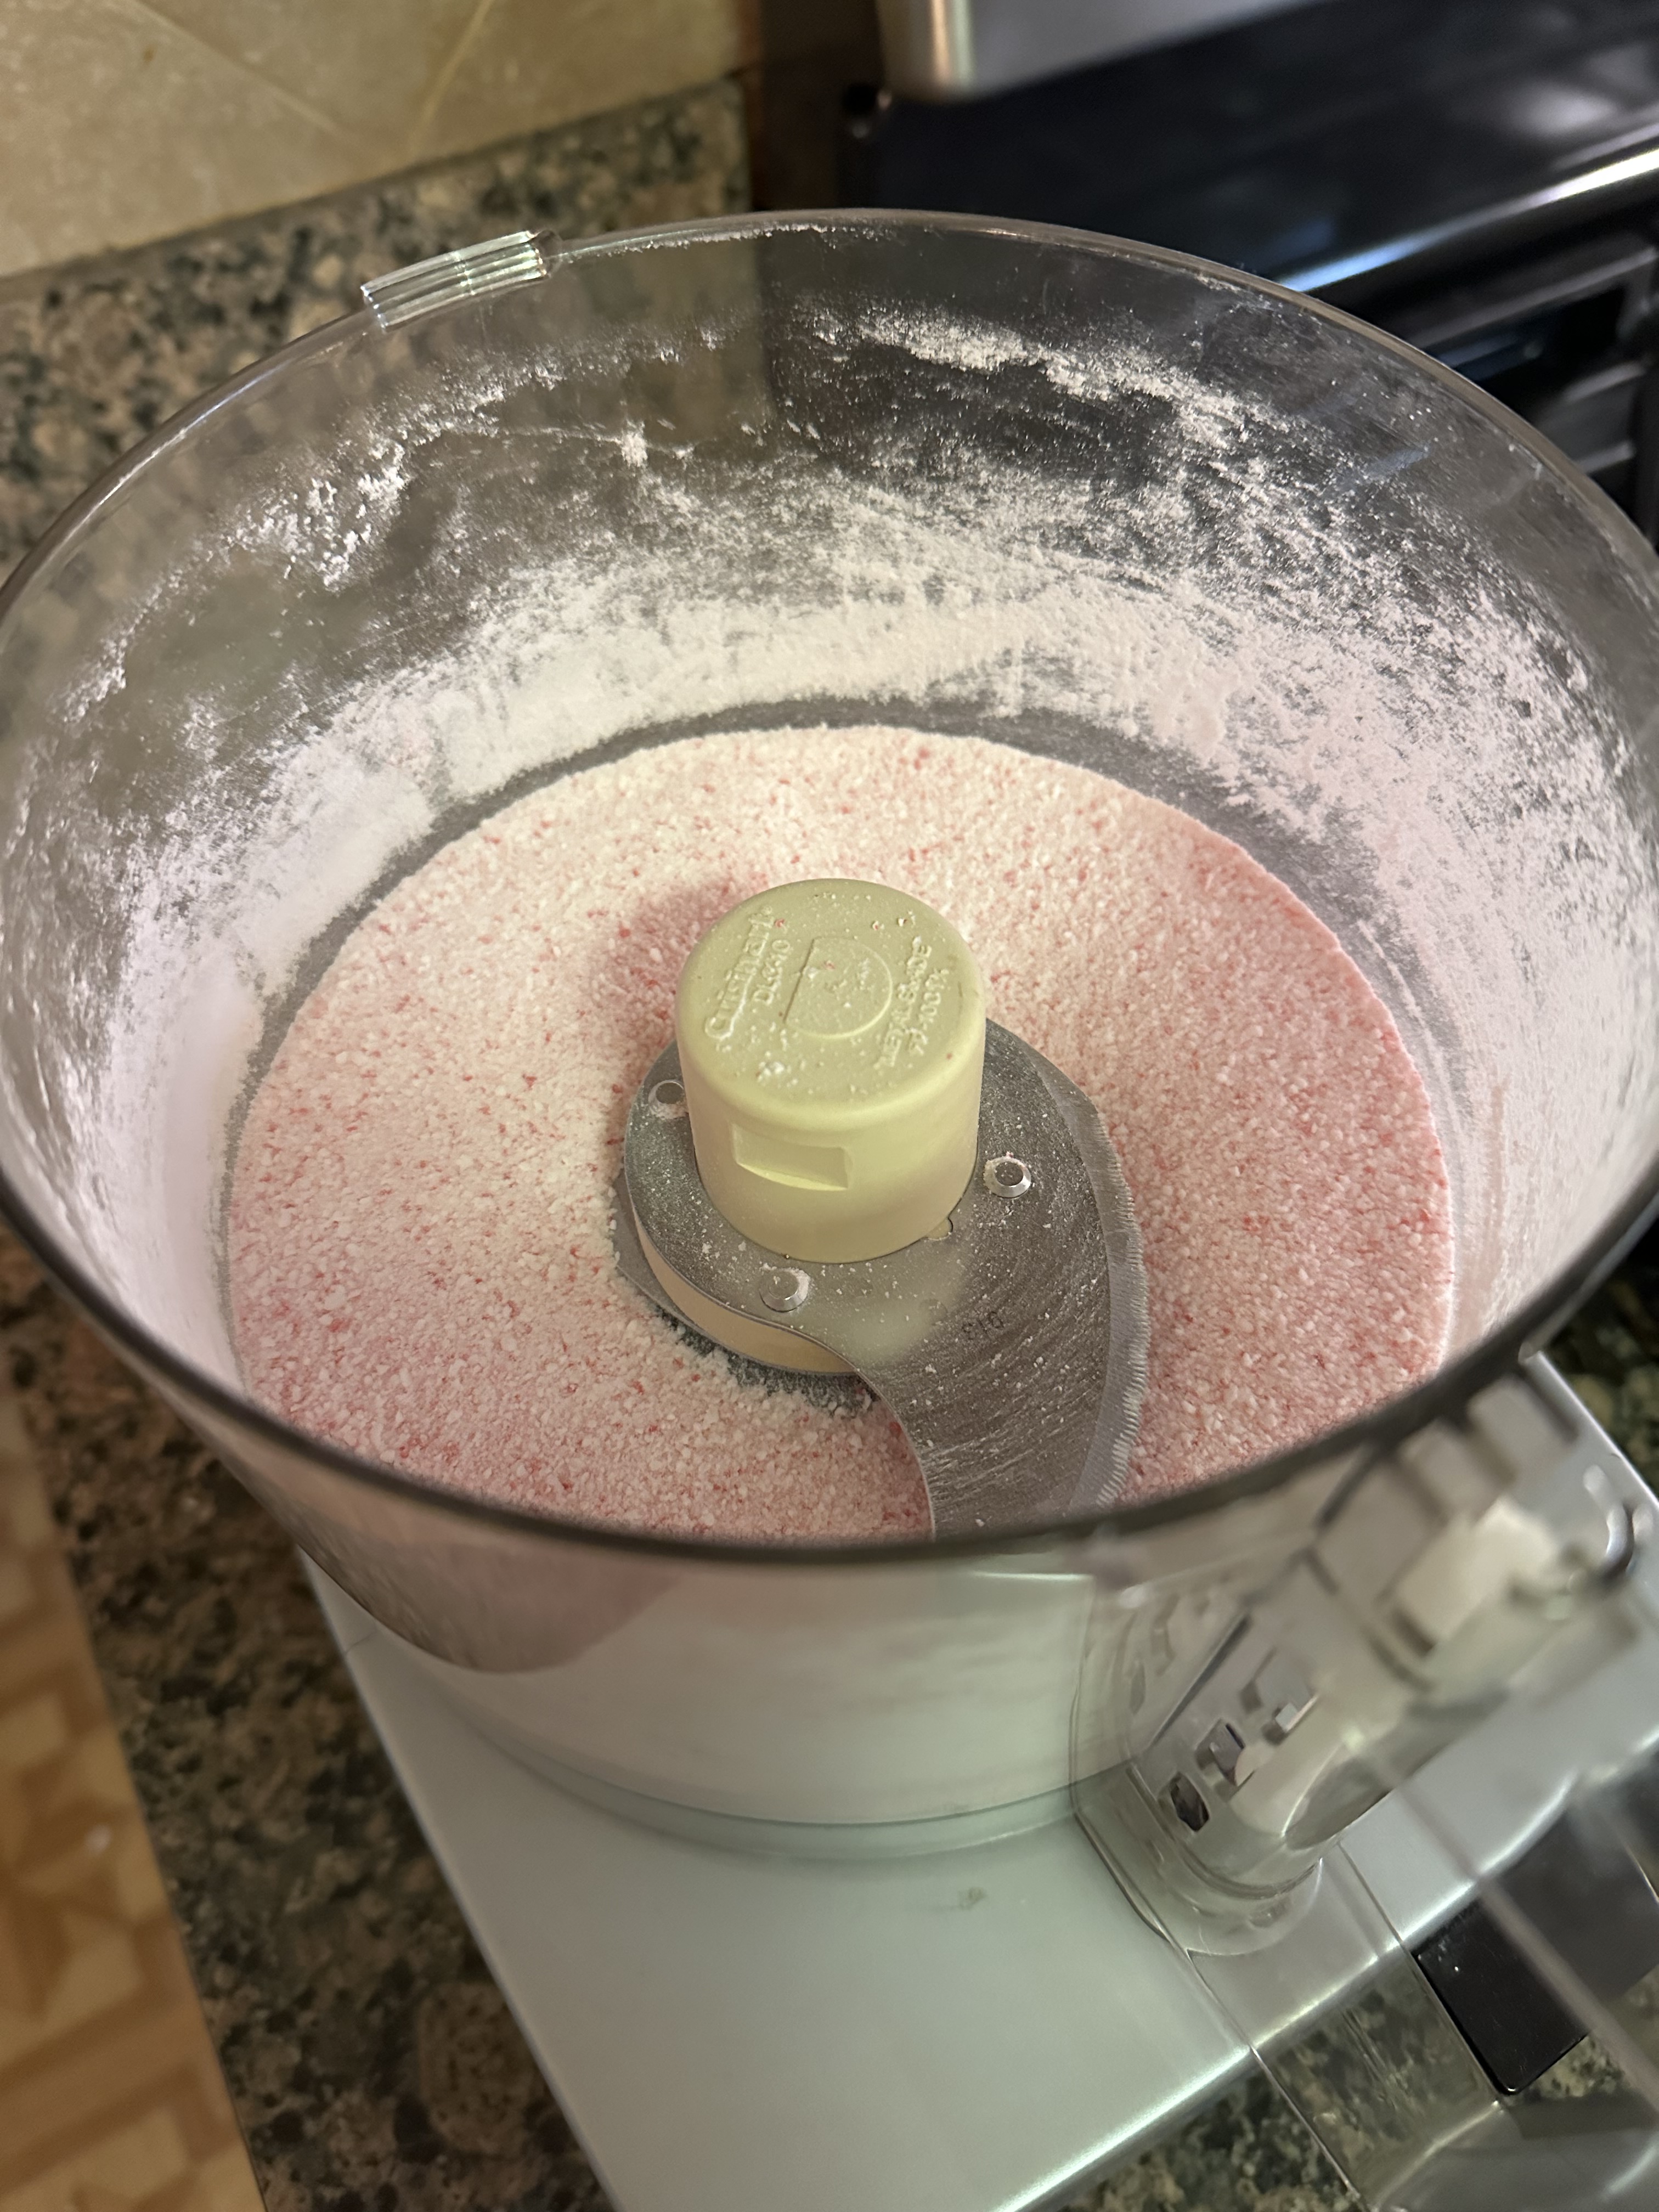
Now, I opted to use candy canes, but you could also use starlight mints. This time of the year I find that candy canes are just easier to find. After unwrapping them I broken them into a few pieces and added them to the bowl of my food processor and processed them until they were about crumb-size. While I normally just crush things by using a rolling pin, I really wanted the pieces of candy to be small and the same size to make it easier to fill the cavities of the mold.

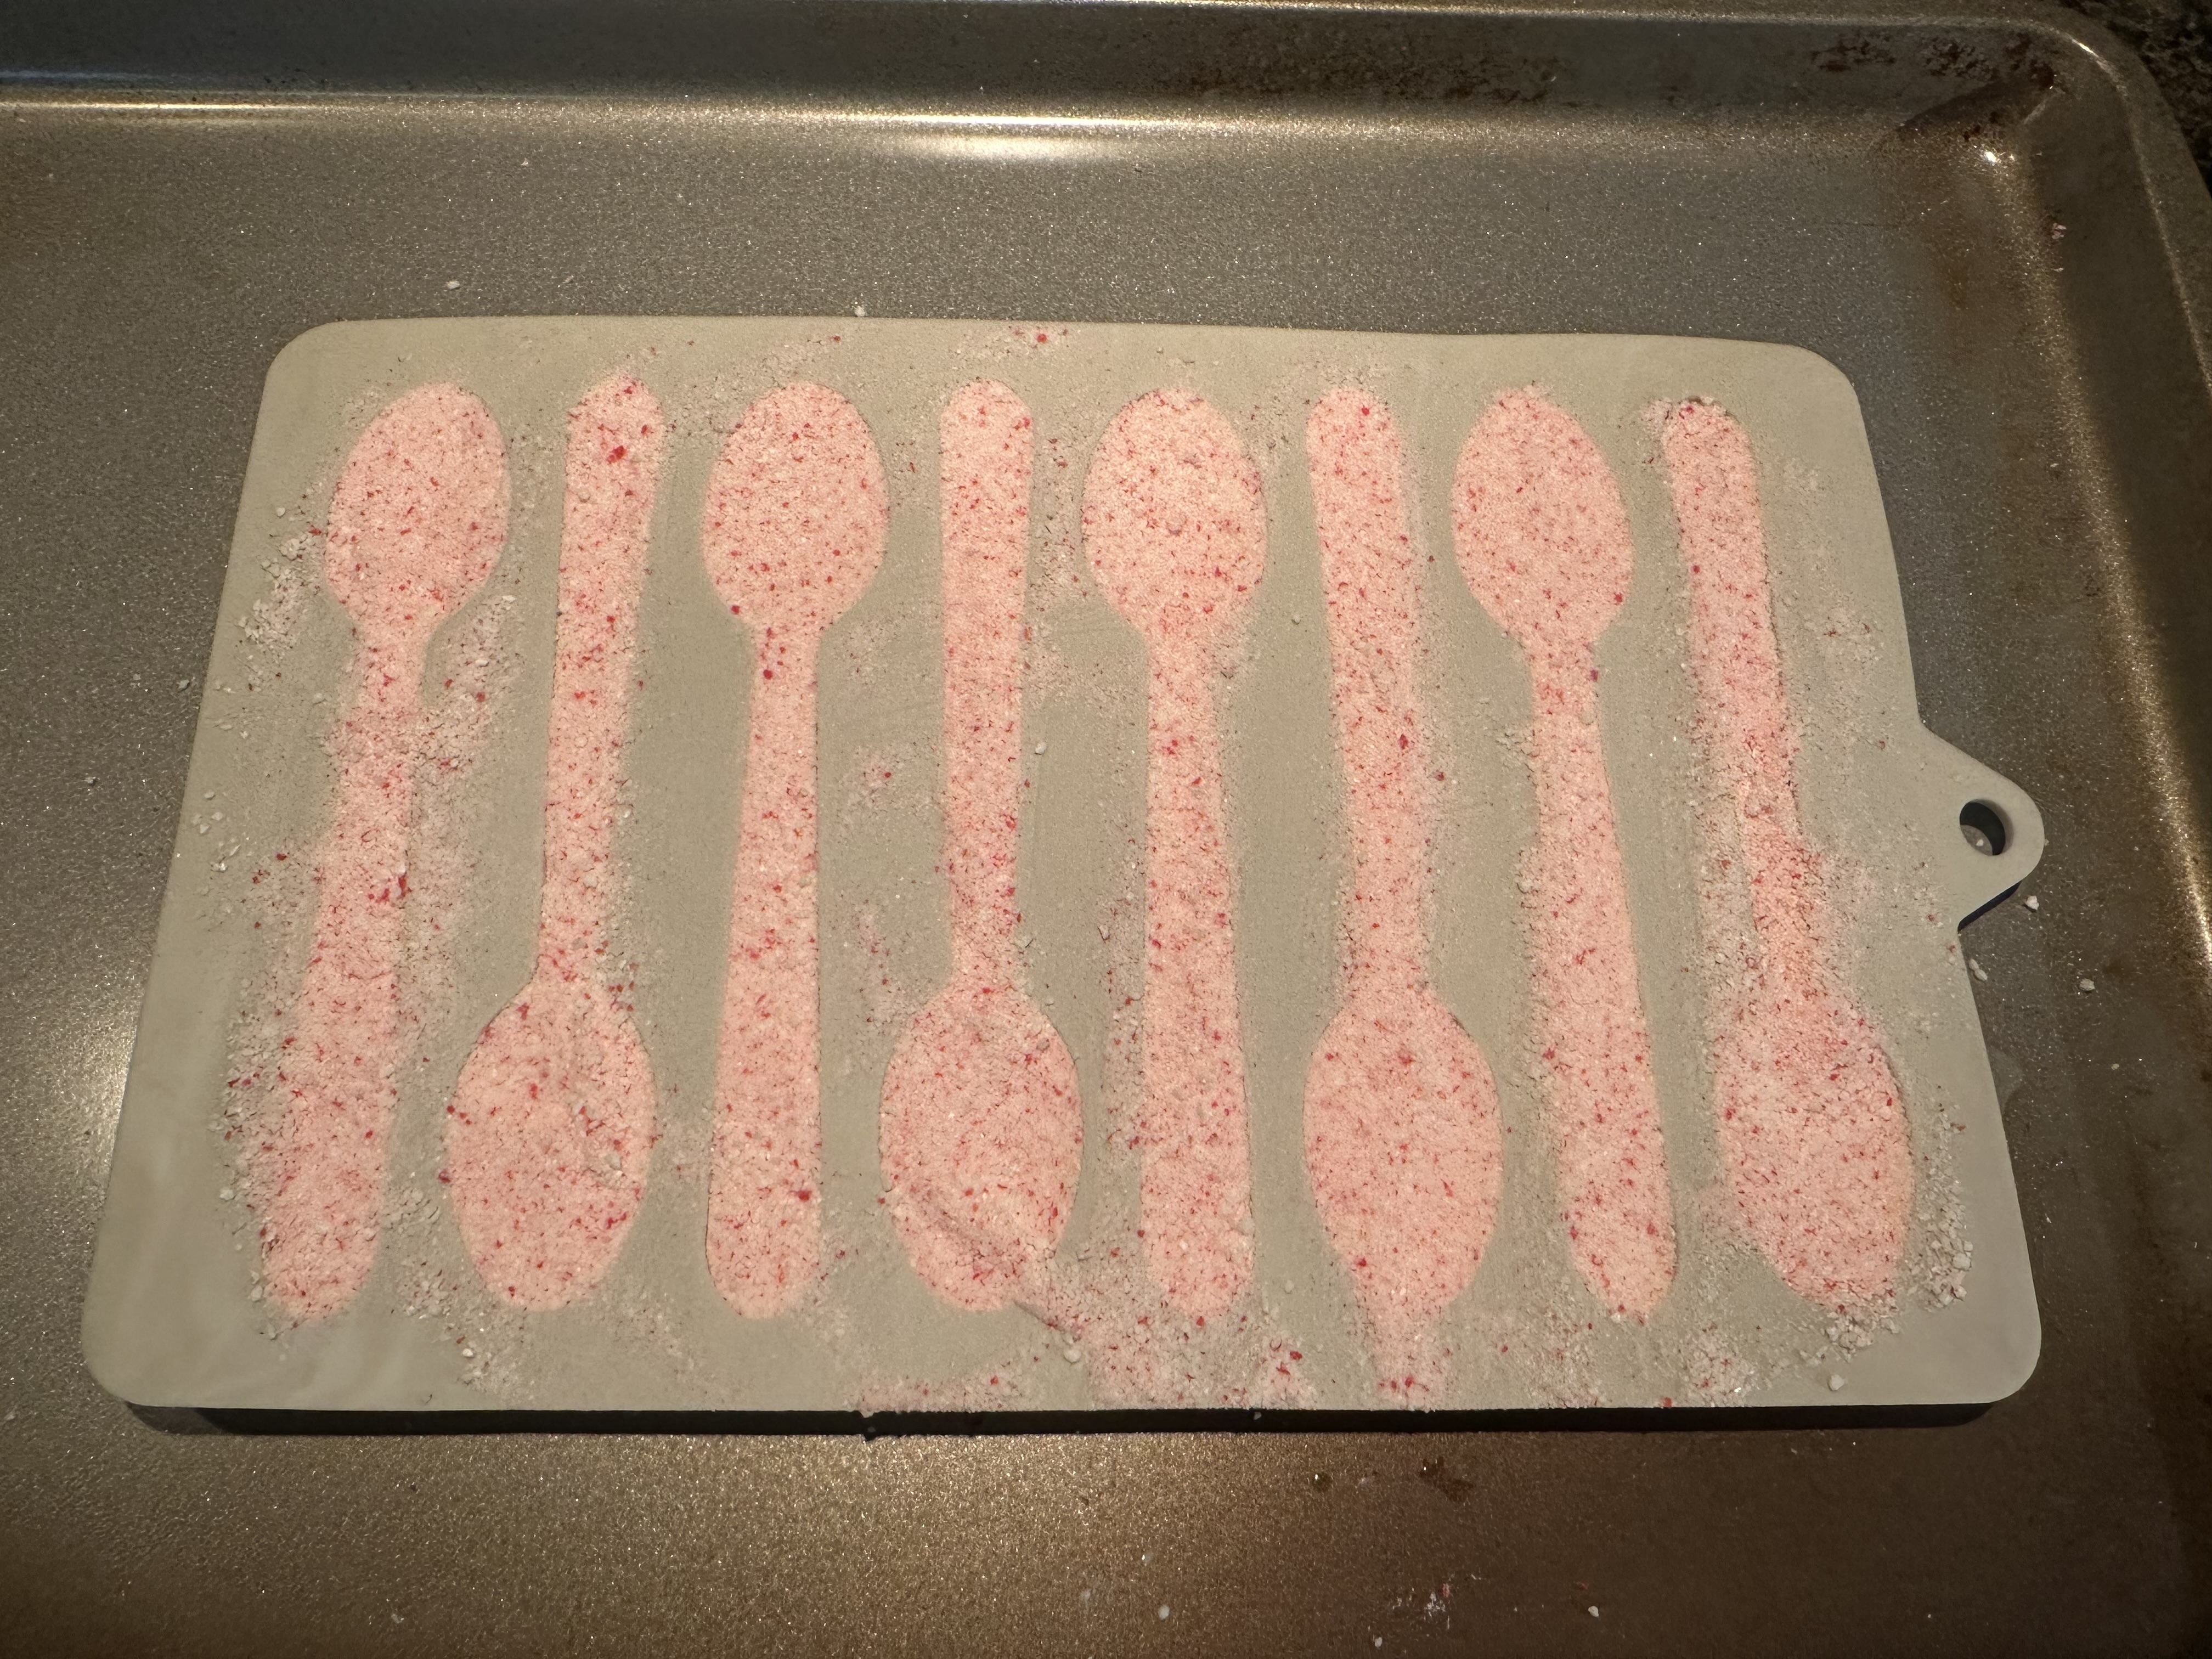
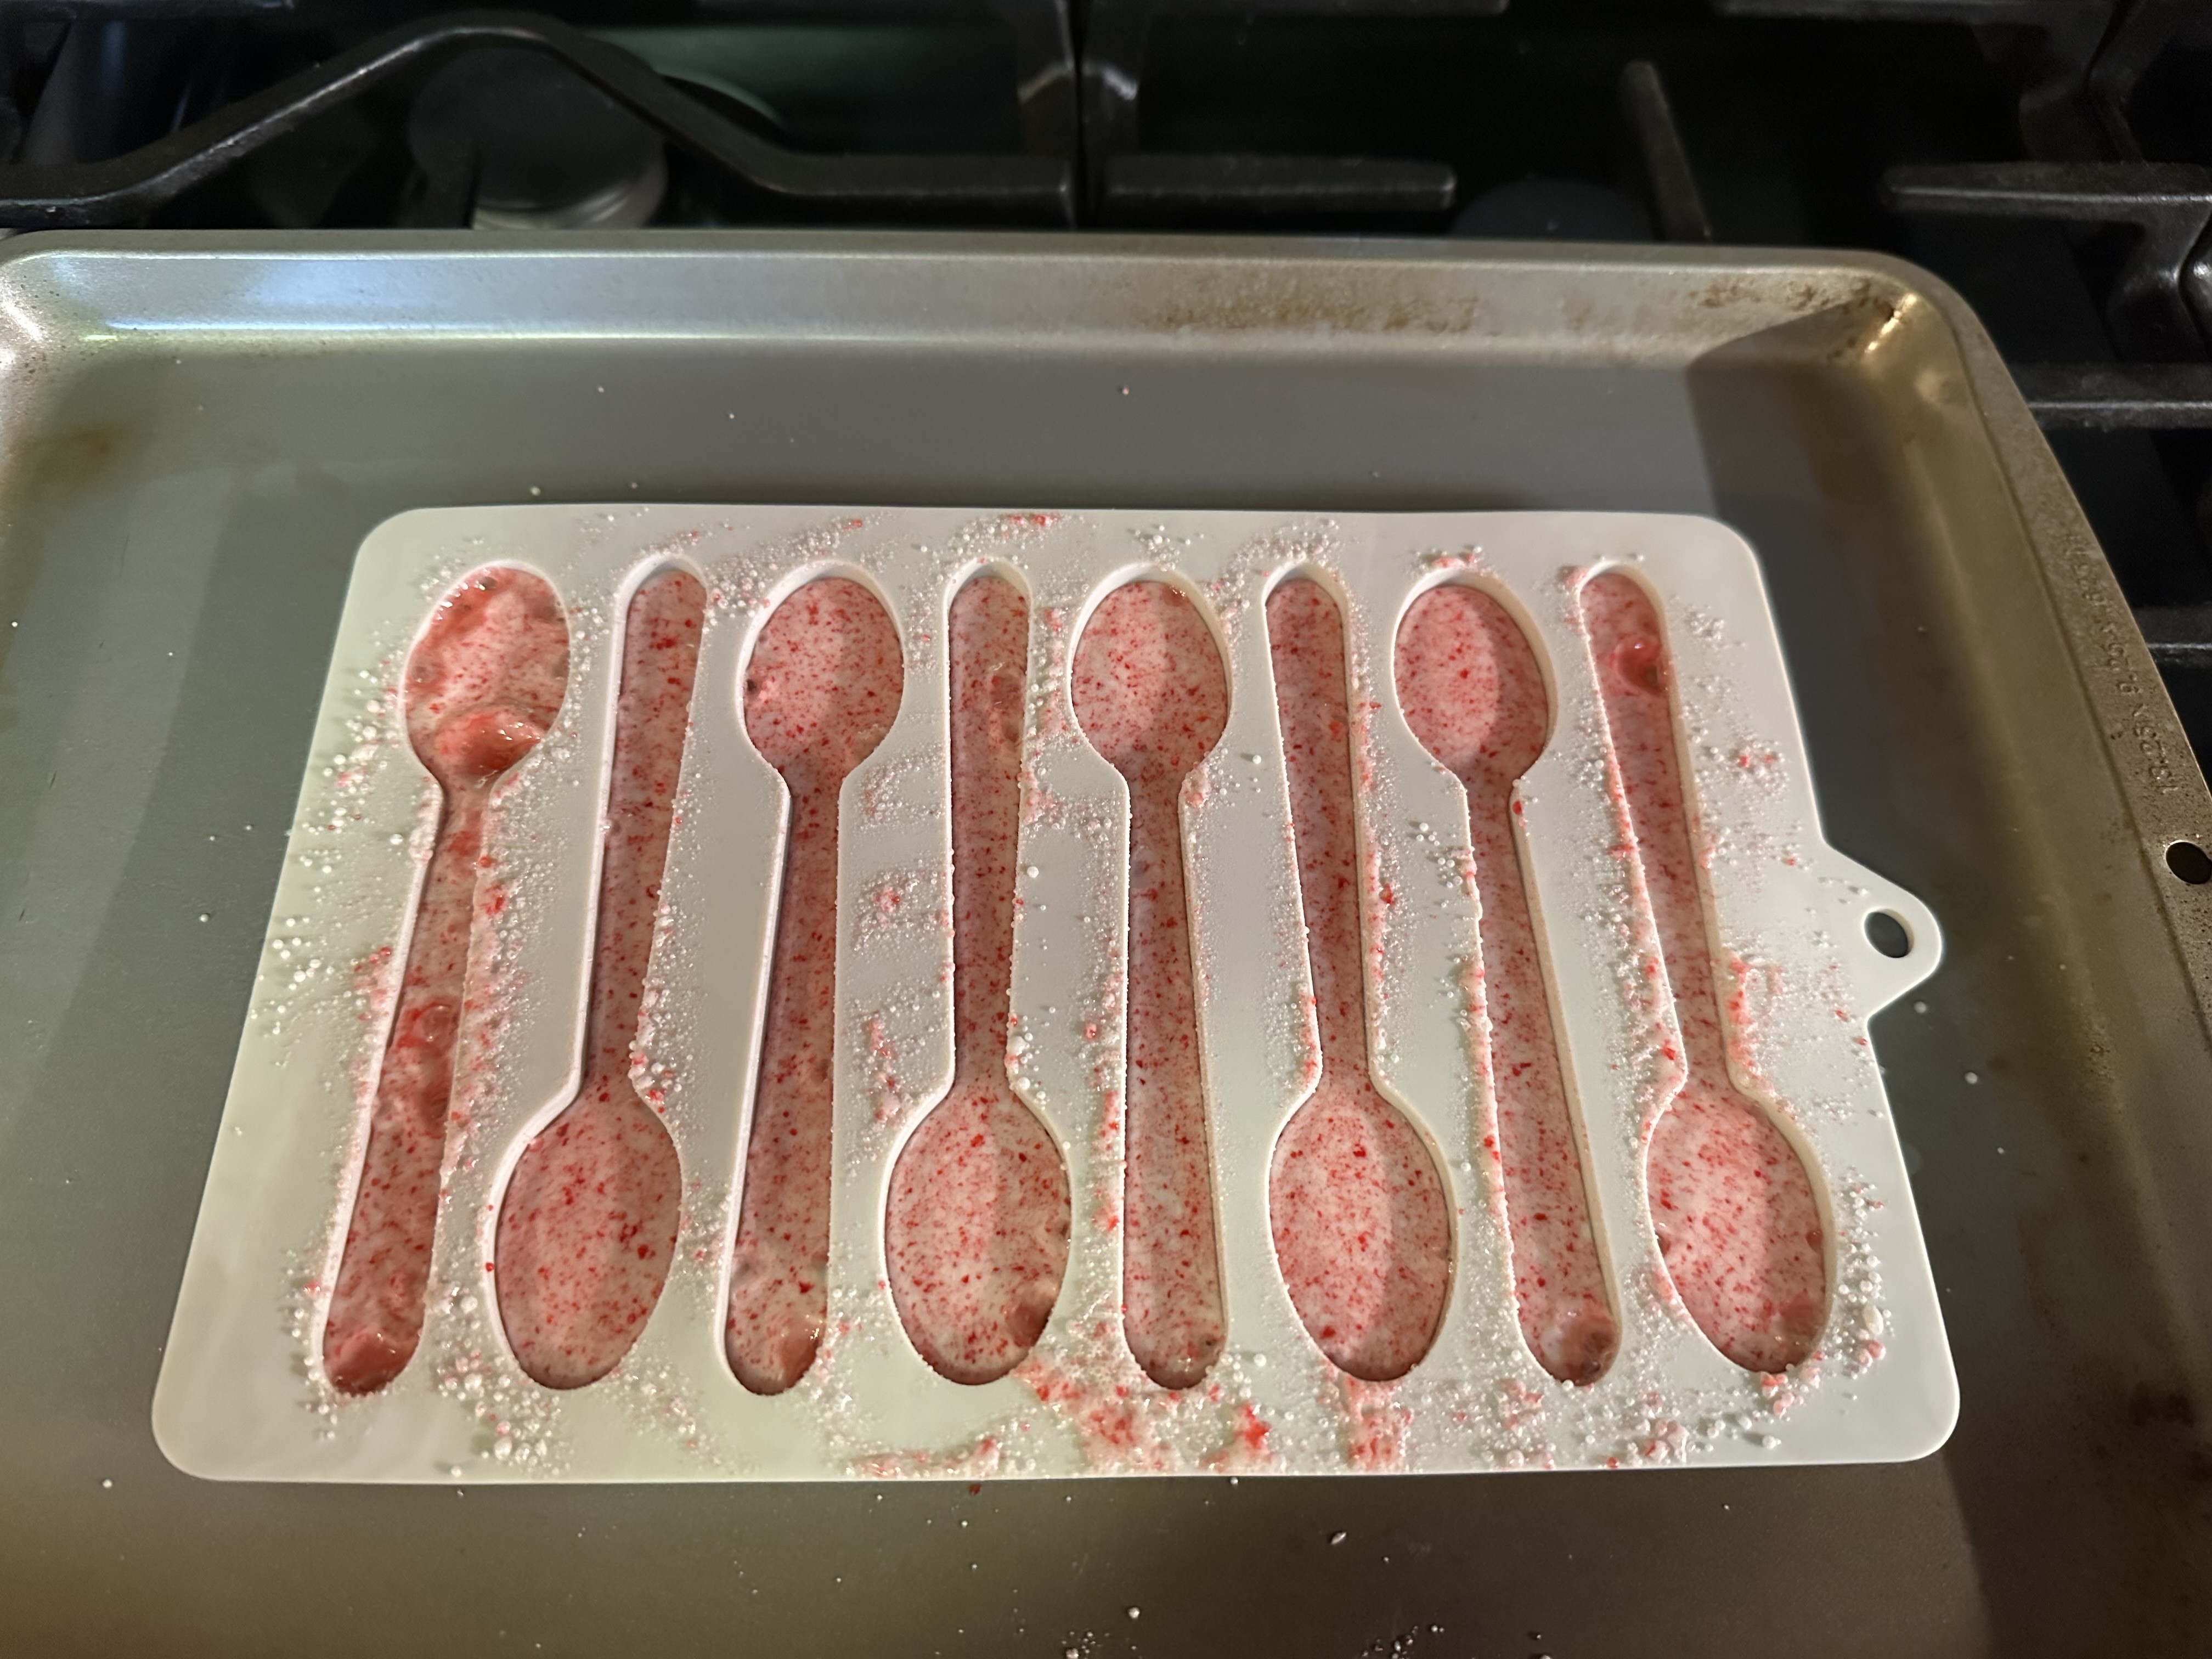
Next, I spooned the crushed candy into the cavities of the mold. I made sure to fill each cavity to the top since the candy would settle considerably as it melted. To make maneuvering my mold in and out of the oven easier and give it more stability, I placed it on a baking sheet.

To melt the candy, I baked it in a 300F preheated oven for about 15 minutes. After removing it from the oven the cavities were only about half-way filled with the melted candy.

I refilled each cavity with the remaining candy and returned it to the oven for an additional 5 minutes. I made sure to add extra candy where the spoons seemed to be on the thinner side. Doing so help to prevent the spoons from breaking when removing them from the molds.

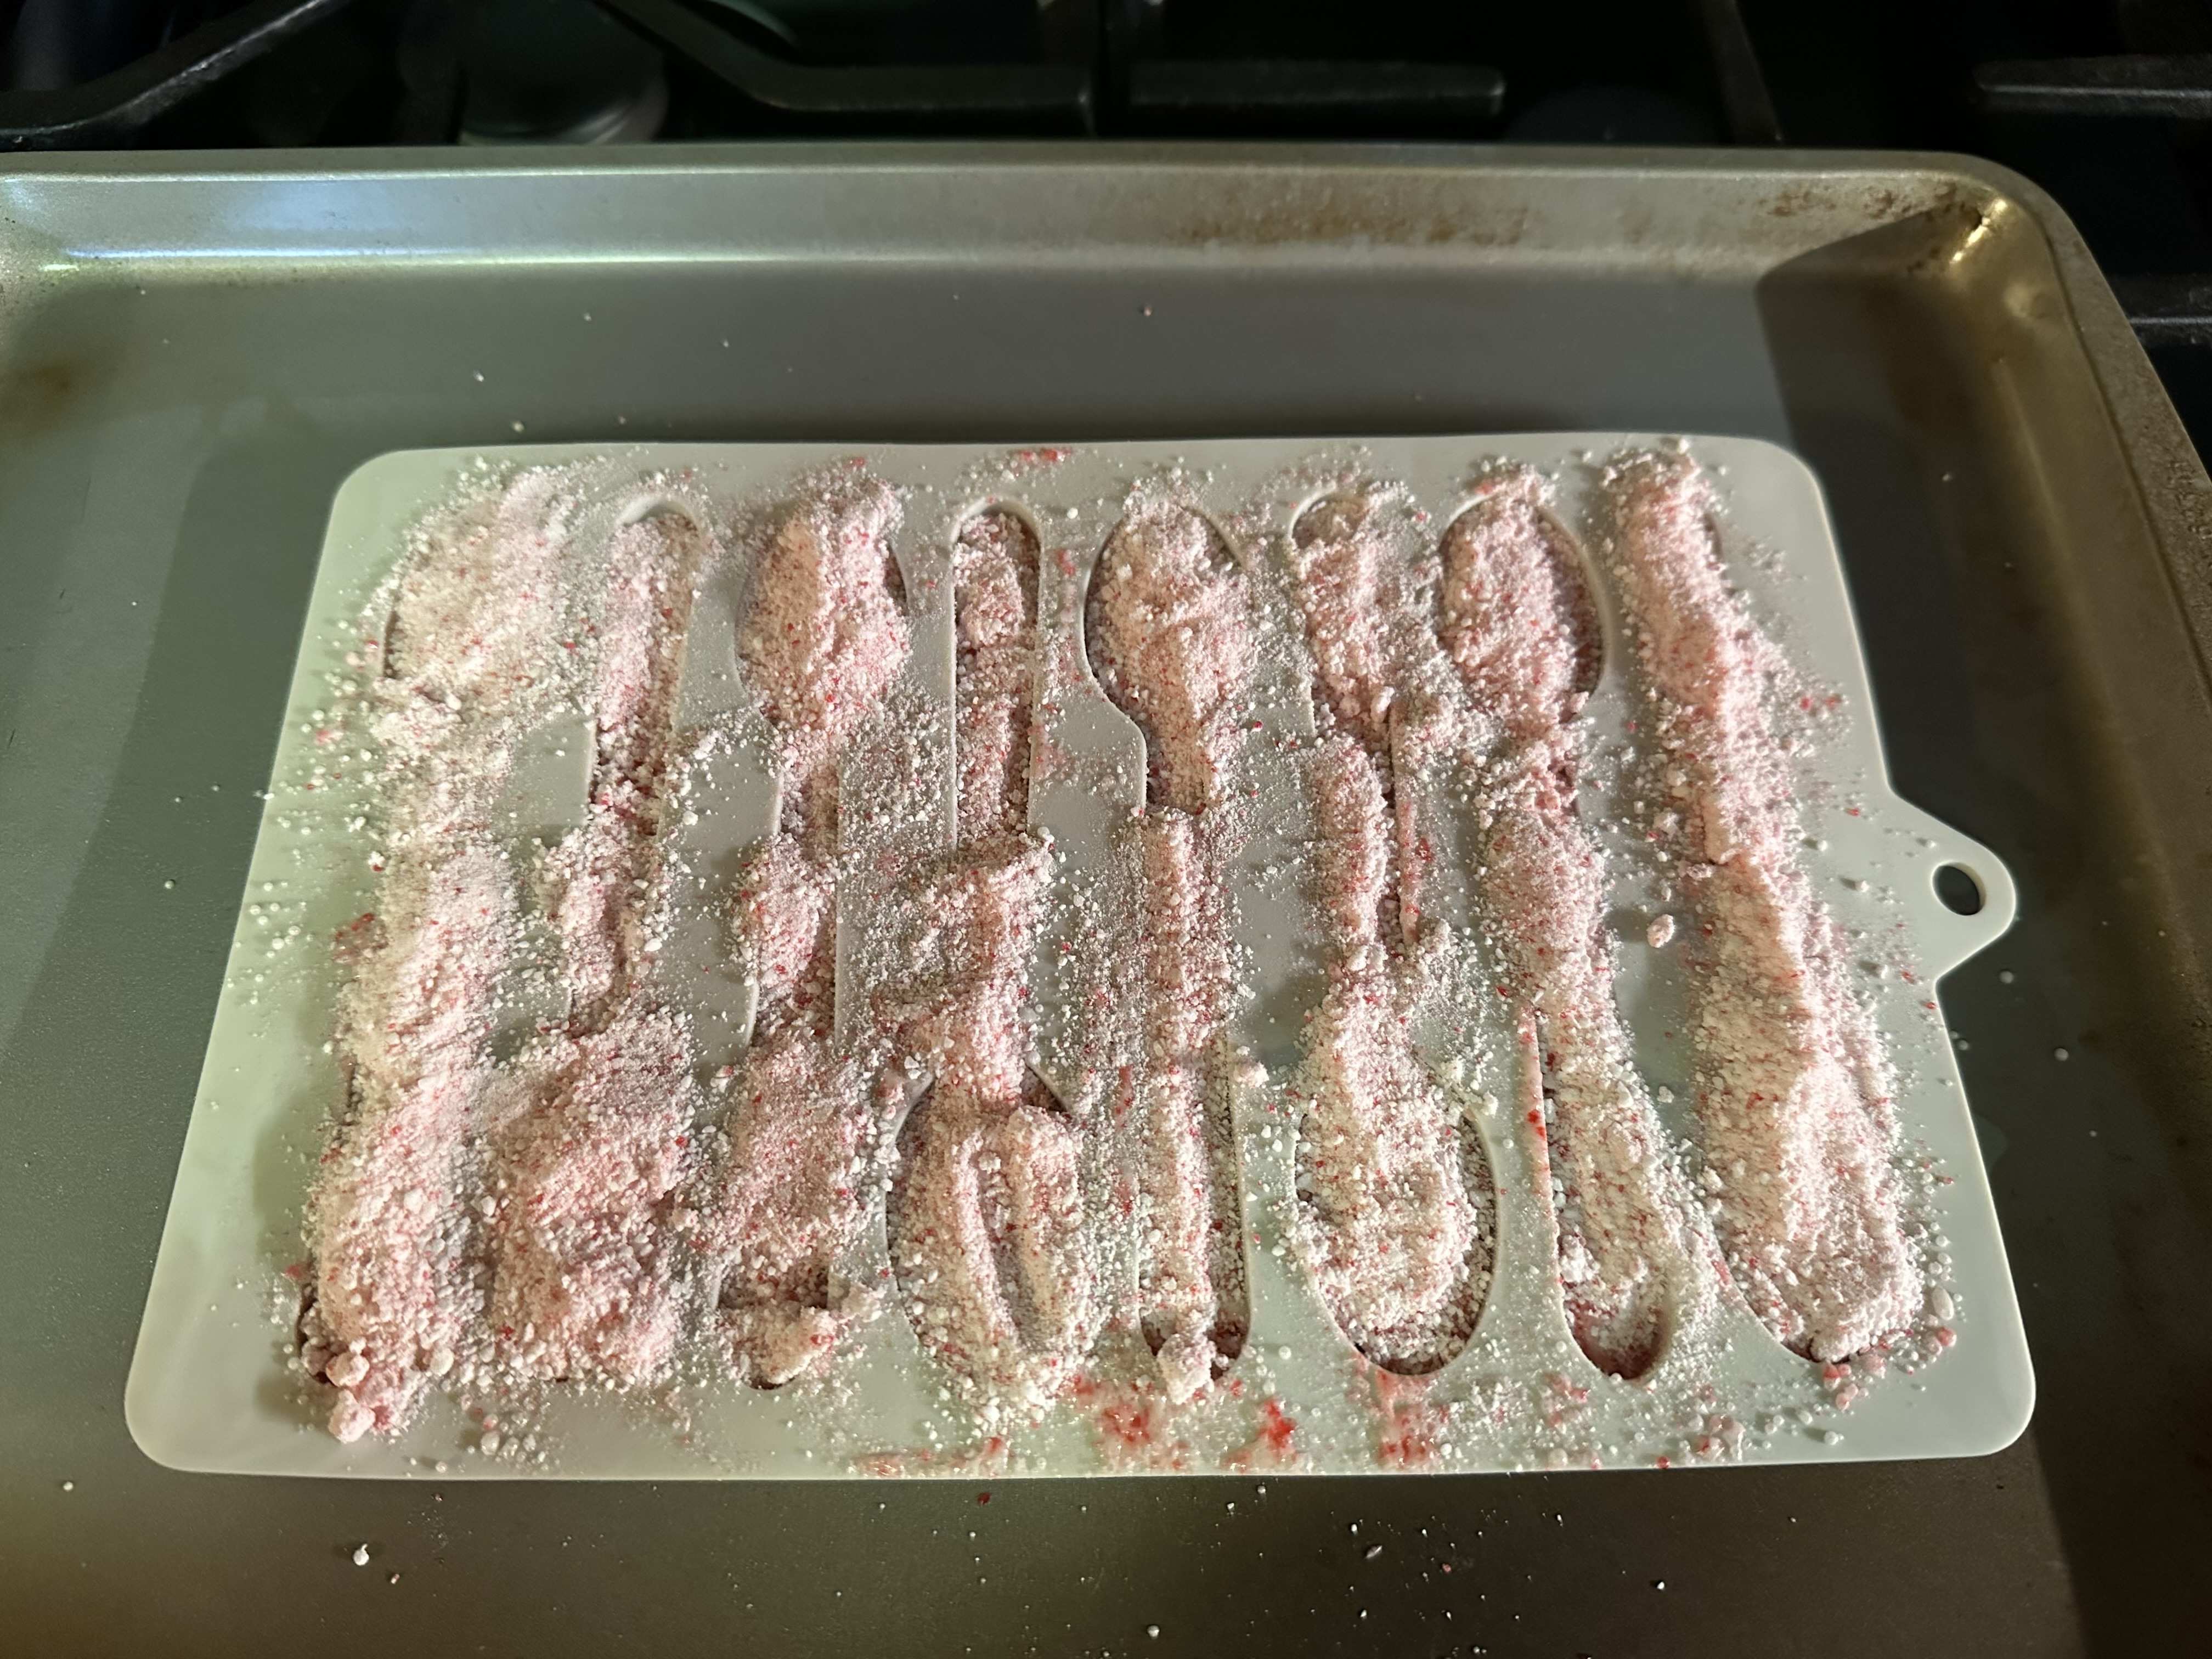
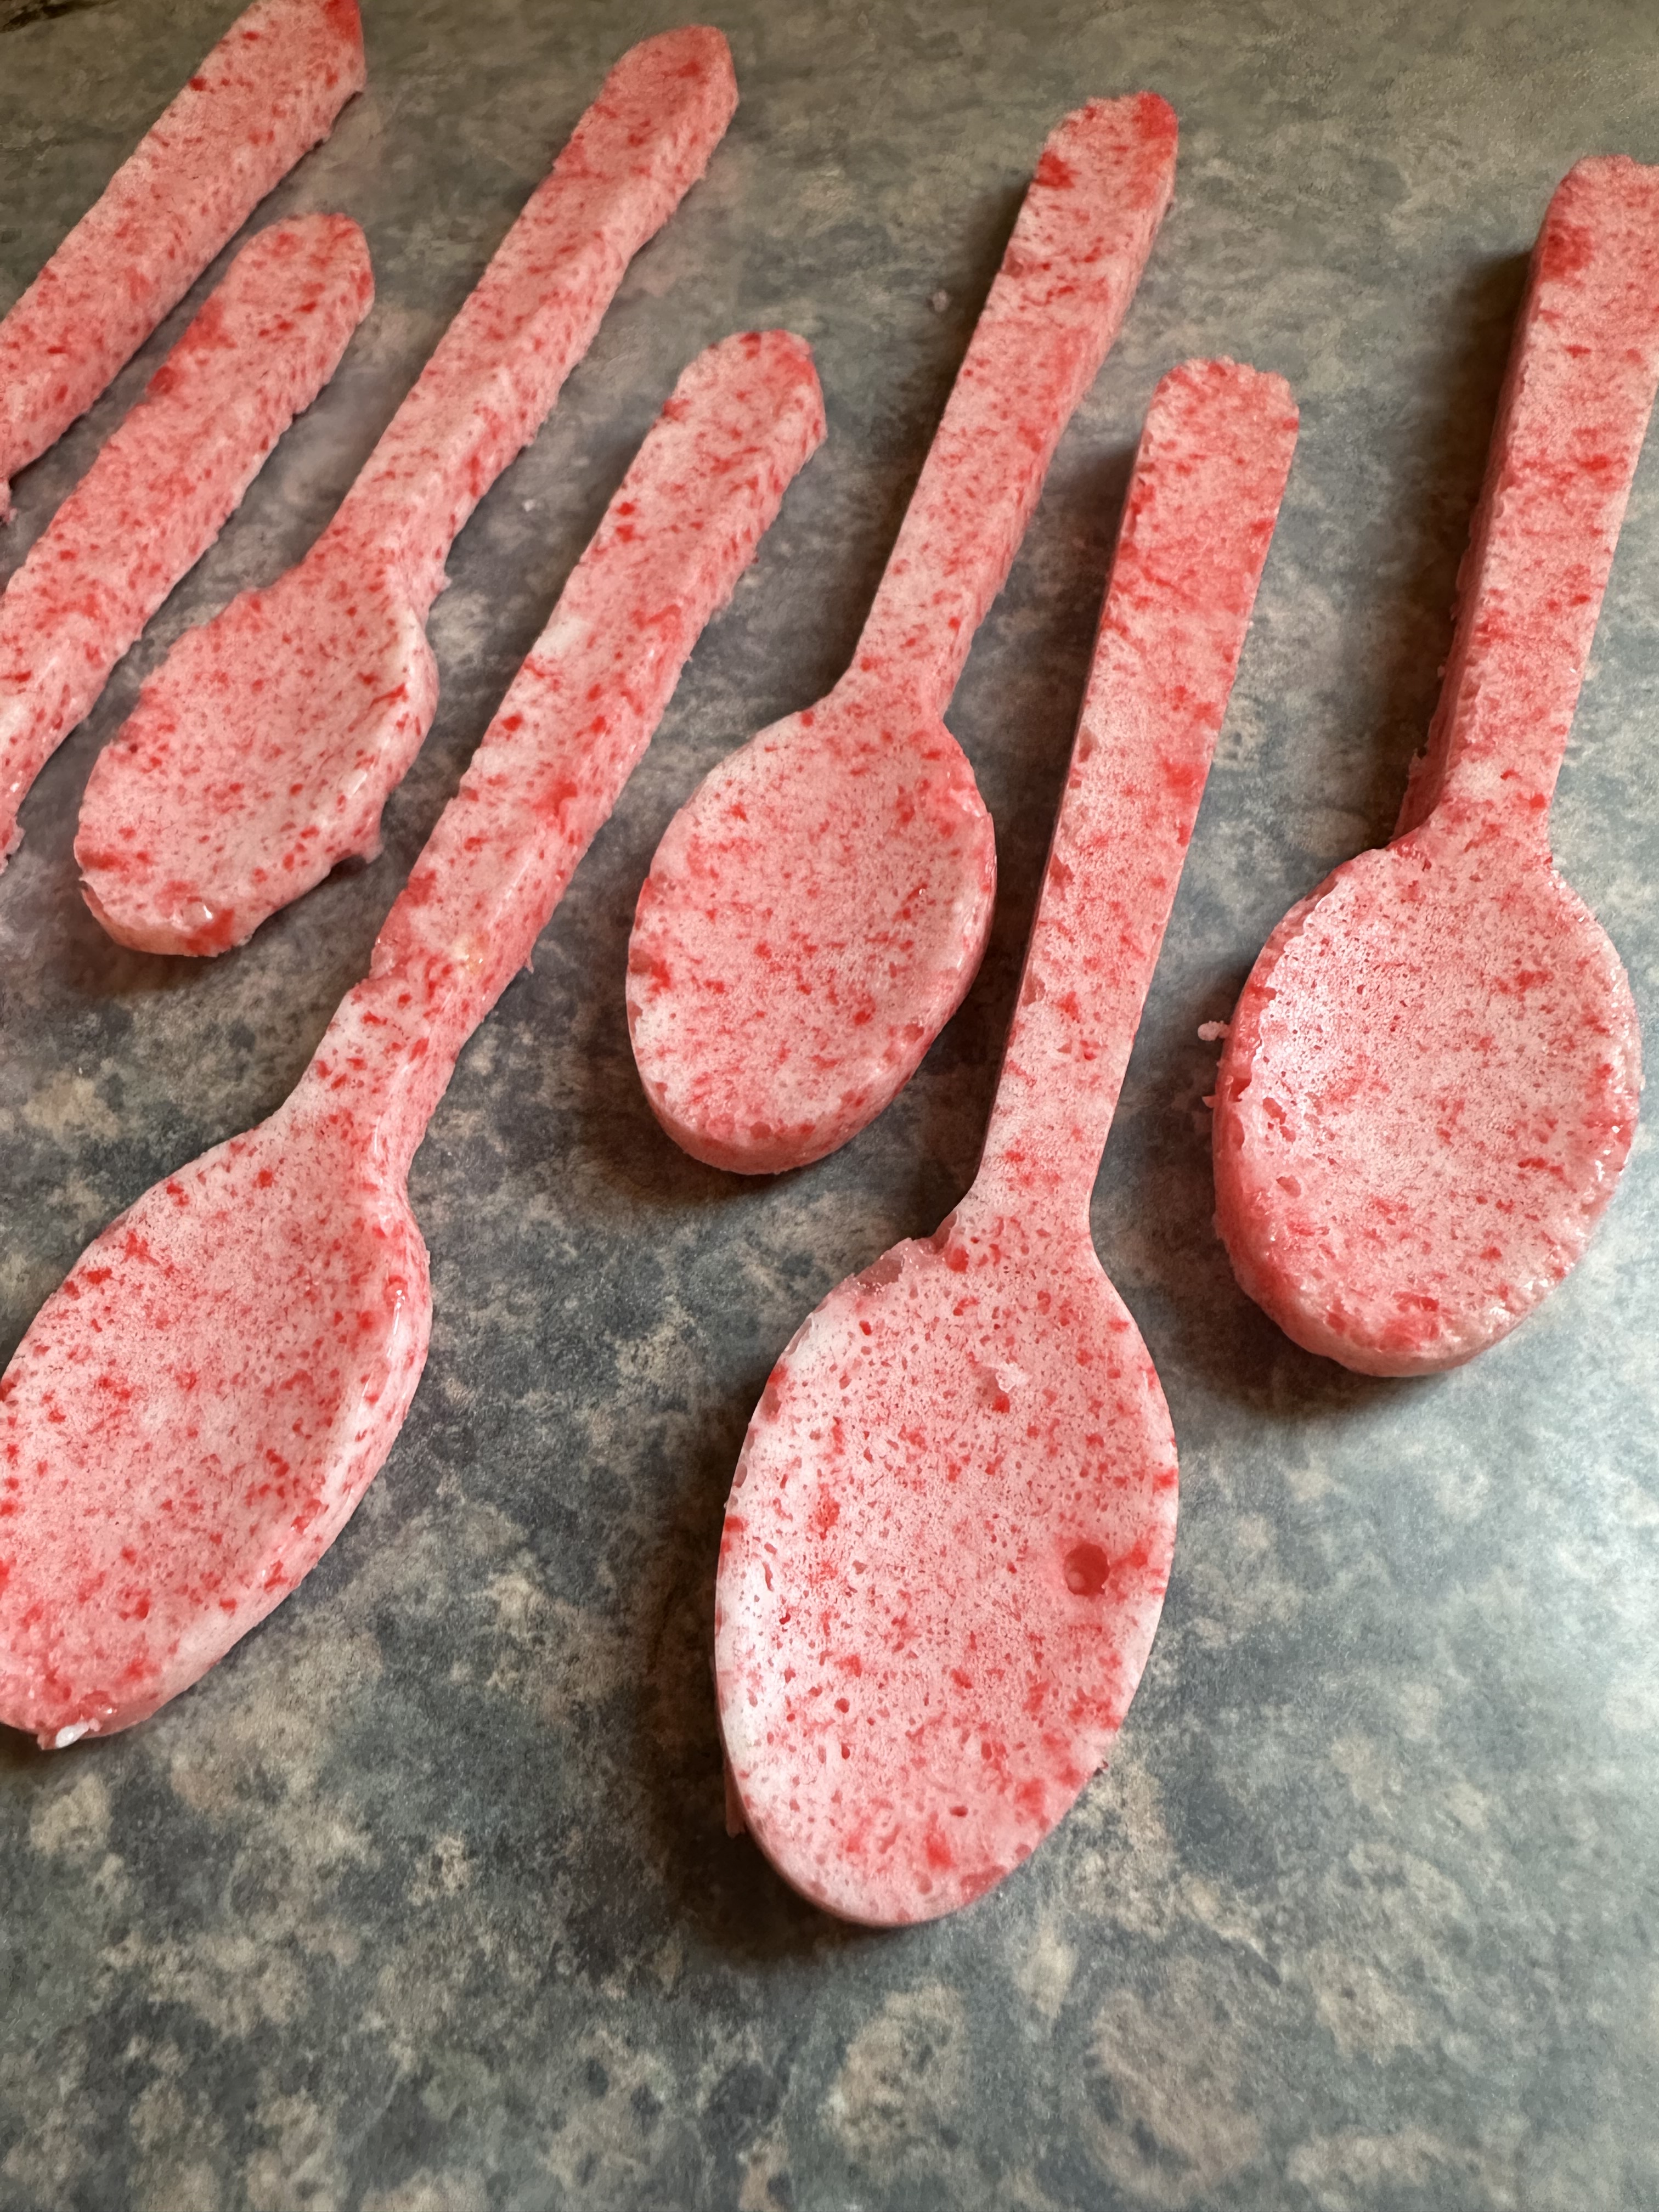
After the second bake the spoons were thicker. I let them cool completely in the mold before removing them.

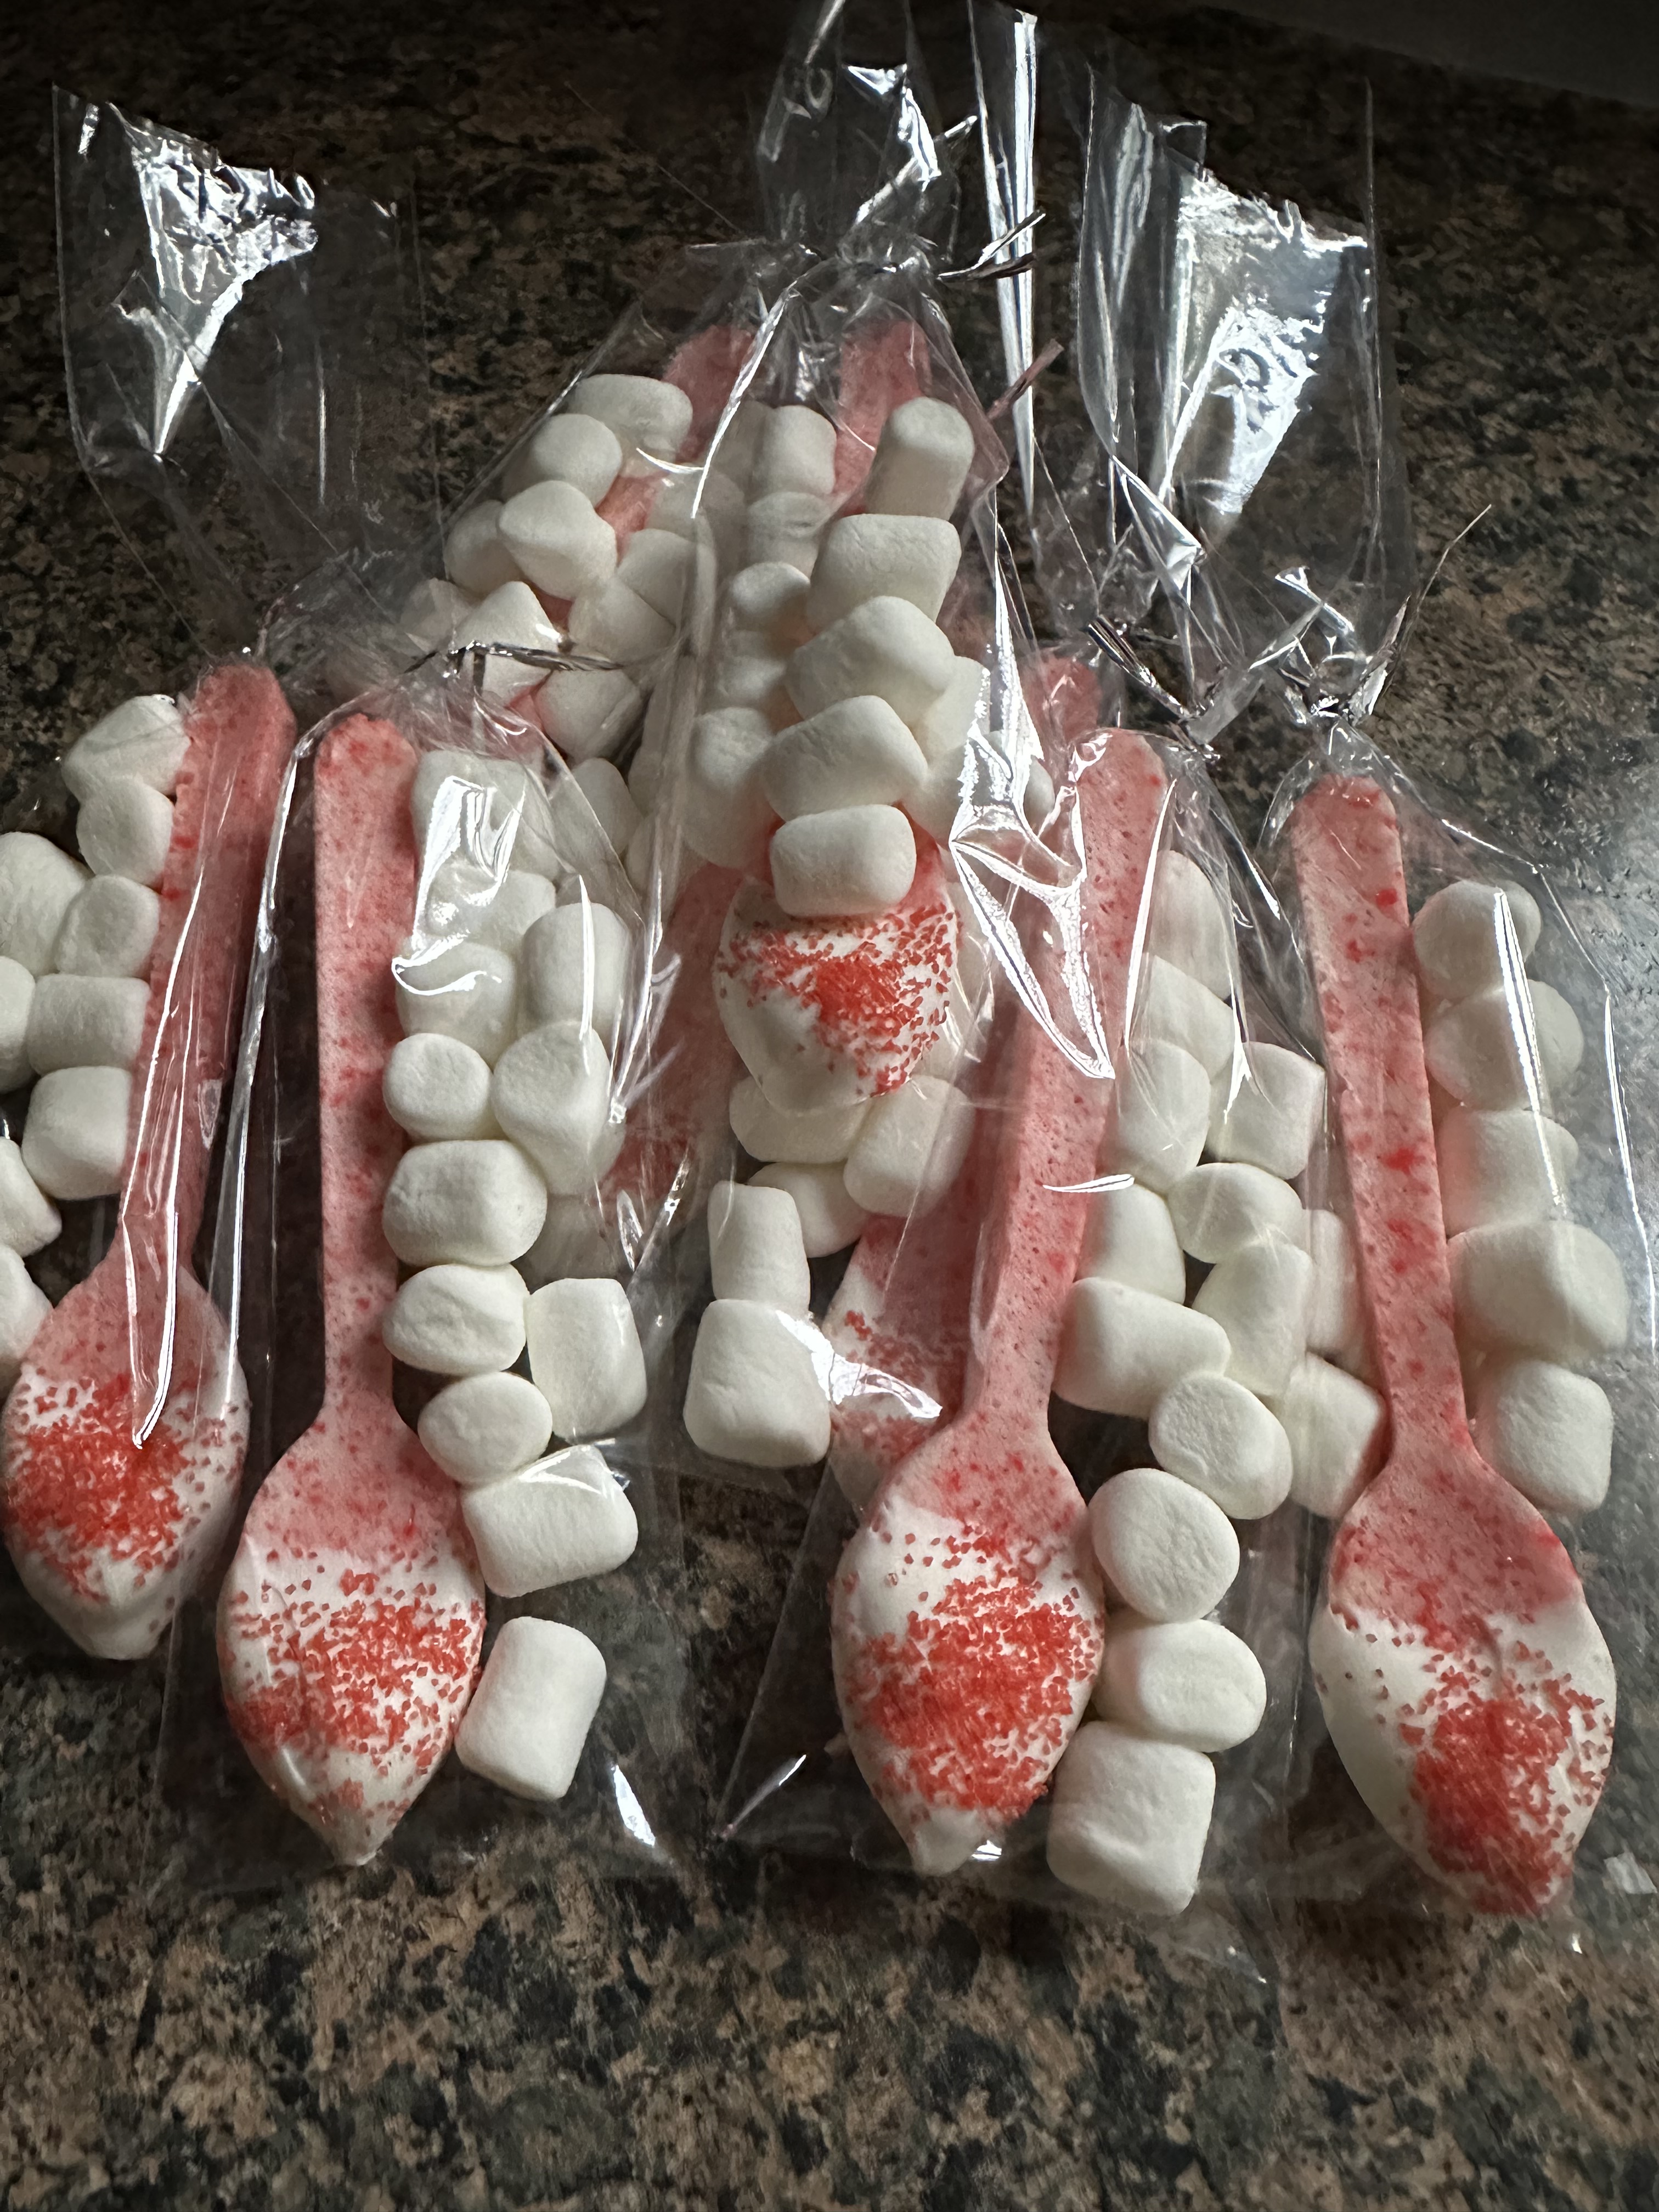
Now these spoons are perfect to use as is, but, if you are planning on gifting them you can jazz them up a little by dipping them in white chocolate (or milk chocolate) and adding some sanding sugar or sprinkles. Next, place each one in a baggie – I used pretzel bags that you can get in the baking aisle of your local craft store – along with some mini marshmallows. Add a good mix of hot chocolate and you have the perfect gift for a neighbor, teacher, or anyone else on your list.

Peppermint Spoons

10 large candy canes or 40 starlight mints

Silicone spoon mold

Baking Sheet

Preheat the oven to 300F and place the silicone mold on the baking sheet.

Crush the candy. If you have a food processor, I recommend crushing them in there so the pieces are all the same size. If not, you can place the candy in a resealable bag and crush them using either a rolling pin or kitchen mallet.

Spoon the crushed candy into the cavities of the mold. Fill them all the way to the top as the candy will settle as it begins to melt. Bake for 10-15 minutes, until the candy is completely melted.

Remove the pan from the oven and fill the cavities with the remaining crushed candy. You want to make sure that there are no thin spots in the spoons as this will cause them to break when you remove them from the mold. Return to the oven for an additional 5 minutes.

Allow the spoons to cool completely before carefully removing them from the molds. Store in an airtight container at room temperature.

Cookie Palooza: Blueberry Crumb Cookies

I’ve saved my favorite cookie for last… A Blueberry Crumb Cookie. I got the idea for this cookie while baking one of my favorite summer desserts, a Blueberry Crumb Cake. Granted you can make it anytime of the year, but it tastes best when the blueberries are at their sweetest. Initially I was thinking of using fresh blueberries in the cookie, but for a few reasons I didn’t think it was the right move. I was concerned that some of the blueberries would be sour (not a good thing for a cookie), inevitably different sizes (you kind of want uniformity in a cookie) and that they might turn the cookies blue during baking. Since cookie dough is a lot thicker than cake batter, I thought that there was good chance of the blueberries being slightly decimated while folding them in. Thankfully I was able to find dried wild blueberries that eliminated all those concerns I had from using fresh ones.

For these cookies I made two mixtures… The cookie dough and the crumb topping.

Once both were ready, I rolled scoops of the dough in the crumb topping and then placed it on my baking sheets. And in case you are wondering, no, the crumb topping won’t burn and yes it will stick to the cookie even after baking.

And yes, the cookies will spread a bit while baking, but I don’t suggest refrigerating the cookie dough prior to scooping and rolling them in the crumb topping. You want the cookie dough to be slightly sticky so the crumb topping will adhere to it. And there’s no harm in a larger cookie. They don’t flatten and are slightly thick so it’s all good!

And I must say that while these cookies are delish the day they come out of the oven, the blueberry flavor gets stronger each day after so you may want to make these a day or two ahead of time and keep them stored in an airtight container prior to serving, sharing or giving. Because of this these cookies are the perfect cookie to mail to someone. They stay moist and the flavor only gets better.

I hope you have enjoyed this year’s Cookie Palooza and hopefully one, two or maybe all of these cookies will earn a spot on your cookie trays this holiday season!

Happy Holidays (and Happy Baking!)

Blueberry Crumb Cookies

  • Servings: 30 Cookies
  • Print

Ingredients:

For the Cookies:

1 stick unsalted butter, at room temperature

1/2 cup light brown sugar

2/3 cup sugar

2 large eggs

1 teaspoon lemon juice

1/4 cup sour cream

2 cups flour

1 teaspoon baking soda

1/4 teaspoon salt

1 cup dried blueberries*

For the Crumb Topping:

2 tablespoons sugar

2 tablespoons light brown sugar

1/2 teaspoon cinnamon

1/8 teaspoon nutmeg

1/2 stick unsalted butter, melted

1/2 cup + 2 tablespoons flour

*I used dried wild blueberries from Trader Joe’s

Directions:

Preheat oven to 350 F. Line 2 baking sheets with parchment paper and set aside.

For the cookies: In a medium bowl whisk together the flour, baking soda and salt. Set aside.

In a large bowl beat together the butter and both sugars with a hand mixer on medium speed until light and fluffy. Add in the eggs one at a time and beat until just combined. Add in the lemon juice and sour cream and continue beating until well combined.

With the mixer on low add in the flour mixture. And then fold in the blueberries.

For the Crumb Topping: In a medium bowl whisk together both sugars, the cinnamon and nutmeg. Stir in the melted butter and then the flour. You may need to use your hands to really get the mixture combined well and to form the crumbs.

To make rolling the dough in the crumb topping easier (and less messy), first scoop the dough onto the prepared baking sheets, then roll in the crumb topping and then return to the baking sheets. Place the dough 2 inches apart.

Bake for 12-14 minutes, until the cookies are set and beginning to brown around the edges. Cool on the pan for 5 minutes before transferring to a wire rack to cool completely.

Store cookies in an airtight container.

Recipe first appeared on Bead Yarn Spatula.

Cookie Palooza: Brown Sugar Vanilla Cookies

Cookies are my least favorite dessert to photograph. Sometimes they just don’t look as appealing in a picture as they do in “real life.” As is the case with today’s Cookie Palooza cookie… Brown Sugar Vanilla Cookies. They taste great, but that’s just not coming across in the pictures since there are no add-ins to give the cookies dimension.

They are essentially a chocolate chip cookie without the chocolate chips. They get their flavor from, you guessed it, brown sugar and vanilla. While most chocolate chip cookie recipes call for using a combination of white and brown sugar which produces a cookie that is crispier, only using brown sugar in these cookies leaves you with a cookie that is chewier and denser. Something a little more comforting during these cold winter months. They are also the perfect cookie to make for anyone on your list who likes a simple cookie without much fuss.  

Brown Sugar Vanilla Cookies

  • Servings: 30 Cookies
  • Print

Ingredients:

2 cups flour

1 teaspoon baking soda

1 teaspoon salt

2 sticks unsalted butter, at room temperature

1 1/2 cups light brown sugar

2 large eggs

2 tablespoons vanilla extract

Directions:

Preheat oven to 375 F. Line 2 baking sheets with parchment paper.

In a medium bowl whisk together the flour, baking soda and salt. Set aside.

In a large bowl, using a handheld mixer on medium speed, cream together the butter and sugar until light & fluffy. Beat in the eggs 1 at a time and then add in the vanilla extract.

With the mixer on low, add the flour mixture until combined. The dough will be very soft. Refrigerate for 30 minutes to firm up so the cookies won’t spread as much while baking.

Use a cookie a cookie scoop to drop the dough 2 inches apart on the prepared baking sheets. Bake for 9-11 minutes, until the edges of the cookies begin to brown. Cool 2 minutes on the baking sheets before transferring to a wire rack to cool completely.

Store in an airtight container.

Recipe first appeared on Bead Yarn & Spatula.

Cookie Palooza: Big Island Oatmeal Cookies

If you are dreaming of being somewhere warm during the colder months today’s Cookie Palooza cookie may help transport you there mentally. It’s an oatmeal cookie loaded with coconut, pineapples and macadamia nuts. All standard things you will find growing in Hawaii, hence the name, Big Island Oatmeal Cookies.

On my first attempt at making these cookies I used dried pineapple and I quickly learned that baking with dried pineapple is not like baking with dried cranberries or blueberries. The pineapple pieces dried out so instead of being chewy and adding flavor to the cookie they were a bit hard and had no flavor. On my second attempt I switched these things up and decided to use canned pineapple tidbits in pineapple juice that I drained. I also added in coconut extract to amp up the coconut flavor and opted not to chop the macadamia nuts. Also on my first attempt I chopped the macadamia nuts and they pretty much got decimated since they are so soft. When you bit into the cookie you really weren’t getting the crunch or taste of them.

So, with my tweaks, my cookies were perfectly loaded with pineapples, macadamia nuts and coconut in two forms. And the taste was exactly what I had hoped for. Not too sweet, the perfect amount of coconut flavor, a little crunch from the macadamia nuts and some added sweetness and taste from the pineapples. Also, because of the pineapples the cookies were incredibly moist. One of the reasons why it’s necessary to let them rest on the baking sheets for a few minutes before transferring them to a wire to cool completely.

While these cookies may not have any of the standard flavors of the holiday season, they will be a welcome addition to your holiday baking menu. Yes, peppermint, sugar cookies, chocolate, etc. are delicious, but a little something different is good as well.

Big Island Oatmeal Cookies

Ingredients:

3/4 cup unsalted butter, at room temperature

3/4 cup light brown sugar

3/4 cup sugar

2 eggs

1 teaspoon vanilla extract

1 teaspoon coconut extract

1 1/2 cups flour

3 cups old-fashioned oats

1 teaspoon baking soda

1/2 teaspoon salt

1 cup macadamia nuts

1 cup sweetened shredded coconut

1 cup pineapple tidbits in juice, drained

Directions:

Preheat oven to 350 F. Line 2 baking sheets with parchment paper.

In a medium bowl whisk together the flour, oats, baking soda and salt. Set aside.

In a large bowl cream together the butter and both sugars with a hand mixer on medium speed. Add the eggs, 1 at a time. Add the vanilla and coconut extract and beat until everything is well combine.

With the mixer on low add in the flour mixture.

Fold in the macadamia nuts, shredded coconut and pineapple tidbits.

Use a cookie scoop to drop the dough onto the prepared cookie sheets 2 inches apart. Bake in the preheated oven for 12-14 minutes, until the cookies are set, and the edges begin to brown.

Let the cookies cool on the baking sheets for 5 minutes and then transfer to a wire rack to cool completely.

Store in an airtight container.

Recipe first appeared on Bead Yarn & Spatula.

Cookie Palooza: Cranberry Pecan Cookies

While peppermint gets all the glory during this time of the year there are other flavors and ingredients that are reminiscent of the season. Cranberries for one. While the sweetened dried ones and the canned jellied version can be found in your supermarket year-round, it’s this time of the year when those fresh tart berries pop up in your grocery section. And while most nuts are popular around this time due to gift baskets, those roasted chestnuts and so forth it’s pecans that really make the rounds thanks to Pecan Pie.  So, I decided to combine the two – cranberries and pecans – for today’s Cookie Palooza cookie with a Cranberry Pecan Cookie that also has some chocolate in it.

These cookies are pretty straightforward to make. Start off by creaming together the butter and sugars, add the eggs and then the vanilla extract. Whisk the dry ingredients separately and then add it to the butter mixture and finally stir in the add-ins; the dried cranberries, chopped pecans and chocolate chips. If you like your cookies to be a little nuttier feel free to add in more pecans. And one thing I have started doing is refrigerating my cookie dough before scooping and baking. I didn’t want to struggle to scoop my dough, so I refrigerated it for only 30 minutes. Enough to get it chilled, but still soft enough to easily scoop with a cookie scoop.

These cookies are perfectly chocolaty, just the right amount of crunch thanks to the pecans and have a little tangy sweetness to them thanks to the cranberries. The perfection addition to any cookie platter this holiday season!

Cranberry Pecan Cookies

  • Servings: 36 Cookies
  • Print

Ingredients:

2 sticks unsalted butter, at room temperature

3/4 cup sugar

3/4 cup light brown sugar

2 large eggs

2 teaspoons vanilla extract

2 cups flour

1/2 cup unsweetened cocoa powder

1 teaspoon baking soda

1/2 teaspoon salt

1 cup semi-sweet chocolate chips

1 cup chopped pecans, toasted

1 cup dried cranberries

Directions:

Preheat oven to 350 F. Line 2 baking sheets with parchment paper.

In a medium bowl whisk together the flour, cocoa powder, baking soda and salt. Set aside.

In a large bowl cream together the butter and both sugars with a hand mixer on medium speed until light and fluffy. Add the eggs 1 at a time and then the vanilla extract.

With the mixer on low add in the flour mixture and beat until just combined.

Add the chocolate chips, pecans and cranberries and beat until combined.

Refrigerate the dough for 30 minutes.

Use a cookie scoop to scoop the dough 2 inches apart on the prepared baking sheets.

Bake in the preheated oven for 13-15 minutes, until the cookies are set.

Transfer to a wire rack to cool completely.

Store in an airtight container.

Recipe first appeared on Bead Yarn Spatula

Cookie Palooza: Pumpkin Spice Chocolate Chip Cookies

Welcome to Cookie Palooza 2022 on Bead Yarn Spatula. I am quite excited this year because all the recipes I will be bringing you this week are original ones. To kick it off I am sharing a recipe that is perfect for all your pumpkin spice loving family and friends and for those that enjoy pumpkin even after the Fall season is long gone… A Pumpkin Spice Chocolate Chip Cookie.

I’ve been searching for a good pumpkin cookie recipe for a while now. Some I made tasted good, but the texture just wasn’t appealing to me. When pumpkin puree is added to any recipe it adds a lot of moisture to it. And if you add too much pumpkin puree to a dessert recipe that isn’t well balanced with other wet ingredients you end up with a very odd texture. As was the case with my first few tries of my Pumpkin Tiramisu Cake. So, how did I finally achieve a good pumpkin cookie recipe? To get these Pumpkin Spice Chocolate Chip cookies just right I started by using a cake mix as the base.

If you are wondering, cake mix cookies are an actual thing. It’s an easy way to make a red velvet, strawberry, lemon and /or carrot flavored cookie since those flavors are readily available in box cake mixes. While I am sure around this time of the year there are pumpkin cake mixes, I opted to use a yellow cake mix as my base and added some spices that are reminiscent to pumpkin pie spice (this is the recipe I used for the cake portion of my Bourbon Caramel Apple Upside Down Spice Cake) and to get real pumpkin flavor I added in a can of pumpkin puree. And that was it for my wet ingredients… no butter, eggs or anything else.

The result, a pumpkin cookie with just the right amount of spice and sweetness. And the perfect texture… Not too moist and nowhere near dry.

Pumpkin Spice Chocolate Chip Cookies

  • Servings: 30 Cookies
  • Print

Ingredients:

1 15.25oz. box of yellow cake mix

1 15oz. can pumpkin puree

2 teaspoons cinnamon

1 teaspoon nutmeg

1/2 teaspoon ginger

1/2 teaspoon allspice

1/2 teaspoon ground cloves

1 teaspoon vanilla extract

1 1/4 cups semi-sweet chocolate chips

Directions:

Preheat oven to 350 F. Line 2 baking sheets with parchment paper.

In a large bowl whisk together the yellow cake mix with the spices. Add in the pumpkin puree and vanilla extract and stir to combine. Finally, stir in the chocolate chips.

Using a cookie scoop, scoop the dough onto the prepared baking sheets and bake in the preheated oven for 13-15 minutes. Cool the cookies 5 minutes on the baking sheets before transferring them to a wire rack to cool completely.

Store cookies in an airtight container.

Some notes:

-The dough will be soft, but there is no need to refrigerate it prior to baking. The cookies won’t spread much while baking.

-If you want a flatter cookie, after scooping the dough onto the baking sheets press them down slightly with a glass bottom sprayed with cooking spray.

Recipe first appeared on Bead Yarn Spatula.

Happy Thanksgiving!

It’s Thanksgiving week! Do you have your menus set or are you still searching for one of two sides to round things out? Or maybe, you are still looking for that perfect dessert to serve or bring to your get together. Below I’ve assembled 5 of my most favorite pies that I have made over the years. I will personally be making the Apple Crumb Pie.

Apple Cranberry Pie

Peanut Butter & Chocolate Mousse Pie

Honey Pumpkin Pie

Apple Crumb Pie

Brown Butter & Vanilla Pear Pie

Have a wonderful Thanksgiving!

Apple Crisp Cheesecake

So, are you savoring these last days of Fall while getting ready for Thanksgiving still embracing the pumpkins, leaves and colors of the season? Or have you just gone full blown into Christmas and all around you is red and green and your Thanksgiving meal will be celebrated with Christmas décor?  People have very strong feelings about this and prefer each holiday to have its own time. Me personally I put up my Christmas Tree on November 1st. I used to wait until after Thanksgiving, but I would always feel rushed then to get all my decorating done in one day. The tree up, décor around the house and the lights outside. It was just too much. So, a few years ago I decided that I would set up my tree right after Halloween. I will wait until Thanksgiving week though to turn it on and enjoy it all lit up. I must say though that this year I found that people really had some strong feelings about people jumping into Christmas right after Halloween. Is it really that big of a deal? Just do you own thing and don’t fault others for wanting to spread some holiday cheer a little early. Regardless, today’s dessert might just be the perfect addition to your Thanksgiving dessert table. It combines quite a few desserts into one, an Apple Crisp Cheesecake. You get your apples, a crisp topping and a cheesecake all tied together into one yummy dessert.

I started off by making the crisp topping since it needed to be chilled, then the apples and finally the cheesecake part. To assemble, I started off by filling a 9-inch graham cracker crust with the cheesecake filling. I added in some apple pie spices – cinnamon, nutmeg, allspice and ginger – to the cheesecake to help tie all the flavors together since I did add cinnamon to both the apples and crisp topping.

I then arranged the apples over the filling. First in an even layer and then placed the remaining apples over them. I tossed the apples with lemon juice, cinnamon and brown sugar. I used Granny Smith apples, so they weren’t very sweet or mushy after baking.

And finally, I sprinkled the chilled crisp topping over the apples. Initially I wasn’t planning on baking the cheesecake on a baking sheet, but, as I started to sprinkle the topping on it, I thought it best to bake it on the sheet just in case any of the topping fell off. The reason I chilled the crisp topping was to minimize the chances of it over-browning or burning too quickly while in the oven.

I baked the cheesecake for just shy of an hour and then let it cool on the baking sheet for a few minutes before placing it on a wire rack to cool completely. It’s best to let cool it for a few minutes on the pan before transferring it so the cheesecake can firm up a bit. The apples will release some juices while baking and while the cheesecake will be done it will feel soft due to these extra juices.

Once the cheesecake had cooled completely, I refrigerated it overnight. And the next day it was time to slice it and enjoy a piece. And I must say, this came out just as I had hoped and envisioned in my head. As with the Apple Tiramisu from the other day it wasn’t overly sweet and all the components worked well together.  

Apple Crisp Cheesecake

Ingredients:

9-inch graham cracker crust

For the Cheesecake:

2 8oz packages cream cheese, at room temperature

1/2 cup sour cream

1/2 cup sugar

1 teaspoon vanilla extract

1/2 teaspoon cinnamon

1/4 teaspoon nutmeg

1/4 teaspoon allspice

1/8 teaspoon ginger

2 large eggs, at room temperature

For the Apple Topping:

2 Granny Smith Apples, peeled, cored & sliced thin

1 tablespoon lemon juice

1/2 teaspoon cinnamon

1 tablespoon light brown sugar

For the Crisp Topping:

1/2 cup old-fashioned oats

1/2 cup flour

1/2 cup light brown sugar

1/2 teaspoon cinnamon

4 tablespoons butter, softened

Directions:

Preheat oven to 325 F.

For the Crisp Topping: In a medium bowl mix together the oats, flour, sugar and cinnamon until well combined. Add in the butter and mix until the mixture is crumbly. It might be best to use your hands. Refrigerate or freeze until ready to use.

For the Apple Topping: In a medium bowl toss together the apples, lemon juice, cinnamon and sugar until the apples are well coated. Set aside.

For the Cheesecake: In a large bowl beat together the cream cheese, sour cream, sugar, vanilla extract, cinnamon, nutmeg, allspice and ginger with a hand mixer on medium speed until well blended. Add the eggs and continue beating until the eggs are incorporated into the batter.

Assemble: Place the graham cracker crust on a baking sheet then pour the cheesecake batter into the crust. Arrange the apples evenly over the batter and then sprinkle the crisp topping over the apples.

Bake in the preheated oven for 50-55 minutes, until the center is set. To prevent the crisp topping from over-browning or burning, tent the cheesecake with aluminum foil for the last 15-20 minutes.

Cool on the pan for a few minutes before transferring to a wire rack to cool completely. Cover with a piece of plastic wrap or aluminum foil and refrigerate for at least 8 hours (or overnight) before serving.

Recipe first appeared on Bead Yarn & Spatula.

Apple Tiramisu

This week I’m bringing you a twist on some traditional desserts, a Fall twist that is with the addition of apples to both. Up first an Apple Tiramisu, and later this week an Apple Crisp Cheesecake.

So, where did the idea for an Apple Tiramisu come from? Well, I had a pack of ladyfingers that were quickly approaching their expiration date and while I was planning on making a traditional tiramisu with them, I started to think that maybe something a little more seasonal would work. And thankfully I was right. Truth be told I had some reservations that the apple filling, similar to what you would make for apple pie, would work in the tiramisu.

To start, I made the apple filling since it needed to be completely cooled before assembling the tiramisu. After peeling, coring and chopping my apples I tossed them with lemon juice, light brown sugar, cinnamon and flour. I then cooked them in melted butter along with a few tablespoons of water in a medium saucepan. The apples were soft, but still had a slight crunch to them.

While the apples cooled, I made a bourbon whipped cream and the mascarpone filling. I folded some of the bourbon whipped cream into mascarpone cheese and reserved the rest for the topping of the tiramisu. I also made the dipping mixture for the ladyfingers by whisking together milk, sugar, vanilla extract and bourbon.

Once all the components were done it was time to start assembling the tiramisu. I began by dipping half of the ladyfingers in the milk mixture and arranging them in an even layer in the bottom of an 8×8-inch baking dish. I spread half of the mascarpone filling over the ladyfingers and then topped it with half of the apple mixture. I repeated the layer one more time and then spread the reserved bourbon whipped cream over the top. I covered the tiramisu with a piece of wax paper and aluminum foil and refrigerated it overnight.

The following day I made a small and quick batch of caramel sauce. After sprinkling chopped walnuts on top of the tiramisu I then drizzled the caramel sauce over it.

This was a nice Fall twist on the traditional Tiramisu. It was light with just the right amount of sweetness from the apples.

Apple Tiramisu

Ingredients:

7oz. package of Ladyfingers

1/2 cup chopped walnuts, for topping

For the Apple Filling:

3 large Granny Smith Apples, peeled, cored & chopped

2 tablespoons lemon juice

2 tablespoons light brown sugar

1 teaspoon cinnamon

1 tablespoon flour

3 tablespoons unsalted butter

4 tablespoons water

For the Mascarpone Cream:

8 oz. mascarpone cheese, at room temperature

3 teaspoons vanilla extract, divided

2 cups heavy cream

1/3 cup sugar

2 tablespoons bourbon

For the Ladyfingers Dipping Mixture:

1 1/2 cups milk*

1 tablespoon sugar

1/2 teaspoon vanilla extract

2 tablespoons bourbon

For the Caramel Drizzle:

1/4 cup light brown sugar

2 tablespoons unsalted butter

1 tablespoon milk

1/2 teaspoon vanilla extract

*I used whole milk

Directions:

Apple Filling: In a medium bowl toss the apples with the lemon juice. Add in the sugar, cinnamon and flour and toss together until the apples are well coated.

In a medium saucepan melt the butter over medium heat, add the apples and water and toss everything together. Lower the heat to medium-low and cook the apples until they are soft but still have a slight crunch to them, 10-15 minutes, stirring occasionally so the apples don’t stick to the pan. Remove from the heat and cool completely.

Mascarpone Cream: In a medium bowl stir together the mascarpone cheese and 1 teaspoon of the vanilla extract until well combined.

In another medium bowl, beat together the heavy cream, sugar, bourbon and the remaining 2 teaspoons of vanilla extract with a hand mixer on medium speed until stiff peaks form. Reserve about 1 1/4 cups of the whipped cream mixture.

Gradually fold the remaining whipped cream mixture into the mascarpone cheese mixture. Start with a quarter of the of the whipped cream mixture and then the remaining amount. Continue folding the two mixtures together until no streaks of either remain and they are well incorporated.

Dipping Mixture: In a shallow bowl whisk together all the ingredients – milk, sugar, vanilla extract and bourbon – until combined.

Assemble: Dip the rounded side of half of the ladyfingers in the dipping mixture and arrange them in an even layer in the bottom of an 8×8-inch baking dish. Top with half of the mascarpone cream and then spread half of the cooled apple mixture over the cream. Repeat the layers once more. Top with the reserved whipped cream mixture. Cover with a piece of wax paper and them aluminum foil and refrigerate for at least 4 hours, or overnight.

For the caramel drizzle: An hour before serving, make the caramel sauce. In a small saucepan combine the sugar, butter and milk. Heat over medium heat until sugar melts and the mixture boils. Boil for a minute or two stirring occasionally, until the sauce thickens. Remove from the heat and stir in the vanilla extract. Allow to cool. The sauce will continue to thicken as it cools. If it looks like it’s separating while it’s cooling, whisk it for a minute or so.

Right before serving, sprinkle the chopped walnuts over the tiramisu and then drizzle with caramel sauce.

Store leftovers in the refrigerator.

Recipe first appeared on Bead Yarn & Spatula.

Pumpkin Churro Bundt Cake

I must say, I haven’t gone crazy this year with baking pumpkin desserts. I had a couple of recipes I wanted to try – which I did – and there were others that I came across that I passed on. Could it be that my love of pumpkin is fading? Mmm…. I don’t think so. I’ve just been focusing on getting some other things done and finding and creating other recipes to make. Now, if you love pumpkin and you love churros today’s cake is for you… It’s a Pumpkin Churro Bundt Cake.

The base of the cake is a white cake mix that is doctored with some spices and of course pumpkin puree. The pumpkin flavor is not overpowering at all and the puree gives the cake a nice light orange hue. Not the artificial looking orange you may see with some pumpkin desserts thanks to the addition of orange food coloring.

And to get the churro effect, once the cake has completely cooled it is rubbed with a cinnamon sugar mixture. I must say, I liked that the recipe didn’t call for the cake being brushed with melted butter before coating it with the cinnamon sugar. I think the cake would have been almost too wet then since the pumpkin helps to make the cake incredibly moist. And yes, there were no issues getting the cinnamon sugar to stick to the cake without it.

Along with the cinnamon mixture on the outside of the cake, there is also a swirl of it on the inside which gives each piece of the cake an extra spice and sweet kick.

If you are in the mood for actual Pumpkin Churros, try the recipe below:

Pumpkin Churros

Pumpkin Churro Bundt Cake

Ingredients:

For the Cake:

1 15.25 box of white cake mix

1/2 cup flour

1 teaspoon cinnamon

1 teaspoon pumpkin pie spice

1/4 teaspoon nutmeg

1/8 teaspoon salt

1/4 teaspoon baking powder

3/4 cup buttermilk

3/4 cup light brown sugar

1/2 cup pumpkin puree

1/2 cup vegetable oil

2 large eggs

1 egg yolk

1 1/2 teaspoons vanilla extract

For the Cinnamon Swirl:

1/2 cup light brown sugar

2 teaspoons pumpkin pie spice

1 teaspoon cinnamon

1/8 teaspoon nutmeg

Directions:

Preheat the oven to 350F. Spray a Bundt pan with baking spray and set aside.

Combine the ingredients for the cinnamon swirl in a medium bowl, set aside.

In a large bowl sift together the cake mix, flour, cinnamon, pumpkin pie spice, nutmeg, salt and baking powder.

In a separate large bowl whisk together the remaining ingredients – buttermilk, pumpkin puree, light brown sugar, oil, eggs and vanilla extract – until well combined. Add this mixture to dry mixture and whisk together until well combined.

Pour half of the batter into the prepared pan and then sprinkle 1/3 cup of the cinnamon sugar evenly over the top of the batter and then pour the remaining batter into the pan.

Bake in the preheated oven for 35-40 minutes, or until a cake tester inserted in the cake comes out clean.

Place the pan on a wire rack and allow the cake to cool completely. Invert the cake on a platter or cake board and rub the remaining cinnamon sugar around it.

Recipe from Sweet Meli Bakery