Tortellini with Pumpkin Alfredo Sauce

Every now and then I do make a pumpkin dish that is not a dessert. I’ve actually made this dish quite a few times (I mentioned it in a post way back in 2013, but, never actually blogged about it) but, this was the first time I followed the recipe and used tortellini as opposed to another type of pasta – usually penne – and I must say it made a huge delicious difference! Some dishes are just better with a little extra cheese in them. One thing though, the leftovers of this dish do taste good, but, it’s much better when you eat it right after you make it because the sauce is super creamy then.

img_0018

Tortellini with Pumpkin Alfredo Sauce

Ingredients:

2 9-ounce packages cheese tortellini*

1 tablespoon unsalted butter

1 small shallot, finely chopped

1/2 cup canned pure pumpkin

1/8 teaspoon of nutmeg

1 1/4 cups heavy cream

1/4 cup grated parmesan cheese, plus more for topping

Freshly ground pepper

Kosher salt

Directions:

Bring a large pot of salted water to boil and cook the tortellini according to the package directions. Reserve 1/2 cup of the cooking water and then drain the pasta.

While the tortellini is cooking, melt the butter in a skillet over medium-high heat. Add the shallot and cook, stirring until slightly soft. About 2 minutes, making sure not to burn the shallots.

Add the pumpkin and the nutmeg and continue cooking for about another minutes. Stir in the cream and bring to a low boil. Reduce the heat to medium low and let simmer while stirring until slightly thickened, about 5 minutes.

Finally, add in the cheese and continue cooking until thick. Season with the salt and pepper.

Add the tortellini to the skillet with the pumpkin sauce and toss to coat, adding some of the reserved pasta water to loosen the sauce**. Serve topped with parmesan cheese.

*I used a 20oz. package of Buitoni Three-Cheese Tortellini

**I used about 1/4 cup of the reserved water

Recipe from Food Network

Slow Cooker Sunday: Pot Roast

Usually when I make pot roast I make it in the oven and top it with beef broth and an array of vegetables – potatoes, carrots, onions, & green beans. Invariably though while the gravy turns out delicious, the meat is on the dry side. Enter my slow cooker. The answer to juicy fall of the bone meat every time.

To begin, I sprinkled a 4 pound chuck roast with a generous amount of Kosher salt and freshly ground pepper. I then coated it with flour and browned it in an oil-coated skillet over medium-high heat. Next I transferred it to the inset of my slow cooker and topped it with carrots, celery, onions and mashed garlic.

IMG_0115

In the same skillet I used to brown the meat I made gravy using tomato paste, beef broth, red wine, bay leaves, fresh thyme, allspice, salt and pepper.

IMG_0117

Once the gravy had thickened slightly I poured it over the meat and vegetables and set the slow cooker to cook on low for 8 hours.

IMG_0118

After 8 hours I removed the roast from the slow cooker and placed it in a pan.

IMG_0132

And I mixed the gravy and vegetables with some chopped parsley.

IMG_0134

The meat was so tender that instead of slicing it it was better to shred it using two forks. Unfortunately I didn’t take any pictures as I was too eager to dig in and enjoy it. But, take my word; it was DELISH and incredibly tender.


Slow Cooker Pot Roast

Ingredients:

1 4lb beef chuck roast

Kosher salt and freshly ground pepper

1/3 cup flour, plus more for coating

3 tablespoons olive oil

4 medium carrots, cut into 2-inch pieces

3 stalk celery, peeled and cut into 2-inch pieces

1 medium onion, cut into 1/2 inch wedges

3 garlic cloves, mashed

3 tablespoons tomato paste

1 cup red wine

3 cups low-sodium beef broth

3 bay leaves

2 sprigs fresh thyme

1/2 teaspoon ground allspice

1/2 cup loosely packed parsley, chopped

Directions:

Sprinkle the roast with 2 1/2 teaspoons of salt and 1 1/2 teaspoons of pepper. Coat in flour and shake off any excess. Heat 2 tablespoons of the olive oil in a large nonstick skillet over medium-high heat, add the roast and cook until golden brown on all sides, about 8 minutes Turning as needed. Transfer the roast to the insert of a slow cooker, along with the carrots, celery, onions and garlic.

Add the remaining tablespoon of olive oil to the skillet over medium heat. Add the tomato paste and stir until the oil begins to turn brick-red, about 1 minute. Add the flour and wine and whisk until thick – there may be some lumps. Add the beef broth, bay leaves, thyme, allspice, 1/2 teaspoon salt and a few grinds of pepper and bring to a simmer, whisking, until the gravy is smooth and thickens slightly, about 4 minutes.

Pour the gravy into the slow cooker over the roast and vegetables. Cover and cook on low for 8 hours – the roast and vegetable should be tender.

Remove the roast and let rest for a few minutes. Discard the thyme stems and strain the vegetables, reserving the gravy. Toss the vegetables with half the parsley and season with salt and pepper. Stir the remaining parsley into the gravy and season with salt and pepper. Slice the roast against the grain. If the meat is too tender you can opt to shred it using two forks. You can serve the meat and vegetables on a platter, moistening them with some of the gravy and serve the remaining gravy on the side.

Recipe from The Food Network

Pumpkin Tiramisu

So, here’s one of those pumpkin recipes I wanted to try that I mentioned in my Pumpkin Bread post… A Pumpkin Tiramisu. About a month or so ago I started thinking about different Pumpkin desserts, not just the typical pie or loaf bread or a variation of them but something more outside the box. Hence the Pumpkin Tiramisu. You may not think it’s not too out of the box, but, how many times have you gone to a restaurant or bakery and they had a different type of tiramisu?

I began by making a pumpkin mousse. In a large bowl I whisked together the pumpkin puree along with brown sugar, ground ginger, cinnamon & nutmeg, salt and sugar. Once that was well combined I added in mascarpone cheese and heavy cream and beat it with my hand mixer on medium speed until soft peaks formed. I must say, this pumpkin mousse is delicious on its own. I actually had some leftover after assembling the tiramisu and it’s the perfect fall dessert with not as much guilt.

img_0350

Next, it was time to assemble. Prior to making the mousse I brewed coffee (I really didn’t brew it, I just made instant – I’m not a coffee drinker) and whisked in sugar and a few tablespoons of Kahlua. After letting it cool, I soaked ladyfinger cookies in it for a few seconds and arranged them on the bottom of an 8×8 baking dish. I then spread the mousse over the cookies and repeated these two steps one more time.

img_0351

And voila… I covered it with wax paper and aluminum foil and refrigerated it overnight.

img_0352

The following day I shaved chocolate over it and enjoyed it!

img_0354


Pumpkin Tiramisu

Ingredients:

15-ounce can pumpkin puree

1/2 cup light brown sugar

3/4 teaspoon ground ginger

3/4 teaspoon ground cinnamon

1/4 teaspoon ground nutmeg

1/4 teaspoon kosher salt

1/2 cup plus 2 tablespoons granulated sugar

1 1/2 cups mascarpone chees

1 1/2 cups heavy cream

2 cups brewed coffee, cooled

2 tablespoons Kahlua*

2 7-ounce packages (about 20) dry ladyfingers

Chocolate shavings, for garnish

*Optional

Directions:

In a large bowl whisk together the pumpkin puree with the brown sugar, ginger, cinnamon, nutmeg, salt and 1/2 cup of the granulated sugar. Add the mascarpone cheese and the heavy cream. With an electric mixer, beat the mixture on medium speed until soft peaks form. Be sure not to overbeat.

In a medium bowl combine the coffee, 2 tablespoons of sugar and the Kahlua and whisk together until the sugar dissolves. Dip half the ladyfingers in the coffee mixture and arrange them on the bottom of an 8×8 baking dish. Spread a generous amount of the pumpkin mousse over the ladyfingers. Repeat these two steps cover and refrigerate overnight. You will have some mousse leftover.

Prior to serving garnish the tiramisu with the chocolate shavings.

This recipe was slightly modified from Food & Wine

Slow Cooker Sunday: Butternut Squash Soup

Slow Cooker Sunday is back! Granted I will put the disclaimer in that I may not be posting every Sunday though. Thankfully I am covered for the next few Sunday’s as I have two recipes in my blog queue that I never posted. It’s a good thing recipes don’t expire! LOL! So, in honor of my first Slow Cooker Sunday post in a quite a few months and since its Fall I bring you a Butternut Squash Soup that’s super easy, super quick and super delicious!

Truthfully this soup couldn’t get any easier… I placed all the ingredients – butternut squash, chicken broth, coconut milk, chopped onion, brown sugar, soy sauce and crushed red pepper – in my slow cooker…

img_0345

And set it cook on low for 4 hours. Granted the before cooking and after cooking are pretty much the same, but, trust me this was 4 hours later.

img_0347

I then transferred the soup to a pot and used an immersion blender to blend all the ingredients together until it was smooth. And then finally I stirred in lime juice, which really took the flavor of the soup up another notch. Citrus really does have a way of bringing out and bringing together different flavors. And that was it!

img_0348


Butternut Squash Soup

Ingredients:

2 pounds butternut squash, peeled, seeded and cut into 1-inch pieces

2 cups chicken broth

1 14-ounce can unsweetened coconut milk

1/2 cup finely chopped yellow onion

1 tablespoon light brown sugar

1 tablespoon soy sauce

1/2 teaspoon crushed red pepper

2 tablespoon lime juice

Directions:

In a 3 1/2 to 4 quart slow cooker, combine all ingredients except for the lime juice.

Cover and cook on low-heat setting for 4 to 5 hours or on high-heat setting for 2 to 21/2 hours.

Use an immersion blender, food processor or blender to blend soup until smooth. Stir in lime juice and enjoy.

Slightly adapted from Better Homes & Gardens

Funfetti Cake

Are you ever too old for sprinkles? If you ask me, I’ll say absolutely not! I’m thirtysomething and when I go to Carvel to get a cup of soft serve vanilla ice cream I always ask for them to put sprinkles in the bottom of the cup before swirling in the ice cream and then ask for more sprinkles on top. So, when a friends’ younger sister asked me to make her a Funfetti cake for her 30th birthday I was more than happy to oblige!

To create this Funfetti cake, I followed a recipe to make a white cake and in the end I folded in a cup of rainbow sprinkles. To create the batter for the cake I began by beating butter until it was creamy and then gradually added in sugar and continued beating it until it was light and fluffy. In a separate bowl I sifted together flour and baking powder and in a measuring cup I mixed together milk and vanilla extract. I added these two to the butter mixture alternating between the two, starting and ending with the flour mixture. In another separate bowl, I beat 5 egg whites until stiff peaks formed. I then folded the egg whites along with the sprinkles into the batter.

img_0307

I divided the batter among 3 8-inch round cake pans that I sprayed with baking spray and then baked them in a 350 F oven for about 25 minutes. After letting the cakes cool in the pans for about 10 minutes I then turned the cakes out on wire racks so they could cool completely.

img_0309

I then made my go-to frosting, a Fluffy Vanilla Frosting from Martha Stewart. After crumb coating the cake…

img_0319

I finished frosting it, added some dropped dollops on top and of course some sprinkles. While everyone wasn’t a fan of the Funfetti Cake – I never realized it was one of those cakes that you either love or hate – the Birthday girl thoroughly enjoyed it!

img_0329


Funfetti Cake

Ingredients:

1 cup whole milk

1 1/2 teaspoons vanilla extract

1 cup (2 sticks) unsalted butter, at room temperature

2 cups sugar

3 cups cake flour

1 tablespoon baking powder

5 egg whites

3/4 cup rainbow sprinkles

Directions:

Preheat the oven to 350 F. Grease and flour 3 8-inch round cake pans.

Stir together the milk and vanilla extract and set aside.

Beat the butter at medium speed until creamy; gradually add in the sugar, beating until the mixture becomes light and fluffy.

In a separate bowl sift together the cake flour & baking powder.

Alternatively add the whole milk and flour mixture into the butter mixture, beginning and ending with the flour mixture. Beat at low speed after each addition until just combined.

Gently fold in the egg whites and sprinkles and then divide the batter among the 3 pans.

Bake for 20 to 25 minutes, or until a cake tested come out clean. Cool the cakes in the pans on wire racks for 10 minutes, and then invert the cakes on the racks and let cool completely.

Recipe based on Mrs. Billets White Cake


Fluffy Vanilla Frosting

Ingredients:

1 1/2 cups (3 sticks) unsalted butter, at room temperature

1 pound (4 cups) Confectioners’ sugar, sited

1/2 teaspoon vanilla extract

Directions:

With an electric mixer, beat the butter on medium-high speed until pale and creamy.

Reduce the speed to medium and add the sugar 1/2 cup at a time, after every 2 additions increase the speed to high for 10 seconds to aerate the frosting. Scrape the bowl as necessary.

Add the vanilla and continue mixing until smooth.

Recipe from Martha Stewart

Chicken Egg Rolls

There’s nothing like making homemade takeout… you know those staples like pizza, burgers, Mexican and probably one of the most popular Chinese. I don’t know about you but one of the things I like the most from my Chinese take-out are the egg rolls. And today I am bringing you a super simple and absolutely delicious recipe to making egg rolls at home!

First, in a medium bowl, I combined shredded chicken (I bought a cooked rotisserie chicken from the supermarket), broccoli slaw (which you can find in your local supermarket in the bagged salad area), cilantro, scallions, and freshly grated ginger along with teriyaki sauce, duck sauce and vegetable oil.

IMG_0197

Next, with the egg roll wrapper positioned in a diamond shape in front of me I placed about two tablespoons of the mixture in the lower corner.

IMG_0198

To roll, I folded up the bottom corner, then each of the sides (it’ll look like an envelope) and then dabbed the top edges with water and then rolled to enclose it.

IMG_0200

Once I had finished rolling all of the egg rolls I heated vegetable oil in my cast iron skillet. I’ll say it was about 1/4 of the way up the sides of my skillet. Now, I’m not one to take the temperature of the oil when frying food. My trick, place a wooden spoon in the center of the oil and if bubbles form around it you know the oil is ready. This is definitely a lot safer than my other “trick,” flicking water into the oil. Not a lot of course, just enough to get a reaction. So, once my oil was ready I fried the egg rolls in batches, turning, about 3-4 minutes until they were golden brown. I then transferred them to a paper towel-lined plate to drain.

IMG_0201

I served the egg rolls with a broccoli slaw salad made by combining the remaining broccoli slaw, cilantro and scallions in a large bowl and tossing it with teriyaki sauce, duck sauce, vegetable oil and rice vinegar. And of course with a side of duck sauce for dipping! YUM! The fresh grated ginger is really the standout ingredient in these egg rolls… You taste it, but, not as an overpowering ingredient but as one that really brings all the flavors together.

IMG_0206

And it wasn’t long before I made these again (less than a week later) but without the chicken, yet, they were just as delicious. I am thinking of trying shrimp next.


Chicken Egg Rolls with Broccoli Slaw

Ingredients:

1 1/2 cups shredded rotisserie chicken, skin removed

4 cups broccoli slaw (about 8 ounces)

1/2 cup roughly chopped fresh cilantro

4 scallions, sliced

2 tablespoons grated peeled fresh ginger

3 tablespoons teriyaki sauce

3 tablespoons duck sauce, plus more for serving

2 tablespoons vegetable oil, plus more for serving

8 egg rolls wrappers

1 tablespoon rice vinegar


Directions:

Mix the chicken, 2 cups broccoli slaw, 1/4 cup cilantro, 2 scallions, the ginger, 2 tablespoons each of teriyaki sauce and duck sauce and 1 tablespoon of vegetable oil in a medium bowl.

Heat about 1/4 inch of vegetable oil in a large skillet over medium-high heat until the oil is hot but not smoking. While the oil is heating, arrange the chicken mixture in the center of each egg roll wrapper.

Tuck in the ends and roll to enclose, dab the edges with water and continue to roll to enclose.

Once the oil is hot, fry the egg rolls in batches, turning, 3 to 4 minutes. Transfer to a paper towel-lined plate to drain.

To make the slaw, combine the remaining broccoli slaw, cilantro and scallions in a large bowl. Add the remaining tablespoon each of teriyaki sauce, duck sauce and vegetable oil along with the rice vinegar, toss. Serve with the egg rolls.

**The original broccoli slaw recipe included a 14-ounce can of baby corn which I opted to leave out.

Recipe from Food Network

Pumpkin Bread

It’s finally Fall and you know what that means – well, it’s already in full effect – Pumpkin Spice everything! It really is amazing how many different things come in Pumpkin Spice. I actually picked up a box of Pumpkin Spice Cheerios last week while grocery shopping. I haven’t tried them yet though. And while at Target the other day I saw Pumpkin Spice Caramel Corn, but, I just couldn’t bring myself to buy it. There has to be a line drawn somewhere… LOL!

So, in honor of Fall finally arriving I bring you my first pumpkin treat of the season… Pumpkin Bread. A simple yet delicious treat that I was quite surprised I hadn’t made before. I opted to halve the recipe and use the remaining pumpkin puree to make Pumpkin Pancakes, unfortunately they didn’t come out that great – there wasn’t much pumpkin flavor. Hopefully I’ll attempt them again before the end of the season, if not, there are some other pumpkin recipes that I can’t wait to try and share. But for now back to the… Pumpkin Bread!

img_0344


Pumpkin Bread

Ingredients:

3 (1 1/2) cups sugar

1 (1/2) cup vegetable oil

4 (2) eggs, lightly beaten

16 ounces (1 cup) canned unsweetened pumpkin

3 1/2 (1 3/4) cups flour

2 (1) teaspoons kosher salt

2 (1) teaspoons baking soda

1 (1/2) teaspoon baking powder

1 (1/2) teaspoon ground nutmeg

1 (1/2) teaspoon ground allspice

1 (1/2) teaspoon cinnamon powder

1/2 (1/4) teaspoon ground cloves

2/3 (1/3) cup water

*Please note the amounts in parenthesis are for 1 loaf

Directions:

Preheat the oven to 350 Degrees F. Butter and flour 2 9 x 5 loaf pans (I opted to use baking spray which contains butter and flour.)

Stir together the sugar and oil and then add in the eggs and pumpkin. You could also use a hand or stand mixer on the lowest setting.

In a separate bowl combine all of the dry ingredients, the flour to the ground cloves.

Blend the dry ingredients into the pumpkin mixture, alternating with the water.

Divide the batter among the loaf pans and bake for 30 to 40 minutes, or until a cake tester comes out clean. Let stand for 10 minutes and then remove from the pans and let cool completely on a wire rack.

Recipe from Food Network

Cake, Cake and More Cake!

So, if you follow me on Instagram or if you take a peek at my Instagram feed on the lower right-hand side of this page you’ll notice that I post more of my baking adventures on there than I actually blog about. It’s for various reasons… Sometimes I’ve already blogged and shared the recipe or as this post is about, its pictures of cakes that I have made and decorated and don’t blog about because I am really bad at taking pictures of the step by step of decorating them. So, I decided that since I made a fair share of cakes this summer I would compile them into a post and give a little description of each.

Up first, a Lion Guard themed birthday cake that I made for a friend’s daughters’ 2nd birthday. Whenever I create these themed fondant cakes quite a bit of thought goes into them and a bit of Pinterest surfing. A week before I actually made the cake I did some prep work by cutting out all the leaves, flowers and animals and stored them in my refrigerator.

img_00631

And then the following week it was time to bake, frost, roll fondant and assemble. After covering the base cake with yellow fondant I painted it orange to give the effect of a sunset. To do so, I combined orange gel color with vodka. I didn’t completely mix the two so I would get different shades of orange as the gel color diluted into the vodka. Once the color was dry I attached all of the cut-outs I made the week before to the cake and topped it with some Lion Guard figurines I picked up from my local Disney Store.

lion-guard-cake

For the 4th of July I created this patriotic cake.

4th-of-july-cake

The inside was patriotic as well…

img_01791

As a belated birthday gift for a dear friend I made this adorable cake topped with a bright big sunflower and some cute purple flowers that I am not sure the name of. To decorate the sides of the cake I piped ruffles vertically using a 1M tip.

img_02531

And finally, this past weekend I made this cake for another dear friend’s birthday. It was truly a death by chocolate cake… A chocolate cake with chocolate frosting and the filling was the mocha cream that I used for the Mocha Chocolate Icebox Cake I blogged about last week. I knew I had to use that delicious cream again for something and what better way than with chocolate cake. I created the dark and white chocolate toppers for this cake by melting Wilton candy melts and then piping them into small drops using a Wilton 6B tip and then placing them in the refrigerator so they could set. The other drops are the mocha cream which I piped using the 6B as well as a 4B tip.

img_02881

And there you have it… My summer shown through decorated cakes!


Mocha Chocolate Icebox Cake

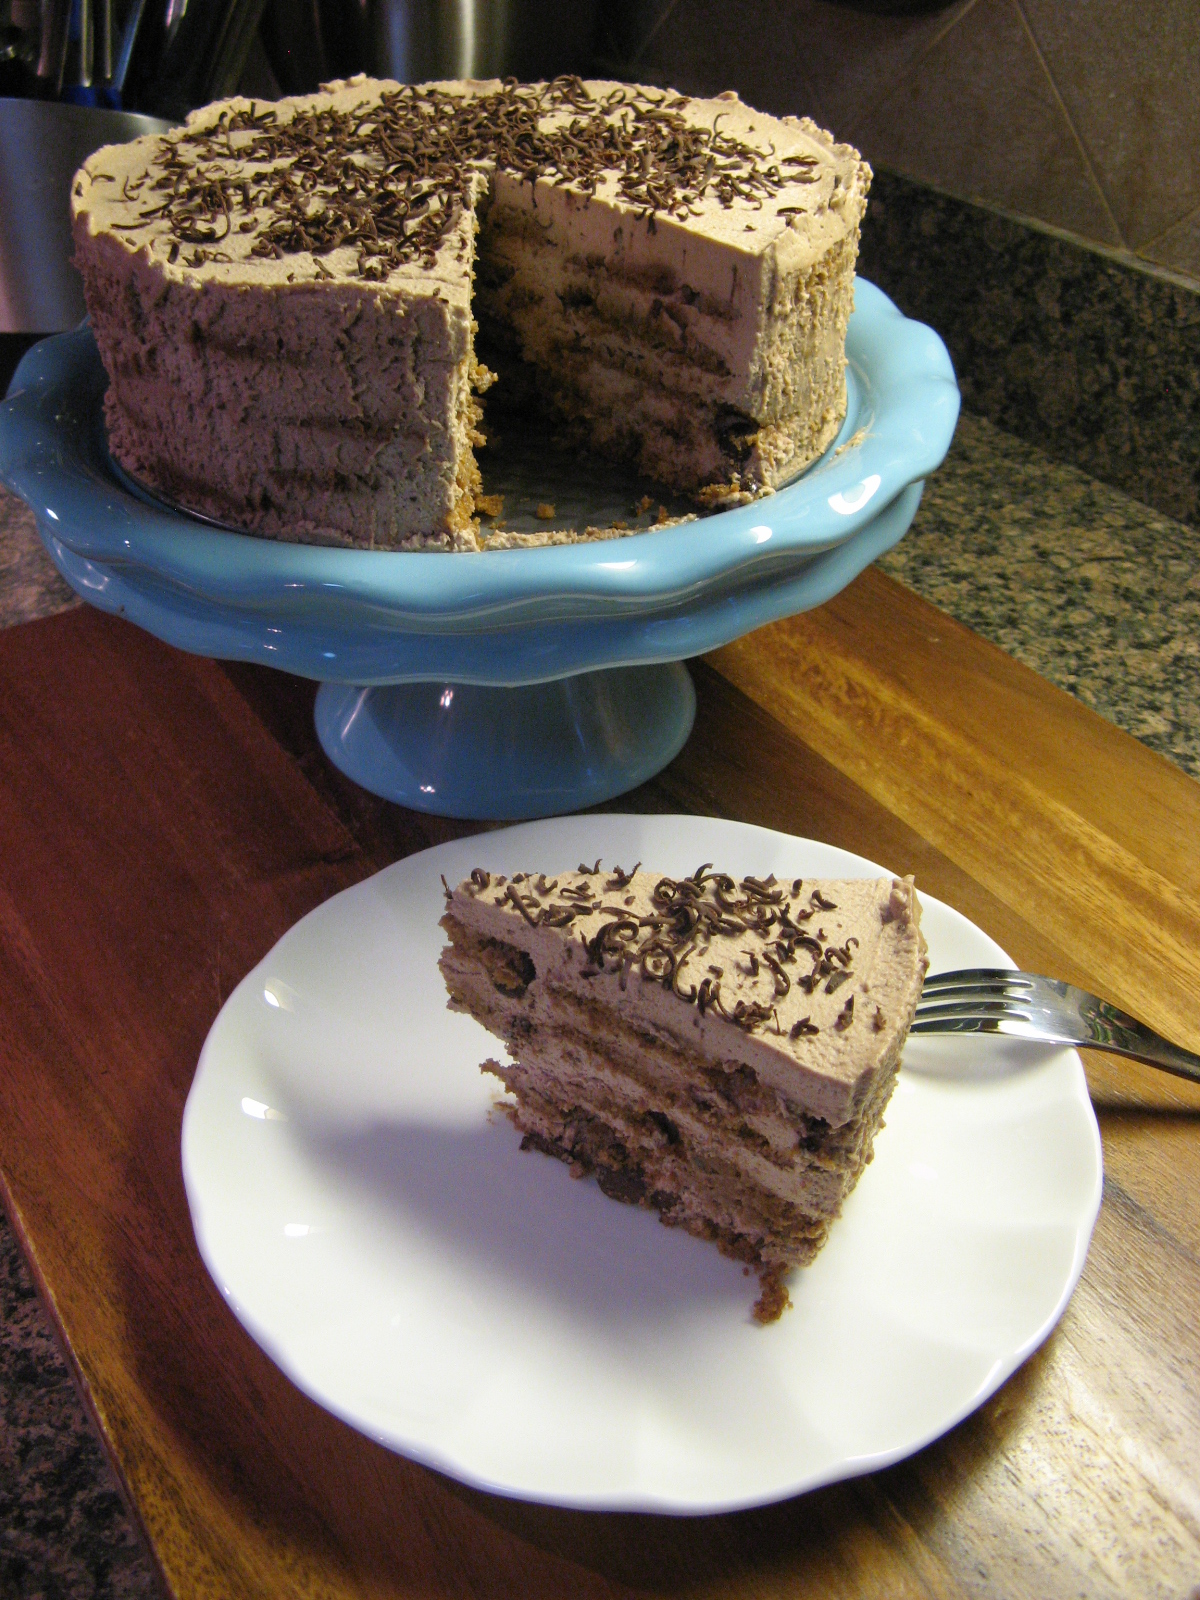
The unofficial end of the summer is upon us! A bittersweet time… the lazy days of summer are coming to an end, kids go back to school (yay for crazy morning traffic – that being said in my most unenthusiastic and sarcastic voice) and temperatures begin to drop. Granted, that last fact is a welcome change to me. Fall is upon us! If you didn’t know, it’s my favorite season! There’s pumpkin everything (I’m actually eating a Chobani Flip Pumpkin yogurt as I write this), apple picking, the crisp air in the morning, the leaves changing color and so many other wonderful things. It also leads us to my other favorite time of the year… The Holiday Season! You know, that time between Thanksgiving and Three Kings Day. Well, that’s what I personally consider the Holiday Season to be, I know for some it ends with the New Year. But, before we get to all that and our ovens working overtime baking wonderful holiday treats, I have a dessert for you that’s perfect for any BBQ’s you’ll be heading to this holiday weekend and for any of those random 90+days that are sure to come… An icebox cake, more specifically a Mocha Chocolate Icebox Cake.

I first saw this recipe on Food Network’s Instagram feed. It’s from Ina Garten aka “The Barefoot Contessa” and I knew I had to make it. And then a few weeks later it was featured in their magazine. Its super simple, only requires 1 bowl for mixing and you have don’t have to bake it. You assemble it and let it set overnight in your fridge – hence icebox cake.

In a large bowl combine heavy cream, mascarpone, sugar, Kahlua, cocoa powder, espresso powder & vanilla extract. Using a hand mixer, mix on low speed until combined and slowly raise the speed until stiff peaks form. Before using this mocha cream of course I had to try it and it tasted similar to the cream used in Tiramisu… Delish!

IMG_0234

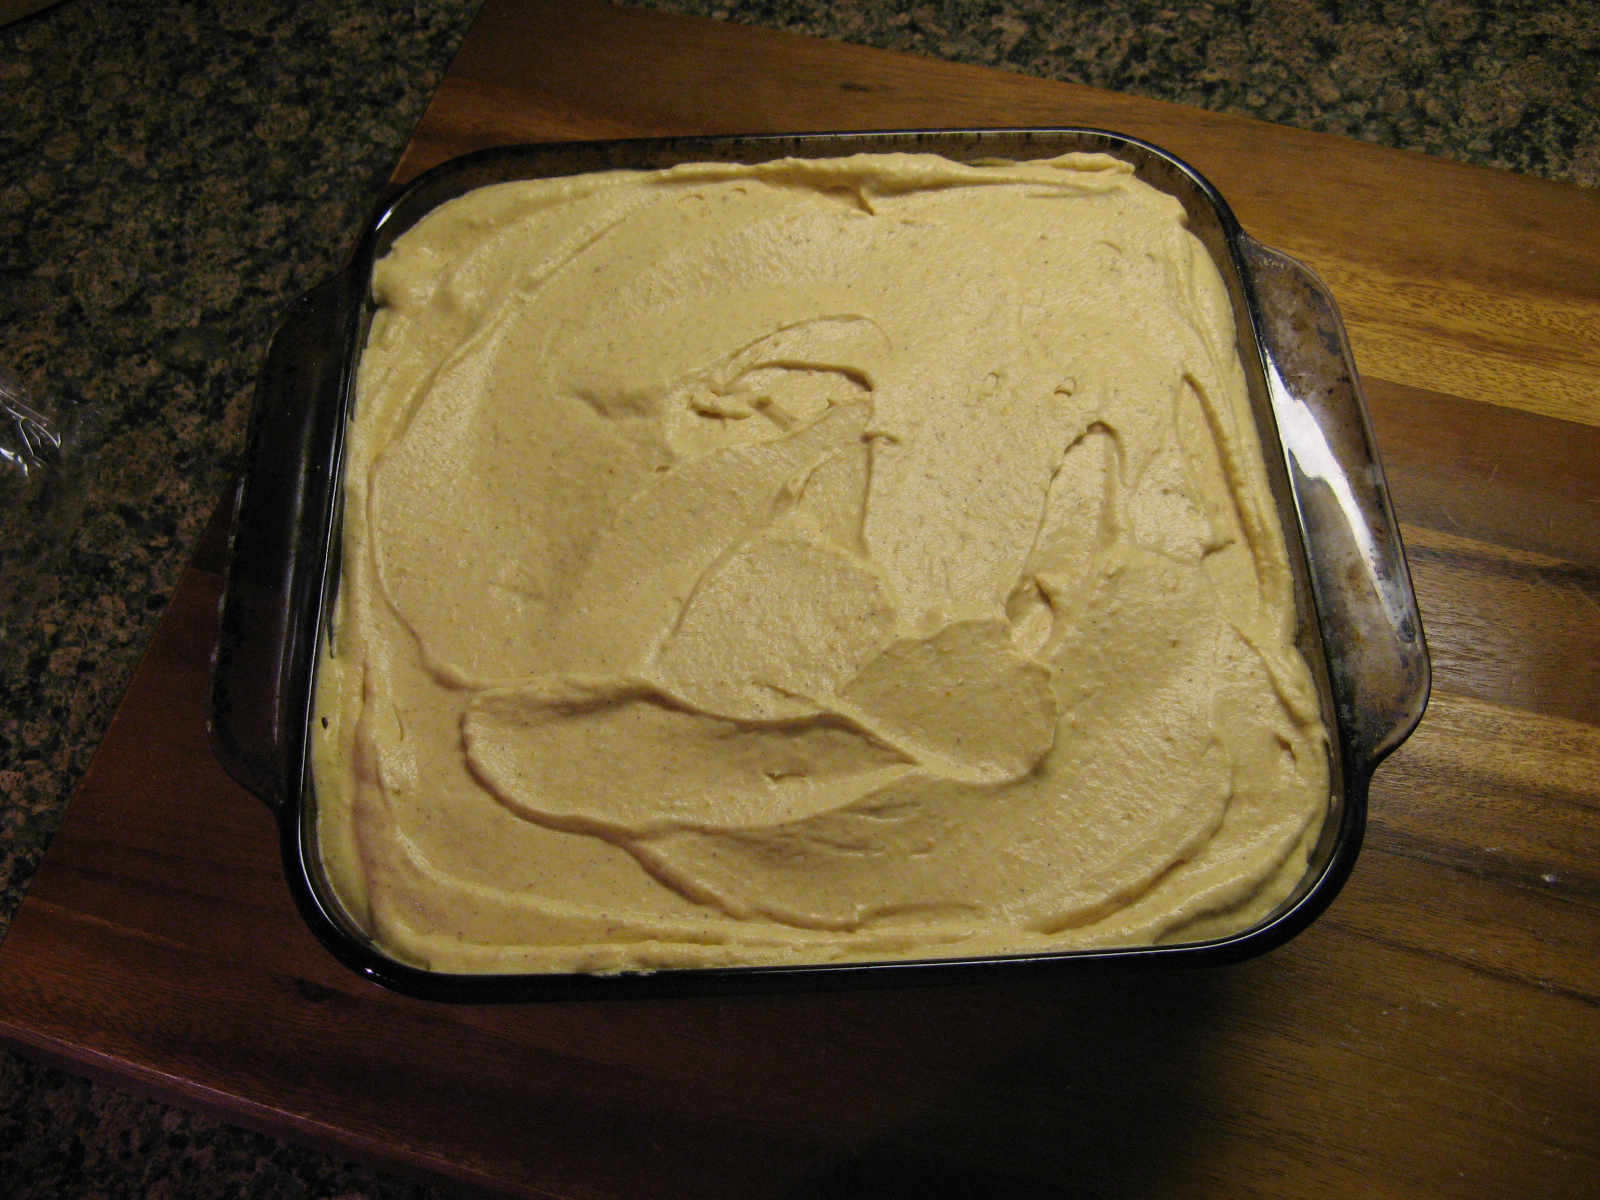
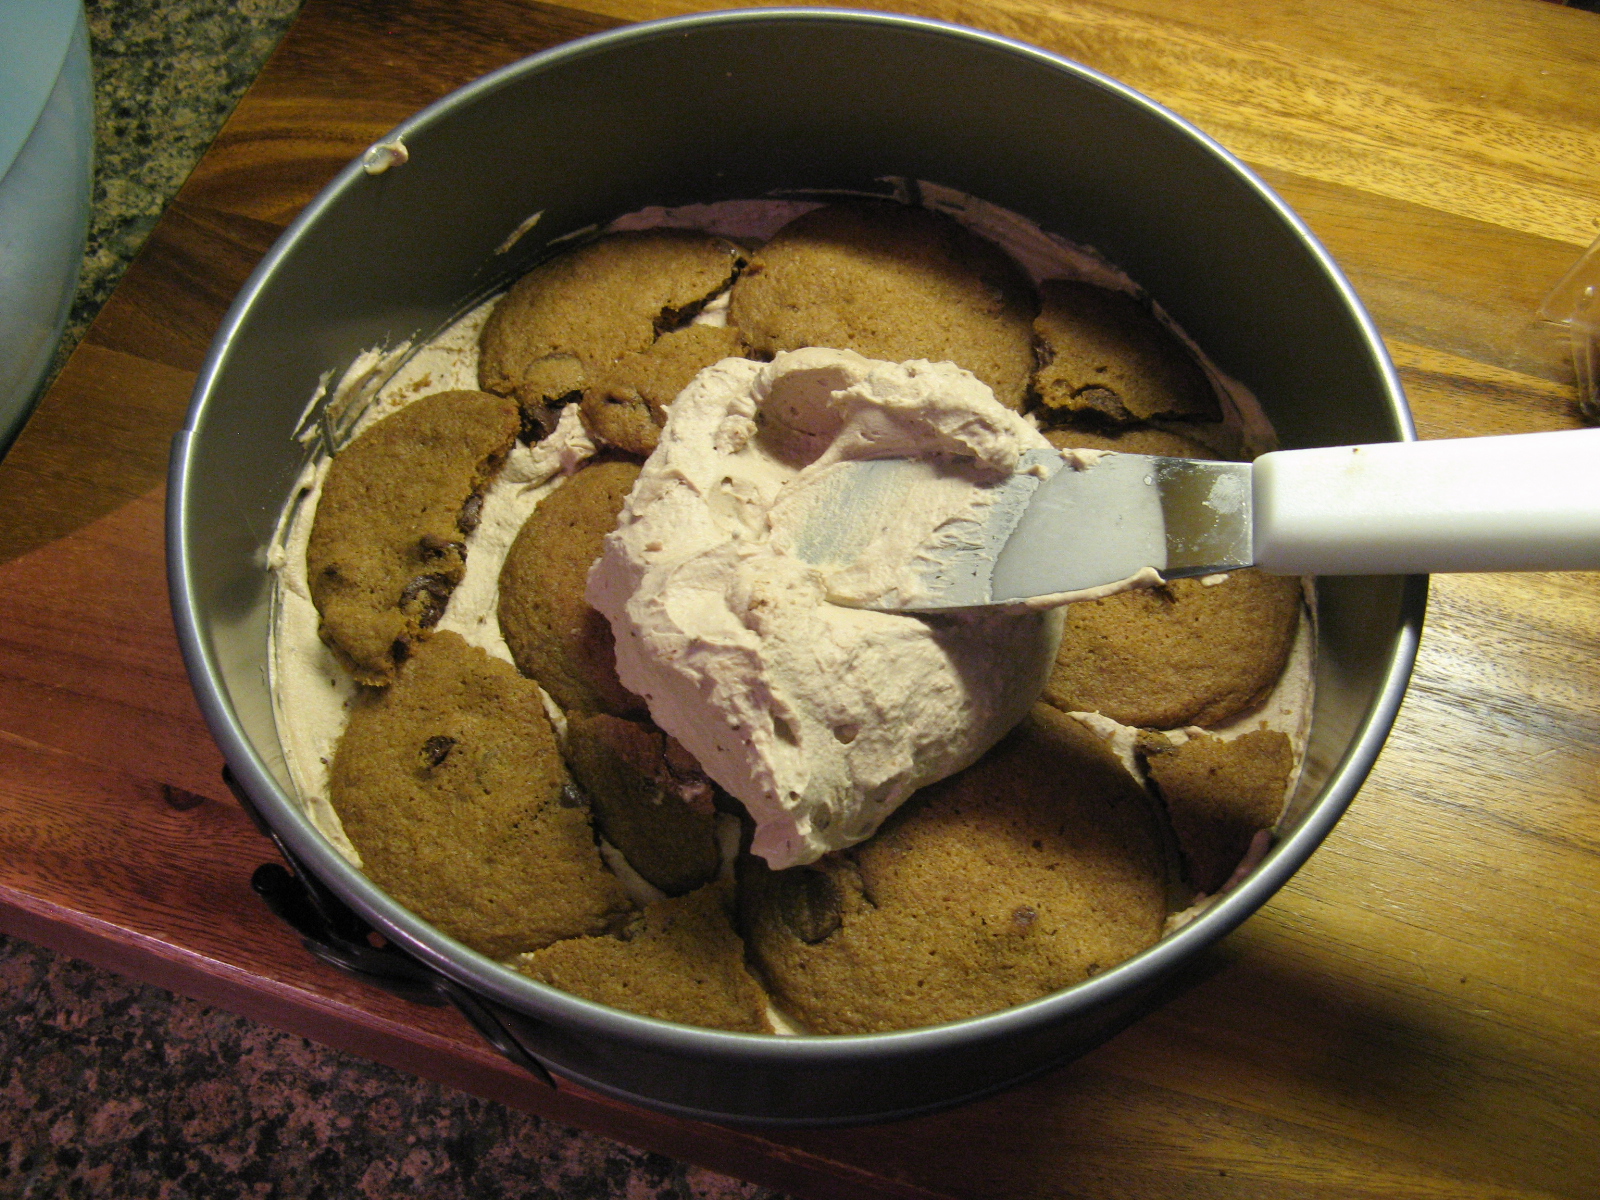
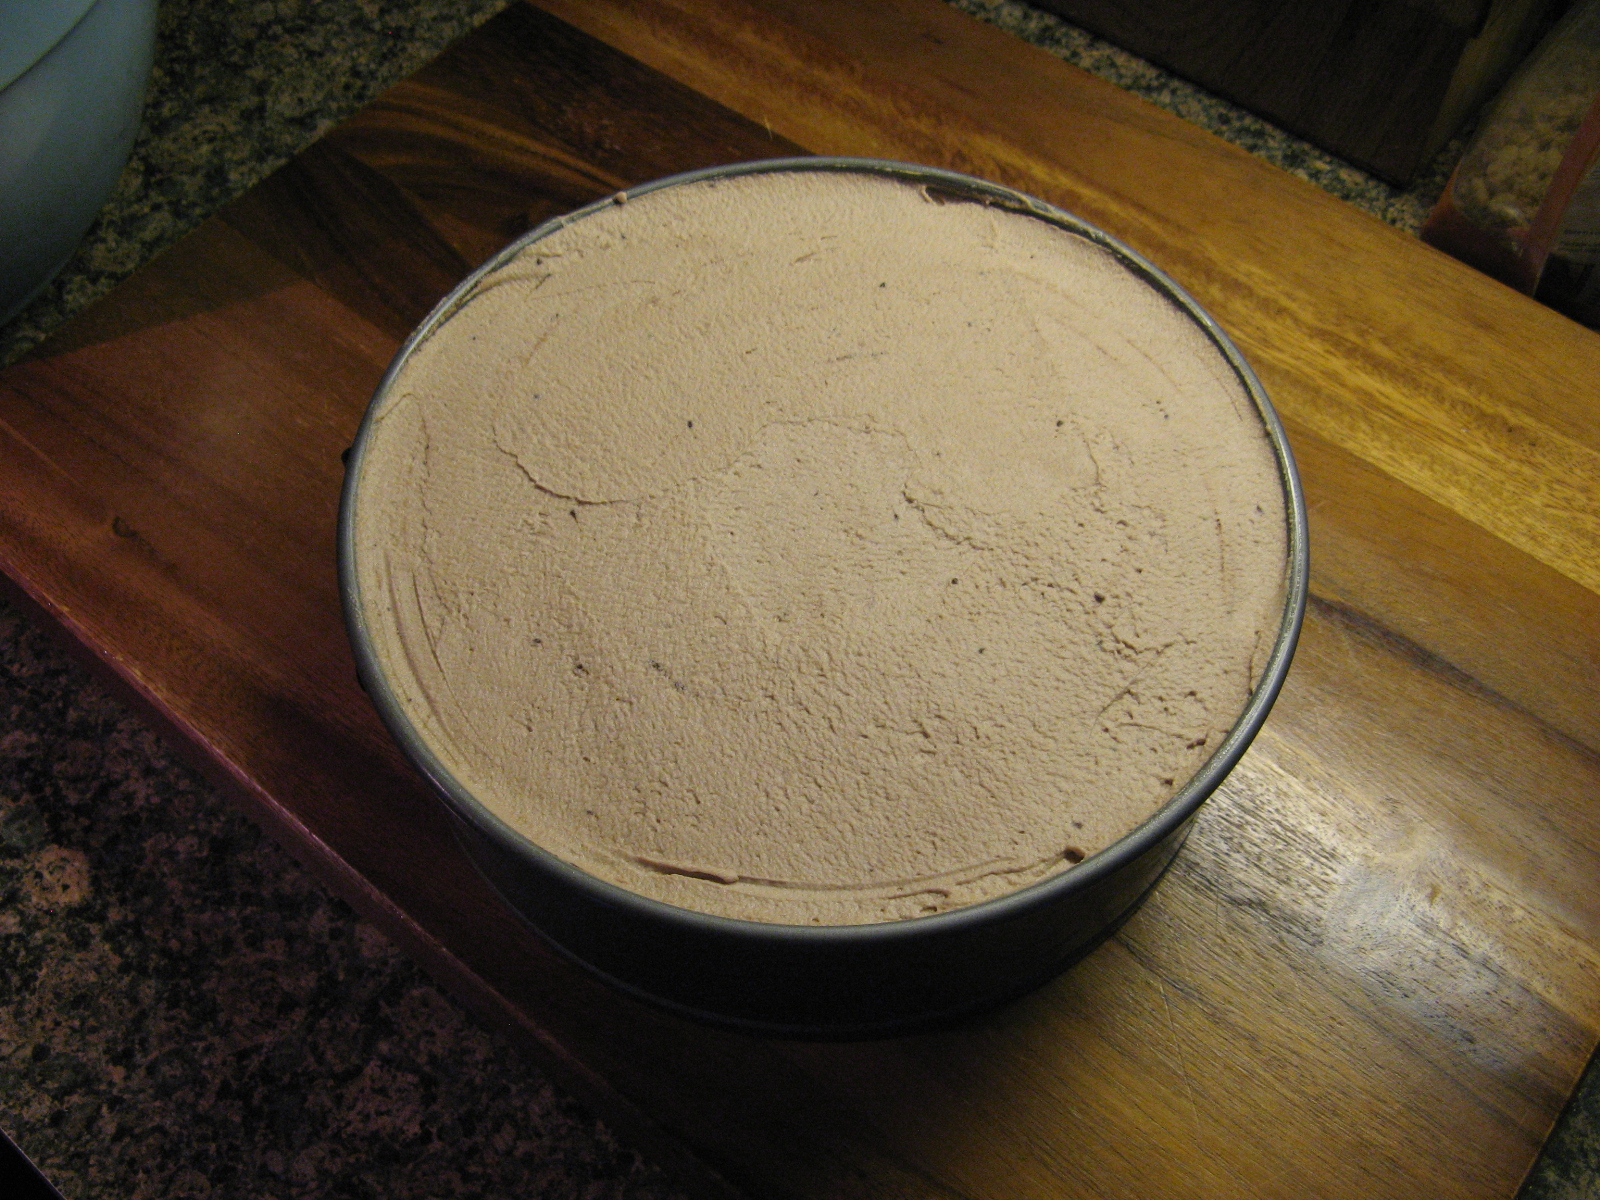
Once the cream is made it was time to assemble the cake. I arranged a layer of thin & crispy chocolate chip cookies flat in an 8-inch springform pan. I used Tate’s cookies, which are famous for their thin & crispy texture. If you can’t find Tate’s or you just don’t feel like ordering them, you can try Chips Ahoy’s new Thins Chocolate Chip Cookie. So, after arranging the first layer of cookies, I spread about a fifth of the cream evenly over the cookies. Next, another layer of cookies and then the cream. I continued this layering pattern until I had 5 layers of each, ending with the cream. I then smoothed the top, covered it with plastic wrap and refrigerated it overnight.

IMG_0235

IMG_0240

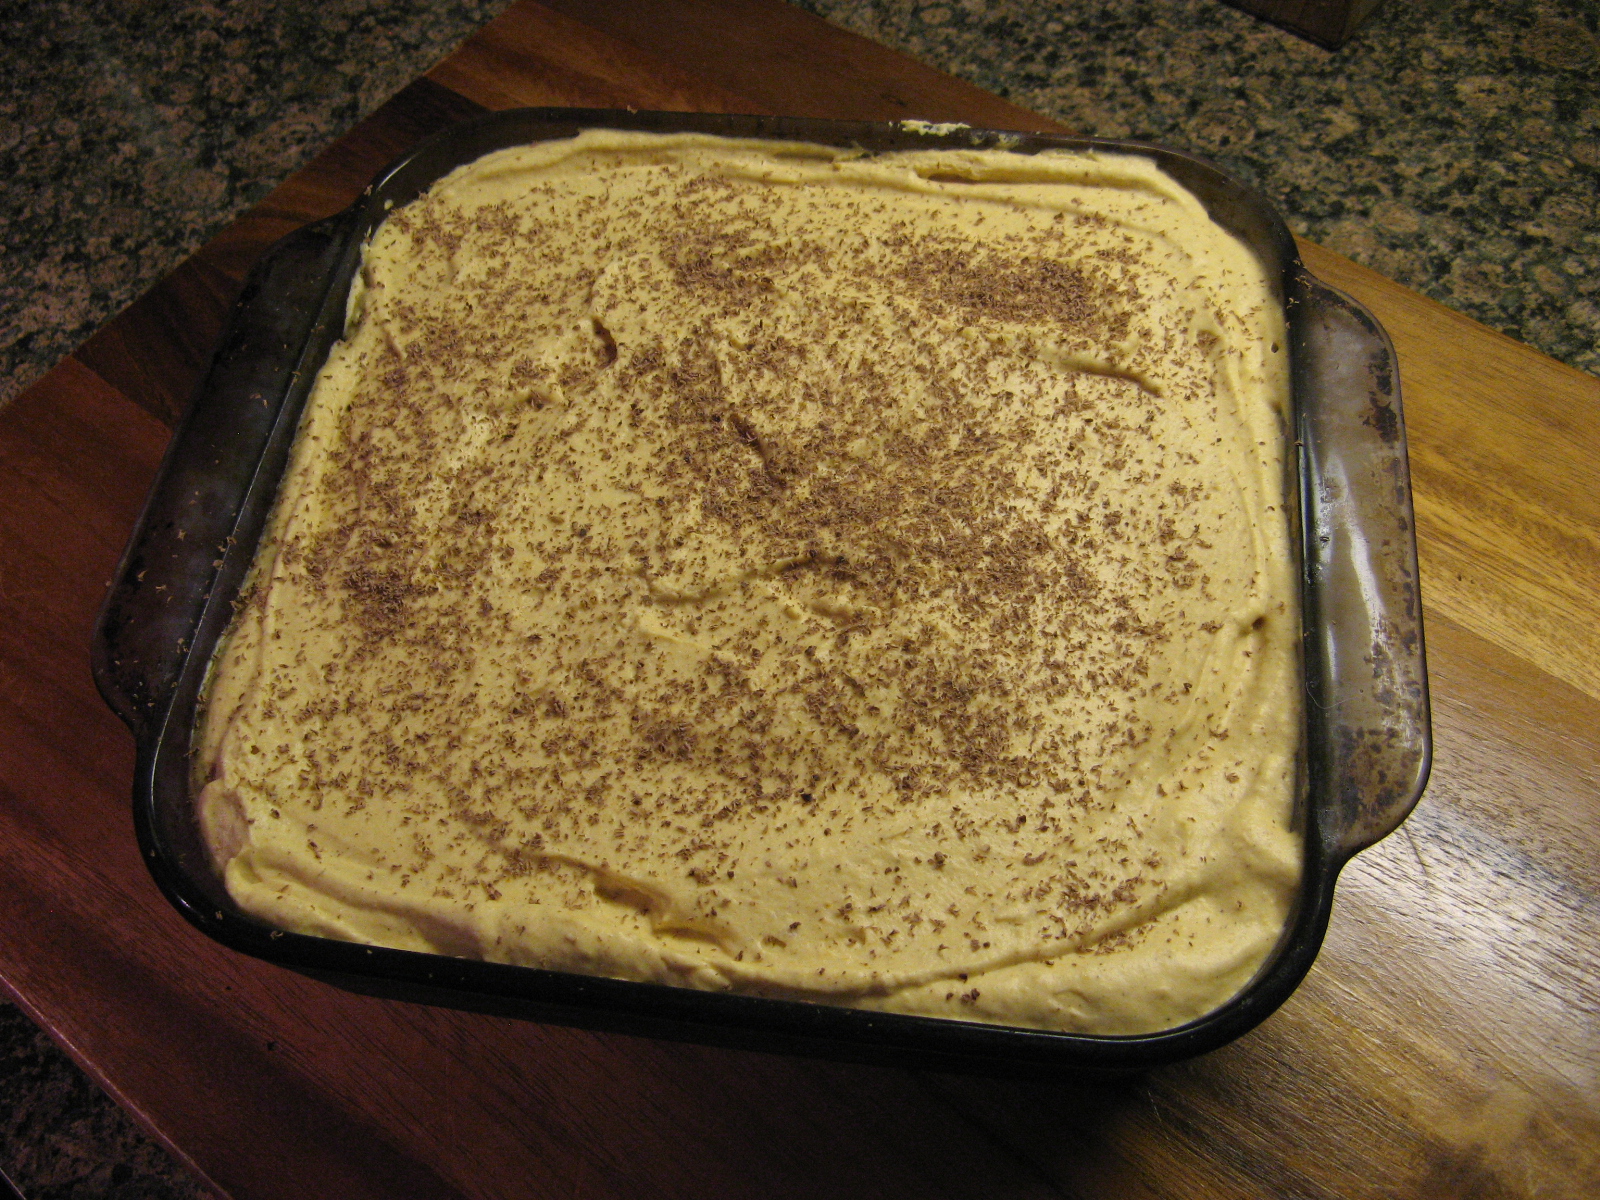
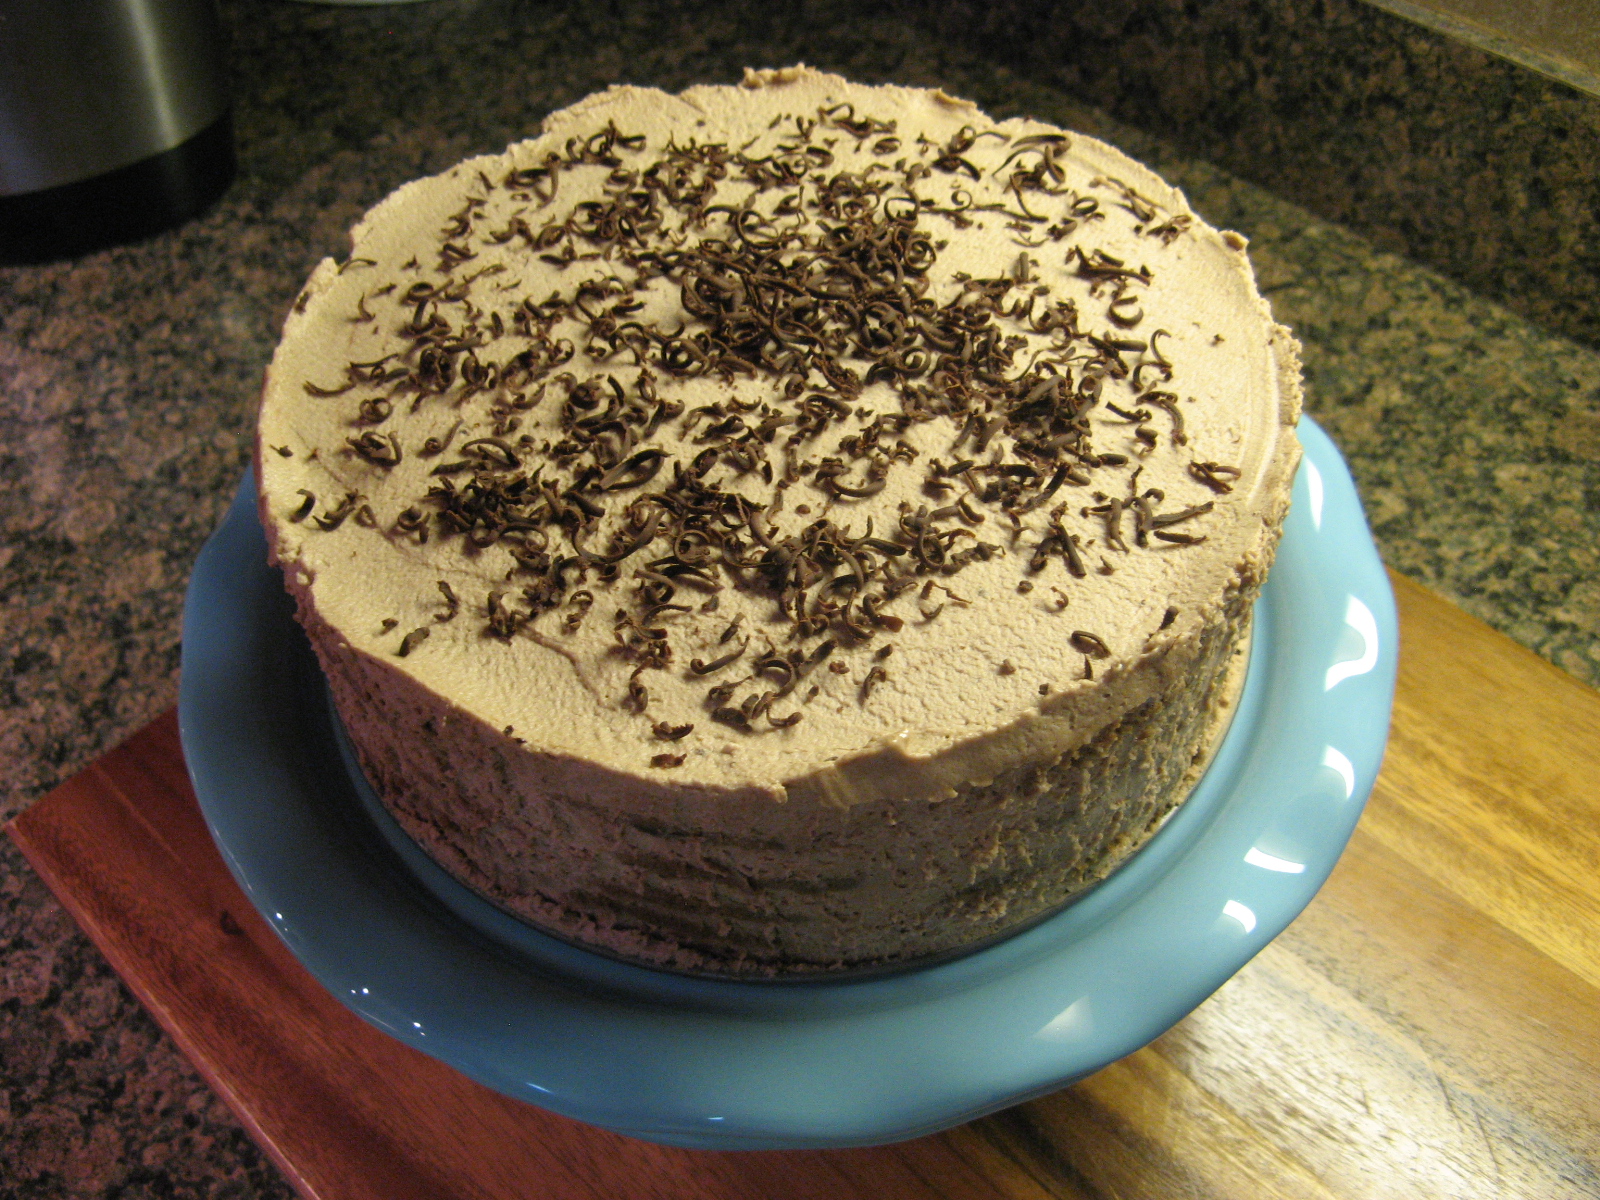
The following day to unmold the cake I ran a sharp knife along the sides and then removed the ring and topped the cake with chocolate shavings.

IMG_0264

Delicious is an understatement for how good this cake is! The cookies soften due to the cream, but, are left with enough texture that you don’t feel like you’re eating mushy cookies… Which would be gross! And the combination of the mocha cream and the chocolate chip cookies is just perfect!

IMG_0266


Mocha Chocolate Icebox Cake

Ingredients:

2 cups heavy cream, cold

12 ounces mascarpone cheese

1/2 cup sugar

1/4 cup Kahlua liqueur

2 tablespoons unsweetened cocoa powder

1 teaspoon instant espresso powder

1 teaspoon pure vanilla extract

24 ounces thin & crispy chocolate chip cookies, about 35

Shaved semi-sweet chocolate, for garnish


Directions:

In a large bowl combine the heavy cream, mascarpone, sugar, Kahlua, cocoa powder, espresso powder & vanilla extract. Using a hand mixer mix on low speed until all ingredients are combined, gradually increase the speed until firm peaks form.

To assemble to the cake, arrange the chocolate chip cookies flat in an 8-inch springform pan, breaking the cookies as necessary to completely cover the bottom of the pan. Spread a fifth of the mocha cream evenly over the cookies. Place another layer of cookies lying flat and then another fifth of mocha cream. Continue this layer pattern until there are 5 layers of each, ending with the mocha cream. Cover with plastic wrap and refrigerate overnight.

To unmold, run a sharp knife along the edges and remover the ring. Sprinkle with shaved chocolate and serve cold.

Recipe from Food Network


Malted S’mores Ice Cream

Happy National S’mores Day! In honor of the day I am sharing with you a Malted S’mores Ice Cream recipe that I came across in a recent issue of Everyday with Rachael Ray magazine. And best of all… you don’t need an ice cream maker to make it.

To begin, I softened a pint of vanilla ice cream by letting it sit uncovered on my kitchen counter for a few minutes. Meanwhile, I roasted (in actuality lightly toasted, but we gotta go with roasted since this is a s’mores ice  cream) 1/2 cup of mini marshmallows in a 425 F preheated oven by spreading them on parchment lined baking sheet and popping them in for a minute or two. Don’t worry if they stick together while roasting, once they cool just pull them apart.

Once the ice cream is softened, mix it along with a 1/4 cup of malted milk power. Once the two were well blended I folded in the cooled marshmallows and 3 crumbled graham crackers. I used cinnamon graham crackers, but, I am sure that honey graham crackers would be just as good. Once all of the ingredients are incorporated transfer the ice cream to a metal loaf pan (or any other freezer safe container) and freeze until firm, at least an hour.

And you may be wondering, “How is this s’mores ice cream without chocolate?” No need to worry, the chocolate comes in the form of chocolate syrup as a topping. Add as little or as much as you like!

IMG_0216

And there you have it… A quick, easy and delicious way to enjoy your own version of a s’more on this National S’mores Day or any other day!


Malted S'mores Ice Cream

Ingredients:

1 pint vanilla ice cream, softened

1/4 cup malted milk powder

1/2 cup mini marshmallows

3 graham crackers, crumbled

Chocolate syrup, for topping

Directions:

Pre-heat oven to 425 F. On a parchment lined baking sheet spread marshmallows and bake until golden, 1 to 2 minutes.  Let cool.

In a large bowl mix softened ice cream with the malted milk powder.

Using a rubber spatula gently fold in the graham cracker crumbles and marshmallows.

Transfer to a freezer-safe containers and freeze until firm, at least an hour.

Serve topped with chocolate syrup.


Recipe from Rachael Ray Magazine