Happy New Year!!!

Happy New Year! The holidays are quickly winding down. Truthfully, and I think most would agree, the holidays just seemed to fly by this season. Mainly due to the short time between Thanksgiving and Christmas. With Thanksgiving falling so late there was less than a month to get everything ready for Christmas. Besides posting my annual Cookie Palooza recipes I just didn’t have time to blog anything else during the month of December. That doesn’t mean I didn’t do a lot of baking though. There were chocolate covered pretzels, Almond Biscotti (these were so good that I ended up baking a second batch the day after making the first), a few cakes (one of which was supposed to be a tangled lights decorated cake but turned into a congratulatory cake for my oldest niece after competing in her very first gymnastics tournament and placing in a few of the events), and of course cookies, cookies and more cookies. I baked about 300 cookies in one day and by the end of the day the smell of sweets and sugar was just too much for me to handle.

So here we are in a new year and a new decade. Truthfully it didn’t really dawn on me that a new decade was upon us until I was watching the news and they started talking about it. I was just thinking of how the year had gone by so fast. And granted one could say that about every year, but, 2019 in particular seemed to fly by to me. I was thinking about things that happened and they didn’t seem like months ago but more so days ago. I have heard that one of the perils of getting older is that time goes by faster. Maybe it’s because you have a greater realization of things happening. As a kid I think you forget more than you remember but as an adult everything that happens gets filed away so it’s easy to measure things by the events in our lives. My dad has been gone 4 years and I still measure things from before and after his death as well as before and after he got sick. I’ll remember something or see something from a particular year and I measure it against these dates. Not always a good thing. But, it is a good reminder to me of how quickly things can change and can happen. It’s true what they say that life can change in the blink of an eye.

And for many a new year means resolutions to change things in their lives or do things differently. I myself have never made a New Year’s resolution. I personally believe that there is no time like the present to make a change for the better. Every day you are given the opportunity to do things better and/or differently than the day before. So why not grab on to that as opposed to waiting for the year to change. Let’s say you fail at your resolution in February, does that mean you should wait 10 months to try again? Absolutely not! So, instead of resolutions I’ll look back and see if I have grown as a person over the course of time. Of course there are things that I would like to be different, but, at the end of the day I am content. And being content makes it a bit easier to work on those things that I would like to change.

So, what’s on my plate for 2020 so far… A semi-monumental college reunion that I may or may not attend and a pretty exciting vacation! And of course more baking and crafting. Next month marks 8 years that I have been blogging. And while I may not have the amount of followers that others have, I am still trudging along and thankful for those of you who do follow me and welcome any and all new readers. I enjoy baking, crafting, photographing, writing, and everything else that makes up my blog so I will continue on! Besides, good things come to those who wait.

I leave you with two pics…

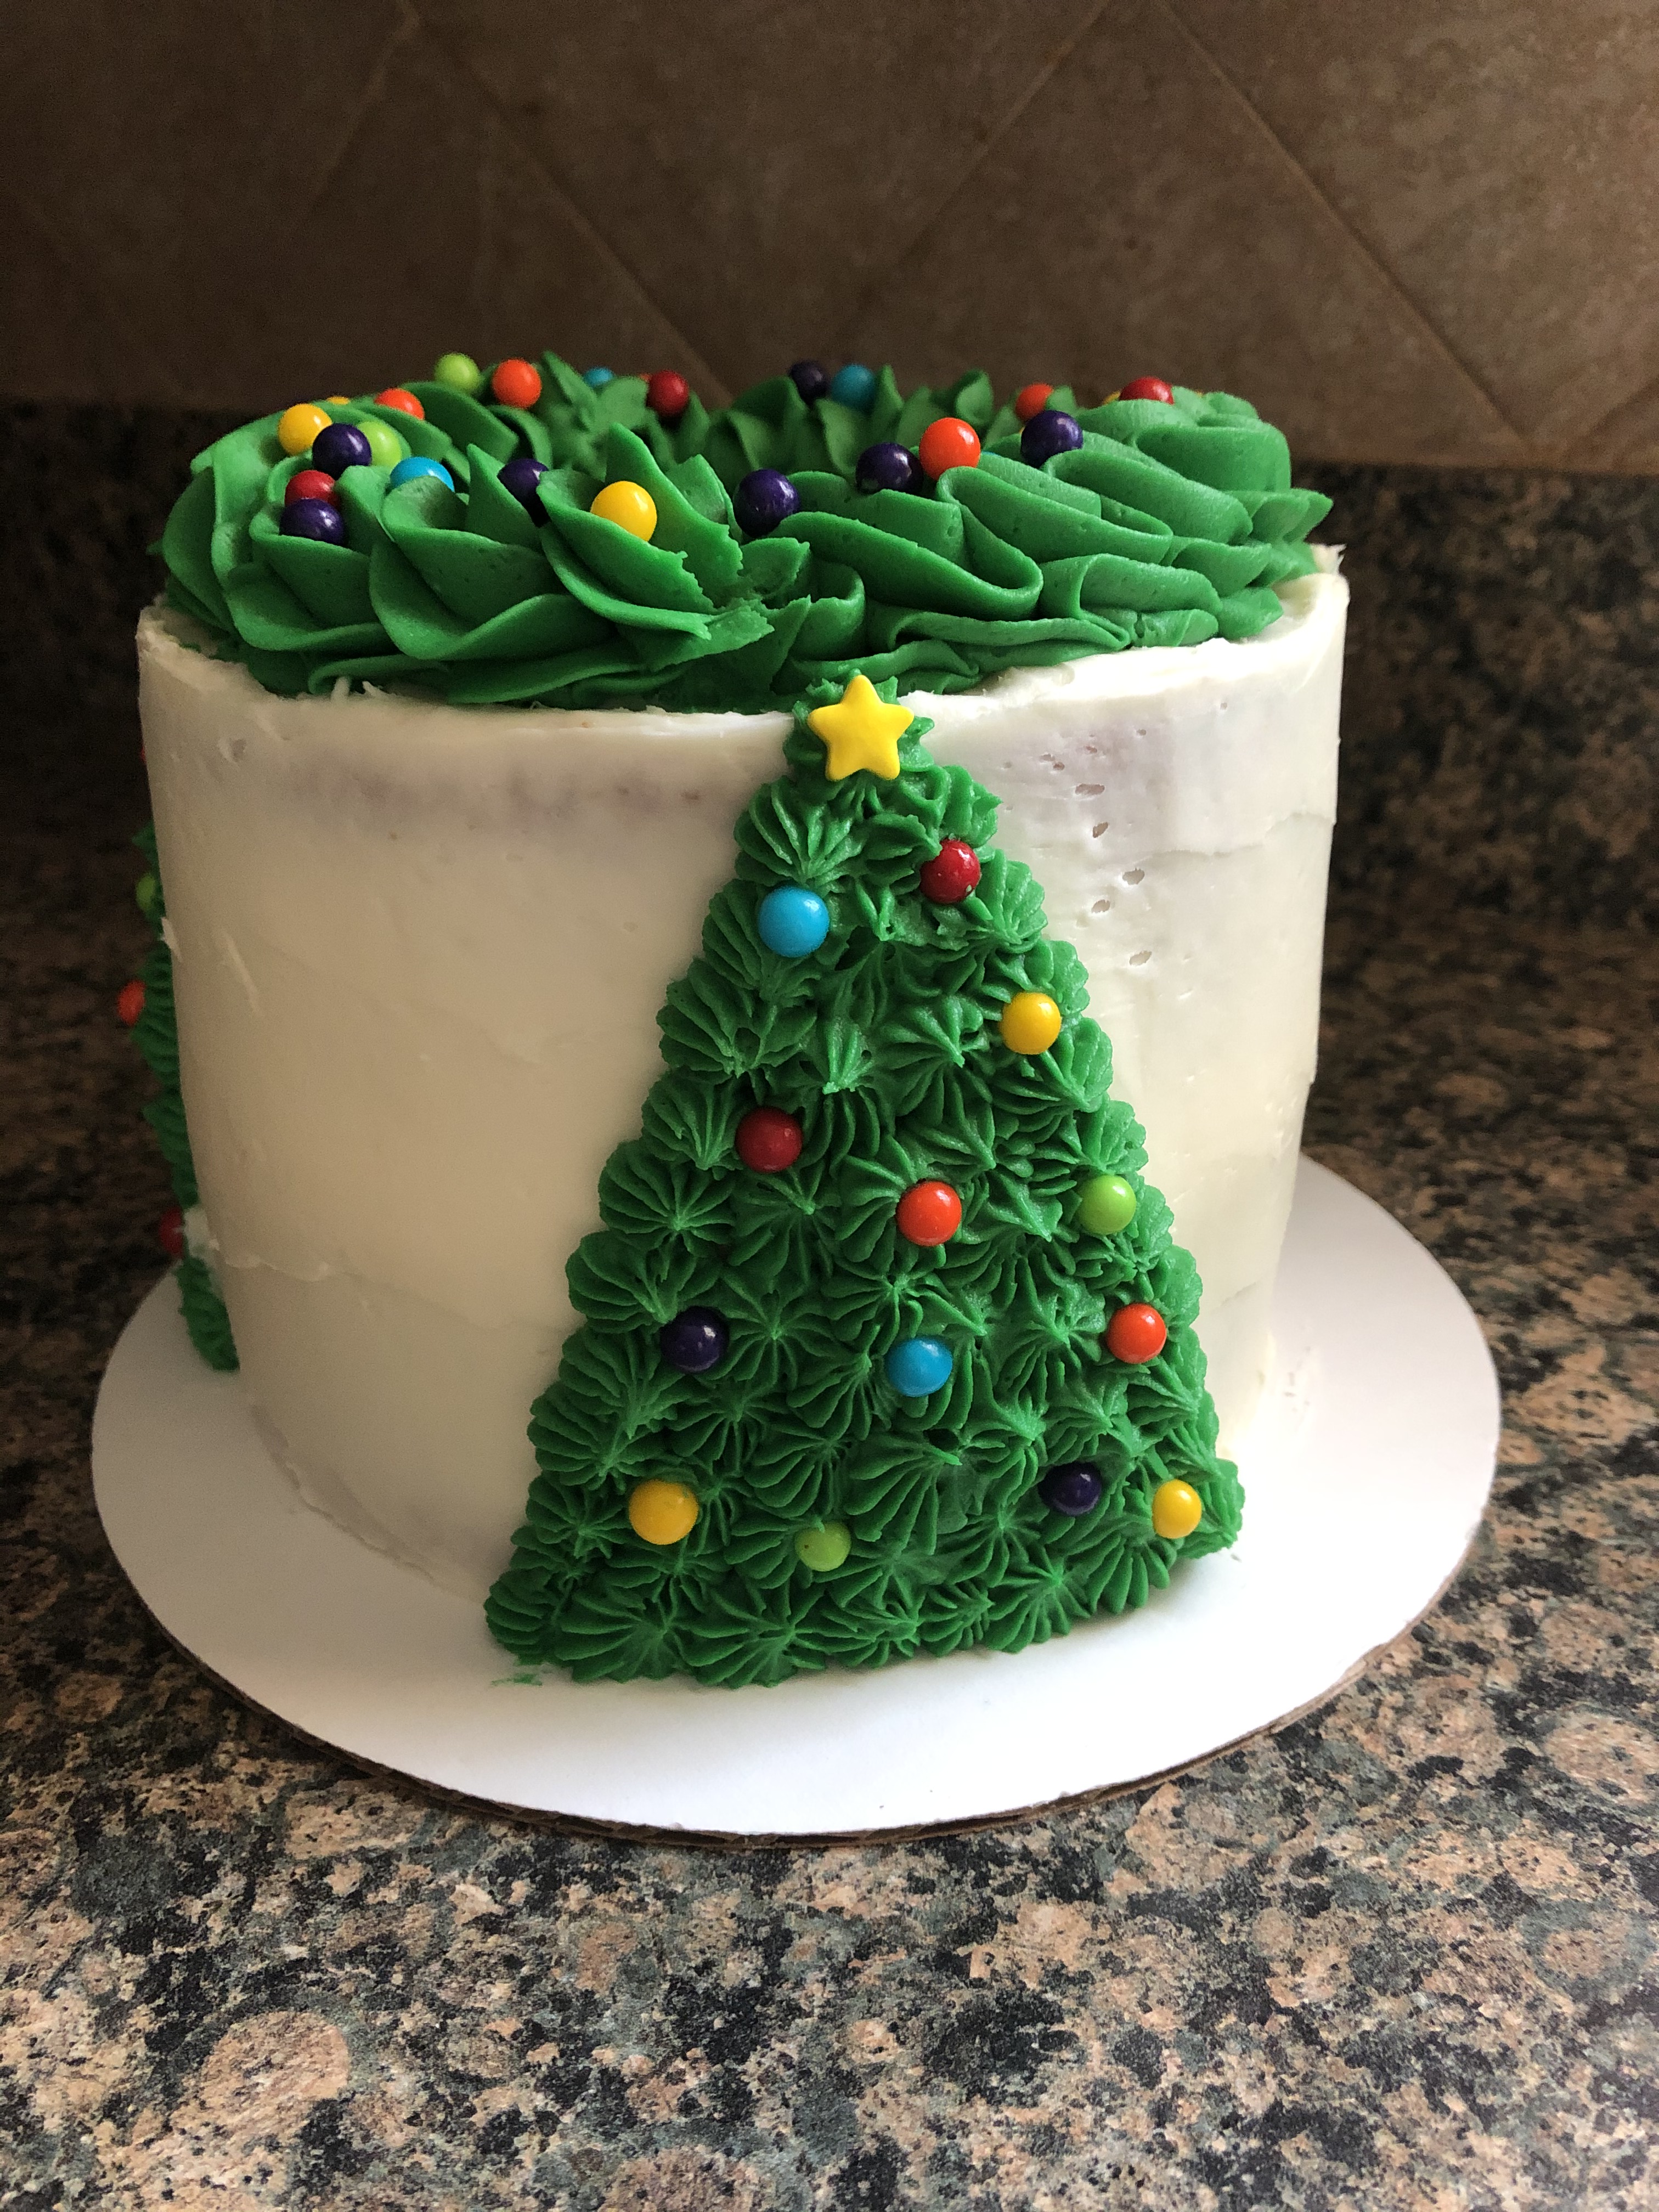
A pic of the Christmas cake I made (this was totally not the design I had in mind for this cake, but, I had a frosting fail at 10p on a work-night so I had to improvise and was happy with the outcome)…

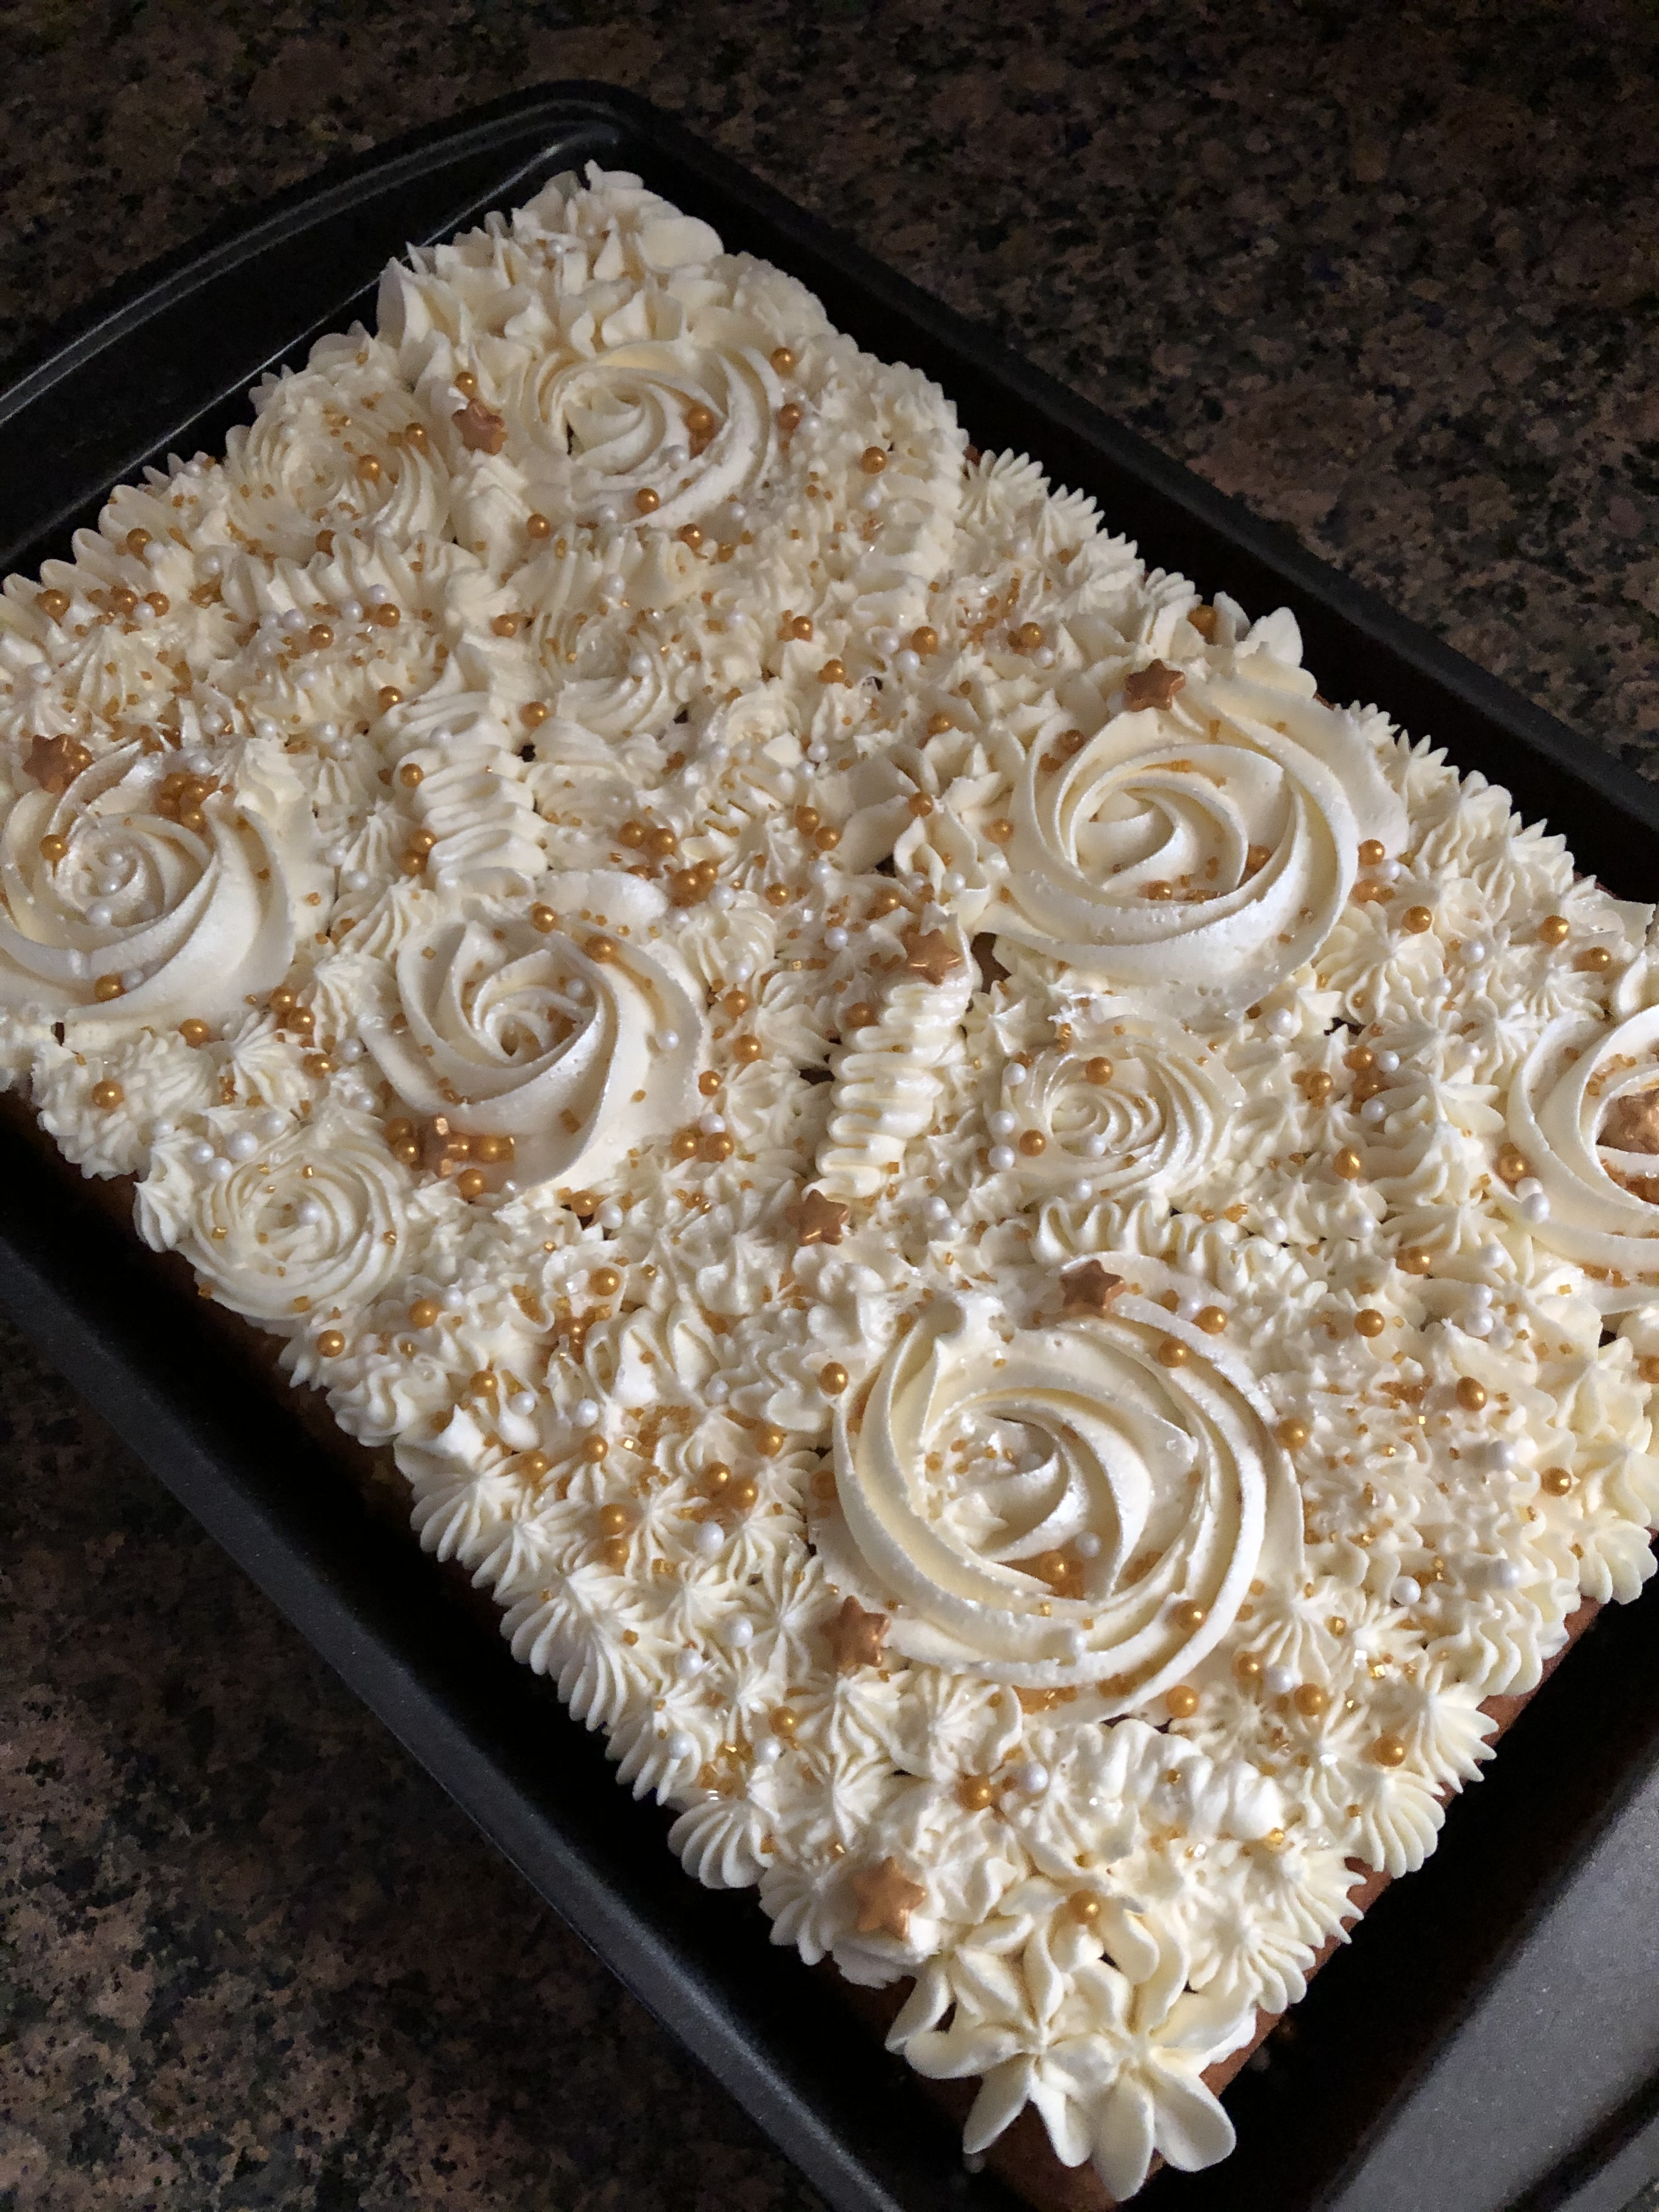
And the cake I made for New Year’s Eve – I decided to try out the decorated sheet cake trend. After piping the designs on to the cake I then sprayed it with Wilton’s Color Mist in pearl and sprinkled it with a mixture of festive sprinkles…

Happy 2020!


Sheet Pan Cuban Rice and Beans

I just might be on a sheet pan cooking kick. I recently shared a recipe for a Teriyaki Barbecue Pineapple Chicken dish and today I am sharing with you a rice and beans dish. I would have never thought I would make rice and beans in the oven on a sheet pan, but, after coming across the recipe and figuring it was worth trying I may try making some other rice dishes this way. I usually make rice the “normal” way, in a pot with water. And while it’s always edible there are times that I miss the moment when I should lower the heat and cover the pot and my rice comes out a little crispy on the bottom, or vice versa, I cover and lower it too soon and I end up with rice that has one too many clumps. I wouldn’t say it’s mushy by any means though. But, my first time using this method turn out rice that was pretty perfect.

I began by combining two sliced bell peppers (red and green), a sliced yellow onion, and 3 sliced garlic cloves with olive oil and salt in medium bowl. After tossing everything together I transferred the vegetables to a sheet pan I sprayed with cooking spray. I roasted the vegetables in a 400 F preheated oven for about 12-13 minutes.

While the vegetables were in the oven I combined rice, 2 cans of rinsed black beans, cumin, oregano, coriander, salt and 2 1/2 cups of water in a medium bowl. Don’t worry, it’s not a lot of water and if you use a large enough sheet pan it will not spill over.

After removing the pan from the oven, I stirred the vegetables and then carefully poured the rice mixture to the pan. I gave everything a few good stirs using a spoon and tongs. I covered the pan with aluminum foil and returned it to the oven for 30 minutes.

I let the pan stand for five minutes after removing it from the oven and then removed the aluminum foil and fluffed the rice with a fork. This was definitely one of the easiest and foolproof ways that I have made rice and beans. The end result was flavorful and the rice was the perfect texture and consistency.

Sheet Pan Cuban Rice and Beans

Ingredients:

2 bell peppers, any colors cut into thin strips

1 yellow onion, thinly sliced

3 garlic cloves, thinly sliced

1 tablespoon olive oil

1 teaspoon kosher salt, divided

1 cup long-grain white rice

1 15oz. can black beans, drained and rinsed

1 teaspoon ground cumin

1 teaspoon dried oregano

1/2 teaspoons ground coriander


Directions:

Preheat the oven to 400 F. Spray a large baking sheet with cooking spray.

Combine the peppers, onion and garlic in a medium bowl and toss with olive oil and 1/4 teaspoon of salt. Spread the vegetables on the prepared baking sheet and roast in the oven for 13 – 15 minutes, until softened. Remove the pan from the oven and stir the vegetables.

In another medium bowl combine the rice, beans, cumin, oregano, coriander, remaining salt and 2 1/2 cups of water. Pour the mixture onto the pan with the vegetables and stir to combine. Cover with foil and return the pan to the oven for 28-30 minutes.

Remove the pan from the oven and let it rest for 5 minutes before removing the aluminum foil.

Remove the foil and fluff the rice with a fork before serving.

Recipe slightly modified from Epicurious

Teriyaki Barbecue Pineapple Chicken Sheet Pan Dinner

Sheet Pan Dinners… They are pretty ingenious. You combine all of your ingredients on a pan, cook it in the oven and dinner is ready. It switches the idea of one pot cooking to a pan and lends itself to an easy and quick clean-up. You can’t beat that. Recently during a lull at work I clicked on a link for 50 sheet pan dinner recipes and came across a few that caught my eye. One is for gnocchi that included a variation to use Trader Joe’s Cauliflower Gnocchi which I currently have a bag of in my freezer. It took me a few trips to Trader Joe’s to finally find it since it’s apparently so popular. On a side note, I normally shy away from making frozen meals or snacks, but I am coming to love some of the frozen food in Trader Joe’s. Some of my faves, their mozzarella sticks, chicken and cilantro wontons, and Mandarin Orange Chicken. Back to the recipe for today though… a Teriyaki Barbecue Pineapple Chicken Sheet Pan Dinner. That’s a mouthful of a recipe title for sure, but, one that turns out a delicious end product.

I began by chopping some of my ingredients into bite-sized pieces: chicken breasts, a green and yellow bell pepper, and a sweet onion. I combined them with broccoli florets – I purchased a bag of these in the produce section – and a can of drained pineapple chunks in a large zip-top bag. In a medium bowl I whisked together the ingredients for the marinade: soy sauce, barbecue sauce, minced garlic, pineapple juice (from the can of pineapple chunks), honey and pepper. I poured some of the marinade into the bag, reserving a cup, and then sealed it and shook and massaged the bag to make sure the marinade was evenly distributed throughout it. I then placed it in the refrigerator for 30 minutes. You could leave it in longer if you have the time.

After the 30 minutes I preheated my oven to 400 F and using a slotted spoon I transferred the chicken and vegetables to a large baking sheet. You want to transfer as little as the marinade from the bag to the pan as possible as the chicken and vegetables will create more liquid as they cook. I then placed it in the oven and cooked it for 20 minutes. The recipe stated 10 minutes but when I checked the chicken at that point it looked way to underdone for my taste so I left it in for another 10 minutes. While the chicken and vegetables were in the oven, I poured the reserved marinade in a small saucepan and simmered it over medium-low heat until it was thickened.

Once chicken was done I removed the pan from the oven and switched it to the broiler setting. Using paper towels I soaked up some of the excess liquid on the pan and then poured the thickened marinade over the chicken and vegetables and stirred it all together. I placed the pan back in the oven and broiled it for about 6 minutes. To go along with this I made rice and had the perfect dinner (and leftovers.)

And there you have it… My first sheet pan dinner that I am sure I will be making again.


Teriyaki Barbecue Pineapple Chicken Sheet Pan Dinner

Ingredients:

2 skinless boneless chicken breasts, cut into bite-sized pieces

1 green bell pepper, cut into bite-sized pieces

1 orange bell pepper, cut into bite-sized pieces

2 cups broccoli florets

1/2 sweet onion, cut into bite-sized pieces

20 oz. can pineapple chunks in pineapple juice, drained and the juice reserved


For the marinade:

1/2 cup soy sauce

1 cup barbecue sauce

1/2 cup reserved pineapple juice

2 tablespoons honey

1/2 teaspoon pepper


Directions:

Combine the chicken, peppers, broccoli, onion and pineapple in a large zip top bag.

In a medium bowl combine the ingredients for the marinade and whisk them together. Reserve 1 cup of the marinade and pour the rest into the zip top bag.

Seal the bag and shake and massage the marinade into the meat until it’s evenly distributed. Refrigerate for at least 30 minutes.

Preheat the oven to 400 F.

Using a slotted spoon (or tongs) transfer the contents from the zip top bag to a sheet pan in a single layer. You don’t want to transfer too much of the marinade since the chicken and vegetables will let off their own liquid as it cooks. Discard the leftover marinade.

Cook in the oven for 15-20 minutes. Until the chicken is just about done.

Meanwhile, pour the reserved cup of marinade in a small saucepan and cook on medium heat until it begins to boil. Reduce the heat to medium-low and continue simmering until the sauce is thickened and has reduced by half.

Remove the pan from the oven and switch the oven to the broiler setting.

Use paper towels to remove any liquid from the pan. Pour the thickened sauce over the chicken and vegetables and lightly toss to coat.

Return the pan to the oven and broil for 5-7 minutes, or until the sauce is bubbly and the chicken and vegetables are browned.

Serve with rice or noodles.

Recipe from Yellow Bliss Road

Slow Cooker Sunday: Hawaiian Barbecue Ribs

I can’t remember the last time I had or made ribs. I am pretty sure it’s been over a year, maybe even two. I wasn’t even sure if I still liked them to be honest. Then I came across a recipe for baby back ribs in a slow cooker and they sounded simple (and tasty) enough that I decided it was time to have ribs again.

While the recipe called for 2 small racks of baby back ribs about 2 lbs. a piece, I ended up getting one rack that was 4 lbs. I divided this rack into 4 pieces and then seasoned it with salt and pepper then rubbed them with vegetable oil and sprinkled chile powder over the ribs. Rubbing the chile powder onto the ribs.

In a measuring cup I whisked together teriyaki barbecue sauce, apple cider vinegar, minced garlic and ginger and then poured this into the insert of my slow cooker. I then added in the seasoned ribs and coated them in the marinade. To make sure each rack was coated, I added each rack one-at-a-time to coat.

I covered my slow cooker and set it to cook on low for 7 hours. Well, I don’t own a digital slow cooker, so, I actually set it to cook for 8 hours. And intended to take the ribs out at 7 hours, but, I put them to cook overnight so by the time I woke up my slow cooker had already switched to the warm setting… Oops! It was all good though, the meat was thoroughly cooked and thankfully still intact.

I transferred the ribs to a foil-lined baking sheet bone-side down. In a small bowl I whisked together some of the cooking liquid from my slow cooker, teriyaki barbecue sauce, pineapple preserves and ketchup to make a marinade. I then generously brushed it on the ribs.

I then broiled them on high for about 5 minutes, until the sauce was sticky and the ribs were charred in spots.

I’ll definitely be making these again, but, I think next time I will make them with Honey Barbecue Sauce for a sweeter flavor.


Slow Cooker Hawaiian Barbecue Ribs

Ingredients:

Small Racks of Baby Back Ribs (1 4lb. rack cut into 4 pieces, or 2 2lb. racks cut in half)

2 tablespoons vegetable oil

3 tablespoons chile powder

2/3 cup teriyaki-style barbecue sauce*, divided

1/3 cup apple cider vinegar

1 tablespoon fresh ginger, minced

2 garlic cloves, minced

1/4 cup pineapple preserves

2 tablespoons ketchup

Kosher salt and freshly ground pepper

*I used Sweet Baby Ray’s

Directions:

Season the ribs with a generous amount of salt and pepper. Rub the ribs with the olive oil and then sprinkle with the chile powder. Rub the chile powder onto the ribs so it will adhere.

In a measuring cup whisk together 1/3 cup of the barbecue sauce, the vinegar, ginger and garlic and then pour into a slow cooker. Add the seasoned ribs and turn to coat in the marinade. Cover and cook on low for 7-8 hours, until the ribs are tender.

Preheat the broiler. Transfer the ribs to a foil-lined baking sheet bone side down. Remove 1/4 cup of the cooking liquid from the slow cooker and combine with the remaining 1/3 cup of barbecue sauce and the pineapple preserves and ketchup in a small bowl. Whisk together.

Brush the sauce generously on the ribs. Broil until the sauce is stick and the ribs are charred in spots, 3 to 5 minutes.

Recipe from Food Network

Slow Cooker Sunday: Beef Ragu with Pappardelle

I’ve said it before and I’ll say it again, my favorite type of slow cooker recipe is the dump it in and forget about it kind. This beef ragu is just that. I added all of my ingredients to my slow cooker…

Set it to cook on low for 7 hours, shredded the meat, added it to some cooked pasta…

And had a delicious meal to pack for lunch.


Slow Cooker Beef Ragu with Pappardelle

Ingredients:

1 lb. beef chuck roast

1 15oz. can of crushed tomatoes

1/4 cup dry red wine

1 tablespoon of tomato paste

3 garlic cloves, sliced

1 sprig of rosemary

1 3-inch piece of Parmesan rind

Kosher salt

Black pepper

12 oz. fresh pappardelle

Directions:

Add the tomatoes, wine, tomato paste, garlic cloves, 1/2 teaspoon of salt to a slow cooker and whisk together. Add the rosemary spring and Parmesan rind. Season the beef with salt and pepper and add to the slow cooker. Cook on low for 7 hours, or until the meat is very tender. Shred the meat with two forks, discard any fat, the rosemary and Parmesan rind and set the slow cooker to warm while you cook the pasta.

Bring a large pot of salted water to boil. Add the past and cook according to label directions. Reserve 1/2 cup of cooking water then drain the pasta. Return the pasta to the pot and add the meat and sauce from the slow cooker as well as the reserved cooking water. Cook on medium high heat until the sauce begins to thicken. Season with salt and pepper. Drizzle each serving with olive oil.

Recipe from Food Network

Rigatoni with Sausage & Peas

I may have mentioned this once or twice before, but, I’m always on the search for quick and easy meals that flavorful, don’t require a slew of ingredients and gives me enough leftovers for a few days. This pasta dish checks all of those boxes.

I started by cooking the pasta. Then, I sautéed garlic, browned the sausage, added frozen peas and finally heavy cream and butter. After bringing it to a boil I added in the pasta and that was it. You can’t top something as simple as that.

Rigatoni with Sausage & Peas

Ingredients:

1 pound rigatoni

2 tablespoons olive oil

1 garlic clove, minced

1 pound sweet Italian sausage meat or sausages with casings removed

12 ounces frozen green peas

1 1/2 cups heavy cream

4 tablespoons butter

Parmesan cheese

Directions:

Bring a large pot of salted water to boil, add pasta and cooking for 8 to 10 minutes, until al dente and then drain.

In a large skillet heat oil over medium heat and sauté garlic. Add the sausage and brown. Then add the green peas and simmer for 5 minutes. Slowly add the heave cream and butter and bring to a slight boil. Cook for 5 minutes and then toss with cooked pasta and top with parmesan cheese.

Recipe from allrecipes

Zucchini, Corn and Basil Stir-Fry with Chicken

Quick and delicious meals are something I am always searching for. And, meals that aren’t written for 6 or more servings. Since I cook for just myself 4 or less is perfect. It gives me enough for leftovers for the following day. While you can find quick to prepare food at the supermarket, you know those flavored rice’s and pasta sides, have you ever noticed how much sodium is in them. I am by no means a health nut, but, I do try to avoid certain things whenever possible. Sodium being one of them. Today, I am bringing you a quick dish that can be made with tofu, chicken or shrimp and has a healthy amount of vegetables… A Zucchini, Corn and Basil Stir Fry. What’s really nice about this dish is that there are no sauces that are giving this dish a flavor. Just some salt, pepper, garlic, onions and basil. Yum! And, it’s written for 2 servings… Perfect for me.

Zucchini, Corn and Basil Stir Fry

Ingredients:

8 ounces tofu, chicken breast or sausage, or shrimp

2 tablespoons olive oil

1/2 cup red onion, chopped

3 medium-sized zucchini, sliced into half-moons a 1/2 inch thick

2 garlic cloves, chopped

1 ear of corn, kernels sliced off*

1/4 cup fresh basil, sliced into ribbons

Salt and pepper

Red pepper flakes, optional

*This is approximately 3/4 cup of corn if you want to sub frozen or canned corn

Directions:

Heat the oil in a large skillet over medium heat, season the oil with salt and pepper. Cook your chosen protein to your liking, fully cooked if chicken or shrimp. Set aside.

In the same skillet, add more oil if necessary, add the onion and sauté for 2 minutes until fragrant. Add the zucchini, and continue cooking for about 5 minutes until the zucchini is golden, stirring frequently.

Add the garlic and corn and cook for an addition 2 minutes, stirring. Add more salt and pepper.

Cover the skillet and let it steam for 3-4 minutes. Check the zucchini with a fork for doneness. When the zucchini is ready add the basil and adjust the salt.

Add the red pepper flakes, if using and return your protein the skillet and heat through.

Recipe from Feasting At Home

Slow Cooker Sunday: Chicken and Sausage Gumbo

So, funny thing, pretty much the only reason why I made this was because I had celery in my fridge and I didn’t want it to go to waste. That always happens when I buy celery. I use a few a few stalks and then the rest gets thrown out. I was determined not to let that happen again. So, I knew I wanted to make something in my slow cooker but wasn’t sure what and then came across this recipe in my favorite slow cooker cookbook.

What was even better, this is one of my favorite types of slow cooker recipes – throw it in there and let it cook. I know that doesn’t sound to proper considering we are talking about food, but, I will assume that you know what I mean. In my slow cooker I added in chicken, andouille sausage, okra, green bell pepper, celery, onion, cayenne pepper, salt, can of diced tomatoes, and chicken broth. Now, it may look like there isn’t enough liquid in there….

But, after cooking on low for about 4 hours there was more than enough liquid. One thing I didn’t do that the recipe called for was adding a cornstarch-water mixture after 3 hours to thicken the liquid. I find that I am not too keen on thickening the liquid because it tends to look congealed after refrigerating it. Granted, all is well once it is warmed up, but, since I am cool with the thinner liquid I stick with that. One more thing, this was delicious, but, if you don’t like spice, I suggest using less cayenne pepper. To go along with the gumbo I made white rice and it’s the perfect accompaniment to soak up all the juices.

Slow Cooker Chicken and Sausage Gumbo

Ingredients:

1 1/2 lbs. boneless chicken thighs, cut into 1 1/2-inch pieces

1/4 lb. andouille sausage, cut into 1-inch pieces

1/2 pound okra, sliced into 1/2-inch pieces

1 green bell pepper, chopped

3 celery stacks, chopped

1 yellow onion, chopped

1/2 teaspoon cayenne pepper

1/2 teaspoon salt

1 14.5 ounce can diced tomatoes

2 cups chicken broth

1/4 cup cornstarch

White rice, for serving (optional)

Directions

In a slow cooker combine the chicken, sausage, okra, pepper, celery, onion, cayenne pepper and salt. Add the diced tomatoes, along with their juices, and the chicken broth and give everything a few good stirs to combine. Cover and cook on high for 3 hours.

In a small bowl, whisk the cornstarch along with 1/4 cup water. Stir into the gumbo to thicken it, cover and continue cooking for an additional hour or until the chicken is cooked through. Season with salt and pepper if necessary. Serve with white rice.

Recipe from Slow Cooker Family Favorites

Brussels Sprouts & Cranberry Sauce

So, I’m working a little backwards here. Yesterday I brought you a delicious pie you can serve for Thanksgiving dessert and today I am bringing you two sides. A roasted Brussels sprouts dish and homemade cranberry sauce. Come back on Sunday for Slow Cooker Sunday where I will tell you how I slow cooked a turkey breast – see, definitely working backwards!

I know Brussels sprouts is not a favorite vegetable for many, but, I think the reason is because they are not preparing them the best way. Yes, they have a bitter flavor, just like broccoli rabe, but, when you season and roast them in the oven they take on a whole new flavor. Even the little charred sections taste good. And, they get perfectly tender. The recipe I recently tried called for them to be roasted in the oven and then topped with a glaze made with grapes, honey & scallions… YUM! I can’t wait to make it again and I am pretty sure it will make any Brussels sprout skeptic think twice about that vegetable that looks like a baby cabbage.

I grew up eating cranberry sauce from a can, not the whole berry sauce one, but, the jellied version. It’s weird, I won’t eat the whole berry one from a can because I feel like it’s too fake but I will eat the jellied version. Yes, I will still eat it with my turkey and stuffing. I don’t really know what prompted me to try making cranberry sauce myself since I was content with the can stuff, but, I’ve used the same recipe now for quite a few years and it’s one of my favorite things about Thanksgiving. I look forward to a sandwich with leftover turkey warmed up with melted cheese (preferably provolone) and topped with cranberry sauce every year after Thanksgiving. I am dreaming of it now as I type… LOL! So, what is so special about this sauce? I think it’s the simplicity of it. There are no out of the box ingredients. It’s simply a bag of fresh cranberries, sugar, water, fresh ginger, orange zest, a cinnamon stick, ground cloves and salt. I tried getting a little fancy one year, but, it just didn’t top the simple yet delicious taste of this cranberry sauce. Make a few days before you intend to use to really get the best flavor.

So, I hope these two dishes will make their way to your table, or, they have given you ideas of something else to try.


Roasted Brussels Sprouts With Grapes

Ingredients:

2 pounds Brussels sprouts, trimmed and halved

3 tablespoons olive oil

3 tablespoons unsalted butter

2 cups red seedless grapes

2 teaspoons chopped fresh thyme

1 bunch scallions, cut into 1-inch pieces

2 tablespoons honey

Kosher salt & freshly ground black pepper


Directions:

Place a baking sheet on the middle rack of the oven and preheat to 450 F.

Toss the Brussels sprouts with the olive oil, 1/2 teaspoon salt and a few grinds of pepper in a large bowl. Spread them on the hot baking sheet and roast, tossing halfway through until tender and charred in spots, 20 to 30 minutes.

While the Brussels sprouts are in the oven…. Melt the butter in a large skillet over medium-high heat. Add the grapes and thyme and cook until the grapes starting to burst, stirring occasionally. Add the scallions and honey. Increase the heat to high and bring to boil, then reduce the heat to medium-low and let simmer until the juices thicken and the grapes are glazed. Season with salt and pepper.

Once ready, transfer the Brussels sprouts to a dish and drizzled the grape mixture over them

Recipe from Food Network


Cranberry Sauce

  • Servings: 2 1/2 Cups
  • Print

Ingredients:

1 12 ounce bag fresh cranberries

1 cup sugar

1 cinnamon stick

2 teaspoons finely chopped ginger

2 teaspoons orange zest

1/4 teaspoon salt

1/8 teaspoon ground cloves


Directions:

In a medium saucepan combine 1 cup of water with the sugar, cinnamon stick, ginger, orange zest, salt and cloves. Cook over medium heat, stirring, until the sugar dissolves. Stir in the cranberries and bring to a boil, then lower the heat to medium-low and allow to simmer, stirring until slightly thickened.

Remove from the heat and transfer to a bowl. Allow to cool before refrigerating

Recipe from Rachael Ray

Caribbean Chicken

Every week there are two questions I dread… What should I make for lunch for the week and what should I make for dinner? I try to switch it up and make different things but sometimes I just run out of ideas or quite simply I just don’t feel like cooking. Thankfully, I have a binder of organized recipes I have been collecting for quite some time and I am finally putting them to good use. This Caribbean Chicken recipe is one that I ripped out from Food Network Magazine a few years ago and I am sure I will be making it again.

To start I browned boneless skinless chicken thighs that I seasoned with curry powder, allspice, thyme salt and pepper in melted coconut cream that I skimmed off the stop of the coconut milk. Just remember not to shake the coconut milk or you won’t be able to skim this cream off of it.


Once the chicken was browned I transferred it to a plate and added onion, garlic, cilantro, a serrano chili and thyme sprigs to my Dutch oven and cooked until the onions began to soften. 


I then returned the chicken to the pot along with water and the remaining coconut cream and milk from the can and cooked it covered on medium-low heat, for about 15 minutes until the sauce was thickened and the chicken was cooked through, about 15-20 minutes. And finally, I added in a cup frozen peas and carrots thawed and cooked everything until the pear and carrots were warmed through. I then seasoned it with salt and pepper.


And served it with white rice.


Caribbean Chicken

Ingredients:

1 1/2 teaspoons curry powder

1/2 teaspoon ground allspice

1/2 teaspoon chopped fresh thyme, plus 3 sprigs

Kosher salt and freshly ground pepper

1 1/2 pounds skinless, boneless chicken thighs, quartered

1 13.5 ounce can unsweetened coconut milk (do not shake)

1 yellow onion, chopped

2 garlic cloves, minced

2 tablespoons chopped fresh cilantro

1 Scotch bonnet, habanero or serrano chili pepper, seeded and finely chopped

1 cup frozen peas and carrots, thawed

Cooked white rice for serving

Directions:

Combine the curry powder, allspice, chopped thyme, 1 teaspoon salt and a few grinds of black pepper in a small bowl and use it to season the chicken.

Skim 2 tablespoons of the solid cream off the top of the coconut milk and transfer to a large Dutch oven or pot and melt over medium-high heat. Add the chicken and brown on both sides, about 5-7 minutes. Transfer to a plate.

Add the onion, garlic, cilantro, chili and thyme sprigs to the pot and cook, stirring until the onions are softened. Return the chicken to the pot along with a 1/4 cup of water and the coconut milk along with any remaining coconut cream. Reduce the heat to medium, cover and cook until thickened, about 15 minutes.

Remove the thyme sprigs and add the peas and carrots and continue cooking until warmed through.

Serve with rice.

Recipe adapted from Food Network