Cookie Palooza: Cannoli Wafer Sandwich Cookies

For today’s Cookie Palooza recipe I bring you a cookie you don’t have to bake! What could be better than that? No flour to measure, no oven to turn on… Anyone can make this cookie. So, what is it? It’s a Cannoli Wafer Sandwich Cookie! And let me just tell you that I brought these cookies to a friend’s house and they were a hit with everyone.

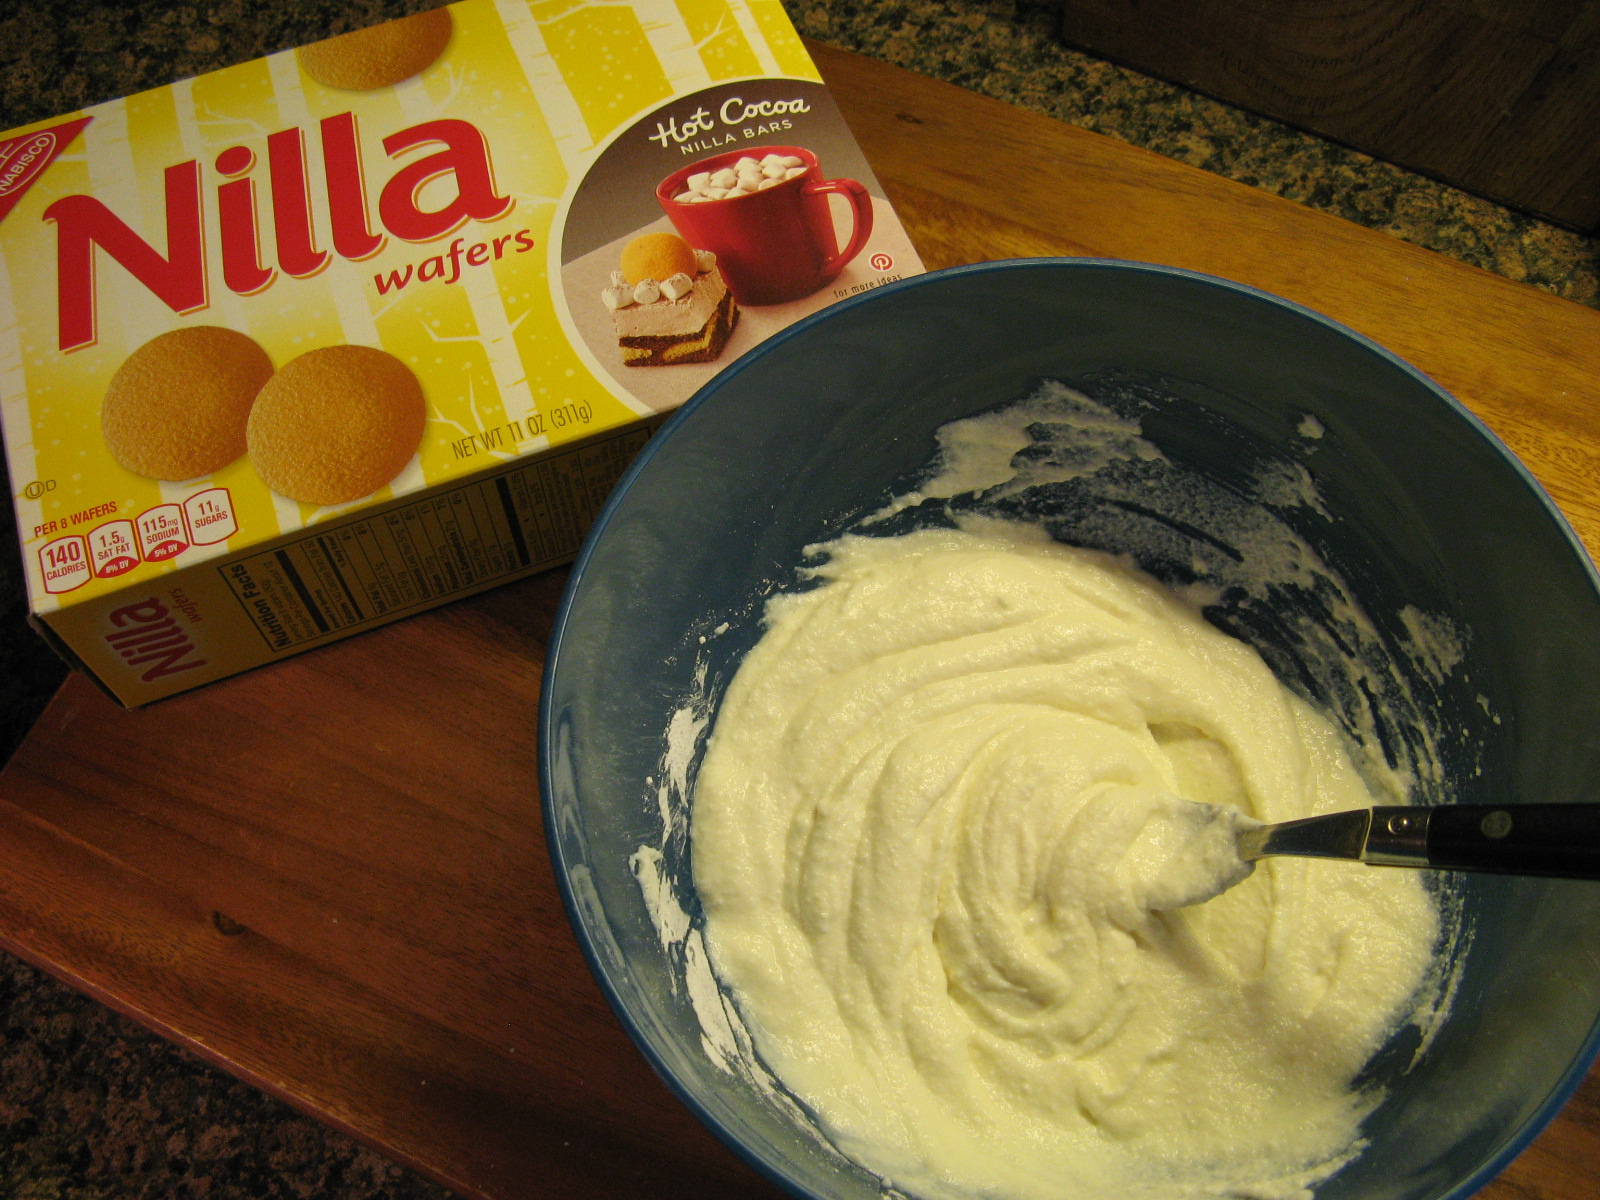
So, here’s what you need for these cookies; vanilla wafers, whole-milk ricotta, confectioners’ sugar, sugar, vanilla extract, white candy coating and miniature semi-sweet chocolate chips.

I began by making the cannoli filling by mixing whole-milk ricotta with confectioners’ sugar, sugar and vanilla extract.

img_0189

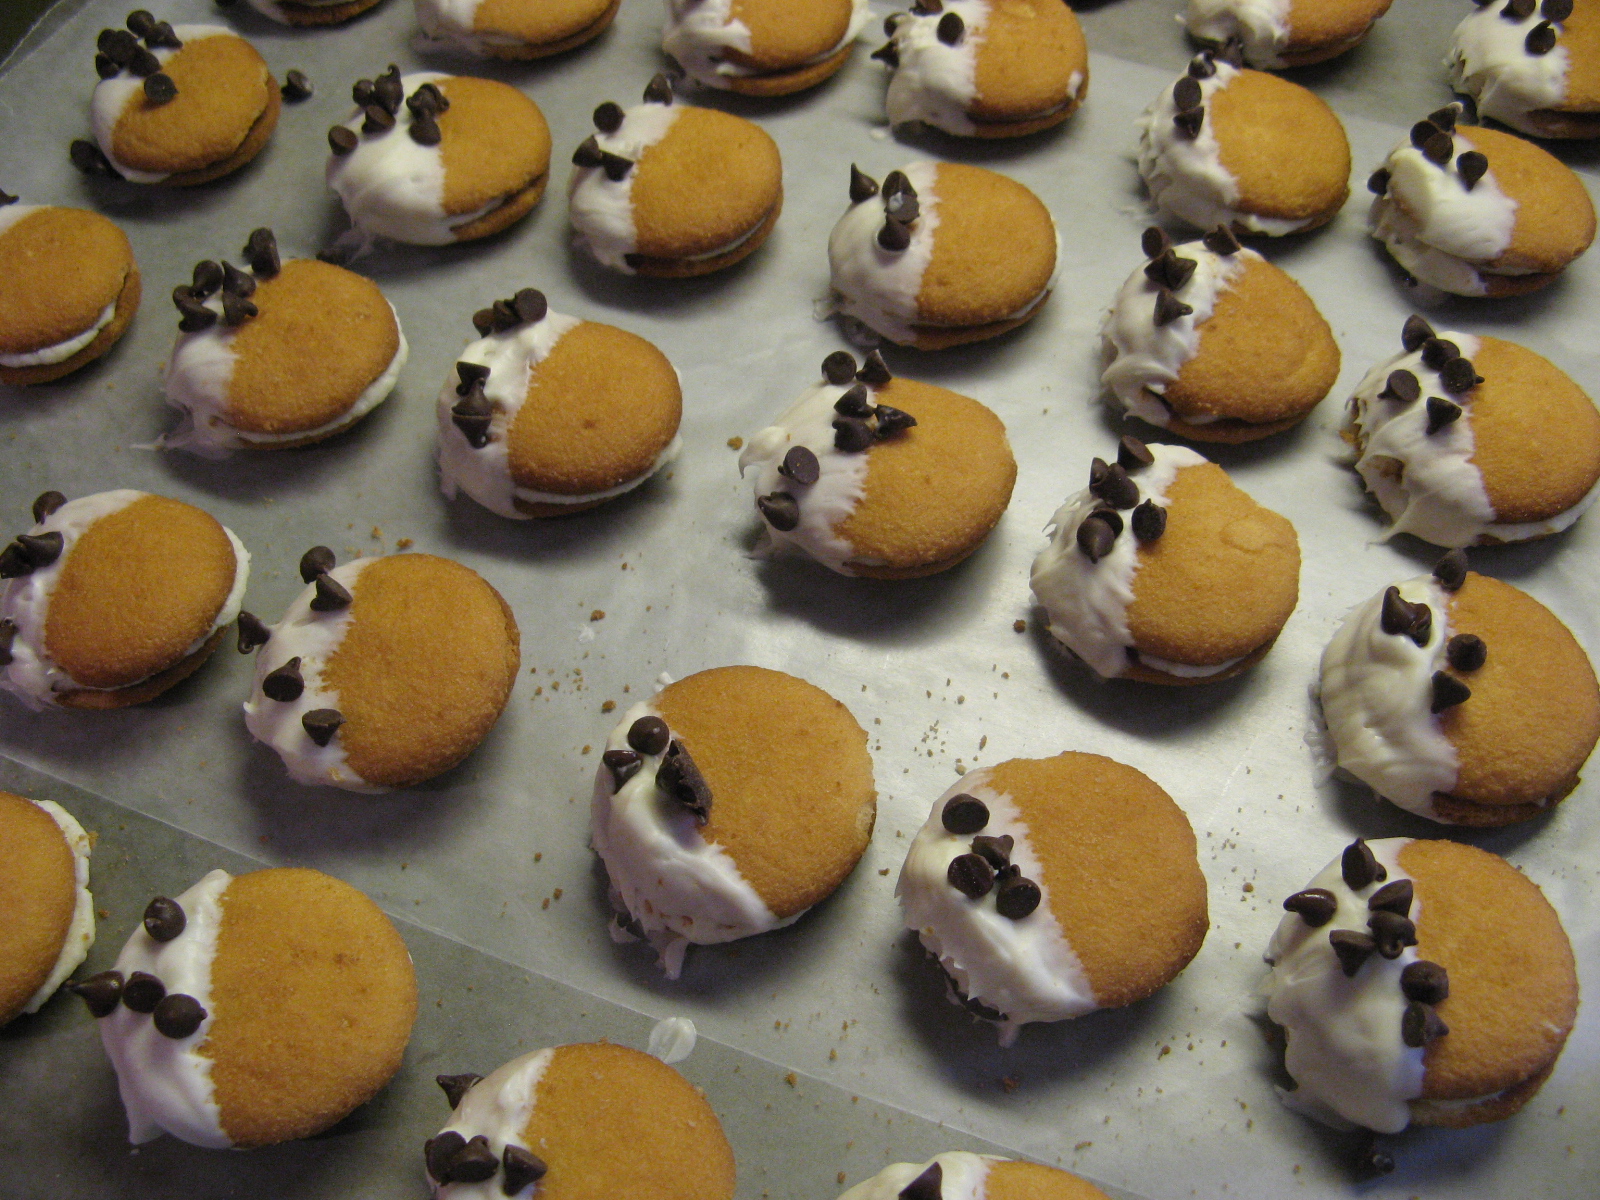
Next, I spread a teaspoon of the filling on the bottom half of the vanilla wafers and then topped them with another wafer.

img_0190

Once I had used up all of the cookies in the box….

img_0191

I dipped each of the sandwich cookies halfway into melted white candy coating – I used White Wilton Candy Melts. I dipped about five cookies at a time and then sprinkled mini chocolate chips on them. You don’t want the candy coating to set too much or the chocolate chips won’t stick to the cookies. Once I dipped all of the cookies I placed the cookies in the refrigerator for a few minutes so the candy coating could set.

img_0192

And finally, I dusted the cookies with confectioners’ sugar. How simple is that!?!?

img_0193

While these cookies are delicious and you might be tempted to save a few for the following day, they are best eaten the same day they are assembled.

Cannoli Wafer Sandwich Cookies

Ingredients:

1 cup whole-milk ricotta cheese

1/4 cup confectioners’ sugar, plus additional for dusting the cookies

1 tablespoon granulated sugar

1/4 teaspoon vanilla extract

1 package (12 oz.) vanilla wafers

12 oz. white candy coating, melted

1/2 cup miniature semi-sweet chocolate chips

Directions:

In a small bowl mix together the ricotta cheese, confectioners’ sugar, granulated sugar and vanilla extract until well blended.

Spread 1 scant teaspoon filling on half of the vanilla wafers and then top with the other half of the cookies.

Dip each of the sandwich cookies halfway into the melted candy coating and place on wax paper. Sprinkle with chocolate chips and let the cookies stand until set, about 10 minutes. Alternatively you can place the cookies in the refrigerator for a few minutes to speed up the process.

Refrigerate the cookies until serving. Dust with confectioners’ sugar prior to serving.

Recipe from Taste of Home

Cookie Palooza: Chocolate Walnut Crinkles

On this third day of Cookie Palooza I bring you a cookie that I have made before… a chocolate crinkle cookie. This version though is a bit simpler to make and it has walnuts. I love walnuts in cookies and brownies.

To make the dough for the cookies I started by toasting the walnuts and melting unsweetened chocolate and butter together. Once the walnuts and chocolate mixture cooled I added it to a large bowl with flour, sugar, eggs, Dutch processed cocoa powder, baking powder and salt. Using a handheld mixer I beat the ingredients until they were combined.

img_0229

Using a cookie scoop I scooped the dough and rolled it into a ball and then rolled it in confectioners’ sugar before placing them on a parchment lined baking sheet.

img_0234

I baked them in a preheated 300 F oven for about 15 minutes. After removing them from the oven I let them cool for a few minutes before transferring them to a wire rack to cool completely.

img_0237

While these cookies were good, I will say this… They are on the sweeter side so they are definitely meant for those who have a super sweet tooth!

img_0246

Chocolate Walnut Crinkles

Ingredients:

2oz. unsweetened chocolate, chopped

2 tablespoons unsalted butter

1 cup flour

1 cup sugar

1/2 cup finely chopped walnuts, toasted*

2 large eggs

1 tablespoon Dutch process cocoa powder

1 1/2 teaspoons baking powder

1/2 teaspoon salt

Confectioners’ sugar, for rolling

*To toast the walnuts, I placed them on a cookie sheet and baked them in a 350 F oven for about 8 minutes.

Directions:

Position racks in the oven in the top and bottom thirds of the oven; preheat to 300 F.

Place the chocolate and butter in a small microwave safe bowl, microwaving on high for 30 second intervals, stirring after each 30 seconds, until melted. Let cool.

Scrape the melted chocolate into a large bowl and add in the flour, sugar, walnuts, eggs, cocoa powder, baking powder and salt. Using an electric handheld mixer, blend on medium speed until well blended.

Using a small cookie scoop (or about 2 teaspoons), scoop the dough and roll in confectioners’ sugar and place on a parchment lined cookie sheet.

Bake until crackly on top and soft in the middle, rotating the sheets and reversing from the top to bottom racks halfway through baking, about 15 minutes. Let the cookies rest for a few minutes before transferring them to a wire rack to cool completely.

Recipe from Rachael Ray

Cookie Palooza: Buttered Rum Meltaways

For today’s Cookie Palooza recipe I bring you a cookie for those of you who don’t like to drink your alcohol but eat it instead… A Buttered Rum Meltaway.

I began by beating butter and sugar until it was pale and fluffy. I then added in vanilla extract and rum.

img_0160

In another bowl I whisked together flour, cornstarch and spices in a medium bowl. Which I then gradually added to the butter mixture.

img_0161

Once the dough came together I shaped it into logs on parchment paper..

img_0162

That I then wrapped in the parchment paper and placed in the freezer.

img_0163

A few days later (you can freeze the dough up to a month) I removed it from the freezer and let it warm a little to make slicing it into 1/4 slices a bit easier.

img_0181

After baking the cookies for about 15 minutes in a 350 F preheated oven…

img_0183

I coated them in confectioners’ sugar by tossing them in the sugar in a Ziploc bag.

img_0186

These cookies are so festive looking they would make a wonderful homemade gift or a welcome addition to a dessert table to a Holiday party you may be attending. Another great thing about these cookies, thanks to the rum they can keep up to 2 weeks in an airtight container!

img_0187

Buttered Rum Meltaways

Ingredients:

1 3/4 cups plus 2 tablespoons all-purpose flour

2 tablespoons cornstarch

2 teaspoons ground cinnamon

1 teaspoons freshly grated nutmeg

1/4 teaspoon ground cloves

3/4 teaspoon coarse salt

3/4 cup unsalted butter, at room temperature

1 cup confectioners’ sugar

1/4 cup rum, dark or light

1 teaspoon pure vanilla extract

Directions:

Whisk together the flour, cornstarch, cinnamon, nutmeg, cloves and salt in a medium bowl and set aside.

Using a handheld mixer or stand mixer beat butter and 1/3 cup confectioners’ sugar on medium speed until pale and fluffy. Mix in the rum and vanilla extract. Reduce the speed to low and gradually add in the flour mixture.

Divide the dough in half and place each half on a piece of parchment paper. Shape the dough into logs. Fold the parchment paper over the dough and using a ruler roll and press the dough into a 1 1/4 inch log. Wrap in parchment paper and chill in freezer at least 30 minutes or up to a month.

Preheat the oven to 350 F. Remove the parchment paper from the dough and slice into 1/4 inch thick rounds. Place on a parchment lined baking sheet and bake for 15 minutes, or until cookies are just golden. Transfer the cookies to a wire rack to cool for 10 minutes. Gently toss the cookies with the remaining confectioners’ sugar in a resalable plastic bag.

Recipe from Martha Stewart

Cookie Palooza: Oat-Rageous Chocolate Chip Cookies

It’s the first week of December, are your ovens ready? It’s time to bake until your hearts content and then bake a little more! It’s probably one of the best things about the Holiday Season… Sweets everywhere! And I am here to help… Every day this week I’ll be bringing you a new cookie recipe that may become part of your baking repertoire or give you some inspiration to create a new recipe for yourself. I’ve scoured my cookbooks and old holiday cookie magazines to gather recipes that are easy to make, are a bit traditional with a twist and one that combines three favorites in one. That’s today’s cookie… One that combines oatmeal, peanut butter and chocolate chips together. So, welcome to Cookie Palooza 2016 on Bead Yarn & Spatula… Up first Oat-Rageous Chocolate Chip Cookies.

img_0150

Oat-Rageous Chocolate Chip Cookies

  • Servings: 30-36 cookies
  • Print

Ingredients:

1/2 cup butter, softened

1/2 cup creamy peanut butter

1/2 cup sugar

1/3 cup packed light brown sugar

1 egg

1/2 teaspoon pure vanilla extract

1 cup all-purpose flour

1/2 cup quick-cooking oats

1 teaspoon baking soda

1/4 teaspoon salt

1 cup semi-sweet chocolate chips

Directions:

Preheat oven to 350 F and line two baking sheets with parchment paper.

In a medium bowl whisk together the flour, oats, baking soda and salt, set aside.

In a large bowl combine the butter, peanut butter and sugars and use an electric mixer to cream together. Beat in the egg and vanilla. Add the flour mixture and mix well. Stir in the chocolate chips.

Drop by rounded tablespoonful onto the prepared baking sheets and bake for 10-12 minutes, until cookies are lightly browned.

Recipe from Taste of Home

Christmas Sugar Cookies

It’s Christmas Eve! Have you gotten all of your baking done? I took my last sheet of cookies out of the oven not too long ago. Speaking of cookies… Decorated sugar cookies are synonymous with the Holidays. Whether they are decorated with royal icing, sprinkles or both, you can usually find them on most cookie platters this time of the year. Now, there are so many different recipes for sugar cookies out there. I once tried one with orange juice… it definitely wasn’t my favorite. What grabbed me about this recipe was that it was for Soft Sugar Cookies. Yes, sugar cookies are supposed to be on the crispier side but I sometimes find that if you leave those cookies in the oven for a few seconds too long your bordering on hard cookies not crispy ones.

To make the dough for these cookies I began by beating butter in the bowl of my stand mixer on medium-high speed until it was light and fluffy. I then added in sugar, egg, vanilla extract and sour cream. Once all of those ingredients were well incorporated I added a flour mixture that included flour, baking powder, salt and baking soda. After the dough came together I shaped the dough into a disk, covered it with plastic wrap and refrigerated it until it was firm.

IMG_0155

Once it was firm I rolled it out on a floured surface and began cutting out my Christmas shapes.

IMG_0158

After transferring the cutouts to a parchment lined cookie sheet I decorated them with holiday themed sprinkles and sugar.

IMG_0160

I baked them in a 350 F preheated oven for 5 to 6 minutes and then transferred them to a wire rack to cool completely. This recipe is definitely going to be my go-to recipe for whenever I want to make sugar cookies. They are not overly sweet and are the perfect texture. They have a little bite to them but overall are nice and soft!

IMG_0164

Hope you all have a wonderful Christmas!!!

Soft Sugar Cookies

  • Servings: 36 3-inch cookies
  • Print

*Please note that I halved the recipe which yielded me 30 2-inch cookies. If you would like to do the same follow the measurements in parenthesis.


Ingredients:

3 cups flour (1 1/2 cups)

1 teaspoon baking powder (1/2 teaspoon)

1/2 teaspoon salt (1/4 teaspoon)

1/4 teaspoon baking soda (1/8 teaspoon)

1 1/2 sticks unsalted butter, at room temperature (6 tablespoons)

1 cup sugar (1/2 cup)

1 egg (2 tablespoons of a whisked egg)

1 teaspoon vanilla extract (1/2 teaspoon)

1/4 cup sour cream (2 tablespoons)


Directions:

In a medium bowl whisk together the flour, baking powder, salt and baking soda and set aside.

In a large bowl using an electric mixer (or using a stand mixer) beat the butter on medium-high speed until light and fluffy. Add the sugar and beat to blend. Add in the egg and vanilla and then the sour cream. Switch the speed to low and beat in the flour until just blended. Halve the dough, shape into disks and wrap plastic wrap and refrigerate until firm – 1 1/2 to 2 hours. If using the smaller measurements just shape into one disk.

Preheat the oven to 375 F and line cookie sheets with parchment paper.

On a floured surface roll out the disk to about 1/8 inch thick and cut out using desired cookie cutters. Place on prepared cookie sheets about 1-inch apart.

Bake until the bottoms of the cookie are light golden, 5 to 7 minutes. Transfer to a wire rack to cool completely.

If you plan on decorating with sprinkles and sugar, place those on the cookies prior to baking. If you plan on decorating with royal icing wait until the cookies have completely cooled to do so.

Recipe from Rachael Ray Magazine

Raspberry Almond Shortbread Thumbprints

There are some recipes you see that you know that you must instantly try… As was the case when I got a recipe in my inbox last week from Land O’ Lakes for a Raspberry Almond Shortbread Thumbprint cookie. I pretty much love any pastry / baked item that involves almonds and then when you throw raspberry into the mix you are definitely in for something pretty delicious. Best of all, not only are these cookies amazing, but, they are simple to make and add a festive to look to your holiday cookie platters.

I began by making the dough (obviously… LOL!)… I combined butter, sugar and almond extract in the bowl of my stand mixer and beat it at medium speed until it was well combined, scraping the bowl as necessary. On low speed I added in flour and continued beat the mixture until it was well combined. Once the dough had come together I covered and refrigerated it for an hour or until the dough was firm.

IMG_0070

Once it was firm, I rolled dough into 1-inch sized balls – I used approximately 1/2 tablespoon of dough for each ball.

IMG_0075

Then using the back of a 1/4 teaspoon (you could simply use your thumb as well, hence the name of the cookie) I made a small indentation into the center of each cookie and then filled them with raspberry jam.

IMG_0076

After refrigerating the cookies for about 10 minutes I baked them in a 350 F preheated oven for about 12-14 minutes, until the edges just began to brown. You don’t have to refrigerate the cookies prior to baking, but, I did so so that the dough could firm up again a bit so the cookies wouldn’t spread as much while baking. My cookies did spread some so I probably could have left them in the refrigerator a bit longer. After removing them from the oven I let them sit on the cookie sheet for a minute or two and then transferred them to a wire rack to cool completely.

IMG_0083

Once the cookies cooled I drizzled a glaze of water, confectioners’ sugar and almond extract over them.

IMG_0096

One word for these cookies… YUM!


Raspberry Almond Shortbread Thumbprints

  • Servings: 36-42 cookies
  • Print

Ingredients:

1 cup (2 sticks) unsalted butter, softened

2/3 cup sugar

1/2 teaspoon almond extract

1/2 cup raspberry jam


For the Glaze:

1 cup powdered sugar

2 to 3 teaspoons water

1 1/2 teaspoons almond extract


Directions:

Combine the butter, sugar and almond extract in a bowl and beat at medium speed until creamy, scraping the sides of the bowl as necessary. Switch to low speed and add in the flour, beating well until all the ingredients have been combined. Cover and refrigerate for at least 1 hour.

Preheat oven to 350 F and cover cookie sheet with parchment paper.

Shape the dough into 1-inch balls; approximately 1/2 tablespoon of dough. Place 2 inches apart on prepared cookie sheets. Make a small indentation in the center of each of the cookies and fill with a 1/4 teaspoon of the raspberry jam.

You could place the cookies back in the refrigerator for a few minutes for the dough to firm up again, or place them directly in the oven for about 12-14 minutes, or until the edges are slightly browned. Let stand on the cookie sheets for 1 minute and then transfer to a cooling rack to cool completely.

Combine all the ingredients for the glaze in a bowl and whisk together until smooth and then drizzle over the cooled cookies.

Recipe from Land O’ Lakes

Vanilla Spritz Cookies

How is your holiday baking going? I’ve been squeezing it in while trying to finish up Christmas cards, Christmas shopping and Christmas gift crafting (i.e. knitting and crocheting.) I think I am on track to get it all done; if not there will be some late nights in my near future.

Today I am bringing you super simple and delicious Vanilla Spritz Cookies. So customarily when you make spritz cookies you pipe them through a cookie press, well, I tried that once and the results were horrible. So for these cookies I decided to pipe them using a pastry bag and a large star tip instead and the end result was great!

IMG_0069

To make the dough I began by beating butter in my stand mixer on medium speed for 30 seconds. Next I added in sugar and baking powder. Once those ingredients were well combined I added in an egg and vanilla bean paste. And finally flour.

IMG_0064

Next I transferred the dough to a pastry bag fitted with a large star tip and made simple piped drop cookies which I then sprinkled with festive colored sugar and sprinkles. Now, I went simple and just did simple drop cookies, but, you could get creative and pipe wreaths or different swirl designs.

IMG_0067

After baking them in a 375 F preheated oven for 8 minutes I removed them from the oven and transferred them to a wire rack to cool completely. Now, these cookies are of the dangerous variety… On the smaller side and super yummy. Which means you could grab a decent handful and munch away on them absentmindedly. But, since it’s the Holidays it’s okay!

IMG_0068


Vanilla Spritz Cookies

  • Servings: 72 cookies
  • Print

***Please note that I halved the recipe. Below is the original recipe with the original measurements. If you would like to make a smaller batch of cookies, i.e. 36, follow the measurements in the parenthesis. To get the 2 tablespoons of egg, whisk the egg and then measure it out. You might be tempted to use the entire egg, but, that would make the dough to watery and prevent you from being able to pipe or form the dough.


Ingredients:

1 1/2 cups unsalted butter, softened (3/4 cup / 12 tablespoons)

1 cup granulated sugar (1/2 cup)

1 teaspoon baking powder (1/2 teaspoons)

1 egg (2 tablespoons)

1 tablespoon vanilla bean paste* (1/2 tablespoon)

3 1/2 cups all-purpose flour (1 3/4 cup)

Sprinkles and Sugar Crystals to decorate

*If you do not have vanilla bean paste you can use an equal amount of vanilla extract

Directions:

Preheat the oven to 375 F. Line cookie sheets with parchment paper.

In a large bowl beat butter with a mixer on medium speed for 30 seconds. Add the sugar and baking powder, continue beating until well combined then add in the egg and vanilla bean paste. And finally the flour. Scrape the sides of the bowl as necessary during the mixing.

Transfer the dough to a pastry bag fitted with a large star tip and pipe drop cookies onto prepared cookies sheets. Sprinkle the cookies with decorative sugar and/or sprinkles.

Bake for 7-8 minutes, until the edges are firm but just beginning to brown. Remove from the oven and transfer the cookies to a wire rack to cool completely.


Recipe slightly modified from Better Homes & Gardens 100 Best Cookies Magazine

Chocolate Crinkles

The Christmas Cookie fun continues with today’s Chocolate Crinkles. Now, I know the cookie recipes I’ve posted earlier – Rosemary and Pine Nut Cookies and Orange Scented Elephant Ears – aren’t your traditional holiday cookie recipes, but, these are definitely in line with what you see around the holidays. I’ve seen recipes for these cookies for quite some time, I probably have 1 or 2 saved in my recipe binder, but, it wasn’t until I was flipping through a Christmas Cookie recipe magazine recently that I finally decided to try them out and I wish I had tried them sooner. They are a cinch to make and delicious… Chocolatey without being overpowering.

I started off by melting unsweetened chocolate, shortening and butter over low heat in a medium saucepan.

IMG_0025

After letting the chocolate mixture cool for a few minutes I continued making the dough for the cookies by mixing together eggs, sugar, baking powder, baking soda and salt.

IMG_0026

Once that was well mixed I then added in the melted chocolate and vanilla extract and finally flour and unsweetened cocoa powder.

IMG_0027

It wasn’t long before the dough had come together. To make sure all of the ingredients had incorporated I gave the dough a few good folds using a spatula.

IMG_0028

Using a cookie scoop I scooped up the dough and shaped it into a ball and then rolled it in granulated sugar and then confectioners’ sugar. I then placed them on a parchment lined cookie sheet.

IMG_0029

To give some of the cookies a festive touch I sprinkled them with red, green and white sprinkles.

IMG_0031

After baking them in a 350 F preheated oven for 8 minutes, I let them cool on the pan for a few minutes before transferring them to a wire rack to cool completely. While the recipe says to bake them for 8-10 minutes, I always like to bake my cookies on the lower end of the time span to ensure that I don’t end up with cookies that are like rocks. Letting them sit on the hot pan for a few minutes allows them to cook and set for a few more minutes. At first I thought I may have removed these cookies from the oven too soon, but, as they continued to cool on the wire rack they firmed up more and the texture of the cookie was spot-on. A little crisp on the outside and completely soft on the inside!

IMG_0036


Chocolate Crinkles

Ingredients:

4 oz. unsweetened chocolate, chopped

1/2 cup shortening

1/4 cup unsalted butter

3 eggs, lightly beaten

1 3/4 cup granulated sugar

2 teaspoons baking powder

1/4 teaspoon baking soda

1/4 teaspoon salt

2 teaspoons vanilla extract

1 1/3 cups all-purpose flour

1/3 cup unsweetened cocoa powder


For Rolling Dough:

1/4 cup granulated sugar

2/3 cup confectioners’ sugar


Directions:

Preheat oven to 350 F and line cookie sheets with parchment paper.

Over low heat in a medium saucepan melt the chocolate, shortening and butter. Let cool.

In a large bowl combine eggs, granulated sugar, baking powder, baking soda and salt. Stir in the melted chocolate and vanilla extract. And then stir in the flour and cocoa powder.

Using a cookie scoop, scoop out dough and shape into balls and roll the ball in the granulated sugar and then the confectioners’ sugar. Place 2 inches apart on the prepared cookie sheets. Bake 8 to 10 minutes or just until edges are set and the cracks appear slightly moist. Cool on the sheet for 2 minutes and then transfer to a wire rack to cool completely.

Recipe from Better Homes & Gardens 100 Best Cookies Magazine

Rosemary and Pine Nut Cookies

December has rolled in, and you know what means… The Holidays are in full force! Everywhere you look there is red and green, Christmas trees, Snowmen, Poinsettias and Dessert! Specifically cookies. There is something about this time of year that makes all of kinds of cookies come out of the woodwork. Okay, maybe that’s not a great way of saying it, but, you catch my drift. Desserts go into overdrive this time of the year. Not that I am complaining though. I do my part and join in on the fun and add to that dessert pile. So, be on the lookout for some new cookie recipes hitting my blog over the next few weeks. The recipes are ones that I have had for quite some time – did I ever mention that I am bit of a recipe hoarder, thankfully they are all nicely organized – but I have never tried making. Well, as they say there’s no time like the present. No pun intended.

Now, you know how they say “Don’t knock it till you try it,” well, I definitely think these cookies could fall into that category. They are a buttery and crisp Rosemary and Pine Nut Cookie. Yes, you read that correctly… Rosemary in a sweet and buttery cookie. Rosemary is not just a wonderful and flavorful herb to add your meats, it can be used in baking and with the right amount it’s not overpowering but instead a welcomed addition. I may have to look for a few more baking recipes that incorporate it. Especially since I have a lovely rosemary plant growing in my kitchen. I originally planted it outside over the summer and since it was growing so well I decided to repot it and bring it indoors.

IMG_9720

For these cookies the key to using the Rosemary is making sure that you chop it first and then combine it with sugar in the bowl of a food processor and pulse it until the rosemary is finely chopped. You definitely don’t want to take a bite of any cookie and get a nice whole piece of rosemary in it. That would definitely be overpowering.

IMG_9721

Once that is done you beat it with butter until it’s fluffy and then add in vanilla extract and eggs. Next add in toasted pine nuts that have been finely chopped in a food processor and finally a mixture of flour, baking soda and salt. Once the dough comes together dump it on a sheet of plastic wrap…

IMG_9722

And form it into a log and wrap it up. I then placed it in the refrigerator for two hours so it could firm up. Once it was slightly firm I removed it from the refrigerator to shape it a little better and then placed in back in the refrigerator.

IMG_9725

After the two hours I sliced the dough into discs about 1/4 inch thick. Unfortunately I didn’t really form my log correctly so my cookies were not perfectly round. I pressed a few toasted pine nuts onto the cookies and baked them in a 350 F preheated oven for 10 minutes.

IMG_9730

I let them cool on the pan for 10 minutes and then transferred them to a wire rack so they could cool completely.

IMG_9734

And I must say these are one of the best cookies I’ve ever had! The butter, pine nuts and rosemary work so well together. And they tasted even better the second day. The flavors only get stronger but in a good way!


Rosemary and Pine Nut Cookies

  • Servings: 30 cookies
  • Print

Ingredients:

1 1/2 cups all-purpose flour

1/2 teaspoon baking soda

1/4 teaspoon salt

3/4 cup granulated sugar

1 1/2 teaspoons fresh rosemary, chopped

3/4 cup unsalted butter, softened

1 large egg

1/2 teaspoon vanilla extract

1/2 cup pine nuts, toasted*


*To toast the pine nuts spread them on a baking sheet and bake them in a 350 F preheated oven for about 5-7 minutes.


Directions:

In a medium bowl combine the flour, baking soda and salt until well blended, set aside.

In a food processor pulse the sugar and rosemary until well combined and the rosemary is finally chopped. Transfer to a stand mixer. Put all but 2 tablespoons of the pine nuts in the food processor and process until finely chopped.

Add the butter to the rosemary mixture and beat on medium speed until light and fluffy. Reduce the speed to low and add in the egg and vanilla extract, beat until combined. Add the chopped pine nuts and then the flour mixture and mix until the dough absorbs the flour and become to come together. Turn the dough out onto a large piece of plastic wrap and form it into a log about 2 inches thick and 11 inches long. Wrap and refrigerate until firm, 1 to 2 hours. If the dough is too soft to form a log, refrigerate for about 30 minutes, remove from the refrigerator form it and then place it back in the refrigerator.

Once firm cut the dough into discs between 1/4 and 1/2 inch thick and place on parchment lined cookie sheets. Sprinkle the cookies with the whole pine nuts, lightly pressing them into the dough. Bake in a 350 F preheated oven for 10 to 12 minutes. Let cool on the sheet for 10 minutes then transfer to a wire rack to cool completely.

Recipe from Fine Cooking

Christmas Themed Sugar Cookies

It’s Christmas Eve and I am happy to say that all of my Christmas baking is officially done. For my final cookie post before the holiday – check out my Rainbow Cookies and Gingerbread Men from earlier in the week – I am going completely traditional with sugar cookies decorated to reflect the holiday!

IMG_6310

After sifting together cake flour (yes, you read that correctly, cake flour for cookies), baking powder and salt in a large bowl…

IMG_6267

I then mixed together butter and sugar in a separate bowl and then added in an egg and vanilla extract and continued mixing until all of the ingredients were incorporated.

IMG_6268

Next I added in the flour mixture to the butter mixture in 2 additions.

IMG_6271

Once the dough came together I divided it in half and wrapped it in plastic wrap and refrigerated it until it was firm – the recipe stated at least an hour but I left it in the fridge overnight and just let it sit out for a few minutes before rolling it out.

IMG_6272

Whereas the recipe said to roll the dough to about a 1/8-inch thick I found it to be thin to work with and the few cookies that I did manage to cut out at that thinness ended up over-browning when I baked them so I went with the standard 1/4-inch thick.

IMG_6291

I decorated a few of the cut-outs with sanding sugar prior to refrigerating them for 30 minutes before baking them in a 350 F preheated oven.

IMG_6293

After letting the cookies cool it was time to spruce them up with royal icing, sanding sugar and sprinkles.

IMG_6305

These snowflakes were by far my favorite and I must say that the cake flour produced a sugar cookie that was much more delicate than and not as crunchy as your typical sugar cookie. I definitely think this will become my go-to sugar cookie recipe from now on.

IMG_6294

Hope you all have a wonderful Christmas!

Sugar Cookies

Makes 24 to 36 cookies

Ingredients

2 1/2 cups cake flour (not self-rising), plus more for dusting

1 teaspoon baking powder

1/4 teaspoon salt

2 sticks unsalted butter, at room temperature

3/4 cup sugar

1 large egg

1 teaspoon pure vanilla extract

Directions

1. Sift the cake flour, baking powder and salt onto a piece of parchment paper or into a medium bowl; set aside. Beat the butter and sugar in a large bowl with a mixer on medium-high speed until light and fluffy, about 5 minutes. Add the egg and vanilla and beat until incorporated. Reduce the mixer speed to low and beat in the flour mixture in 2 batches until just incorporated. Divide between 2 pieces of plastic wrap; shape into disks. Wrap and refrigerate until firm, at least 1 hour. (The dough can be frozen for up to 1 month; thaw overnight in the refrigerator before rolling.)

2. Line 2 baking sheets with parchment paper. Working with 1 disk at a time, roll out the dough on a floured surface, dusting with flour as needed, until about 1/8 inch thick*. Cut out shapes with 2-to-4-inch cookie cutters; arrange 2 inches apart on the prepared baking sheets. (If the dough becomes too soft as you work, return to the refrigerator until firm.) Gather the scraps and refrigerate until firm; reroll once to cut out more cookies. Chill the cutouts 30 minutes.

3. Position racks in the upper and lower thirds of the oven and preheat to 350 degrees F. Bake, switching the pans halfway through, until the cookies are slightly puffed and just golden, 13 to 15 minutes. Let cool 5 minutes on the baking sheets, then transfer to racks to cool completely before icing.

*I rolled out my cookies 1/4 inch thick.