Rainbow Cookie Cake

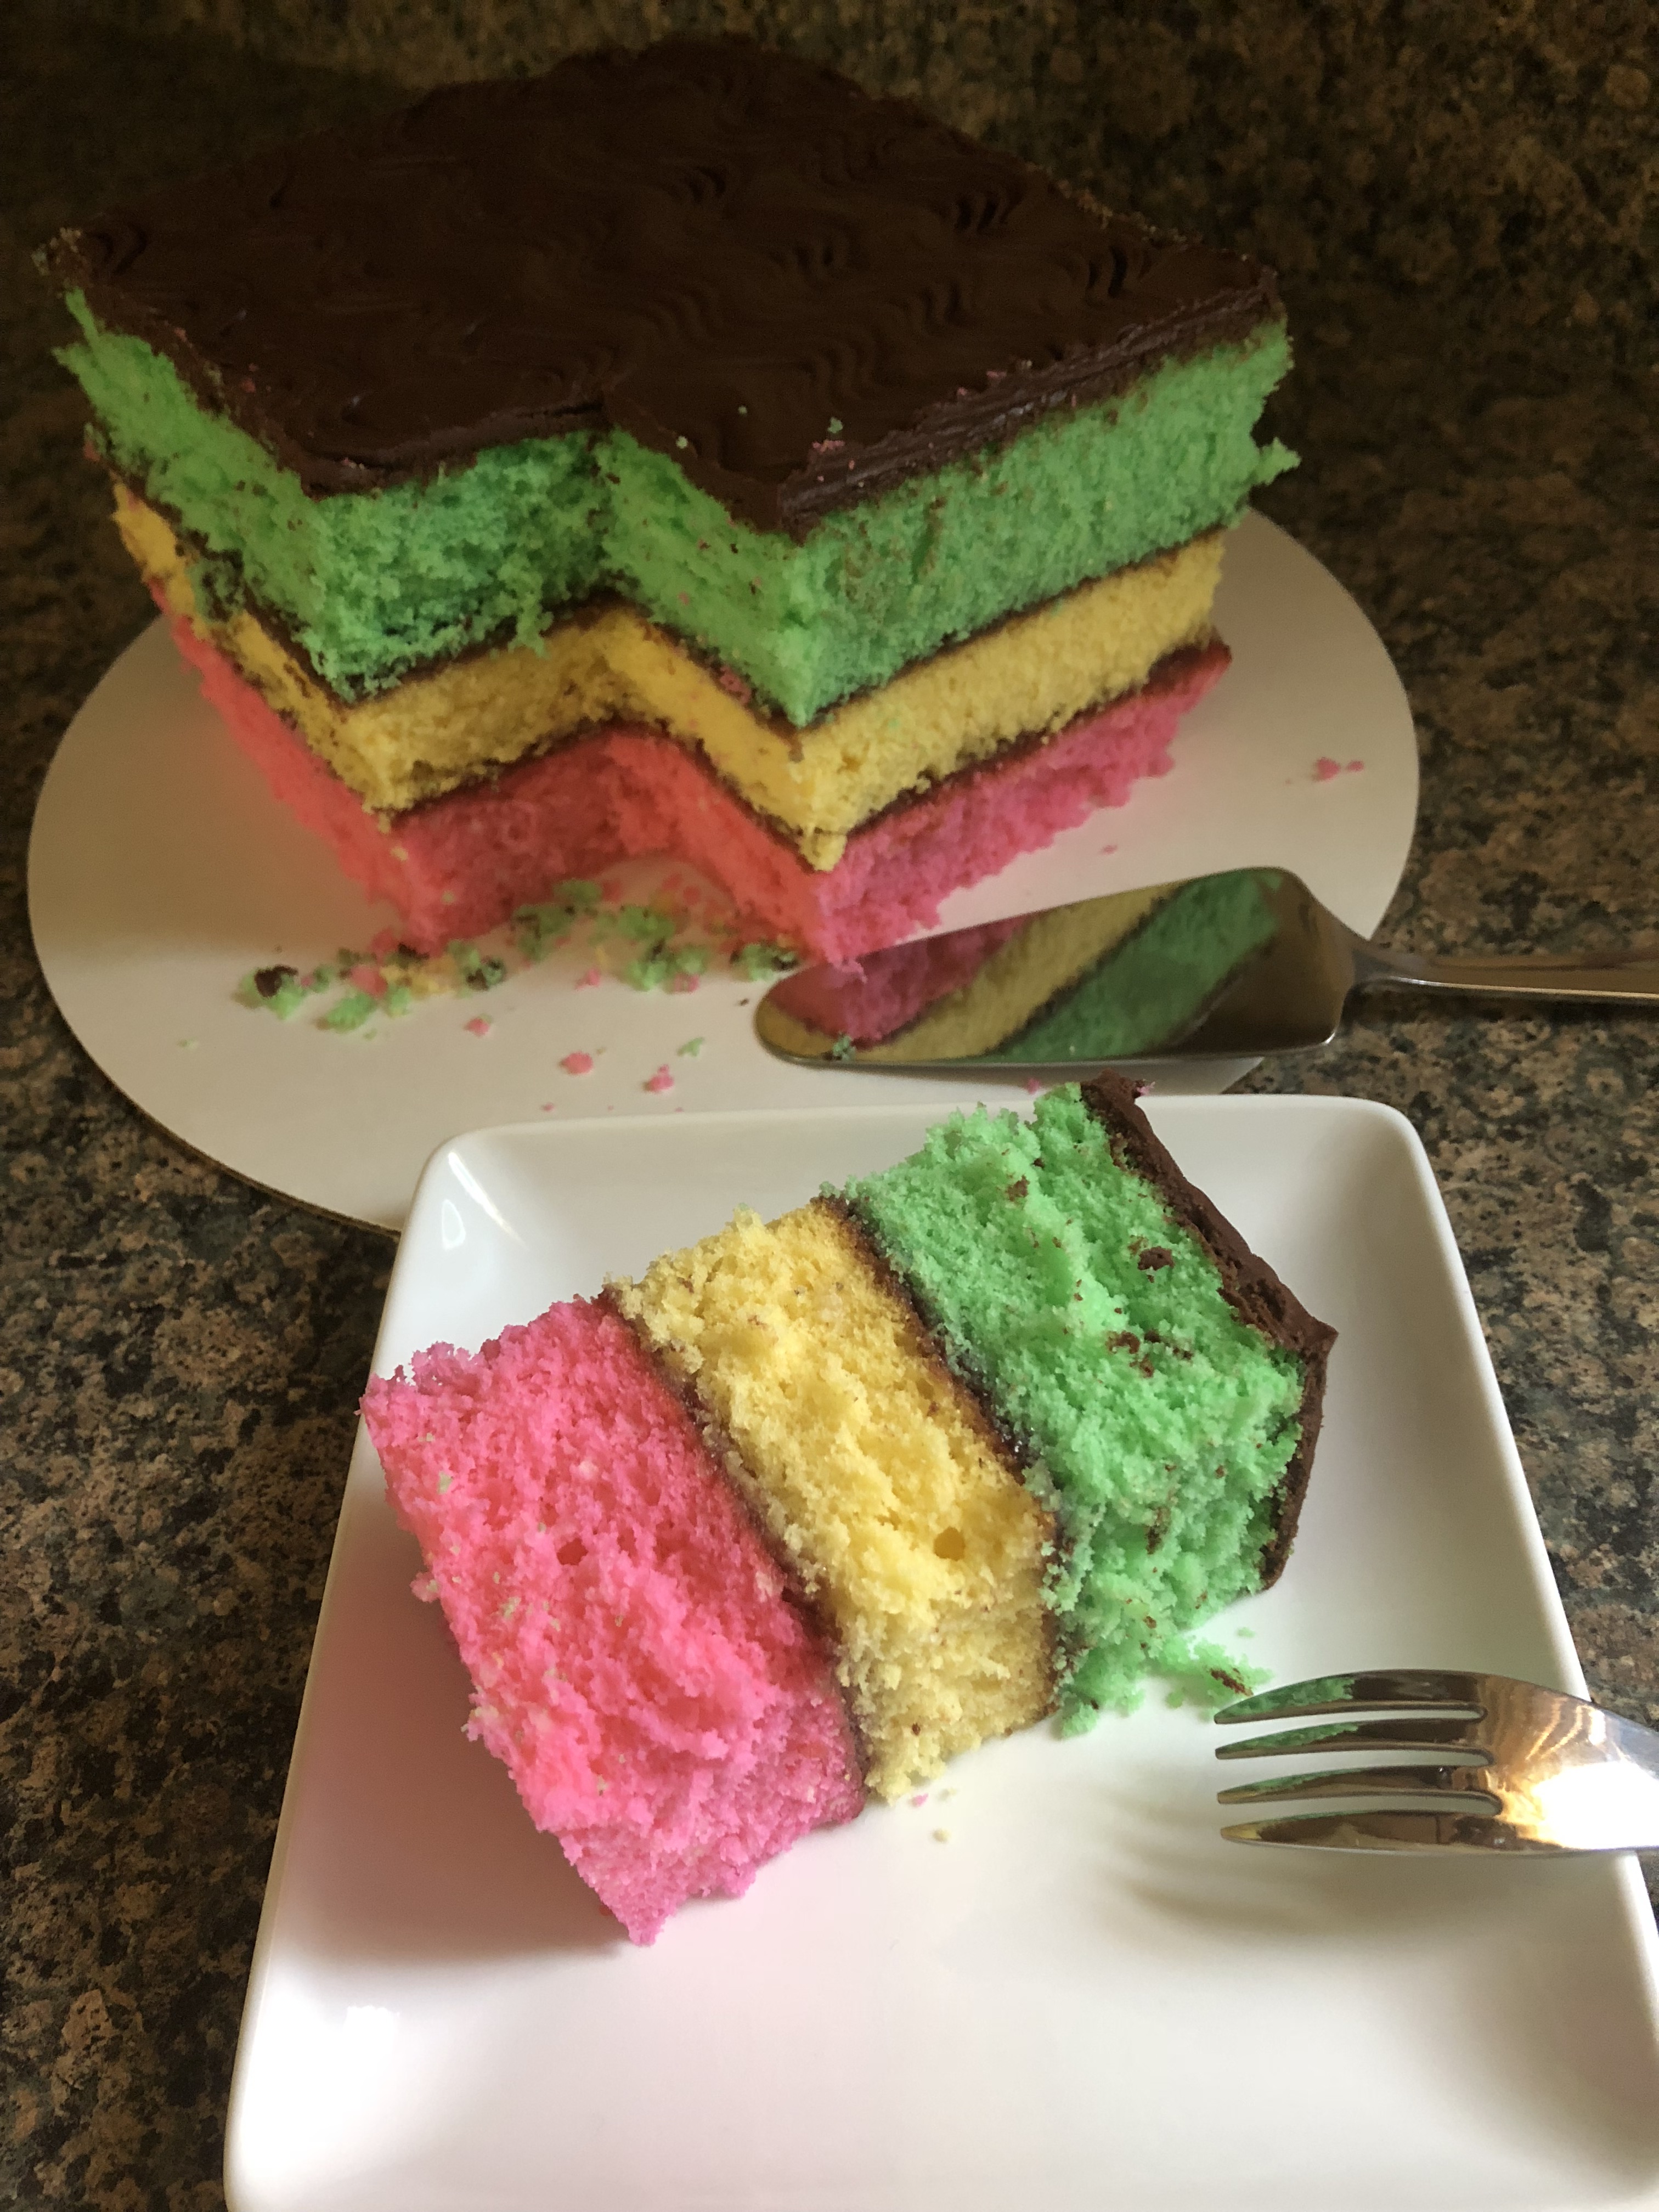
This cake might be a stretch as a holiday cake, but, since I normally make Rainbow Cookies around the holidays I figured a Rainbow Cookie Cake would be a nice addition as a holiday cake. It definitely has a bit of a wow factor and it’s much easier & quicker to make than the cookie version.

One of the things that made this cake easy was using three boxes of white cake mix. I prepped each following the directions on the package and added in 1/2 teaspoon of almond extract to each. While the almond flavor was noticeable, I think it would have been better to add in 3/4 to 1 teaspoon of extract to each. Or, you could skip the extract altogether and grate in almond paste. I would suggest buying one package of almond paste and dividing it into three equal parts. Once the cake mix was prepped I then added in gel food coloring to achieve the pink, yellow & green colors. Here’s a tip, instead of adding a bunch of one color to achieve your desired shade, add in a little orange to the yellow, add a drop of red to the pink and a bit of blue for the green. This will also result in more vibrant shades of each color as well.

I baked each of the layers in a 9 inch square pan. While the directions said to bake the cakes in a 350 F oven for about 35 minutes, I found that after 30 minutes my cakes were still undercooked so I lowered the oven temperature to 325 F and baked the cakes for an additional 10-12 minutes. I let the layers cool in the pan for about 15 minutes and then inverted them on wire racks to cool completely.

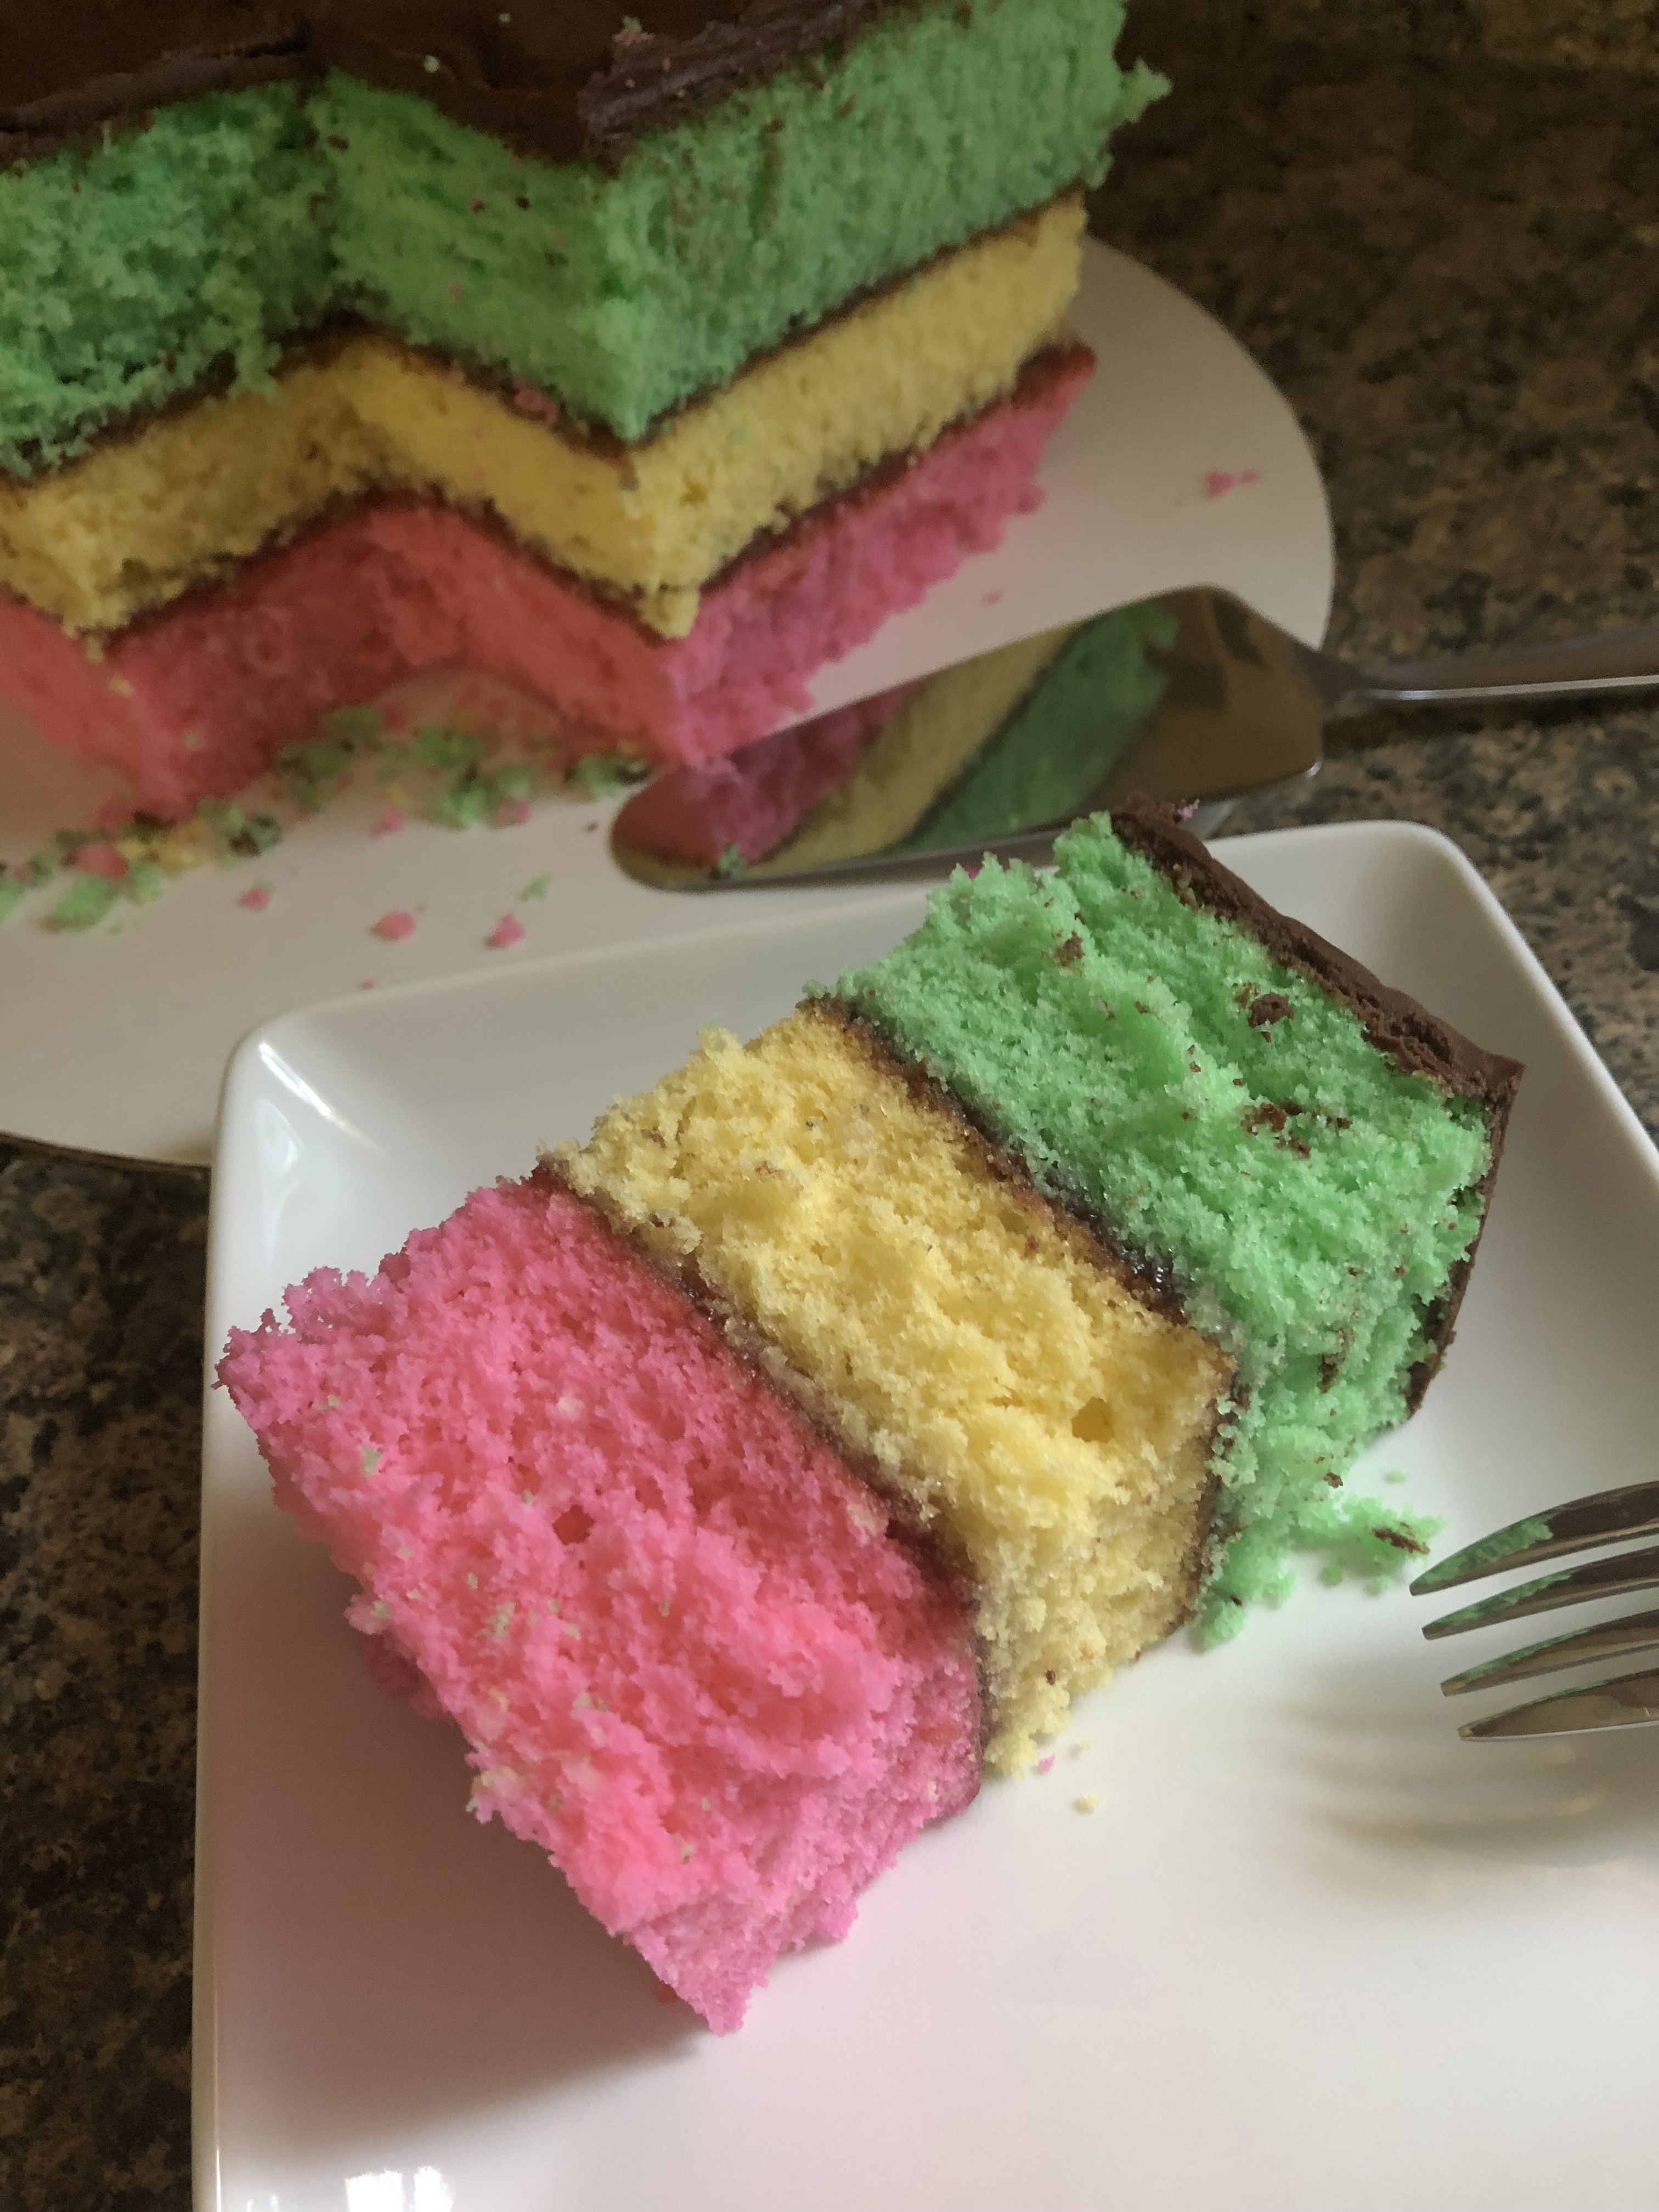
Once the layers were cooled I leveled each of them with a serrated knife. I placed the pink layer on a cake board, trimmed side up, and spread about 1/2 cup of raspberry jam. I repeated this step with the yellow layer and then topped the cake the green layer, trimmed side down. While the directions called for the cake to be frozen for 1 hour, unfortunately I used a round cake board that wouldn’t fit in my freezer so I ended up refrigerating it for about 2-3 hours. Don’t worry if your layers are not flush, i.e. not the same width, you will be trimming the sides of the cake once you top it with chocolate. This ended up happening to me because while both of the pans I used were 9 inch squares the sides of one of the pans was straighter than the other.

Before removing the cake from the refrigerator I made the chocolate topping. I melted chocolate and butter together in the microwave in 30 second intervals. Well, to be truthful, I microwaved it once at 30 seconds and the second time at 45 seconds and then stirred it together until smooth. I set it aside for about 10-15 minutes so it could cool and thicken before pouring it on the cake. If you pour it right away the chocolate will be too thin and just run down the sides of cake when you try to spread it. Also, you won’t be able to create the usual wavy lines in the chocolate that rainbow cookies normally have.

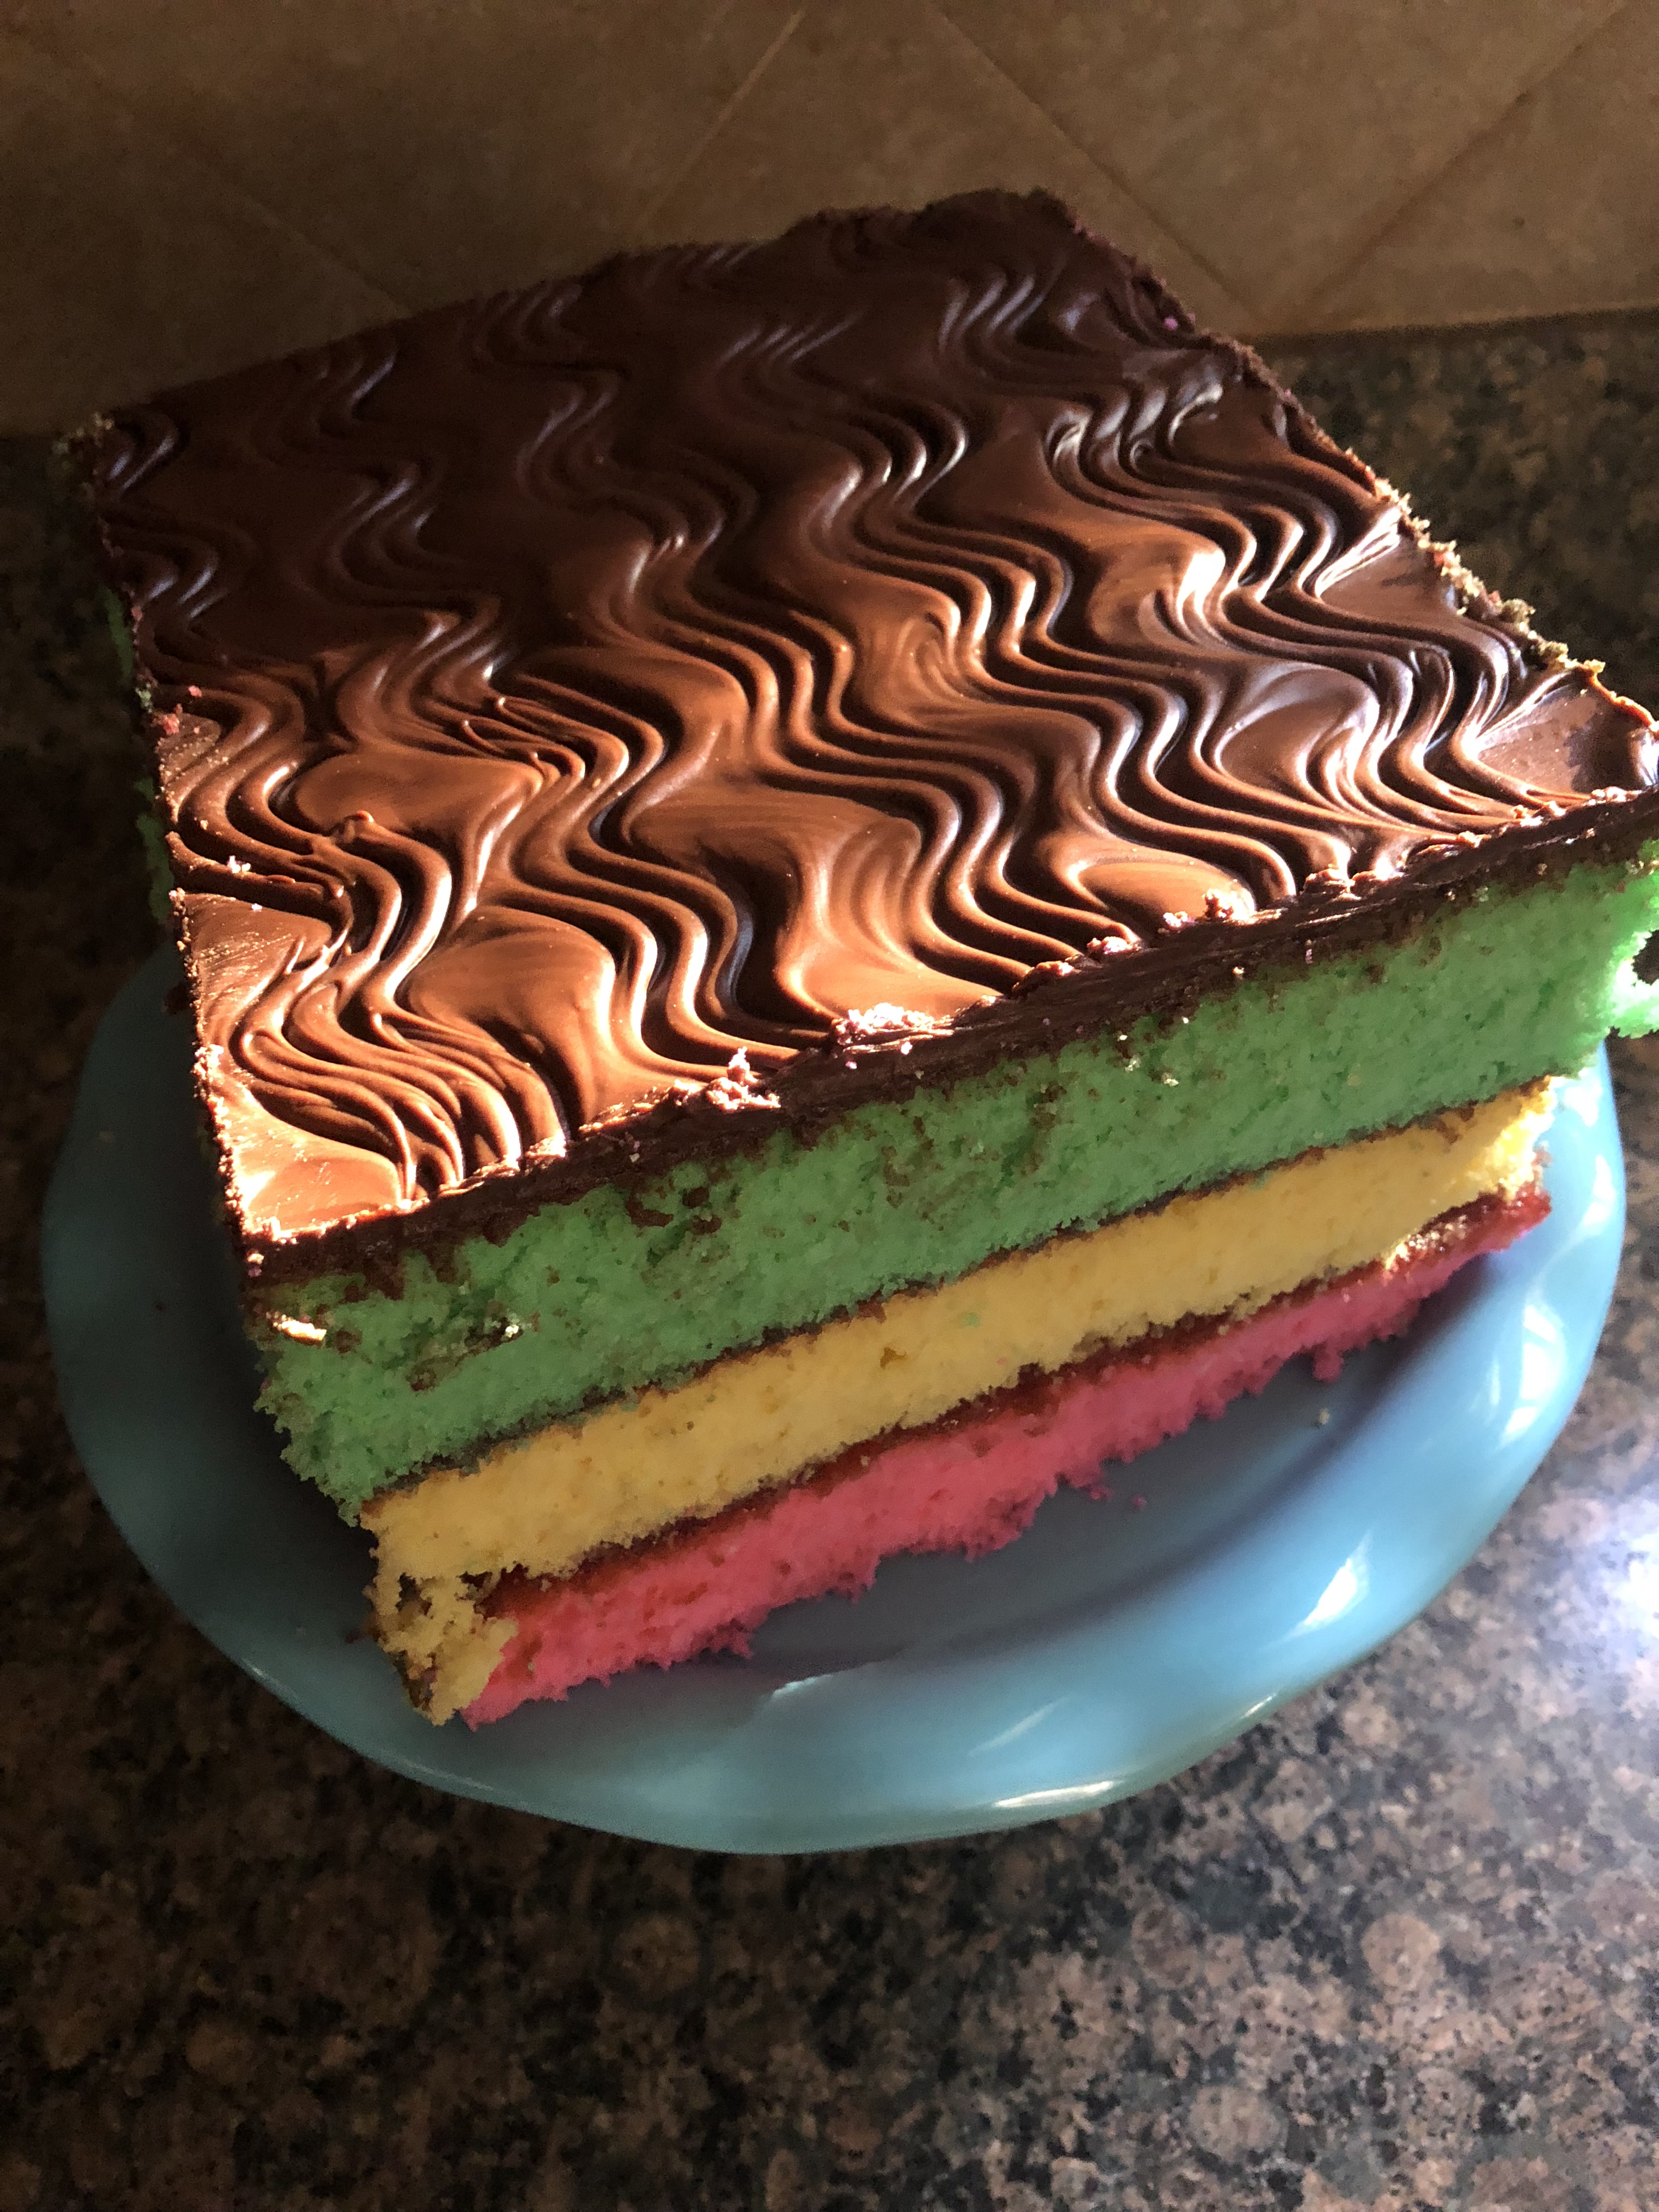
Once the chocolate was ready I removed the cake from the refrigerator and poured the chocolate over the top and using an offset spatula I spread it into a thick even layer over the cake. And for the final touch, using the tines of a fork I created wavy lines in the chocolate. If you find that the chocolate isn’t holding the wavy pattern, wait a minute or two and then go over the patter again with the fork. It could just be that the chocolate needs to cool a bit more. I then returned the cake to the refrigerator so the chocolate could set, but, not harden.

And finally, I trimmed all for sides of the cake. I did find this part a bit tricky as my cake was crumbling while doing so. Partly because, as per the directions, I only used eggs whites in the batter which produces a much lighter cake. You could use whole eggs as opposed to the egg whites which would produce a denser and moister cake and one that is slightly yellower, which would be good when tinting the yellow layer of the cake.

So, everyone who tried this cake, including me, loved it. They all agreed that it was light and not crazy sweet. The perfect type of dessert.

Rainbow Cookie Cake

Ingredients:

Cake:

3 16 to 18–ounce boxed of white cake mix (plus the required ingredients)

1 1/2 teaspoons pure almond extract

Pink, yellow and green gel food coloring

1 cup seedless raspberry jam

Chocolate Topping:

2 4–ounce bars semisweet chocolate, chopped

6 tablespoons unsalted butter, cubed

Directions:

Preheat the oven to 350 F. Spray a 9-inch square pan with baking spray and set aside.

Prepare 1 cake mix per box directions adding in 1/2 teaspoon of vanilla extract. Tint with the pink food coloring, stirring well making sure no white streaks remain. Transfer to the prepared pan and bake in the preheated oven for 35 minutes. Let cool in the pan for 15 minutes and then transfer to a wire rack to cool completely.

Repeat to make the yellow and green layers.

Trip the tops of each of the cakes to make level. Don’t worry if the widths of the cakes are different, you will even it out at the end.

Place the pink cake, trimmed side up, on a cake board and spread with 1/2 cup of jam. Top with the yellow cake, trimmed side up, and spread the remaining jam on top. Top with the green layer, trimmed side down. Freeze for 1 hour.

Microwave the chocolate and butter together in 30 second intervals, stirring after each, until melted and smooth. Let it cool slightly.

Pour the cooled chocolate over the top of the cake and using an offset spatula, spread the chocolate in a thick even layer over the cake.

Using the tines of a fork create a wavy lines pattern in the chocolate. Return the cake to the freezer so the chocolate can set, but not harden, about 15 minutes.

Using a long serrated knife trim all four sides of the cake.


Recipe notes:

You can use whole eggs as opposed to the recommended egg whites on the box directions

For a stronger almond taste try adding in more almond extract, or substituting it with almond paste.

To achieve brighter shades of pink, yellow and green, add a little red to the pink, orange to the yellow and blue to the green

You can place the cakes in the refrigerator as opposed to the freezer, but, will need to leave them in longer.

Recipe from Food Network

Chocolate Dipped Coconut Macaroons

Coconut is one of those things that people either love or hate. For me, I love coconut. Come the summer I can never pass up getting a Coconut Italian Ice and while I enjoy most flavors of Chobani Greek yogurt my favorite by far is the Almond Coco Loco Flip. So, it’s pretty surprising that I have never had a Coconut Macaroon. I’ve always wanted to make them, but, some other treat makes its way into my oven instead. I finally got around to making them and I must say I wish I had made them sooner!

These were by far one of the easiest cookies I have ever made… They didn’t require a hand or stand mixer and were easily prepared in one bowl. You can’t beat simplicity like that. I began my mixing together shredded sweetened coconut along with sugar, flour, and salt.

IMG_7133

I then added in egg whites and almond extract and mixed the ingredients until they were well blended. Then using a cookie scoop I scooped up the coconut mixture…

IMG_7134

And dropped them on a parchment lined cookie sheet and baked them in a 325 F preheated oven for about 20 minutes.

IMG_7135

Once out of the oven I immediately transferred the macaroons to a wire rack to cool completely.

IMG_7148

After they cooled it was time to dip them in melted chocolate. Conveniently I had half a bag of semi-sweet chocolate chips in my fridge. I melted the chocolate in the microwave and then dipped the bottom of each of the macaroons in the chocolate and then placed them on a wax paper lined cookie sheet and put them in the fridge so the chocolate could set.

IMG_7152

And since I had some chocolate left-over I decided to enjoy a mid-afternoon snack of chocolate dipped pretzels… You can’t go wrong with sweet & salty!

IMG_7156

Overall these macaroons were delish… With the combination of coconut, almond extract and chocolate they were reminiscent of an Almond Joy candy bar!


Coconut Macaroons

Makes 3 Dozen

Ingredients:

1 14oz. package sweetened coconut flakes (5 1/3 cups)

2/3 cup sugar

6 tablespoons flour

1/4 teaspoon salt

4 egg whites

1 teaspoon almond extract

Directions:

1. Preheat oven to 325 F. Line two cookies sheets with parchment paper.

2. Mix coconut, sugar, flour and salt in a large bowl. Stir in eggs whites and almond extract until well blended. Drop by rounded tablespoonful (I used a small cookie scoop which yielded 26 macaroons) onto prepared cookie sheets.

3. Bakes for 18-20 minutes, or until edges of cookies are golden brown. Remove from cookie sheets and transfer to a wire rack to cool completely.

Enjoy as is, or dip in melted chocolate for an extra sweet treat!

A Delicious Short-Cut Peach Pie

Short-cuts aren’t always a bad thing. When you are driving they can get you where you have to go quicker and hopefully help you avoid some traffic along the way. In our day-to-day lives they can make us a bit more efficient to get daily tasks completed. And in baking they can guarantee us a flakier crust and fruit that’s perfectly ripe for a pie!

A few weeks ago I got it in my head that I wanted to make a peach pie. I’m actually not a big fruit pie fan – I’m not that keen on fruit pie filling, especially when it’s on the runny side – but, I think the Pillsbury Pie Crust sitting in my refrigerator got me thinking. I’ve made pie crusts from scratch once or twice before but, like I said there’s nothing wrong with taking a short-cut every now and then. I went one step further with my short-cut and opted to use frozen peaches. I just wasn’t in the mood to peel and slice a few pounds of peaches.

IMG_4587

I combined 2 pounds of frozen sliced peaches with sugar, flour, lemon juice, cinnamon, allspice and almond extract. I decided on the almond extract after reading that many bakers used to add the nut – sometimes called a “bitter almond” –  that’s inside the pit of the peach to the pie while baking to give it an almond flavor. That practice has since diminished as it was discovered that the nut contains trace amounts of cyanide, granted you would have to eat a large quantity of them for anything to happen, but, who wants to bite down on something hard when they are enjoying a piece of pie.

IMG_4588

Next I unrolled one of the pie crusts and pressed it into the bottom of the pie dish.

IMG_4590

I then added the filling and mounded it slightly in the middle and dotted it with small pieces of unsalted butter.

IMG_4593

Instead of just unrolling the other pie crust on top of the pie I decided to give it a little pizazz with a lattice pattern that wouldn’t require weaving. First I sliced the top pie crust into 6 1-inch strips…

IMG_4595

And then divided those strips in half to end up with a total of 12 1/2-inch strips.

IMG_4596

I laid five strips across the pie, doing my best to equally space them

IMG_4597

Then I laid four strips across the previous strips diagonally.

IMG_4598

And after some trimming and crimping, voila, a simple lattice pattern.

IMG_4600

I then placed the pie on a baking sheet in a 400 F preheated oven for about 25 minutes. I then lowered the oven to 375 F and baked the pie for about another hour. Prior to lowering the temperature I brushed the top of the pie with an egg wash to ensure a nice golden brown color. I kept a close eye on the pie and when I noticed the rims of it were browning a tad bit too much I covered it with aluminum foil. I knew it was time to take the pie out of the oven when the filling was bubbling.

IMG_4617

After letting it cool it was time to slice into it…

IMG_4639

And I happy to say that the pie was a perfect consistency… Not too watery and not too dry! It was a definite winner!

IMG_4645


Peach Pie – Adapted from here

1 box refrigerated pie crusts, softened as directed on box

Filling:

2 pounds of sliced and peeled frozen peaches (Use frozen, do not thaw)

3/4 cup sugar

1/2 cup flour (I doubled the amount the original recipe called for to allot for the water the frozen fruit would release while baking)

1 tablespoon lemon juice

1/2 teaspoon cinnamon

1/4 teaspoon all spice

1/2 teaspoon almond extract

2 tablespoons unsalted butter, cut into small pieces

1 large egg

Directions:

1. Preheat the oven to 400 F.

2. Make the filling by mixing the peaches in a large bowl with the sugar, flour, lemon juice, cinnamon, all spice and almond extract.

3. Unroll one pie crust and place in an ungreased 9-inch pie plate. Add the filling, mounding it slightly in the center and dot with the butter.

4. Unroll the second crust and dust it lightly with flour and cut it into 1/2-inch wide strips. Lay half of the strips on the pie in one direction, leaving about a 1-inch space between each strip. Lay the remaining strips on top, crossing them diagonally to make a faux lattice pattern. Trim the edges of the strips leaving a small overhang and crimp the edges into the bottom crust with your fingers.

5. Place the pie on a baking sheet and place it in the oven for 20 minutes. Lower the temperature of the oven to 375 F and brush the pie with an egg wash (beat the egg with a tablespoon of water). Bake for another hour until the filling it bubbly. If you notice the out crusts of the pie is browning too quickly cover it loosely with aluminum foil. Once baked, transfer to a rack to cool completely before slicing. Store remaining pie in the refrigerator.


Raspberry Ripple Cupcakes

Last week I took a mini road trip which of course meant I had to bake some yummy treats for the drive. I didn’t want to make anything that could possibly spoil so I settled on trying a cupcake recipe that didn’t call for the cupcakes to be frosted – mini Raspberry Ripple Cupcakes. I’ve wondered whether an unfrosted cupcake would qualify as being a muffin and after a few Google searches I haven’t been able to get a concrete answer on that one. Do you guys have any ideas on that?

IMG_4269

To begin, I lightly mashed a cup of fresh raspberries with a fork.

IMG_4233

I then sifted flour, baking powder, and cornstarch into the bowl of my stand mixer.

IMG_4235

Following that I added in softened butter, sugar, eggs and almond extract (I knew these cupcakes would be delicious once I saw this final ingredient.)

IMG_4237

I then beat all of the ingredients together until the mixture was smooth.

IMG_4241

And finally I folded in the mashed raspberries. And that was it… Sometimes you have to relish those recipes that are super quick to put together!

IMG_4243

After dividing the batter among paper lined mini muffin tins I baked them in a 375 F preheated oven for about 20 minutes.

IMG_4244

Once I removed them from the oven I transferred the cupcakes to a wire rack to cool completely.

IMG_4272

And of course I had to try a few before heading out on said road trip and they were super delicious… Moist and fluffy bursting with the flavors of almond and raspberries. Yum!

IMG_4263

To go along with these cupcakes I also made a batch of rugelach. Both of which were a hit with my fellow road trippers… We came back with empty tins!

IMG_4281


Raspberry Ripple Cupcakes*

Makes 32 mini cupcakes

1 1/2 cups all-purpose flour

1 tablespoon baking powder

1 tablespoon cornstarch

3/4 cup unsalted butter, softened

3/4 cup superfine sugar

3 eggs, beaten

1 teaspoon almond extract

1 cup fresh raspberries

1. Preheat the oven to 375F. Put 32 paper liners into shallow muffin tins.

2. Sift the flour, baking powder, and cornstarch into a large bowl and add the butter, sugar, eggs and almond extract. Beat well until the mixture is smooth. Mash the raspberries lightly with a fork, then fold into the mix.

3. Divide the mixture among the paper liners. Bake in the preheated oven for 15-20 minutes, or until risen, firm and golden brown. Transfer the cupcakes to a wire rack to cool.

*Unfortunately I cannot tell you the origin of the recipe as I ripped it out of a book (I know not so nice, but, my bookshelf was getting a little overloaded) and didn’t make note of which one.

%d bloggers like this: