Pumpkin Quick Bread

It’s officially Fall… Bring on the pumpkin treats! While I have purchased and enjoyed some pumpkin spice treats – Special K cereal (I’m yet to try it), Pumpkin Pie Spice Butter (still haven’t tried this either), Pumpkin Pie Kit Kats (I definitely didn’t need a whole bag of these) and Werther’s Original Caramels (just a nice hint of pumpkin spice) – I have refrained from posting any pumpkin treats on here until Fall officially began. And while last week brought some Fall-like days this past weekend felt more like Summer. I guess Summer wanted to go out with a bang.

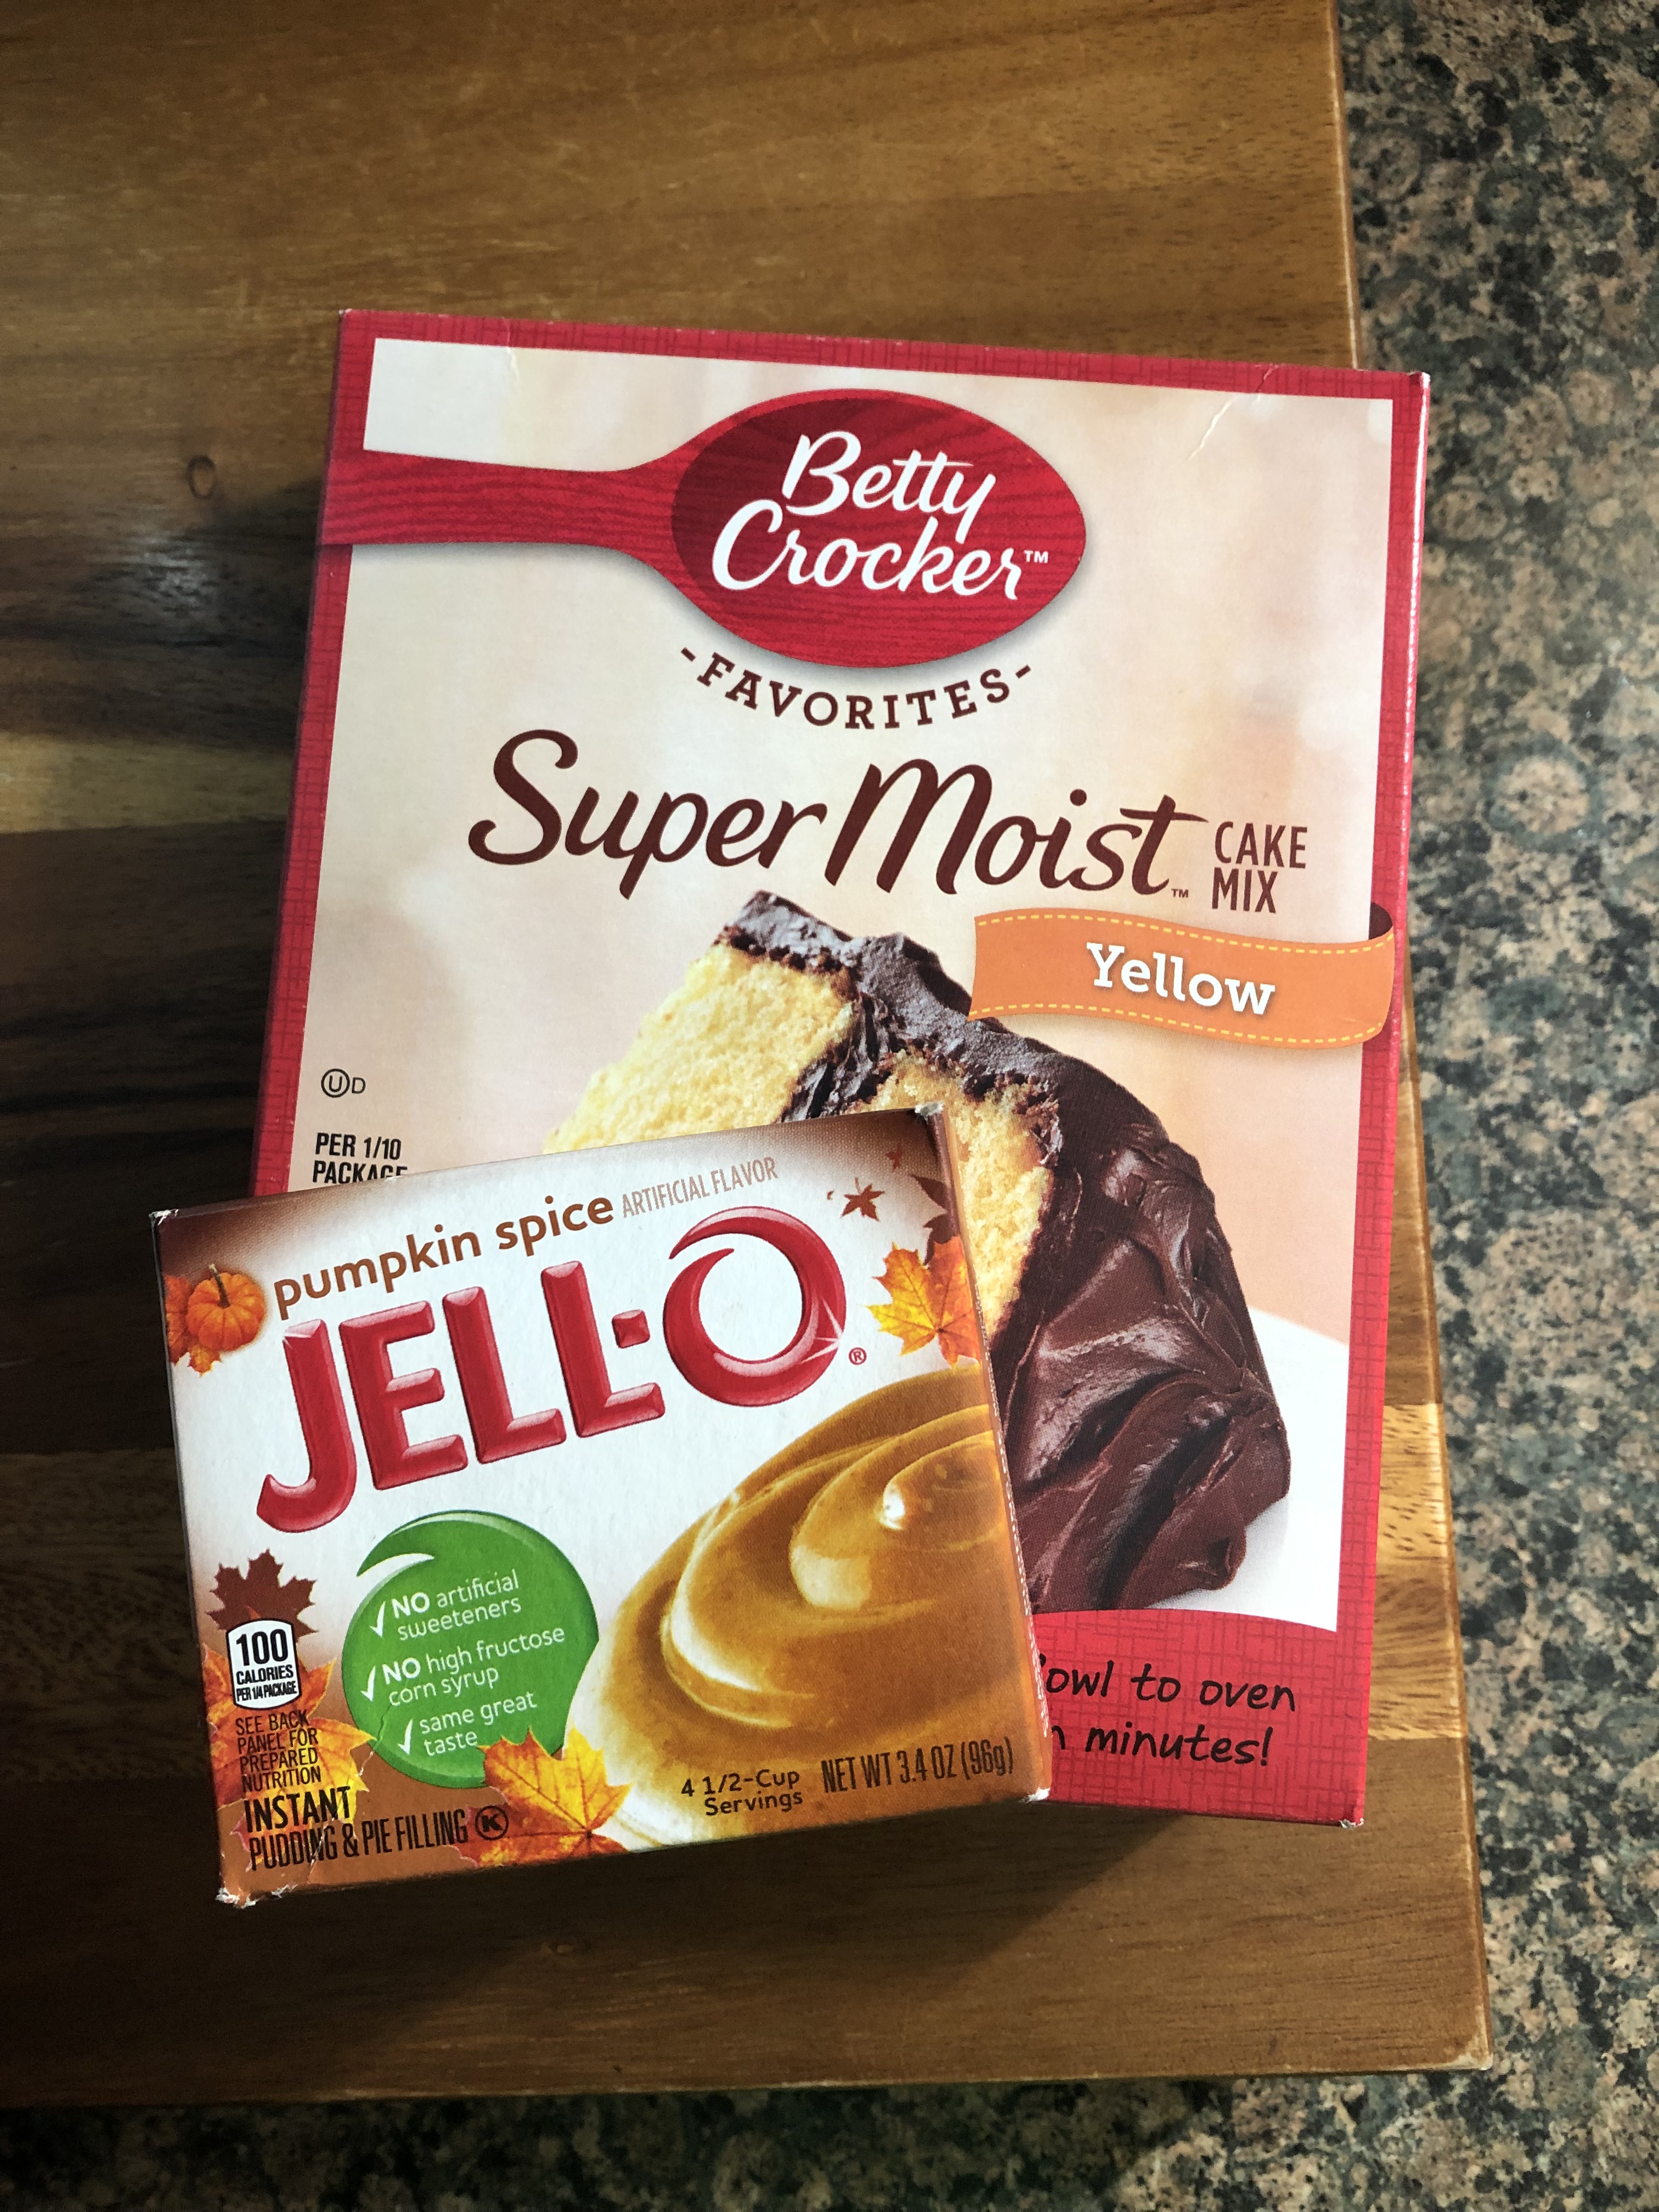
For my first pumpkin treat of the season – there will definitely be more, just not sure how many more – I bring you a Pumpkin Quick Bread. Now, I have shared a Pumpkin Bread recipe on here before but this one is a bit different as it doesn’t involve using any canned pumpkin. Some of you might be taken back by the ingredients, but, trust me, it’s delicious. It involves a box of yellow cake mix and a box of Jell-O Pumpkin Spice Pudding Mix. I got the idea for this quick bread after making a Pistachio Quick Bread earlier this year with a box of white cake mix and a box of pistachio pudding mix.

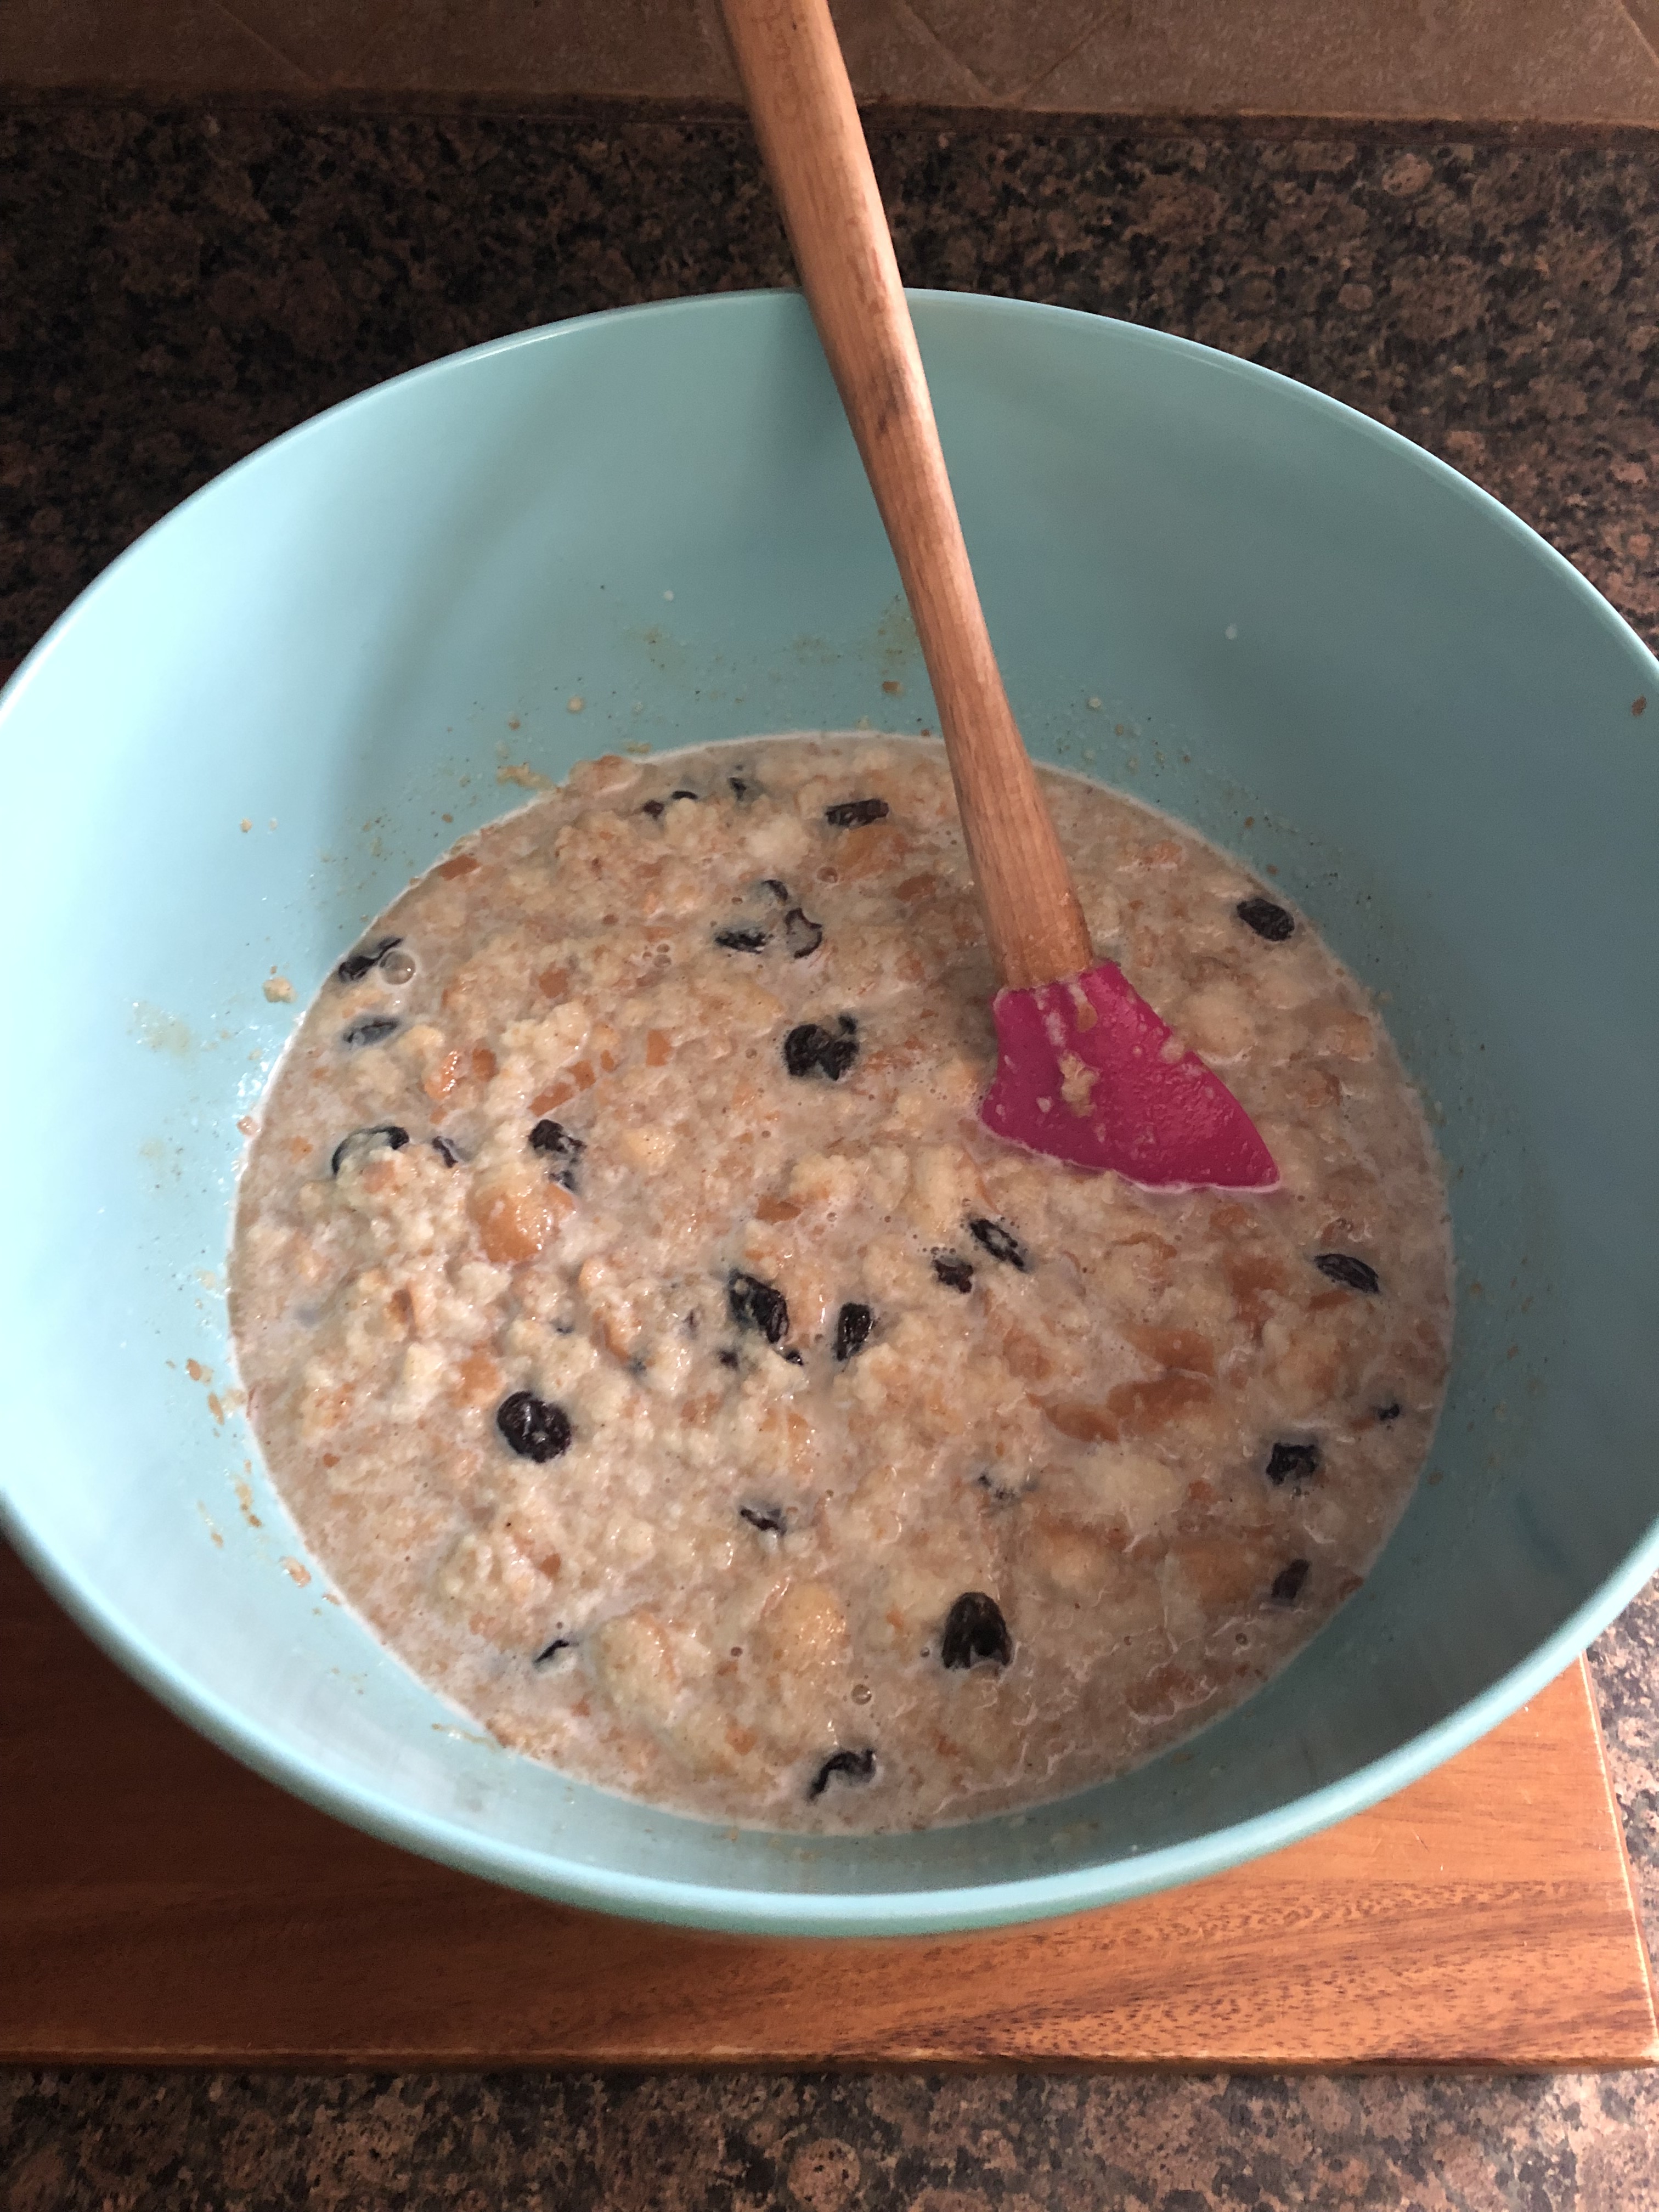
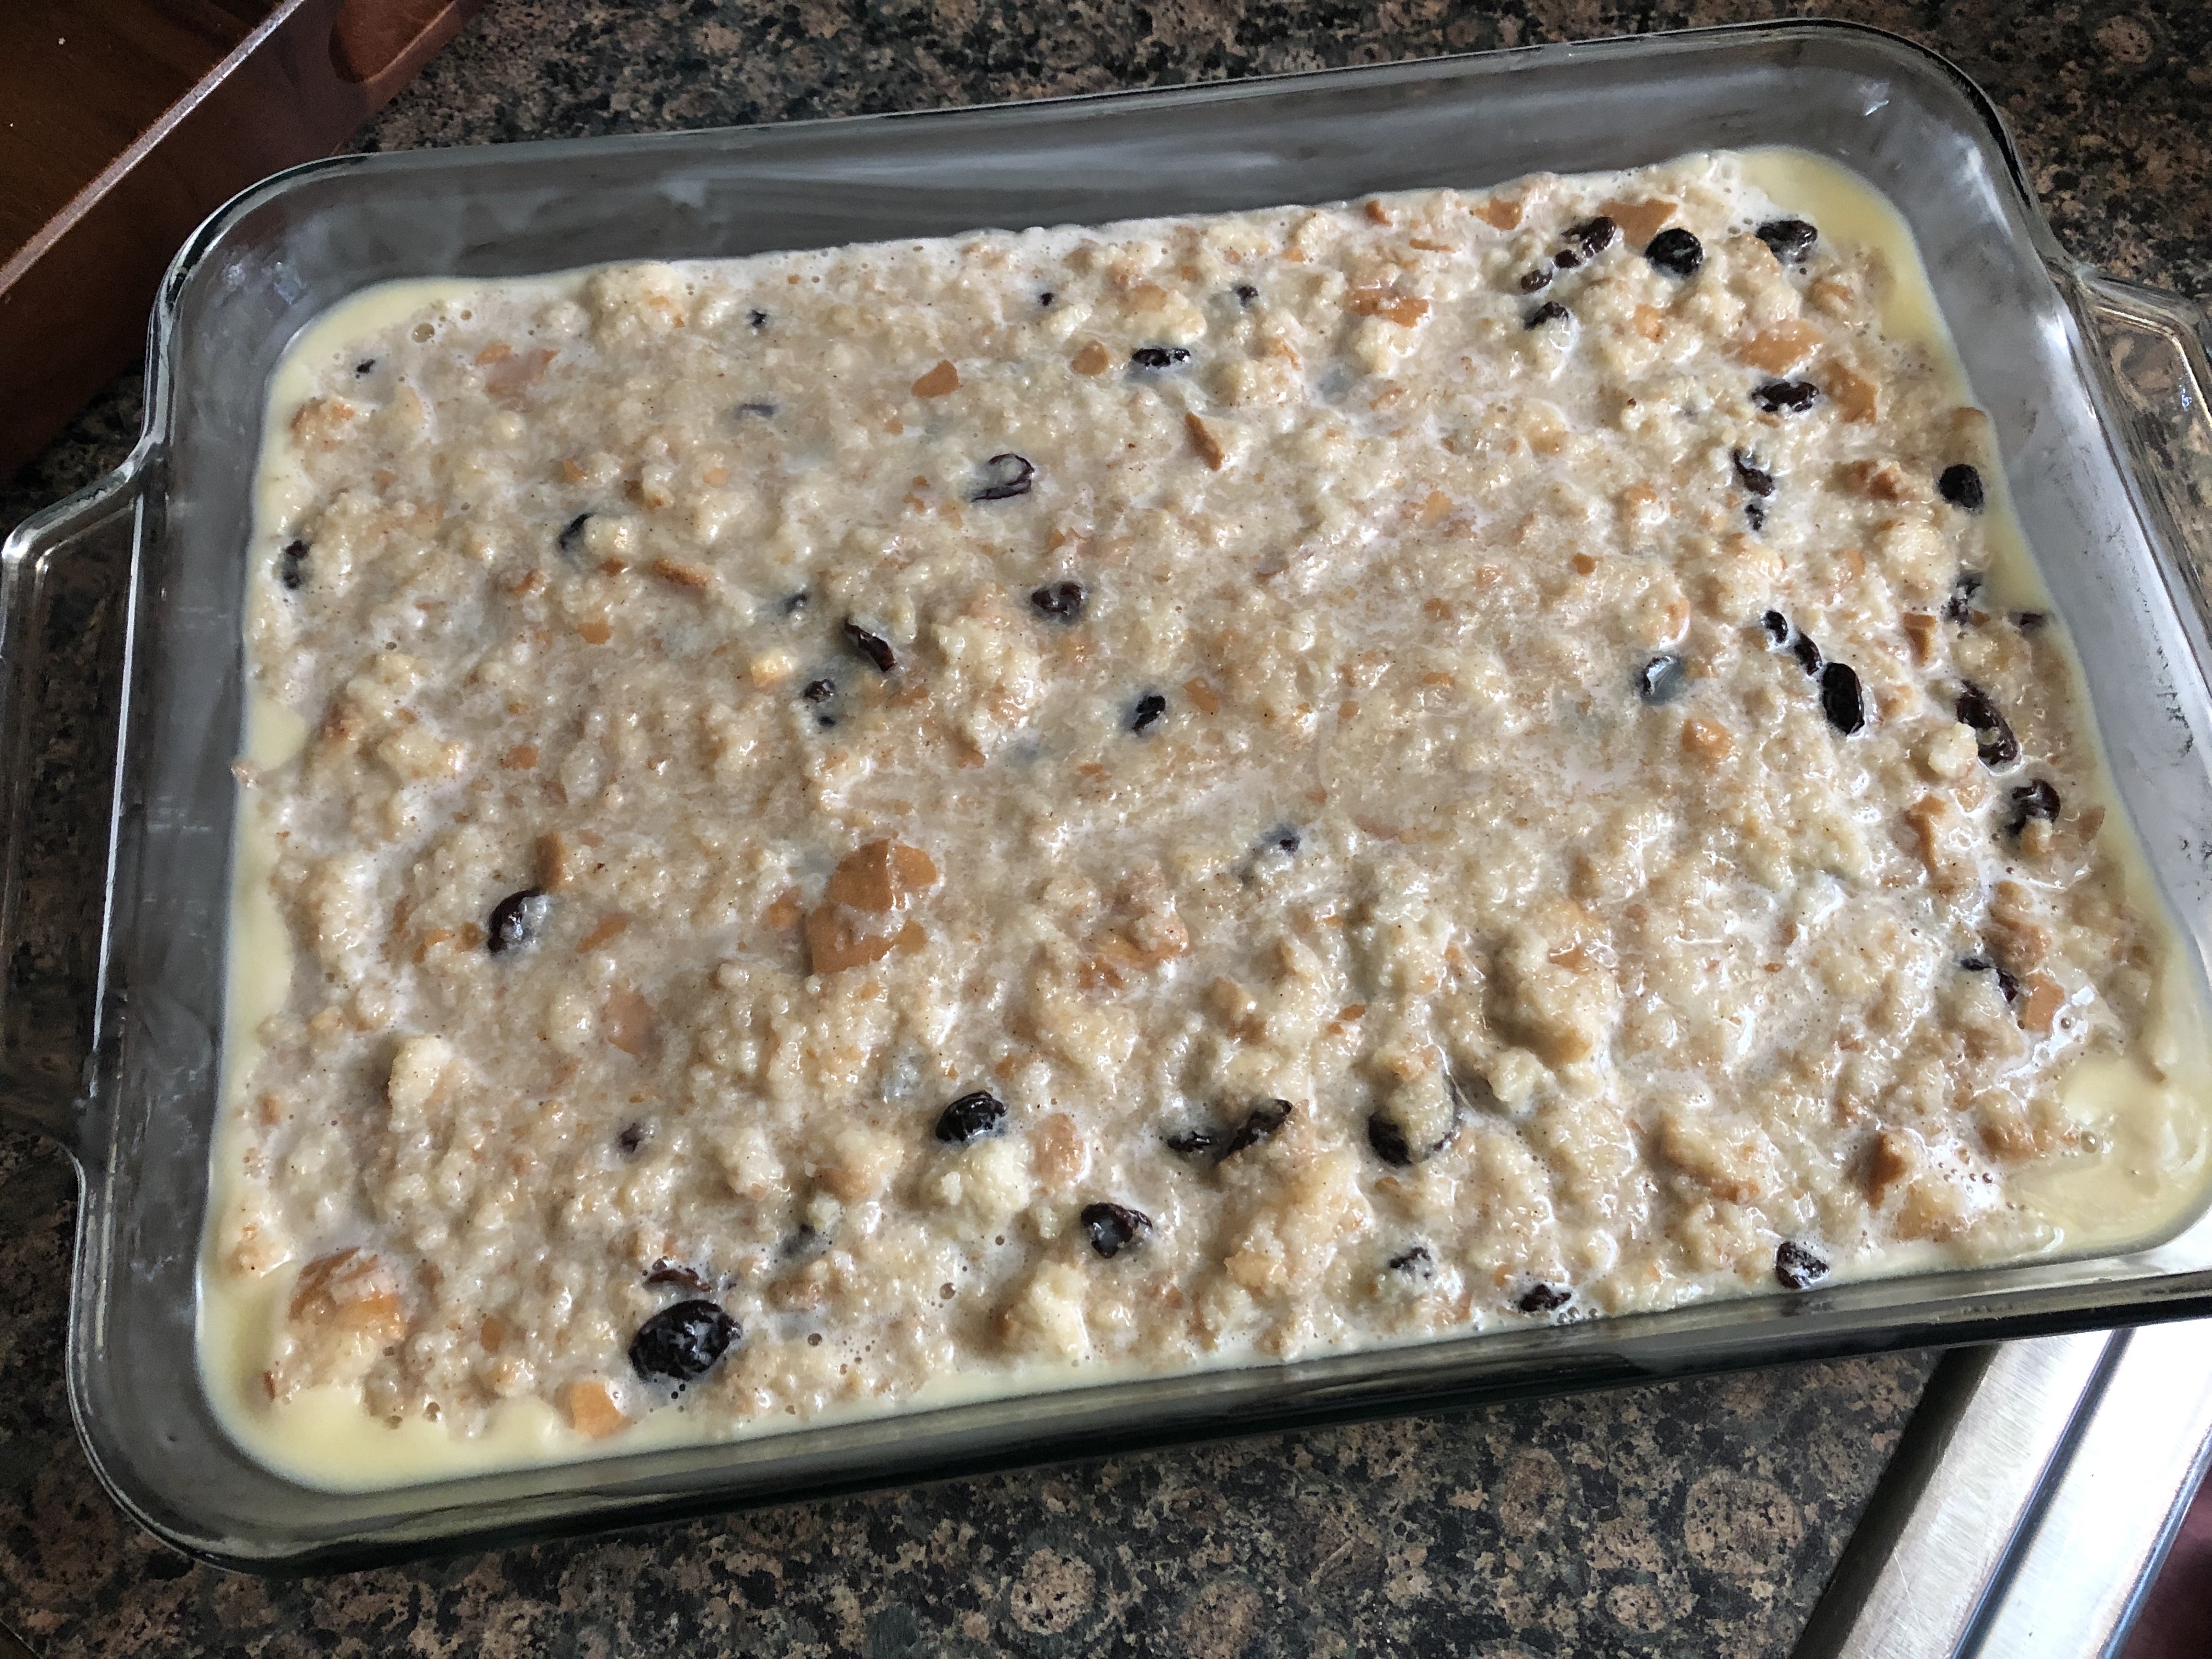
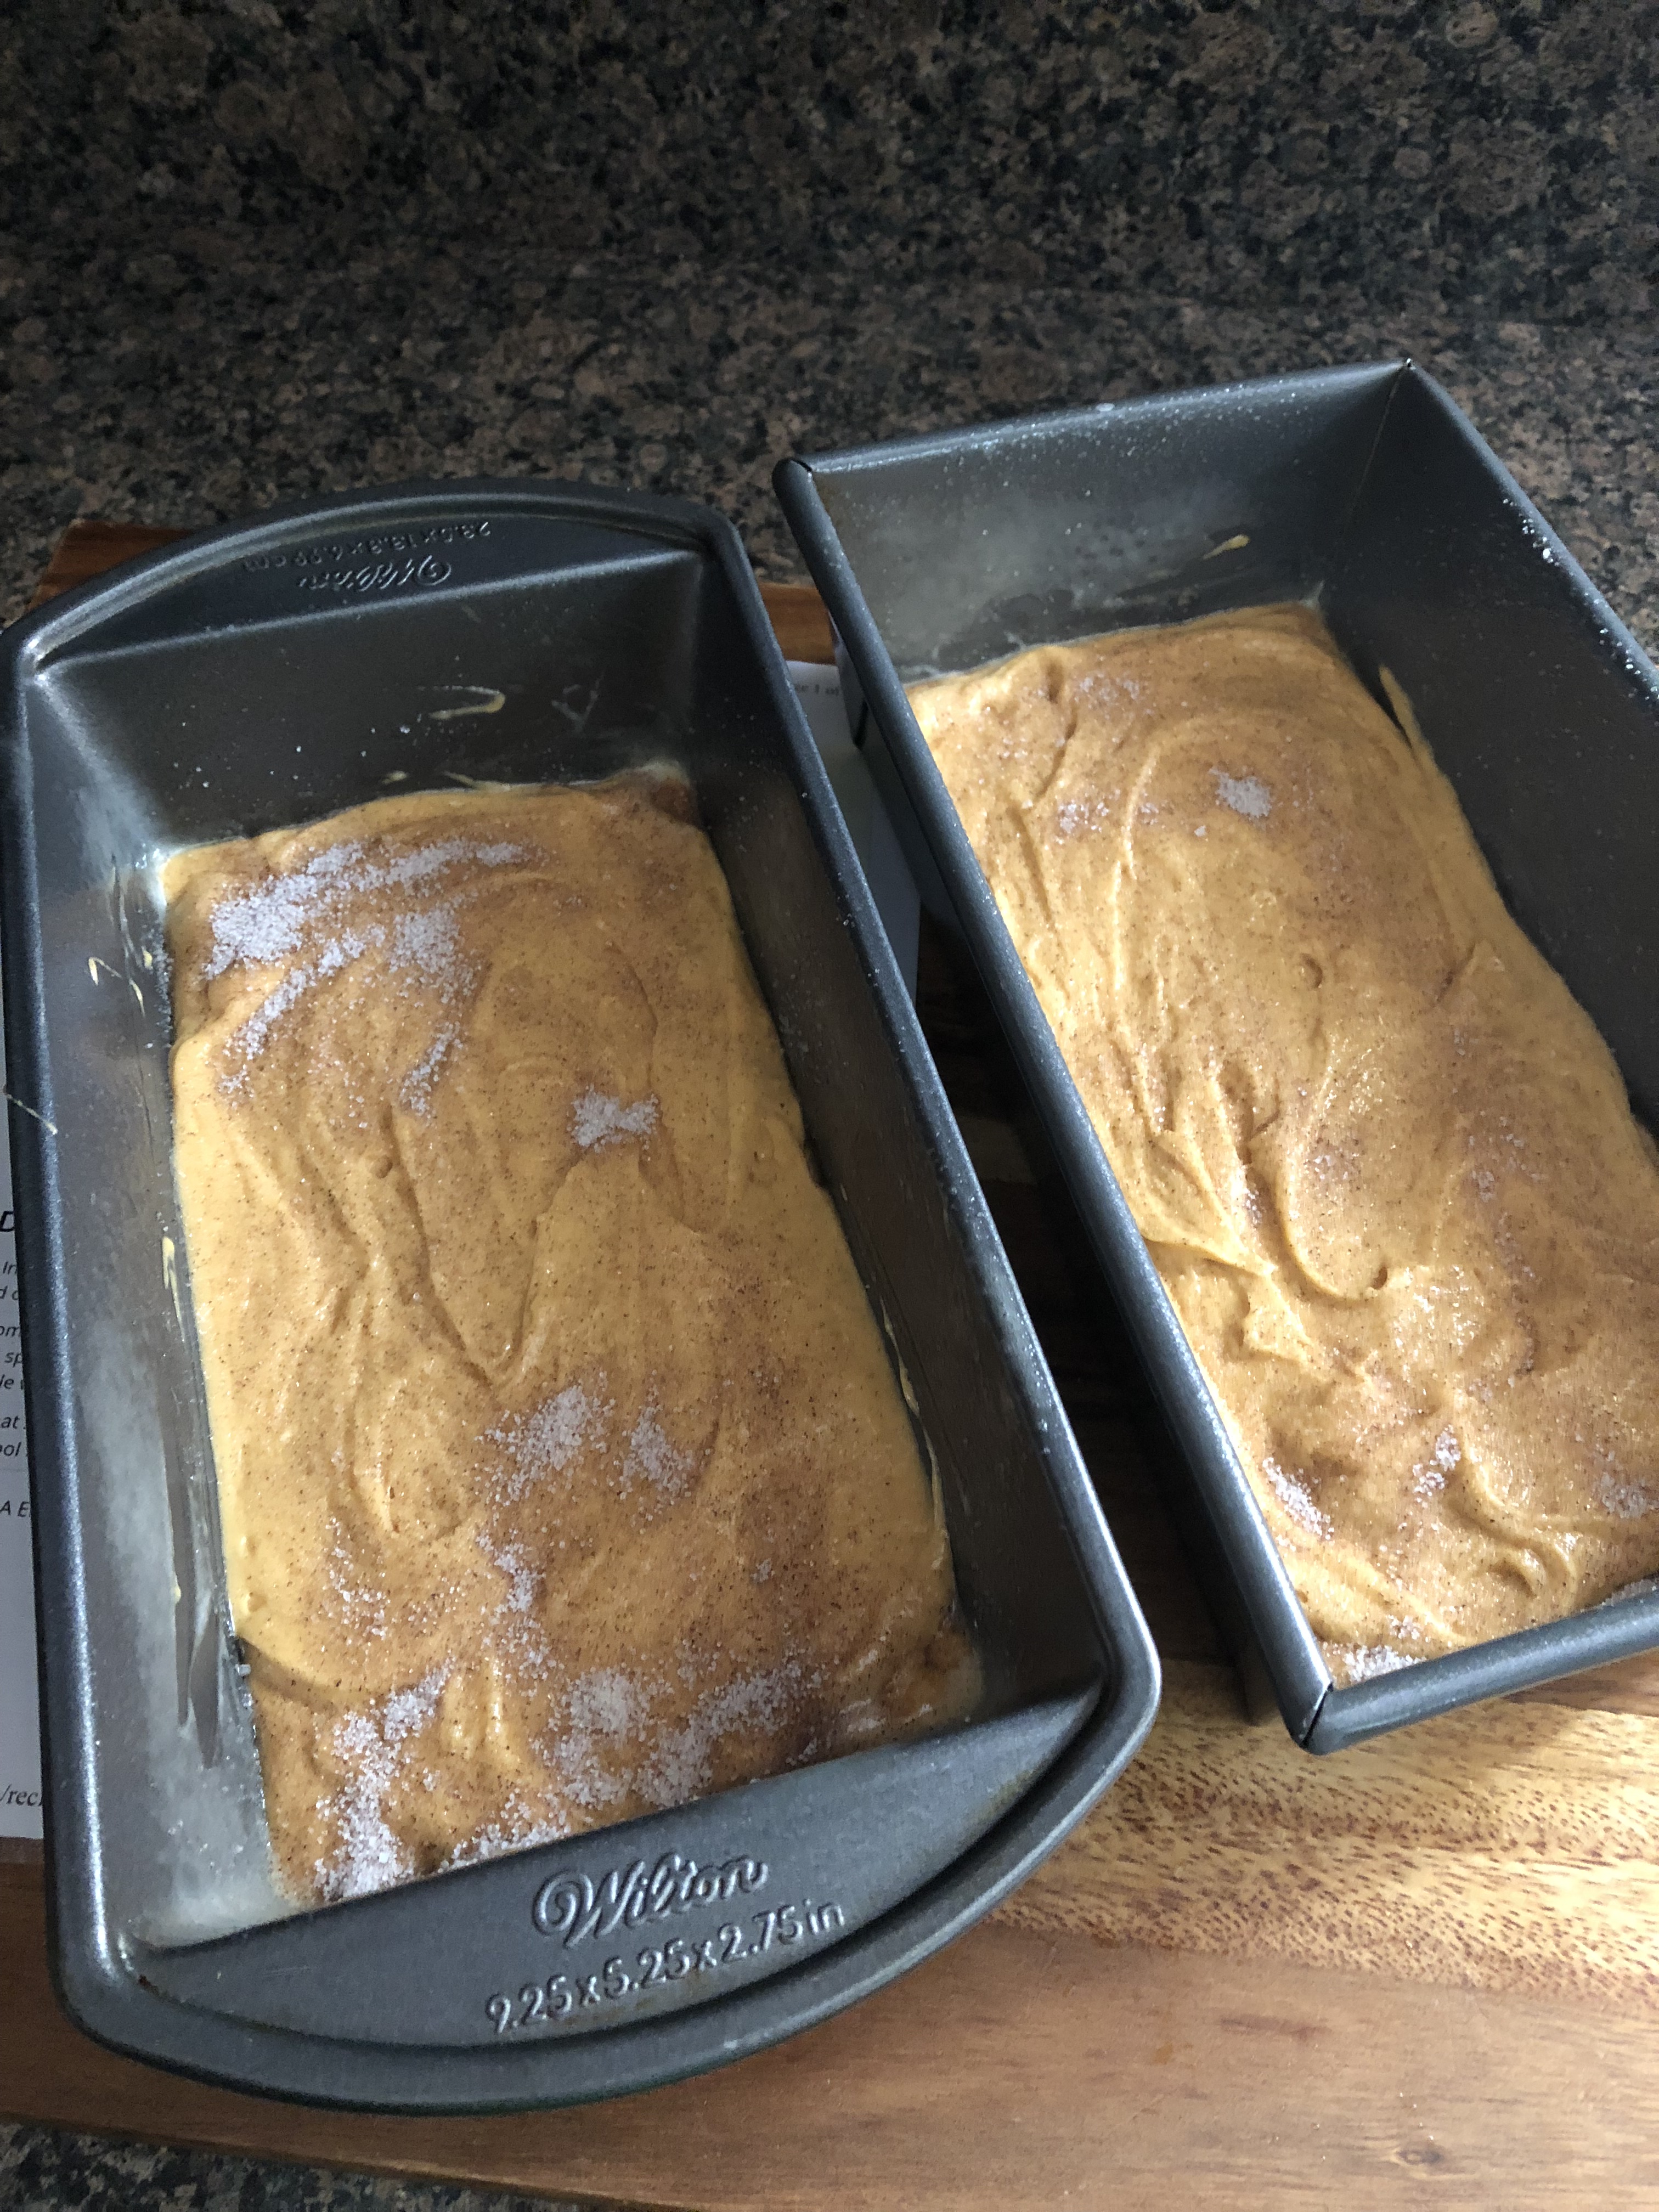
I began by making cinnamon sugar and then setting it aside. In a large bowl I whisked together the cake mix and pudding mix. I then added in eggs, sour cream, water and oil and beat it with a hand mixer. I poured about 1/2 cup of batter into the bottom of two loaf pans that I sprayed with baking spray. The batter was thick so I used a spoon to spread the batter evenly across the pan. I then sprinkled the top of both with 2 tablespoons of the cinnamon sugar. I spread the remaining batter evenly over the cinnamon sugar in both pans and smoothed the top with an offset spatula and then sprinkled the remaining sugar evenly over both. There didn’t seem to be a lot of batter in the pans and I thought that I was going to end up with loaves that lacked height…

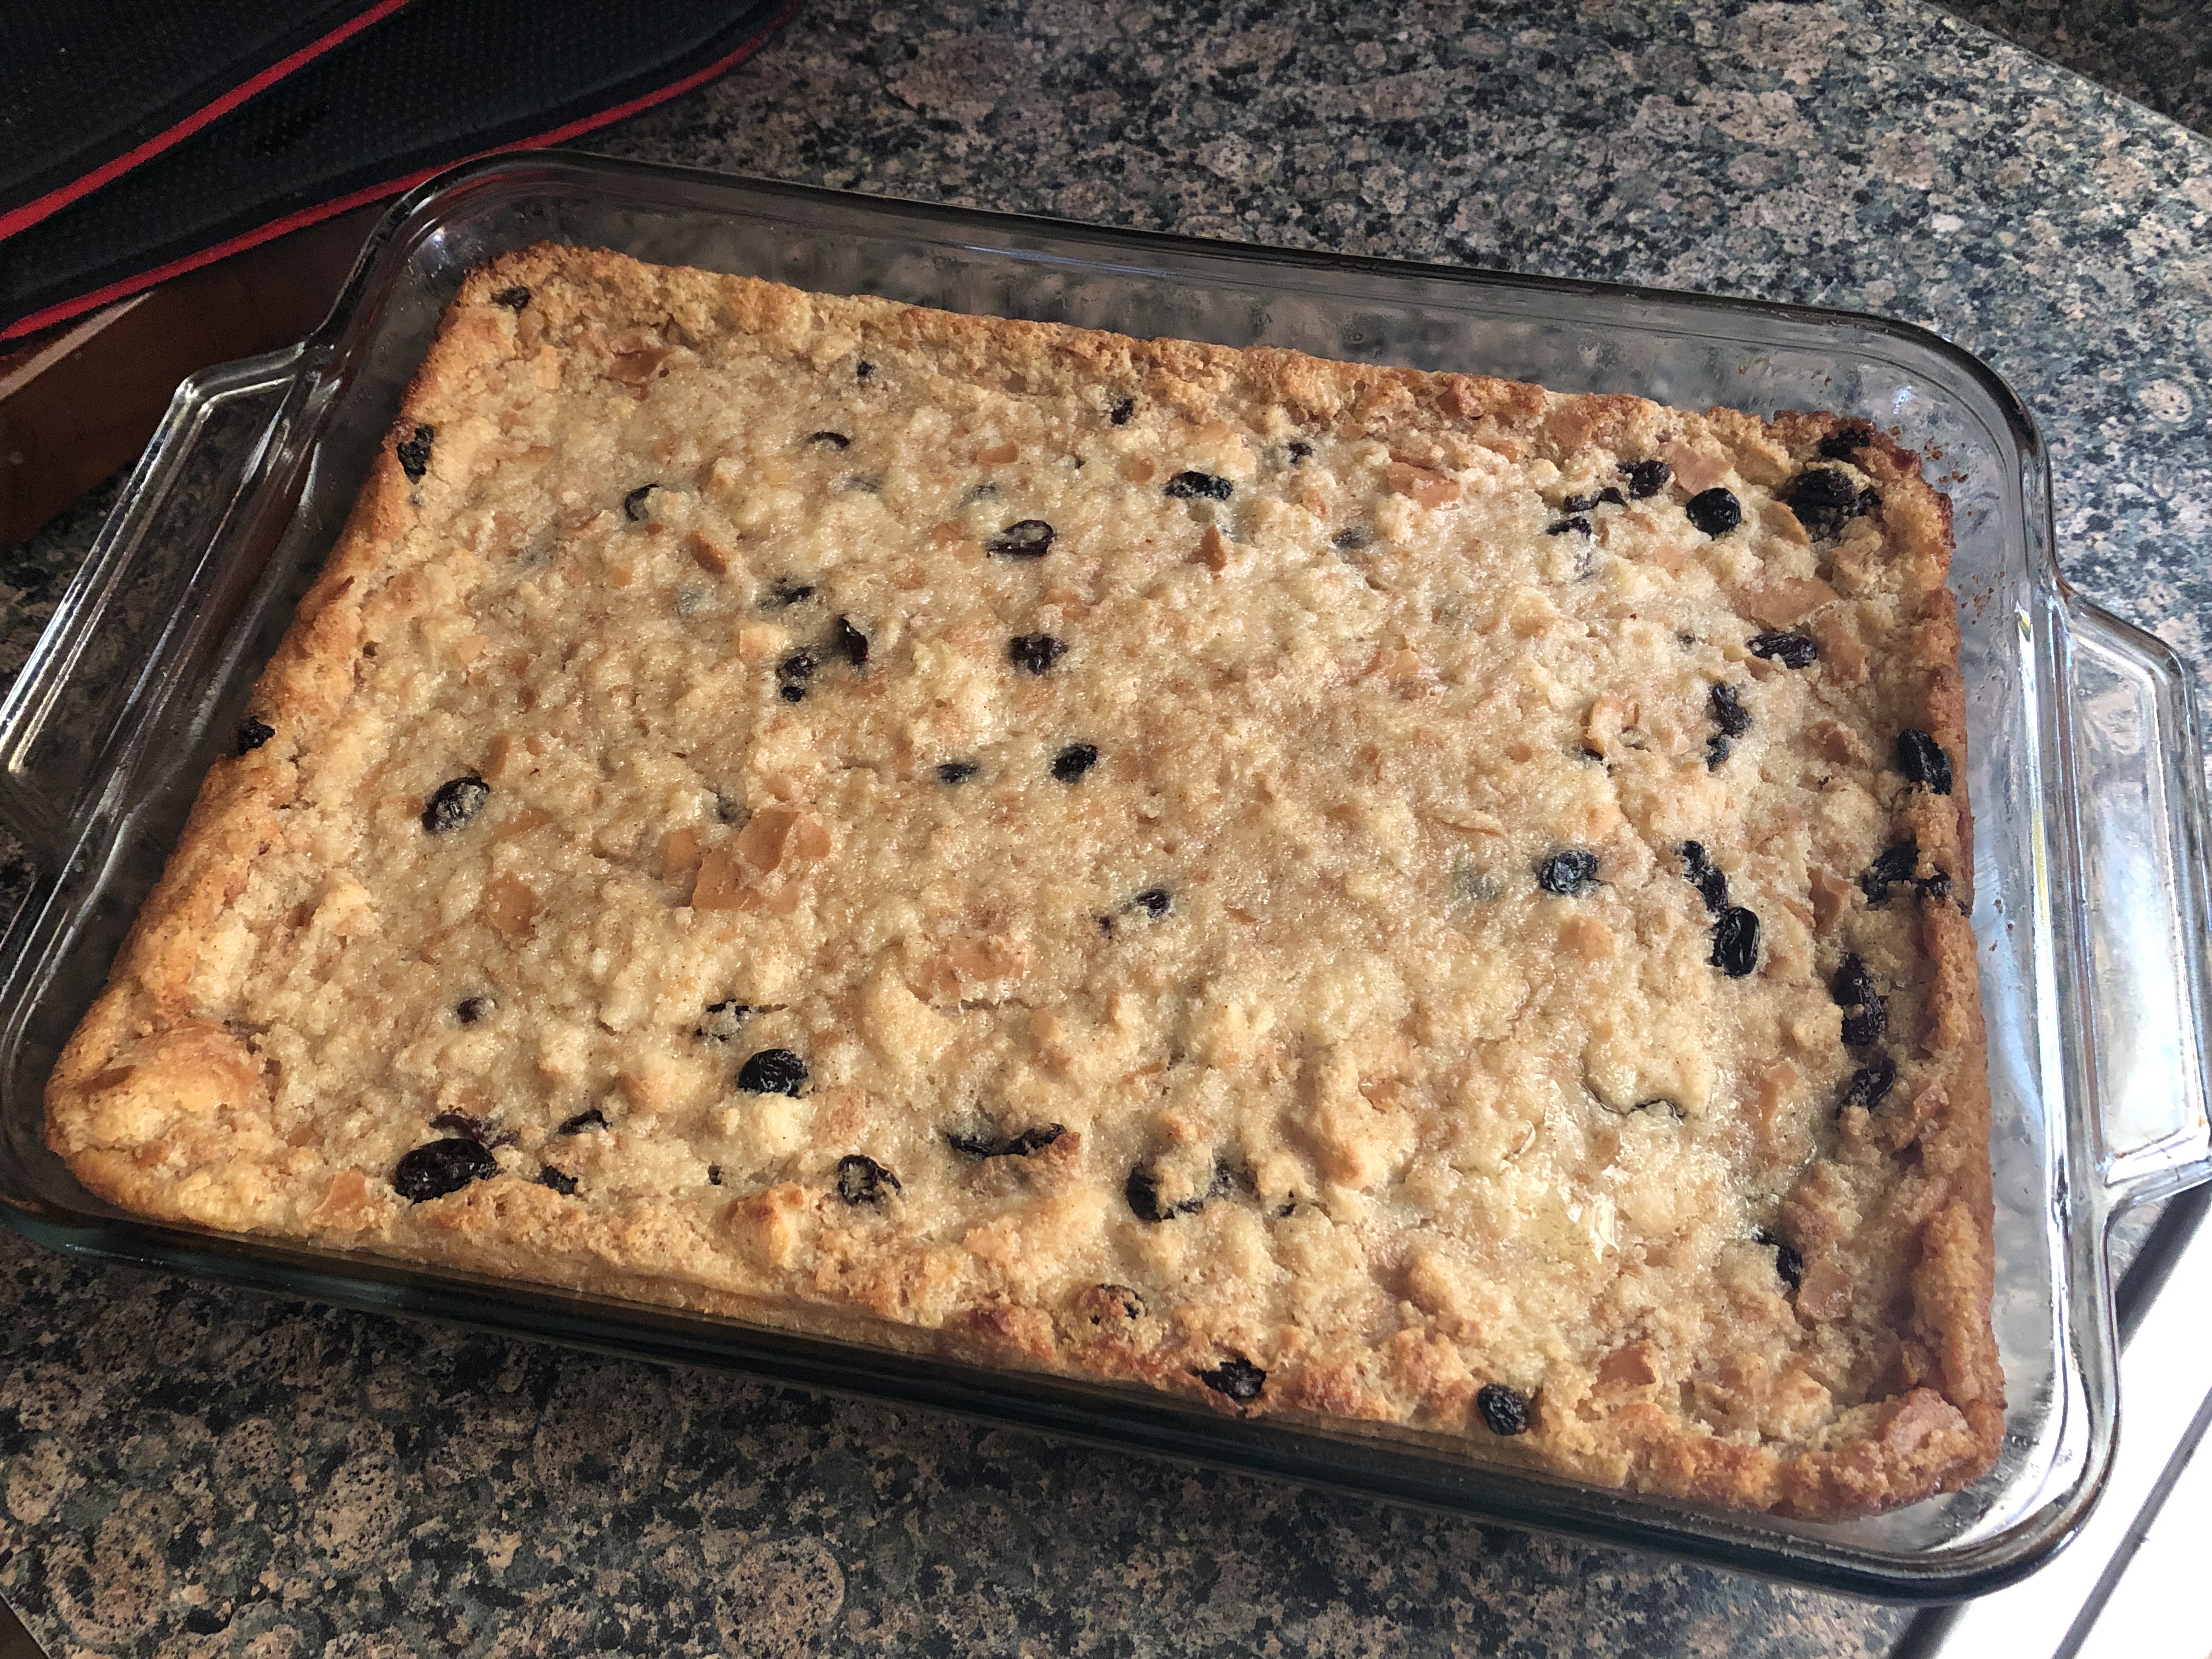
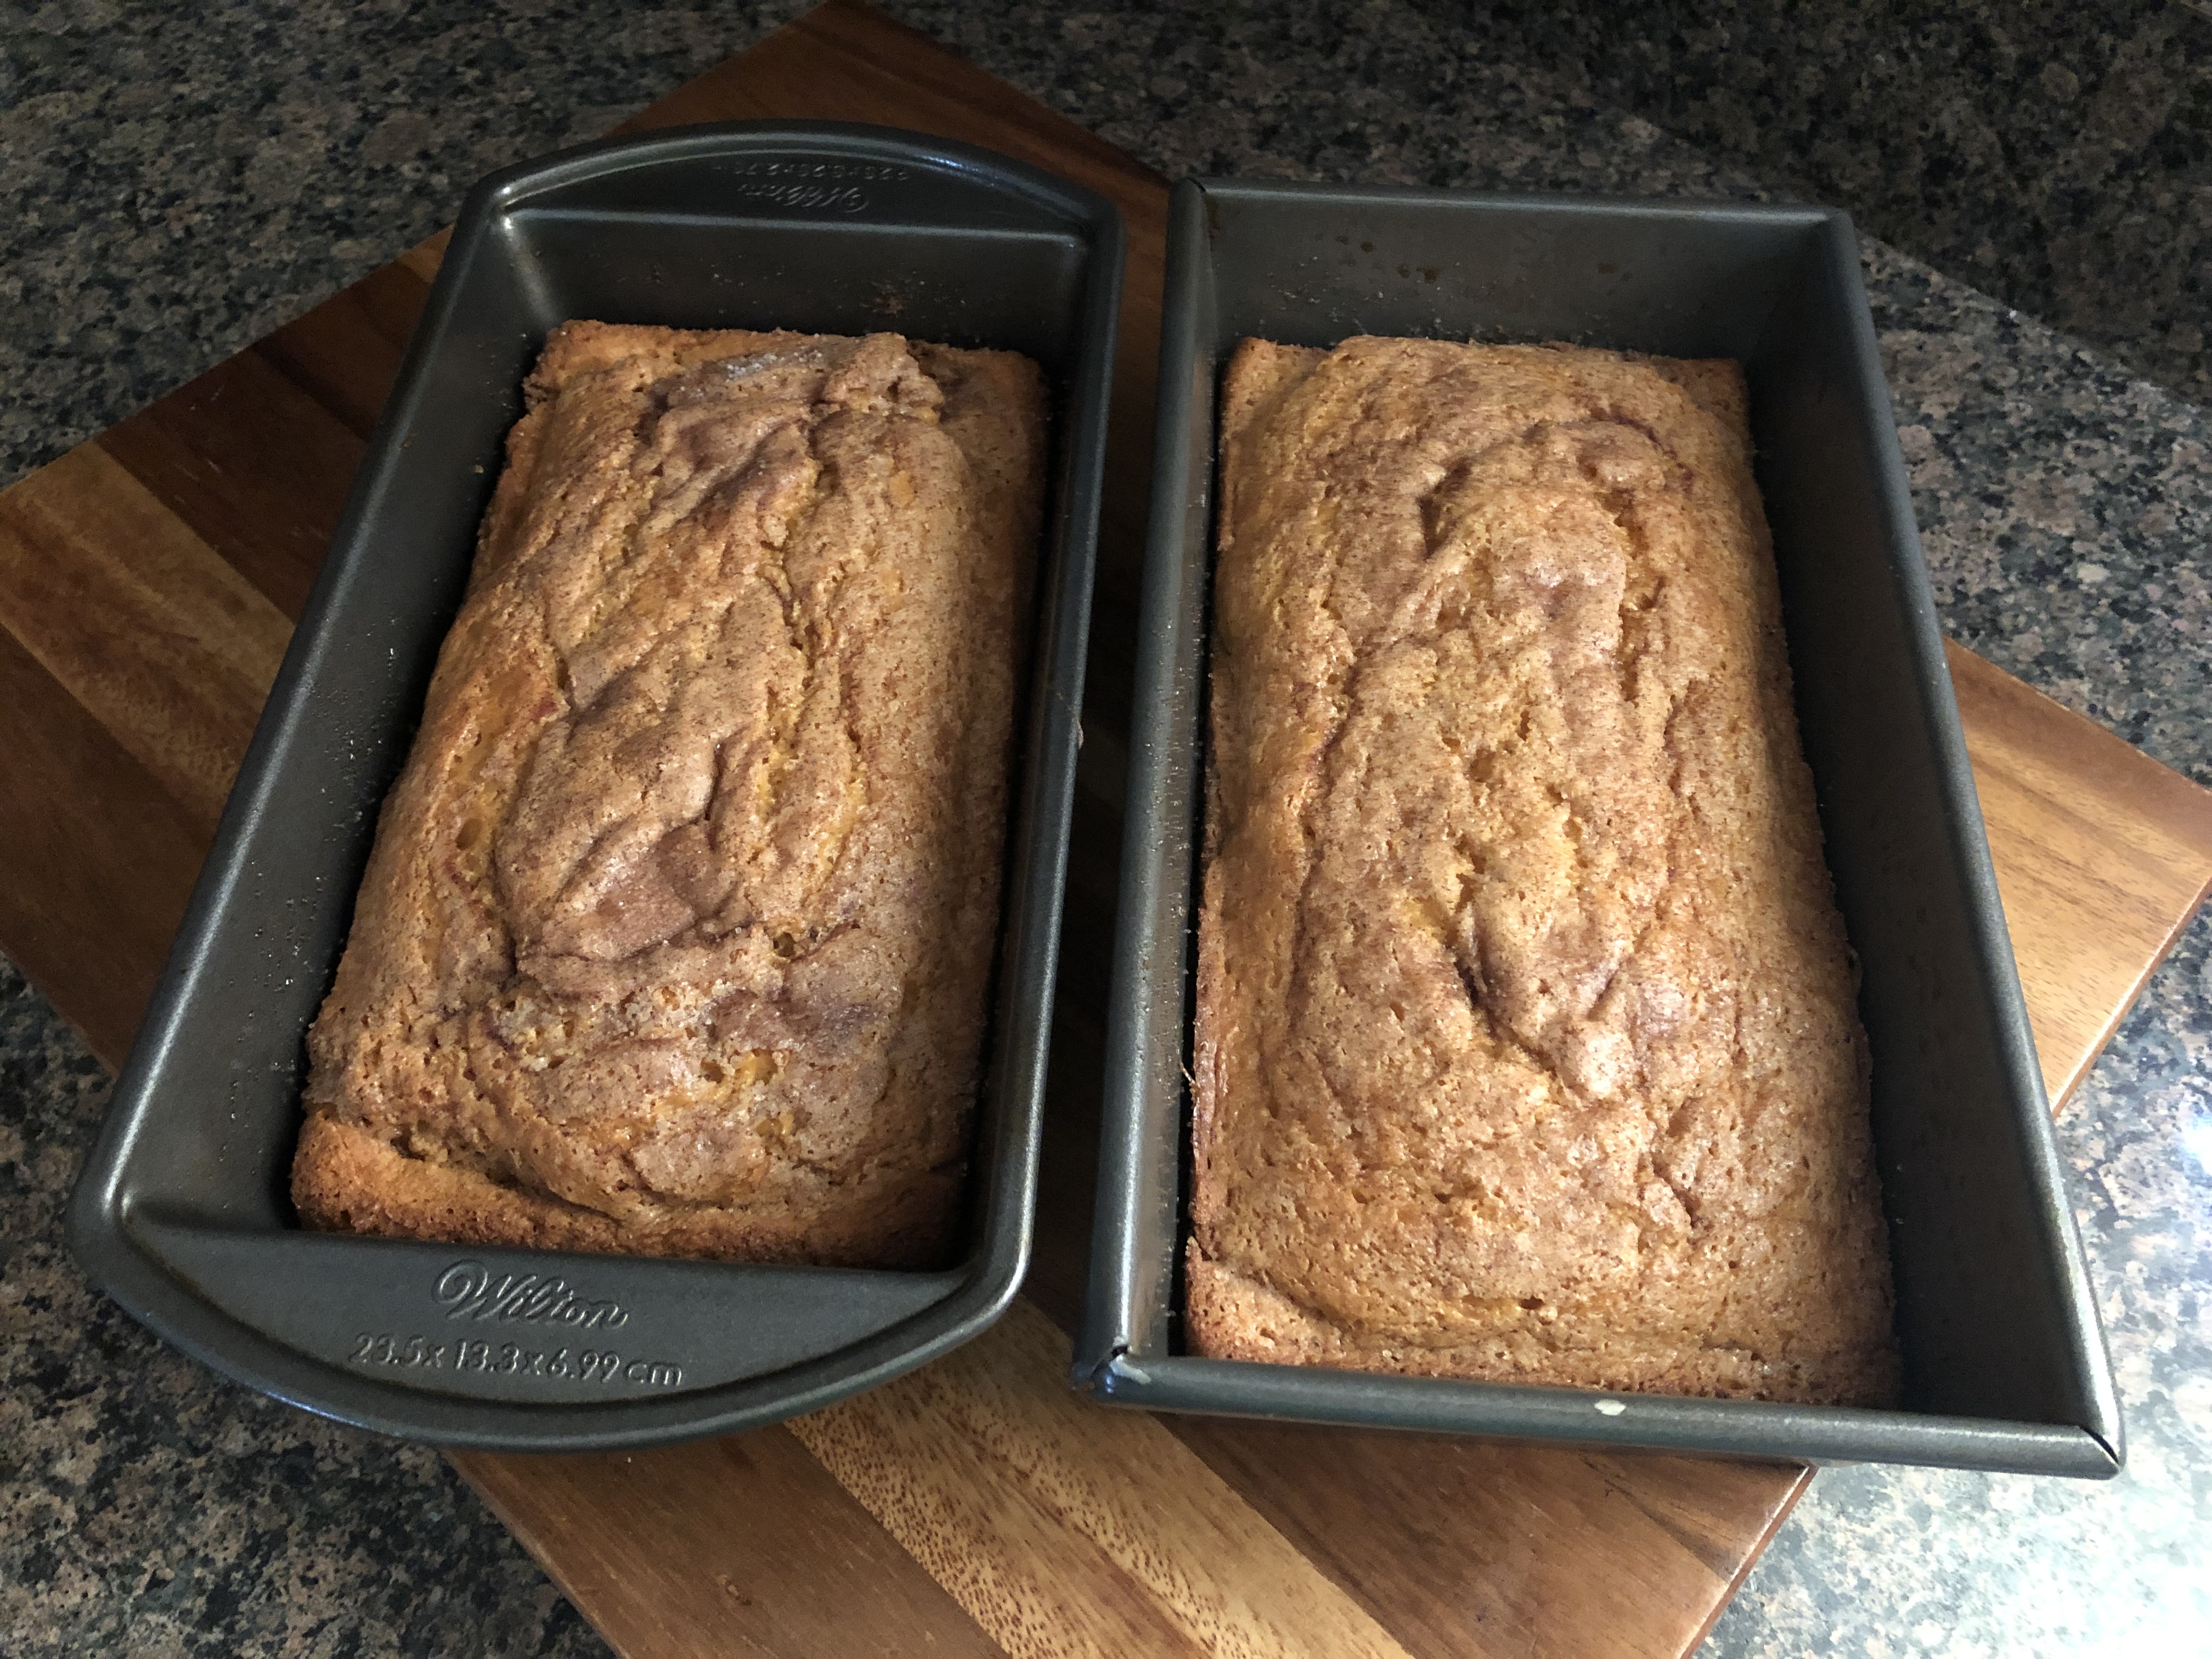
But, after baking both loaves for about 40 minutes both had risen nicely.

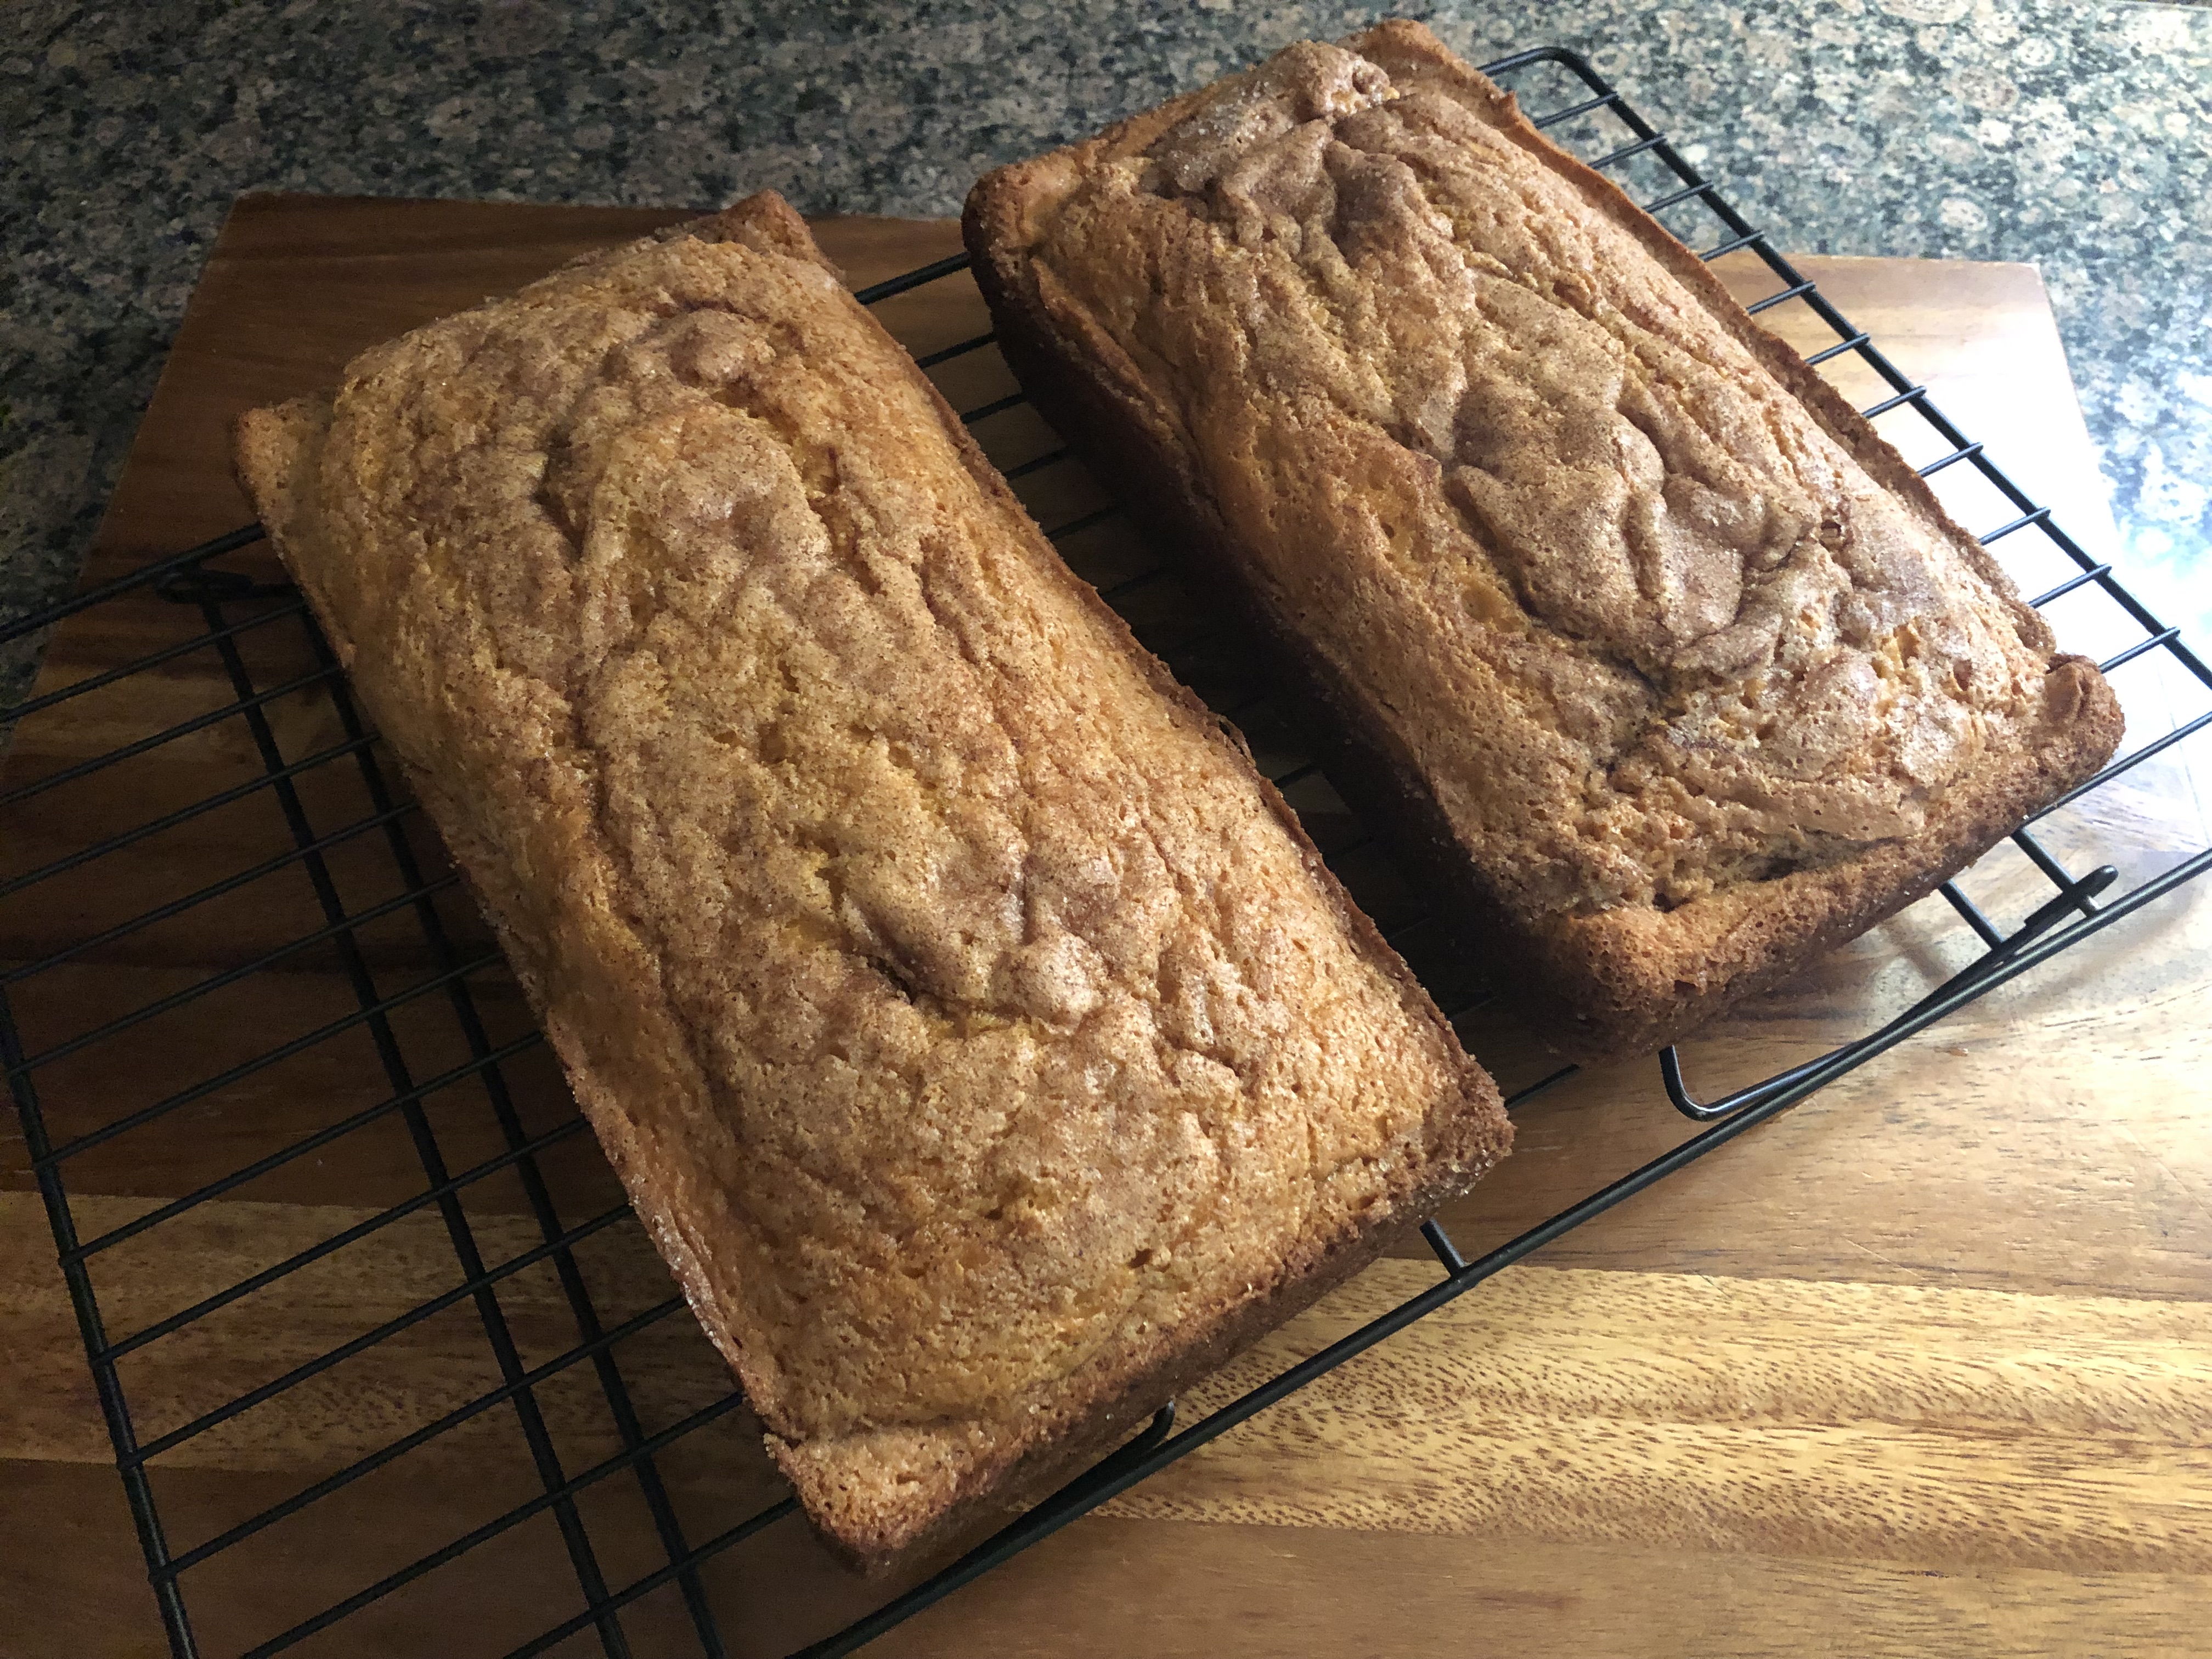
I let them cool in the pans for a few minutes before transferring them to a wire rack to cool completely.

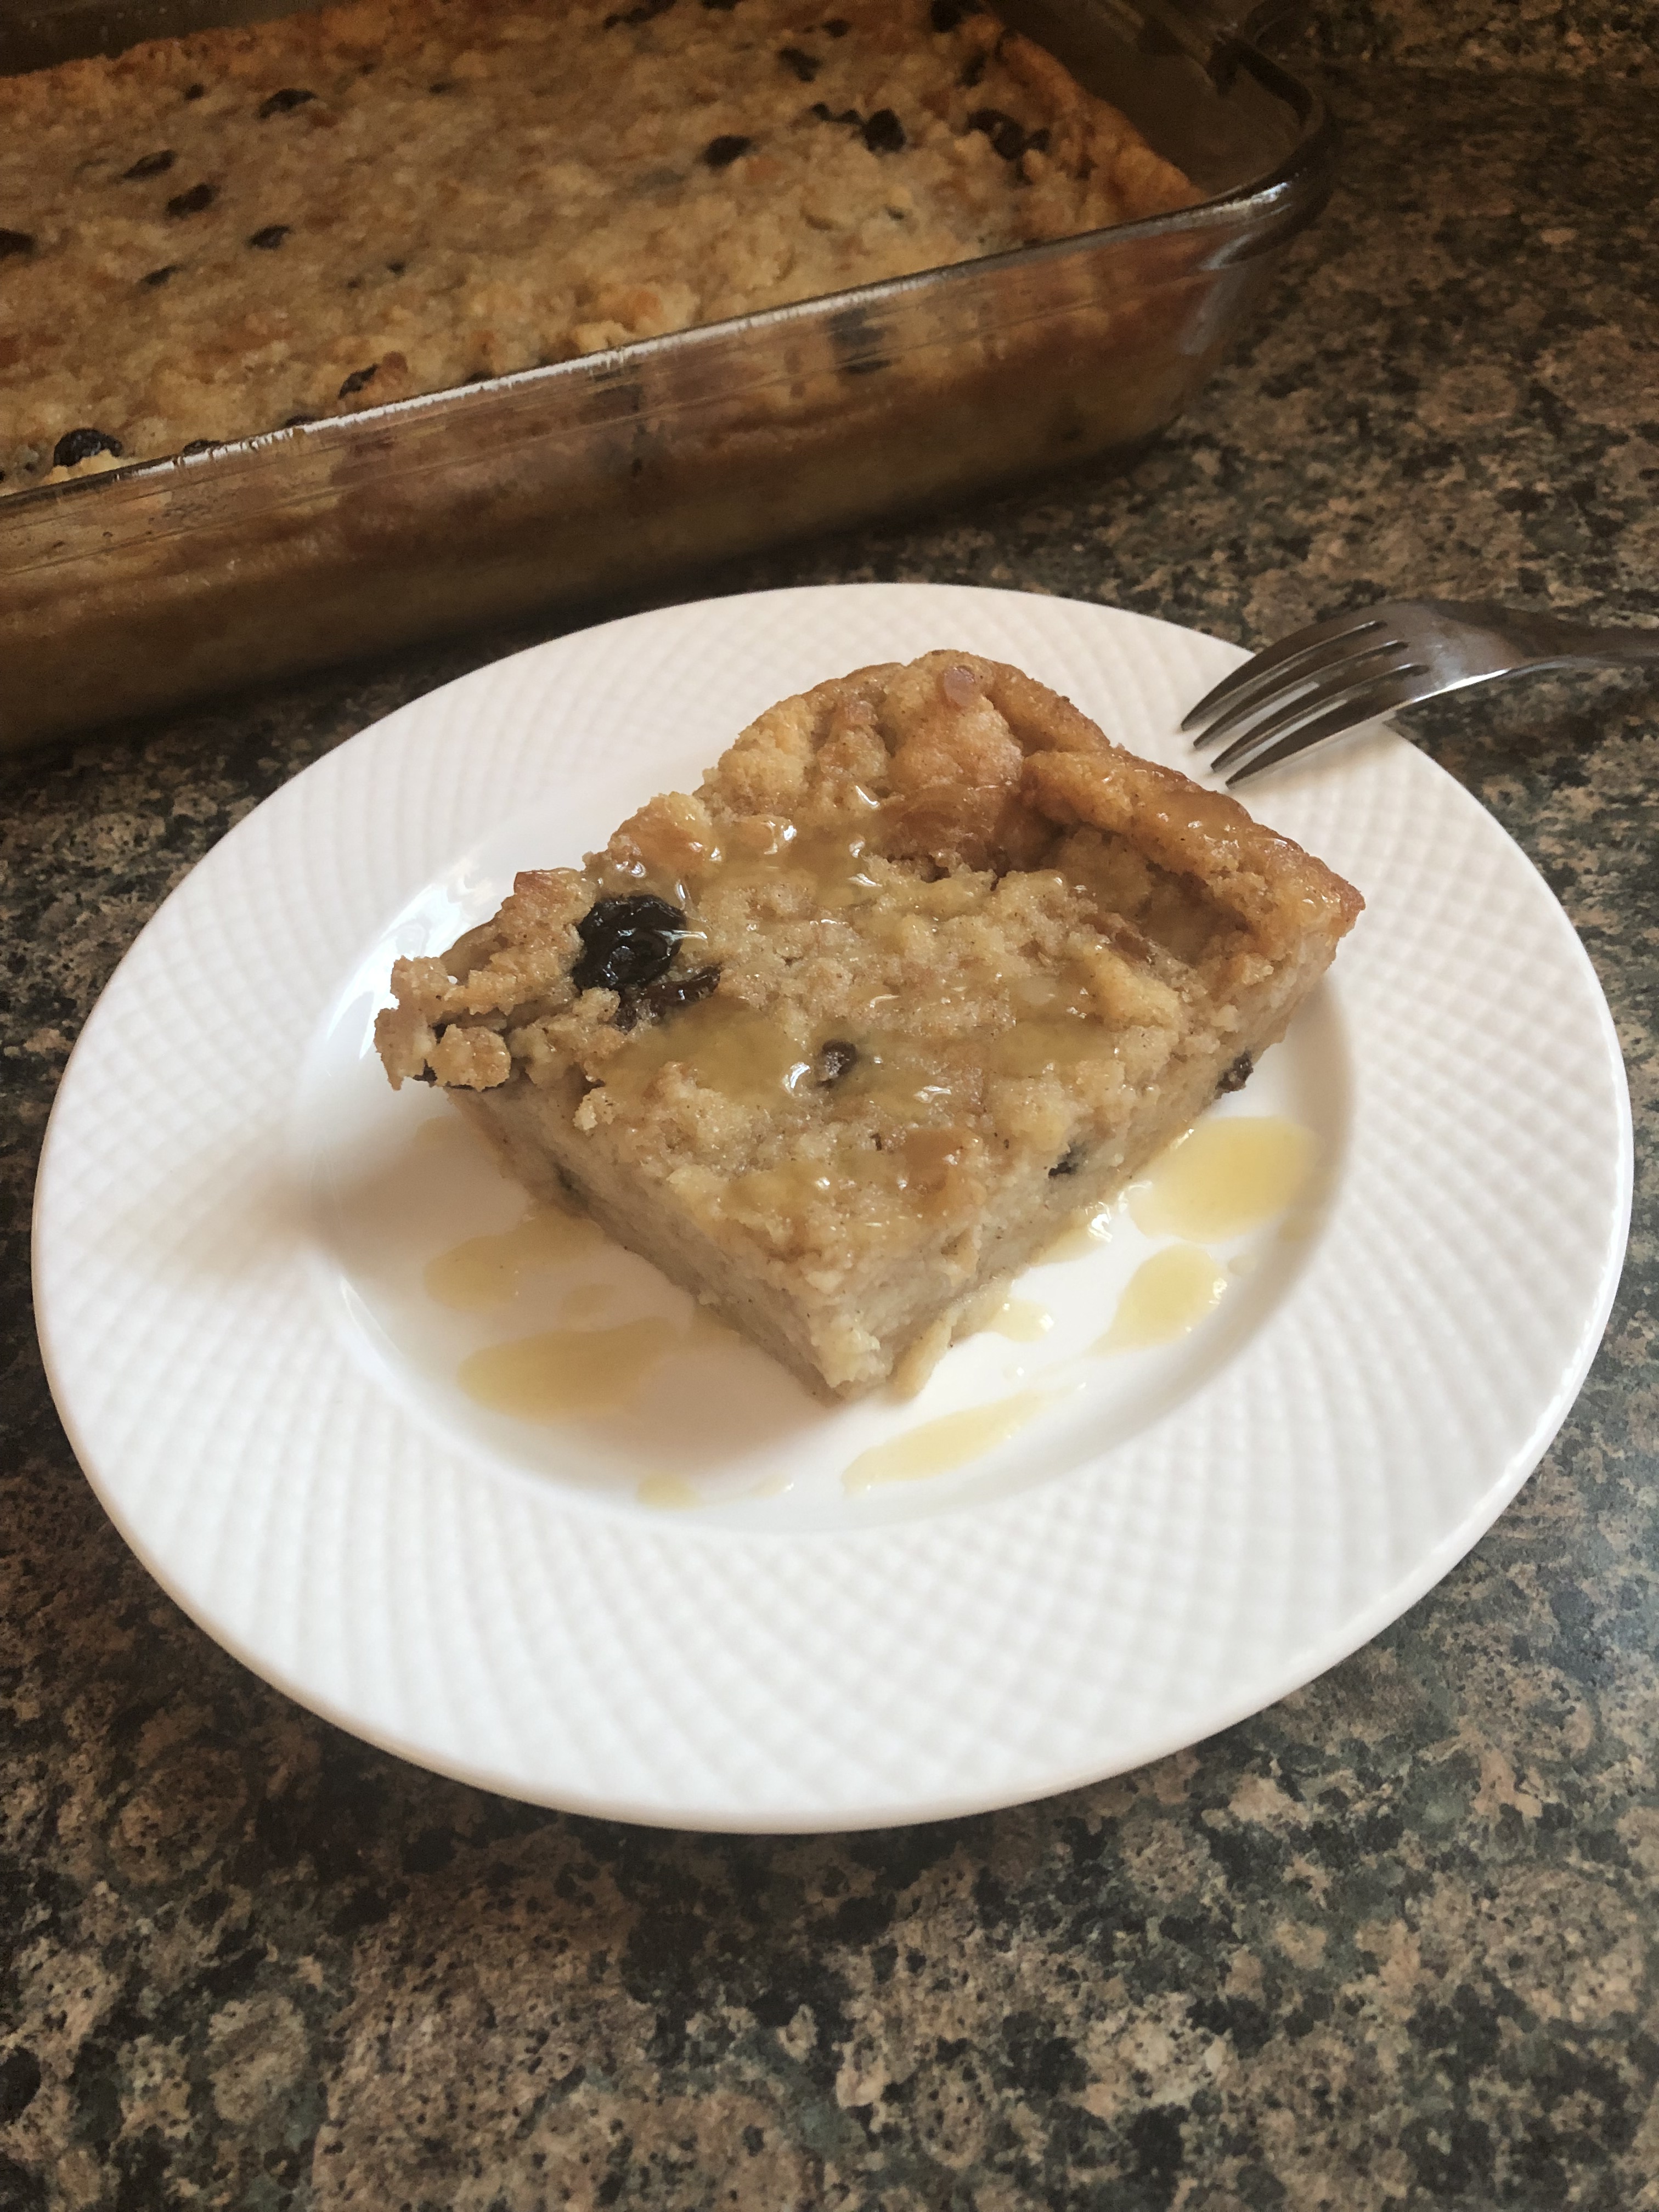
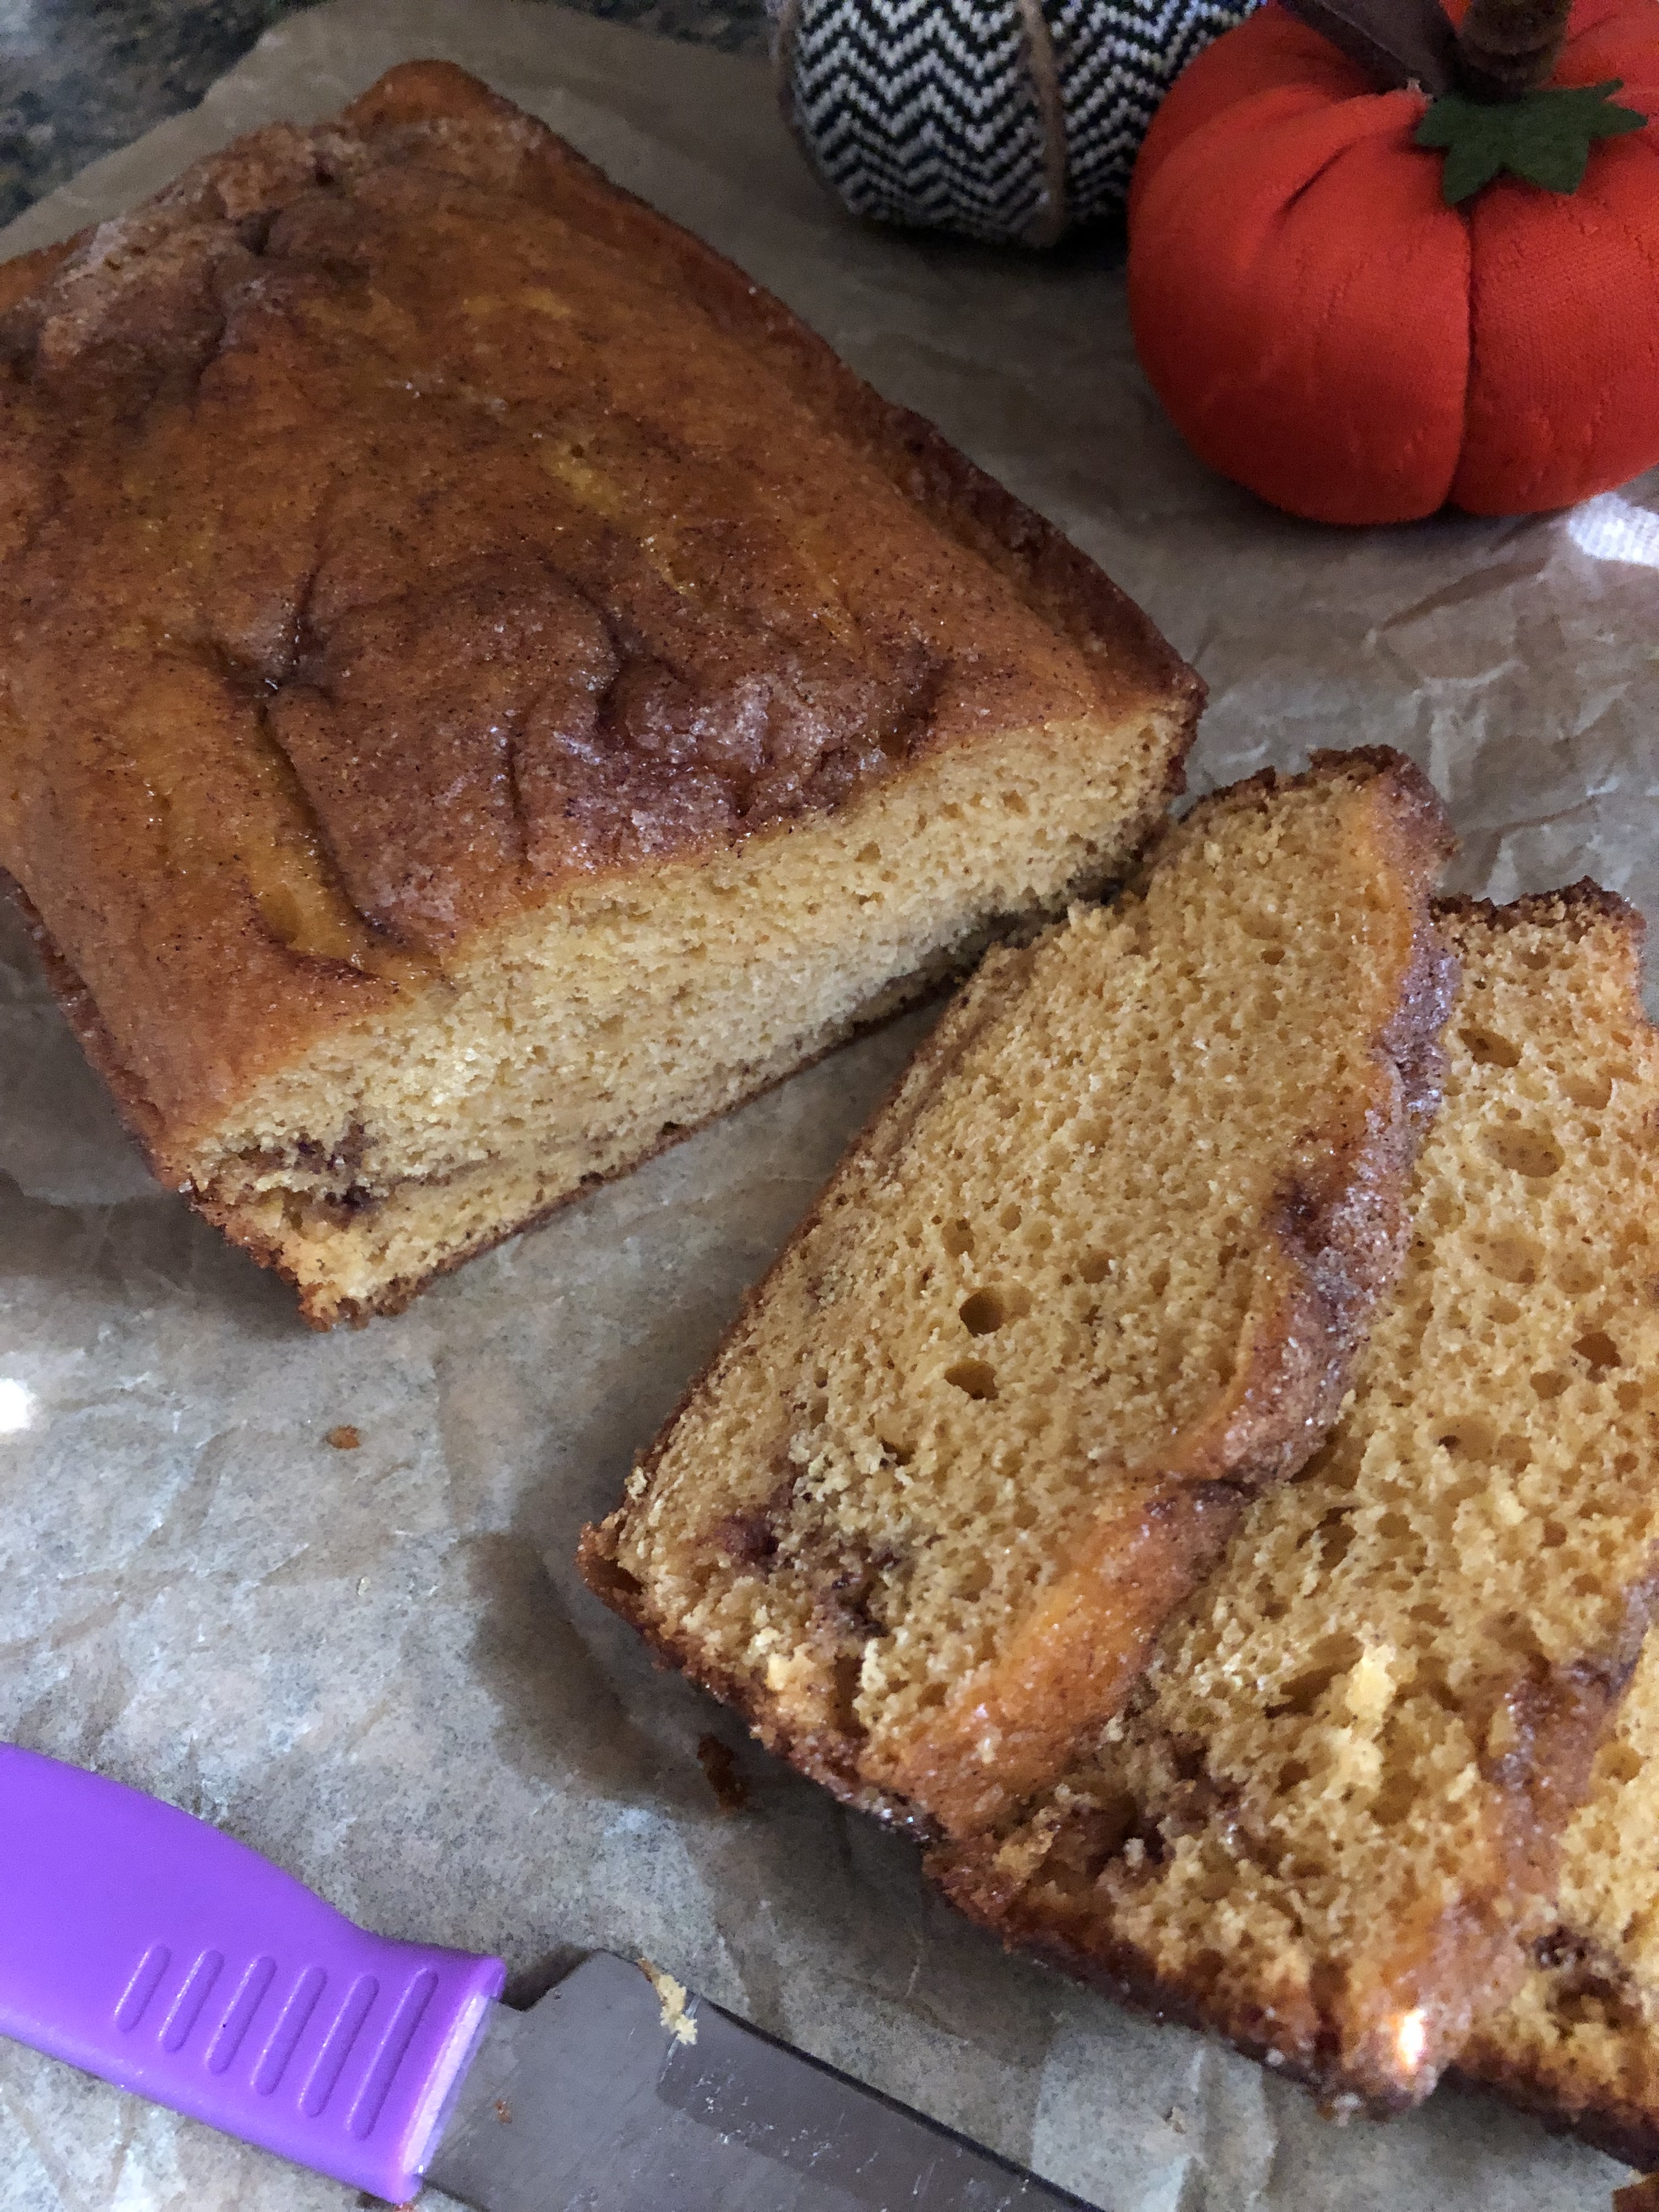
And once they were cool it was time to slice into one of the loaves. You can see the cinnamon sugar swirl in the bottom of the bread and a little up the side of the cake. As for the cinnamon sugar on top, it baked in nicely to the breads.

I kept one loaf for myself and brought the second one to a friend’s house for Sunday dinner and it was a hit!


Pumpkin Quick Bread

Ingredients:

1 package yellow cake mix

1 package instant pumpkin spice pudding mix

4 large eggs

1 cup sour cream

1/4 cup water

1/4 cup canola or corn oil

1/3 cup sugar

3/4 teaspoon ground cinnamon


Directions:

Preheat the oven to 350 F. Prep two loaf pans by spraying them with baking spray or greasing them with butter.

In a large bowl combine the cake and pudding mix. Add the eggs, sour cream, water and oil and beat until blended (the batter will be thick).

Combine the sugar and cinnamon. Spoon about 1/2 cup of batter into each of the prepared loaf pans. Sprinkle 2 tablespoons of the cinnamon sugar over the batter in each pan. Divide the remaining batter among the two pans and sprinkle the top with the remaining cinnamon sugar.

Bake for 35-40 minutes or until a cake tester inserted in the middle comes out clean. Cool in the pan for 10 minutes and then remove and transfer to a wire rack to cool completely.

Recipe modified from Taste of Home

Knitted Cocoon Shrug

Have you ever completed a craft project and felt a bit disappointed with the outcome? I’m sure we have all been there… I know I have quite a few times. You kind of feel like you wasted your time and possibly money on the supplies.

For the longest (a few years to be sort of exact) I finished knitting a rectangle that would ultimately become a shrug – all that was left to do was seam it together. I folded it and placed stitch markers on the sides so I knew exactly where I needed to seam, but then I folded it up and placed it in a corner and kept reminding myself that I had to finish it. I would put it on my desk and in other places so that it would be in my line of vision, but, it just wasn’t working. Not really sure why I was procrastinating. I was possibly thinking that it was going to be more difficult than it really was. Truth be told, I enjoy crocheting and knitting, but I am just not fond of those projects that require seaming at the end to complete them.

But then I finished up another project that requires seaming (hexagons for a Christmas Tree Skirt) and I thought to myself that there was no way I could start seaming this project if I still hadn’t finished the one from years ago. So, I took the rectangle out of the corner and procrastinated for a few more days and then finally sat down and got to work. And guess what, I realized that all that procrastinating was for nothing. I seamed up the sides of the shrug in about an hour. I did one side while watching television and the other side laying in bed before going to sleep. Finishing it prompted me to get out of bed and try it on and that’s when the feeling of disappointment came over me. I tried it and my first thought was “Eh.” The pattern was one size fits all, but, I think if I was a little taller I would like the way it fit in the back better. And while the picture accompanying the pattern had the sleeves coming down about 3/4 of the way on the model’s arm, on me the sleeves end before my elbows. Maybe trying it on over my pj’s didn’t help give me the best impression of the shrug, but, considering that I was fussing with it so much to get it to look just right I don’t know if my thoughts will change. Ultimately, I ended up folding it back up and placing it in another spot. At least it’s done, so, I can to get to work on seaming the hexagons that I am determined to get done before my Christmas Tree goes up this year. I have some time so fingers crossed I will get it done.


Sheet Pan Chicken Fajitas

Sometimes the hardest part of writing a blog post is the intro. Thinking of something catchy to grab the reader’s attention to keep reading. I was having that exact problem for this blog post. I was trying to think of something catchy about how sheet pan dinners were becoming a go-to for me, but, I just couldn’t come up with anything. So I will just say, if you are thinking of making chicken tacos, this is a quick and easy way to make the filling. Hopefully that got you!

I began by slicing three bell peppers, an onion and chicken breast into strips. I then combined them all in a large bowl and sprinkled it with a spice mixture of chili powder, cumin, paprika, coriander and salt and pepper. Next I drizzled everything with olive oil and gave it a good toss. I then transferred the mixture to a rimmed baking sheet that I lined with aluminum foil.

I then baked it in a 400 F preheated oven for about 25 minutes.

Ideally at this point, while the chicken fajita mixture is still hot, it would be the perfect time to make tacos or fajitas with it, but, I made this as prep for the upcoming week’s dinner. So, after letting it cool to room temperature I placed it an airtight container and refrigerated it. The following evening I heated up some of it up and made tacos with it. And I am happy to say that it heated up well.


Sheet Pan Chicken Fajitas

Ingredients:

Fajita Seasoning:

2 teaspoons chili powder

1 1/2 teaspoons cumin

1 teaspoon paprika

1/2 teaspoon coriander

Salt and black pepper

Fajita Filling:

1 1/2 lbs. boneless chicken breast, sliced into thin strips

3 bell pepper (1 of each – red, green & yellow), sliced into strips

1 medium yellow onion, sliced into strips

2 garlic cloves, minced

3 tablespoons olive oil

For serving:

Taco size flour tortillas

Lime wedges

Sour cream

Guacamole

Salsa

Cheese


Directions:

Preheat the oven to 400 F. Line a rimmed baking sheet with aluminum foil and set aside.

In a small bowl combine the ingredients for the fajita seasoning and set aside.

In a large bowl combine the chicken, peppers, onion and garlic. Sprinkle with the fajita season and the drizzle with the olive oil. Toss everything together and then transfer to the prepared baking sheet. Spreading everything in an even layer.

Cook in the preheated oven for 18-25 minutes, tossing everything at the halfway point.

To serve, wrap the tortillas in aluminum foil and heat in the oven for five minutes. Drizzle lime juice over the fajita filling and season with salt to taste. Tossing everything to coat.

Serve the filling warm in the warm tortillas with your desired topping.

Recipe from Cooking Classy

An Ombre Cake, the Fall and A Few Other Things

With Labor Day weekend over summer has unofficially ended. The weather is also signaling the end of summer as well. Looking at the extended forecast there doesn’t seem to a day in the 80’s in sight. I am not complaining though. Fall is my favorite season and I very rarely complain about the cold temps the winter brings. While I am not a fan of hazy, hot & humid days of the summer I will rarely complain about them as well. Truthfully, I love being able to enjoy the 4 seasons in my neck of the wood. Although, it seems like Spring happens in the blink of an eye. It’ll start off super cold, then a few rainy days (possibly even snow) and then finally a few Spring-like days and then bam, there will be days of crazy heat before the Summer has truly began.

Labor Day was a rainy one by me. The weekend was beautiful, although, I spent half of it in the kitchen baking, decorating a cake and making floral centerpieces for a bridal shower. The alternative would have probably been yardwork so it’s all good.

I started the day by making Cheesecake Brownie Bites. I’ve been making these for years and while they are always a hit, I probably have tried them once of twice. Crazy I know. Well, I had extra brownie and cheesecake batter so I made a few extra that I ended up snacking on throughout the day and I will definitely be eating them the next time I make them.

After running a few errands I came back home and got to work on the cake. The plan was a two-tier blue ombre buttercream cake decorated with fresh sunflowers. To save myself time (and stress) I baked the cake layers a few days before, let them cool and then wrapped them in plastic wrap to store in the refrigerator. I started by making my short-cut chocolate mousse and then refrigerated it while I whipped up a batch of vanilla frosting. Once the frosting was done I then torte, filled and crumb coated the two tiers. Each tier was a three-layer cake – chocolate cake sandwiched between two yellow caked. Once 6-inch, the other a 9-inch.

I then placed the cakes in the refrigerator and whipped up two more batches of vanilla frosting. Yes, this cake took about 12 cups of frosting to complete. I’ve learned that it’s best to have left-over frosting as opposed to barely enough, especially when tinting the frosting. One time I was decorating a cake with a ruffle design in pink frosting. Well, by the time I got to the top of the cake I had run out of the pink frosting so I ended up having to frost the top of the cake with white frosting. It didn’t look bad, but, I was definitely kicking myself. Once I was done making the frosting it was time to tint it. I used three Wilton colors to create the ombre effect – Royal Blue, Cornflower Blue & Sky Blue. Once the frosting was ready I started by frosting the top of each of the cake. The smaller tier with while frosting and larger tier with the cornflower blue frosting. I filled piping bags with the remaining frosting and snipped the ends off the bag.

I began by piping the bottom of the larger tier with the royal blue frosting. I then switched to the cornflower blue frosting to finish piping the sides of the cake. Next I used a straight edge icing spatula to smooth the sides of the cake. And finally I used a small spoon to create stripes on the cake by dragging it along the frosting while spinning the turntable.

After placing the smaller tiered cake on the larger one and securing it with a wooden dowel I repeated the frosting and decorating process using the sky blue and white frosting. At this point I popped the cake in the refrigerator overnight so the frosting could set (and I could take a break).

After resting and taking a dinner break I got to work on the centerpieces.

The next morning it was back to the cake. Here’s a pic of the cake before adding the sunflowers…

And with the flowers added…

And finally on display at the bridal shower.

So, now that Fall is right around the corner it’s, dare I say, time to think about the holidays, especially if you are planning on doing any crafting for it. Earlier this year I started crocheting hexagons to make a Christmas tree skirt. I completed about 2/3 of the hexagons but I put the project on hold as I couldn’t find 4 skeins of the same dye lot of the green yarn I wanted to use. I finally got them so that project is back on. Fingers crossed I will get it done. I started working on the hexagons again and for some reason the size is not matching up to the ones I made earlier. I keep ending up with an extra side, so instead of hexagons I am making heptagons. Not sure what I am doing wrong. I made so many hexagons already that I thought making them would utilize muscle memory but something is off. Ugh! I also started looking at Christmas card designs on Pinterest during some downtime. I think I know what I am making this year. I always wait until the last minute to make my cards and I am doing by best this year to start early so I am not scrambling in mid-December. If all this talk about the holidays has you stressing out, I apologize. At least I haven’t started shopping. Back to Fall though, I started decorating with some pumpkins around the house, nothing outside though. I will wait until it’s actually Fall to do that. I was almost tempted to put up my scarecrows but I held off. And of course there is baking… I’ve got some ideas for Fall treats and I am already looking ahead to Christmas cookies. Sorry, I brought it up again. But, my fellow crafters and bakers know where I am coming from. You’ve got to be a season ahead with these things, especially when you are blogging about them. For now… Happy Fall Y’all (albeit a few weeks early!)

Sprinkle Fault Line Cake

Earlier this summer a new cake trend began flooding my Instagram feed… A Fault Line Cake. Initially I thought it would be extremely difficult to create. And I am sure some of the ones I have seen are – ones with macaroons, lemons, edible decorative paper and so forth – but, the one that caught my eye and seemed somewhat easy to practice on was a sprinkle one. Essentially, the center of the cake exposes a design between two thick layers of frosting. Sort of like a fault line separating after an earthquake and exposing the ground beneath.

I first attempted this trend a few weeks ago and it was a complete DISASTER! Since I was just trying out the technique I attempted to take some short-cuts… mainly use store bought frosting. Chocolate frosting at that and I really should have known better. Not that there is anything wrong with store bought frosting – I have used it quite often to decorate – but, it was hot outside (and inside my house) and I have learned that store bought frosting just doesn’t hold up as well in the heat as homemade. Also, I made a six inch cake using boxed cake mix thinking that would give me enough height for the cake and I was wrong on that account as well.

Here’s what happened… I baked a yellow cake mix into a two-layer 6-inch cake and it came out just fine. Then, I started to frost it and the issues began. Like I said it was hot on this day so I decided to refrigerate the frosting for about 20 minutes so it could firm up a little. Once it was firm, I started by crumb coating the cake and it just wasn’t going on smooth, but, I plowed ahead. Once I finished with the crumb coat I placed the cake in the refrigerator so it could set. After about a half hour I removed the cake from the refrigerator and attempted to add more frosting to the middle of the cake to adhere the sprinkles and it was a mess. The crumb coat never got a crust on it so when I added more frosting it was all just coming off. I continued and finally got a layer of frosting around the middle of the cake and then added the sprinkles. But, since I had to add such a thick layer of frosting to the cake to get it to adhere my sprinkles got swallowed up by the frosting. It was such a fail. At this point I just gave up. I realized that the frosting was just not going to cooperate and that the cake didn’t have enough height to look good.

Fast forward a few weeks later and with a free weekend ahead of me I decided to try once again. I made some tweaks this time though. I decided to make a three-layer 8-inch cake and for the frosting I whipped up two batches of Martha Stewart’s Fluffy Vanilla Frosting. It’s my go-to frosting whenever I have to decorate a cake. It has a great consistency that makes it perfect for frosting, piping and/or tinting.

I opted to go with a box cake mix again. I used a yellow cake mix to make two 8-inch layers and then a chocolate mix to make one 8-inch layer. I used the remaining chocolate batter to make 6-inch cake.

Once the cakes were done I let them cool in the pans for about 15 minutes and then transferred them to a wire rack to cool completely. I then wrapped them in plastic wrap and placed them in the refrigerator overnight. I used to just leave my cakes out at room temperature, but, I have found that refrigerating them makes it easier to torte, layer and frost.

The next day I made two batches of vanilla frosting and my short-cut chocolate mousse (beat a package of Jell-O chocolate pudding mix along with a cup each of heavy whipping cream and whole milk until thick). I then torted and layered the cake, filling the layers with the chocolate mousse. Next I crumb coated the cake and placed it in the refrigerator for about a half hour.

After the half hour I removed the cake from the refrigerator and added an extra layer of frosting in the middle of the cake…

And then added sprinkles to that layer of frosting.

I then placed the cake back in the refrigerator for another half hour so the frosting and sprinkles could set.

I transferred frosting to a piping bag and snipped the end off and piped the frosting around the cake, except for the part with the sprinkles.

I then smoothed the frosting and added some 1M swirls on top of the cake and sprinkled them with sprinkles and my cake was done. I finally created a successful Fault Line Cake. I wonder what new cake trend will be flooding my Instagram feed next.

Lime Pudding Cups

The best desserts in the summer are of course no-bakes ones. No one wants to turn on their oven when it’s 90+ degrees outside, but, sometimes you can make a slight exception and light up your stove for a quick delicious treat like these Lime Pudding Cups. These came up on my Instagram feed a few weeks ago and I knew instantly that I wanted to make them – partially because it meant using up the last of some heavy whipping cream I had in my refrigerator that was expiring soon and more importantly because they reminded me of one of my favorite desserts… Key Lime Pie.

The prep and cooking time for these is less than an hour. That includes juicing and zesting the limes, cooking the pudding on the stove and then letting it cool before straining and dividing it. (Okay, maybe it’s more like less than 45 minutes). Once all that is done you place them in the refrigerator for at least 2 hours so the pudding can set. While they are in the refrigerator you whip up some homemade whipped cream to top them and refrigerate it until they are ready.

Once the pudding has set top each one with a dollop of whipped cream, crushed graham crackers (to crush, I placed 1 graham cracker in a Ziploc bag and then rolled with a rolling pin) and lime zest.

And as simple as that you have a refreshing summer dessert that’s sweet and citrusy!

Lime Pudding Cups

Ingredients:

2 cups heavy cream

2/3 cup granulated sugar

1 tablespoon grated lime zest, plus more for topping

Pinch of kosher salt

1/3 cup freshly squeezed lime juice (from 4 medium-sized limes)

Crushed graham crackers, for topping

Sweetened whipped cream, for topping (use store-bought or follow recipe below to make your own)


Directions:

In a medium saucepan combine the heavy cream, sugar, lime zest and salt and bring to a boil over medium heat. Stir the mixture often until it is reduced to 2 cups. About 8 to 10 minutes.

Remove the saucepan from the heat and stir in the lime juice. Let cool for 20 minutes and then strain the mixture through a sieve into a measuring cup, discarding the solids. Divide evenly (about 1/3 cup in each) among 6 ramekins. Place in the refrigerator until set, at least 2 hours.

To make the whipped cream: Combine 1 cup heavy cream, 2 tablespoons confectioners’ sugar and 1/2 teaspoon vanilla extract in a chilled bowl. Beat on low speed until the mixture thickens and then beat on medium speed until soft peaks form.

Once the pudding is set, top each one with a dollop of whipped cream, some of the crushed graham cracker and lime zest.

Recipe from Martha Stewart

No-Bake Chocolate Chip Cannoli Cheesecake

So, you want something sweet, but, you don’t feel like turning on your oven in the dead of summer to bake something. I hear ya’. On those hot days when I must bake or cook something I usually try to make a couple of things at once so that turning on my oven isn’t too futile. Every year I hope it’s the year I can get central air conditioning but, it hasn’t been yet. I finally did get an air conditioning unit to put in my living room window and that does help, but, on a recent day when the feel like temps were over 100 degrees and I waited until the early afternoon to turn it on it really didn’t do much in cooling down the house. My dog positioned himself perfectly on the floor though and enjoyed it. Maybe I should have curled up next to him. The solution to those sweet tooth cravings in the summer are no bake desserts. Now, I have made a few ice box cakes during the summer months to avoid the oven – S’mores, Mocha Chocolate & Chocolate Hazelnut – but, I have never made a no-bake cheesecake. Not really sure why. Maybe I had my doubts that it would be as good as a baked one or hold together as well. Well, I finally decided to try making one after coming across a recipe for a No-Bake Chocolate-Chip Cannoli Cheesecake. Cannoli are one of my favorite desserts so if I can have anything reminiscent of the filling I am trying it.

I made some tweaks to the original recipe I found. Instead of using a combination of crushed cannoli shells and graham cracker crumbs for the crust I decided to go an easier (and less driving around route) and use a store bought graham cracker crust. And since I didn’t have rum extract at home but did have rum, I opted to use the pure rum instead. I’ll admit the cheesecake did have more of an alcohol taste due to this, but, no one was complaining. It was delicious nonetheless and perfectly chilled for a refreshing dessert after hot summer day’s dinner.


No-Bake Chocolate Chip Cheesecake

Ingredients:

1 9-inch graham cracker pie crust

2 8 oz. packages of cream cheese, at room temperature

1 cup confectioners’ sugar

1/2 teaspoon grated orange zest

1/4 teaspoon cinnamon

3/4 cup part-skim ricotta cheese

1 teaspoon vanilla extract

1 tablespoon light rum*

1/2 cup miniature chocolate chips

Chopped pistachios for topping, optional


*The original recipe called for a 1/2 teaspoon rum extract


Directions:

Using a stand or hand mixer, beat the cream cheese, sugar, orange zest and cinnamon on medium speed until well combined. Add in the ricotta cheese, vanilla and rum and continue beating until incorporated. Fold in the chocolate chips and then transfer the mixture to the graham cracker crust.

Cover with a piece of plastic wrap and refrigerate for at least 4 hours until the filling is set. Top with chopped pistachios before serving.

Recipe modified from Taste of Home

S’mores Chocolate Chip Cookies

Happy National S’mores Day! This year to commemorate the day I decided to make S’mores Chocolate Chip Cookies. Now quite a few years ago I made a S’mores Stuffed Chocolate Chip Cookie – this was before I was aware of this celebratory day for this campfire staple – and it was exactly as the name suggests, an actual s’more (marshmallow, chocolate and graham cracker) baked into the center of a chocolate chip cookie. For these cookies today the ingredients for a s’more are incorporated into the cookie. The graham crackers are crushed and whisked together with the flour and cocoa powder while the marshmallows and milk chocolate chips are folded into the cookie dough once all of the other ingredients have been mixed and combined.

The resulting cookie is one that’s perfectly chocolatey, a little gooey thanks to the marshmallows and has a hint of graham cracker.

S'mores Chocolate Chip Cookies

  • Servings: 30 cookies
  • Print

Ingredients:

1 cup mini marshmallows

1 cup flour

1 cup crushed graham cracker crumbs

1/2 cup dark cocoa powder

1 teaspoon baking powder

1/2 teaspoon salt

1/2 cup unsalted butter, softened

1/2 cup sugar

1/2 cup light brown sugar

2 eggs

1 teaspoon vanilla extract

1 1/2 cups milk chocolate chips


Directions:

Prep baking sheets with parchment paper and set aside.

The night before you make the cookies place the marshmallows in a bowl and leave on the counter uncovered. This will “age” the marshmallows and help them keep their shape while baking.

In a large bowl whisk together the flour, graham cracker crumbs, cocoa powder, baking powder and salt. Set aside.

Using a hand or stand mixer, cream together the butter and sugars until light. Add the eggs and vanilla extract and beat until fluffy.

Slowly add the flour mixtures, scraping the sides of the bowl as necessary. Once the ingredients are full incorporate stop mixing. Fold in the chocolate chips and the marshmallows.

Using a cookie scoop form the dough into balls and place on the prepared cookie sheets, leaving room for spreading. Chill the dough on the cookie sheets in the refrigerator for at least an hour.

Preheat the oven to 350 F and baking the cookies for 12-15 minutes. The cookies will be set on the outside and soft in the middle.

Let the cookies cool on the cookie sheets for 5 minutes and then transfer to a wire rack to cool completely.

Recipe modified from Food52

Crocheted Keyhole Scarf

Earlier this year I got a request to make a keyhole scarf (it can also be referred to as an Ascot scarf). It’s a short scarf that sits at the upper chest. As opposed to other scarves this style stays put because one end is inserted into the keyhole of the other. Since I truly had no clue how to make one I started looking for patterns online similar to the picture of the one requested. Once I found a pattern I set it aside figuring I would have time to make it by the deadline of September. Eventually I picked up the pattern to give it a good read over and instantly got worried. I wasn’t sure if I would be able to actually make it. The words leaf, keyhole and neck in the pattern through me for a bit of a loop. I decided though that I would practice on some extra yarn that I have stored away – I have a bin of yarn in my basement with remnants from past projects. I clean it out every now and then because I realized you don’t really need a few yards of random shades of yarn.

So, I picked a yarn that was similar in weight to the yarn I planned on using for the actual scarf. And I must say actually working on something with your hands as opposed to reading and imagining how to do it are so opposite. Once I had the yarn and crochet needle in my hand the pattern made sense and the scarf was a cinch to crochet. I decided to work thru the pattern from the first leaf, to making the keyhole and then a bit of the neck (all those words that through me for a loop at the beginning.) Once I got to a decent point I showed the sample to the recipient of the final product and they were happy with it. I then went and purchased the actual yarn.

And started working on it…

It took me less than a week (probably the quickest I’ve ever gotten a yarn project done – well, except for some ruffle scarves I made a few years ago. I was cranking out two a day after someone requested like 10 of them) and the scarf was done. This is a pic of the scarf just completed but before washing and blocking it.

After washing and blocking the scarf it laid flat.

Here’s a pic of the keyhole…

What the scarf looks like without one end being inserted into the other…

And a not so great shot of me wearing the scarf, but, it gives you an idea of how the scarf fits.

Most importantly, the intended recipient was delighted with it and is planning on wearing it on her upcoming Alaskan cruise!

Unfortunately I cannot share the pattern I used to make the scarf, but, if you would like to make it yourself the pattern I used was the Rita Ascot Scarf by Emily Johannes.


Bourbon Bread Pudding

With the summer in full swing you might have enjoyed a hamburger or hot dog by now. And with those summer BBQ staples comes one dilemma I’m sure most have you have faced… left-over hamburger and hot dog buns. If you haven’t, you’re lucky. I was facing this very dilemma after my July 4th BBQ. I bought extra buns just in case, and while most of it went I still had some left that I just wouldn’t be able to finish on my own. So, I started thinking what I could make with them. A Bourbon Bread Pudding sounded like a good option.

To start, I soaked a cup of raisins in a quarter cup of Jim Beam Bourbon. I let them sit for about 2 hours until most of the bourbon had been soaked up by the raisins. You can actually do this step a day or two before you plan on making your bread pudding.

Since the hot dog buns were still fresh, I had to make them “stale” so that they wouldn’t fall apart too much when I added the liquid. To do so I toasted the bread. I began by slicing 8 hot dogs buns into cubes. Without splitting the buns in half, I sliced them in half lengthwise and then sliced them again into cubes. I placed them on a baking sheet and toasted them a 350 F preheated oven for about 15 minutes. Until the cubes were toasted, but not burnt.

Once the bread had cooled I transferred it to a large bowl and added in a quart of whole milk. Using my hands I pressed the bread into the milk until all of it was absorbed.

In a medium bowl I whisked together eggs, sugar, vanilla extract, allspice and cinnamon.

Once the egg mixture was well combined I poured it over the bread mixture and then gently folded everything together. Finally I folded in the bourbon soaked raisins, adding in any bourbon that hadn’t been soaked up by the raisins as well.

I poured the mixture into 9×13 baking dish that I brushed with melted butter and baked it in a 350 F preheated oven for about 45-50 minutes.

When done, the edges of the bread pudding were brown and pulling away from the baking dish. And while the center was still a little wet, I knew that it would firm up as it cooled.

And while it cooled I made a bourbon sauce to drizzle over the bread pudding. In a medium saucepan I melted a stick of unsalted butter over low heat. I then added in sugar and an egg and whisked everything to combine. As the mixture continued to cook over low heat I constantly stirred it until it began to thicken. At this point I removed it from the heat and whisked in bourbon.

The sauce was the perfect topping to a slice of the bread pudding, all that was missing was a scoop of vanilla ice cream!


Bourbon Bread Pudding

Ingredients:

Bread Pudding:

1 cup raisins

1/4 cup whiskey bourbon

8 hot dog buns, cut into cubes

1 quart whole milk

3 large eggs

2 cups sugar

2 tablespoons vanilla extract

1/4 teaspoon allspice

1/2 teaspoon cinnamon

3 tablespoons unsalted butter, melted


Bourbon Sauce:

1 stick unsalted butter

1 cup sugar

1 egg

1/2 cup bourbon whiskey


Directions:

In a small bowl combine the raisins and 1/4 cup of bourbon whiskey, cover and let sit until the raisins soak up most of the liquid. At least one to two hours.

Preheat oven to 350 F.

Place the cubes of bread on a baking sheet and toast in the oven until crispy, about 12 – 15 minutes. If you find the bread still soft on the bottom, flip and bake for a few more minutes.

Remove the bread from the oven and let cool for a few minutes before transferring to a large bowl. Add the milk and using your hands press the bread into the milk until it’s absorbed.

In a medium bowl whisk the eggs together and then whisk in the sugar, vanilla extract, allspice and cinnamon. Pour this over the bread mixture.

Fold the two mixtures together until well incorporated and then gently stir in the bourbon soaked raisins, adding in any bourbon that wasn’t soaked up by the raisins.

Pour the melted butter into the bottom of 9×13 baking dish and using a pastry brush (or napkin) coat the bottom and sides of the dish with the butter. Pour the bread pudding mixture into the dish and bake in the oven for 40 – 50 minutes.

The bread pudding is ready when the edges begin to brown and pull away from the sides of the baking dish.

Remove from the oven and let cool.

While the bread pudding is cooling you can make the bourbon sauce.

In a medium saucepan melt the butter over low heat. Add the sugar and egg and whisk to blend it. Continue cooking the mixture over low heat, stirring constantly until the mixture has thickened. It should be able to coat the back of a spoon. Remove the mixture from the heat and whisk in the bourbon.

Serve the bread pudding with the bourbon sauce drizzled over it.

Recipe modified from Simply Recipies