Almond Tiramisu

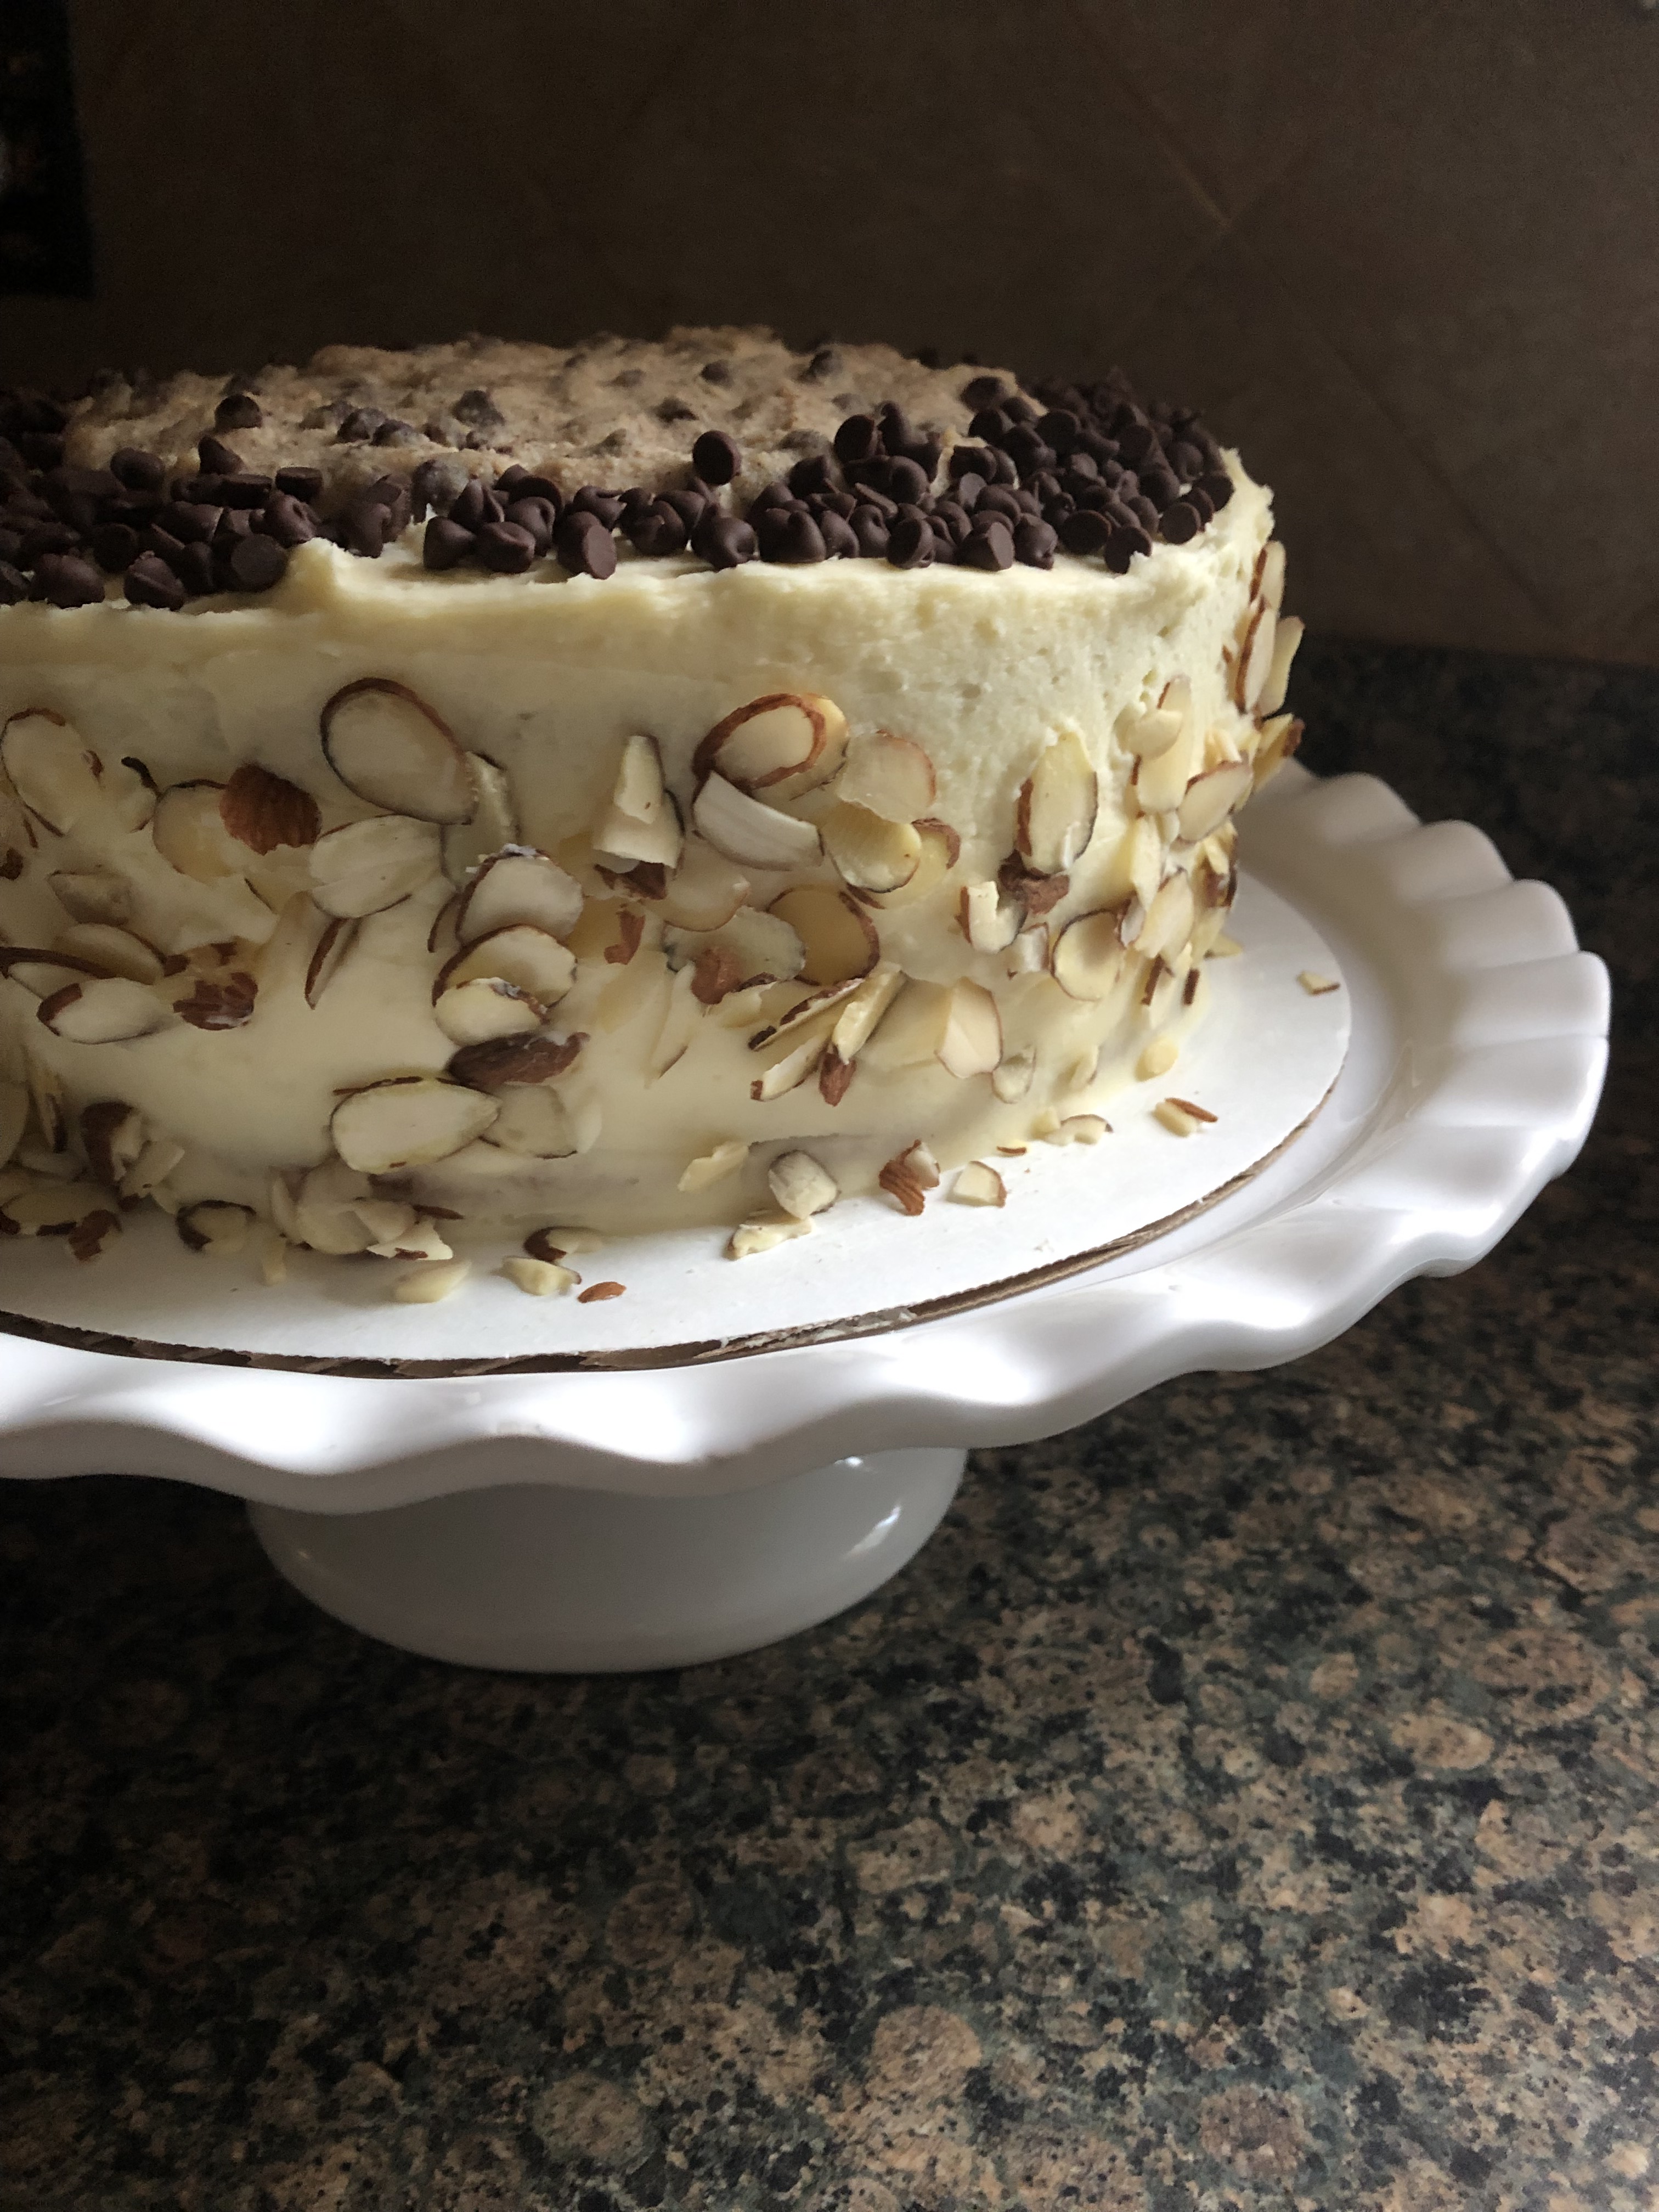
If you love the flavor of a Good Humor Toasted Almond Bar you are going to love this dessert. The recipe calls it a Toasted Almond Cream Cake but I am calling it an Almond Tiramisu since the ingredients and assembly are quite similar. Where it differs is that instead of dipping the ladyfingers in a coffee mixture you dip them in a milk mixture that contains Amaretto. You can use any type of milk that you like as well. As with your traditional Tiramisu this one also has a layer of mascarpone cream, it’s just given an extra almond flavor kick with almond extract and some more Amaretto. There’s also a layer of coarsely chopped almond slices and Amaretti cookies, that also get used for the topping.

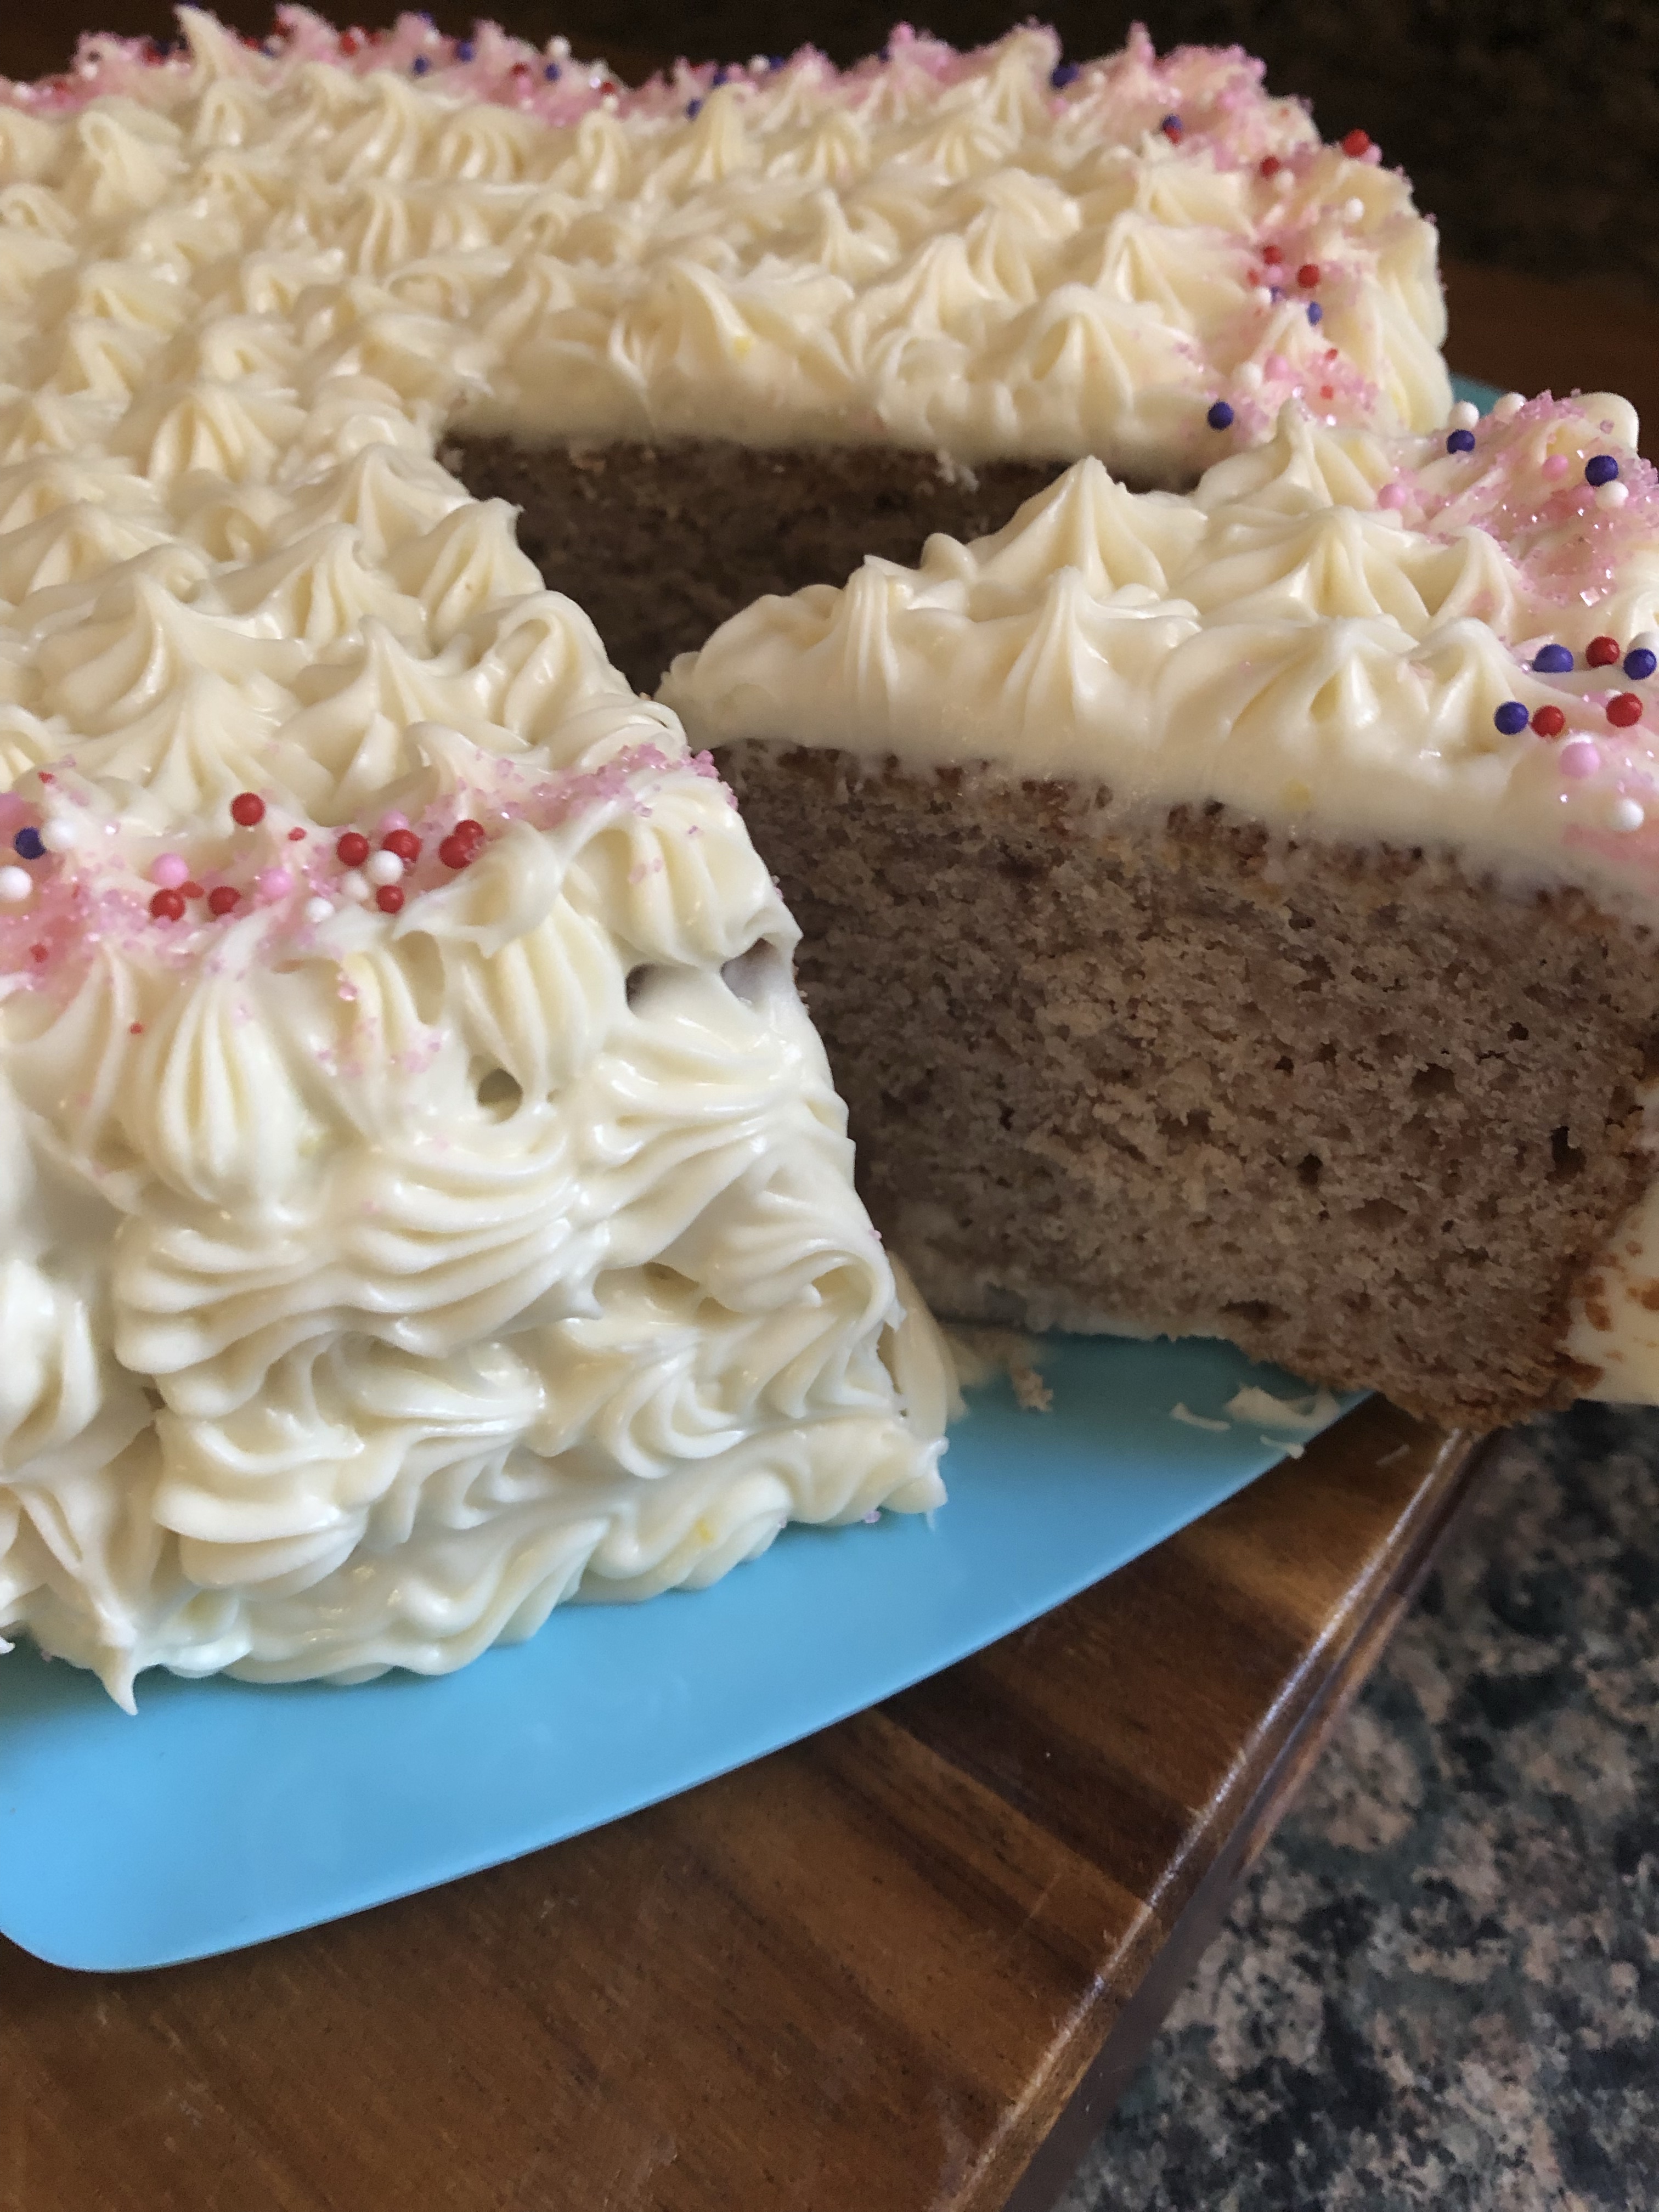
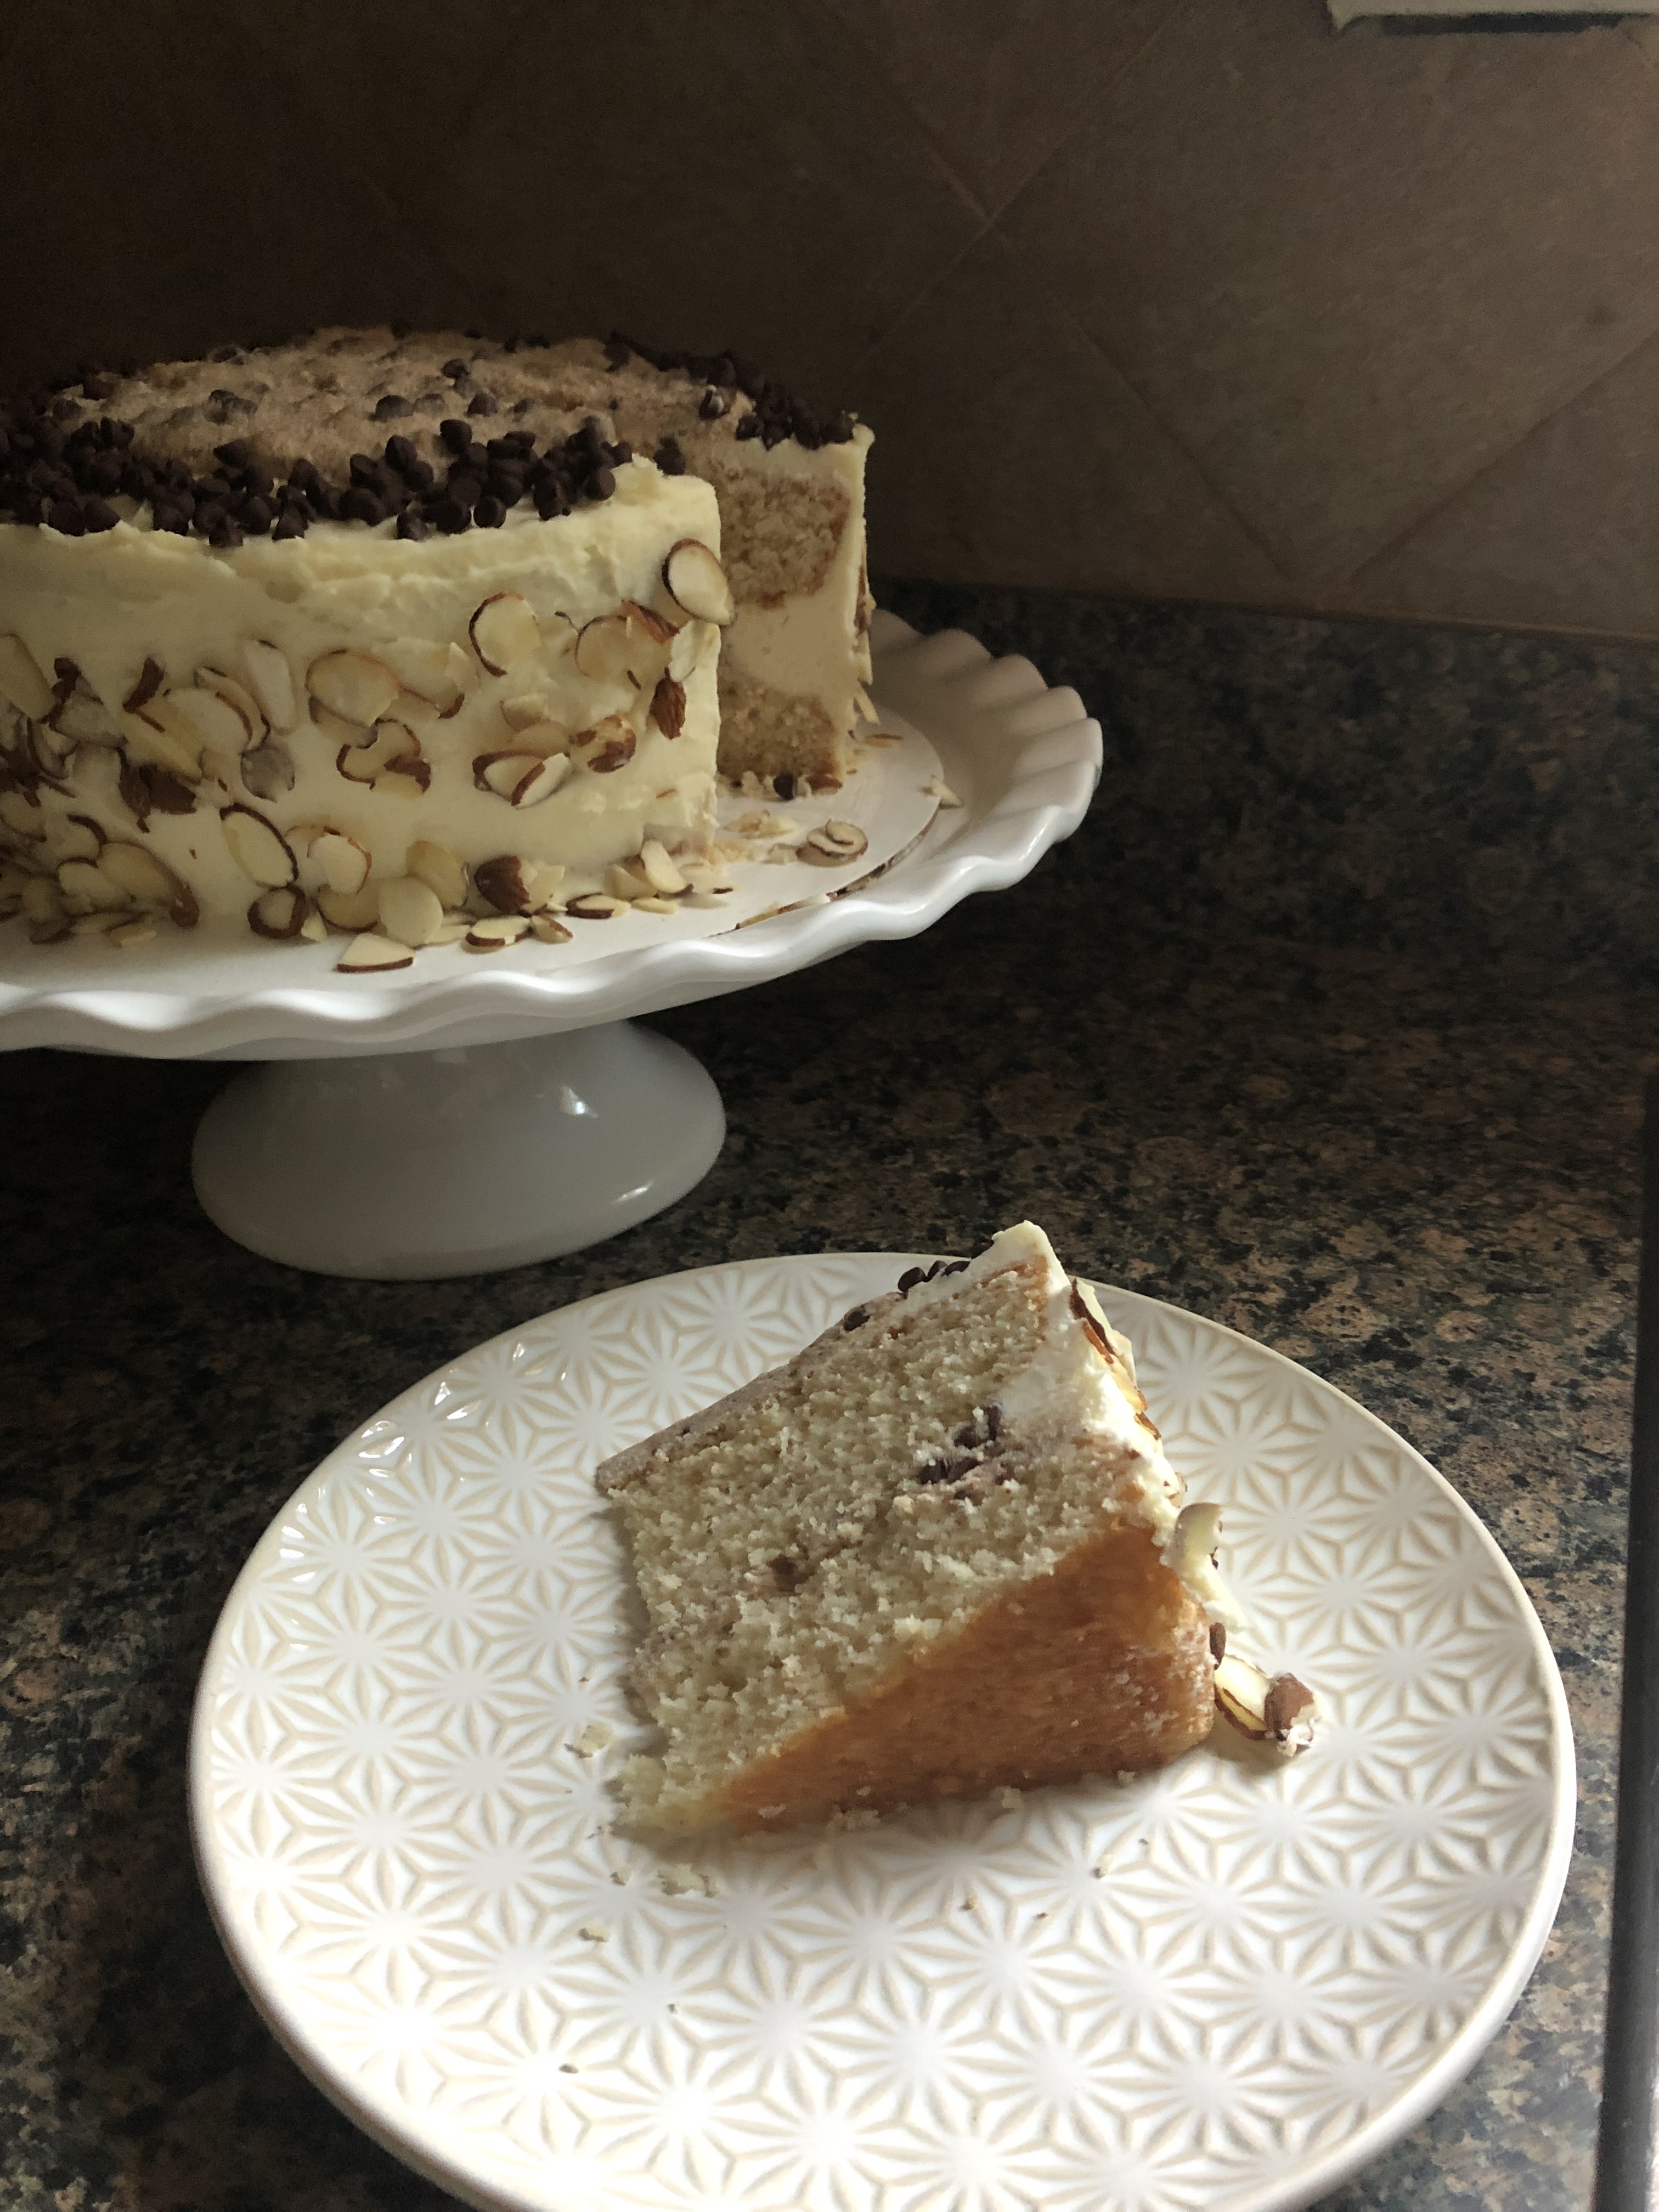
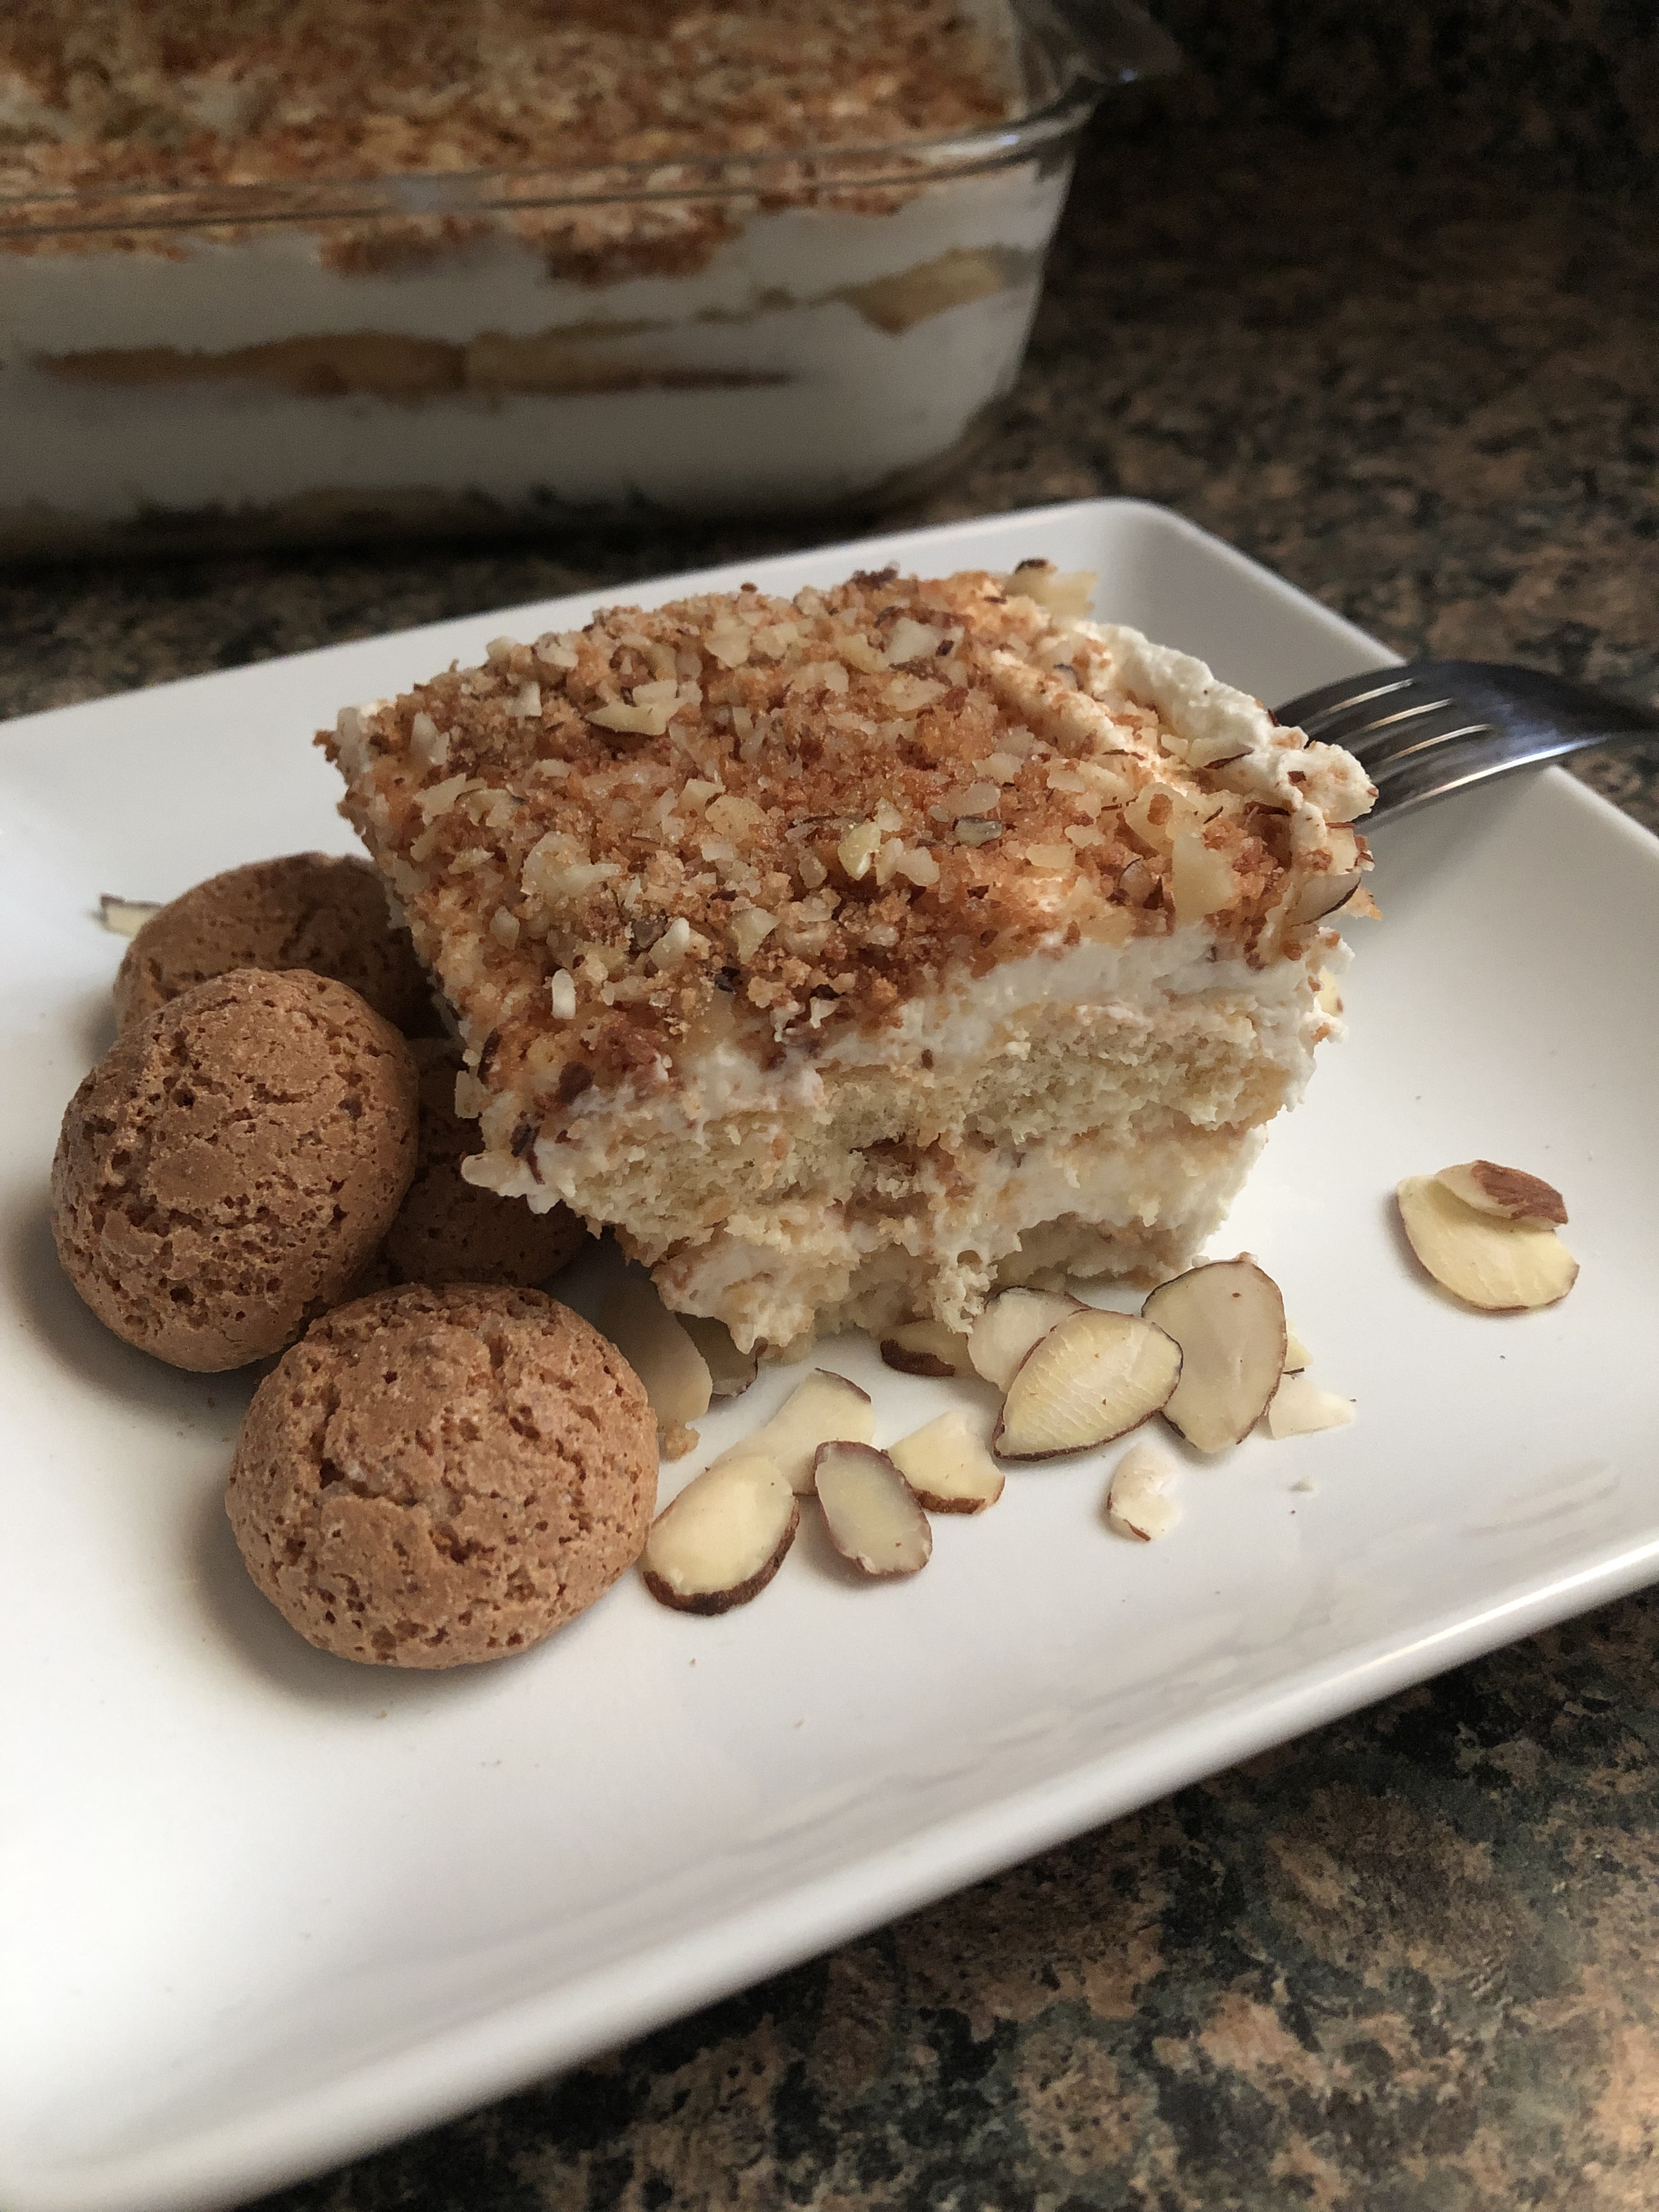
When you slice into it, you can see those perfect layers of deliciousness that you get from any Tiramisu… The layers of ladyfingers and cream.

Looking for more variations on Tiramisu. Check out these recipes:

Salted Caramel Tiramisu

Pumpkin Gingersnap Tiramisu

Pumpkin Tiramisu

White Chocolate Blackberry Tiramisu
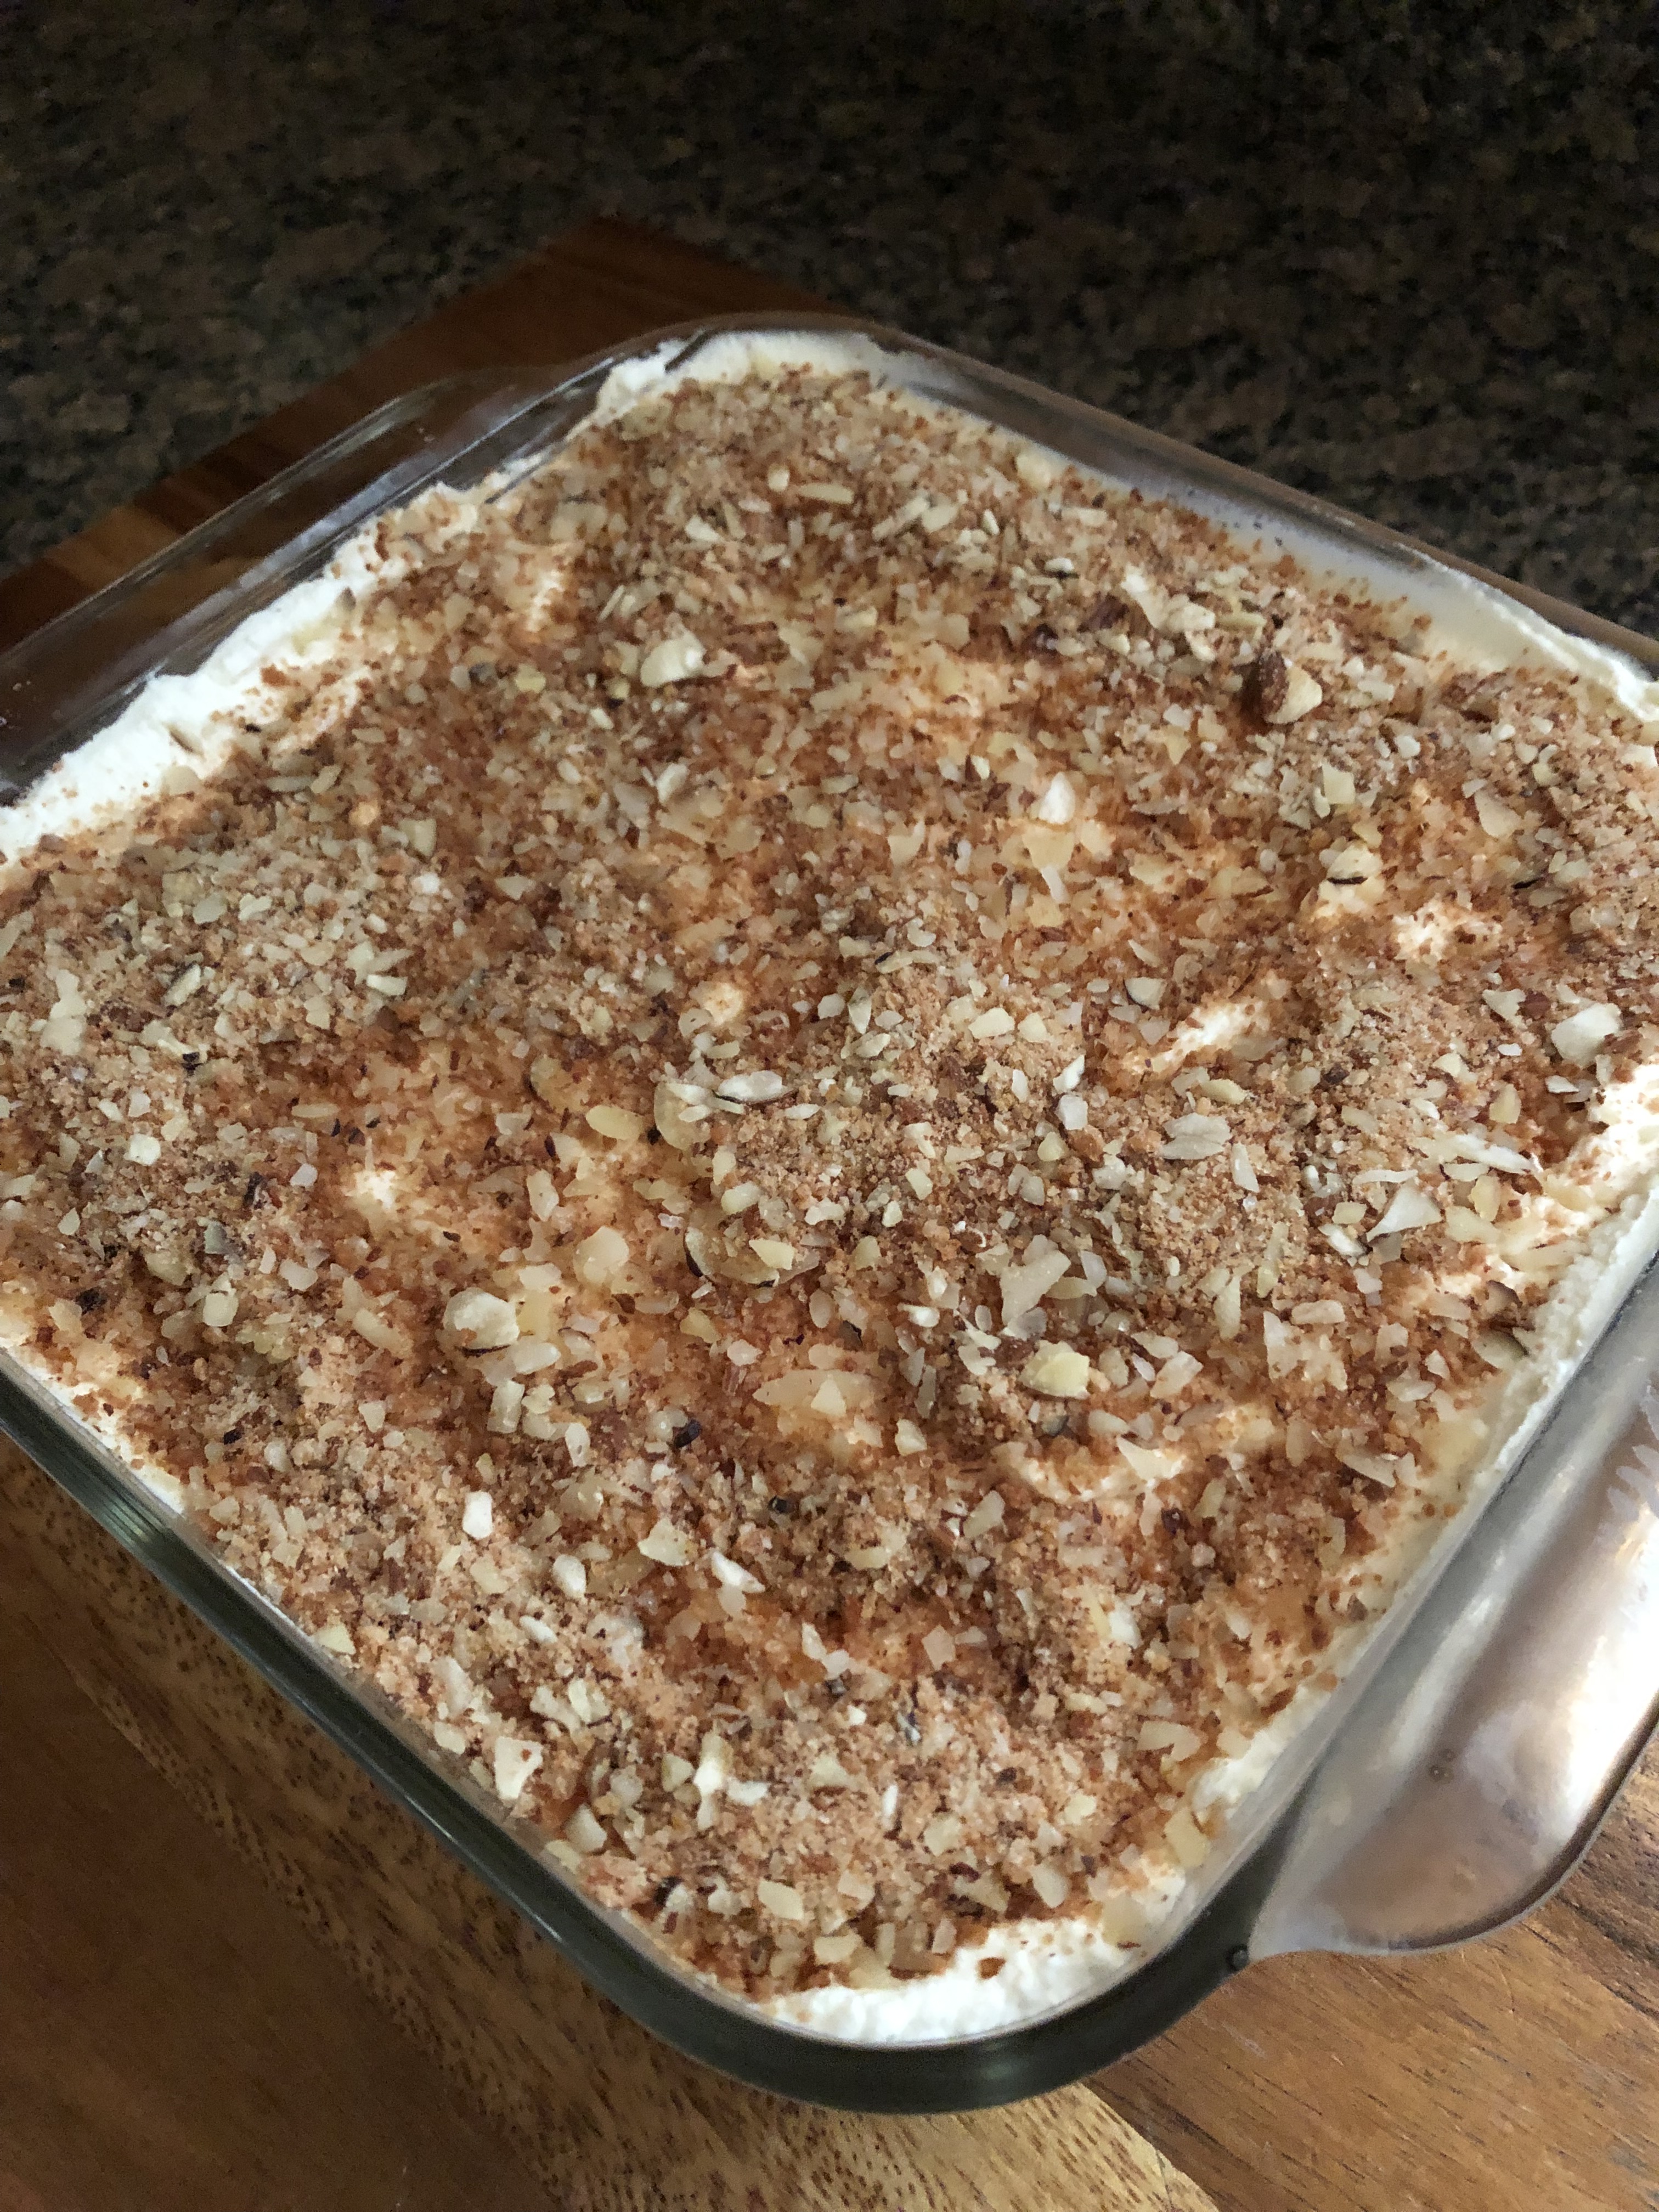
Tiramisu

Tiramisu Pudding Cakes

Tiramisu Cheesecake

Almond Tiramisu

Ingredients:

7oz. package of Ladyfingers – about 24 cookies

Mascarpone Cream:

8 ounces mascarpone cheese, at room temperature

1 teaspoon almond extract

1 cup heavy cream

1/4 cup sugar

1/2 teaspoon vanilla extract

1 tablespoon Amaretto liqueur

Amaretti Topping:

20 Amaretti cookies*

1/2 cup sliced almonds

Dipping Mixture:

1 1/2 cups milk**

1 tablespoon sugar

1/2 teaspoon vanilla extract

1 tablespoon Amaretto liqueur

*If you can’t find Amaretti cookies, you can substitute with almond cookies or biscotti

**I used whole milk, but you can substitute with the milk of your choice

Directions:

In the bowl of a food processor add the Amaretti cookies and the sliced almonds and pulse until both are coarsely chopped. Set aside.

Mascarpone Cream: In a medium bowl stir together the mascarpone and almond extract until well combined. In another bowl beat the heavy cream along with the sugar, vanilla extract and Amaretto with hand mixer on medium speed until soft peaks form. Fold a quarter of the whipped cream mixture into the mascarpone mixture until incorporated. Continue to fold in the whipped cream mixture in batches until the two are well combined and no streaks remain. Set aside.

Dipping Mixture: In a shallow bowl combine the ingredients for the dipping mixture and whisk together.

To Assemble: Dip the rounded side of half of the ladyfingers in the dipping mixture and then arrange them in the bottom of an 8 x 8 – inch square baking dish. Top with half of the mascarpone cream and then sprinkle with Amaretti / almond mixture. Repeat the layers once more, ending the remaining Amaretti / almond mixture. Cover and refrigerate for at least 4 hours, or overnight. Slice into squares to serve.

Recipe from Mangia Bene Pasta

One Bowl Baked Oatmeal

My go-to breakfast as of late has been 2 slices of wheat bread with peanut butter along with a bowl of fruits and veggies. On the weekend’s I cheat a little and the peanut butter becomes butter with a schmear of jam on top. I’ve been wanting to cut back on eating so much bread though and was trying to think of something else that would be quick and filling to eat. I used to eat hard-boiled eggs, but sometimes they become a little hard to swallow. And while I love oatmeal, I just don’t feel like making it every day and I haven’t gotten my measurements just right to make a big batch over the weekend to have for the week. I finally found something though that is delicious, healthy, and filling… Baked Oatmeal. I made this on a Sunday afternoon and I had breakfast for the entire week. I just heated in the microwave for about :45 seconds before enjoying. The first time I made it I used frozen mixed berries and the second time, a diced apple. Both versions were equally delicious.

A couple things to note about the recipe below, for the applesauce, instead of buying a large jar I opted to buy a 6-pack of individual servings and just used 1 to make the oatmeal. Instead of maple syrup you could use an equal amount of brown sugar. If you want a little crunch to your oatmeal squares you could top the oatmeal with a 1/2 cup of chopped nuts of your choosing before baking. The possibilities are endless so you don’t have to worry about getting bored quickly eating the same thing every day.

One Bowl Baked Oatmeal

Ingredients:

1 3/4 cups milk (of your choice)

2 large eggs

1/2 cup maple syrup

1/4 cup unsalted butter, melted and slightly cooled

1/4 cup unsweetened applesauce*

3 cups old-fashioned oats

1 teaspoon baking powder

1 teaspoon cinnamon

1 teaspoon vanilla extract

1/4 teaspoon salt

1 1/2 cups fruit of your choice (e.g.: mixed berries (fresh or frozen – do not thaw), diced apple, bananas, etc.)

Directions:

Preheat the oven to 350 F. Spray a 9×9 – inch backing dish with nonstick spray and set aside.

In a large bowl, add all the ingredients and whisk together until well incorporated. Pour into the prepared dish. Bake in the preheated oven for 35 minutes, or until the center appears just set. The oatmeal will be soft. If you want your oatmeal to be drier and more solid, bake it until the center is set.

Cool for 5 minutes before slicing and serving. Cover leftovers and refrigerate for 1 week.

Recipe from Sally’s Baking Addiction

White Chocolate Raspberry Mousse Pie

Happy Pi Day! Last year for Pi Day I made a delicious Peanut Butter & Chocolate Mousse Pie, this year, coincidentally, I made another mousse pie in honor of the day, a White Chocolate Raspberry Mousse Pie. So, how did I come up with this flavor? Well, while brainstorming for a pie flavor to make I decided to make a spin on my favorite cheesecake from The Cheesecake Factory, a white chocolate raspberry cheesecake. The end result, a delicious take on my favorite cheesecake that’s much lighter and doesn’t require baking (except for the crust that is).

I will say, I did have some concerns about making this pie. I opted to use gelatin to set the mousse and I was concerned about two things happening; that it would give the pie a weird texture and/or that it wouldn’t work and that the pie wouldn’t set. Neither happened I am happy to say. I did leave the pie out of the fridge for a little too long and it got a little too soft, but, placing it back in the refrigerator solved that problem quickly.

White Chocolate Raspberry Mousse Pie

Ingredients:

For the crust:

24 Oreos

4 tablespoons unsalted butter, melted

For the Raspberry Sauce:

12oz. fresh raspberries

3 teaspoons water, divided

1 teaspoon cornstarch

2 tablespoons sugar

For the White Chocolate Mousse:

2 tablespoons orange juice

1 teaspoon unflavored gelatin

1 1/2 cups heavy cream, divided

6 oz. white chocolate, chopped*

For the whipped cream topping:

1/2 cup heavy cream

1 tablespoon Confectioners’ sugar

1/2 teaspoon vanilla extract

*Don’t use white chocolate chips, they don’t melt the same as white chocolate and you will end up with a mousse that isn’t smooth.

Directions:

Preheat oven to 350F. Spray a 9-inch pie plate with non-stick spray and set aside.

For the Oreo Crust: In the bowl of a food processor, pulse the Oreos until they are fine crumbs. Add the melted butter and pulse a few times to combine. Transfer to the prepared pie dish and press the crumbs in an even layer on the bottom and up the sides of the pie dish. Bake in the preheated oven for 10 minutes. Transfer to a wire rack and let cool completely.

For the Raspberry Sauce: In a small bowl stir together the cornstarch and 2 teaspoons of the water, set aside. In a small saucepan combine the raspberries, the remaining teaspoon of water and sugar over medium heat. Stir and mash the raspberries. Once the mixture begins to simmer stir in the cornstarch mixture. Let the mixture simmer for a few minutes to thicken. Strain through a fine mesh sieve and allow the sauce to cool completely.

For the White Chocolate Mousse: In a medium saucepan add the orange juice and sprinkle the gelatin on top. Let this sit for 5 minutes. Add 3/4 cup of the heavy cream and heat over low heat stirring until the gelatin has dissolved. Add the chopped white chocolate and continue to stir until the chocolate has melted and the mixture is smooth. Transfer to a bowl and let cool for a few minutes before refrigerating. Refrigerate for about 30 minutes, stirring occasionally, until the mixture has thickened but isn’t set. Beat the remaining 3/4 cup of the heavy cream until stiff peaks form and then gently fold into the white chocolate mixture.

To assemble: Spoon half of the white chocolate mousse into the cooled Oreo crust and drizzle with the cooled raspberry sauce. Repeat with the remaining white chocolate mousse and more of the raspberry sauce (you want to leave some of the raspberry sauce to drizzle on top once you top the pie with whipped cream). Using a toothpick swirl the sauce into the mousse. Refrigerate for at least an hour.

Before serving, make the whipped cream. Combine the heavy cream, confectioners’ sugar and vanilla in a medium bowl and beat with a hand mixer on medium speed until stiff peaks form. Transfer to a piping bag fitted with a large star tip (or to a resealable bag and snip off the corner) and pipe dollops of the whipped cream along the edges of the pie. Finish by drizzling the remaining raspberry sauce over the whipped cream.

Keep the pie refrigerated until serving. Store leftovers in the refrigerator.

Granny Square Cardigan

While I’ve been crocheting for over 10 years it wasn’t until recently that I learned how to make a granny square. A little backwards since learning how to make a granny square is usually one of the first things you learn to make when you start crocheting. When you are pretty much self-taught though you learn things as you go and as you need. So, why did I finally learn? Well, I was asked if I could make a granny square cardigan and since I am always up for a challenge and I like to learn new things I said yes.

First though I had to learn how to make a granny square. Once I found a pattern that was simple enough to follow I used some extra yarn from my stash to test it out a few times to make sure I had the hang of it.

Next, I had to finalize the colors. The person who I was making it for had a color scheme in mind from a cardigan they already saw. They were looking for pastel colors so after going back and forth with different options she decided on the colors below.

Now, the fun part. I started making the granny squares. I made a few and sent her a picture to make sure she liked the colors once they were all put together.

Once I got the greenlight that those looked good I went ahead and continued to crochet more. Truth be told I didn’t have an exact pattern to follow for how many squares I needed. I looked at various patterns and pictures to get an idea. I knew that I had to make the equivalent to a size medium. From doing my research I initially went with making 30 squares and I placed them in the layout below. I had a feeling that it wasn’t completely right but I decided to move on to another part of the cardigan… the sleeves.

Normally with granny square cardigans the sleeves are made using granny squares as well, but, the person I was making it for requested the sleeves to be solid white and they didn’t want them to be granny squares. So, more research. I knew that when it came to making sleeves they needed to be tapered to accommodate a wider upper arm to a narrower wrist. But, I didn’t want to just wing it and start crocheting. I was able find a sweater pattern that had the sleeves broken down exactly as I needed them. The width on top was perfect to be placed in the center of two specific granny squares. I also went ahead and crocheted two additional squares and placed them in the empty spaces I had.

I started seaming together the squares for the back of the cardigan but I still had my doubts about the layout. It just didn’t seem like it was going to fit correctly.

I ended up crocheting four more granny squares and added an additional row to the back of the cardigan so it would sit better. I then finished seaming all the other squares together and then attached the arms and seamed them together. I tried it on and it fit perfectly.

And finally, I crocheted a border around the entire cardigan to give it a more finished look.

I am happy to say that the person I made this for was very happy with it. I may make one for myself one of these days!

Strawberry Cake with Lemon Cream Cheese Frosting

With Valentine’s Day just around the corner you may be on hunt for a pink or red dessert. You can always turn to a tried and true Red Velvet cake but what about something a little different like a Strawberry Cake. Now, strawberry cake can pose some issues. Basically, how to get the strawberry flavor into the cake without it ending up being a soggy mess thanks to the extra moisture of the strawberries. You could dice up some strawberries and add them to your batter, but, that’s not really a strawberry cake. There’s also the option of reducing the strawberries into a syrup and then incorporating that into your batter. But, a much more simpler way is to use freeze-dried strawberries. For this cake, I simply processed the strawberries in my food processor to turn them into a powder that I then incorporated with the rest of my dry ingredients.

Once my batter was ready I decided to bake it in a 6-inch heart pan. If you don’t have a heart pan on hand you can bake it in a 6-inch round cake pan instead. You could also do an 8-inch pan, but, your cake won’t have as much height to it and you will also have to adjust your baking time.

Typically, most strawberry cakes are topped with a strawberry buttercream. I opted not to do that for one simple reason. I only had enough freeze-dried strawberries to make the cake! So, I did a little brainstorming and thought that a Lemon Cream Cheese Frosting would work well with the cake. I came up with a frosting that still has the flavor of cream cheese with just the right amount of lemon. I literally could eat this frosting by the spoonful.

To frost the cake, I decided to go a little fancy and use a small star tip to decorate and then sprinkled some Valentine’s Day sprinkles around the perimeter.

And I am happy to say that the cake and frosting worked well together! You can’t tell from the picture, but, my cake was a very light pink. If you want a cake with a deeper pink or red hue you can add in some food coloring once you are done making the batter to get to the color you want.

Strawberry Cake with Lemon Cream Cheese Frosting

Ingredients:

For The Cake:

1 cup flour

1/2 teaspoon baking powder

1/2 teaspoon baking soda

1/2 teaspoon Kosher salt

1 oz. freeze dried strawberries

1/2 cup sugar

6 tablespoons unsalted butter, at room temperature

1 large egg, at room temperature

1/3 cup sour cream, at room temperature

1/4 cup milk, at room temperature

1/2 tablespoon lemon zest

2 teaspoons vanilla extract

For the Frosting:

1 8oz. block cream cheese, at room temperature

1/4 cup unsalted butter, at room temperature

2 cups confectioners’ sugar

1 tablespoon lemon juice

2 teaspoons lemon zest

1 teaspoon vanilla extract

Directions:

For the Cake:

Preheat oven to 350 F. Spray a 6-inch pan with baking spray or coat with butter and then dust with flour.

Using a food processor pulse the strawberries into a powder. 

Whisk together the strawberry powder, flour, baking powder, baking soda and salt together in a medium bowl and set aside.

In the bowl of a stand mixer cream together the butter and sugar on medium speed. Add the egg and beat until well combined. Add in the sour cream, milk, lemon zest & vanilla and continue mixing until well combined. Add in the flour mixture and beat until just combined.

Transfer the batter to the prepared pan and bake 30 to 40 minutes, or until a cake tester inserted in the center comes out clean.

Let cool in the pan for 10 minutes and then transfer to a wire rack to cool completely.

For the Frosting:

Using a handheld mixer (or stand mixer) beat the cream cheese and butter together on medium speed until smooth and creamy. With the mixer speed on low add in the sugar until well incorporated. Raise the speed to medium and add in the lemon juice, lemon zest and vanilla extract until all incorporated.

Café Mocha Bombs

Today I am bringing you a twist on the Hot Cocoa Bombs that were popular last year (and continue to be), Café Mocha Bombs. While these treats are pretty much made the same way that I made my Hot Cocoa Bombs, the two big differences are that instead of having hot cocoa mix inside of them they have powdered coffee creamer and they are melted in hot coffee instead of hot milk.

While you could stick with the traditional café mocha flavor when making these, chocolate and coffee, you can get creative with the flavors and be your own barista right at home. For the one’s I made I went with the seasonal flavors of peppermint and gingerbread as well as a pumpkin spice and salted caramel.

After making the chocolate shells for these I placed half of them in cupcake liners. The cupcake liners make it easier to work and they also offer a nice presentation for the café mocha bombs. In the shells in the liners I added in a tablespoon of powdered coffee creamer in each. I then added in my flavors. For the peppermint ones, I added in crushed peppermint candy, for the pumpkin spice I added in pumpkin spice seasoning, for the salted caramel a soft caramel candy and a few grinds of sea salt and finally for the gingerbread flavor I added in homemade gingerbread spice (recipe below).

I dipped the remaining chocolate shells in melted chocolate and placed them on top of the filled halves. First though I made sure to make note of what each one was filled with. I then decorated the top of them to reflect the flavor inside. I found gingerbread and pumpkin spice flavor candy melts at my local craft store. And I also had mini gingerbread men silicone molds at home. I melted about a 1/4 cup of the gingerbread melts in the microwave and filled two of the molds halfway and then placed it in the freezer. In a few minutes, I had to gingerbread flavored gingerbread men to place on top of my Gingerbread Café Mocha Bombs. I drizzled the top of each with the remaining melted melts and then placed the gingerbread man on top of each. For the pumpkin spice one I simply melted some of the flavored melts and drizzled it on top. For the peppermint and salted caramel one’s I drizzled the top of those with some of the remaining melted chocolate and topped those with crushed peppermint candy and a piece of caramel and a few grinds of seal salt, respectively.

Another flavor you could do is cinnamon or you can even fill the café mocha bomb with your favorite mini candy bar. And while I used traditional powdered coffee creamer, you could also amp up the flavor of yours by adding in flavored powdered creamer. I wouldn’t say the possibilities are endless, but, you can really treat yourself to a one of a kind treat with these.

Café Mocha Bombs

Ingredients:

12oz. chocolate melts

6 tablespoons powdered coffee creamer

For the flavors add the following to each bomb:

Pumpkin Spice:

1/2 heaping teaspoon pumpkin pie spice

Gingerbread Spice:

1/2 heaping teaspoon gingerbread spice*

*To make your own gingerbread spice combine 2 tablespoons each ground ginger and cinnamon, 2 teaspoons ground allspice, 1/2 teaspoon each ground nutmeg and black pepper and 1/4 teaspoon ground cloves

Salted Caramel:

1 to 2 soft caramel cut in half

1/4 teaspoon sea salt

Peppermint:

1/2 to 1 teaspoon crushed peppermint candy

Specialty Item:

2- 6 Hole Silicone Mold

Directions:

Melt the chocolate in the microwave for 30 second intervals, stirring between each, until the chocolate is melted and smooth.

Add a tablespoon of the melted chocolate to each crevice and using a pastry brush spread the chocolate evenly around each crevice. Place on a baking sheet and freeze for 5 minutes.

Once the chocolate has set, add more melted chocolate and spread it evenly again and freeze for an additional 5 minutes.

Once the chocolate shells are set unmold them and place half of them in cupcake liners.

Fill the shells in the liners with a tablespoon each of the powdered coffee creamer and then add desired flavorings to each.

You should have some melted chocolate leftover. If it’s beginning to set pop it in the microwave for about 5-10 seconds to re-melt. Stir. Dip the other half of the shells in the melted chocolate and place on top of the filled shells.

Transfer the remaining melted chocolate to a piping bag and snip off the end. Drizzle the chocolate on top of the Café Mocha bombs.

Some ideas to decorate the top of the Café Mocha bombs to know which is which. For the peppermint add some additional crushed peppermint candy to the top. For the salted caramel add an additional caramel cut in half with some additional salt. For the gingerbread, a small gingerbread cookie that can be removed before melting in coffee. And for the pumpkin, melted orange candy melts or a piece of candy shaped like a pumpkin.

Store in an airtight container until ready to use.

To make, place the Café Mocha Bomb in a mug and top with hot coffee. Stir to melt the chocolate and enjoy!

Recipe first appeared on Bead Yarn & Spatula

Cannoli Cake

Happy Holidays! Are you in the throes of holiday baking and eating your way through more sweets than you would like to admit? Well, today I am bringing you a cake that you would be a nice addition to your holiday dessert table and to be honest is my favorite cake flavor… A Cannoli Cake! And it doesn’t skimp on the flavors and ingredients of the delicious handheld dessert… Ricotta and chocolate chips.

The cake itself is made with a French Vanilla box mix (I used a Duncan Hines mix) and the cannoli flavors comes from the filling made with ricotta cheese, cinnamon, three different extracts, confectioners’ sugar and of course chocolate chips. It’s all topped off with a mascarpone cheese frosting and sliced almonds and mini chocolate chips are used to decorate it. It sounds like a lot, but, trust me it’s not. All of the flavors/ingredients work well together and you won’t feel guilty for enjoying a slice because it’s just so good!

Cannoli Cake

Ingredients:

1 package French Vanilla Cake Mix, plus additional ingredients to prepare per packaging

Filling:

2 cups ricotta cheese

1/2 cup confectioners’ sugar

2 teaspoons cinnamon

1 teaspoon almond extract

1 teaspoon rum extract

1 teaspoon vanilla extract

1/3 cup mini chocolate chips

Frosting:

2 8oz. packages mascarpone cheese, at room temperature

3/4 cup confectioners’ sugar

2 teaspoons almond extract

1 teaspoon vanilla extract

2 tablespoons whole milk

1 cup sliced almonds

mini chocolate chips, for top of cake

Directions:

Prepare and bake cake mix per package directions using two 8-inch round baking pans sprayed with baking spray. Cool in pans for 10 minutes and then transfer to wire racks to cool completely.

Make the filling: In a large bowl fold together the ricotta cheese, confectioners’ sugar, cinnamon, and all extracts until well incorporated. Stir in the chocolate chips. Set aside.

Make the frosting: In another large bowl, using a hand mixer on medium speed, beat the mascarpone cheese, confectioners’ sugar, almond & vanilla extracts and milk until creamy.

Place one of the cake layers on a cake board or serving plate and spread 1 cup of the filling over it. Top with the other cake layer and spread the remaining frosting over the top of the cake within 1inch of the edge. Frost the sides and top edge of the cake with the frosting.

Press the almonds on the sides of the cake and the chocolate chips around the edge of the top of the cake.

Refrigerate until ready to serve.

Recipe from Taste of Home

Cookie Palooza: Peppermint Hot Chocolate Cookies

I hope you have enjoyed this year’s Cookie Palooza. I’m closing it out with a cookie that is inspired by my favorite holiday beverage. While I’m not a coffee drinker, around this time of the year I make frequent visits to Starbucks to get a Peppermint Hot Chocolate. And while you can order one any time of the year, there’s just something extra special about it during the holidays. I love having one while I am running holiday errands or doing some Christmas shopping.

To get the flavors of a peppermint hot chocolate, I added peppermint extract to chocolate cookie dough. I baked the cookies for 10 minutes and then removed them from the oven and pressed a large marshmallow cut in half in the center. I then returned the cookies to the oven to bake for an additional 2 minutes. I opted to use one large marshmallow as opposed to the traditional mini ones used in hot chocolate so that I could press them in and get the cookies back in the oven quickly. When you remove them from the oven after the 2 minutes the marshmallows will be soft, but they will still be puffy, they will flatten a bit as the cookies cool though so don’t be tempted to press them down. I let them cool on the pan for about a minute before transferring them to a wire rack to cool completely.

Once the cookies were cool it was time to decorate them and amp up the peppermint hot chocolate flavor. I crushed peppermint candy (I used starlight mints, only because I couldn’t find candy canes) and melted semi-sweet chocolate chips in the microwave. I transferred the melted chocolate to a piping bag and snipped a small piece off the end. I drizzled each cookie with the melted chocolate and then sprinkled them with the crushed peppermint candy. I let the chocolate set for a few minutes and then popped the cookies in the refrigerator for about 10 minutes so it could set completely.

And I must say, these tasted spot on to my favorite holiday beverage!

Peppermint Hot Chocolate Cookies

  • Servings: 30 Cookies
  • Print

Ingredients:

2 cups flour

1/2 cup unsweetened cocoa powder

1 teaspoon baking soda

1/2 teaspoon salt

3/4 cup sugar

3/4 cup light brown sugar

2 sticks unsalted butter, at room temperature

2 large eggs

1 teaspoon vanilla extract

1 teaspoon peppermint extract

15 large marshmallows, cut in half

1 cup semi-sweet chocolate chips

1/2 cup crushed peppermint candy (either candy canes or starlight mints)

Directions:

Preheat the oven to 350 F. Line two baking sheets with parchment paper and set aside.

In a medium bowl whisk together the flour, unsweetened cocoa powder, baking soda and salt.

In the bowl of a stand mixer or in a large bowl if using a hand mixer, beat both sugars and butter on medium speed until creamy. Add the eggs one at time, beating well after each addition. Then beat in both extracts.

With the mixer on low, add in the flour mixture and beat until combined.

Using a cookie scoop, drop the dough onto the prepared baking sheets 2 inches apart. Bake in the preheated oven for 10 minutes. Remove from the oven and press half of a marshmallow in the center of each cookie. Return to the oven for an additional 2 minutes.

Let the cookies cool on the pan for 1-2 minutes before transferring to a wire rack to cool completely.

Once the cookies are cooled, melt the chocolate chips in the microwave. Microwave for :30 second intervals, stirring between each, until the chocolate is smooth.

Transfer the melted chocolate to a piping bag or a resealable bag and snip off the end and drizzle the chocolate over the cookies and then sprinkle with the crushed peppermint candy. Let the chocolate set before enjoying or storing. You can place them in the refrigerator for 5-10 minutes to speed up the process.

Store in an airtight container.

Recipe first appeared on Bead Yarn & Spatula

Cookie Palooza: Browned Butter Spice Cookies

On this fourth day of Cookie Palooza I am bringing you a variation on the classic chocolate chip cookie. Now, I must say chocolate chip cookies are one of those baked goods that once you find your favorite recipe it becomes your go-to. I personally have two or three of them. A traditional chocolate chip cookie recipe and then two others that produce a nice twist on the classic. Today I am bringing you a version that some might say is nowhere near what a chocolate chip cookie should be… A Browned Butter Spice Cookie.  

Let’s talk about the flavors that go into this cookie. First, browned butter. To make browned butter you are cooking butter just beyond its melting point. This produces a nutty flavor that is just not possible to get by using softened butter. A word to the wise though, it’s best to cook the butter on medium-low heat and with a cover on your saucepan. Melted butter can pop and shoot-up pretty high and make quite the mess. Along with cinnamon, ginger and nutmeg there’s also a splash of spiced rum that really ups the ante for the spice in these cookies. If you don’t have spiced rum you could sub it with vanilla extract or regular rum and just add a little extra of each of the spices. Finally, dark chocolate chips. The dark chocolate is a nice balance to the spice in these cookies. Semi-sweet would just be too sweet and the flavors wouldn’t work well together.

As with the Gingersnaps from yesterday, the cookie dough for these cookies needed to be refrigerated prior to baking. I did the same thing again though. I rolled the dough into balls and then refrigerated them as opposed to refrigerating the entire bowl of cookie dough.

I then baked them in a 350 F preheated oven and then transferred them to a wire rack to cool completely.

The end result… A cookie with a nice balance of spice and sweetness.

Browned Butter Spice Cookies

  • Servings: About 2 dozen
  • Print

Ingredients:

1 stick unsalted butter, cubed

1 cup light brown sugar

1 large egg

1 tablespoon spiced rum

1 1/4 cups flour

1 1/2 teaspoons cinnamon

1/2 teaspoon baking soda

1/4 teaspoon salt

1/4 teaspoon ground ginger

1/4 teaspoon ground nutmeg

1/2 cup dark chocolate chips

Directions:

Place butter in small saucepan and cover medium heat until golden brown, about 5-7 minutes. Let cool for a few minutes.

In a medium bowl whisk together the flour, cinnamon, baking soda, salt, ginger and nutmeg. Set aside.

Add cooled butter to a large bowl along with the brown sugar. Beat with a hand mixer on medium speed until blended. Add the egg and then the spiced rum. With the mixer on low, gradually add in the flour mixture until combined. Stir in the chocolate chips.

Line a baking sheet with waxed paper. Drop dough by rounded tablespoonfuls onto the prepared baking sheet. Cover with plastic wrap and refrigerate for at least 30 minutes.

Preheat oven to 350 F.

Line a baking sheet with parchment paper and placed refrigerated dough 2 inches apart. Baked for 10-12 minutes. Until cookies are set and bottoms are beginning to brown. Transfer to a wire rack to cool complete.

Store in an airtight container.

Recipe from Taste of Home

Cookie Palooza: Gingersnaps

There are quite a few flavors that are synonymous with the holidays… Peppermint, Eggnog, Cranberry, Pumpkin, and so forth. A few flavors – molasses, ginger, cloves, nutmeg and cinnamon – combine to create one of the most popular, gingerbread. For today’s Cookie Palooza recipe I am bringing you a variation on gingerbread cookies… Gingersnaps. So, what’s the difference between the two? Gingersnaps are dropped cookies that are crispy around the edges and chewy in the center whereas Gingerbread cookies are almost always shaped with cookie cutters after the dough is rolled out.

For these Gingersnaps, the dough needed to be refrigerated prior to baking. Refrigerating the dough helps to prevent the cookies from spreading too much while baking. I always find though that cookie dough is too hard to scoop once it has been refrigerated. So, I opted to shape tablespoonfuls of the dough into balls and place them on a parchment paper lined baking sheet prior to refrigerating. I let the dough chill for about 4 hours.

I then rolled the dough balls in sugar and placed them back on parchment lined baking sheets 2-inches apart…

And then baked them in a 350 F preheated oven for about 10 minutes. After letting the cookies cool on the pan for 2 minutes so they could set I then transferred them to a wire rack to cool completely.

The texture of these Gingersnaps was spot on. Crispy around the edges and chewy in the middle. And since the recipe is for a small batch (just shy of 2 dozen) you may want to double it to make sure you have enough to share or maybe some extra to make ice cream sandwiches.  

Love the flavor of gingerbread? Check out the recipes below for a Gingerbread Cake and your traditional Gingerbread Men. You could also use the cookie recipe to make your own Gingerbread House.

Gingerbread Cake

Gingerbread Men

Gingersnaps

  • Servings: About 2 Dozen
  • Print

Ingredients:

1/3 cup shortening

1/2 cup sugar

1 large egg, at room temperature

2 tablespoons molasses

1 cup flour

1 teaspoon baking soda

1/2 teaspoon cinnamon

1/2 teaspoon ground cloves

1/2 teaspoon ground ginger

1/8 teaspoon salt

Additional sugar to roll the cookie dough

Directions:

Line two baking sheets with parchment paper and set aside.

In a large bowl beat the shortening and sugar together using a hand mixer on medium speed until light and fluffy. Beat in the egg and the molasses.

In a medium bowl whisk together the flour, baking soda, cinnamon, cloves, ginger and salt.

With the mixer speed on low, gradually beat the flour mixture into the sugar mixture until incorporated.

Shape tablespoonfuls of the dough into balls and place on the prepared baking sheets 2-inches apart. Cover with plastic wrap and refrigerate for at least 4 hours.

Preheat the oven to 350 F. Scoop 1/4 cup of sugar into a small bowl. Roll each of the dough balls in the sugar and return to the baking sheets. Bake in the pre-heated oven for 8-10 minutes. Let the cookies cool on the baking sheets for 2 minutes before transferring to a wire rack to cool completely.

Store in an airtight container.

Recipe from Taste of Home