Rigatoni Pie

Don’t worry… You’re not putting pasta in a pie crust with this pie. This is a fun variation on your basic pasta, sauce and cheese dish.

You start off by boiling a pound of rigatoni pasta until it is lightly less than al dente – the minutes truly depend on the brand of pasta you buy. Once the pasta is ready, drain it and spread it on a baking sheet and toss with a tablespoon of olive oil.

Next, line a baking sheet with aluminum foil and place a 9-inch springform pan in the center. Grease the pan with a tablespoon of olive oil and began standing the rigatoni on their ends in the pan until the entire pan is filled.

Pour your favorite pasta sauce over the noodles and then sprinkle mozzarella and parmesan cheese over the sauce.

Tent the pan with aluminum foil and bake for 30 minutes in a preheated 375 F oven. Uncover the pan and bake for about another 30 minutes, until the cheese is golden brown and bubbly.

Let the pasta cool for 10 minutes and then carefully remove the ring from the pan, cut the pie and serve.


Rigatoni Pie

Ingredients:

4 cups of marinara sauce (store bought or homemade)

1 pound rigatoni

2 tablespoons olive oil

Kosher salt

1 pound mozzarella cheese, grated

2/3 cup parmesan cheese, grated


Directions:

Preheat oven to 375 F. Grease a 9-inch springform pan with a tablespoon of olive oil and place on a foil-lined baking sheet.

Bring a large pot of salted water to a boil and cook the pasta until is slightly less than al dente. Drain the pasta, spread in a single layer on a rimmed baking sheet and toss with a tablespoon of olive oil.

Stand the rigatoni on their ends in the prepared springform pan. Pour the sauce over the noodles and spread with the back of a spoon. Sprinkle with cheeses.

Tent the pan with aluminum foil and bake in the oven for 30 minutes, uncover and bake until the cheese us bubbly and golden brown, about an additional 30 minutes. Cool for 10 minutes and then remove the ring from the pan.

Recipe from Food Network


Garlicky Baked Shrimp

This is my kind of recipe… Quick, simple and foolproof. I’ve made it 3 times and each time it was perfect. What is it… Garlicky Baked Shrimp. I usually serve it with rice, but, I think it would be perfect tossed with some pasta.

A few things to note… Don’t bake for more than 7 minutes or you will overcook the shrimp and you definitely don’t want rubbery shrimp. You can broil for an extra minute or so, but, once you see the bread crumbs are a nice toasty color you’re good to go – you don’t want garlic shrimp with a burnt topping. And finally, if you like your shrimp extra garlicky, through in an extra clove of garlic or two.

Garlicky Baked Shrimp

Ingredients:

1 1/2 – 2 lbs. raw shrimp, peeled and de-veined*

6 cloves garlic, minced

3 tablespoons white wine**

Kosher salt and freshly ground black pepper

4 tablespoons melted butter***

1/2 cup Panko bread crumbs

1-2 tablespoons freshly-squeezed lemon juice

2 tablespoons fresh Italian-leaf parsley, chopped

*I buy my shrimp frozen, uncooked, peeled and de-veined. I let it sit out for a few hours to defrost and then proceed with the recipe.

**I used Chardonnay

***I used unsalted. If you choose to use salted keep that in mind when seasoning the shrimp with salt

Directions:

Preheat the oven to 425 F.

In a medium bowl combine the shrimp, garlic and white wine and toss to combine. Transfer the shrimp mixture to a 9 x 13 – inch baking dish and spread it out in an even layer. Season with salt and pepper.

Rinse out the bowl and then add the melted butter and bread crumbs. Use a fork to stir everything together. With your finger, sprinkle the bread crumb mixture evenly over the shrimp.

Bake for about 7 minutes, until the shrimp is just turning pink. Switch the oven to broiler setting (high if you have that option) and broil for 2-3 minutes. Until the shrimp are completely pink and cooked through and the bread crumbs are beginning to turn golden.

Remove from the oven and drizzle the lemon juice over the shrimp and then sprinkle the parsley.

Recipe from Gimme Some Oven Blog


Slow Cooker Sunday: A Cookbook Review and Marinara Sauce

So about two months ago while perusing in the cookbook section of my local Barnes & Noble I began scanning through some of their slow cooker cookbooks and settled on purchasing America’s Test Kitchen: Slow Cooker Revolution. I was excited to try out some of the recipes as they sounded really good. I started with the Loaded Baked Potato Soup and it was a disaster! It had no flavor and was more like heavy mashed potatoes instead of soup. I decided that I would try it again another day with less potatoes. But then I tried another recipe and it didn’t come out that great, okay, truthfully, it was horrible again. It was a Broccoli and Chicken sauce that was to be used for pasta. The sauce, made with chicken broth and wine as the base, was bitter and the chicken was dry. Yuck! So, instead of trying a third recipe – quite honestly at this point none of the recipes sounded all that great – I headed back to Barnes & Noble to see if I could return it. And luckily I was able to. And since I wasn’t in a rush, I headed back to the cookbook area and picked up another book to try out… Slow Cooker Family Favorites by Maggie Shi. And (oh boy, starting 3 sentences in a row with “and,” such bad grammar… LOL) the first recipe I tried was delish… a slow cooker marinara sauce.

To make the sauce I combined crushed tomatoes, olive oil, tomato paste, red wine vinegar, fresh basil, fresh garlic and salt in the bowl of my slow cooker.

img_0410

And then gave everything a few good stirs and set it to cook on low for seven hours. For a little extra seasoning I added a few grinds of fresh pepper and that was it.

img_0424

I ended up with about 6 cups of sauce. I decided to freeze 4 cups and used 2 cups as a dipping sauce for this Cheesy Garlic Monkey Bread that I will be posting about tomorrow!

img_0427

Slow Cooker Marinara Sauce

Ingredients:

2 28-ounce cans crushed tomatoes

2 tablespoons olive oil

2 tablespoons tomato paste

1 tablespoon red wine vinegar

2 large fresh sprigs basil

2 garlic cloves, minced

2 teaspoons salt, plus more if needed

Directions:

Add all the ingredients to the bowl of a slow cooker and stir together.

Cover and cook on low for 7 hours. Taste for seasoning.

Serve with breadsticks, garlic bread, baguette slices, etc. for dipping. Or use for your favorite pasta. Makes about 6 cups.

Recipe from Slow Cooker Family Favorites


Slow Cooker Sunday: Kielbasa and White Bean Cassoulet

So, what exactly is a cassoulet you might be thinking? Well, it’s a slow-cooked dish from the south of France that usually contains meat, pork skin and white beans. This cassoulet has 2 out of those 3 things… Pork skin is the only thing missing.

In the bowl of my slow cooker I combined dry Northern beans, beef kielbasa that I sliced into 1-inch pieces, chicken broth, diced tomatoes, onion, garlic, thyme and salt and set it to cook on low for 8 hours…

img_0208

But, after checking on it after 7 hours I decided that my cassoulet was done as I didn’t want my beans to turn into mush.

img_0217

To go along with this hearty soup I toasted 8 1/2-inch buttered baguette slices that I then cubed…

img_0219

And then topped my cassoulet with.

img_0220

Yum… This is the perfect dish for these cold winter days.


Slow Cooker Kielbasa and White Bean Cassoulet

Ingredients:

1 1/2 cup dried white beans, Northern or Navy Beans

1 pound kielbasa, cut into 1-inch pieces

3 cups low-sodium chicken broth

1 15-ounce can diced tomatoes with juice

1 medium yellow onion, finely chopped

2 cloves garlic, finely chopped

2 teaspoons fresh thyme leaves, chopped

Kosher salt and black pepper

8 1/2-inch slices of baguette, buttered and toasted, cut into cubes

Directions:

Combine the beans, kielbasa, broth, tomatoes, onion, garlic, thyme and 1/2 teaspoon salt in a 4 -to- 6 quart slow cooker.

Cover and cook on low for 7 to 8 hours, until the beans are tender and creamy (check the beans after 7 hours) or on high for 5 hours. Season with salt and pepper.

Serve topped with the baguette cubes.

Recipe from Real Simple Magazine

Slow Cooker Sunday: Italian Vegetable and Pasta Soup

This is probably the best I have ever made and tasted, well, there was this French Onion Soup I had years ago at a restaurant that I still compare all French Onion Soup’s I have had to this day. Maybe I should try making that soup one day. But anyhoo, I digress, as usual. Back to the soup at hand, an Italian Vegetable and Pasta Soup that best of all is made in a slow cooker. There’s nothing better than dumping everything into your slow cooker and then coming back a few hours later with a great meal waiting for you.

I began by adding all of my vegetables to my slow cooker: corn, chopped onion, chopped carrots, sliced zucchini and garlic. I wasn’t sure if garlic could be considered a vegetable, but, adter a little research it turns out it can be.

 img_0001

Next, I stirred in broth, tomato paste, salt and basil until the tomato paste had completely blended into the broth. I used tomato paste with basil, garlic and oregano. I advise using this blend of tomato paste since it adds more flavor to the soup.

 img_0002

I opted to cook it on the high setting for about 3 1/2 hours and then added in dried shell macaroni and a bag of frozen green beans and cooked it for an additional 45 minutes.

 img_0004

Once it was done I served myself a bowl and topped it with shredded parmesan cheese. YUM!

 img_0007

Italian Vegetable and Pasta Soup

Ingredients:

1 10-ounce package frozen whole kernel corn

1 cup chopped onion

1 cup chopped carrots

1 small zucchini, sliced into half moons

2 garlic cloves, minced

6 cups low sodium vegetable or chicken broth

1 6-ounce can tomato paste blended with basil, garlic and oregano

1/2 teaspoon salt

1/2 teaspoon dried basil

1 9-ounce package frozen green beans

1 cup dried small shell macaroni

Shredded parmesan cheese, for topping

Directions:

In a 3 1/2 to 5 quart slow clooker combine the frozen corn, onions, carrots, zucchini and garlic.

Stir in the broth, salt, basil and tomato paste until the tomato paste is completely blended into the broth.

Cover and cook on high for 3 1/2 to 4 hours (or on low for 7 to 8 hours). Add the macaroni and green beans and cook for an additional 45 minutes. Please note, if you cooked the soup on the low setting, set it to high once you add in the macaroni and green beans.

Serve in bowls topped with shredded parmesan cheese.

Recipe from Better Homes and Gardens


Slow Cooker Sunday: Pulled Pork

So last week I brought you shredded beef, albeit it wasn’t supposed to be shredded, and this week I am bringing you pulled purk, which is essentially shredded pork. When I usually make pork shoulder I make it in the oven with a variety of spices, this time around I decided to try it in my slow cooker and I think I may be sticking with this method from now on. The meat came out extrememly tender and flavorful.

After rinsing a bone-in pork should I placed it in the insert of my slow cooker over a yellow conion cut into wedges. In a medium bowl I made a marinade by combining a variety of spices, including paprika, salt, black pepper, cayenne pepper, garlic powder and oregano along with honey, red wine vinegar and olive oil.

IMG_0254

I made a few punctures into the meat using a knife and then poured the marinade over it.

IMG_0256

I cooked the meat on low for 8 hours…

IMG_0259

And then using two forks I shredded the meat and left it in my slow cooker on the warm setting for about 15-20 minutes so the meat could absorb some of juices that accumulated on the bottom.

IMG_0260

And like I said… It was delicious! You could eat this on its own or use it for a delicious sandwich.


Slow Cooker Pulled Pork

Ingredients:

4 pound pork-shoulder bone in*

3 tablespoons paprika

1/2 tablespoon salt

2 teaspoons black pepper

1/4 teaspoon cayenne pepper

1 1/2 teaspoons garlic powder

1 teaspoon dried oregano

1/2 cup honey

1/4 cup red wine vinegar

3 tablespoons olive oil

1 onion, cut into wedges


*you could also use a 3 to 3 1/2 pound shoulder without the bone


Directions:

Place the onion in the insert of the slow cooker and place the pork on top of it. Make a few punctures in the meat.

In a medium bowl combine all of the spices and then add in the honey, vinegar and olive oil to form a marinade. Pour the marinade over the pork and cook on low for 7 to 8 hours. Until the meat is fully cooked and tender. Shred the meat with two forks and allow it to sit in the juices in the slow cooker on the low setting for 15-20 minutes.

Recipe slightly modified from 100 Days of Real Food


Tortellini with Pumpkin Alfredo Sauce

Every now and then I do make a pumpkin dish that is not a dessert. I’ve actually made this dish quite a few times (I mentioned it in a post way back in 2013, but, never actually blogged about it) but, this was the first time I followed the recipe and used tortellini as opposed to another type of pasta – usually penne – and I must say it made a huge delicious difference! Some dishes are just better with a little extra cheese in them. One thing though, the leftovers of this dish do taste good, but, it’s much better when you eat it right after you make it because the sauce is super creamy then.

img_0018

Tortellini with Pumpkin Alfredo Sauce

Ingredients:

2 9-ounce packages cheese tortellini*

1 tablespoon unsalted butter

1 small shallot, finely chopped

1/2 cup canned pure pumpkin

1/8 teaspoon of nutmeg

1 1/4 cups heavy cream

1/4 cup grated parmesan cheese, plus more for topping

Freshly ground pepper

Kosher salt

Directions:

Bring a large pot of salted water to boil and cook the tortellini according to the package directions. Reserve 1/2 cup of the cooking water and then drain the pasta.

While the tortellini is cooking, melt the butter in a skillet over medium-high heat. Add the shallot and cook, stirring until slightly soft. About 2 minutes, making sure not to burn the shallots.

Add the pumpkin and the nutmeg and continue cooking for about another minutes. Stir in the cream and bring to a low boil. Reduce the heat to medium low and let simmer while stirring until slightly thickened, about 5 minutes.

Finally, add in the cheese and continue cooking until thick. Season with the salt and pepper.

Add the tortellini to the skillet with the pumpkin sauce and toss to coat, adding some of the reserved pasta water to loosen the sauce**. Serve topped with parmesan cheese.

*I used a 20oz. package of Buitoni Three-Cheese Tortellini

**I used about 1/4 cup of the reserved water

Recipe from Food Network

Slow Cooker Sunday: Pot Roast

Usually when I make pot roast I make it in the oven and top it with beef broth and an array of vegetables – potatoes, carrots, onions, & green beans. Invariably though while the gravy turns out delicious, the meat is on the dry side. Enter my slow cooker. The answer to juicy fall of the bone meat every time.

To begin, I sprinkled a 4 pound chuck roast with a generous amount of Kosher salt and freshly ground pepper. I then coated it with flour and browned it in an oil-coated skillet over medium-high heat. Next I transferred it to the inset of my slow cooker and topped it with carrots, celery, onions and mashed garlic.

IMG_0115

In the same skillet I used to brown the meat I made gravy using tomato paste, beef broth, red wine, bay leaves, fresh thyme, allspice, salt and pepper.

IMG_0117

Once the gravy had thickened slightly I poured it over the meat and vegetables and set the slow cooker to cook on low for 8 hours.

IMG_0118

After 8 hours I removed the roast from the slow cooker and placed it in a pan.

IMG_0132

And I mixed the gravy and vegetables with some chopped parsley.

IMG_0134

The meat was so tender that instead of slicing it it was better to shred it using two forks. Unfortunately I didn’t take any pictures as I was too eager to dig in and enjoy it. But, take my word; it was DELISH and incredibly tender.


Slow Cooker Pot Roast

Ingredients:

1 4lb beef chuck roast

Kosher salt and freshly ground pepper

1/3 cup flour, plus more for coating

3 tablespoons olive oil

4 medium carrots, cut into 2-inch pieces

3 stalk celery, peeled and cut into 2-inch pieces

1 medium onion, cut into 1/2 inch wedges

3 garlic cloves, mashed

3 tablespoons tomato paste

1 cup red wine

3 cups low-sodium beef broth

3 bay leaves

2 sprigs fresh thyme

1/2 teaspoon ground allspice

1/2 cup loosely packed parsley, chopped

Directions:

Sprinkle the roast with 2 1/2 teaspoons of salt and 1 1/2 teaspoons of pepper. Coat in flour and shake off any excess. Heat 2 tablespoons of the olive oil in a large nonstick skillet over medium-high heat, add the roast and cook until golden brown on all sides, about 8 minutes Turning as needed. Transfer the roast to the insert of a slow cooker, along with the carrots, celery, onions and garlic.

Add the remaining tablespoon of olive oil to the skillet over medium heat. Add the tomato paste and stir until the oil begins to turn brick-red, about 1 minute. Add the flour and wine and whisk until thick – there may be some lumps. Add the beef broth, bay leaves, thyme, allspice, 1/2 teaspoon salt and a few grinds of pepper and bring to a simmer, whisking, until the gravy is smooth and thickens slightly, about 4 minutes.

Pour the gravy into the slow cooker over the roast and vegetables. Cover and cook on low for 8 hours – the roast and vegetable should be tender.

Remove the roast and let rest for a few minutes. Discard the thyme stems and strain the vegetables, reserving the gravy. Toss the vegetables with half the parsley and season with salt and pepper. Stir the remaining parsley into the gravy and season with salt and pepper. Slice the roast against the grain. If the meat is too tender you can opt to shred it using two forks. You can serve the meat and vegetables on a platter, moistening them with some of the gravy and serve the remaining gravy on the side.

Recipe from The Food Network

Slow Cooker Sunday: Chicken and Hominy Stew

Hey Everyone! For this week’s Slow Cooker Sunday I am bringing you a stew that those of you who are sensitive to spiciness may find too spicy and those of you on the other end of the spectrum will say “Where’s the spice?” I’m on the latter side of that statement. I truthfully didn’t think the stew had any kick to it but others who tried it did, but, not so much that they weren’t able to enjoy it. So, what is this stew? Well, it’s a Chicken and Hominy Stew.

Once again, this is another of my favorite types of slow cooker meals… Just chop, drain then add to the slow cooker and let the machine work its magic. After cutting boneless skinless chicken thighs into approximately 1-inch pieces I placed them in the bottom of my slow cooker. Next I added in 2 seeded and chopped poblano chile peppers, half a bunch of cilantro that I roughly chopped and two cans of hominy that I rinsed and drained. If you are wondering what exactly is hominy check out this link.

IMG_9710

I then added in my liquids… low-sodium chicken broth and a jar of mild salsa verde.

IMG_9711

And finally I added in two corn tortillas that I tore into small pieces. I then covered it and set it to cook on low for 7 hours. Now, if you have a programmable slow cooker you need not worry about your start time, but, if you have a slow cooker like mine – I have one that has a 4 and 6 hour cook setting for high and a 8 and 10 hour cook setting for low, and a separate warm setting – make sure you take note of your start time. You don’t want to “overcook” the soup and end up with chicken that’s on the verge of shredding. You want a bit of bite to this soup since it is a stew.

IMG_9713

And after 7 hours it was time to enjoy a bowl. I topped it with some chopped avocado and enjoyed it with an extra corn tortilla on the side. Overall there’s not one thing about this stew I would change. The flavors all worked well together and like I said earlier I definitely didn’t feel like it was too spicy, it was just right!

IMG_9717

Slow Cooker Chicken and Hominy Stew

Ingredients:

1 1/2 pounds boneless skinless chicken thighs, cut into 1-inch pieces

2 15-ounce cans hominy, drained and rinsed

2 poblano chile peppers, seeded and chopped

1/2 bunch fresh cilantro, roughly chopped

2 cups low-sodium chicken broth

1 16-ounce jar salsa verde

1/2 teaspoon kosher salt

2 6-inch corn tortilla

Kosher salt

Options for topping:

sour cream

avocado, diced

cilantro, chopped

romaine lettuce heart, shredded

corn tortillas, warmed

Directions:

Add the chicken, hominy, peppers and cilantro to the slow cooker. Add the broth, salsa verde and salt and stir to combine. Next, tear the 2 corn tortillas into small pieces and add to the slow cooker. Give everything a good stir, cover and cook on low for 7 hours.

If serving with the tortillas, warm them according to the package directions. Top each serving of the stew with your favorite topping and enjoy. Serve with the warmed tortillas on the side.

*Please note I use a 5 1/2-quart slow cooker.

Recipe modified from The Food Network

Portobello Mushrooms Stuffed With Caprese Salad

While browsing through my Instagram feed last week I came across a picture that made me stop and double-tap immediately! If you’re on Instagram and you’re not following Foodgawker you should definitely go check them out and start following them. They post amazing pictures of food that you can get the recipes to by visiting their website. And most of the recipes are ones that you can easily make in your home kitchen – which we can all agree is very important! If you love quick recipes, mushrooms, tomatoes and mozzarella this is the recipe for you! And if mushrooms are not your thing – I think it’s something that people either love or hate – but if you love Caprese salad, you may want to think about roasting the mozzarella and tomatoes next time you make it – it really enhances the flavors.

IMG_8438

I began by cleaning out the gills of the mushrooms and wiping them with a damp paper towel. To remove the gills I used a small spoon to scoop them out. Now, I know there are some people who opt not to clean out the gills, and I did a little research (a quick Google search) as to which is the proper way to eat Portobello’s and it really comes down to personal preference. For me, I prefer them gone because sand could be trapped within the gills and the sand is not going to come out when you cook them and I just think they look “cleaner” when the gills are gone.

IMG_8430

Next, I melted butter with two cloves of crushed garlic in the microwave and brushed the garlic butter on the bottom of each of the mushrooms.

IMG_8433

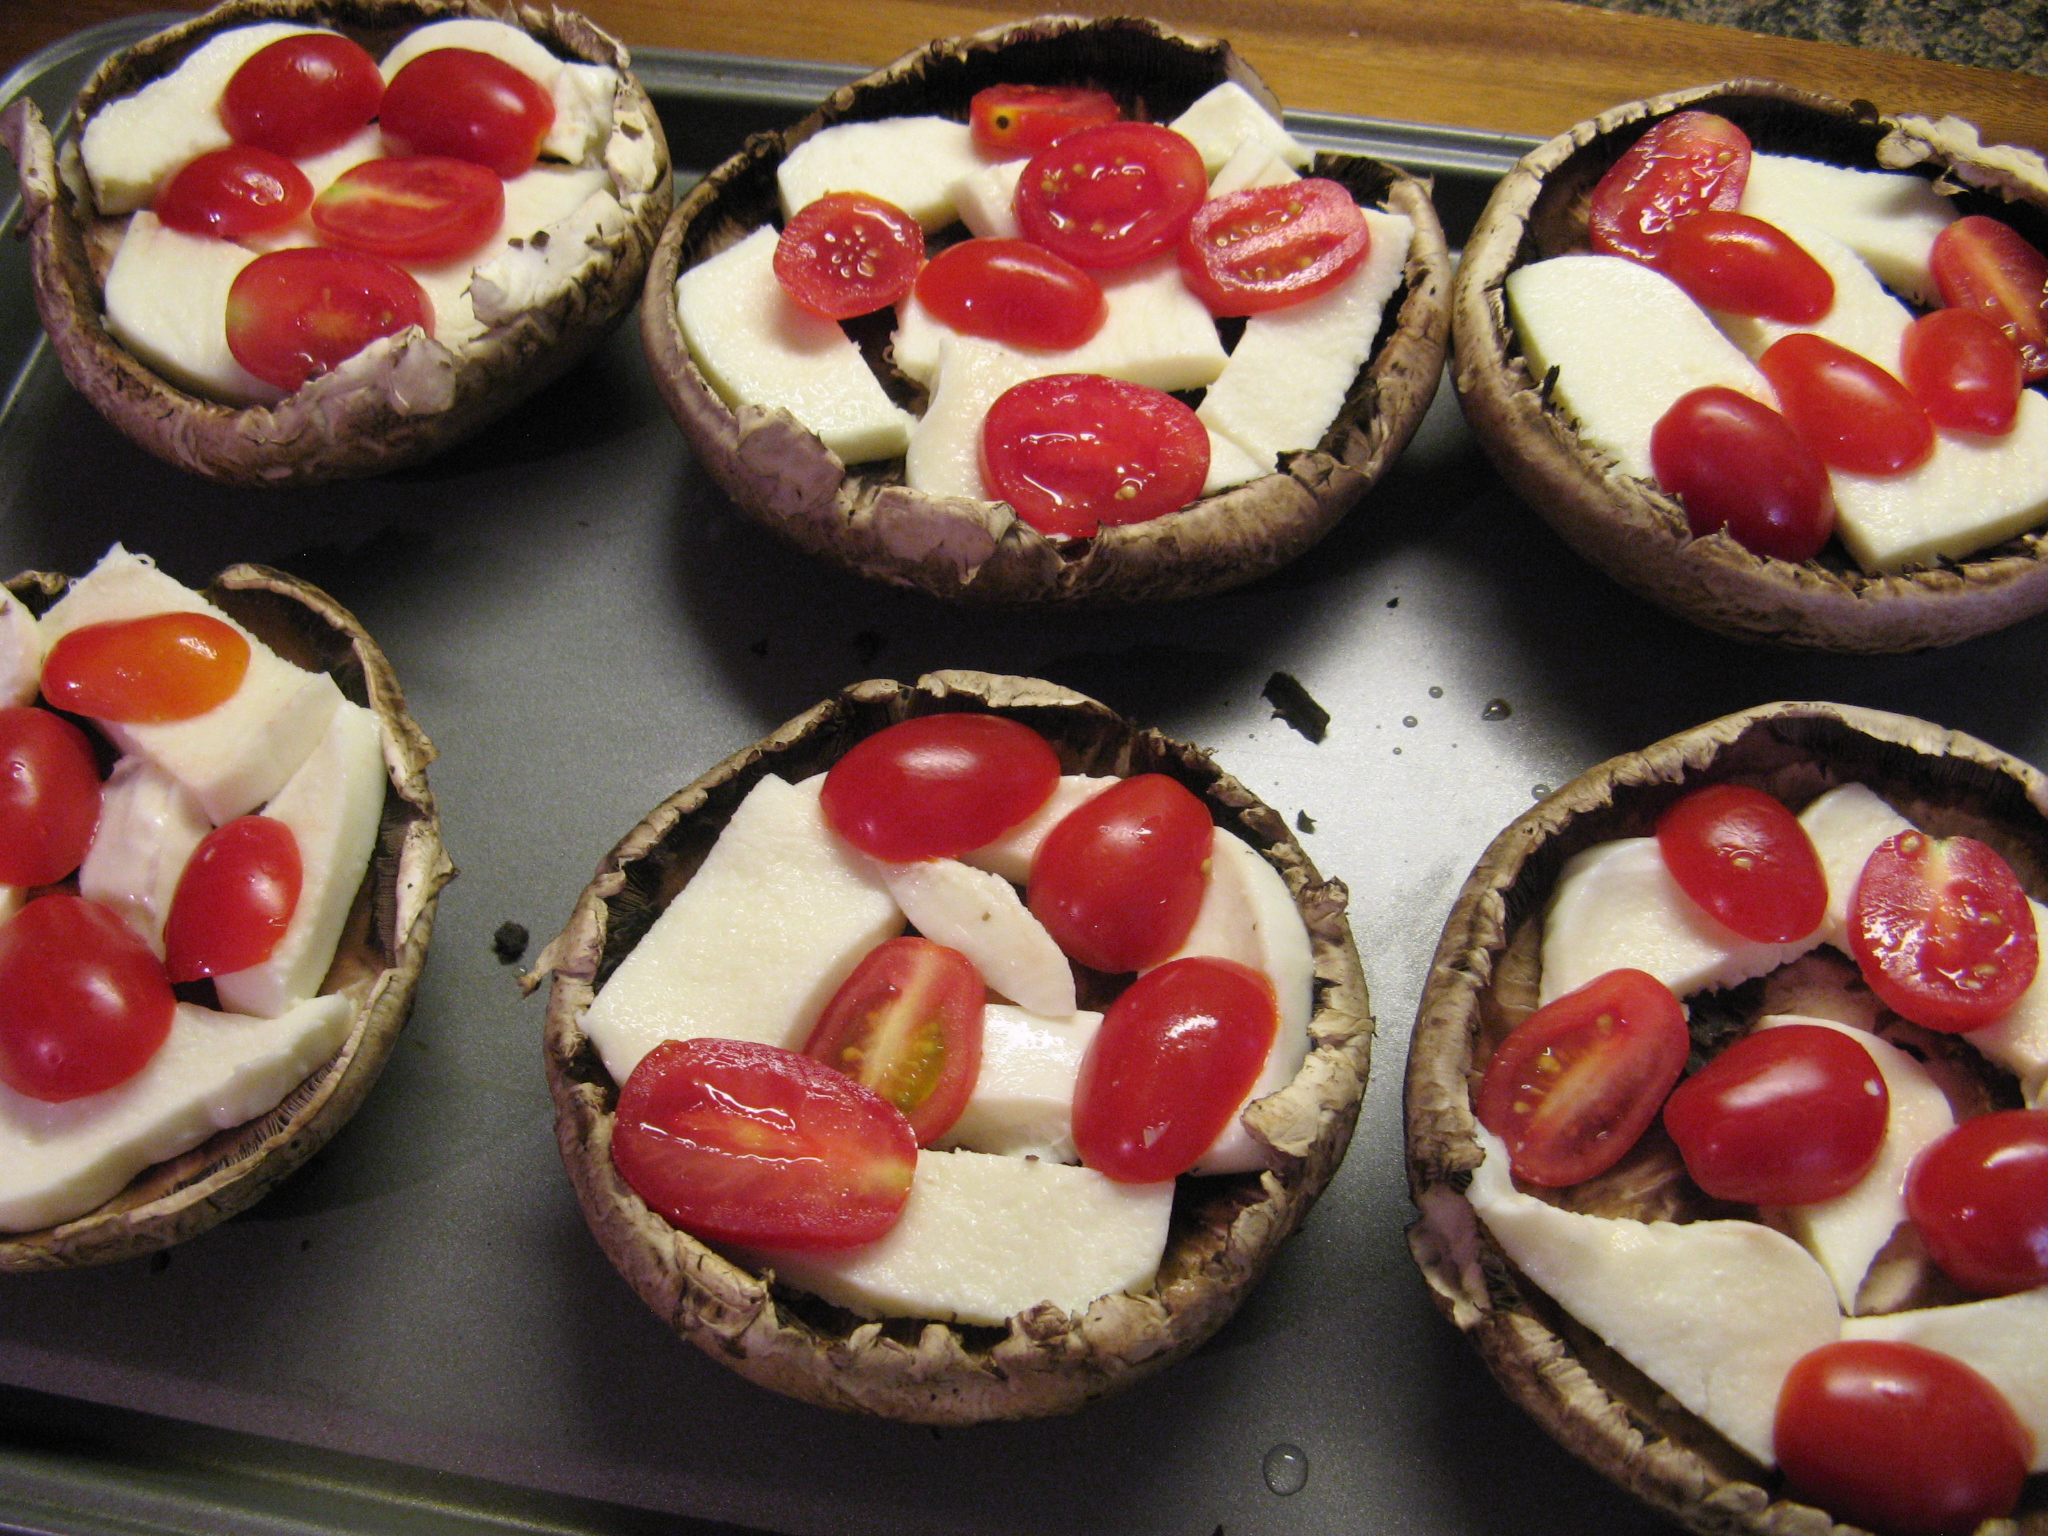
Once the mushrooms were prepped I sliced grape tomatoes and fresh mozzarella into thin slices and placed them inside of the mushrooms.

IMG_8436

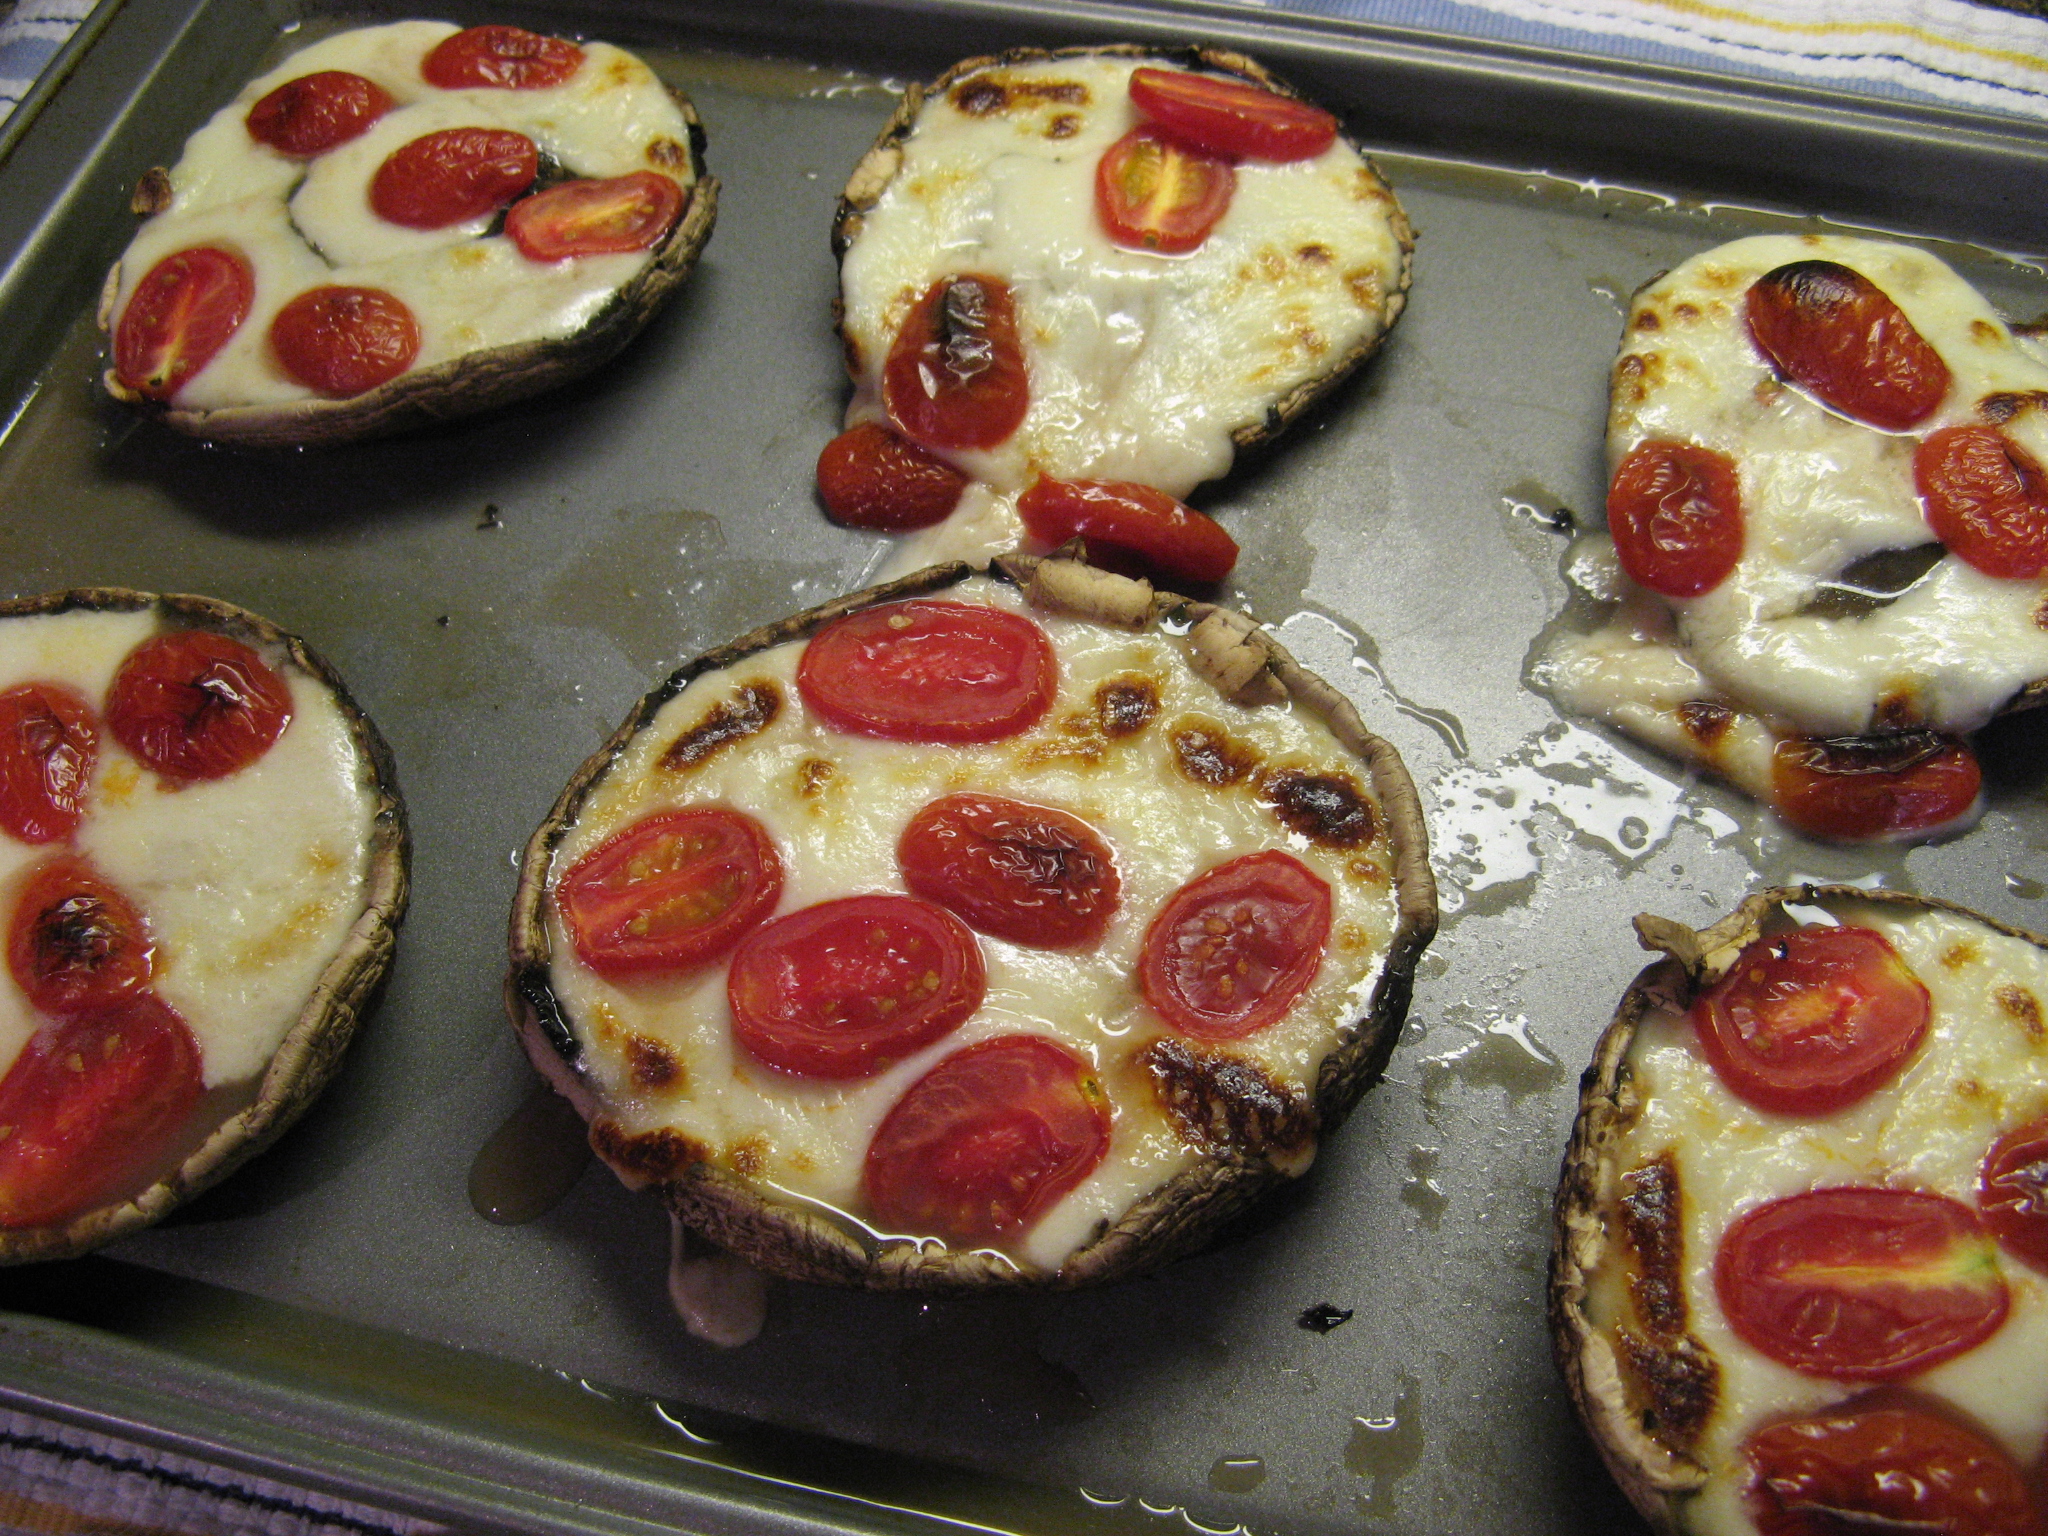
With the broil set to high I placed the mushrooms in the oven and broiled them for about ten minutes, until the cheese was melted and beginning to brown.

IMG_8437

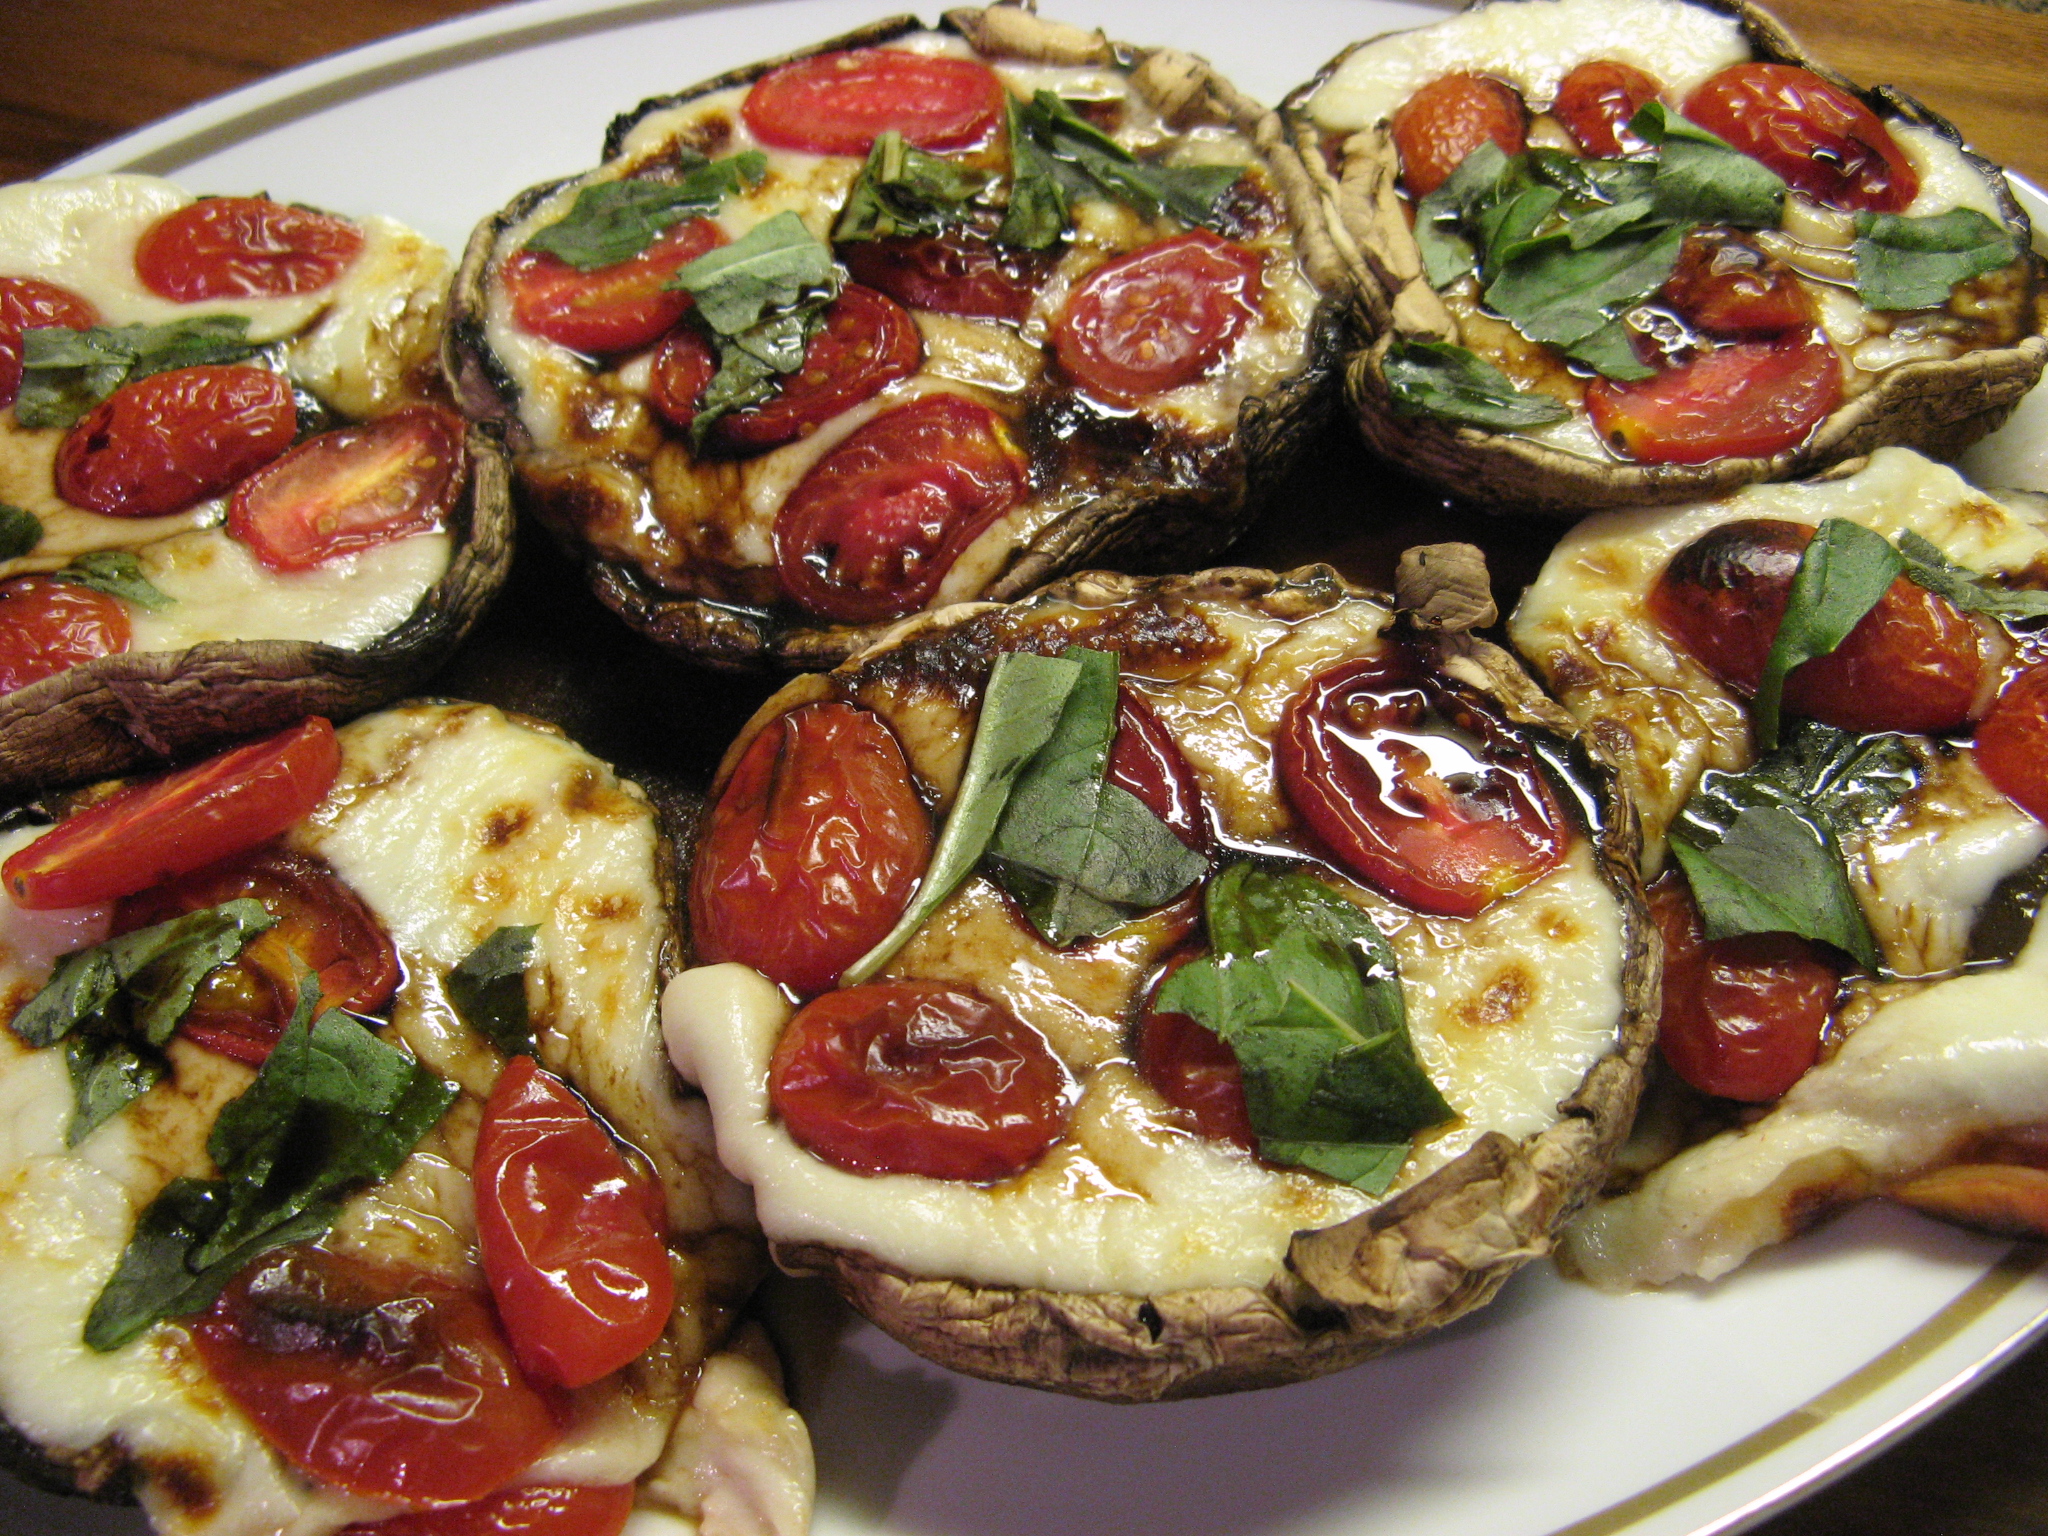
While the mushrooms were in the oven I made a balsamic glaze to drizzle over them. I combined balsamic vinegar and brown sugar in a small saucepan and brought it to a boil, then reduce the heat and let it simmer until it was reduced by half. Once the mushrooms were done I took them out of the oven and transferred them to a platter and top them with torn basil leaves and the balsamic glaze.

IMG_8442

These mushrooms were absolutely delicious!  Caprese Salad is delicious on its own, but once you roast the tomatoes and bring out some of their sweetness and the mozzarella is melted it’s just a whole other level of delectableness. And the heartiness of the mushroom to go along with it makes this a great main dish with other vegetable or as a quick side.


Caprese Stuffed Garlic Butter Portobellos

Ingredients:

Garlic Butter:

1 tbsp. unsalted butter

2 cloves garlic, crushed

Mushrooms:

6 large Portobello mushrooms, stems and gills removed, wiped clean with a damp paper towel

1 cup grape tomatoes, each tomato sliced into thirds

Fresh mozzarella*, thinly sliced

Fresh basil, torn into pieces

Balsamic Glaze**:

1/4 cup balsamic vinegar

2 tsps. brown sugar


*I used about half of a 12oz. pre-sliced log, cutting each piece into strips

**You could also use store bought


Directions:

1. Arrange oven rack to middle of oven and preheat the oven to broil on the high setting.

2. Combine the garlic and butter and melt the butter in the microwave or in small saucepan on medium heat until the garlic becomes fragrant. Brush the bottoms of the mushrooms and place them, buttered side down, on a rimmed cookie sheet.

3. Fill each mushroom with tomatoes and mozzarella and place them in the oven, broiling them until the cheese has melted and begun to brown (about 8 – 10 minutes.)

4. Transfer the mushrooms to a serving dish and top with the basil and drizzle with the balsamic glaze. Sprinkle with kosher salt and fresh ground pepper.

To make the Balsamic Glaze:

Combine the sugar and vinegar in a small saucepan over high heat to bring to a boil. Reduce the heat allowing the mixture to simmer until the mixture has thickened and reduced to a glaze, 5 – 8 minutes.