Sweet & Salty Christmas in July White Chocolate Bark

Merry Christmas in July! Have you been indulging in any holiday activities to get you into the holiday spirit super early? I’ll admit, I have watched a few Christmas movies thanks to Hallmark Channel’s Christmas in July stunt. Nothing too crazy though. If you are a crafter, now is the perfect time to start on any Christmas crafts/gifts you plan on making. And of course, there have been sales, but instead of calling them Christmas in July sales retailers have been terming them Black Friday in July sales. Not everyone is keen on celebrating or even mentioning Christmas before Thanksgiving!

Initially I was stumped on what to make to celebrate. I toyed with the idea of a Peppermint Shake along the lines of last year’s refreshing No Churn Peppermint Chip Ice Cream. And then I thought of forgoing the whole thing and not making anything. But then I remembered I had a bag of red & green mini M&M’s I bought during the holidays last year that I was planning on using to decorate Gingerbread Cookies that I never made. Thankfully they hadn’t expired – it’s scary sometimes how long candy can last – so I decided to make a super simple and festive chocolate bark with them.

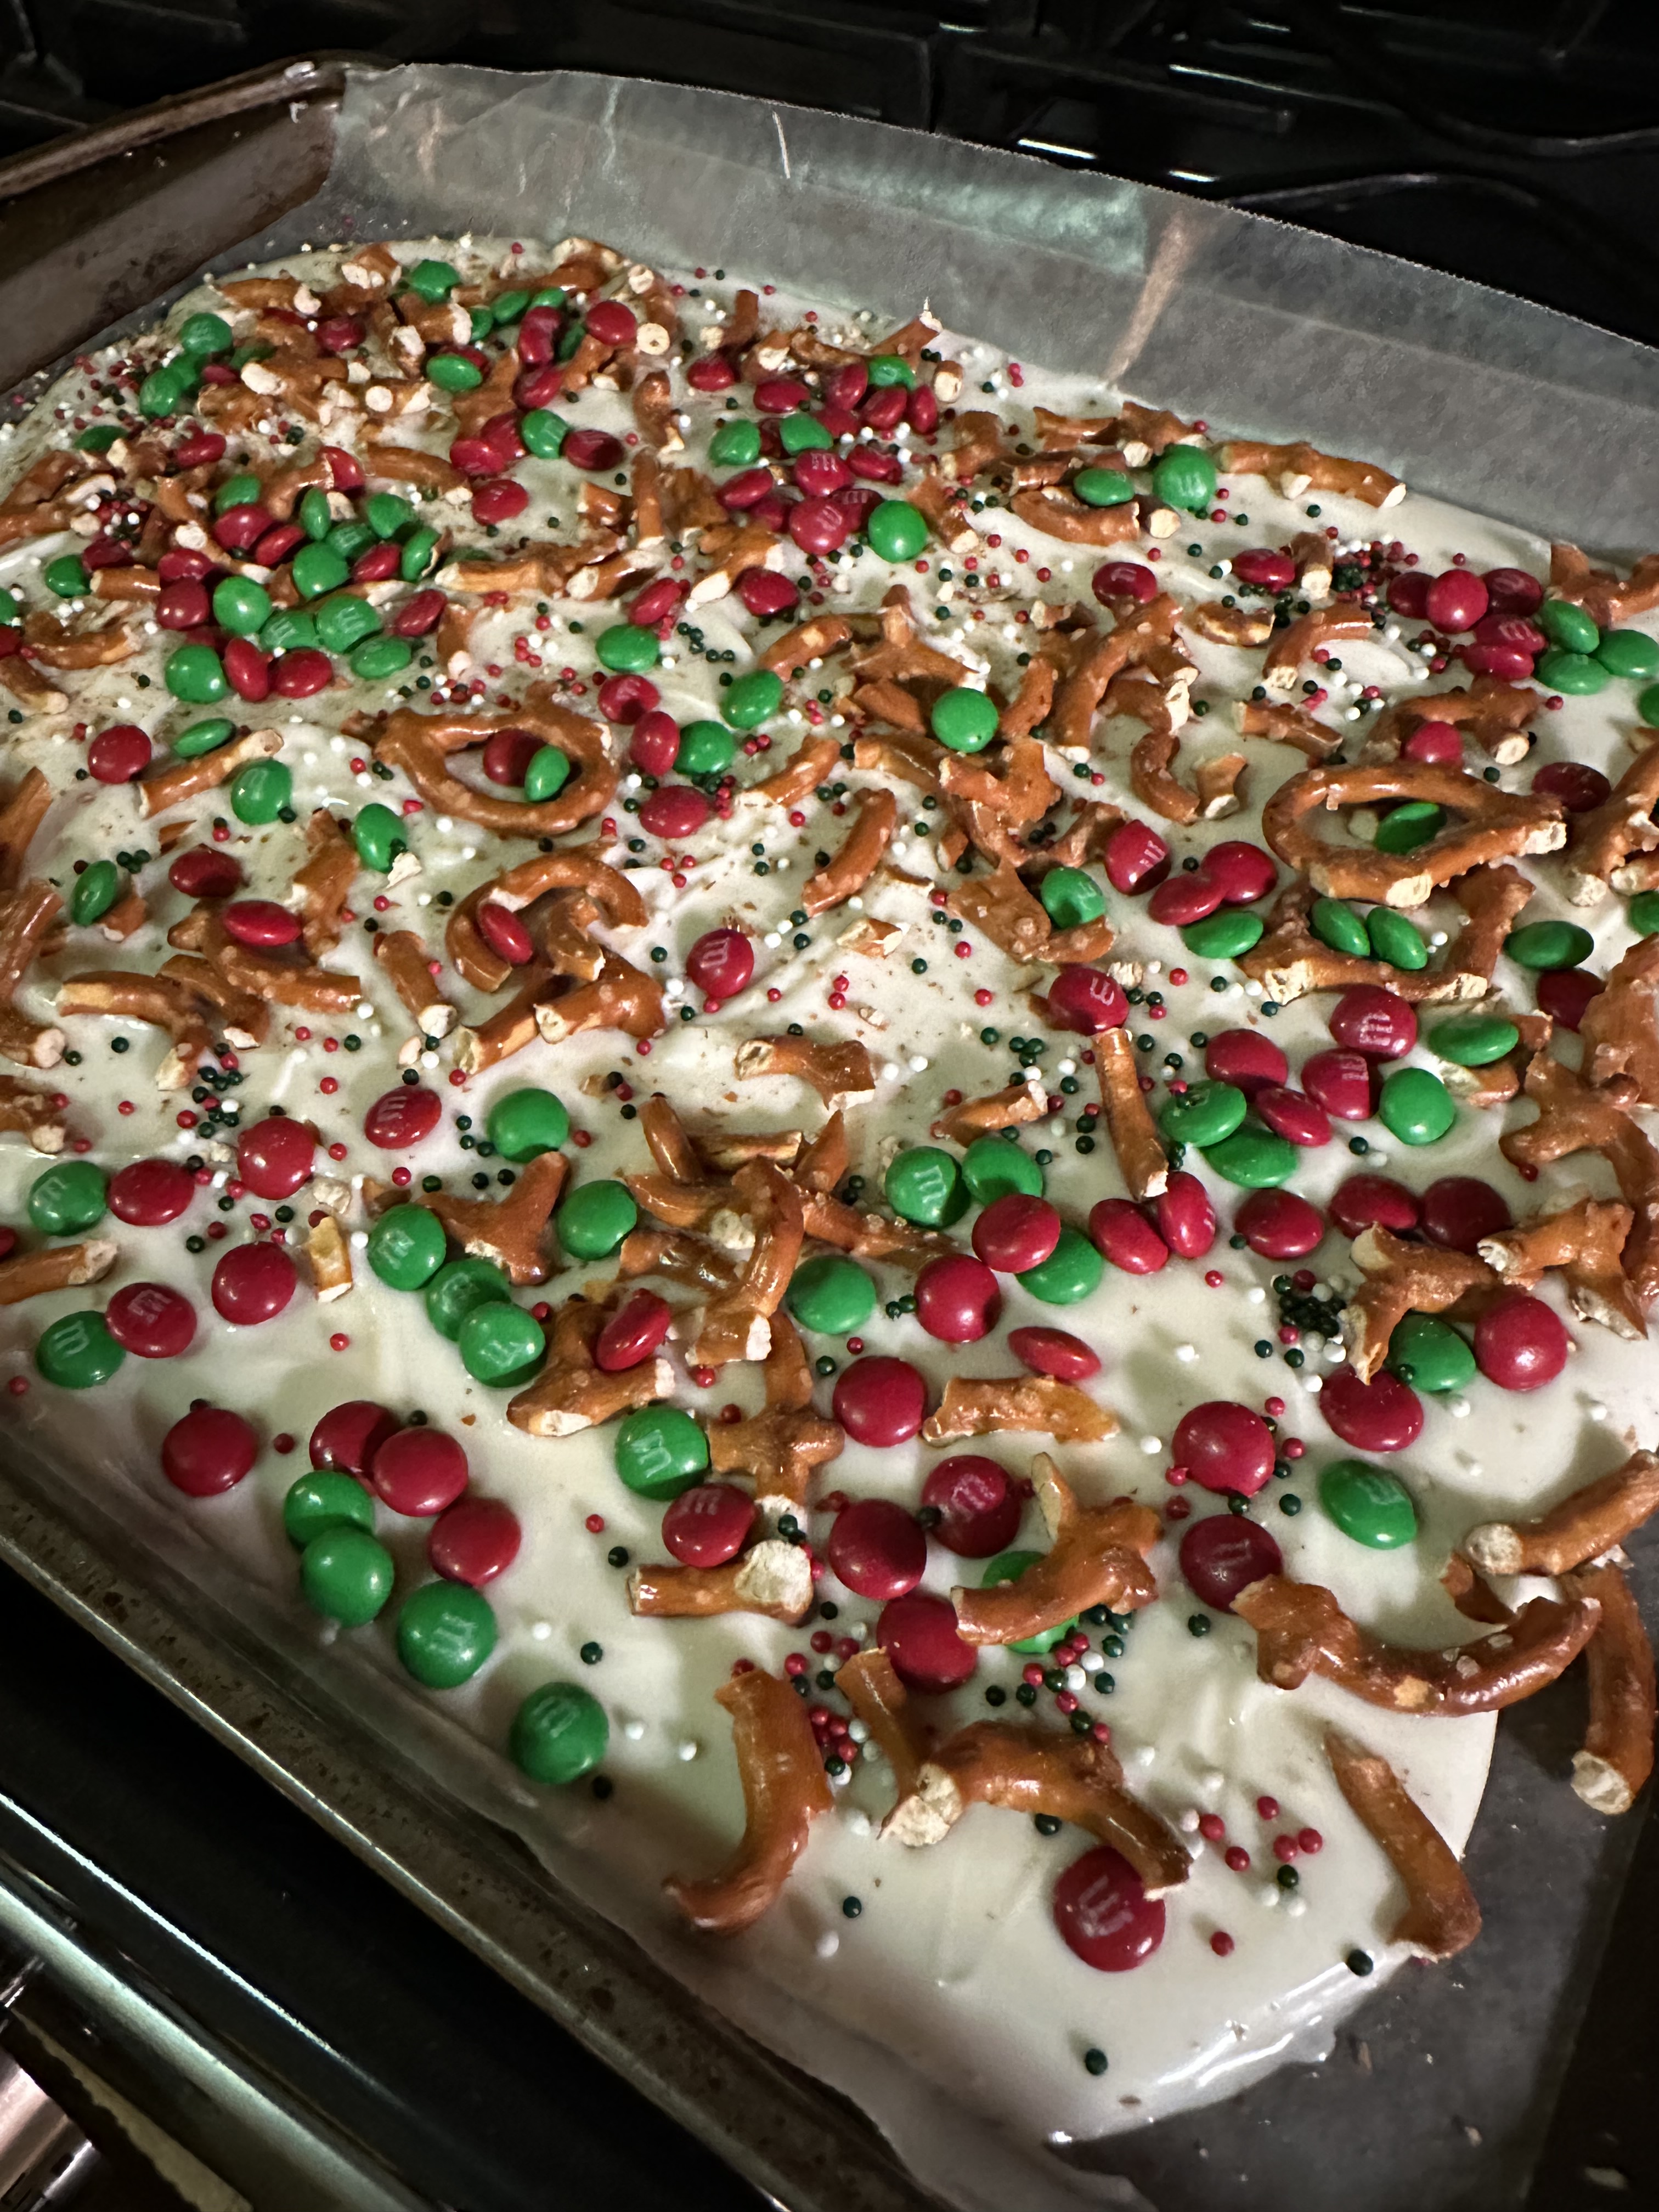
Along with the M&M’s I used chopped pretzels and nonpareils to decorate melted white chocolate. If you are not a fan of white chocolate, you could easily swap it out for either semi-sweet or milk chocolate. Making chocolate bark is one of the simplest things you can make, and the M&M’s and nonpareils can be swapped out for any holiday. After melting white chocolate chips in the microwave, I spread the chocolate on a parchment lined baking sheet about 1/4-inch thick and then sprinkled it with the M&M’s, chopped pretzels and nonpareils. I lightly pressed everything into the chocolate and then placed it in the refrigerator for about 20 minutes so the chocolate could harden.

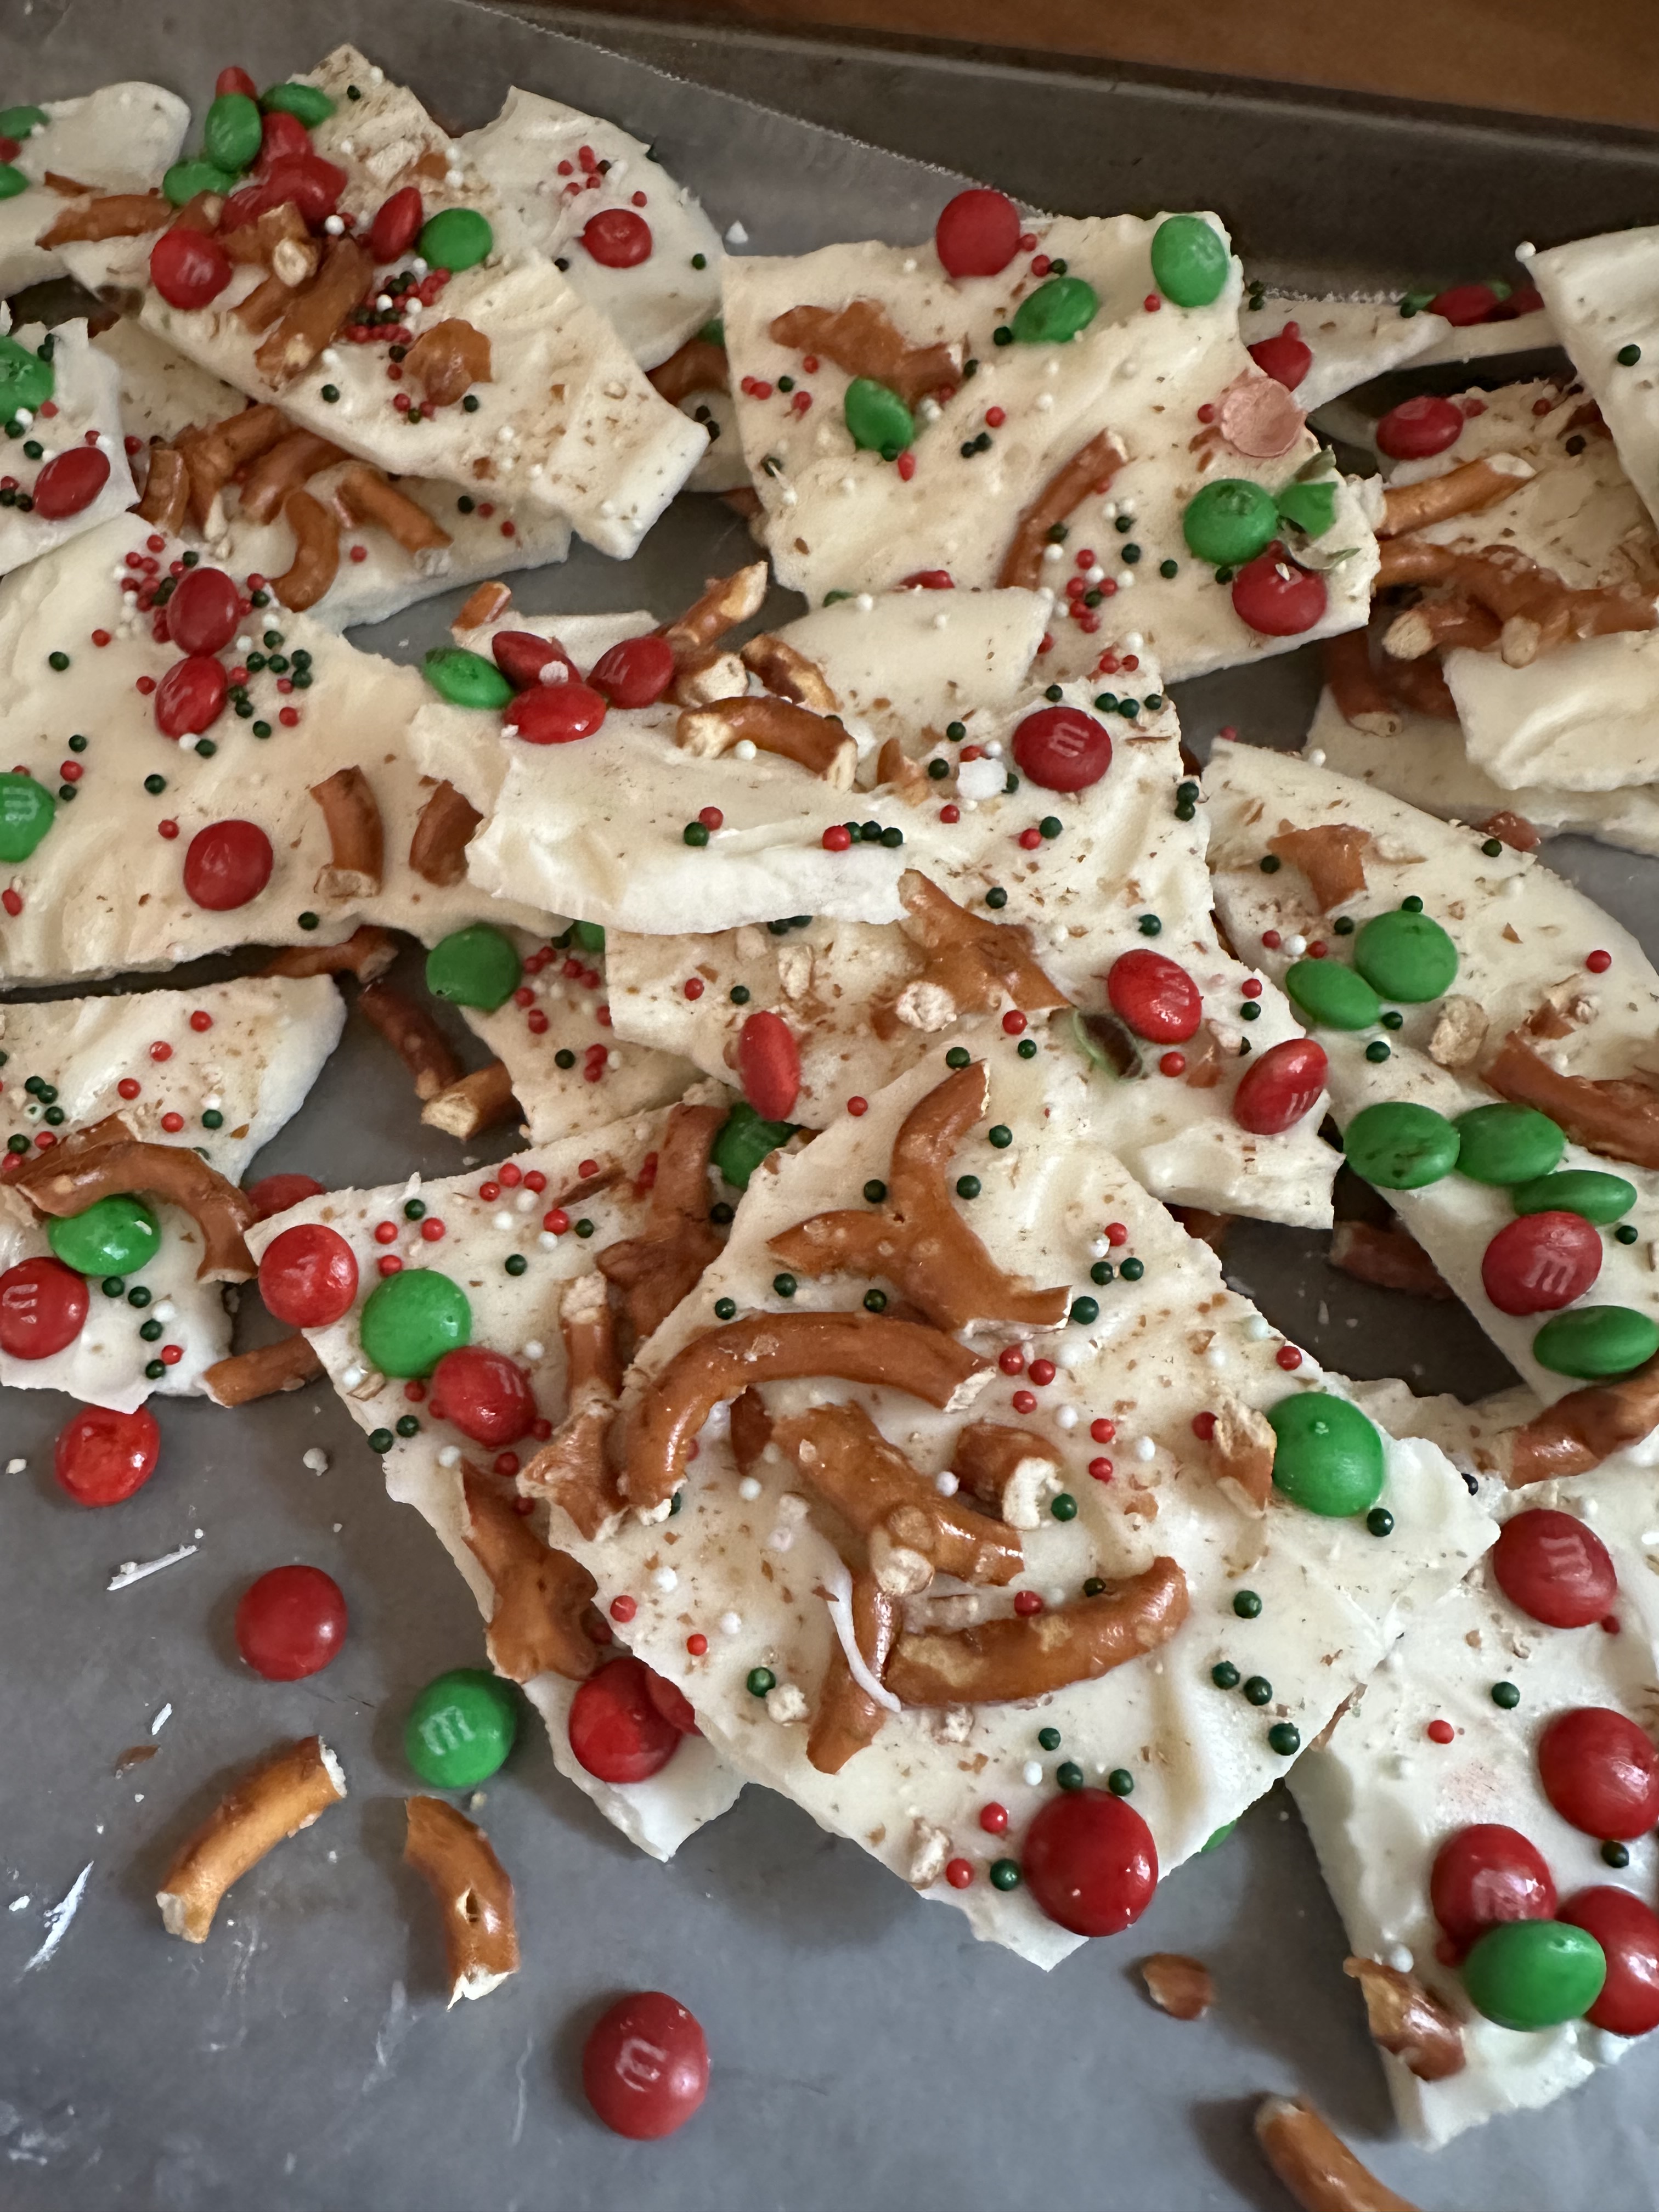
And then I just haphazardly broke it apart and stored it in the refrigerator for an occasional sweet treat! Come the holidays though this would be the perfect treat to serve guests or to gift.

Sweet & Salty Christmas in July White Chocolate Bark

Ingredients:

1 12oz. bag white chocolate chips

1/2 cup green & red mini M&M’s

1 cup mini pretzel twists, chopped

Holiday nonpareils

Directions:

Line a baking sheet with parchment paper.

Place chocolate chips in a microwave safe bowl and melt in 30-second intervals, stirring between each until chocolate is melted and smooth. Spread on the prepared baking sheet to about a 1/4-inch thick.

Sprinkle the M&M’s, chopped pretzels and nonpareils over the chocolate and lightly press into the chocolate.

Place in the refrigerator for 20 minutes, or until the chocolate hardens, and then break into pieces.

Store in an airtight container in the refrigerator.

*If you want your bark saltier sprinkle with sea salt before refrigerating.

Recipe first appeared on Bead Yarn & Spatula

Chocolate Turtle Cake

Around the holidays I always do what I have termed as marathon baking. Usually on December 22nd or 23rd I bake a bunch of cookies that I give as Christmas gifts. I have tried and true recipes that I make every year that I know are crowd pleasers and then I try one or two new ones to add to the mix. Last year one of those cookies was a Chocolate Caramel Thumbprint, essentially a Turtle candy turned into a cookie. And just in case you are not familiar, Turtles are candies made with pecans and caramel dipped in chocolate. The cookies were so good that I ended up making them again for New Year’s Eve. Which then got me thinking of making a cake reminiscent of the flavors and ingredients. Hence, today’s Chocolate Turtle Cake.

So, how are all the flavors incorporated into the cake? Well, two chocolate cake layers are separated by a generous layer of caramel whipped cream and then the whole thing is covered in a delicious chocolate frosting. And finally, decorated with chopped pecans and drizzled with caramel sauce. YUM!

Chocolate Turtle Cake

For the Chocolate Cake:

1 15.25oz box of chocolate cake mix (I used Duncan Hines Devil’s Food)

3 large eggs

1 cup coffee, cooled

1/2 cup vegetable oil

1/2 cup sour cream

1 teaspoon vanilla extract

For the Caramel Sauce / Caramel Whipped Cream:

14oz. package caramels*

1/2 cup evaporated milk

1/4 cup maple syrup

1 cup heavy cream

For the Chocolate Frosting:

2 cups sugar

1 14 oz. can evaporated milk

8oz unsweetened chocolate melted and cooled

Pecan halves and/or chopped pecans, to decorate the cake

*I used Kraft caramels

Directions:

Preheat oven to 350 F. Spray two 8-inch round cake pans with baking spray and set aside.

For the chocolate cake: In a large bowl combine the eggs, coffee, vegetable oil, sour cream and vanilla extract. Beat with a hand mixer on medium speed until well combined. Sift the cake mix over the mixture and beat the mixture on low speed until just combined. Divide among the prepared pans and bake in the preheated oven for 30-35 minutes, or until a cake tester comes out clean. Cool the cakes in the pans for 10 minutes before transferring to wire racks to cool completely.

For the caramel sauce / caramel whipped cream: In a small saucepan combine the unwrapped caramels and evaporated milk. Over medium heat, stir constantly until the caramels melt and the mixture is smooth. Remove from the heat and stir in the maple syrup. Let cool.

Once the caramel sauce is cooled, add 1/4 cup of the sauce along with the heavy cream to a medium bowl and beat with a hand mixer on medium speed until stiff peaks form. Refrigerate the caramel whipped cream until ready to use. Set aside the remaining caramel sauce to drizzle on the cake.

For the chocolate frosting: Add the ingredients to a blender and blend on low speed for 1 minute and then switch to high speed and blend for another minute. The sound of the blender should change signaling that the frosting is done. Transfer the frosting to an airtight container and let sit at room temperature for 1 hour until thickened and spreadable.

To assemble: If necessary, level the cake layers. Place one of the layers on a cake stand or cake round. Transfer about 1 cup to 1 1/2 cups of frosting to a piping bag and pipe a dam around the bottom layer and then fill with the caramel whipped cream. You may have more whipped cream than you need. Place the second cake layer on top of the cake and crumb coat the entire cake. Refrigerate for about 30 minutes and then finish frosting the cake. With remaining frosting pipe decorate dollops on top of the cake. Drizzle some of the remaining caramel sauce on top of the cake as well and then decorate with chopped pecans along the sides of the cake.

No-Churn Coffee Ice Cream

I’m not a coffee drinker. I’ve tried it once or twice, but the flavor is just not appealing to me. I will enjoy a Caramel Frappucino once in a while from Starbucks, but the caramel and whipped cream really mask any coffee flavor. And in the Fall, I may get a Pumpkin Spice Latte, but the flavor of coffee is still there which makes it a bit hard to swallow so half a cup and I’m good. One coffee item that I do enjoy without any reservations is coffee ice cream. Yes, the coffee flavor is there, but it’s not that strong and thanks to the sweetness of ice cream it’s tolerable. So, to kick off Summer 2023 I am sharing a recipe for a No-Churn Coffee Ice Cream.

If you’ve never made ice cream at home, you are missing out. It’s super simple, you can control how sweet it is, what the ingredients are and you can get quite creative with the flavors. Initially I was using an ice cream maker to make ice cream, but, once I discovered no-churn ice cream I haven’t broken out that machine since. I just beat all of the ingredients together, transfer it to a loaf pan and then freeze it overnight.  

This coffee ice cream tasted just as good as my favorite store-bought one. If you like your coffee on the stronger side, you could use an extra half or full tablespoon of the coffee granules.

No Churn Coffee Ice Cream

Ingredients:

2 tablespoons instant coffee granules

1/4 cup boiling hot water

2 cups heavy cream

1 14oz. can sweetened condensed milk

1 teaspoon vanilla extract

Directions:

Line a 9×5-inch loaf pan with wax paper leaving an overhang and set aside.

In a measuring cup stir together the coffee and water and let cool for a few minutes.

In a medium bowl beat the heavy cream with a hand mixer on medium speed until stiff peaks form. Add in the cooled coffee, condensed milk and vanilla extract and beat together on low speed until well combined.

Pour into the prepared loaf pan and cover tightly with a piece of wax paper and aluminum foil and freeze at least 8 hours or overnight.

Recipe first appeared on Bead Yarn & Spatula

Orange Pistachio Loaf Cake

I’ve posted quite a few loaf cakes this year. They are just so easy to make, and you get so much so flavor without having to do too much, i.e. decorate. And most of them are perfect for any time of the day… As a treat for breakfast, a snack in the middle of the day or for dessert in the evening. Today’s Orange Pistachio Loaf Cake is no exception to any of this. The citrus flavor of this loaf cake makes it perfect for the warmer months ahead when you want something sweet but not too heavy. And you don’t have to whip out your hand or stand mixer to make it. Simply whisk the dry ingredients together in one bowl, the wet ingredients in another and then whisk both together before folding in the pistachio nuts. That was a bit out a mouthful, but rest assured this cake is easy to make.

And once the cake is baked and cooled it’s time to make the glaze. Previously, I would skip adding glazes to my baked items. Whenever a recipe included it, I just assumed that it would add too much sweetness, but I have come around and realized that what it really does is enhance the flavor, well sometimes. For this cake I decided to add an orange glaze and top it with chopped pistachios to really kick up the overall flavor of the cake.

Orange Pistachio Loaf Cake

Ingredients:

For the loaf cake:

2 cups flour

1 teaspoon baking powder

1/2 teaspoon baking soda

1/2 teaspoon salt

1/2 cup freshly squeezed orange juice (2-3 navel oranges)

1/4 cup vegetable oil

1/2 cup sour cream

2 large eggs

1 teaspoon vanilla extract

Zest of 1 orange

1 cup sugar

1/2 cup chopped pistachios

For the glaze:

1/2 cup confectioners’ sugar

1 teaspoon orange zest

1 – 2 tablespoons fresh squeezed orange juice

2 – 3 tablespoons chopped pistachios

Directions:

Preheat oven to 350 F. Spray a 9 x 5 – inch loaf pan with baking spray and set aside.

In a medium bowl, whisk together the flour, baking powder, baking soda and salt. Set aside.

In a different medium bowl whisk together the orange juice, vegetable oil, sour cream, eggs, vanilla extract and zest until combined and then whisk in the sugar until well combined. Add in the dry ingredient and whisk together until just combined. Finally fold in the chopped pistachios.

Transfer the batter to the prepared loaf pan and bake for 45-55 minutes, or until a cake tester inserted in the center comes out clean.

Cool in the pan for 10 minutes before removing and cooling completely on a wire rack.

Once the loaf is cool prep the glaze. In a small bowl whisk together the confectioners’ sugar, orange zest and orange juice. Start with a tablespoon of orange juice and add more as needed. The glaze should be pourable but thick. For an easier clean-up, line a rimmed baking sheet with wax paper and place the wire rack with the loaf cake on top of the wax paper. Drizzle the glaze on top of the cake then sprinkle the chopped pistachios on top. To set the glaze quickly, place the cake in the refrigerator for 15-20 minutes.

Slice and enjoy!

Store cake in an airtight container at room temperature.

Recipe first appeared on Bead Yarn & Spatula.

Wild Blueberry Donuts

A few years ago homemade baked donuts were all the rage. I definitely think it was due to the availability of donut pans. You no longer needed to roll out dough and cut it to make a donut shape that would then be fried. You could simply pipe batter into a pan and pop it in the oven and within 20 minutes you had delicious homemade donuts. Recipes were popping up everywhere. I definitely jumped on the bandwagon as well. Nowadays I don’t come across as many new recipes and I probably only use my donut pans 2 or 3 times a year. That doesn’t mean I don’t have recipe/flavor ideas swirling around in my head. One of my favorite donuts is a Blueberry Donut from The Doughnut Plant in NYC. This year in honor of National Donut Day I decided to create my own version, Wild Blueberry Donuts.

While using fresh blueberries would have probably given my donuts a nice blue hue I decided to go with dried wild blueberries since their flavor is consistent and they worked so well in my Blueberry Crumb Cookies last year. I didn’t want to have too many donuts, so I decided to make a small batch – only 6. It was the perfect amount. And once they cooled, I added a blueberry glaze that wasn’t too sweet and did give them a nice blue hue!

Happy National Donut Day!

Wild Blueberry Donuts

For the donuts:

1 cup flour

1 teaspoon baking powder

1/2 teaspoon salt

1/4 teaspoon nutmeg

2 tablespoons unsalted butter, melted

1/4 cup sugar

1/2 cup buttermilk

1 large egg

1 1/2 teaspoons vanilla extract

3/4 cup dried wild blueberries

For the glaze:

1/4 cup fresh blueberries

1 cup confectioners’ sugar, sifted

Directions:

Preheat oven to 350 F. Spray a 6-cavity donut pan with baking spray and set aside.

Sift together the dry ingredients – flour, baking powder, salt & nutmeg – into a medium bowl.

In another medium bowl whisk together the butter, sugar, buttermilk and egg until combined.

Add the dry ingredients to the wet ingredients and fold together until just combined. Fold in the dried blueberries.

Transfer the batter to a piping bag (or a resealable bag) and snip off the end. Pipe the batter into the donut pan about three-quarters full.

Bake in the preheated oven for 13-15 minutes. Cool in the pan for 10 minutes and then remove and cool completely on a wire rack.

For the glaze: Place the blueberries in a microwave safe bowl and heat for 30-45 seconds. Just to get them warm, but you don’t want them exploding. Transfer the blueberries to a fine mesh sieve and then mash them over a medium bowl to get the juices out. Gradually add the confectioners’ sugar to the blueberry puree, stirring between each addition. Continue adding the sugar until the glaze is pourable but thick. Drizzle the glaze over the donuts or dip the top of the donuts in the glaze. Let set and then enjoy!

Recipe first appeared on Bead Yarn & Spatula.

Mixed Berry Crumble Pie

This weekend, Memorial Day weekend, is the unofficial start of the summer. Bring on the BBQs, warm weather, and all the other fun things associated with this time of the year! One thing I personally love about this time of the year is the in-season fruit and veggies. Yes, you can get most fruit and vegetables year-round, but certain ones just taste better now. Especially berries! Today I am sharing a pie that is perfectly patriotic for your Memorial Day & July 4th celebrations, but, truth-be-told, perfect for all your summer get-togethers… A Mixed Berry Crumble Pie. It’s also super simple to put together and perfect for a last-minute dessert.

I started off by making the crumble topping since I needed to refrigerate it for a few minutes before sprinkling it on the pie. In a medium bowl I whisked together old-fashioned oats, flour, light brown sugar, salt, cinnamon and allspice. Then, using my hands, I mixed in cold butter that I cut into small pieces. If you are averse to using your hands you could also use a fork or pastry cutter. You want the butter to be completely incorporated into the mixture. Once its ready the ingredients should easily clump together. While the topping chilled, I prepped the rest of the pie.

As I am sure I’ve mentioned before I normally use store-bought pie crust. It’s fool-proof and it saves time. Before making the filling, on a lightly floured surface (my countertop) I rolled out a store-bought pie crust and an extra inch or so. I then placed it in a 9-inch pie dish and crimped the edges. To make the filling, I gently mixed fresh blueberries, blackberries and raspberries together along with light brown sugar, sugar, lemon juice, cornstarch, cinnamon, freshly grated nutmeg and salt. I started off using a wooden spoon but quickly switched to a rubber spatula to avoid breaking up the berries. I wanted most of them to remain intact during baking so the pie would still look appealing once done and have some texture to it. 

I transferred the berry mixture to the prepared pie dish…

And then sprinkled the crumble topping on top before baking in a 375 F preheated oven.

I checked on the pie after 25 minutes and noticed that the edges of the crust and the topping were beginning to brown, so I tented it with a piece of aluminum foil until to prevent it from burning. After about another 40 minutes the pie was ready. The crumble topping had a nice golden color and the filling had just started to bubble.

After letting it cool it was time to enjoy a piece and it was DELISH! Not too sweet and some of the berries were still intact.

Mixed Berry Crumble Pie


Ingredients:

For the Crumble Topping:

3/4 cup old-fashioned oats

1/2 cup flour

1/2 cup light brown sugar

1/2 teaspoon salt

1/2 teaspoon cinnamon

1/4 teaspoon allspice

6 tablespoons cold unsalted butter, cut into small pieces

For the Pie:

1 single pie crust (either store-bought or homemade)

2 cups fresh blackberries

2 cups fresh blueberries

2 cups fresh raspberries

1/3 cup light brown sugar

1/3 cup sugar

3 tablespoons lemon juice

1/4 cup cornstarch

1/4 teaspoon cinnamon

1/8 teaspoon freshly grated nutmeg

1/4 teaspoon salt

Directions:

Preheat oven to 375 F.

For the crumble topping: In a medium bowl whisk together the oats, flour, sugar, salt, cinnamon & allspice. Cut in the butter using a pastry cutter (or much easier your hands), until everything is well combined and the mixture clumps together. Refrigerate until ready to use.

For the pie: Roll out the pie crust to about 10-11 inches and then place in a 9-inch pie dish and crimp the edges. Place the pie dish on a baking sheet and set aside.

In a large bowl gently mix the berries, both sugars, lemon juice, cornstarch, cinnamon, nutmeg and salt together until well combined. Transfer to the pie dish and then sprinkle the crumble topping on top.

Bake in the oven for 55 to 65 minutes, or until the filling just begins to bubble. If the edges of the pie and/or the crumble topping begin to brown too quickly tent with aluminum foil.

Allow to cool to room temperature on a wire rack before slicing and enjoying.

Recipe first appeared on Bead Yarn & Spatula

Fig & Brie Croissants

I love a good croissant, especially a good almond croissant. Now, I don’t think I would ever attempt to make croissants from scratch since they do seem a bit labor intensive and it’s possible (and easier) to buy them. I did make these Almond Croissants that were easy and delish, but I used plain croissants as the base and doctored them up a bit. I did attempt to make almond croissants using puff pastry once and it was a fail. They never even made it into the oven! Something was off with the puff pastry, and it never thawed properly.  Recently on Instagram I saw a video of someone making Ham & Cheese Croissants using puff pastry. Which gave me the idea to make Fig & Brie Croissants. Thankfully this time the puff pastry thawed properly, and the croissants actually made it into the oven. 

To thaw the puff pastry I removed it from the packaging and let it sit at room temperature for about 40 minutes. When it was ready, I was able to easily unfold it, but it was still a bit cold/frozen. I lined a baking sheet with parchment paper and unfolded one of the sheets on top of it and brushed it with an egg wash, reserving the rest of it. Each column of the puff pastry makes three croissants, so next I dropped a teaspoon of fig jam in the center of each croissant and then topped it with brie cheese.

The day I made these I was trying to do too many things at once, so I completely forgot to snap a picture of what they looked like before going in the oven. Basically, I topped it with the second pastry sheet and gently pressed the two sheets together removing any air from each square. I then sliced the croissants and separated them on the parchment paper about 2 inches apart. While the oven heated to 400 F I placed them in the refrigerator to ensure that the pastry would be flaky. Since I did handle the puff pastry a bit it could have warmed, and this would definitely affect texture of it. Puff Pastry is made with butter and the cold butter in the pastry is what gives you the flaky layers.  After baking for about 25 minutes, I had golden flaky fig & brie croissants to eat.

I let them cool for about 10 minutes before slicing into one to enjoy and it was delish!

And yes, I did try making the Ham & Cheese one’s I saw as well with a few tweaks. I opted to use spicy mustard and Swiss cheese in lieu of whole grain mustard and gruyere cheese and they were just as good as the Fig & Brie ones.

Fig & Brie Croissants

Ingredients:

1 package (2 sheets) puff pastry, thawed per directions*

1 large egg, beaten

3 tablespoons fig jam

9 pieces of Brie cheese, cut from an 8oz. wheel of Brie about 1/4-inch thick

*I used Pepperidge Farm Frozen Puff Pastry

Directions:

Line a baking sheet with parchment paper and gently unfold one of the puff pastry sheets on the parchment paper. Brush with the egg wash, reserving the remaining egg wash for the top of the croissants.

You will have a total of 9 croissants, 3 from each column of the puff pastry. Visualize each column of the puff pastry sheet divided in three and drop a teaspoon of fig jam in the center of each. Repeat for the other two columns. Then place a piece of brie cheese on top of each teaspoon of fig jam.

Gently unfold the other puff pastry sheet and place on top. Use your fingers to press the two sheets together, removing any trapped air from each square. Using a sharp knife, pastry wheel or pizza cutter to slice into 9 squares. Separate them leaving about two inches between each and cover with a kitchen towel and refrigerate while the oven preheats to 400 F.

Once the oven is ready, bake the croissants for 20-25 minutes. Allow to cool for 10-15 minutes before enjoying.

To make the Ham & Cheese Croissants swap out the fig jam & brie cheese for spicy mustard, 5 slices of deli ham cut in half and folded, and 3 slices of Swiss cheese cut into quarters. Drop a teaspoon of mustard onto each croissant and then top with a folded half slice of ham and a quarter piece of the Swiss cheese. All other directions are the same.

Mango Citrus Tart

I’ve owned a tart pan with a removable bottom for years and have only used it a handful of times. I believe I bought it to make a frangipane tart over 10 years ago. If you search my blog, you can find the recipe. The pictures are so bad from that post that I will refrain from posting the link.  In case you are wondering though, frangipane is basically as an almond tart. You can use almond flour, almond paste or ground almonds to make the custard filling and it usually has a fruit added in as well. I got to dust off my tart pan to make a Mango Citrus Tart I recently came across in an issue of Food Network Magazine. And don’t worry, you don’t have to peel or chop any mangoes to make this tart, you simply use frozen mango pulp thawed as the base for the filling.

Before I made the filling, I made the crust for the tart. In my food processor I processed graham crackers until they were finely ground before adding in melted butter. Once the mixture was combined, I pressed it into the bottom and up the sides of the tart pan. To make sure the crust was even and compact in the pan I used the bottom of a glass to press and smooth it down. After baking the crust, I let it cool on wire rack while I made the filling.

To make the filling I combined the mango puree with eggs, cornstarch, sugar, salt, lime and lemon juice in a medium saucepan. After whisking everything together until it was combined, I used a rubber spatula to stir it while heating it on medium-low heat until it was slightly thickened. Don’t make the same mistake I did, I stopped stirring for a few seconds and the mixture immediately started to bubble. Thankfully nothing bubbled over, and it didn’t scorch.  I removed the filling from the heat and stirred in unsalted butter until it melted.

Once the filling was ready, I placed the crust on a baking sheet and strained it through a fine mesh sieve directly into the cooled crust.

I then placed it in the oven for about 30 minutes. I ended up baking it a few minutes too long as the filling ended up cracking in a few places…

But it was nothing that a little whipped cream and lime zest couldn’t cover up and besides it didn’t alter the flavor of the tart one bit. It was delish! Not too sweet and the mango flavor was spot on!

Mango Citrus Tart

Ingredients:

For the crust:

14 whole graham crackers

2 tablespoons sugar

1/4 teaspoon kosher salt

6 tablespoon unsalted butter, melted

For the filling:

1 14oz package frozen mango puree, thawed*

6 large eggs plus 2 egg yolks

1 tablespoon cornstarch

1/2 cup sugar

1/4 cup lime juice

3 tablespoons lemon juice

Pinch of kosher salt

4 tablespoon unsalted butter, cubed

*To thaw the puree I placed it in the refrigerator overnight

For the topping:

1 cup heavy cream

2 tablespoons confectioners’ sugar

1 teaspoon vanilla extract

Zest of 1 lime

Directions:

Preheat the oven to 350 F.

For the crust: Break the graham crackers into pieces and place in the bowl of a food processor along with the sugar and salt. Process until the crackers are finely ground. Add in the butter and pulse to combine. Press the mixture evenly into the bottom and up the sides of a 9-inch tart pan. Bake for 12 minutes in the preheated oven until the crust is golden. Transfer to a wire rack to cool.

For the filling: In a medium saucepan whisk together the mango puree, whole eggs, egg yolks, cornstarch, sugar, lime juice, lemon juice and salt until smooth and combined. Cook over medium-low heat, stirring constantly with a rubber spatula, until the mixture begins to thicken, about 7 to 10 minutes. Remove from the heat and add in the butter and stir until the butter has completely melted.

Place the cooled crust on a baking sheet. Strain the mango filling through a fine mesh sieve directly into the crust. Bake until the filling is set but the center is still a bit jiggly, 25 to 30 minutes. Let cool to room temperature before refrigerating for 4 to 6 hours.

For the whipped cream: Combine the heavy cream, confectioners’ sugar and vanilla extract in a medium bowl and beat with a hand mixer on medium speed until stiff peaks form.

Prior to serving the tart top with the whipped cream and sprinkle zest on top.

Recipe from Food Network

Chocolate Dipped Churro Cookies

Feliz Cinco de Mayo! I’ve made all kinds of desserts to celebrate the day, but never a cookie! Truthfully, I had no clue what to make this year. The idea for a cookie came to me from wondering what I could make with a box of French vanilla cake mix (besides a cake). Yup, it’s another cake mix cookie. And as with the Chocolate Salted Caramel Chip Cookies I posted a few weeks ago today’s Chocolate Dipped Churro Cookies were also a big hit. Yes, I turned a cake mix into a cookie reminiscent of fried dough coated in cinnamon sugar! YUM!

So, how did I turn a French vanilla cake mix into a churro cookie? To start, I added vanilla extract and cinnamon to the dough and then rolled scoops of the dough in a cinnamon sugar mixture before baking. A couple of things to note. If you’ve ever made a cake mix you know that water, oil and eggs are the key add-ins to the mix. To turn cake mix into cookie dough you don’t want to add as much liquid to the mix. So, I omitted the water, reduced the eggs and swapped the oil for sour cream. You could use oil instead, but that will change the texture of the cookie. Not in a bad way, they just won’t be as soft. Now, even though I did refrigerate the dough for an hour it was still quite soft. So, instead of having a sticky mess of dough on my hands, I dropped the scoops of dough directly into the cinnamon sugar mixture to coat it before rolling the dough into balls and placing them on a parchment lined baking sheet. And after baking I let the cookies cool on the sheets for about 5 minutes so they could set.

These cookies were delish as is and incredibly soft, but, since I like dipping my churros in chocolate sauce, I decided to dip the cookies in melted chocolate.  And that kicked these cookies up a notch or two! And yes, I will say that they look like Snickerdoodles, but they don’t taste like them.

Chocolate Dipped Churro Cookies

  • Servings: 18 Cookies
  • Print

Ingredients:

For the Cookies:

1 15.25 oz box French Vanilla cake mix (I used Duncan Hines)

1/3 cup sour cream

2 eggs

1 teaspoon vanilla extract

1 teaspoon cinnamon

For the Cinnamon Sugar Coating:

1/4 cup sugar

1 teaspoon cinnamon

For Dipping:

1 cup semi-sweet chocolate (chips or chopped), melted

Directions:

In a large bowl beat together the cake mix, sour cream, eggs, vanilla extract and cinnamon with a hand mixer on medium speed until all the ingredients are incorporated. Cover and refrigerate for 1 hour.  

Preheat the oven to 350 F. Line 2 baking sheets with parchment paper.

In a small bowl combine the sugar and cinnamon for the cinnamon sugar coating.

Use a cookie scoop (1 1/2 tablespoons) to scoop the dough and drop into the cinnamon sugar. Roll the dough around to coat then use your hands to gently roll the dough into a ball and place on the prepared baking sheets 2 inches apart. It’s best to roll the dough in a ball after it’s been coated as the dough will be quite sticky.

Bake in the preheated oven 10-11 minutes, until the cookies are set. Let cool on the baking sheets for 5 minutes before transferring to a wire rack to cool completely.

To melt the chocolate… Place the chocolate in a microwave-safe bowl and heat for 20 second intervals, stirring between each, until the chocolate is completely melted and smooth. Dip one side of each cookie in the chocolate and then place on a wax paper lined baking sheet so the chocolate can set. To speed up the process of the chocolate setting place the cookies in the refrigerator for about 10 minutes.

Store in an airtight container.

Recipe first appeared on Bead Yarn & Spatula

Malted Chocolate Brownies

I’ve made quite a few desserts with malted milk powder as the star ingredient, and I must say none have ever disappointed. My favorite by far are the Malted Chocolate Chip Cookies I shared over 10 years ago and still make to this day – thankfully my pictures have improved since then! Today’s Malted Chocolate Brownies are a very close second though. These brownies are rich and decadent, but not overly sweet. The malted milk powder really enhances the chocolate flavor in them.

To start, I heated butter and sugar together in a saucepan over medium-low heat until the sugar mostly dissolved. I didn’t want to leave it on the heat too long and end up with the beginnings of caramel sauce. In a large bowl I whisked together eggs, vanilla extract, cocoa powder, malted milk powder, salt and baking powder. I slowly poured the butter mixture into the egg mixture and stirred everything together until it was smooth. I then stirred in the flour and finally folded in milk chocolate chips. I transferred the batter to a 9×13-inch baking pan I lined with parchment paper. And finally, I topped the batter with chopped malted milk balls (i.e. Whoppers).

After baking for about 35 minutes they were done. The malted milk balls on top ended up with a nice caramel color and some of the pieces that were still decent size after chopping them gave a nice malted milk taste to the brownies. Just a quick note in case you are thinking of doing the same, I actually didn’t slice these brownies the same day I baked them. I wrapped them in plastic wrap and kept them at room temperature and then sliced them the following day to try to keep them fresh an extra day or two. And, I will point out, as with most brownies, you should warm your knife under hot tap water before slicing. You will get cleaner slices that way.

If you are looking for more recipes with malted milk powder, check these out:

Malted Brownies

Malted S’mores Ice Cream

Chocolate Malted Cupcakes with Fluffy Vanilla Frosting

Malted Chocolate Brownies

Ingredients:

2 sticks unsalted butter

2 cups sugar

4 large eggs

2 teaspoons vanilla extract

1 cup unsweetened cocoa powder

1/4 cup malted milk powder

1 teaspoon kosher salt

1 teaspoon baking powder

1 1/2 cups flour

1 11.5 oz. bag milk chocolate chips

1 5 oz. package malted milk balls (Whoppers), roughly chopped or gently crushed in a resealable bag

Directions:

Preheat oven to 350 F. Line a 9×13-inch baking dish with parchment paper leaving an overhang on all sides.

In a medium saucepan heat the butter and sugar on medium-low heat until the butter melts and the sugar has mostly dissolved.

In a large bowl whisk the eggs and vanilla extract until combined. Whisk in the cocoa powder, malted milk powder, kosher salt and baking powder.

Gradually stir the butter mixture into the egg mixture and stir until smooth. Add the flour and stir until just combined. And finally, fold in the chocolate chips.

Spread the batter evenly into the prepared dish and top with the malted milk balls, pressing them lightly into the batter.

Baked in the preheated oven for 30 to 35 minutes, until the edges begin to pull away from the sides of the pan and a cake tester inserted in the center comes out mostly clean. Cool in the pan on a wire rack to room temperature then slice. Store in an airtight container.

Recipe from Real Simple