Raspberry Almond Cake with Chocolate Frosting

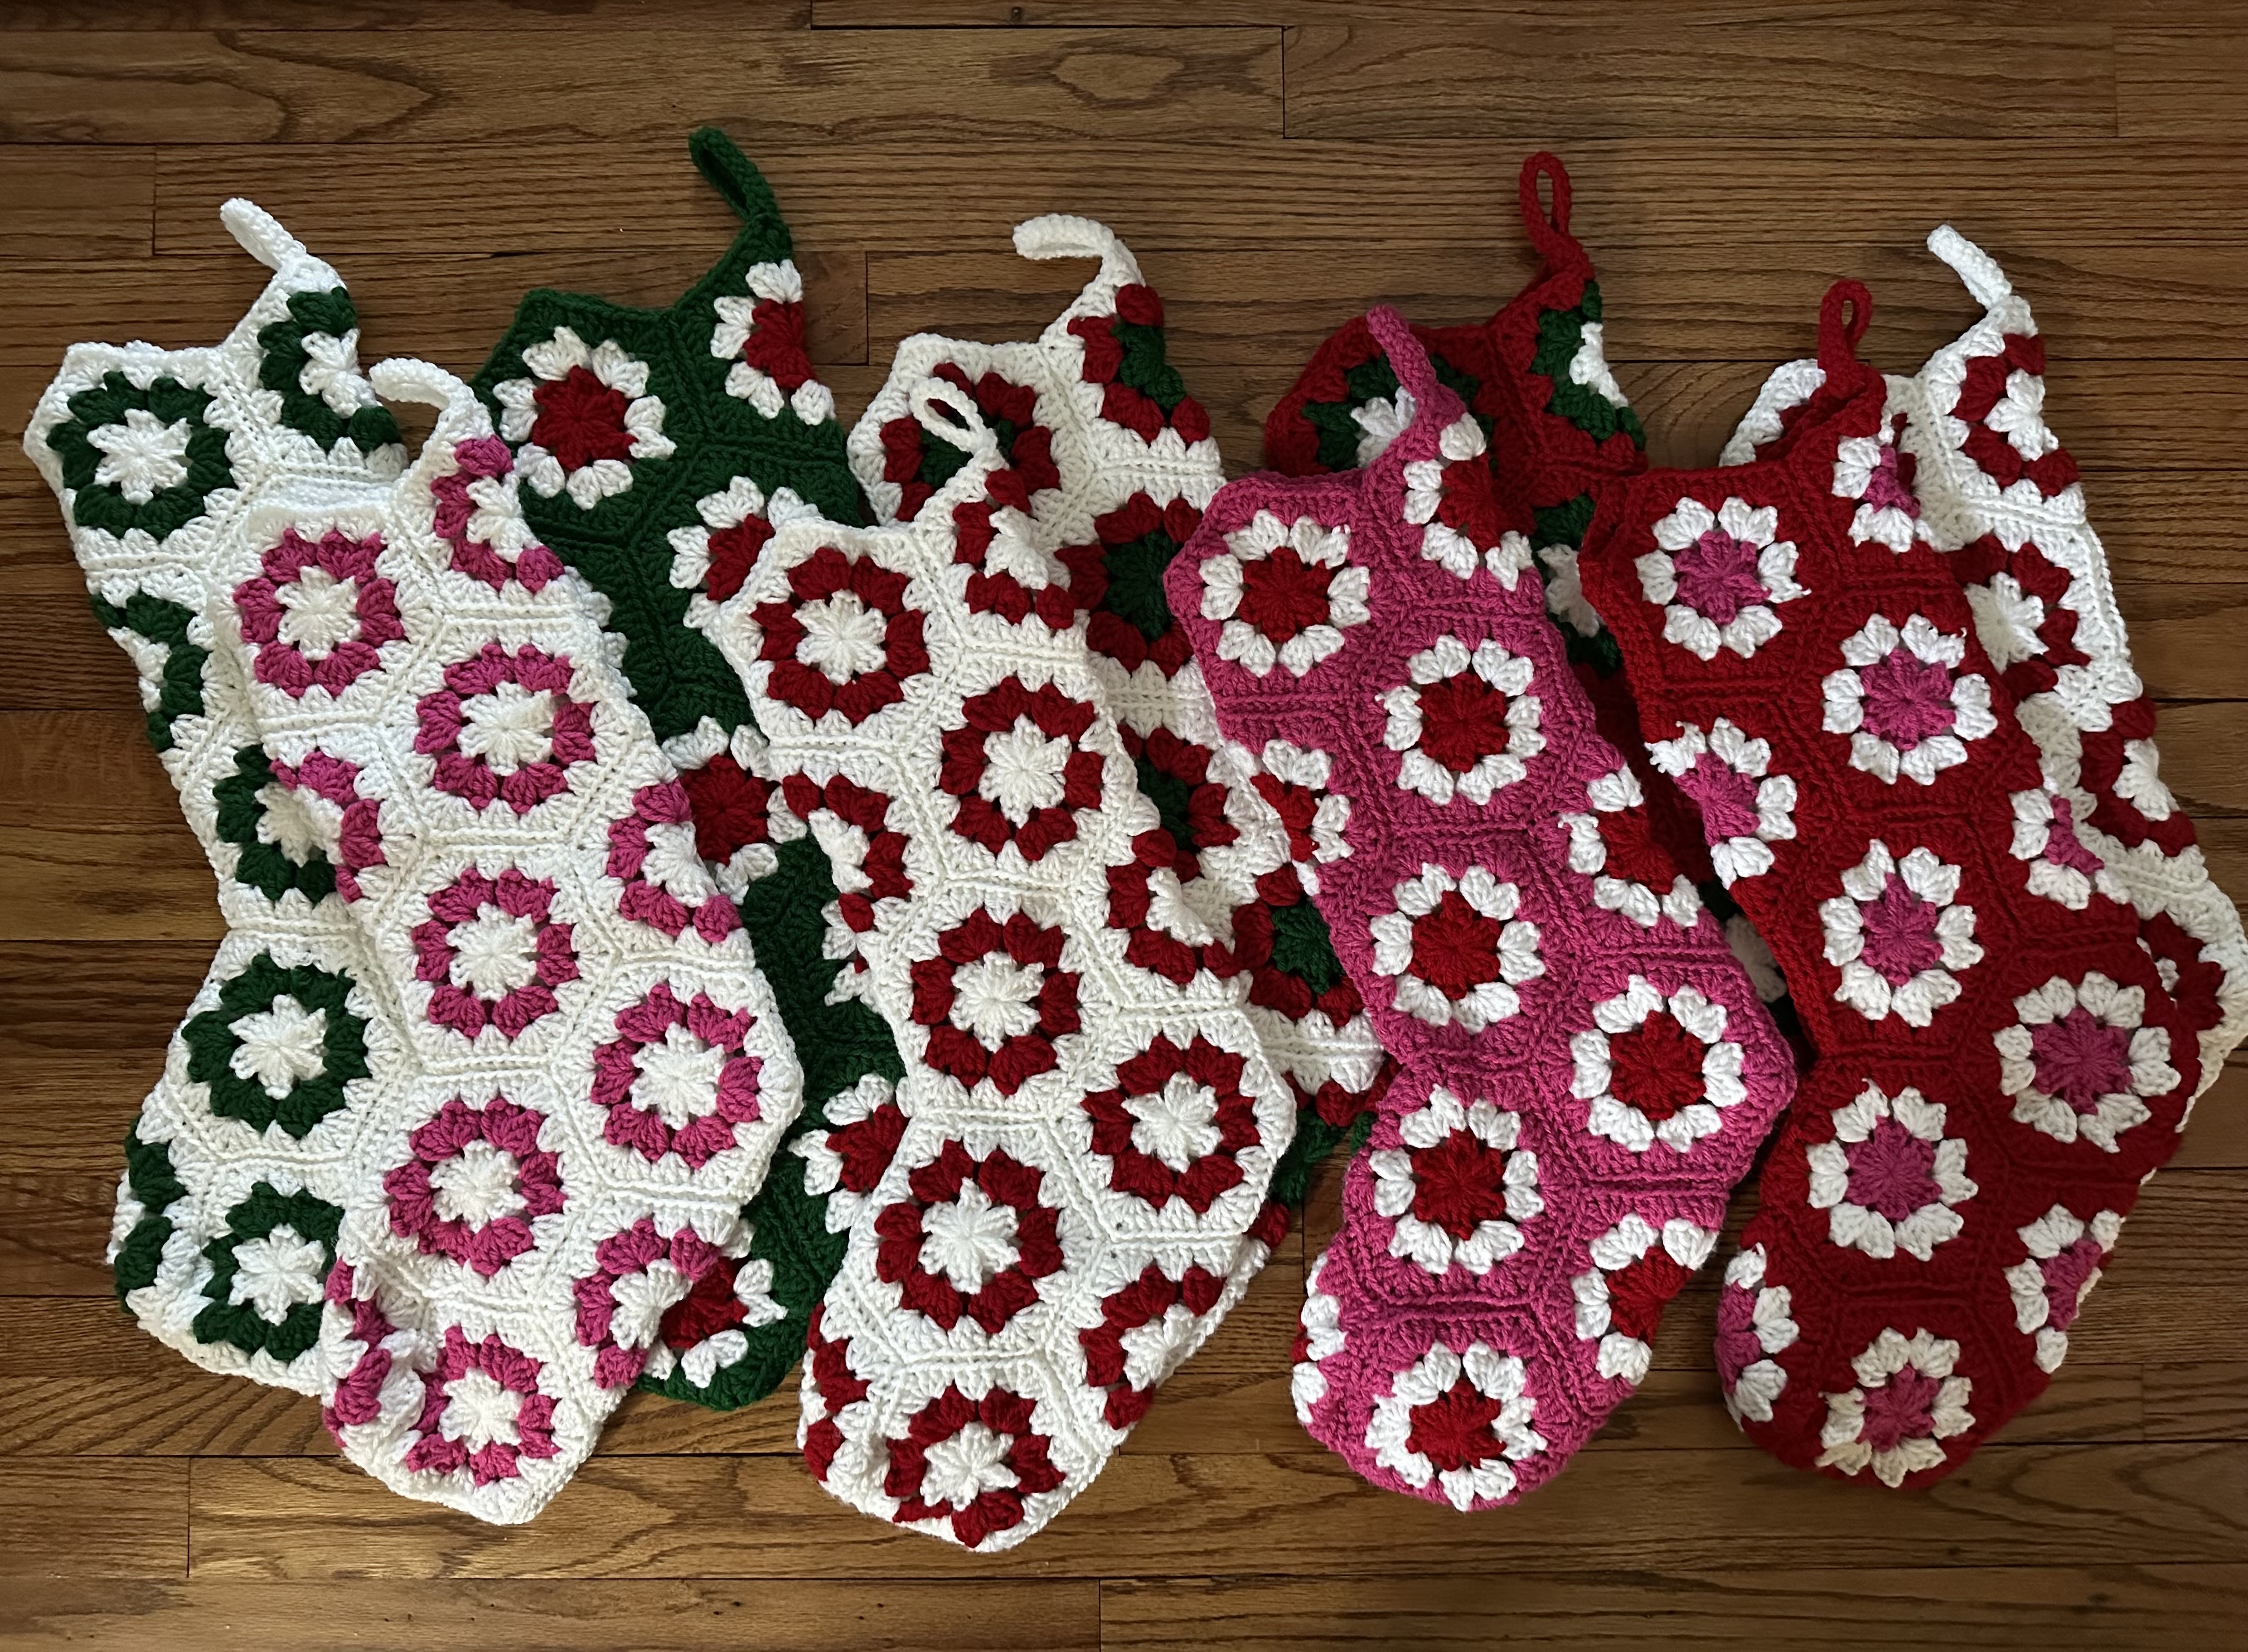
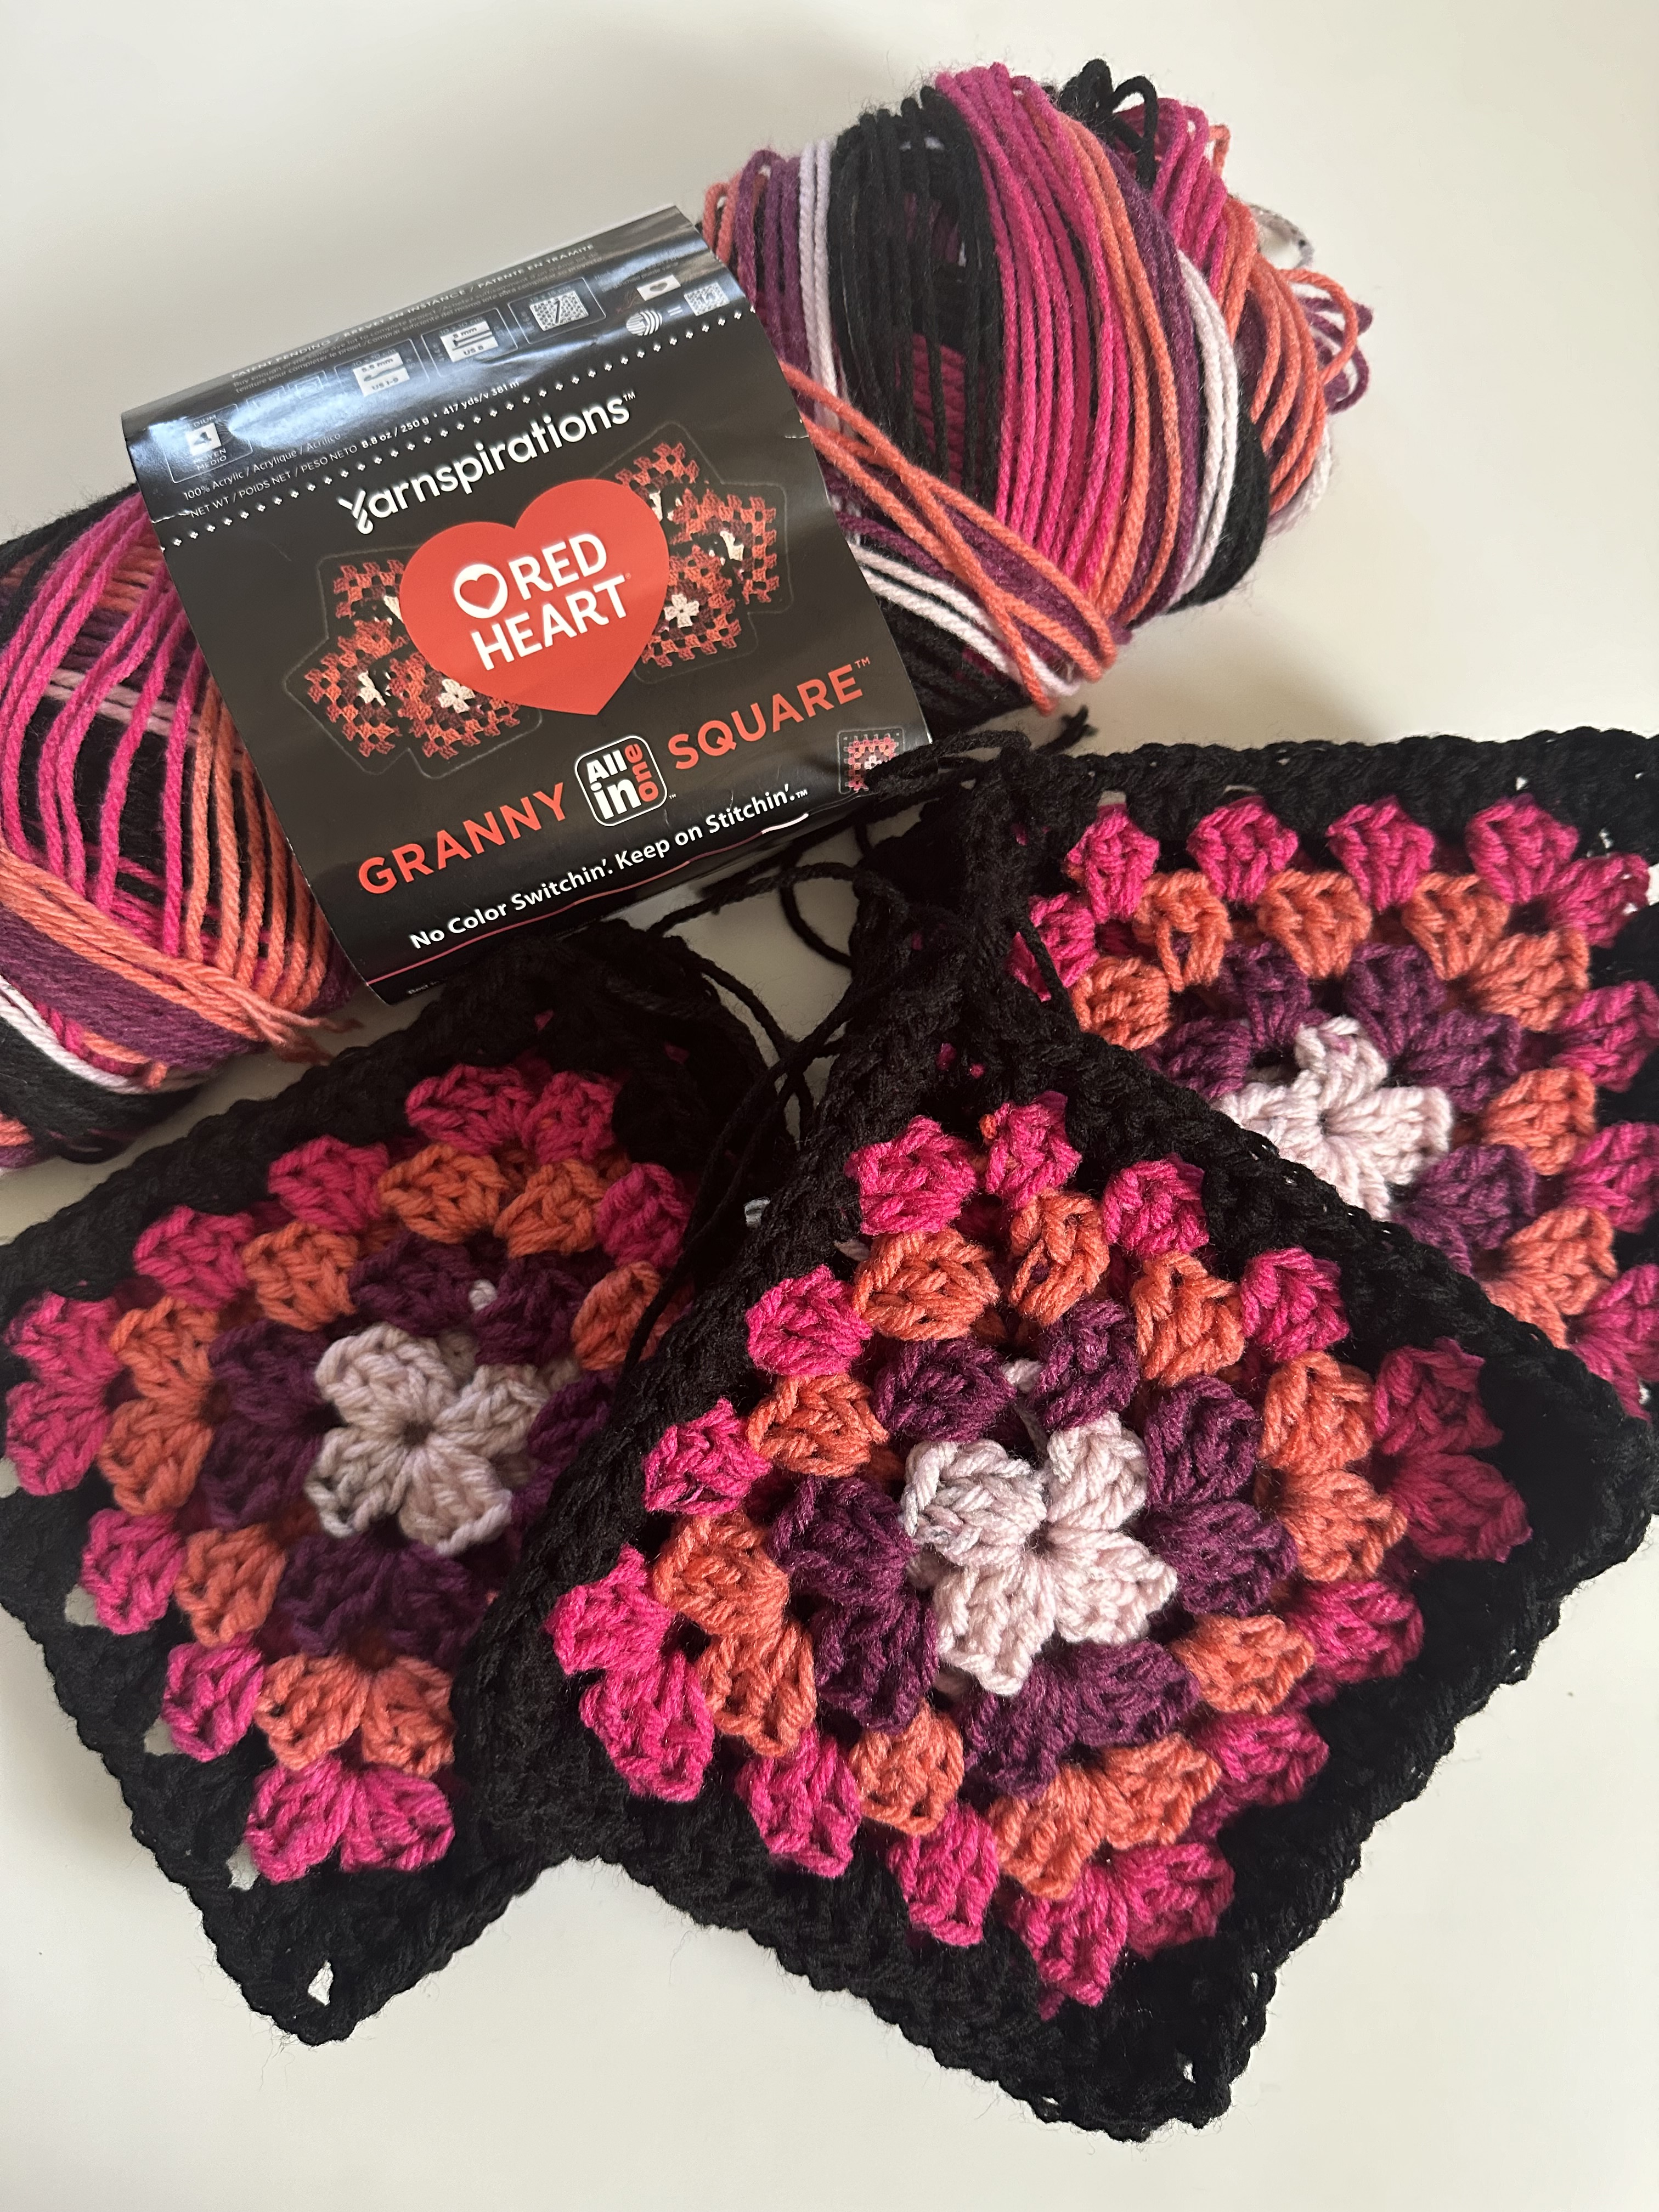
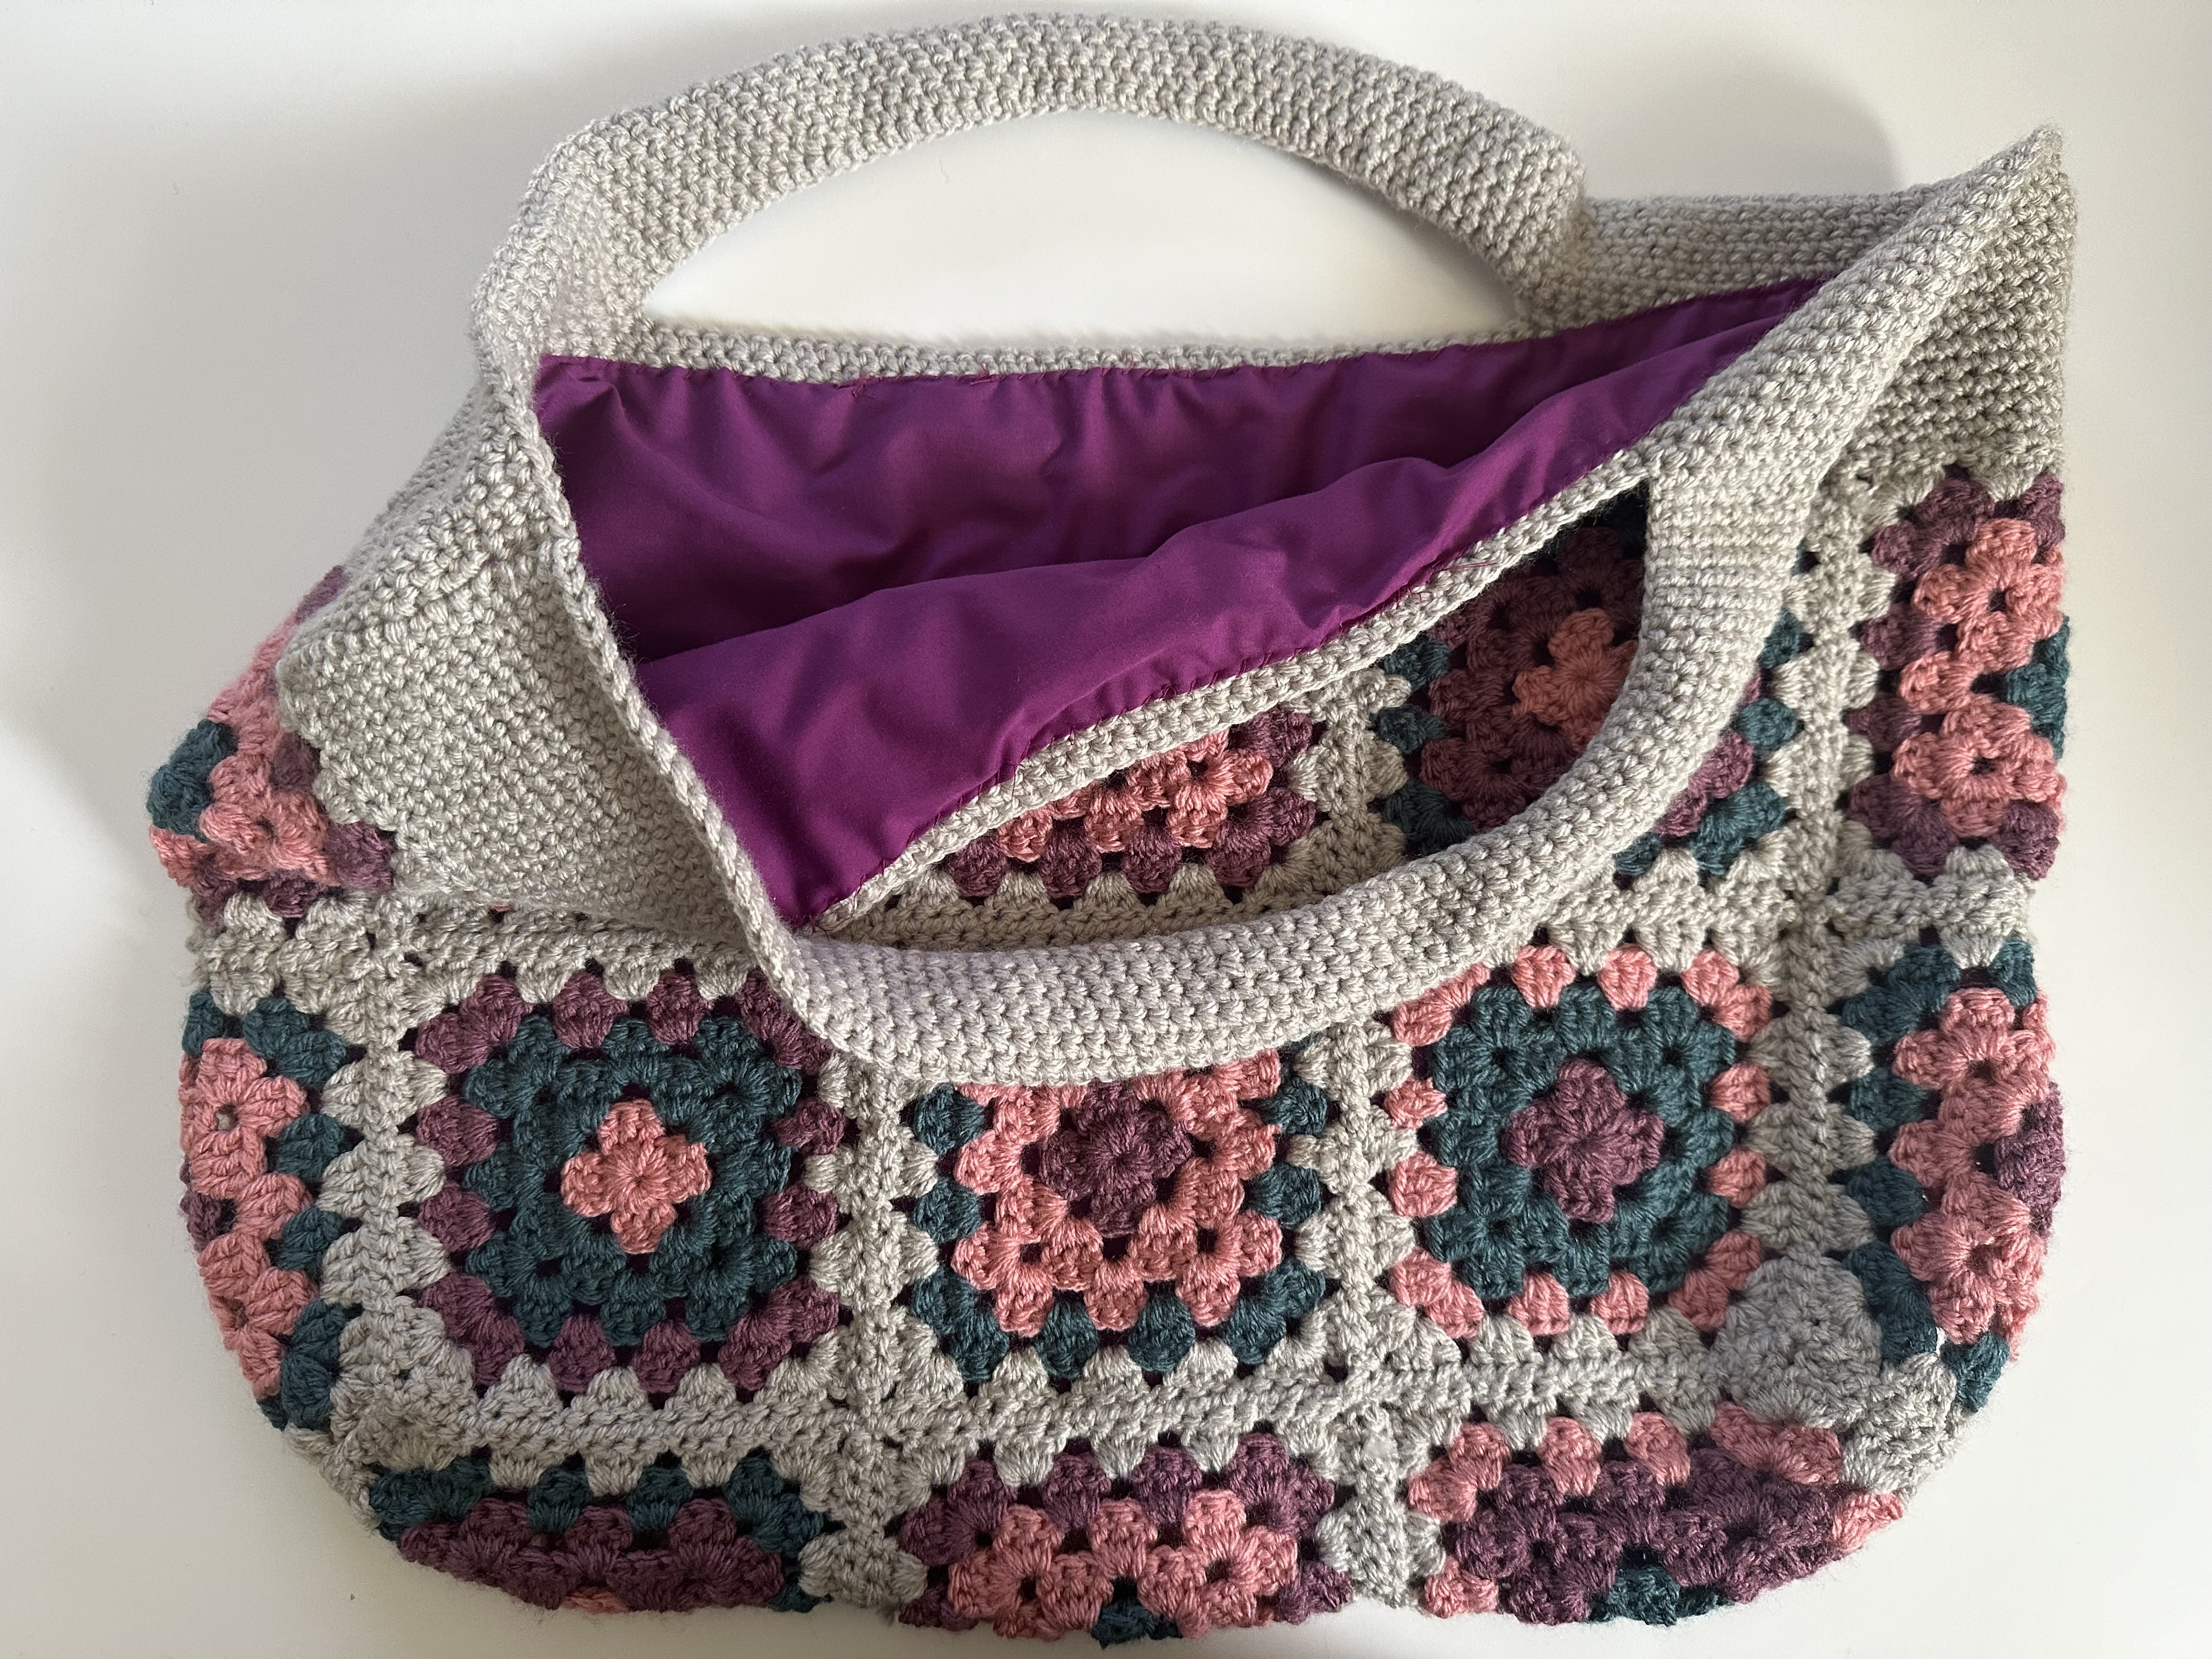
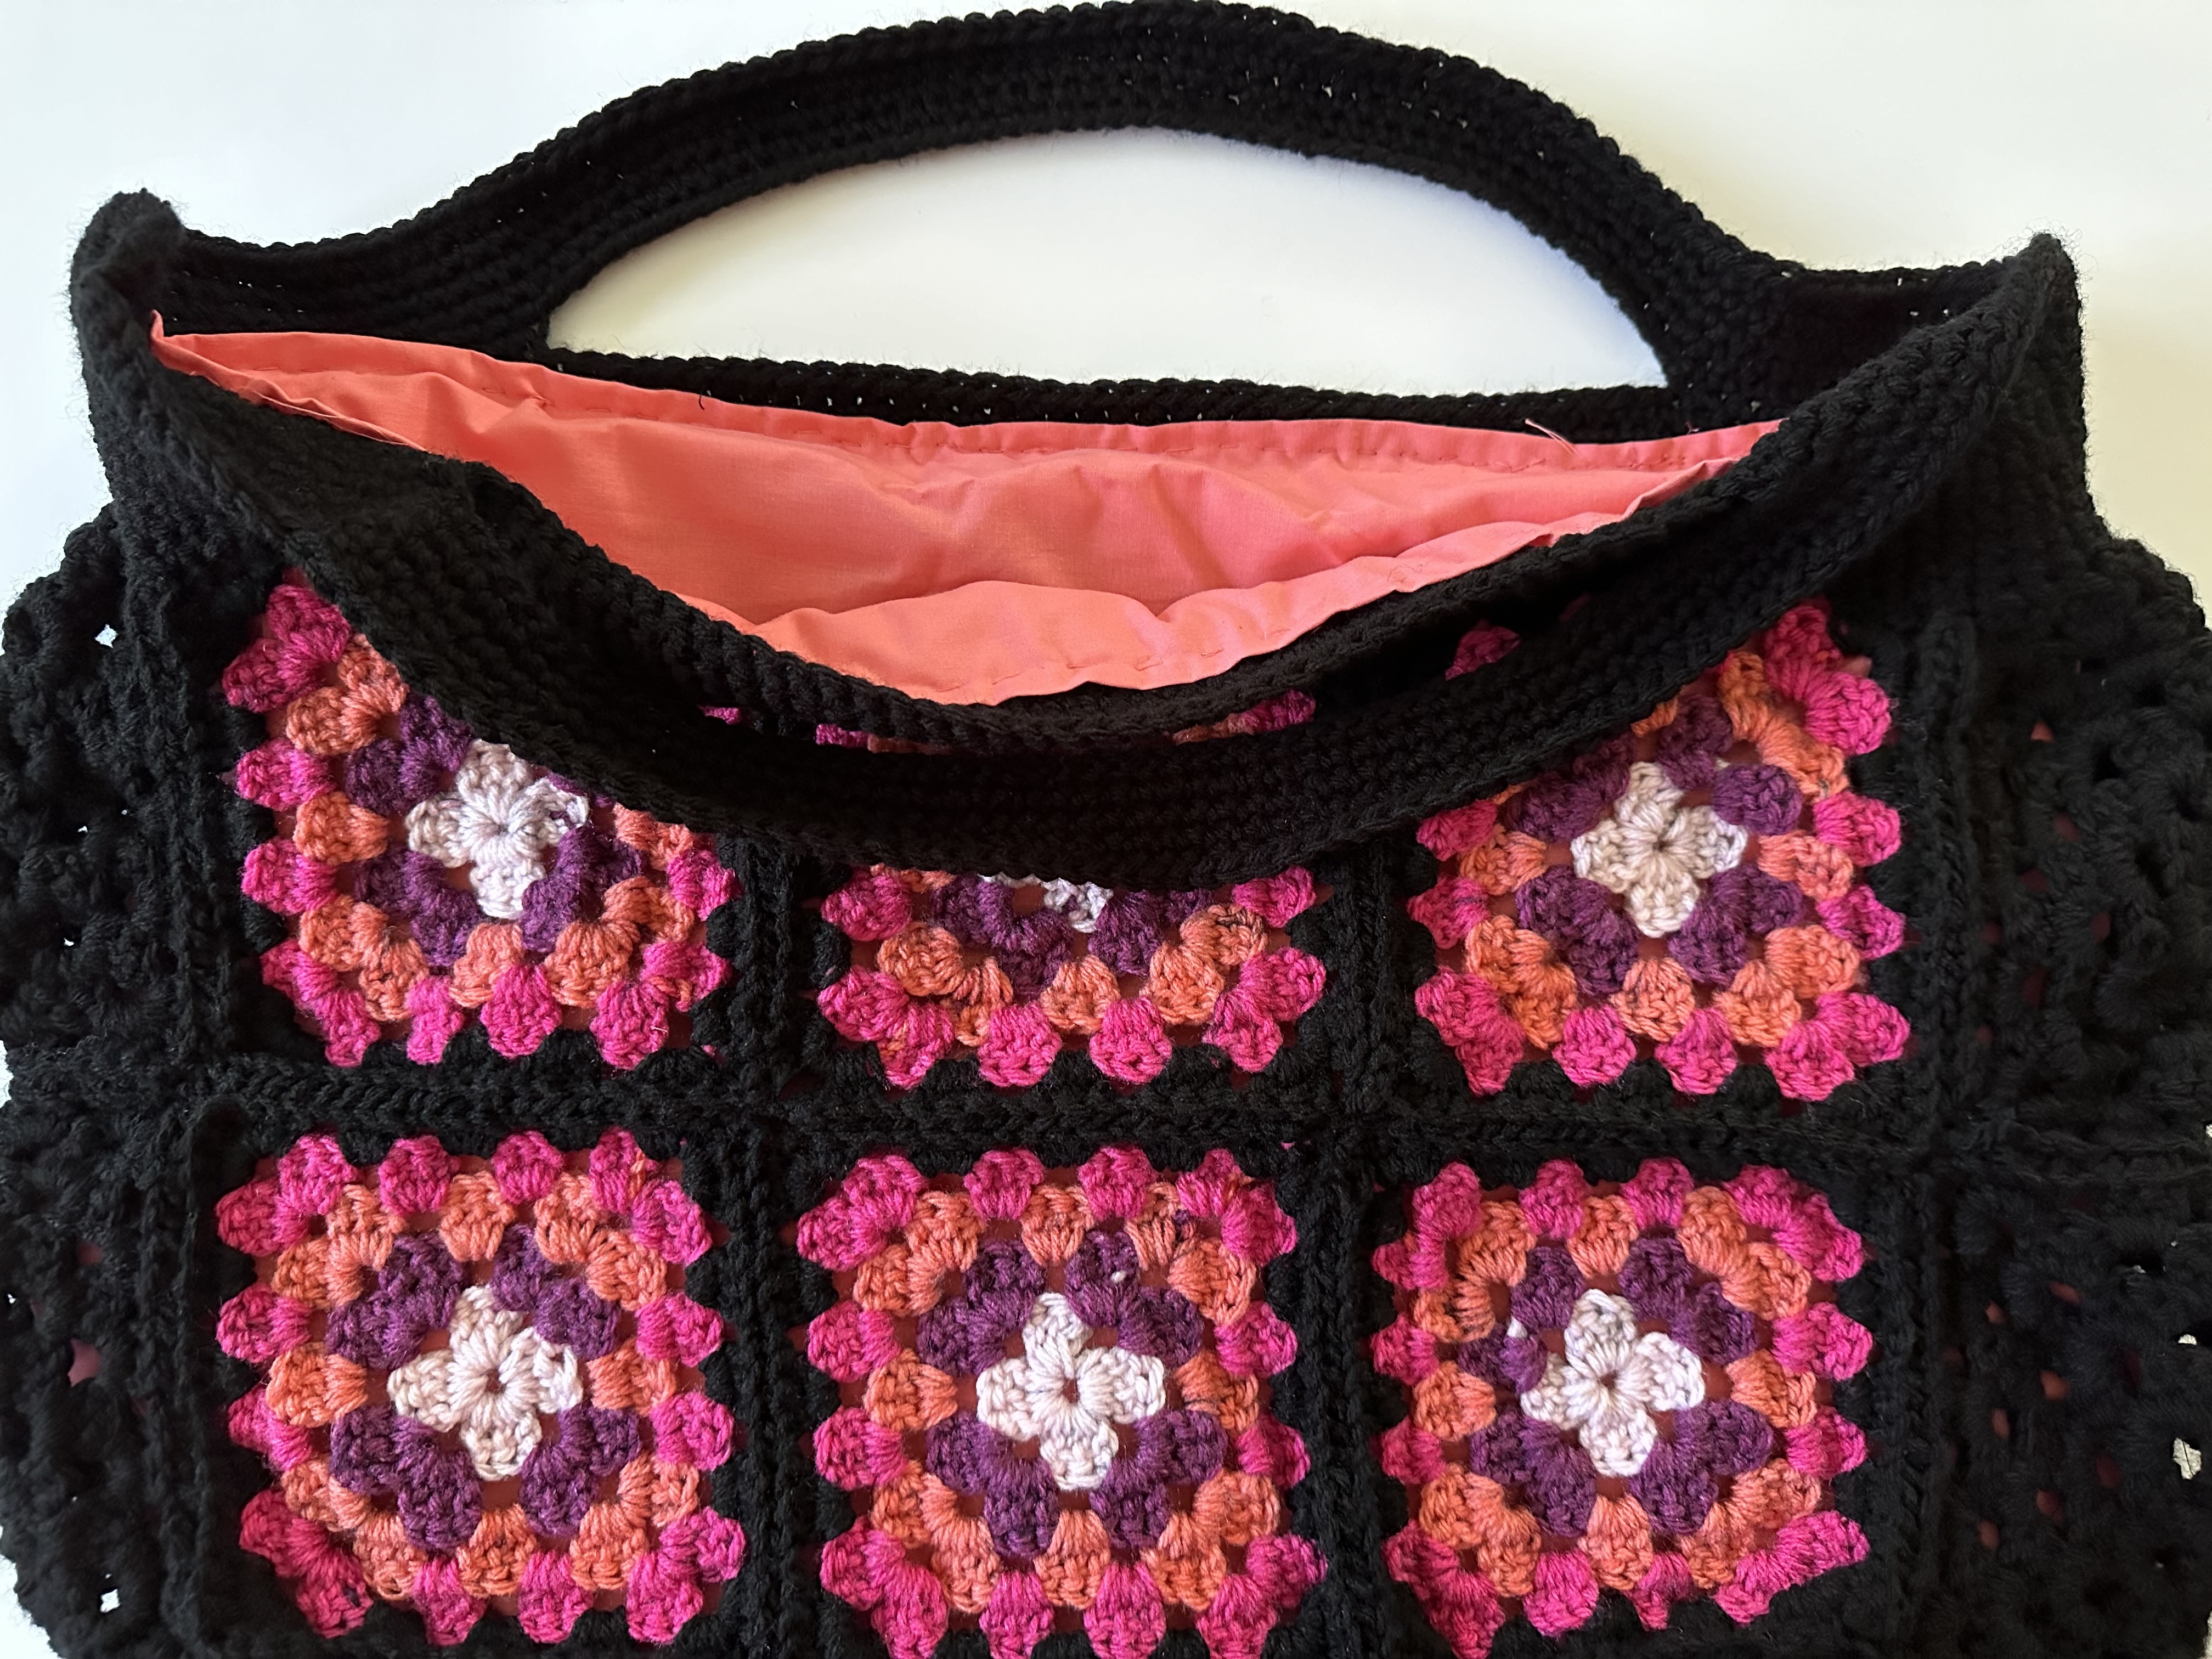
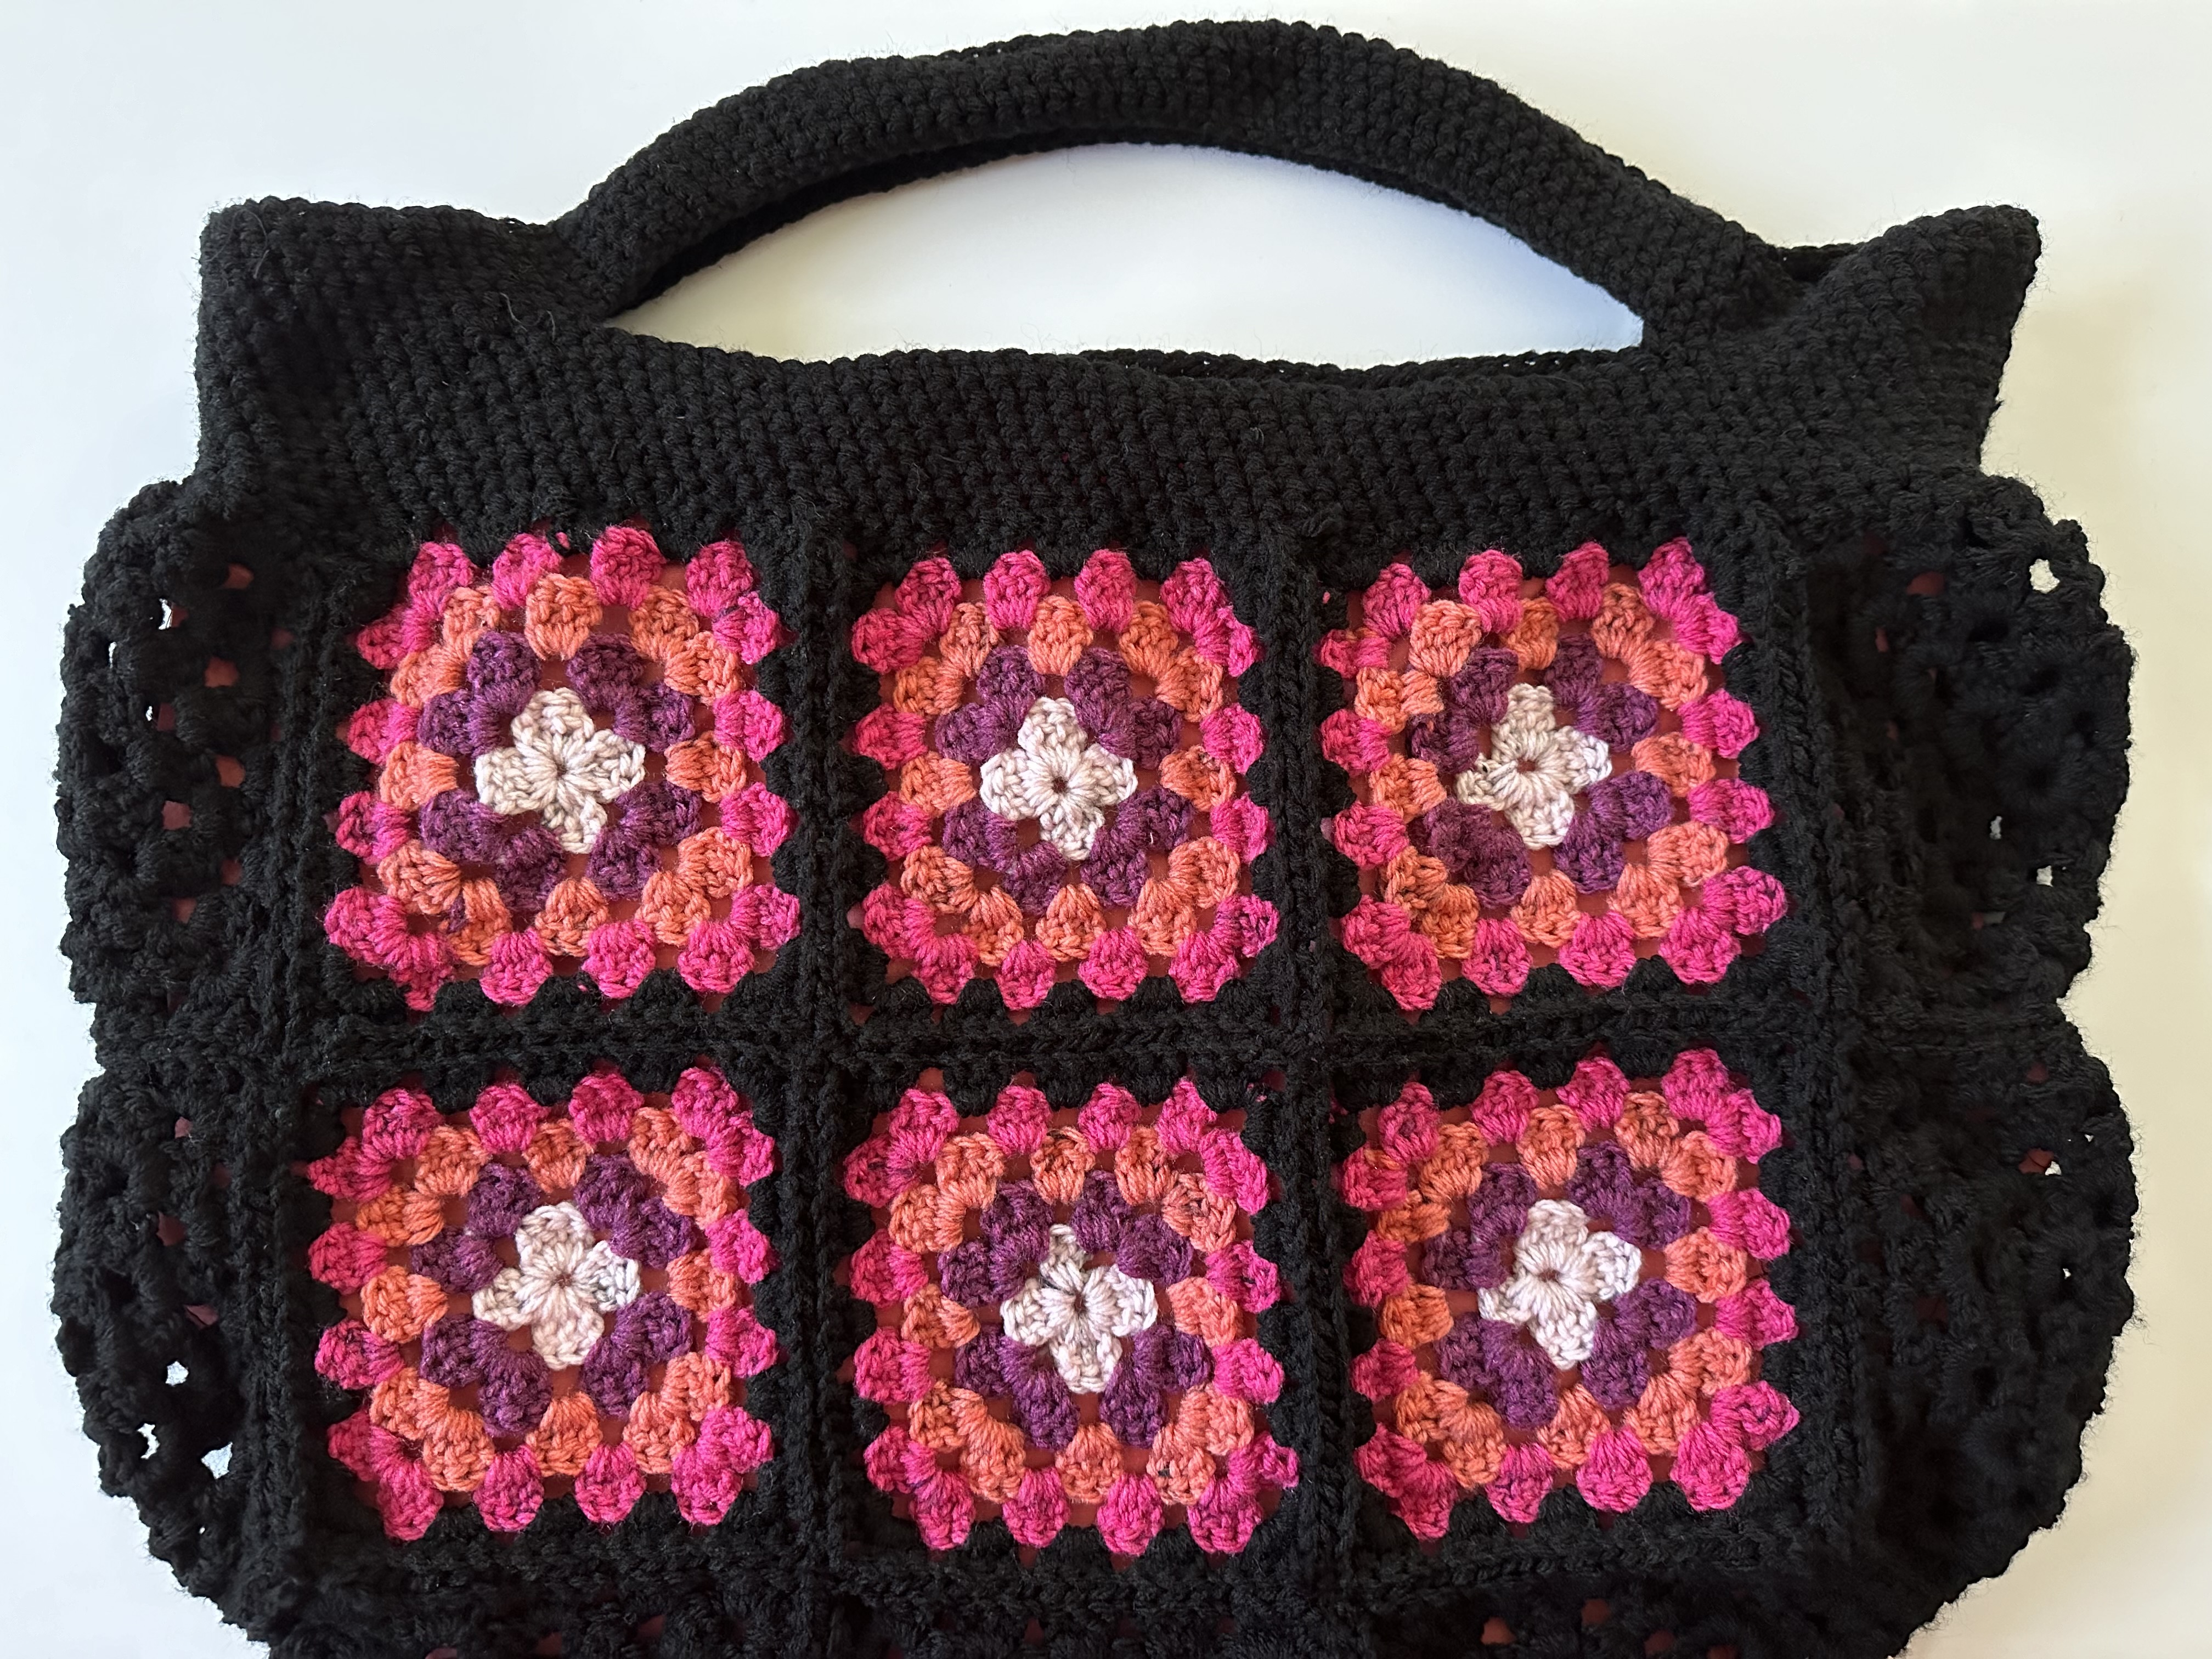
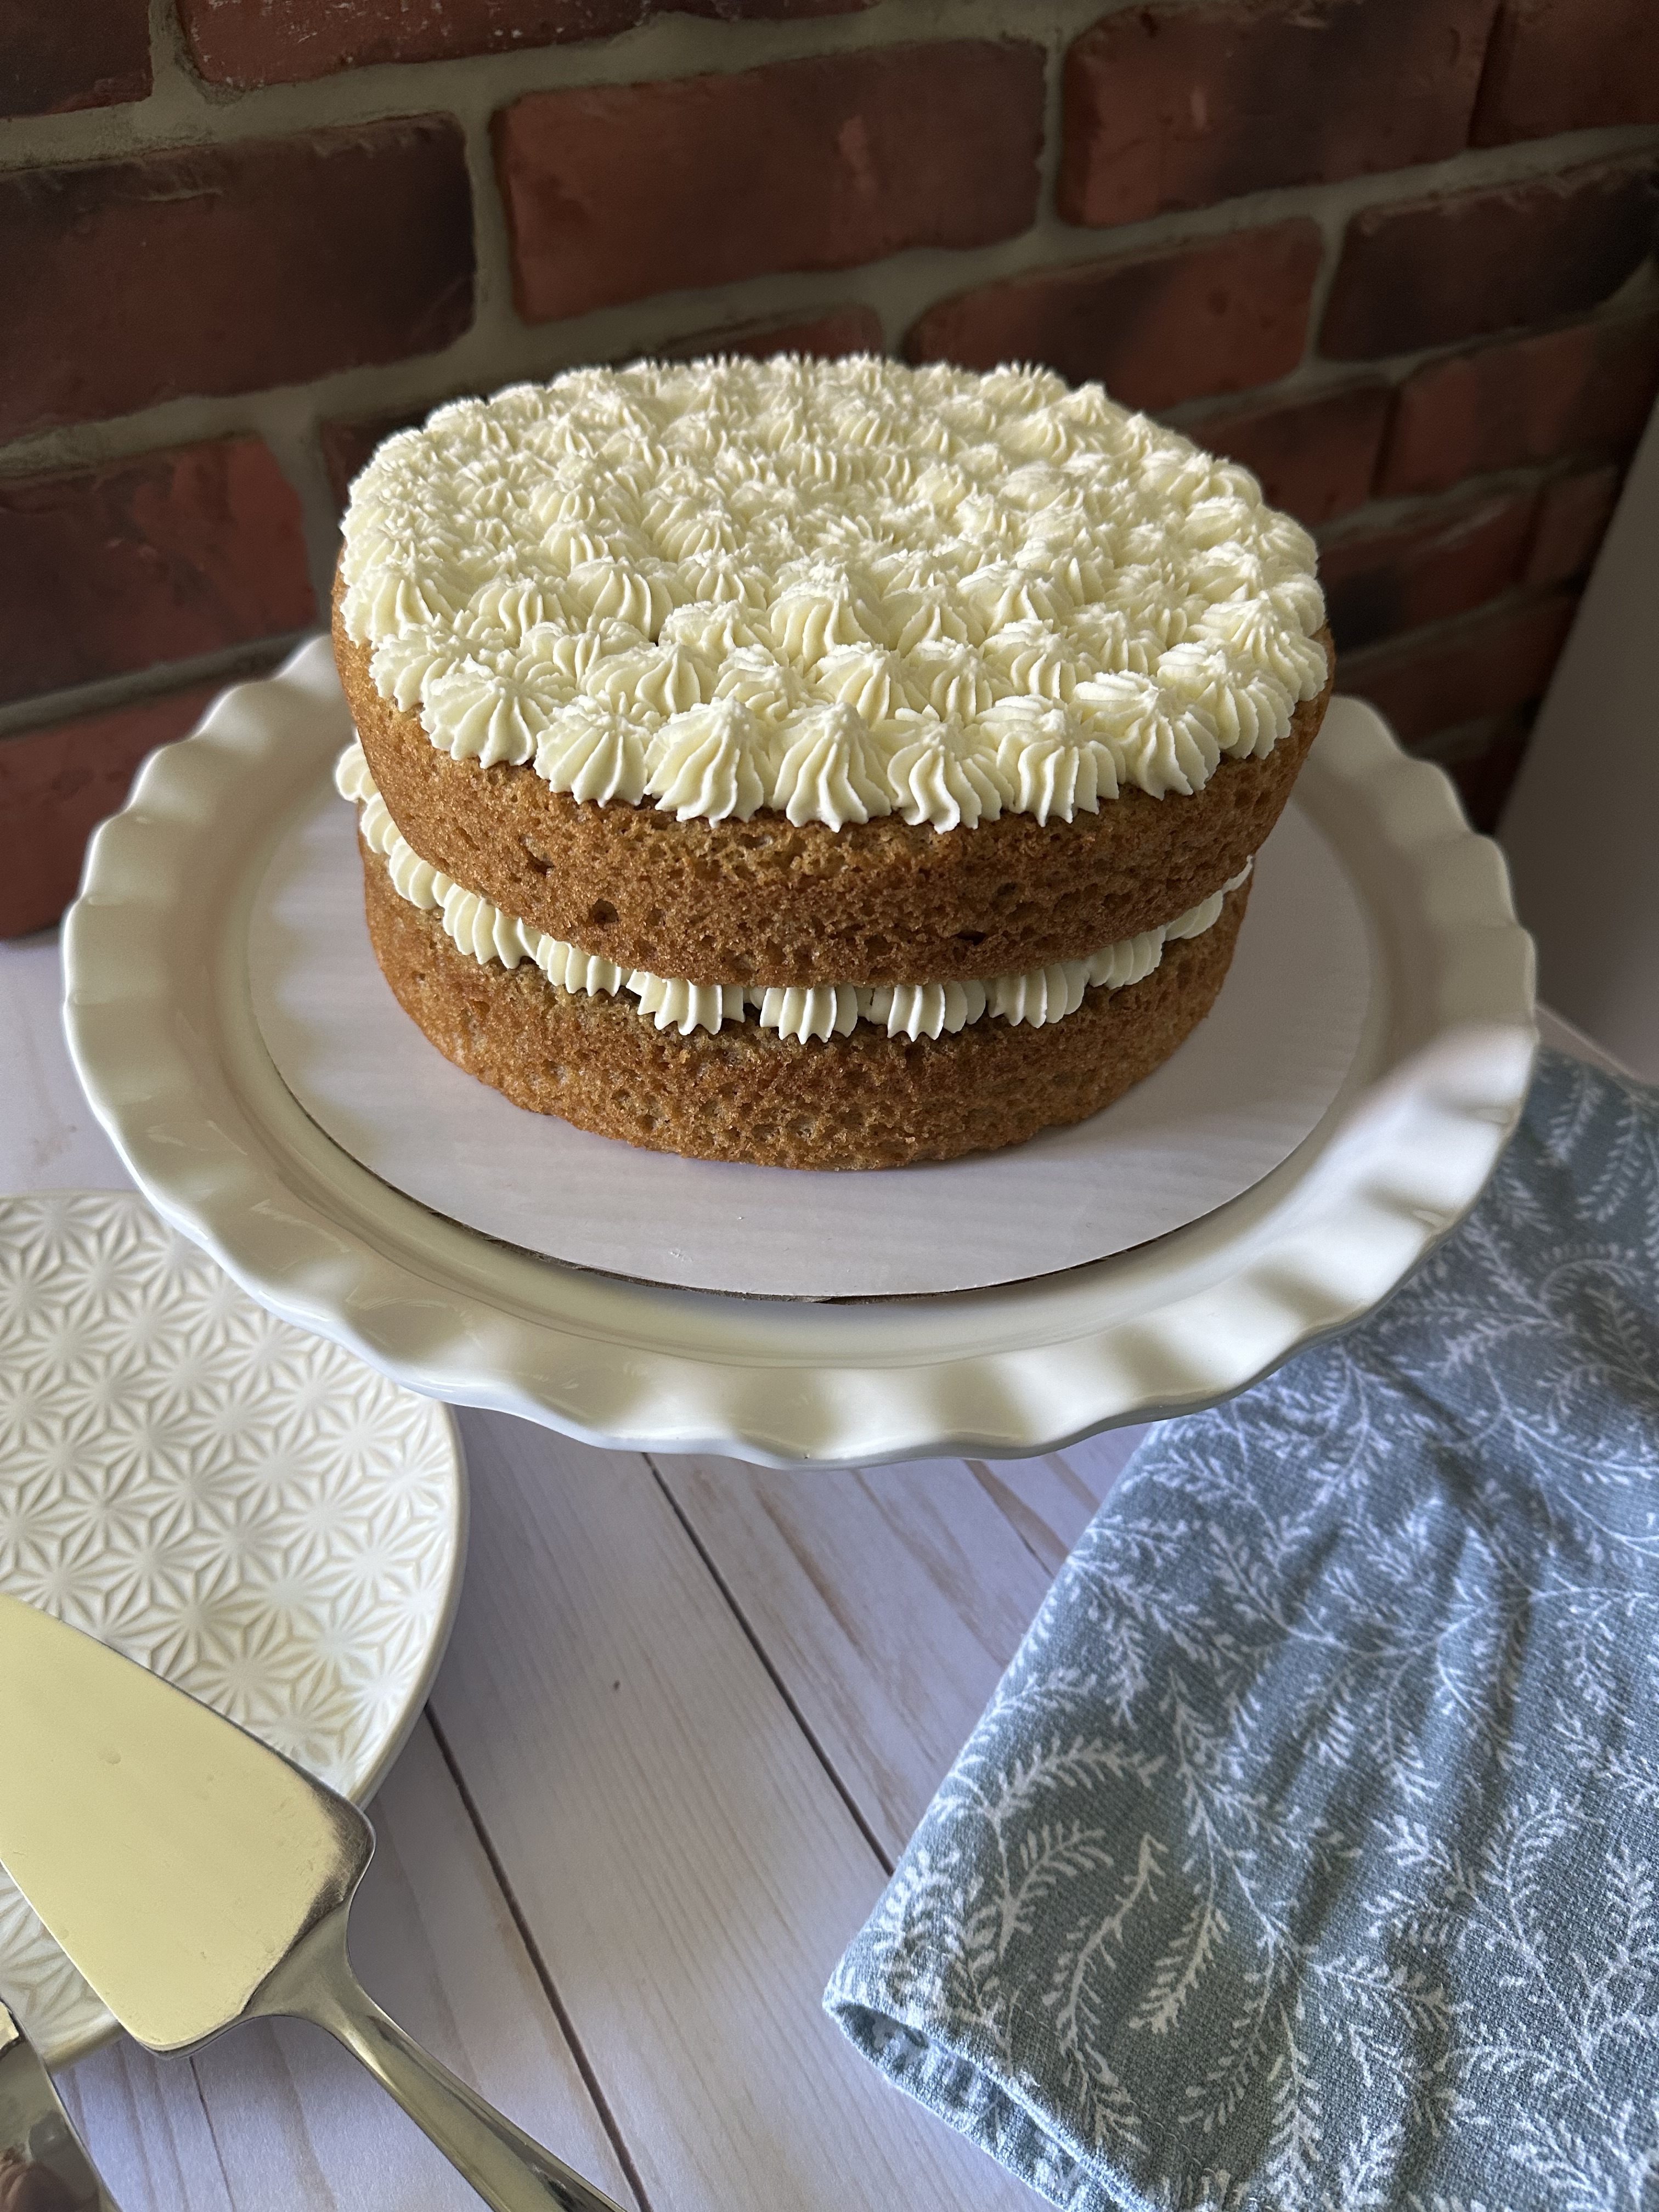
Hi there… It’s been a while! I have been baking, but I haven’t really been baking anything new to share. I did tweak a Blueberry Crumb Muffin recipe that was quite yummy that I intended on sharing, but didn’t photograph so it didn’t become a blog post. I’ll have to whip up a batch soon to share especially since berry season is right around the corner. I’ve also been doing quite a bit of crocheting. I used up most of my remnant stash of Bernat Blanket Yarn to create a colorful granny square blanket. I’ll be sharing that soon. I’ve also been working on a sunburst granny square cardigan for myself. Full disclaimer, I’ve been working on it for over a year. I go through bursts of making the squares and then take a break. I believe I am only a few squares away from having enough to start stitching it together so hopefully it doesn’t take me another year to complete. But today I am sharing a cake where all the flavors work perfectly well together. A Raspberry Almond Cake with Chocolate Frosting. So, if you like chocolate-covered almonds, raspberry truffles, any almond dessert, etc. this cake is for you!

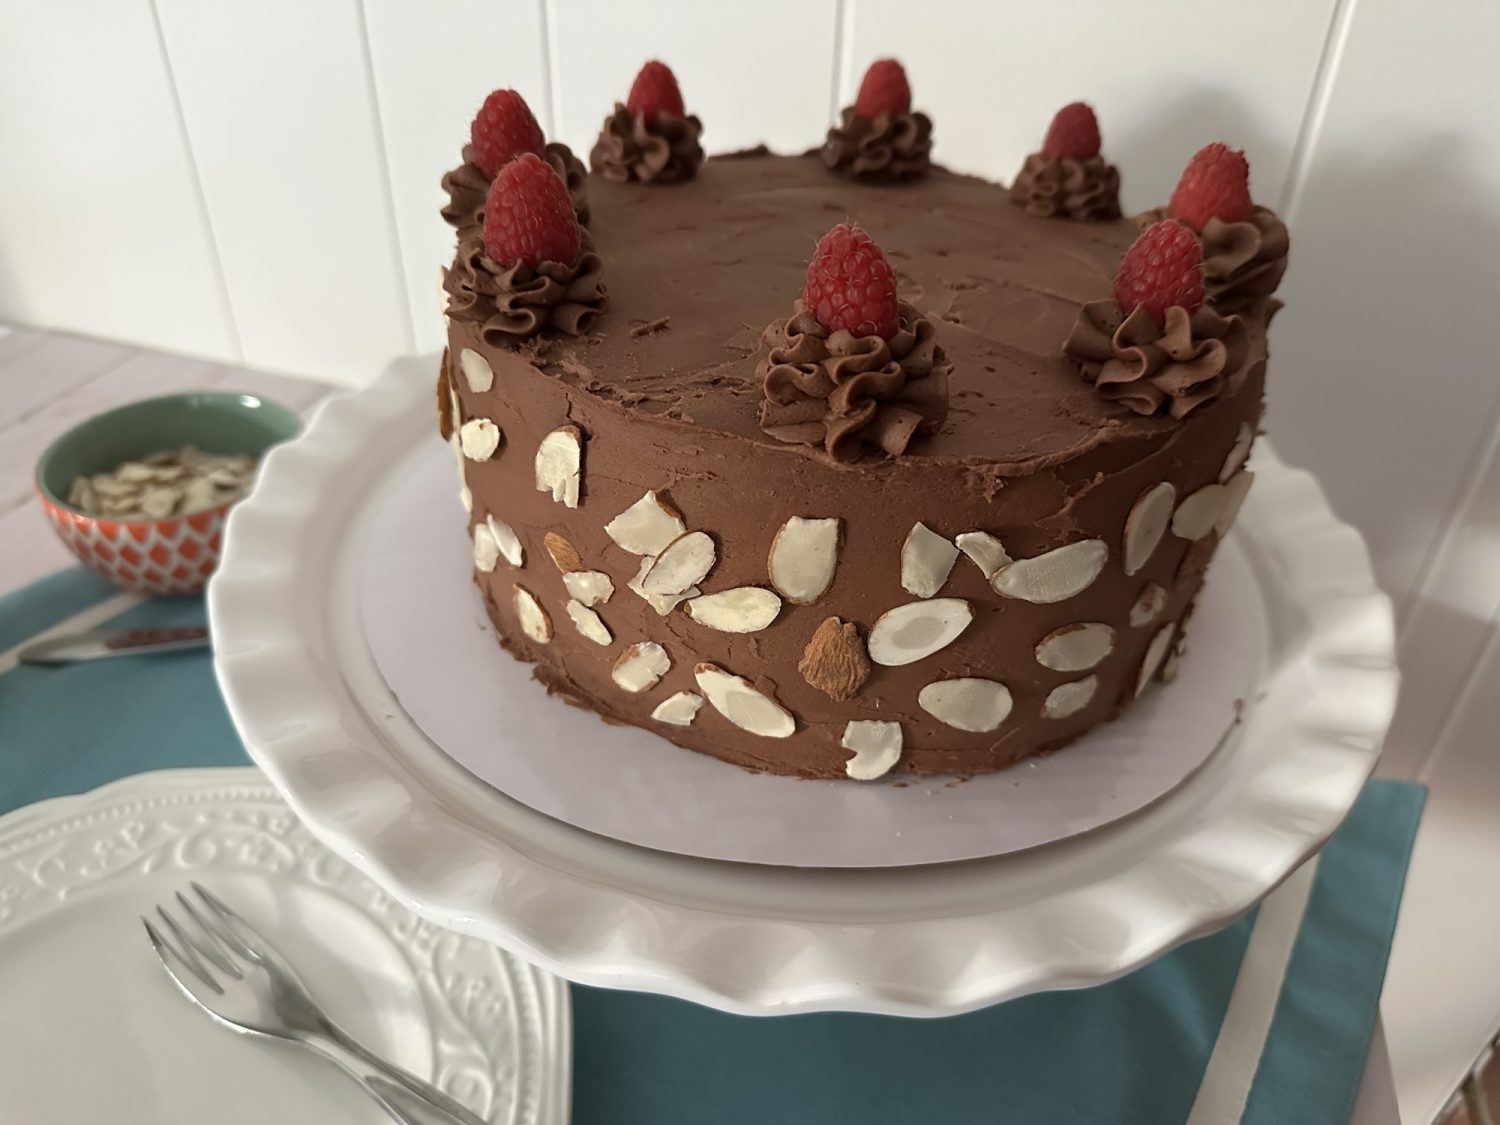
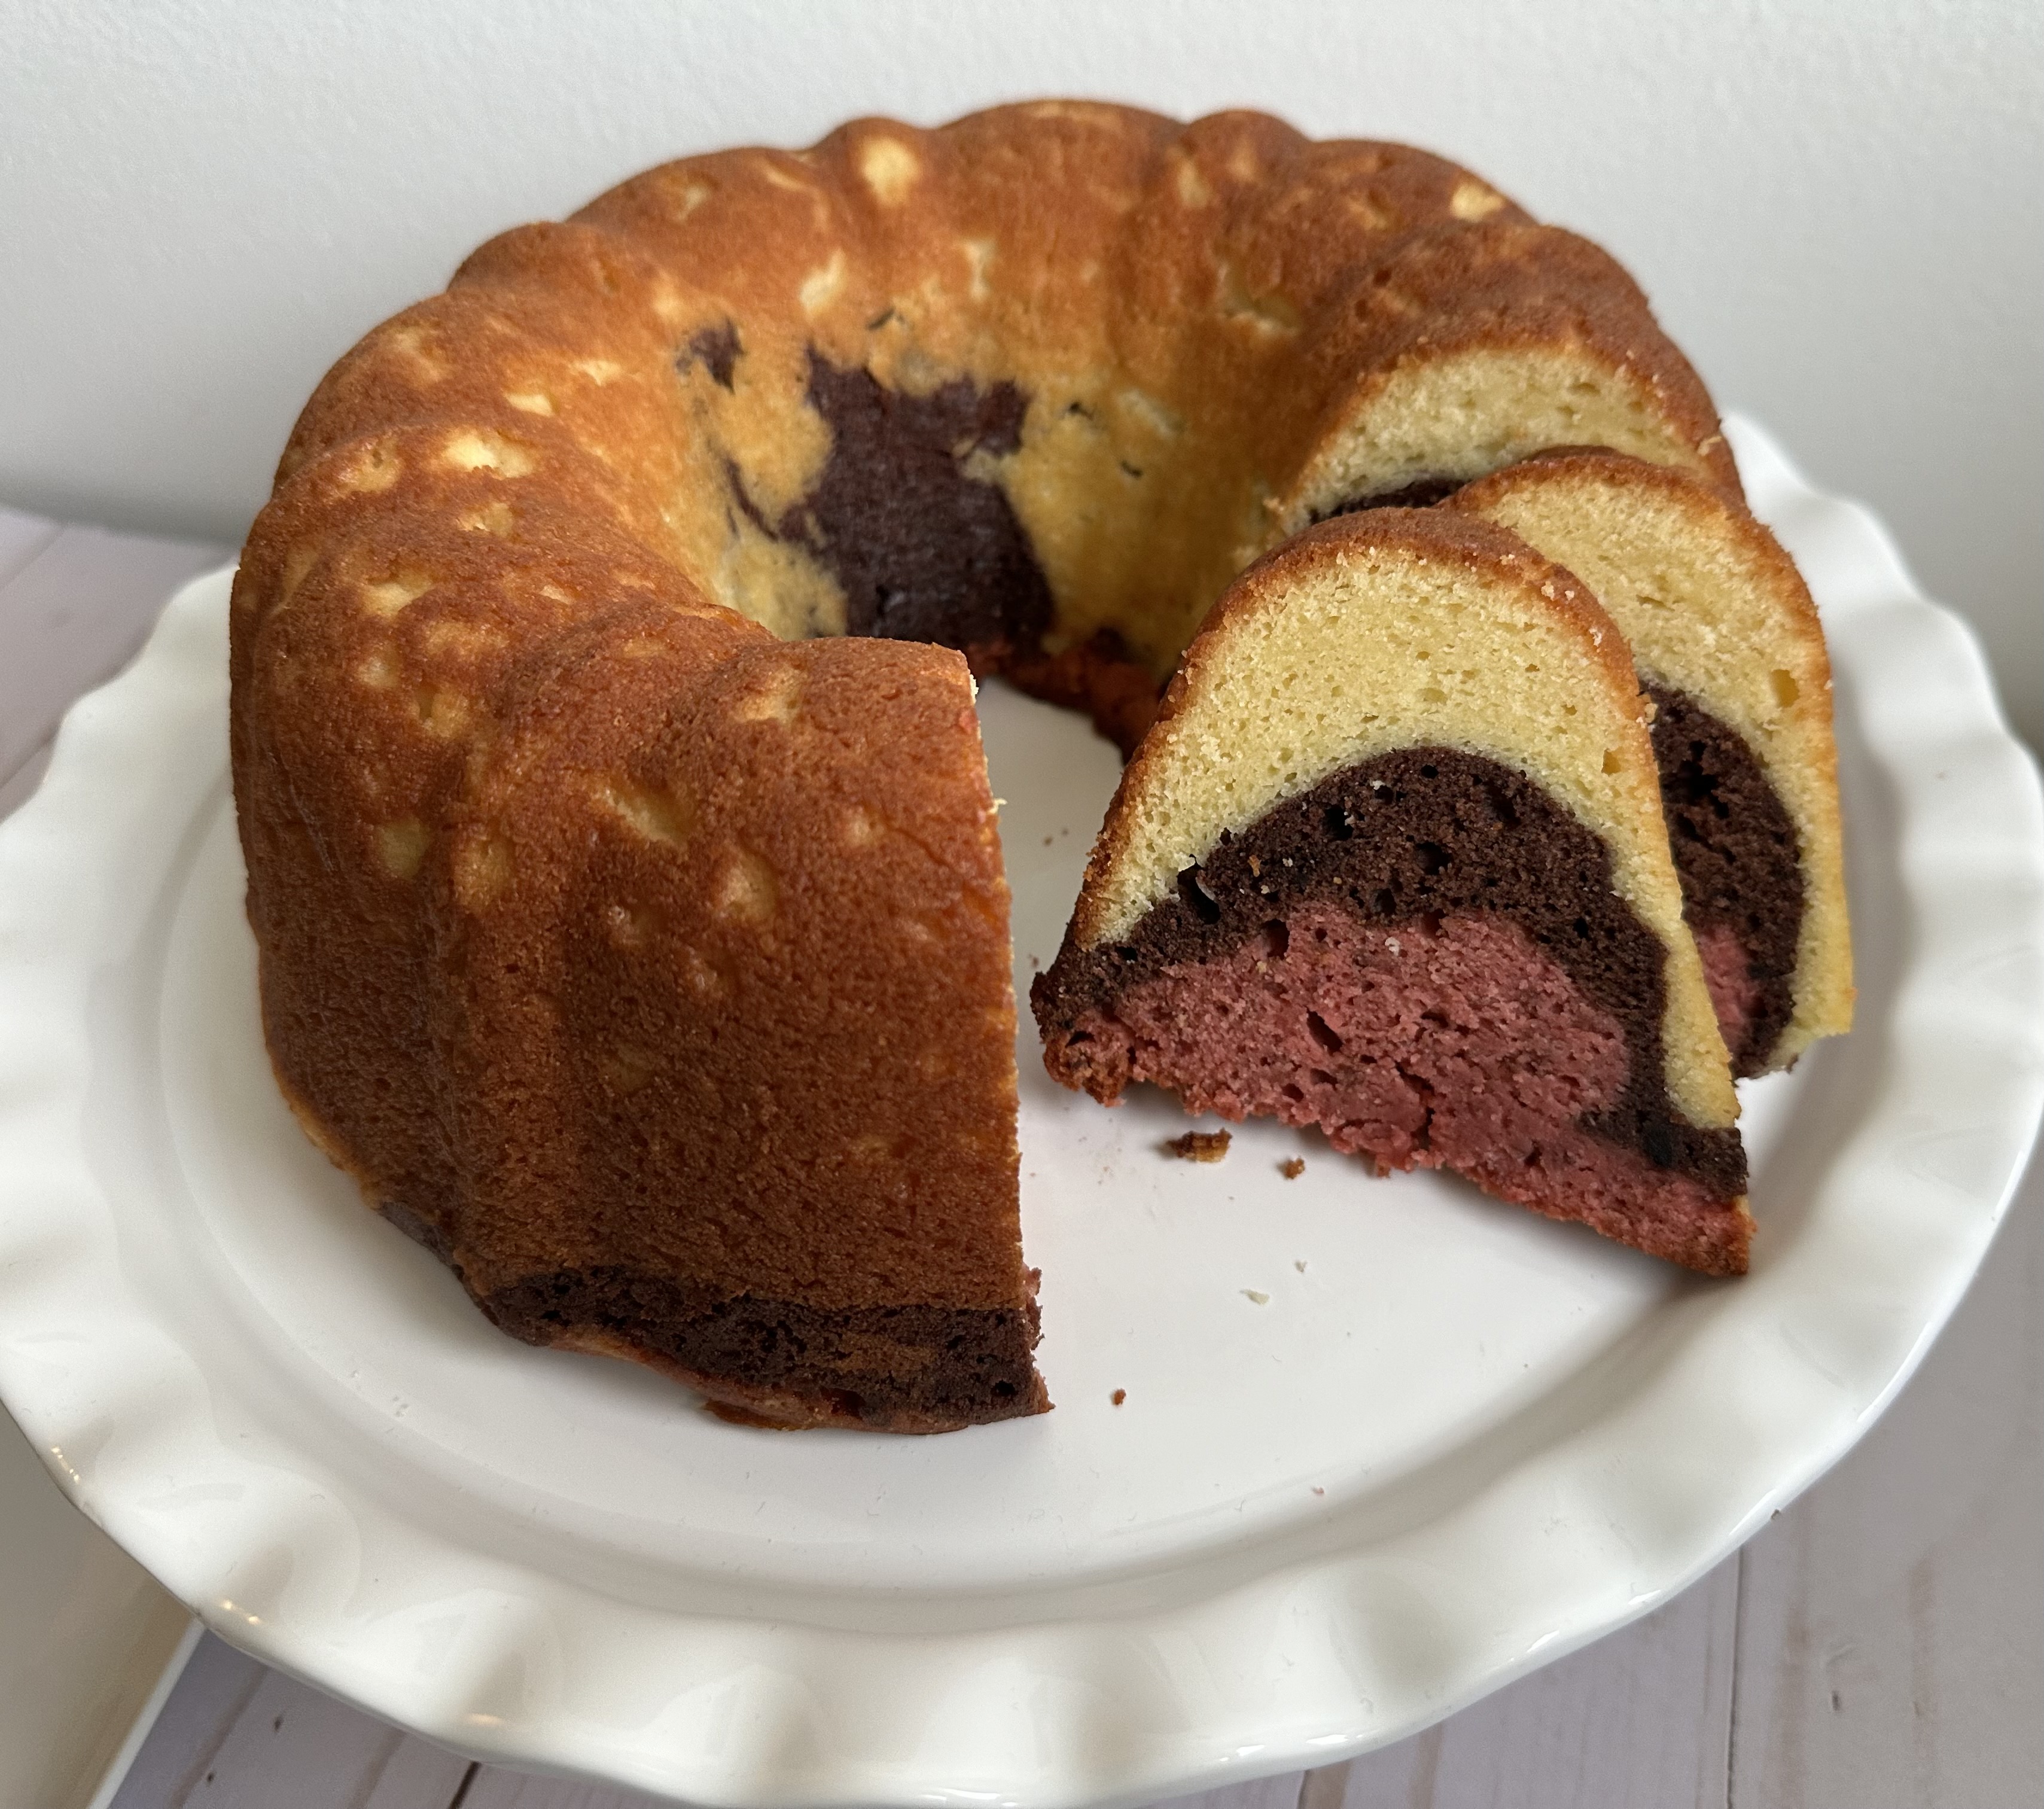
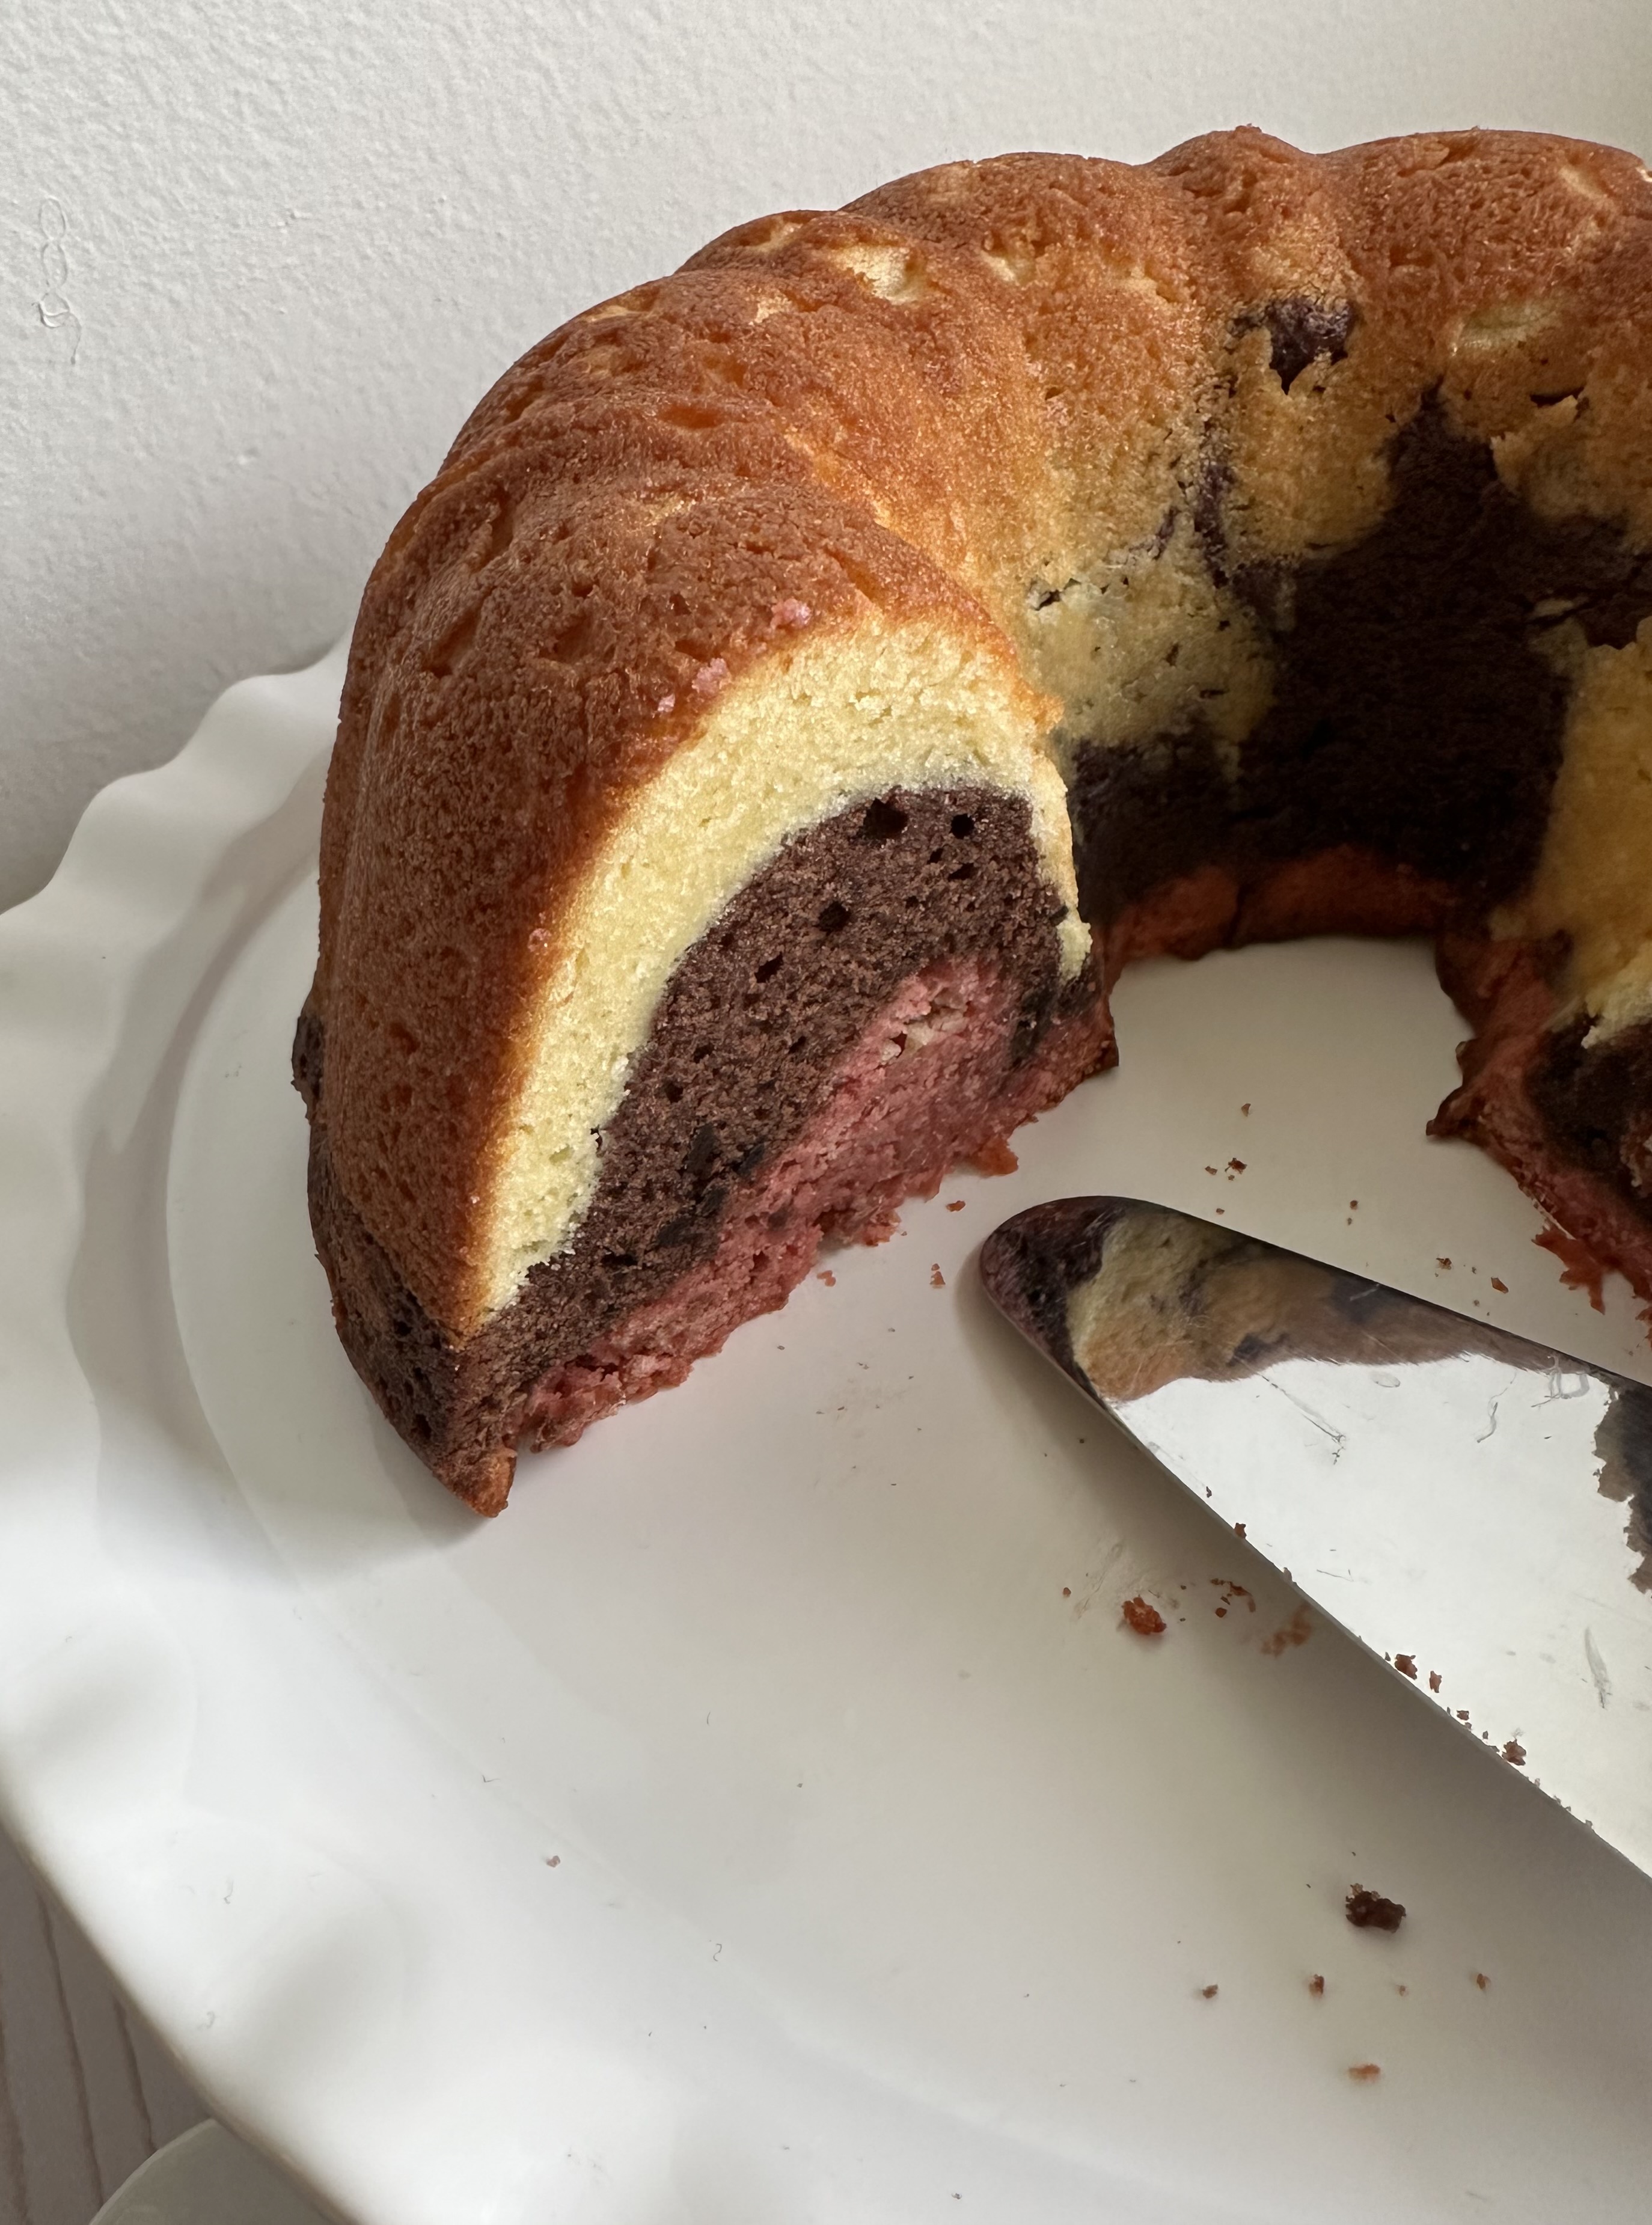
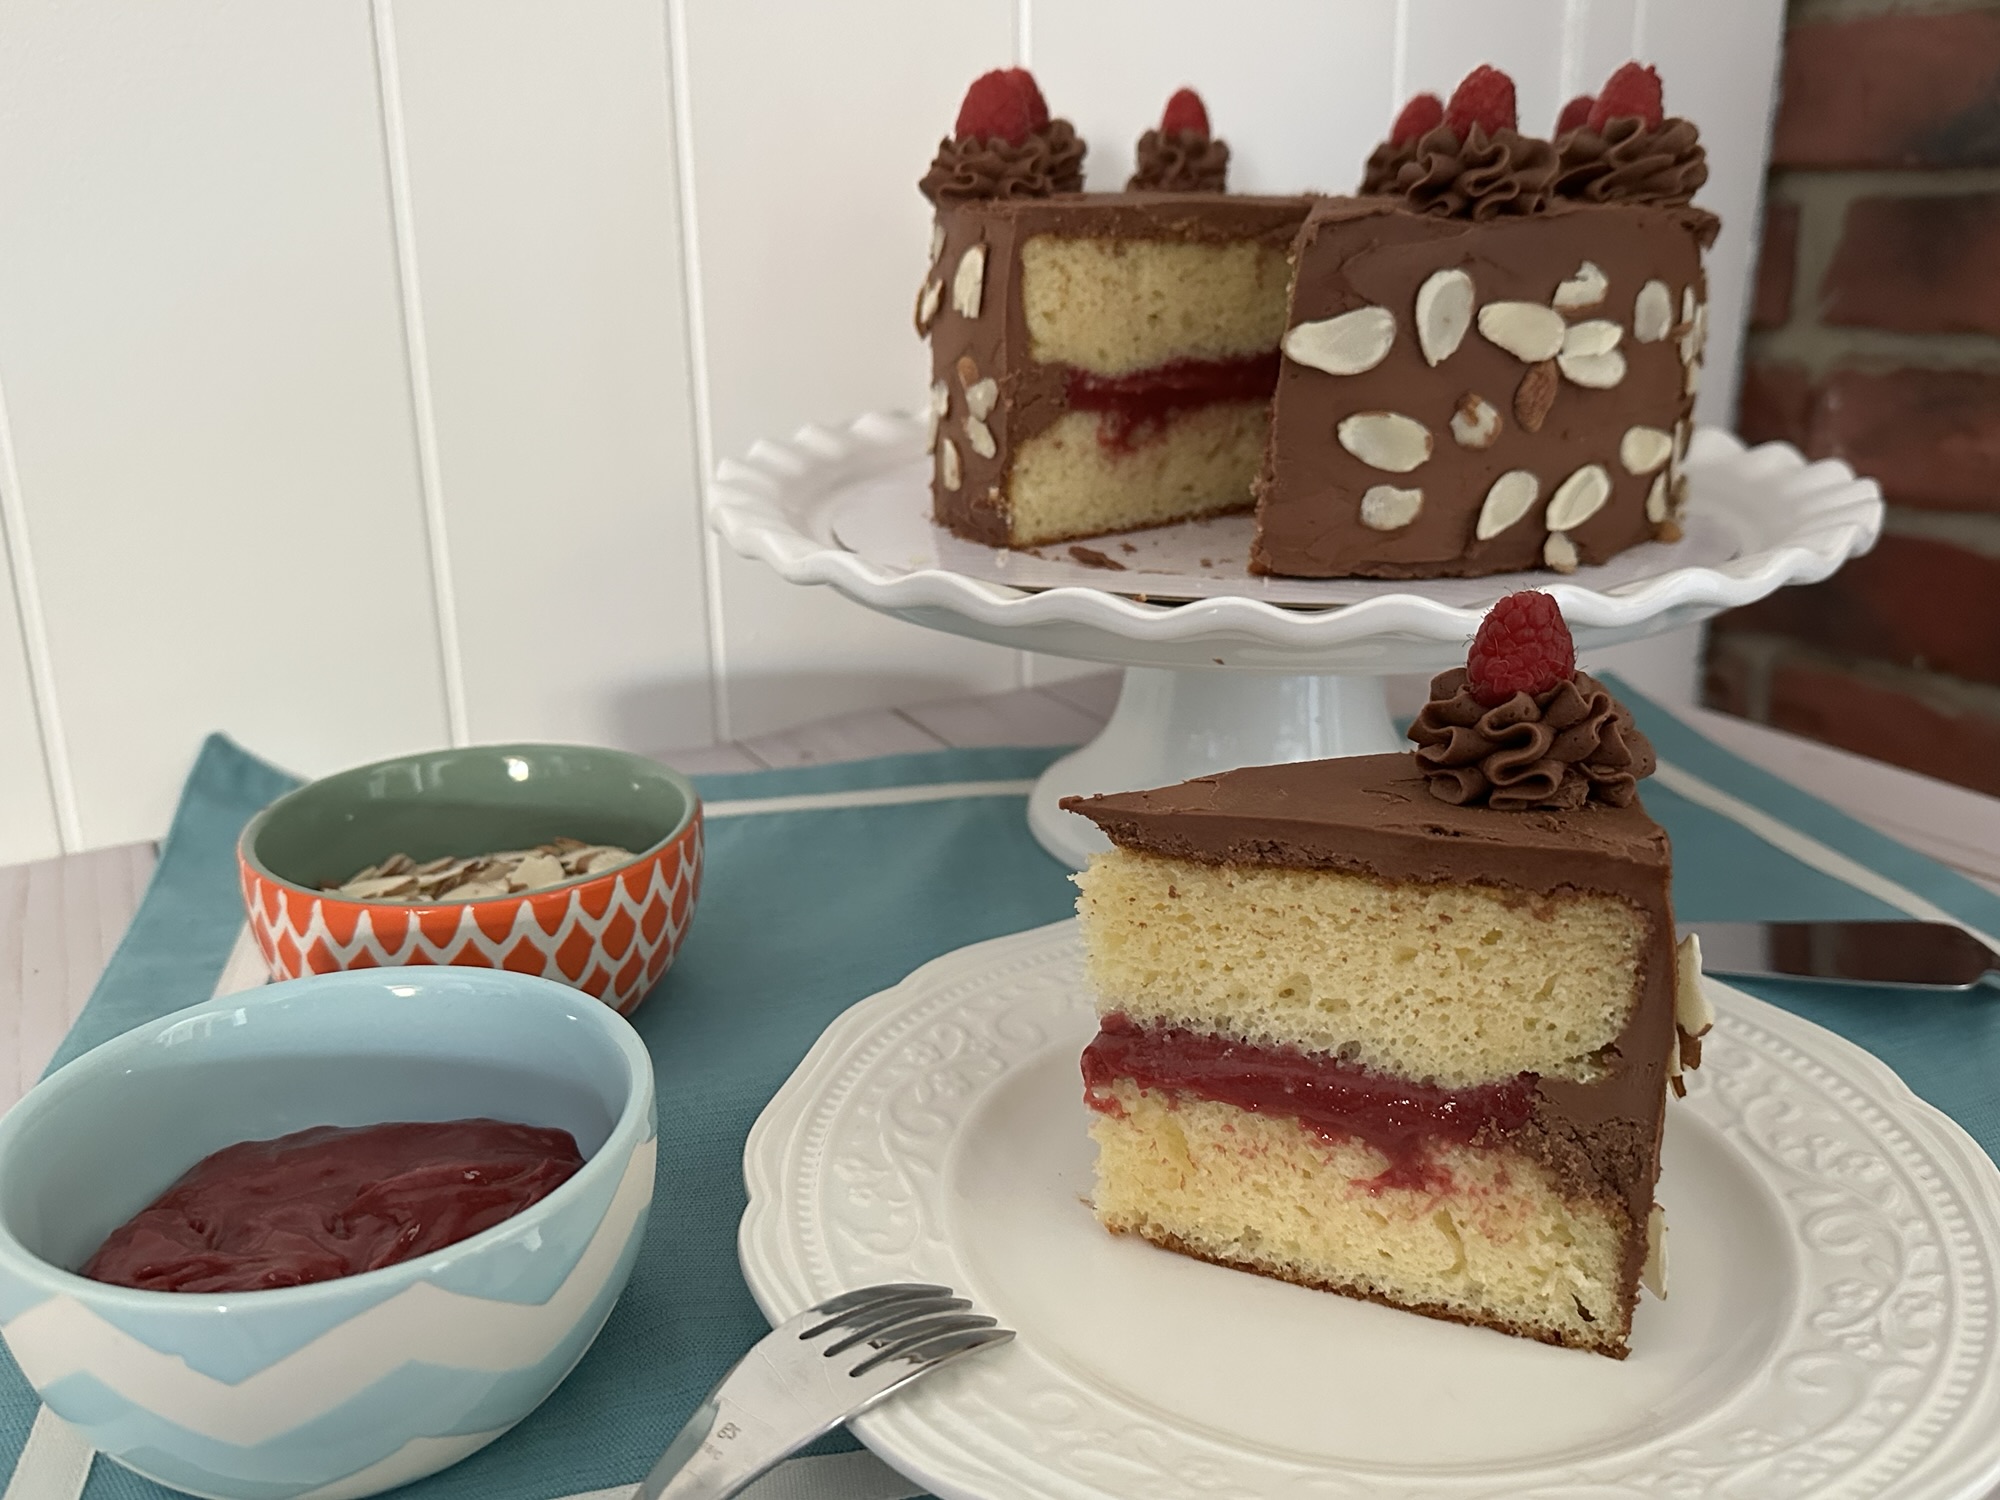
To start I made the raspberry curd. Yes, raspberry curd. While most people think of citrus –especially lemon – when it comes to curd you can pretty much make curd with any fruit. The steps are basically the same you may just have to adjust the amount of sugar you use depending on the sweetness of the fruit. Once the curd was done, I let it cool in the refrigerator overnight so it could thicken.

For the cake, I used a white cake mix that I doctored by adding in buttermilk, sour cream, vanilla extract and a decent amount of almond extract to get the perfect almond flavor without it being too overpowering – a full tablespoon. You may think this is too much, but any less and the almond flavor won’t stand out. I wanted the flavors to complement each other but also to stand out on their own.

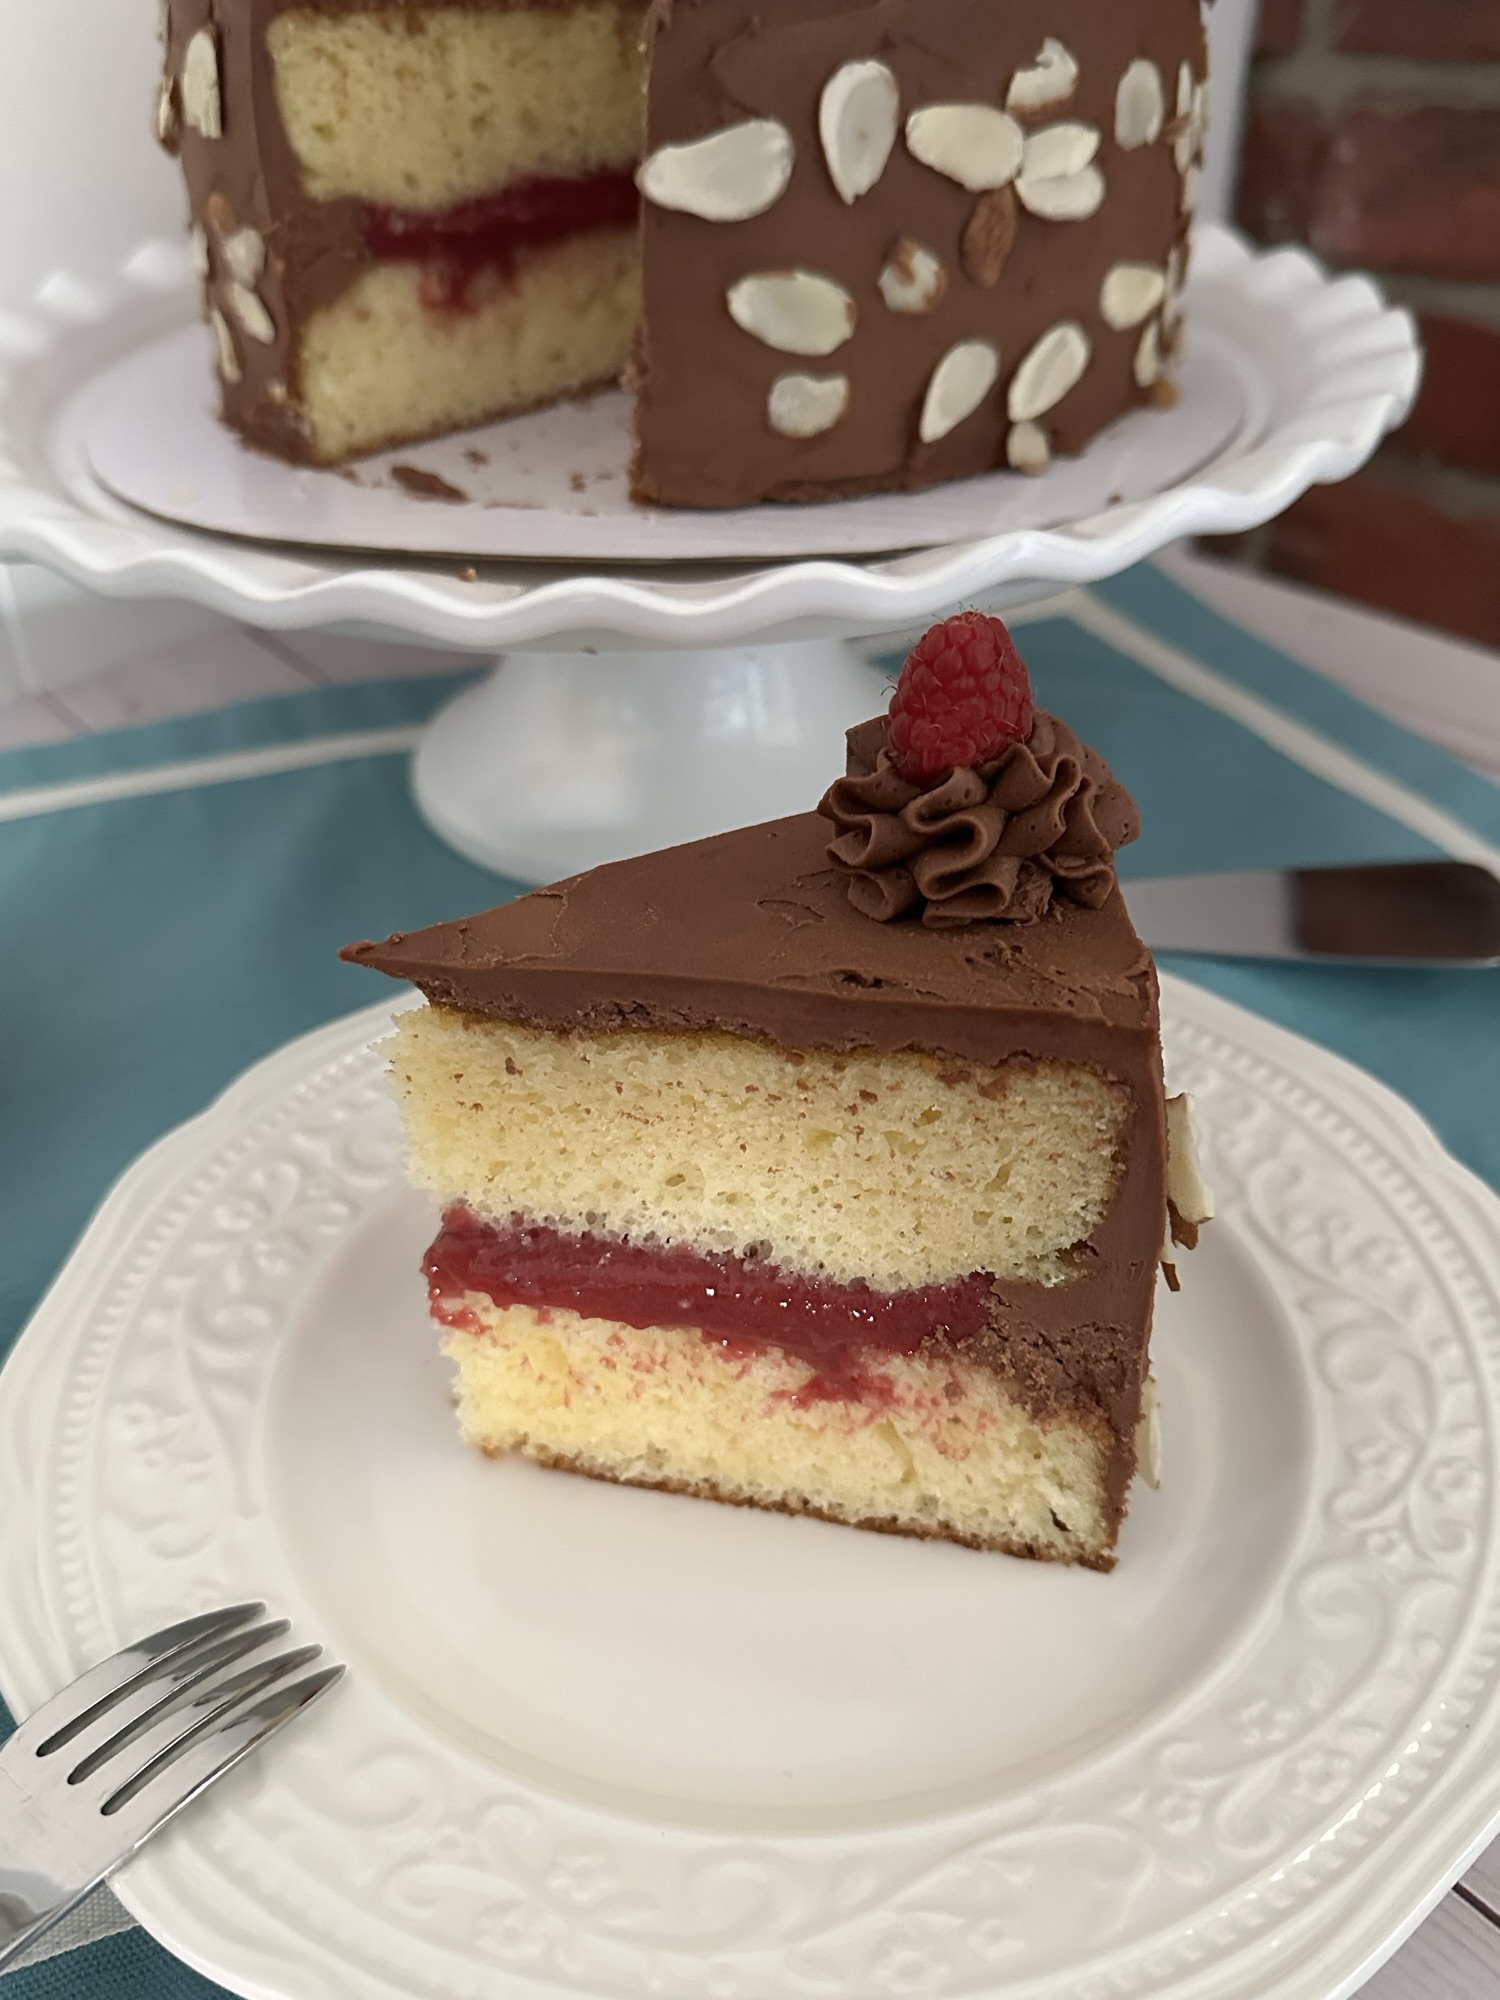
Any to top it all off a simple chocolate buttercream frosting. Perfectly chocolatey without being overly sweet! I may have enjoyed a few spoonful’s of the leftover frosting.

Put all those together and you have a cake that may just become your go-to when looking for something special but not too difficult to make.

Raspberry Almond Cake with Chocolate Frosting

Ingredients:

Raspberry Curd:

11-12oz. Raspberries (frozen or fresh)

1 cup sugar

2 tablespoons lemon juice

6 egg yolks

1 stick unsalted butter, cubed

Almond Cake:

1 15oz white cake mix

3 large eggs, at room temperature

1/2 vegetable (or canola) oil

3/4 cup buttermilk, at room temperature

1/3 cup sour cream, at room temperature

1 tablespoon almond extract

1 teaspoon vanilla extract

Chocolate Buttercream:

2 1/2 sticks unsalted butter (1 1/4 cups), at room temperature

3 1/2 cups confectioners’ sugar

3/4 cup cocoa powder

5 tablespoons heavy cream, at room temperature

1/4 teaspoon salt

2 teaspoons vanilla extract

Fresh raspberries and sliced almonds for decorating, optional

Directions:

For the Raspberry Curd: In a medium saucepan combine the raspberries and the lemon juice. Cook on medium low heat until the raspberries begin to burst, and you can smash them. Once the raspberries are mostly liquid press them through a fine mesh sieve to remove the seeds. Allow it to cool.

In a medium saucepan lightly beat the egg yolks and then add in the sugar. Whisk the eggs yolks and sugar together until well combined. Then whisk in the cooled raspberry mixture. Cook on low heat whisking constantly until the mixture thickens and coats the back of a spoon. Remove from the heat and whisk in the cubed butter until it has completely melted. Strain the curd through a fine mesh sieve into a heatproof bowl. Allow it to cool to room temperature and then place a piece of plastic wrap directly on the surface then cover the bowl and refrigerate for at least 2 hours or until the curd has thicken.

For the Almond Cake: In a large bowl add the cake mix, eggs, oil, buttermilk, sour cream and both extracts. Beat with a hand mixer on low for 30 seconds and then increase speed to medium and continue beating for about 2 minutes until the ingredients are well combined. Do not overbeat. Divide the batter among 2 8-inch cake round pans that have been sprayed with baking spray. Bake in a 350 F preheated oven for 26-28 minutes, or until a cake tester inserted in the center comes out clean.

Allow the cakes to cool in the pans for 15 minutes and then transfer to a wire rack to cool completely.

For the Chocolate Buttercream: In the bowl of a stand mixer fitted with the paddle attachment beat the butter on high speed until creamy. Scrape the sides of the bowl and then add the sugar, cocoa powder, heavy cream, salt and vanilla extract. Beat on low speed for about 30 seconds and then gradually increase the speed to high and beat for an additional minute until all the ingredients are well incorporated and the frosting has come together.

To assemble the cake: If necessary, level the cake rounds. Place one of the cake rounds on a cake board or cake platter, flat side down. Using the chocolate frosting, pipe a dam around the perimeter of this cake round. Fill the cake with the cooled raspberry curd (you will only need a little more than half of the curd). Place the other cake round on top, with the flatter side as the top of the cake. Crumb coat the cake with the frosting and then refrigerate for 10 minutes so it can set. Finish frosting the cake with the remaining chocolate buttercream. If you would like you could pipe swirls on top of the cake with the remaining buttercream and then top each with a fresh raspberry. If using, decorate the sides of the cake with almond slices by simply pressing them on.

Recipe first appeared on Bead Yarn & Spatula

Brown Butter and Maple Chewy Pumpkin Cookies

Happy Holidays! It’s the week after Thanksgiving and normally this week I share a week’s worth of cookie recipes to inspire you to bake for the holidays. Unfortunately, this year that’s not happening. Time got the best of me, and I spent the bulk of my free time crocheting. I kept thinking that I would be able to test the recipes I had written up, but I opted not to rush the process just to publish some blog posts. I believe quality over quantity is more important. I recently tried a recipe for a Brown Butter and Maple Chewy Pumpkin Cookie that was absolutely delish, so I decided to share that recipe with you this week. It would be the perfect addition to your cookie platter this holiday season.

But first, in case you are wondering what I was crocheting… Granny Hexagon Christmas Stockings, 16 to be exact (not counting the 3 I also made to sell in my Etsy shop). It was an order that needed to be completed by the end of November. And while I finished them with a week or two to spare, I was then also fulfilling custom orders for ornament ball wreaths from my Etsy shop. So, I’ve been busy. 

And now back to the cookies. While I normally don’t bake (or gravitate towards) oversized cookies I decided to try these since the flavors sounded so good. Brown butter, maple and pumpkin are the perfect combination for the season. Although with Christmas just around the corner peppermint is dominating a bit more nowadays.

If you are intimidated to make browned butter don’t be. It’s an easy process that requires a bit of patience, a watchful eye and a constant stir. Don’t be tempted to raise the heat as doing so will cause the butter to burn a lot quicker and instead of having a nutty flavor, the butter will have a burnt flavor. Once the butter has a rich amber color it’s done. Remove it from the heat and transfer it to a heat-proof container to stop the cooking process. Leaving it in the pan will continue to heat and ultimately burn the butter. While the original recipe called for placing the butter in the refrigerator to cool, I opted to cool it to room temperature on my counter for two reasons. A) I didn’t have to worry about it solidifying if I left it in the fridge for too long and B) I’m always apprehensive of putting hot items in the fridge immediately.

Once the brown butter is cool these cookies come together quickly and easily. Simply mix the dry ingredients together in one bowl, the wet ingredients in another and then fold together the two to form the dough. After refrigerating the dough for about 15 minutes – to prevent the cookies from spreading while baking – roll in a cinnamon sugar mixture and then bake. After cooling you will have the perfect cookie to enjoy with a hot cup of cocoa, tea or coffee for the cold days ahead!

Brown Butter and Maple Chewy Pumpkin Cookies

  • Servings: 11-12 large cookies
  • Print

Ingredients:

For the Cookies:

1 cup (2 sticks) unsalted butter

1 1/2 cups dark brown sugar

1 large egg yolk

3 tablespoons maple syrup

1 teaspoon vanilla extract

1/3 cup pumpkin puree

2 1/4 cups flour

1 teaspoon baking soda

1 teaspoon baking powder

1/2 teaspoon salt

1 1/2 teaspoons pumpkin pie spice

1/2 teaspoon cinnamon

For the Cinnamon Sugar Coating:

2 tablespoons light brown sugar

2 tablespoons sugar

1 teaspoon cinnamon

Directions:

Begin by browning the butter. In a medium saucepan melt the butter over medium heat, stirring until it reaches a rich amber color. Pour the butter into glass measuring cup, you should have just shy of 1 cup. Allow to cool to room temperature.

Preheat the oven to 350 F and line 2 large baking sheets with parchment paper.

In a medium bowl whisk together the dry ingredients – flour, baking soda, baking powder, salt, pumpkin pie spice and cinnamon – and set aside.

In a large bowl whisk together the brown sugar and cooled brown butter. It should resemble clumpy wet sand. Next whisk in the egg yolk, maple syrup, vanilla extract and pumpkin puree until smooth. Fold in the dry ingredients. Continue folding the two mixtures together until the dough forms.

Refrigerate the dough for 15-20 minutes so it can firm up and prevent spreading while baking.

In a small bowl whisk together the ingredients for the sugar coating.

Use a large cookie scoop (i.e. ice cream scoop) or 1/4 measuring cup to scoop out the dough and then roll in the sugar coating. Place on the prepared baking sheet about 3 inches apart.

Bake for 12-15 minutes, or until the cookies are darkened around the edges and the center are puffed and look slightly underdone.

Allow the cookies to cool on the baking sheet for 2-3 minutes before transferring to a wire rack to cool completely.

Store in an airtight container.

Recipe slightly modified from Butternut Bakery Blog

Neapolitan Pound Cake

Summer has officially come to an end. Truth be told I am happy to be moving into a new season, my favorite one as well! Bring on the pumpkins, apples, leaf peeping, sweater weather and all the other Fall season fun! But if you are looking to hold onto summer just a little bit longer, I have a dessert for you that just might do that, an homage to the classic Neapolitan ice cream. Today’s Neapolitan Pound Cake has a layer of vanilla, chocolate and strawberry.

I had a few hiccups along the way while making the batter for this cake. It’s what happens when you haven’t baked in a few months and your brain isn’t 100% into it. You make silly mistakes. I thought I was using a 1/3 cup measuring cup when adding the sugar to the butter, but it was a 1/2 cup one, so I ended up adding in an extra cup of sugar. I knew something was off when the mixture wasn’t looking right while beating it, so I had to start over. And then, while typing up the recipe for this blog post I realized another mistake, I used 2 packages of cream cheese when the recipe only needed 1. Eeek! Thankfully it only enhanced the cake by making it extra moist, but it would have been just fine with 1 package – which is how I wrote up the recipe below.

Hopefully I’ll get myself in the right mindset for Fall baking and the holidays so I don’t make anymore silly mistakes!

Neapolitan Pound Cake

For the Cake:

2 stick unsalted butter, at room temperature

2 cups sugar

1 8oz. packages of cream cheese, at room temperature

1 teaspoon vanilla extract

6 large eggs

2 cups flour

1 tablespoon baking powder

1 teaspoon salt

For the Strawberry Layer:

1 oz. bag freeze dried strawberry, processed into a powder

1/2 teaspoon strawberry emulsion

A few drops of red food coloring

For the Chocolate Layer:

1/4 cup Dutch process cocoa powder

Directions:

Preheat oven to 325 F. Spray a bundt pan with baking spray and set aside.

In a medium bowl whisk together the flour, baking powder and salt, set aside.

In a large bowl beat the butter with a hand mixer on medium speed until creamy. Gradually add the sugar 1/2 cup at a time, beating well after each addition. Continue beating until the mixture is light and fluffy. Next add the cream cheese and vanilla extract and beat for an additional minute. Finally, add the eggs 1 at a time, beating well after each.

Add the flour mixture to the butter mixture and beat until well blended.

Transfer 2 cups of the batter to a bowl and an additional 2 cups to another bowl. In one add the dried strawberry powder, strawberry emulsion and red food coloring and in the other the cocoa powder. Stir both batters well until well blended.

Pour the original (unflavored/vanilla) batter into the prepared Bundt pan. Gently pour the chocolate batter in top and finally the strawberry batter.

Bake in the preheated oven for 50-55 minutes, or until a cake tester inserted in the center comes out clean.

Cool in the pan for 10 minutes and then invert onto a wire rack to cool completely.

Recipe first appeared on Bead Yarn & Spatula

Granny Square Tote Bag – Red Heart All In One Granny Square Yarn

Most crocheters / knitters would agree that the worst part of any project is weaving in the ends. If you are unfamiliar with what that means, it’s basically weaving the ends of the yarn into your finished project. This is especially the worst when you create something with multiple yarn colors, like granny squares!

So, I was excited when I saw that Red Heart created a yarn that would minimize ends with granny squares with their new Red Heart All in One Granny Square Yarn. The yarn also takes the guesswork out of selecting colors for the granny squares, although I wasn’t all that thrilled with the color selections. I did find one that I liked, I just had to get my eyes used to crocheting with black yarn. There is a funny saying that goes “If someone makes you something out of yarn, they like you. If they make it out of black yarn, they love you.” Not sure who said it, but there is a lot of truth in it. My mom used to crochet, and she would avoid dark colors (if possible) when working on a project. Working with darker colors requires ample lighting to reduce the strain on your eyes as you work so you don’t miss any stitches. Which can slow your progress down as well. For me personally I can crochet much quicker (and with less mistakes) when working with lighter colors.

Now, while most patterns for granny squares are the same with just a few tweaks here and there, I opted to follow the pattern that came with the yarn as opposed to the one I normally use just to be sure that my granny squares would work up “properly.” Well, right off the bat I realized that it wasn’t going to be as easy as it seemed. I was constantly frogging (ripping out the yarn) and adjusting my tension to get the colors to line up for the different rounds of the square. There was always a round or two that was off which meant I would have to start the round again. I decided to read the reviews for the yarn on their website to see if there were any tricks or suggestions and what I found was a bunch of negative reviews. I was determined though. Ultimately, I ended up with 15 granny squares that required a lot of patience!

So, what to do with the 15 squares? For a moment I thought of buying a few more skeins of the yarn to make a throw, but I quickly tossed that idea out. I really didn’t feel like working with the yarn again to make more granny squares after all the trouble it was to create the initial 15. I decided on a tote bag instead. I had recently finished another granny square tote bag so why not make another. One thing though, I was going to need more granny squares. I needed a total of 19 granny squares for the basic design I was thinking of. So, I ended up crocheting 7 granny squares in black yarn – straining my eyes once more.

As I mentioned this tote bag was my second granny square bag. After crocheting and stitching together the squares for the first one I decided to add a liner to the bag to give it more structure and to prevent it from stretching when carrying anything in it. This was a daunting task. While I own a sewing machine, I had no clue how to use it for the longest time. I tried once and it was a complete failure. So, to add the liner to the bag I did it completely by hand. Overall, it didn’t come out too bad, but it’s definitely not stitched into the bag completely straight.

Well, for this new bag I learned how to use my sewing machine. My local library had a “class” where you could bring in your machine and an instructor would show you how to use it. Woo-Hoo! Well, almost! My first attempt at stitching the liner into the new bag was a fail! I practiced with scraps of fabric but then when I got to working on the bag it just wasn’t working out. I sewed the liner in, but it was atrocious! Not one to give up though, I watched a few YouTube videos (which I probably should have done in the first place) to get some tips and decided to rip the liner out of the bag and try again. And my second attempt was much better. I did end up stitching the liner into the bag by hand, but it was much neater this time.

I also ended up making this cute pouch with 2 remaining squares. I even added a zipper to the top!

So, would I use this yarn again? Probably not to make granny squares that’s for sure. While the yarn does cut down on the amount of ends to weave in, I am not all that inspired by the color choices. And I find that lining the colors up for each round is too time consuming and requires me to crochet with a much looser tension than I am accustomed to which I didn’t like. I ended up the squares that were limp and loose.

Individual Strawberry Short-Cut Shortcakes

Even though August is quickly coming to an end there is still some summer fun to be had. July flew by for me for a bunch of reasons, so I am little behind in posting fun warm-weather desserts on here. But the one I am sharing today is quick, easy and perfect for summer evenings. It’s an Individual Strawberry Short-Cut Shortcake. What makes it a short-cut? Taking the work out of making the biscuits by using refrigerated biscuits that are ready in just under 15 minutes in the oven.

The other steps for this dessert are just as simple. Combine sliced strawberries with sugar and refrigerate for at least 2 hours so the berries can release their juices. And whip up a batch of fresh whipped cream with 3 simple ingredients – heavy whipping cream, confectioners’ sugar and vanilla extract.

Once the biscuits have cooled it’s time to assemble your dessert. Slice the biscuits in half and place a healthy dollop of whipped cream on the bottom half and then top with the strawberries along with some of their juices. Top with the remaining half of the biscuit and enjoy! It doesn’t get much easier than that.

Individual Strawberry Short-Cut Shortcakes

Ingredients:

For the strawberries:

1lb. fresh strawberries, sliced

1/3 cup sugar

For the whipped cream:

1 1/2 cups heavy whipping cream

1/3 cup confectioners’ sugar

1 teaspoon vanilla extract

Pillsbury Grands Southern Homestyle Original Biscuits – 8 count

Directions:

In a medium bowl stir together the sliced strawberries and sugar. Cover and refrigerate for 2 hours.

Bake the biscuits per the instructions on the package – On an ungreased cookie sheet in a 375F oven for 12 minutes, or until golden brown. All to cool to room temperature.

While the biscuits cool make the whipped cream. Add the heavy whipping cream, confectioners’ sugar and vanilla extract to a medium bowl and beat with a hand mixer on medium speed until stiff peaks form. Refrigerate until ready to serve.

To serve, slice the biscuit in half and place the bottom on a plate or in a bowl. Top with a hearty scoop of the whipped cream and then drizzle the strawberries – including the juice – on top and then cover with the top half of the biscuit. Enjoy!

Recipe first appeared on Bead Yarn & Spatula

No Bake Passion Fruit Tres Leches

Memorial Day weekend is upon us… The unofficial start of the summer. The season to spend less time indoors and enjoy the great (hopefully) weather outdoors! It’s also a time where we are all looking for quick and easy recipes that don’t require us being in a hot kitchen for hours on end. That applies to desserts too. And today I have a great recipe that will require you to turn on your stove but not your oven. It’s a No Bake Passion Fruit Tres Leches Cake. Ladyfingers take the place of the traditional cake part and are then topped with a layer of passion fruit curd followed by layer of homemade whipped cream. YUM!

And while this recipe doesn’t require any baking, it does require some time to prep and assemble. Mostly inactive time though.  I started by making the passion fruit curd since it needed to chill and set in the refrigerator. While I am sure you could use 100% pure passion fruit from a bottle, or even extract the juice from fresh passion fruits I opted to use frozen passion fruit pulp that I defrosted in the refrigerator overnight. It takes the work out of using fresh passion fruits and I know for certain it’s only passion fruit pulp with nothing added in. I followed the same curd recipe I used to make a Passion Fruit & Coconut Cake a few years back and it was just as easy and delish!

While the curd cooled and set in the refrigerator, I prepped the tres leches cake. In a medium bowl I whisked together evaporated milk, sweetened condensed milk and heavy cream until it was well combined. I then transferred the mixture to a large measuring cup (at least 4 cups) to make it easier to pour over the ladyfingers. I reserved 3/4 cup of the mixture in a small food storage container and refrigerated it. In an 8×8-inch baking dish I arranged ladyfingers in an even layer and then poured about 3/4 cup of the milk mixture over them. After letting it soak in for 15 minutes, I poured another 3/4 cup of the mixture over the ladyfingers again.

I then arranged a second layer of ladyfingers over the first. For the second layer I placed the ladyfingers in the opposite direction as the first layer to ensure that the cake would hold together when sliced.

As with the first layer, I poured 3/4 cup of the milk mixture over the ladyfingers and let it rest for 15 minutes before pouring another 3/4 cup over them. I then covered the dish with aluminum foil and refrigerated it for 3 hours so the ladyfingers could fully soak in the milk mixture and become soft.

After 3 hours, I poured the reserved milk mixture over the ladyfingers, re-covered the dish and refrigerated for an additional hour.

After an hour it was time to finish assembling the cake. I spread the passion fruit curd on top of the ladyfingers and then spread homemade whipped cream over the curd.

I thought about decorating the top with fresh strawberries strictly for picture purposes, but the week I made this the strawberries didn’t look that great at the supermarket. Instead, here is a side picture of the different layers.

While I was concerned that this No Bake Passion Fruit Tres Leches would be overly sweet as some Tres Leches cakes can be I was pleasantly surprised that it wasn’t. While the curd and whipped cream were sweetened and the sweetened condensed milk is of course sweet, using the ladyfingers, which aren’t that sweet, really helped to keep the sugary taste down.

If you love passion fruit, check out these desserts as well…

No Churn Passion Fruit Ice Cream

Passion Fruit Panna Cotta

Passion Fruit Pie

No Bake Passion Fruit Tres Leches

Ingredients:

For the Passion Fruit Curd:

1/2 cup passion fruit juice*

7 large egg yolks

1 cup sugar

10 tablespoons unsalted butter, sliced into tablespoons

Pinch of salt

For the Tres Leches Cake:

22-25 Ladyfingers

12.5 oz can of evaporated milk

14 oz. can sweetened condensed milk

1/3 cup heavy cream

For the Whipped Cream Topping:

1 cup heavy cream

2 teaspoons confectioners’ sugar

1 teaspoon vanilla extract

*I used defrosted frozen passion fruit pulp

Directions:

For the Passion Fruit Curd: In a medium saucepan combine the passion fruit juice, egg yolks and sugar, stir to combine. Heat over medium heat and continue stirring until the sugar has dissolved and the mixture thickens, enough to coat the back of a spoon.

Remove from the heat and add a pinch of salt. Add the butter a tablespoon at a time, stirring between each addition to ensure the butter has melted. Strain the mixture through a fine mesh sieve two times. The first time into a bowl and the second time into the container you plan to use to store the curd. Place a piece of plastic wrap directly on the surface of the curd, cover and refrigerate for 2-3 hours, until cool and thickened.

For the Tres Leches: In a medium bowl whisk together the evaporated milk, sweetened condensed milk and heavy cream until well blended. Transfer to a large measuring cup to make it easier to pour. You should have about 3.5 cups. Reserve 3/4 cups in a separate bowl, cover and refrigerate.

Arrange half of the ladyfingers in the bottom of an 8×8-square baking dish. Pour a quarter of the remaining milk mixture over the ladyfingers, about 3/4 cup. Let rest for 15 minutes and then pour another 3/4 cup of the milk mixture over the ladyfingers.

Arrange the remaining ladyfingers over the soaked ladyfingers. Pour another 3/4 cup of the milk mixture over the second layer of ladyfingers. Let rest for 15 minutes and then pour the remaining mixture over the ladyfingers. Cover with aluminum foil and refrigerate for 3 hours.

After 3 hours pour the reserved milk mixture over the ladyfingers. Cover and refrigerate again for about an hour.

For the Whipped Cream Topping: In medium bowl beat together the heavy cream, confectioners’ sugar and vanilla extract with a hand mixer on medium speed until stiff peaks form.

Finishing the Tres Leches: Spread the passion fruit curd in an even layer over the soaked ladyfingers. Then spread the whipped cream topping over the curd. You can now serve the Tres Leches or cover with wax paper and aluminum foil and refrigerated until ready to serve.

Recipe first appeared on Bead Yarn & Spatula

French Vanilla Espresso Cake with Almond Mascarpone Frosting

Quite a few of my recipes as of late have used a boxed cake mix as their base. There are some bakers who would scoff at this and there are others who always turn to a boxed cake mix for their baking. It’s all a matter of preference. And in all honesty, it is possible to make a boxed cake mix taste homemade by switching out and adding in ingredients.

For today’s French Vanilla Espresso Cake with Almond Mascarpone Frosting, I used a French Vanilla boxed cake and instead of adding water to the mix I added in a cup of espresso which toned down the flavor of the French vanilla and gave it a hint of coffee flavor. While the cake is incredibly soft and moist the real stand-out is the frosting. It’s incredibly light and fluffy and the almond flavor is delish without being overpowering. While I opted to pipe stars on the two layers of the cake to decorate it you could also lightly frost it for a naked look.

French Vanilla Espresso Cake with Almond Mascarpone Frosting

For the cake:

1 15.25 French Vanilla box cake mix*

3 eggs

1 cup espresso (or strong coffee)

1/3 cup vegetable oil

For the frosting:

8oz. mascarpone cheese

1 cup confectioners’ sugar

1 teaspoon vanilla extract

1 teaspoon almond extract

2 tablespoons Amaretto**

1 cup heavy whipping cream

*I used Duncan Hines

**Optional

Directions:

For the Cake: Preheat the oven to 350 F. Spray two 8-inch round cake pans with baking spray and set aside.

In a large bowl combine the cake mix, eggs, coffee and vegetable oil and beat on medium speed until just combined. Divide the batter between the two pans and bake in the preheated oven for about 25 minutes, or a cake tester inserted in the center comes out clean.

Let the cakes cool in the pan for 15 minutes before inverting on a wire rack to cool completely.

For the Frosting: In a large bowl combine the mascarpone cheese, confectioners’ sugar, both extracts and Amaretto (if using). Beat with a hand mixer on medium speed until just combined. Add in the heavy whipping cream and continue beating until the frosting is light and fluffy. Be careful not to overbeat the frosting as this will cause it to curdle.

To Assemble: Torte the cake layers if necessary. Transfer the frosting to a piping bag fitted with a large star tip. Place one of the cake layers on a cake board or cake stand and pipe the entire top of the cake with dropped stars. Place the second layer on top and pipe the top with stars as well.

Recipe first appeared on Bead Yarn & Spatula

White Chocolate Cheesecake with Mixed Berry Swirl

There are many reasons why people create recipes. Following a specific diet, just have a taste for something, curious if certain flavors work together, using up various ingredients… The list goes on and on. For today’s White Chocolate Cheesecake with Mixed Berry Swirl the idea came to me when I had a bag of frozen berries in my freezer and a package of Oreos in my pantry that I didn’t want to go to waste. This is also a slight variation of my favorite cheesecake from The Cheesecake Factory – White Chocolate Raspberry Truffle.

While I used mixed berries for the swirl you could swap them out for any berry – blueberry, raspberry, strawberry, etc. The method of making the sauce will still be the same. And while I am sure I have mentioned in a few different blog posts that when a recipe calls for melted white chocolate you should avoid using white chocolate chips since they are usually not real chocolate and won’t melt properly, I broke that rule for this recipe.  I was able to get the white chocolate chips to melt smoothly by melting it along with heavy cream. I then folded it into the cheesecake filling without any little bits of white chocolate chips lingering.

The end result… A delicious cheesecake with hints of white chocolate and a fruity swirl with just the right amount of sweetness!

White Chocolate Cheesecake with Mixed Berry Swirl

Ingredients:

For the Mixed Berry Sauce:

2 1/2 cups (12 oz) frozen mixed berries

1/2 cup water

2 tablespoons sugar

2 teaspoons cornstarch

For the Crust:

20 regular Oreos, crushed into fine crumbs

5 tablespoons unsalted butter, melted

For the Cheesecake Filling:

2 8oz packages cream cheese, at room temperature

2/3 cup sugar

1/4 cup sour cream, at room temperature

2 large eggs, at room temperature

1 teaspoon vanilla extract

1 cup white chocolate chips

1/4 cup heavy cream

Directions:

For the Sauce: In a medium saucepan combine the frozen berries, water, sugar and cornstarch. Bring to a boil and allow to boil for 5 minutes, stirring and mashing the berries occasionally, until the mixture thickens. Strain through a fine mesh sieve and allow to cool to room temperature.

Preheat oven to 325 F.

For the Crust: In a medium bowl stir together the cookie crumbs and melted butter, then press into the bottom (in an even layer) and up the sides of a 9-inch pie dash. Bake in the preheated oven for 8-10 minutes, until set. Set aside.

For the Cheesecake Filling: Measure the heavy cream in a glass measuring cup and then add in the chocolate chips. Microwave for 30-second intervals, stirring between each, until the mixture is smooth. Allow to cool.

In a medium bowl beat the cream cheese, sour cream, sugar and vanilla extract together with a hand mixer on medium speed until smooth. Add the eggs one at a time and continue beating until well incorporated and the mixture is smooth. Fold in the melted chocolate until no streaks of either mixture remains.

Assemble the Cheesecake: Pour half of the cheesecake filling into the prepared crust. Drizzle half of the berry sauce on top and then gently swirl into the cheesecake mixture with a toothpick or knife. Repeat these layers with the remaining cheesecake filling and berry sauce, once again gently swirling the sauce into the cheesecake.

Place in the oven and bake for 60-70 minutes. The cheesecake should be set along the edges but still jiggly in the center.

Transfer to a wire rack and cool completely. Gently cover with wax paper and aluminum foil and refrigerate for at least 3 hours or overnight before slicing and serving.

Recipe first appeared on Bead Yarn & Spatula

Chicken Lo Mein

Every week I am faced with the same dilemma…. What should I make for dinner? I go through a list of ideas in my head to see which one sparks enthusiasm and makes my taste buds feel excited. As many people do, I have a few good standby’s that I turn to when I just can’t think of anything else. And there are those times when I want to try something new. As was the case when I decided to make Chicken Lo Mein recently. I had come across a recipe in a magazine that I was sure I had ripped out, but, when I went to go look for it, I couldn’t find it. So, I turned to the internet to get some ideas for a recipe. After reading a few, I created my own that turned out delicious and best of all, quick and easy to make.

A few of the recipes I saw called for chicken breasts, but I opted to use boneless skinless chicken thighs instead as I find chicken thighs absorb the flavor of a dish better (especially sauces) and they do not dry out as easily as chicken breasts does when slightly overcooked.  And while I did plan on using Lo Mein noodles, they weren’t available at my local supermarket so I went with Linguine instead, you could also use spaghetti if you have a preference. One other change I made was the oil I used. Most of the recipes I saw online called for sesame oil, I used canola oil instead. Simply because I had it on hand and I knew it was a good substitute.

To make the dish I started by cooking the linguine per the package instructions. Once ready, I drained and then tossed them with a bit of oil before setting aside. Meanwhile, I cooked the chicken in a large skillet for a few minutes and then added in the vegetables. After cooking for an additional few minutes, to allow the vegetable to become tender, I added the sauce and noodles and tossed everything together. After letting it cook for a few more minutes it was ready to enjoy!

Chicken Lo Mein

Ingredients:

1 lb. boneless skinless chicken thighs, cut into bite-sized chunks

3 tablespoons canola oil

1/2 cup reduced-sodium soy sauce

2 tablespoons sweet chili sauce

1/4 cup light brown sugar

2 teaspoon corn starch

8 ounces linguine

2 garlic cloves, minced

2 teaspoons minced ginger

1 red bell pepper, sliced into strips

8 ounces white mushrooms, sliced

2 carrots, cut into matchsticks

2 cups broccoli florets

Salt & pepper

Directions:

Cook the noodles per the package instructions, then drain and toss with 1 teaspoon of canola oil. Cover to keep warm.

In a small bowl whisk together the soy sauce, sweet chili sauce, brown sugar, cornstarch and 1 of the minced garlic cloves and 1 teaspoon of the minced ginger.

Season the chicken with a teaspoon each of salt & pepper.

Heat 3 tablespoons of canola oil in a large skillet over medium heat, add the chicken and cook for 4-5 minutes, until it’s no longer pink on the outside.

Add the remaining garlic and ginger, along with the vegetables – pepper, mushrooms, carrots and broccoli – to the skillet with the chicken and cook covered, stirring occasionally, until the vegetables are tender. Add the soy sauce mixture along with the cooked linguine and stir to combine – it might be easier to use tongs to toss everything together. Cover and allow to cook for a few more minutes for the flavors to meld.

Recipe first appeared on Bead Yarn & Spatula

Key Lime Cake with White Chocolate Buttercream

If you love citrus desserts, you are going to love today’s Key Lime Cake with White Chocolate Buttercream. It’s a nod to the classic key lime pie with key lime curd sandwiched between layers of key lime cake. All topped with a white chocolate buttercream that is the perfect complement to the lime flavor.

In an attempt to make a boxed white cake mix taste homemade I added homemade buttermilk (whole milk mixed with vinegar) along with key lime juice and lime zest to the batter. Well, I forgot the fundamentals of baking science and the result of all that acidity was two cake layers that were dense and barely rose. On my second attempt I decided to keep it simple and ended up with perfect cake layers.

While the cake layers themselves have just a hint of lime flavor the real star of the cake is the key lime curd. The flavor is spot on without being overpowering. As a heads up, the recipe for the curd will yield more than what’s needed for the cake. I ended up mixing my leftover curd with yogurt. You could do as I did, or top it on pancakes or waffles, or just enjoy it on its own since it’s so good! And to top it all off I made a white chocolate buttercream by beating melted white chocolate along with butter and a few other ingredients.

Two quick things to note regarding the key lime juice and white chocolate. For the key lime juice, I opted to use Nellie & Joe’s Key West Lime Juice. It’s become my go-to for whenever I make any key lime desserts. Now, if you are up to it and are able to find them you can squeeze fresh key limes to get the juice. Just keep in mind that key limes are smaller than regular limes and you will need a decent amount of them to get the amount of juice needed for the cake. As for the white chocolate, you may be tempted to use white chocolate chips as opposed to baking bars, but speaking from experience the bars are better as they melt smoothly. Which is important when making the buttercream. I used chips once to make white chocolate buttercream and the chips didn’t melt smoothly and my buttercream ended up with small chunks of white chocolate. The buttercream tasted good, but it was an unexpected texture. I used Ghirardelli white chocolate bars which can be found in the baking aisle, but you could also use Lindt white chocolate bars which can be found in the candy aisle.

Key Lime Cake with White Chocolate Buttercream

Ingredients:

For the Key Lime Curd:

1 cup sugar

Zest from 1 lime

6 egg yolks

1/2 cup key lime juice

1 stick unsalted butter, cubed

For the Key Lime Cake:

1 15.25oz. box white cake mix

3 eggs

1 cup water

1/2 cup vegetable oil

1/4 cup key lime juice

Zest from 2 limes

For the White Chocolate Buttercream:

2 4oz. white chocolate baking bars, chopped*

2 1/2 sticks (1 1/4 cup) unsalted butter, at room temperature

2 1/2 cup confectioners’ sugar

1 teaspoon vanilla extract

1/4 teaspoon salt

1/4 cup heavy whipping cream

Graham cracker crumbs to decorate, optional

*I used 2 4oz. Ghirardelli White Chocolate Baking Bars

Directions:

For the Key Lime Curd:

In a medium saucepan lightly whisk the egg yolks. Add the sugar and lime zest and continue whisking until well combined. Gradually whisk in the lime juice.

Heat over low heat and continue whisking the mixture until it begins to thicken and coats the back of a spoon.

Remove from the heat and whisk in the cubed butter. Continue whisking until the butter has melted.

Strain the curd through a fine mesh sieve into a food-storage container. Place a piece of plastic wrap directly on the surface of the curd (to prevent it from forming a skin) and allow to cool for a few minutes before covering and refrigerating for at least 8 hours. The curd will continue to thicken as it chills.

For the Key Lime Cake:

Preheat the oven to 350 F. Spray 2-8inch round cake pans with baking spray and set aside.

In a large bowl combine all the ingredients for the cake and beat with a hand mixer on medium speed until combined, careful not to overbeat. Divide the batter among the prepared pans – about 2 cups each – and bake in the preheated oven for 28-33 minutes, until a cake tester inserted in the center comes out clean.

Allow the cakes to cool in the pans for 10 minutes before removing and transferring to a wire rack to cool completely. If you are not assembling the cake the same day as baking the cake rounds, wrap them in plastic wrap and refrigerate until ready to use.

For the White Chocolate Buttercream:

Place the chopped white chocolate in a microwave safe bowl and heat in the microwave for 30 seconds, stir and then continue to heat for 15 second intervals, stirring between each, until the chocolate is melted and smooth. Do not overheat as this will scorch the chocolate. Allow the chocolate to cool for 20 minutes.

In the bowl of a stand mixer beat the butter on medium speed until creamy. Gradually add in the cooled chocolate and continue beating until smooth. With the mixer on medium-low speed gradually add in the confectioners’ sugar. Beat in the vanilla extract and salt until combined.

Add in the heavy whipping cream and beat for a few seconds until incorporated and then increase the speed to high for 30-60 seconds to fluff the frosting.

To assemble the cake:

If necessary, level the cakes. Place one of the cakes on a cake board or a cake stand. Transfer some of the frosting to a piping bag (or resealable bag) and pipe a thick dam around the edge of the cake. Fill with the lime curd and then place the second cake on top. Crumb coat the cake and place in the refrigerator for 15 minutes. Frost the cake with the remaining frosting. If desired pipe swirls on top of the cake. If using, press the graham cracker crumbs on top of the cake and on the sides.

Recipe first appeared on Bead Yarn & Spatula