Cranberry Orange Walnut Muffins

Not sure why, but, I had two bags of dried cranberries in my pantry that were quickly approaching their expiration date. They were probably on sale or I was planning on eating more salads than I have been. Either way, I decided it was time to start using them before they did expire. Cranberries are always a good add in for baked goods since they offer a pop of sweetness and do have health benefits. I like to think they are still healthy even after they are baked into something sweet. I was debating between cookies or muffins, but, I opted to go with the muffins… A Cranberry-Orange Walnut Muffin.

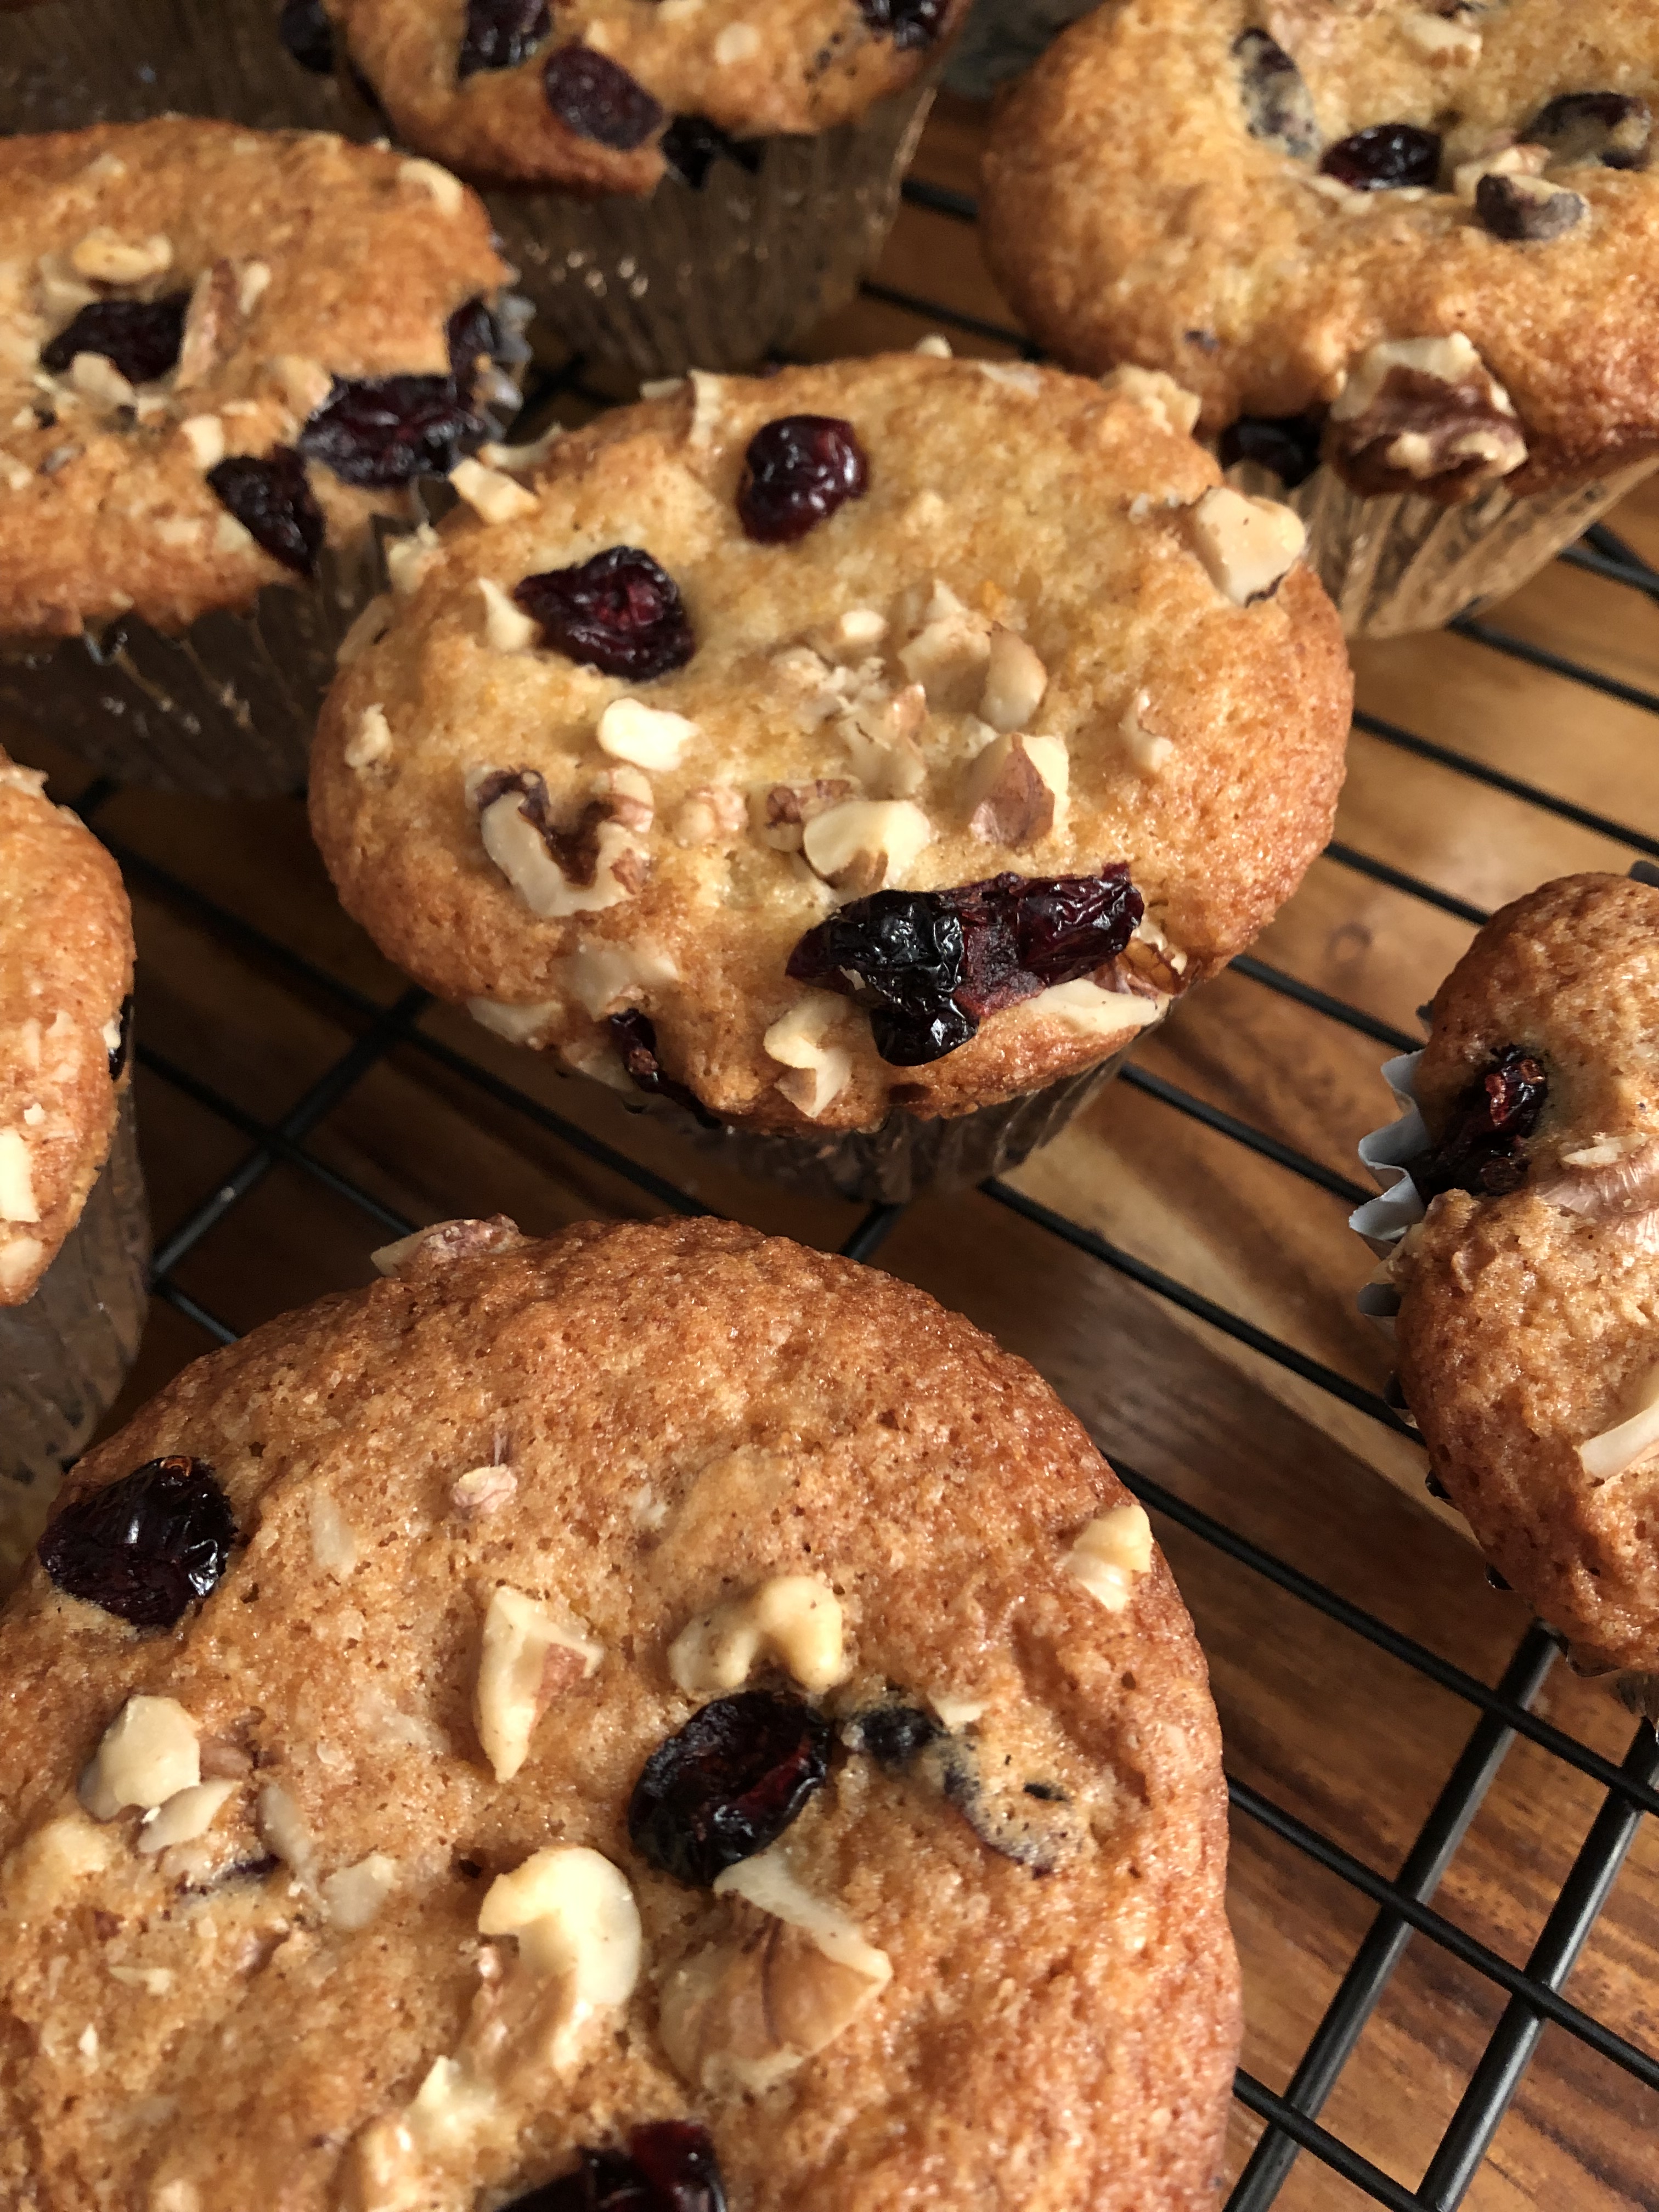
The recipe for these is pretty straight forward. Next time I make them though I will cut the sugar in half (1/2 cup as opposed to a 1 cup). They were delicious, but, I just found them to be a tad bit sweet and since I normally eat muffins for breakfast and I am not big into sweets for breakfast I think I would enjoy them more with less sugar. Also, since you are using freshly squeezed orange juice and if your orange is sweet and then you add sugar and dried cranberries on top of that you are getting sugar from all sides so it’s best to cut back on the actual sugar you are adding in. They will still be delicious and even a bit better for you. And while the original recipe called to make these in a 12-cup cupcake tin, I opted to bake them in 6-cup muffin tin instead. I prefer bakery sized muffins than cupcake sized ones. To accommodate the extra batter, I placed my muffin liners in ramekins on a baking sheet and baked them as normal.

Cranberry Orange Walnut Muffins

  • Servings: 8 Large Muffins / 12 Small Muffins
  • Print

Ingredients:

1 cup sugar

1 stick unsalted butter, at room temperature

1 large

2 cups flour

1 1/2 teaspoons baking powder

1/2 teaspoon salt

1/2 teaspoon baking soda

1 teaspoon freshly grated orange zest

3/4 cup freshly squeezed orange juice*

3/4 cup dried cranberries

1/2 cup chopped walnuts

*I used 3 large navel oranges

Directions:

Preheat oven to 350F. Line a muffin/cupcake pan with paper liners.

In a medium bowl whisk together the flour, salt, and baking powder & soda together. Set aside.

In a small bowl stir together the orange juice & zest. Set aside.

In a large bowl cream together the butter and sugar using a handheld mixer on medium speed. Add the egg and continue beating until incorporated. With the mixer on low speed add the flour mixture in three parts alternating with the orange juice mixture. Stir in the cranberries and walnuts.

Divide the batter among the prepared pans. Bake in the preheated oven for 25-25 minutes for smaller muffins and 30-35 minutes for larger muffins. Let cool in pans for 5 minutes before removing muffins from pans and cooling completely on a wire rack.

Recipe from Fisher Nuts

Mini Cinnamon Sugar Pumpkin Muffins

I recently posted saying I finally found the perfect pumpkin muffin recipe for me and here I am posting another one. So, what’s the difference? Well, I consider these Mini Cinnamon Sugar Pumpkin Muffins to be more like donut holes and I find them to be more dessert-like than for breakfast. But most importantly, they are delicious nonetheless!

A definite plus about this recipe… You don’t need a stand mixer or a hand mixer to make the batter. You whisk the dry ingredients together in one bowl and the wet ingredients in another and then whisk both together to make the batter. Next, using a cookie scoop (or a small spoon) drop the batter into a mini muffin pan sprayed with baking spray (no cupcake liners needed either!).

Bake in a 350 F preheated oven for about 12 minutes and let them cool slightly in the pan…

Before rolling in melted butter and a cinnamon sugar mixture for the topping. YUM! And, while I normally don’t like glazes and coatings (they can be a tad bit too sweet for me) I will say that while these mini muffins are delicious without the coating, they are amazing with it so don’t skip it.

Mini Cinnamon Sugar Pumpkin Muffins

  • Servings: 24 Mini Muffins
  • Print

Ingredients:

For the Muffins:

1 3/4 cups flour

1 1/2 teaspoons baking powder

1/2 teaspoon salt

1 teaspoon cinnamon

1 1/2 teaspoons pumpkin pie spice

1/4 cup unsalted butter, melted and slightly cooled

1/2 cup light brown sugar

1 large egg

1 1/2 teaspoons vanilla extract

3/4 cup pumpkin puree

1/2 cup whole milk

For the Cinnamon Sugar Coating:

1/2 cup sugar

2 teaspoons cinnamon

1/4 cup unsalted butter, melted

Directions:

Preheat the oven to 350 F. Spray a mini-muffin pan (24 count) with baking spray and set aside.

In a medium bowl whisk together the flour, baking powder, salt, cinnamon, and pumpkin spice.

In a large bowl, whisk together the cooled melted butter and brown sugar. Add in the egg, vanilla extract, pumpkin puree and milk and continue whisking until combined.

Add the dry ingredients to the wet ingredients and whisk everything together until just combined and no streaks of the flour mixture remain. The batter will be thick.

Using a cookie scoop, drop scoops of the batter into the prepared pan.

Bake in the preheated oven for 11-13 minutes, or until a cake tester inserted in the center of one of the muffins comes out clean.

Transfer the pan to a wire rack and allow the muffins to cool slightly.

While the muffins are cooling combine the sugar and cinnamon for the coating in a small bowl.

Once the muffins are cool enough to handle dip them in the melted butter and then roll in the cinnamon sugar mixture.

Store in an airtight container.

Recipe from Sally’s Baking Addiction

Chocolate Chip Pumpkin Muffins

I must say I have been on the search for a good pumpkin muffin recipe for a while now. Two years ago, I shared two that were quite good and very different from each other. A Pumpkin Cream Cheese Swirl Muffin, that reminded me of this Cheesecake Stuffed Pumpkin Bread and a Pumpkin Cranberry one, that I got the idea for from a Chobani pumpkin yogurt. And while both of those pumpkin muffins were delicious, I think I finally found the perfect pumpkin muffin for me. It stayed moist for a couple of days in an airtight container at room temperature, it doesn’t involve a lot of crazy ingredients and it has chocolate chips. Which means it works just as well as a breakfast treat as it does for a midday snack or even dessert.  I enjoyed one for each of those occasions. It’s simply called a Chocolate Chip Pumpkin Muffin.

One more thing that’s great about this recipe… You can halve it easy enough and still end up with a decent amount of delicious muffins. I halved it and ended up with enough batter for 14 muffins. One last thing, make sure to sprinkle your muffins with a few extra chocolate chips prior to baking. It makes them prettier and a little extra sweeter!

Chocolate Chip Pumpkin Muffins

  • Servings: 24 Muffins
  • Print

Ingredients:

3 cups flour

3 cups sugar

2 teaspoons baking soda

1/2 teaspoon baking powder

1 teaspoon Kosher salt

2 cups pumpkin puree

1 cup vegetable oil

4 eggs

2/3 cup water

1 teaspoon ground clove

1 teaspoon all spice

2 cups semi-sweet chocolate chips, plus additional for sprinkling on top

Directions:

Preheat oven to 350 F. Line two cupcake pans with liners.

In a medium bowl whisk together the flour, sugar, baking soda, baking powder, and salt. Set aside.

In a large bowl, using a handheld mixer, beat the pumpkin, oil, eggs, water and spices on medium speed until combined. With the mixer on low gradually add in the flour mixture and mix until just combined. And finally, fold in the chocolate chips with a rubber spatula.

Transfer the batter to the prepared cupcake tins, filling each crevice about 2/3 full. Sprinkle the top of each muffin with a few chocolate chips. Bake in the preheated oven for 25-30 minutes, until a cake tester inserted into the center of one of the muffins comes out clean. Let cool in the pans for five minutes and then transfer to a wire rack to cool completely.

Store in an airtight container at room temperature.

Recipe from What’s Gaby Cooking

One Banana Three Muffins

Normally when I have overripe bananas my go-to is to make a Banana Nut Bread. But that requires 3 bananas and this time around I only had 1. And while I could have tossed it, I’m not keen on eating overripe bananas, I also don’t like to waste food. So, I decided to tweak a recipe to turn that 1 banana into muffins.

Truthfully before making and dividing the batter I wasn’t sure how many muffins I would get from it. Once I was done prepping it, I was able to divide it into 3 large muffins. I used a 6-cup muffin pan as opposed to a 12-cup cupcake pan.

After baking in a 375 F preheated oven I let the muffins cool in the pan for a few minutes before transferring them to a wire rack to cool completely.

And the following morning enjoy one for breakfast.

These muffins were delicious! From now on when I buy bananas I may leave one to overripe so I can bake up a batch of these muffins. They are quick, easy, delicious and the perfect amount!


Banana Nut Muffins

Ingredients:

3 tablespoon unsalted butter, at room temperature

1/3 cup sugar

1 egg

1/4 teaspoon baking soda

3/4 cups flour

1 overripe banana, mashed

3 tablespoons chopped walnuts


Directions:

Preheat the oven to 375 F. Line 3 cavities of a 6-cup muffin pan with liners.

In a medium bowl sift together the flour and baking soda and set aside.

In another medium bowl cream together the butter and sugar using a handheld mixer. Add the egg and continue to beat until well incorporated. Add the dry ingredients to the mixture and beat until just incorporated. Stir in the mashed banana and the walnuts.

Divide the batter among the prepared muffin pan and bake in the oven for 20-25 minutes, or until the muffins are golden brown and cake tester inserted in the middle comes out clean.

Cool in the pan for 10 minutes before removing the muffins and transferring them to a wire rack to cool completely.

Meyer Lemon Poppy Seed Muffins

With 2 bags of Meyer Lemons I have made my fair share of desserts. I made the scones I posted last week, a pie which I will be sharing with you on Pi Day (3/14) and these Lemon Poppy Seed Muffins I am sharing with you today. I was planning on making these muffins prior to the scones but I didn’t have any poppy seeds, well, guess what. I have way more than enough now. I honestly thought I would be able to purchase a small bag of them like I did for sesame seeds, but, at my usual supermarket poppy seeds are only available in containers like spices. So, because it was a better value I purchased the larger container. I guess I will be making a lemon poppy seed cake one of these days.

What was nice about these muffins is that they require only one large bowl to make the batter. I began by creaming together butter, eggs and sugar, then added in lemon juice and zest and finally the dry ingredients – baking powder, salt and poppy seeds. I opted to bake them in a 6 – cup muffin tin, but, you could bake them in a 12-cup cupcake tin instead. You will just need to keep an eye on them because the baking time will differ. These tasted good and were a nice treat for breakfast, but, next time I think I will bake them at 350 F instead. I found that baking them at 375 F allowed for the outside of the muffin to overbake a little while the inside finished baking.

Meyer Lemon Poppy Seed Muffins

Ingredients:

1/2 cup unsalted butter, at room temperature

2 eggs

3/4 cup sugar

3 tablespoons meyer lemon juice

1 teaspoon meyer lemon zest

1 1/2 cups flour

1 1/2 teaspoons baking powder

3/4 teaspoon salt

1 tablespoon poppy seed

*If you cannot find Meyer Lemons, you can use regular lemons

Directions:

Preheat the oven to 350 F. Line a 6-cup muffin tin with liners.

In a large bowl cream together the butter, eggs and sugar using a hand mixer or stand mixer on medium speed. Add in the lemon zest and juice and continue mixing until well combined. Add in the flour, baking powder, salt and poppy seeds and stir together until just combined, being careful not to over-mix.

Divide the batter among the prepared muffin tin.

Bake for 20-25 minutes, or until a cake tester inserted in the middle comes out clean.

Enjoy warm or at room temperature. Store left-over muffins in an air-tight container for 2 to 3 days.

Recipe from Miss in the Kitchen

%d bloggers like this: