Tiramisu Parfait

Can you believe that we are in March already?  Insane! Time really does fly by, and you don’t even need to be having fun for it to happen. It just does! Hope February treated you well and that you celebrated the month of love as you saw fit.

Tiramisu is one of my favorite desserts, but whipping up a whole batch is just too much. I recently came across a recipe for Tiramisu for Two in the recent issue of Real Simple magazine that I thought was perfect to try – after I basically switched up all the ingredients to be reminiscent of my favorite tiramisu recipe. I used mascarpone cheese instead of cream cheese, Kahlua instead of bourbon or rum and completely omitted the raspberries the recipe called for. What I ended up with though was a delicious tiramisu that took less than 20 minutes to prepare.

It was so good, that I made it twice within a week. Also because I couldn’t get good pics of the first two I made to share with this blog post, so I had to make it again. No complaints though. I was more than happy to make the sacrifice for this blog post. 

Hope you try the recipe and enjoy it as much as I did!
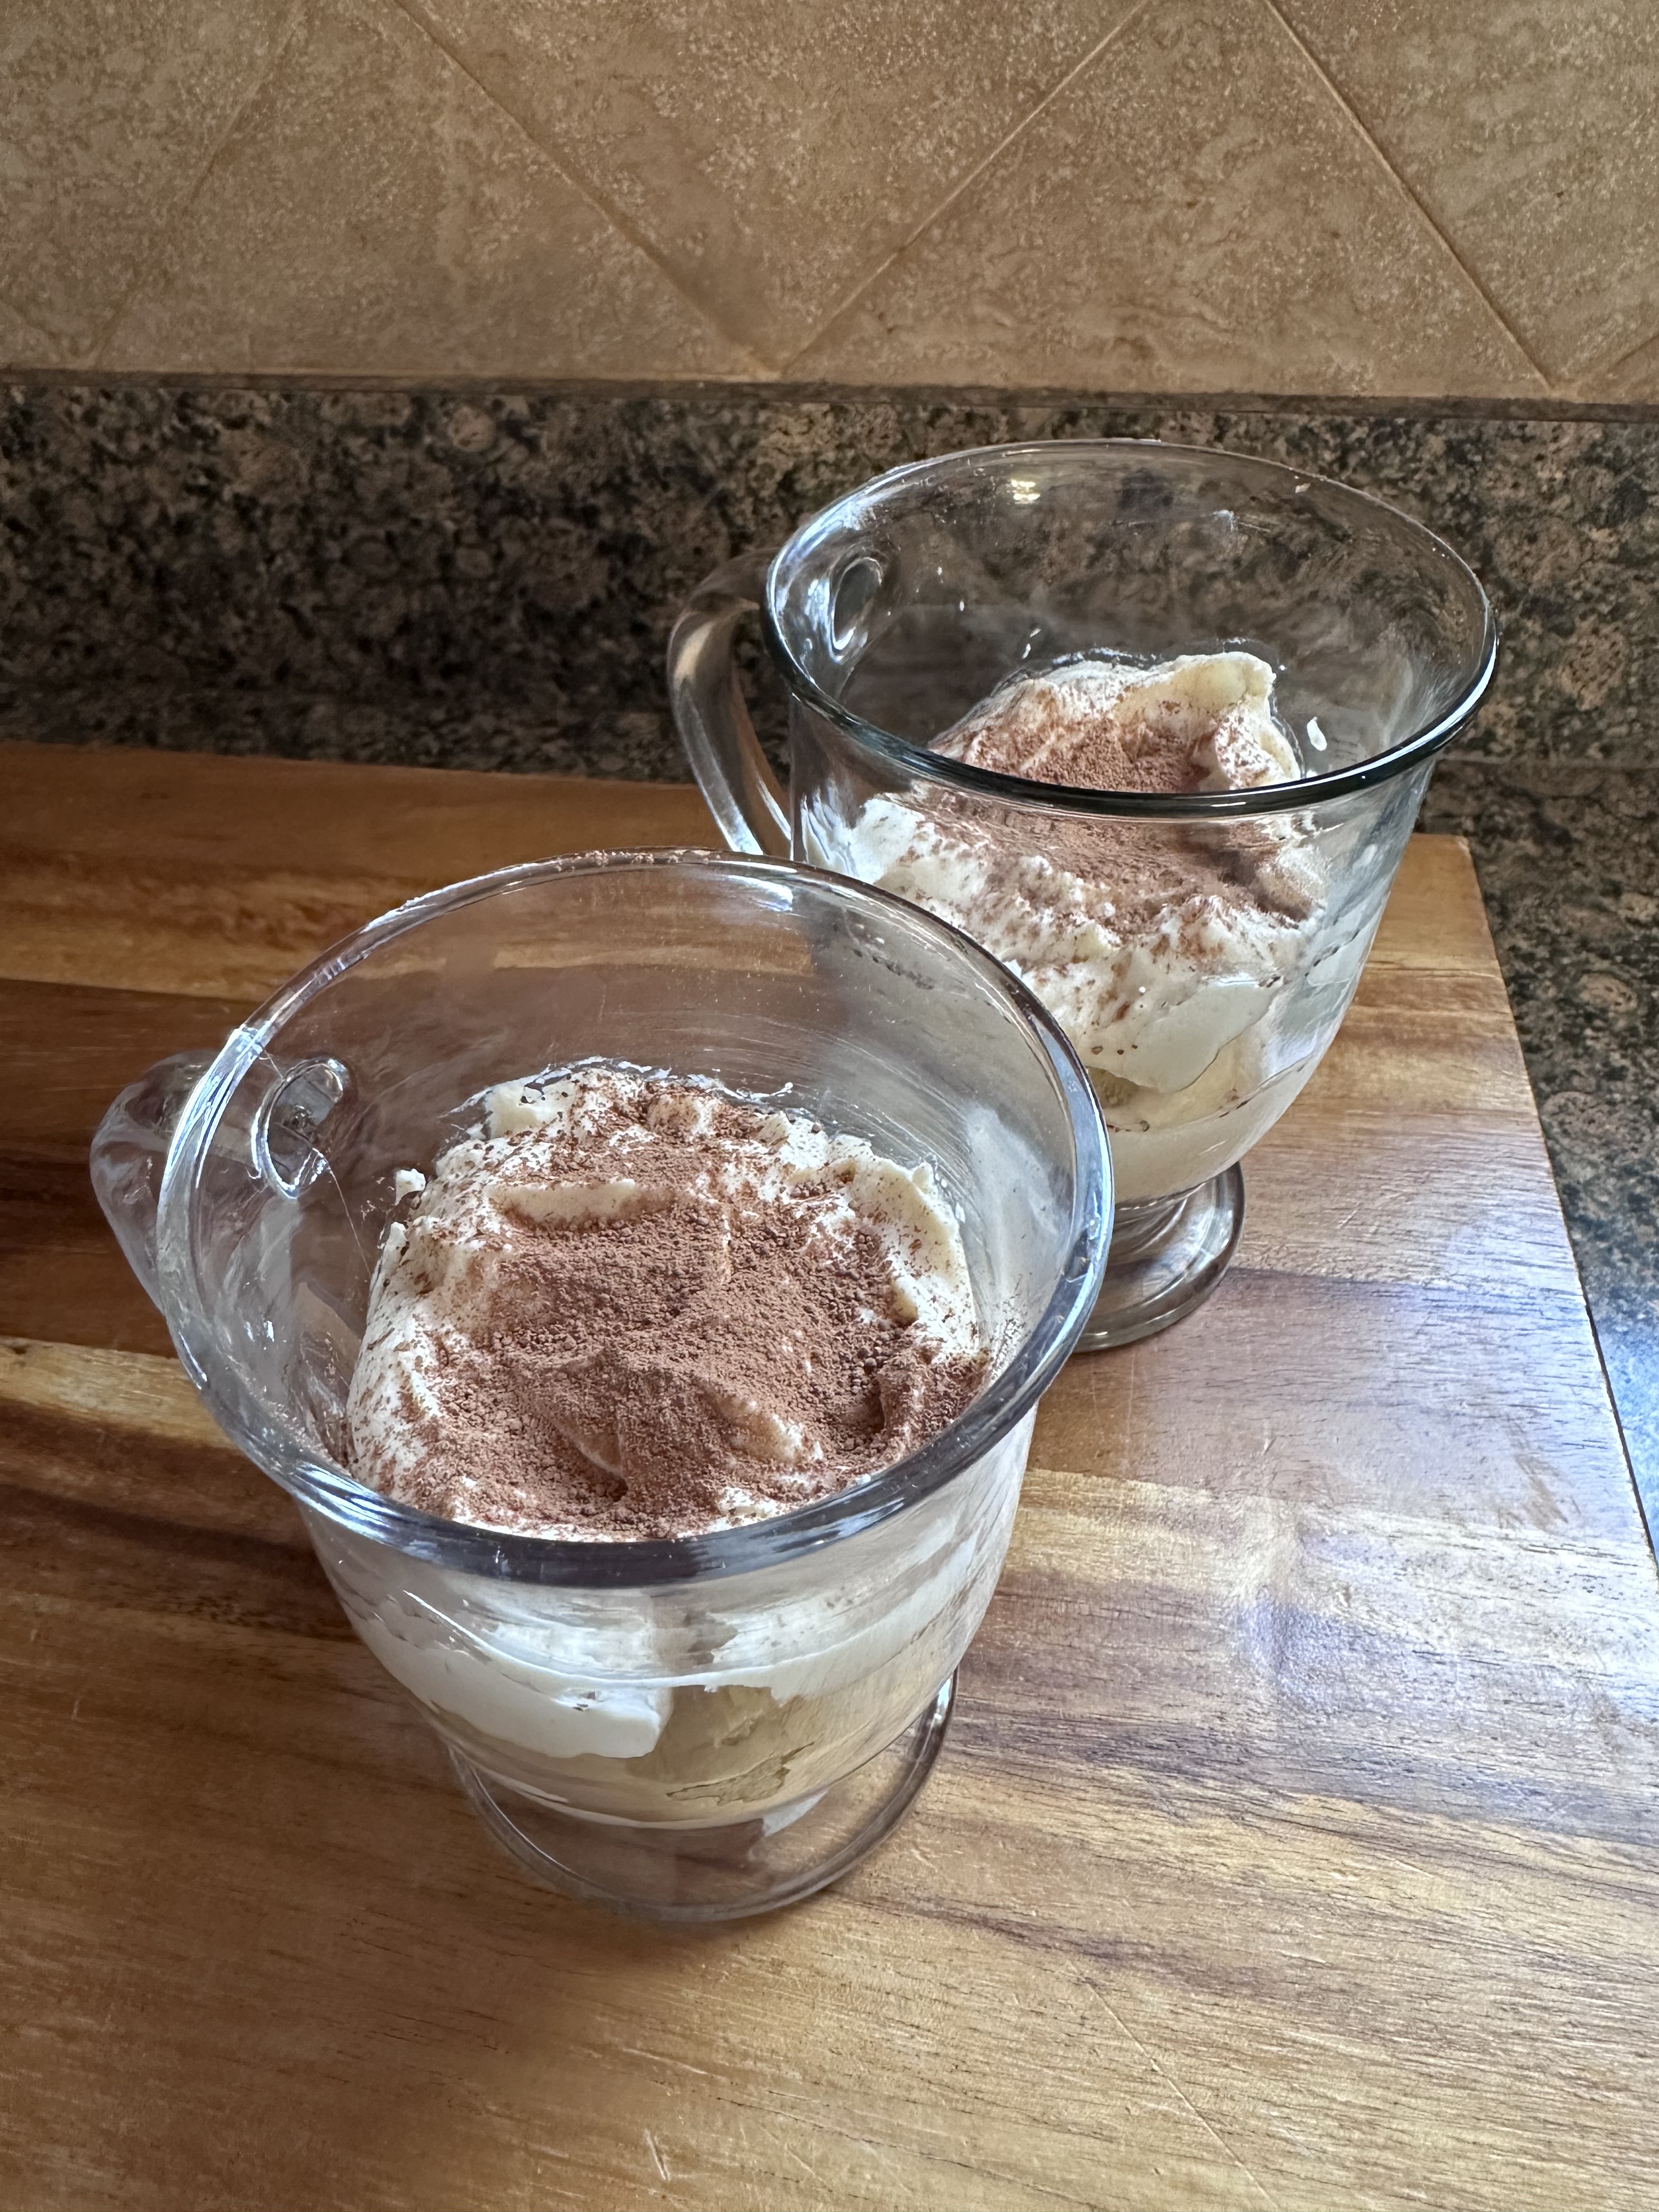
Tiramisu Parfait

Ingredients:

4 oz. mascarpone cheese, at room temperature

1/2 cup heavy cream

1/4 cup confectioners’ sugar

1 tablespoon Kahlua

6 ladyfingers, halved crosswise

1/2 cup brewed espresso or coffee, cooled

Cocoa powder, for dusting

Directions:

In a medium bowl beat the mascarpone cheese with a hand mixer on medium speed until creamy. Add the heavy cream, sugar and Kahlua and increase the speed to high and beat until the mixture is smooth and has thickened. This will take a few minutes.

In another medium bowl add the espresso/coffee and dip the ladyfingers, coating both sides.

Arrange 3 of the ladyfingers in the bottom of 2 straight sided glasses / mugs. Top with 1/3 cup of the mascarpone mixture and then repeat the layers – ladyfingers and then the remaining mascarpone mixture. Top with a dusting of cocoa powder.

Cover with plastic wrap and refrigerate for at least 3 hours and up to 2 days.

Recipe modified from Real Simple

Chicken Lasagna Soup

It had been a few years since my neck of the woods had measurable snow fall, but last week that changed when a Nor’easter dropped a few inches of snow that required me to break out of my shovel and get to work. And unfortunately, it wasn’t the nice powdery snow that’s easy to shovel, it was the heavy wet snow that can be a bit of a back-breaker to clean. The snow also brought with it colder temperatures. The weekend before the snow it was in the 50’s, but after the snow it was in the 30’s with wind chills making it feel much colder. Thankfully, I had today’s delicious soup to enjoy on those cold days, a Chicken Lasagna Soup. I know the name might conjure up all kinds of ideas as to what it could be, but it’s pretty much a very fancy chicken noodle soup.

So, why a Chicken Lasagna Soup? Well, I have a recipe for a lasagna that I want to make, and I tend to purchase grocery items that I know I am going to need in the future when they are on sale, so I bought the lasagna noodles when they were on sale, only to reread the recipe and realize they were the wrong ones. I was supposed to buy no-boil ones, but I didn’t want them to go to waste so I started thinking of other things I could make with them and remembered seeing quite a few recipes for lasagna soup.

The soup came together rather quickly. I started off by poaching chicken breasts in seasoned chicken broth along with onions and mushrooms. Once the chicken was cooked, I removed it from the broth, shredded it and then added it back to the broth along with baby spinach, sun dried tomatoes, heavy cream and the lasagna noodles (already cooked). I opted to cook the noodles separately as opposed to cooking them in the soup to reduce the amount of starch added to the soup, which would have made the soup consistency thicker. Once the spinach was wilted, I added in cheeses and gave everything a good few stirs until they were melted and then it was ready to be enjoyed.

And this soup didn’t disappoint. It was flavorful and hearty, the perfect soup for cold winter days!

Chicken Lasagna Soup

Ingredients:

2 tablespoons unsalted butter

1 1/2 tablespoons flour

1 yellow onion, chopped

2 cups sliced mushrooms (8oz. package)

4 garlic cloves, minced

2 teaspoons dried rosemary

1 teaspoon dried basil

2 teaspoons dried oregano

1 teaspoon red pepper flakes

1 teaspoon Kosher salt

1 teaspoon ground black pepper

6 cups low-sodium chicken broth

2 skinless chicken breasts (about 1 pound)

8 lasagna noodles, broken into pieces

1 5oz. bag baby spinach

1/3 cup sun dried tomatoes, sliced

1 cup heavy cream

1/2 cup shredded provolone cheese

1/4 cup grated parmesan cheese

Directions:

In a large pot or Dutch oven melt the butter and flour together over medium heat. Add in the onions, mushrooms, rosemary, basil, oregano and garlic and stir everything to combine. Add in the chicken broth and stir again. Add the chicken breast along with the red pepper flakes, salt & pepper. Cover and cook for 20-25 minutes, until the chicken is cooked.

Meanwhile, cook the lasagna noodles in a separate pot per the package instructions. Drain and set aside.

Once cooked, remove the chicken from the pot and shred, then return to the pot. Raise the heat and bring the soup to a boil and add in the noodles, spinach, sundried tomatoes and heavy cream. Stir and allow the soup to lightly boil until the spinach wilts. Add in the cheese and stir until melted.

Store leftovers in the refrigerator in an airtight container.

Recipe adapted from Half Baked Harvest

Strawberry & Chocolate Cookies

Valentine’s Day is just around the corner and today I am sharing the cutest cookies to make for the day. I’ve used all kinds of cake mixes to make cookies and in honor of Valentine’s Day I used a strawberry cake mix to make Strawberry & Chocolate Cookies that are topped off with a chocolate heart pressed into the center of each cookie.

Making the dough for these cookies is quick and easy. In a large bowl along with the strawberry cake mix, I beat together baking powder, vegetable oil, eggs and vanilla extract. While I normally don’t add any kind of leavening agent to my cake mix cookies, I decided to add baking powder to these to give them a little more rise. After the dough came together, I refrigerated the dough for 30 minutes to firm up a bit.

Next, I dropped the dough onto prepared baking sheets and baked in a 350 F preheated oven for 10 minutes. Just until the cookies were set. After removing from the oven, I immediately pressed a chocolate heart (I used Dove’s Milk Chocolate Hearts) into the center of each cookie. I let the cookies cool on the baking sheets for 5 minutes before transferring to a wire rack to cool completely and allow the chocolates to firm up again. Alternatively, you could use 1 cup of semi-sweet or milk chocolate chips folded into the batter in lieu of the chocolate hearts…

But a pink cookie with a chocolate heart couldn’t be any more perfect for Valentine’s Day!

Strawberry & Chocolate Cookies

  • Servings: 18 Cookies
  • Print

Ingredients:

1 15.25 oz. Strawberry Cake Mix (I used Duncan Hines)

1 teaspoon baking powder

1/3 cup vegetable oil

2 large eggs

1 teaspoon vanilla extract

18 chocolate hearts unwrapped (I used Dove Milk Chocolate Hearts) *

*In lieu of the chocolate hearts, fold 1 cup of semi-sweet or milk chocolate chips into the dough instead

Directions:

In a large bowl add the cake mix, baking powder, oil, eggs and vanilla extract. Beat with a hand mixer on medium speed until well combined. Cover the bowl with plastic wrap and refrigerate for 30 minutes.

Preheat the oven to 350 F. Line two baking sheets with parchment paper.

Using a cookie scoop (1.5 tablespoons) to drop the dough onto the prepared baking sheets about 2 inches apart. Bake in the preheated oven for 10-11 minutes.

As soon as the cookies come out of the oven press a chocolate heart in the center of each cookie and allow the cookies to cool on the sheets for 5 minutes before transferring to a wire rack to cool completely.

The chocolate may still be soft even after the cookies cool, allow them to firm up again before transferring to an air-tight container to store.

**If you opt to use chocolate chips instead, fold them into the dough after beating the other ingredients together and then follow the instructions for refrigerating, baking and cooling the cookies.

Recipe first appeared on Bead Yarn & Spatula

Cranberry Orange Upside Down Bundt Cake

If you are still looking for a festive and delicious dessert to serve at your holiday gatherings but don’t want anything that requires too much fuss, then today’s Cranberry Orange Upside Down Bundt Cake may just be what you are looking for.

While the name may be a mouthful, this cake is super easy to make and comes together rather quickly thanks to using a yellow cake mix as the base for the cake. Simply add some orange zest and freshly squeezed orange juice to the batter and you end up with a nice orange flavored cake that is slightly sweet yet refreshing. And the addition of cardamom is a nice complement to the orange flavor. If you don’t have cardamom, you could use cinnamon instead. While the fresh cranberries on top of the cake adds a nice pop of color and a slight tartness to the cake. If you want your cranberries to be a bit sweeter add more brown sugar to the topping.

So, with little effort and in about an hour you have a beautiful and delicious cake to enjoy!

Cranberry Orange Upside Down Bundt Cake

Ingredients:

For the Cranberry Topping:

4 tablespoons unsalted butter, melted

1 1/2 cups fresh cranberries

1/3 cup light brown sugar

For the Cake:

1 15.25 oz box yellow cake mix*

3 large eggs

1 cup water

1/3 cup vegetable oil

1 teaspoon cardamom

Zest from 2 navel oranges

Juice from 1 navel orange

*I used Duncan Hines

Directions:

Preheat the oven to 350 F and spray a Bundt pan with baking spray.

Pour the melted butter into the prepared pan, spreading it evenly. Scatter the cranberries over the melted butter in an even layer and then sprinkle the brown sugar over the cranberries.

In a large bowl add all the ingredients for the cake – cake mix, eggs, water, vegetable oil, cardamom, orange zest and juice – and beat with a hand mixer on medium speed until combined.

Gently pour the batter into the Bundt pan and tap it down on the counter a few times to release any air bubbles. Bake in the preheated oven for 30-35 minutes, or until a cake tester inserted in the cake comes out clean.

Let the cake cool in the pan for 15 minutes before inverting onto a cake stand (or cake board) and let cool completely before slicing and enjoying.

Store leftovers in the refrigerator.

Recipe first appeared on Bead Yarn & Spatula  

Gingerbread Spice Chocolate Chip Cookies

Are you still in search of cookies to bake for the holidays? Or maybe you can’t decide between baking a holiday staple, gingerbread, or everyone’s favorite, chocolate chip? If so, why not make both with today’s recipe for a Gingerbread Spice Chocolate Chip Cookie.

I came across this recipe in the most recent issue of Food Network Magazine and knew immediately that I wanted to try it. Especially after making my Gingerbread S’more Blossoms and knowing how well gingerbread and chocolate go together. Although, I made a few tweaks to the original recipe. While the original recipe called for Gingerbread Spice, I didn’t feel like searching for an actual jar of McCormick’s Gingerbread Spice (it’s a real thing just like pumpkin spice), so I created my own with a blend of ground cinnamon, ginger and cloves. Alternatively, you could swap out the cloves for allspice. And I opted to use semi-sweet chocolate chips as opposed to milk-chocolate chips. The result was a cookie with all the flavors of gingerbread with just the right amount of chocolate. And while they are delicious just as they are, they are perfect to make winter ice cream sandwiches – which is what a friend of mine did after receiving a batch of them from me!

Gingerbread Spice Chocolate Chip Cookies

Ingredients:

2 sticks unsalted butter, at room temperature

1 1/4 cups dark brown sugar

1/2 cup sugar

2 large eggs

2 teaspoons vanilla extract

2 teaspoons molasses

2 1/2 cups flour

1 1/2 teaspoons cinnamon

1 1/2 teaspoons ground ginger

3/4 teaspoons ground cloves

1 teaspoon baking soda

1 teaspoon salt

2 cups semi-sweet chocolate chips

Directions:

Preheat the oven to 375F. Line 3 large baking sheets with parchment paper and set aside.

In a medium bowl whisk together the flour, cinnamon, ginger, cloves, baking soda and salt, set aside.

In a large bowl beat the butter and both sugars with a hand mixer on medium-high speed until light and fluffy. Reduce the speed to low and beat in the flour mixture, gradually increase the speed to medium-high and beat until just combined. Add in the chocolate chips and continue beating until the chocolate chips are well incorporated into the dough.

Scoop the dough using a medium cookie scoop (about 1 1/2 tablespoons) and roll into balls and then place on the prepared baking sheets about 2 inches apart.

Bake in the preheated oven for 12-15 minutes, until the cookies are golden brown around the edges and soft in the center. Allow the cookies to cool completely on the baking sheets before transferring them to an airtight container.

Recipe slightly modified from Food Network

Peppermint Bark Molten Lava Cakes

Creating and making your own recipes is like conducting a science experiment. Until you take that first bite you wonder if you got the proportions of the ingredients correct, will the flavors work together and is it even edible. These thoughts and more swirled around my head while making today’s Peppermint Bark Molten Lava Cakes.  

I got the idea after having a package of Ghirardelli Peppermint Bark Squares left-over from last Christmas. I say left-over because I normally buy a few packages to enjoy around the holidays since they are a seasonal treat. I bought one too many though because I couldn’t bring myself to open the last package I had because I had my fill of the square by then. I figured there had to be something I could incorporate them into. At first, I thought cookies, but around the same time I was working on the recipe for these Raspberry Molten Lava Cakes and thought that maybe I could use them to make a peppermint lava cake that would be perfect for the holidays.

I made some tweaks to the Raspberry Molten Lava Cake recipe and ended up with a molten lava cake that was the perfect balance of peppermint and chocolate. And it’s finally time to share the recipe with the holidays just around the corner. To make the batter I melted the peppermint bark squares in the microwave along with butter and then incorporated that into a mixture of sugar and eggs and finally folded in flour. After dividing the batter among 4 ramekins…  

I baked them in a preheated oven for about 15 minutes and then let them cool for a few more…

Before inverting on a plate and dusting with confectioners’ sugar to enjoy.

So, this holiday season if you have an extra bag of peppermint bark or are looking for a fun twist on the traditional molten lava cake pick up a bag of peppermint bark and whip up a batch of these yummy cakes!

Peppermint Bark Molten Lava Cakes

Ingredients:

1 5.4 oz. package Ghirardelli Peppermint Bark Squares, broken into quarters

1/2 cup unsalted butter

1/2 cup sugar

3 large eggs, at room temperature

1/4 cup flour

Confectioners’ sugar, for dusting

Directions:

Preheat the oven to 425 F.

Spray 4 6oz. ramekins with baking spray and place on a baking sheet.

In a microwave safe bowl combine the peppermint bark squares and butter and microwave for 30-second intervals until the butter melts. Once the butter has melted stir the mixture until the chocolate melts.

In a medium bowl beat together the sugar and eggs with a hand mixer on medium speed until pale and fluffy.

Fold the egg mixture into the chocolate mixture until just combined. Add the flour and continued folding the mixture together until well combined.

Divide amongst the prepared ramekins, about 1/2 cup of batter in each.

Bake in the preheated oven for 15-16 minutes. Cool for 5-10 minutes before inverting. Dust with confectioners’ sugar and enjoy.

For leftovers, cover the ramekins tightly with plastic wrap and refrigerate. To heat, microwave for 30 seconds. Let sit for a minute then invert and enjoy.

Recipe first appeared on Bead Yarn & Spatula.

Gingerbread S’more Blossoms

Today’s cookie is mash-up of a few cookies and it’s perfect for anyone short on time or doesn’t fancy themselves a baker. It’s a Gingerbread S’more Blossom.

So, what exactly is a Gingerbread S’more Blossom? It’s a gingerbread cookie, topped with a marshmallow that is roasted under the broiler and then topped with a Hershey Kiss! And as I mentioned they are perfect for anyone who is a bit apprehensive to bake cookies from scratch as the gingerbread cookie is made using a prepackaged mix. If you prefer to use your favorite gingerbread recipe that would work as well. I’ve made gingerbread cookies from scratch, and I have made them using Betty Crocker’s Gingerbread Cookie mix and have been just as happy with the results and have appreciated the time it saves!

The end result is a cookie that is the perfect combination of a s’more and blossom cookie along with gingerbread!

Gingerbread S’more Blossoms

Ingredients:

1 17.5 oz Gingerbread Cookie Mix* plus ingredients listed on package to make the cookies

Large marshmallows, cut in half**

Hershey Kisses, unwrapped**

*I used Betty Crocker’s Gingerbread Cookie Mix

**For the marshmallows, you will need half the amount of cookies you bake and for the Hershey Kisses you will need an equal amount

Directions:

Prepare the dough and bake the gingerbread cookies per the package instructions.

After removing the cookies from the oven press a marshmallow in the center of each cookie, cut side down and let the cookies cool on the baking sheets.

Switch the oven to the broiler setting and place one baking sheet at a time back in the oven for 30-60 seconds, or until the marshmallows begin to brown. Remove from the oven and immediately place a Hershey Kiss in the center of each marshmallow. Transfer the cookies to wire rack to cool completely.

Store in an airtight container.

Recipe first appeared on Bead Yarn & Spatula.

Coconut Caramel Thumbprints

Today’s cookie might be a bit controversial. It involves coconut and I have found that people either love coconut or hate it. There doesn’t seem to be an in-between. Sometimes it’s the flavor that is off-putting, other times it’s the texture and then there are those times where it’s a combination of both. But if you are a fan of coconut then today’s cookie is for you, it’s a Coconut Caramel Thumbprint. And if you aren’t a fan, I have included steps on how you can still make these delicious cookies without the addition of coconut.

I’ll start off by saying that these cookies do require a few steps. The dough needs to be made and then refrigerated for about 30 minutes. If not, the cookies will spread too much while baking and instead of a thumbprint cookie you’ll end up with a flat cookie. Once the cookies are cooled, they are filled with caramel sauce. Instead of making it from scratch though I used caramels that I melted along with heavy cream. And finally, once the caramel has set, the cookies are drizzled with white chocolate. Now, the final step of white chocolate can be omitted if you’re not a fan or you’re concerned they might be too sweet.

Now, if coconut is not your thing you can easily alter these cookies to make your taste buds happy. Simply omit the coconut extract and the shredded coconut and you will end up with is a buttery cookie with a caramel filling.

Coconut Caramel Thumbprints

  • Servings: 36 Cookies
  • Print

Ingredients:

For the Cookies:

3 sticks unsalted butter, at room temperature

3/4 cup sugar

1/4 cup light brown sugar

1 teaspoon vanilla extract

1 teaspoon coconut extract

1 egg, separated, plus 1 additional egg white

3 1/2 cups flour

1/4 teaspoon Kosher salt

2 cups sweetened shredded coconut, finely chopped (or pulsed a few times in a food processor)

For the Caramel Filling:

11 oz. bag caramels*

6 tablespoons heavy cream

For the White Chocolate Drizzle:

1 cup white chocolate chips

4 teaspoons shortening

*I used Kraft caramels.

Directions:

For the Cookies:

Add the butter and both sugars to a large bowl and beat with a hand mixer on medium speed until light and fluffy. Add in the vanilla & coconut extracts and the egg yolk.

In a medium bowl whisk together the flour and salt and then add to the butter mixture and beat until well combined. Cover the bowl with plastic wrap and refrigerate for 30 minutes.

Preheat the oven to 350 F and line 2 baking sheets with parchment paper.

In a small bowl whisk together the egg whites. In another bowl add the chopped shredded coconut.

Scoop the dough – using a 1 1/2 tbsp cookie scoop – and then roll into a ball. Dip the ball in the egg white and then coat with the shredded coconut and place on the prepared baking sheets 2 inches apart. Use the back of a teaspoon to make an indent in the center of each.

Bake in the preheated oven for 10 minutes, remove from the oven and re-press the indentation. Return to the oven for an additional 9-10 minutes, or until the cookies are golden.

Transfer to a wire rack to cool.

For the Caramel Filling:

In a small saucepan add the caramels and heavy cream and cook on medium-low heat until melted and smooth. Stirring occasionally. Spoon the caramel into the cookies and let cool.

For the White Chocolate Drizzle:

In a small saucepan combine the chocolate chips and shortening and melt on low heat. Stirring until smooth. Let cool for a few minutes before transferring to a piping bag (or small resealable bag). Snip a small piece of the end and drizzle the chocolate over each cookie. Let sit for a few minutes so the chocolate can harden (or refrigerate for 10 – 15 minutes to speed up the process).

Notes:

If you like the flavor of coconut but not so much shredded coconut, you could skip rolling the dough in the shredded coconut. This will mean that you will not need the 2 egg whites listed in the ingredients. All other steps in the recipe remain the same.

If you are not a fan of coconut at all you could omit the coconut extract and shredded coconut and simply make butter cookies with a caramel filling and white chocolate drizzle. This will also mean you will not need the two egg whites as they are only used to help adhere the shredded coconut to the dough.

Recipe first appeared on Bead Yarn & Spatula

Peppermint Chocolate Chip Snowballs

This time of the year peppermint is the star flavor in many beverages, candies and baked goods. And if you are a fan of the flavor, you are going to love today’s Snowball cookies. Snowballs, also known as Mexican Wedding Cookies and/or Russian Tea Cakes, are typically flavored with vanilla extract and have finely chopped pecans, but today’s version takes a festive approach with peppermint extract and chocolate chips for a Peppermint Chocolate Chip Snowball.

These buttery cookies will melt in your mouth and have you begging for a cup of hot cocoa. A few things to note, while I added 2 teaspoons of peppermint extract you could reduce it to 1 teaspoon. You will still get the peppermint flavor, but it won’t be as pronounced. Also, if you want to make the appearance of these cookies festive for the season you could add a few drops of red food coloring to give them a nice pink hue.

Peppermint Chocolate Chip Snowballs

  • Servings: 24 Cookies
  • Print

Ingredients:

2 sticks unsalted butter, at room temperature

1 1/2 cups confectioners’ sugar, divided

2 teaspoons peppermint extract

2 cups flour

1 cup semi-sweet chocolate chips

Directions:

Preheat oven to 350 F. Lines 2 baking sheets with parchment paper.

In a large bowl beat together the butter and 1/2 cup of the confectioners’ sugar with hand mixer on medium speed until smooth. Beat in the peppermint extract. Reduce the speed to low and gradually add in the flour and then the chocolate chips.

Scoop tablespoons of dough and roll into a ball and then place on the prepared baking sheets about 2 inches apart.

Bake in the preheated oven for 10-12 minutes, until the cookies are a light golden brown.

Place the remaining cup of confectioners’ sugar in a medium bowl.

Let the cookies cool on the sheets for 2 minutes before transferring to a wire rack to cool for 5 minutes. After 5 minutes roll the cookies in the confectioners’ sugar to coat them. Return them to the wire rack to cool completely.

Once the cookies have completely cooled roll them in the confectioners’ sugar once again.

Store in an airtight container.

Recipe first appeared on Bead Yarn & Spatula

Red Velvet Cake Mix Cookies

If you’ve never thought of using cake mix to whip up a batch of delicious cookies let this be your PSA to do so. I’ve shared a recipe using a chocolate cake mix – Chocolate Salted Caramel Chip Cookies – a yellow cake mix – Pumpkin Spice Chocolate Chip Cookies – and today I am sharing one using a red velvet cake mix to make Red Velvet Cake Mix Cookies (how original!).

These cookies are perfect for the season with their deep red hue and little effort required to make them (let’s be honest, most people’s to-do list around this time can seem never-ending). While it is nice to bake something that is “fancy” and a tad bit involved it’s just as a nice (and less stressful) to make something that is easy and quick. The most stressful part of these cookies is having to wait one hour to bake them while the dough chills.

But after waiting for the dough to chill, and baking and cooling you’ll have delicious cookies that will be a great addition to any other cookies you are baking for the holiday’s or perfect just on their own. 

One quick thing to note, to mimic a traditional Red Velvet Cake I used Hershey’s Cream Cheese Chips in these cookies, if you are unable to find them you can use white chocolate chips instead.

Red Velvet Cake Mix Cookies

  • Servings: 24 Cookies
  • Print

Ingredients:

1 15.25oz box Red Velvet Cake Mix

1 1/2 teaspoons instant coffee granules (optional)

1/3 cup vegetable oil

2 large eggs

1 teaspoon vanilla extract

1 cup cream cheese chips*

*I used Hershey’s Cream Cheese Baking Chips, if you cannot find them white chocolate chips can be used instead.

Directions:

In a large bowl combine the cake mix, instant coffee (if using), oil, eggs and vanilla extract and beat with a hand mixer on medium speed until well combined. Stir in the cream cheese (or white chocolate) chips. Cover the bowl with plastic wrap and refrigerate 1 hour.

Preheat the oven to 350 F. Line two baking sheets with parchment paper.

Using a cookie scoop drop the dough about 2 inches apart on the baking sheets. Bake in the preheated oven for 10-11 minutes. The cookies will look slightly underbaked. Allow to cool on the baking sheets for 5 minutes before transferring to a wire rack to cool completely.

Store cookies in an airtight container.

Recipe first appeared on Bead Yarn & Spatula.