The unofficial kick-off to the summer is upon us… Memorial Day. And thankfully it’s shaping up to be a great weekend where I am. Lately every weekend seems to have at least one day of rain or unseasonably low temperatures. Not good for the yard work I have to get done. My lawn is so high that my dog seems to be avoiding walking on the grass when I let him out. Not that I can blame him, certain parts of the lawn seem to be taller than him, he’s a Chihuahua. And he’s a not teacup sized one, he’s pretty average so that should give you an idea of just how high my lawn is. But, my goal this weekend is to get out there and clean things up. Wish me luck! After I am done with the front yard I have to then tackle the backyard. So, are you planning on firing up your grill this weekend and having a BBQ or are you just going to be taking it easy and enjoy that extra day to the weekend? If it’s the former have you thought about dessert? Today I am sharing with you a fun twist on a stars and stripes themed cake that would be perfect. I will say that this cake takes some patience and the ability to forge on when (and if) it doesn’t seem like it’s going to come together. See, the stipes on this cake are vertical as opposed to horizontal. Huh? Yes, the cake layers are rolled together to form the stripes. Are you still scratching your head?
I began by preheating my oven to 350 F. I sprayed a half sheet pan (13 x 18 inches) with baking spray and then placed a piece of parchment paper in the pan and sprayed it with baking spray as well. Now, I do have a cookie sheet this size that I was tempted to use, but, opted not to because sometimes the sheet twists while it’s in the oven and I was concerned that my cake would then spill over or I would end up with a twisted cake. I ended up using this pan. Which I did purchase at my local Target.
After making the batter for the cake I poured it into my prepared pan and baked it for about 18 minutes. A couple of notes on making the batter. Make sure you use a whisk attachment when making the meringue with. I have made meringue before and I have always used my whisk attachment on my stand mixer, but, I was absentmindedly following the recipe and I used my beater attachment and my eggs whites never became meringue no matter the speed or time my mixer was going. Also, while the recipe calls for 1 tablespoon of red food coloring, I ended up using about 1 1/2 tablespoons of McCormick’s Red Food Coloring. I started with the tablespoon, but, the cake was looking a little pink and while I knew that the color would gets darker as it sits and as the cake baked I wanted to be sure I ended up with a vibrant red in the end.

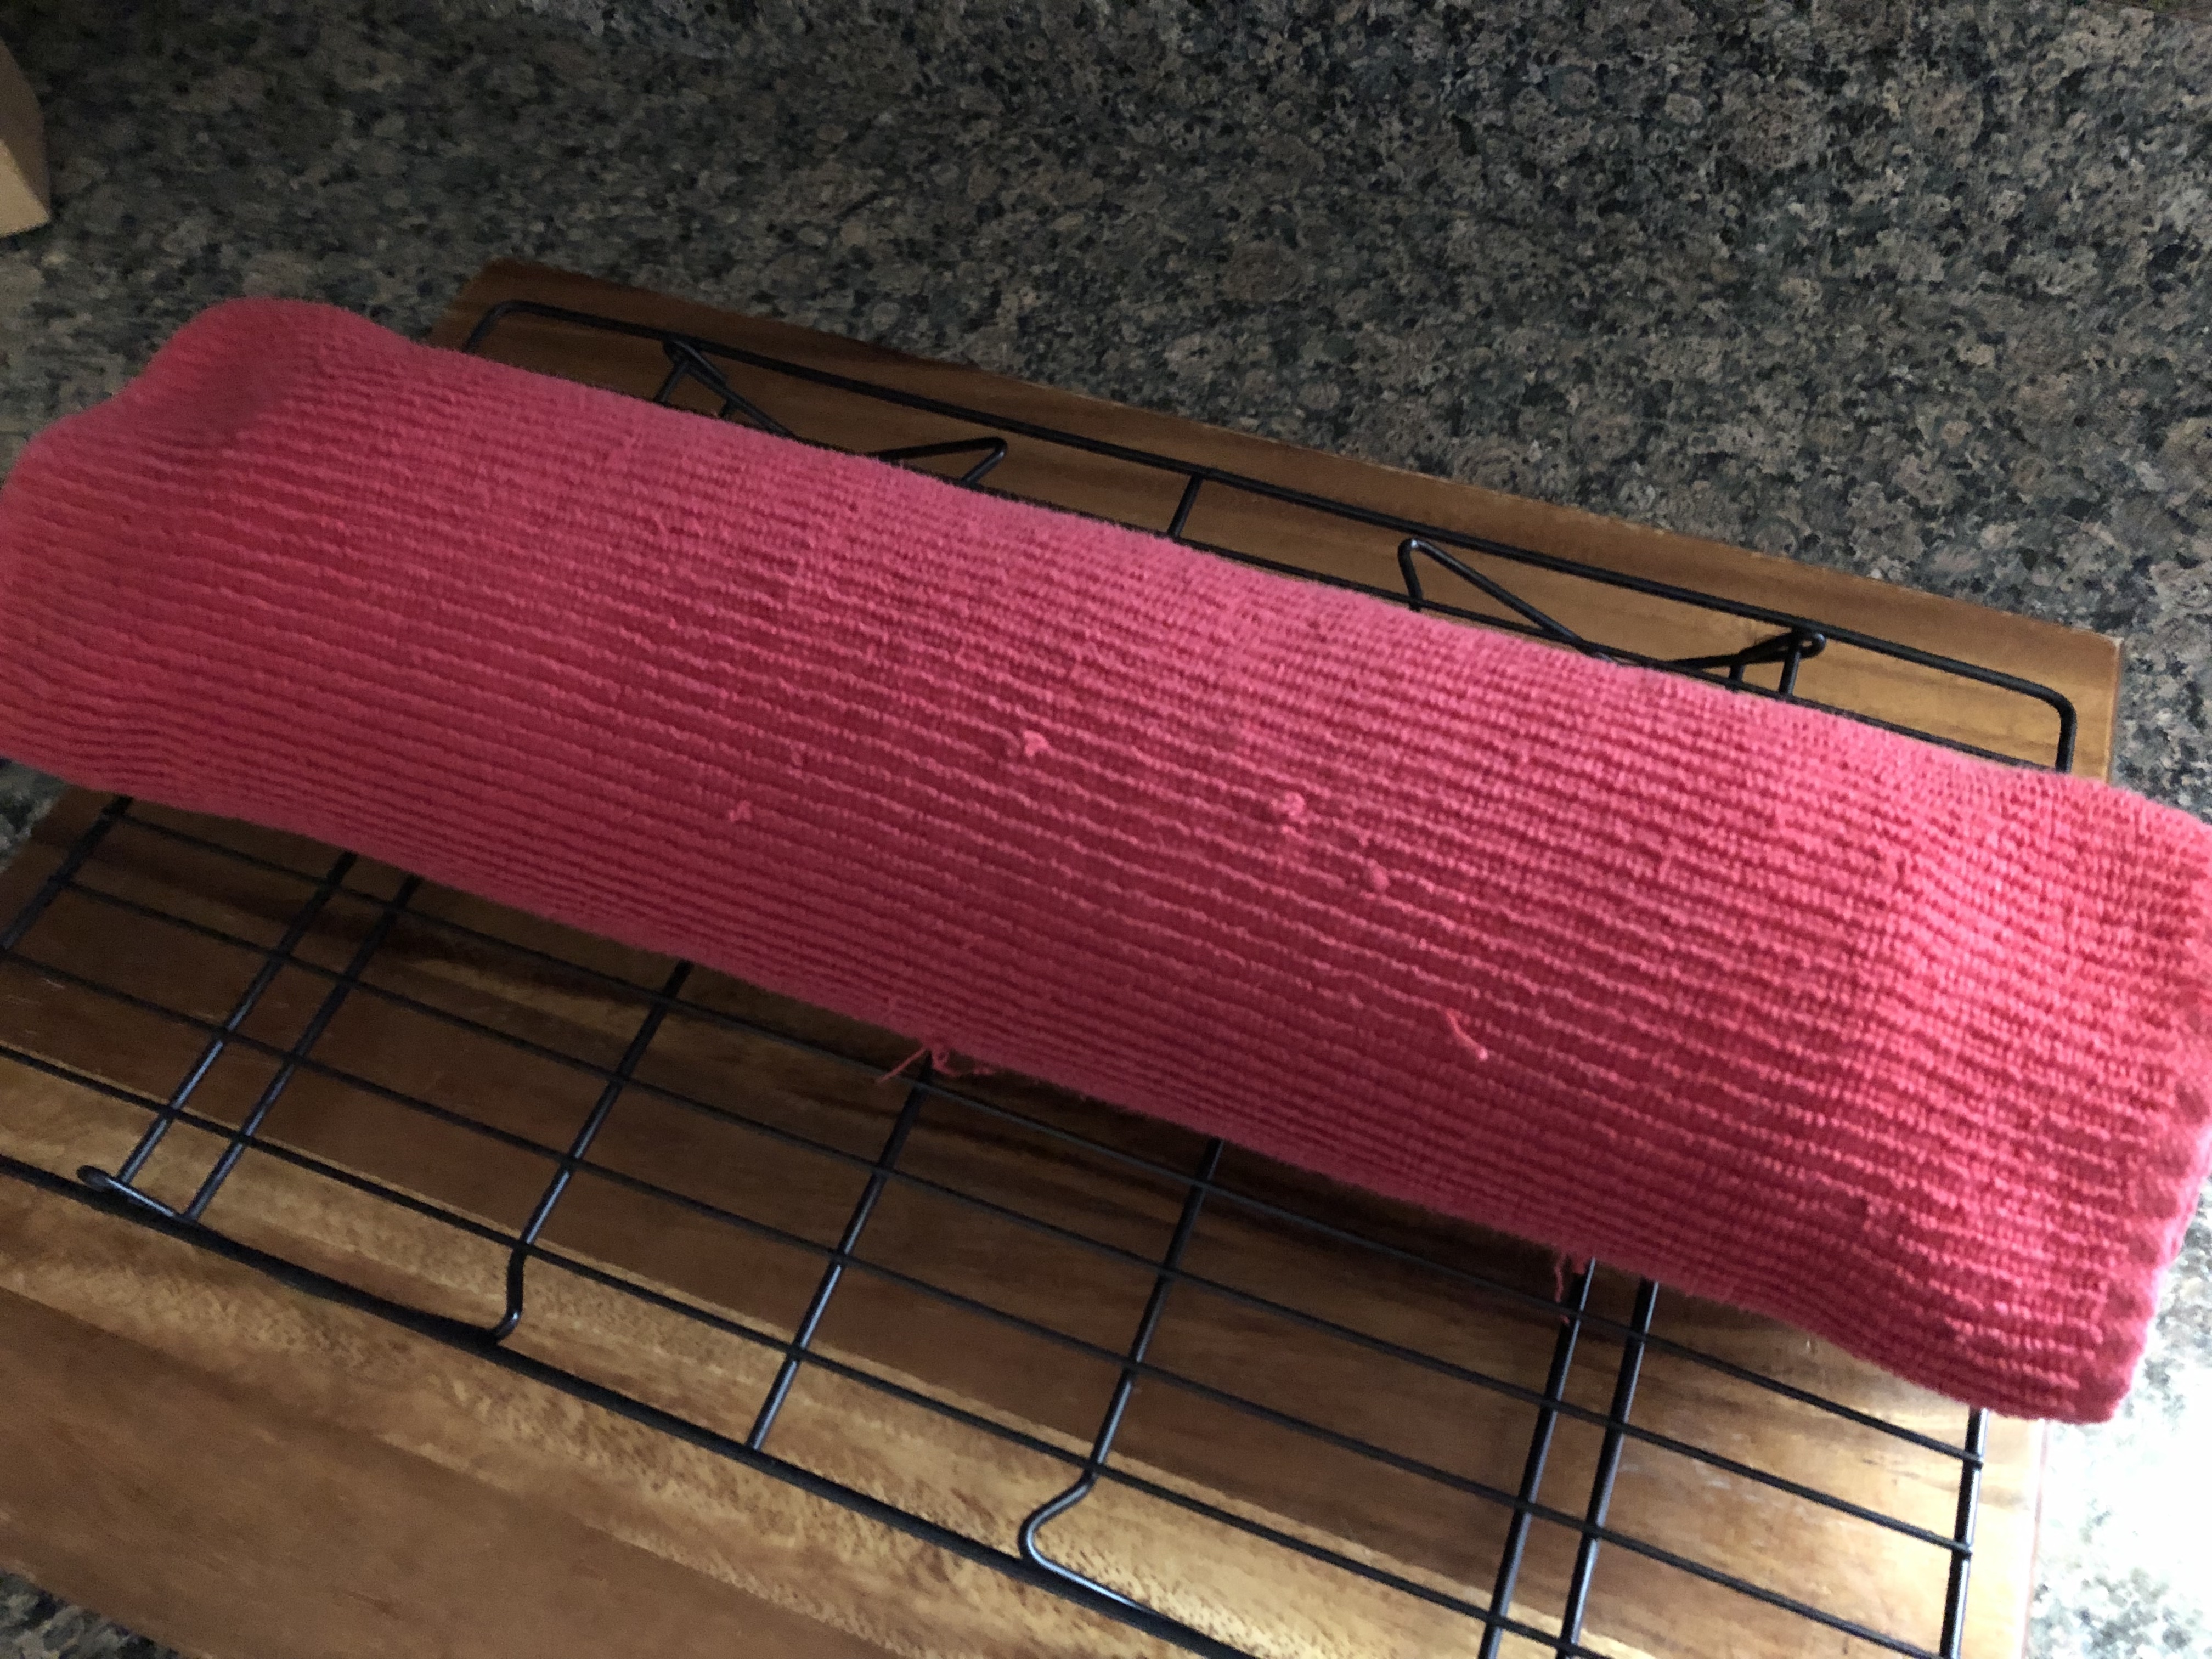
Immediately after taking the cake out of the oven I sprinkled it with confectioners’ sugar and placed a cotton towel over the cake. I placed a baking sheet over the towel, bottom side to the towel, and then flipped the cake onto the towel. I carefully removed the pan and parchment paper from the cake. Starting on one of the short ends of the cake I began rolling the cake and towel together into a log.

I then placed it on a wire rack to let the cake cool completely.
While the cake was cooling I made the frosting. I would liken the frosting to a whipped cream cheese frosting. I began by beating three 8oz. bars of cream cheese with confectioners’ sugar on medium-high speed until it was smooth. With the mixer on low, I then added in vanilla extract and heavy whipping cream. Once the whipping cream was incorporated I increased the speed to high until the frosting was smooth.
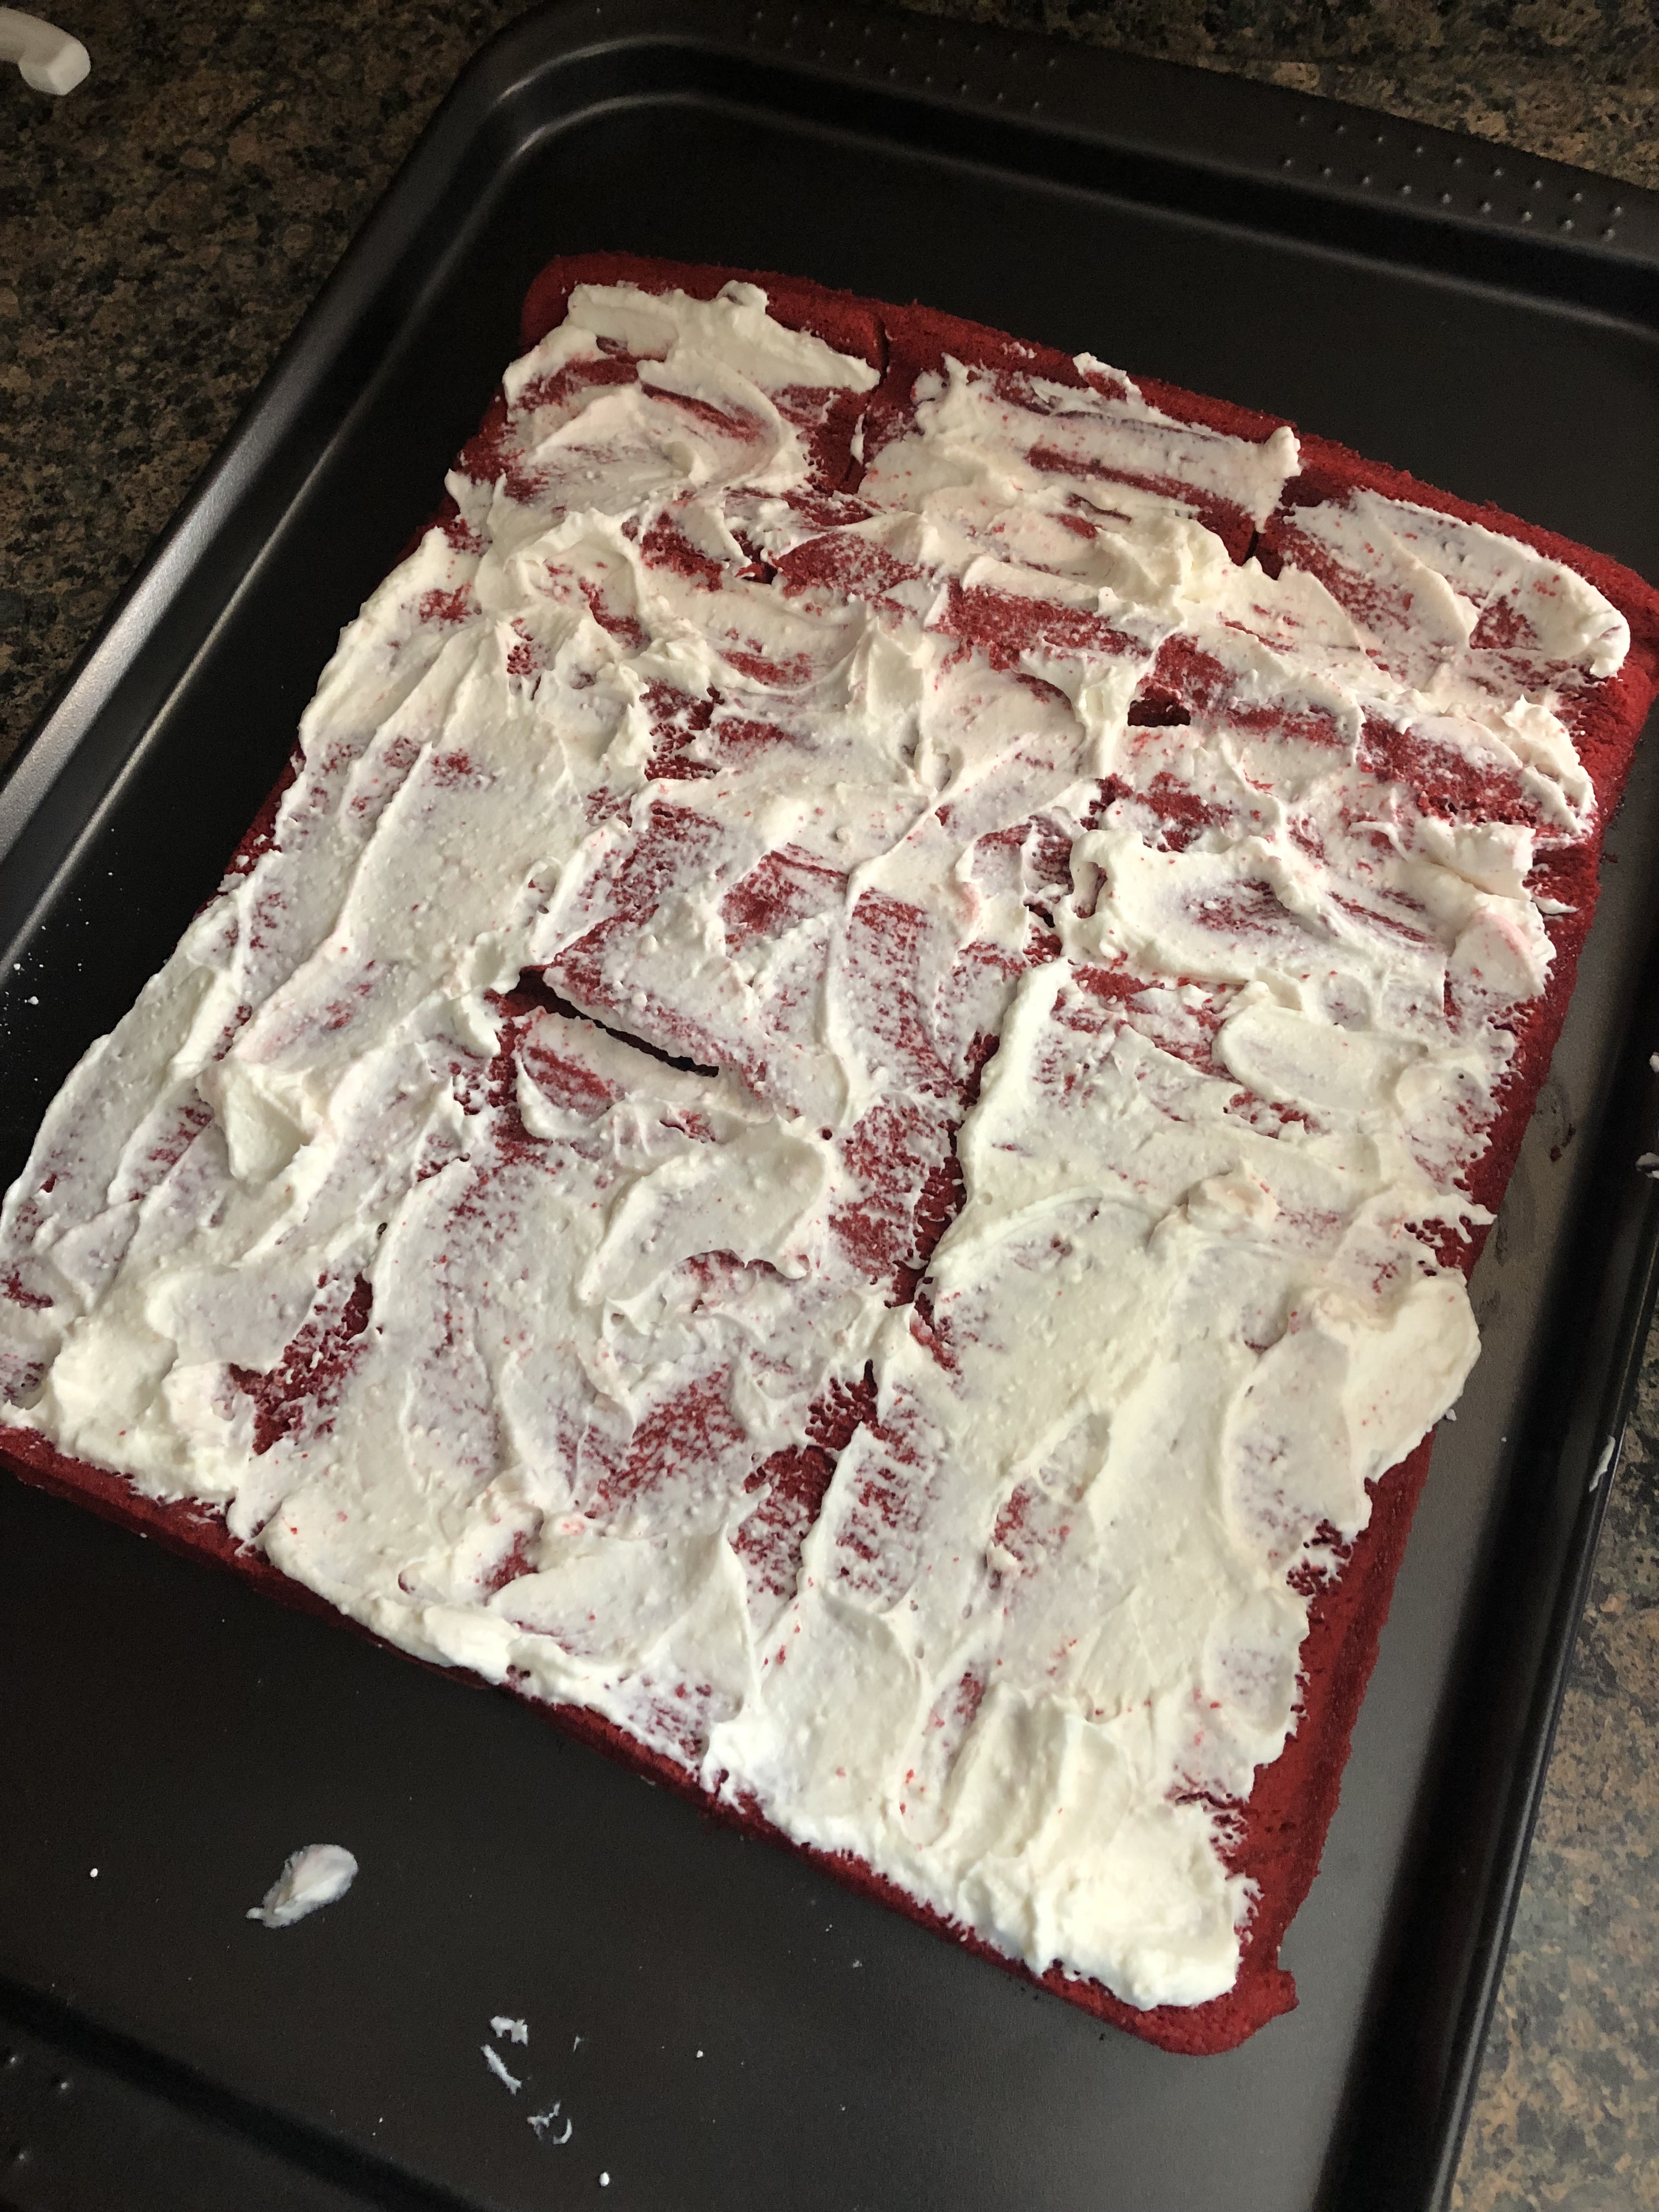
Once the cake was cooled I placed it in an extra-large baking sheet to unroll it so I would have room to work. I unrolled it and this is where my patience and perseverance were tested. As is common with rolled cakes, my cake cracked in certain spots. I cut the cake into three long strips, about 4 inches wide each, and then spread frosting on each of the strips. I should have spread more, but since my cake had cracked I was concerned that if I used too much frosting I would have ended up with a big mess.
And now, the fun part. Rolling the cake together. I started by rolling one of the strips together, from short end to short end. I placed that piece on another strip, making sure to line up where the first strip ended with the start of the next strip. I repeated this for the final strip and then turned the cake flat side down on a cardboard cake round to frost.

I frosted the cake with a thin layer of frosting and then refrigerated it for 30 minutes. Unfortunately my cake wasn’t perfectly round due to the seam on the cake. I did my best to fill that seam with extra frosting to make the cake round, ultimately I decided that would be the back of the cake.
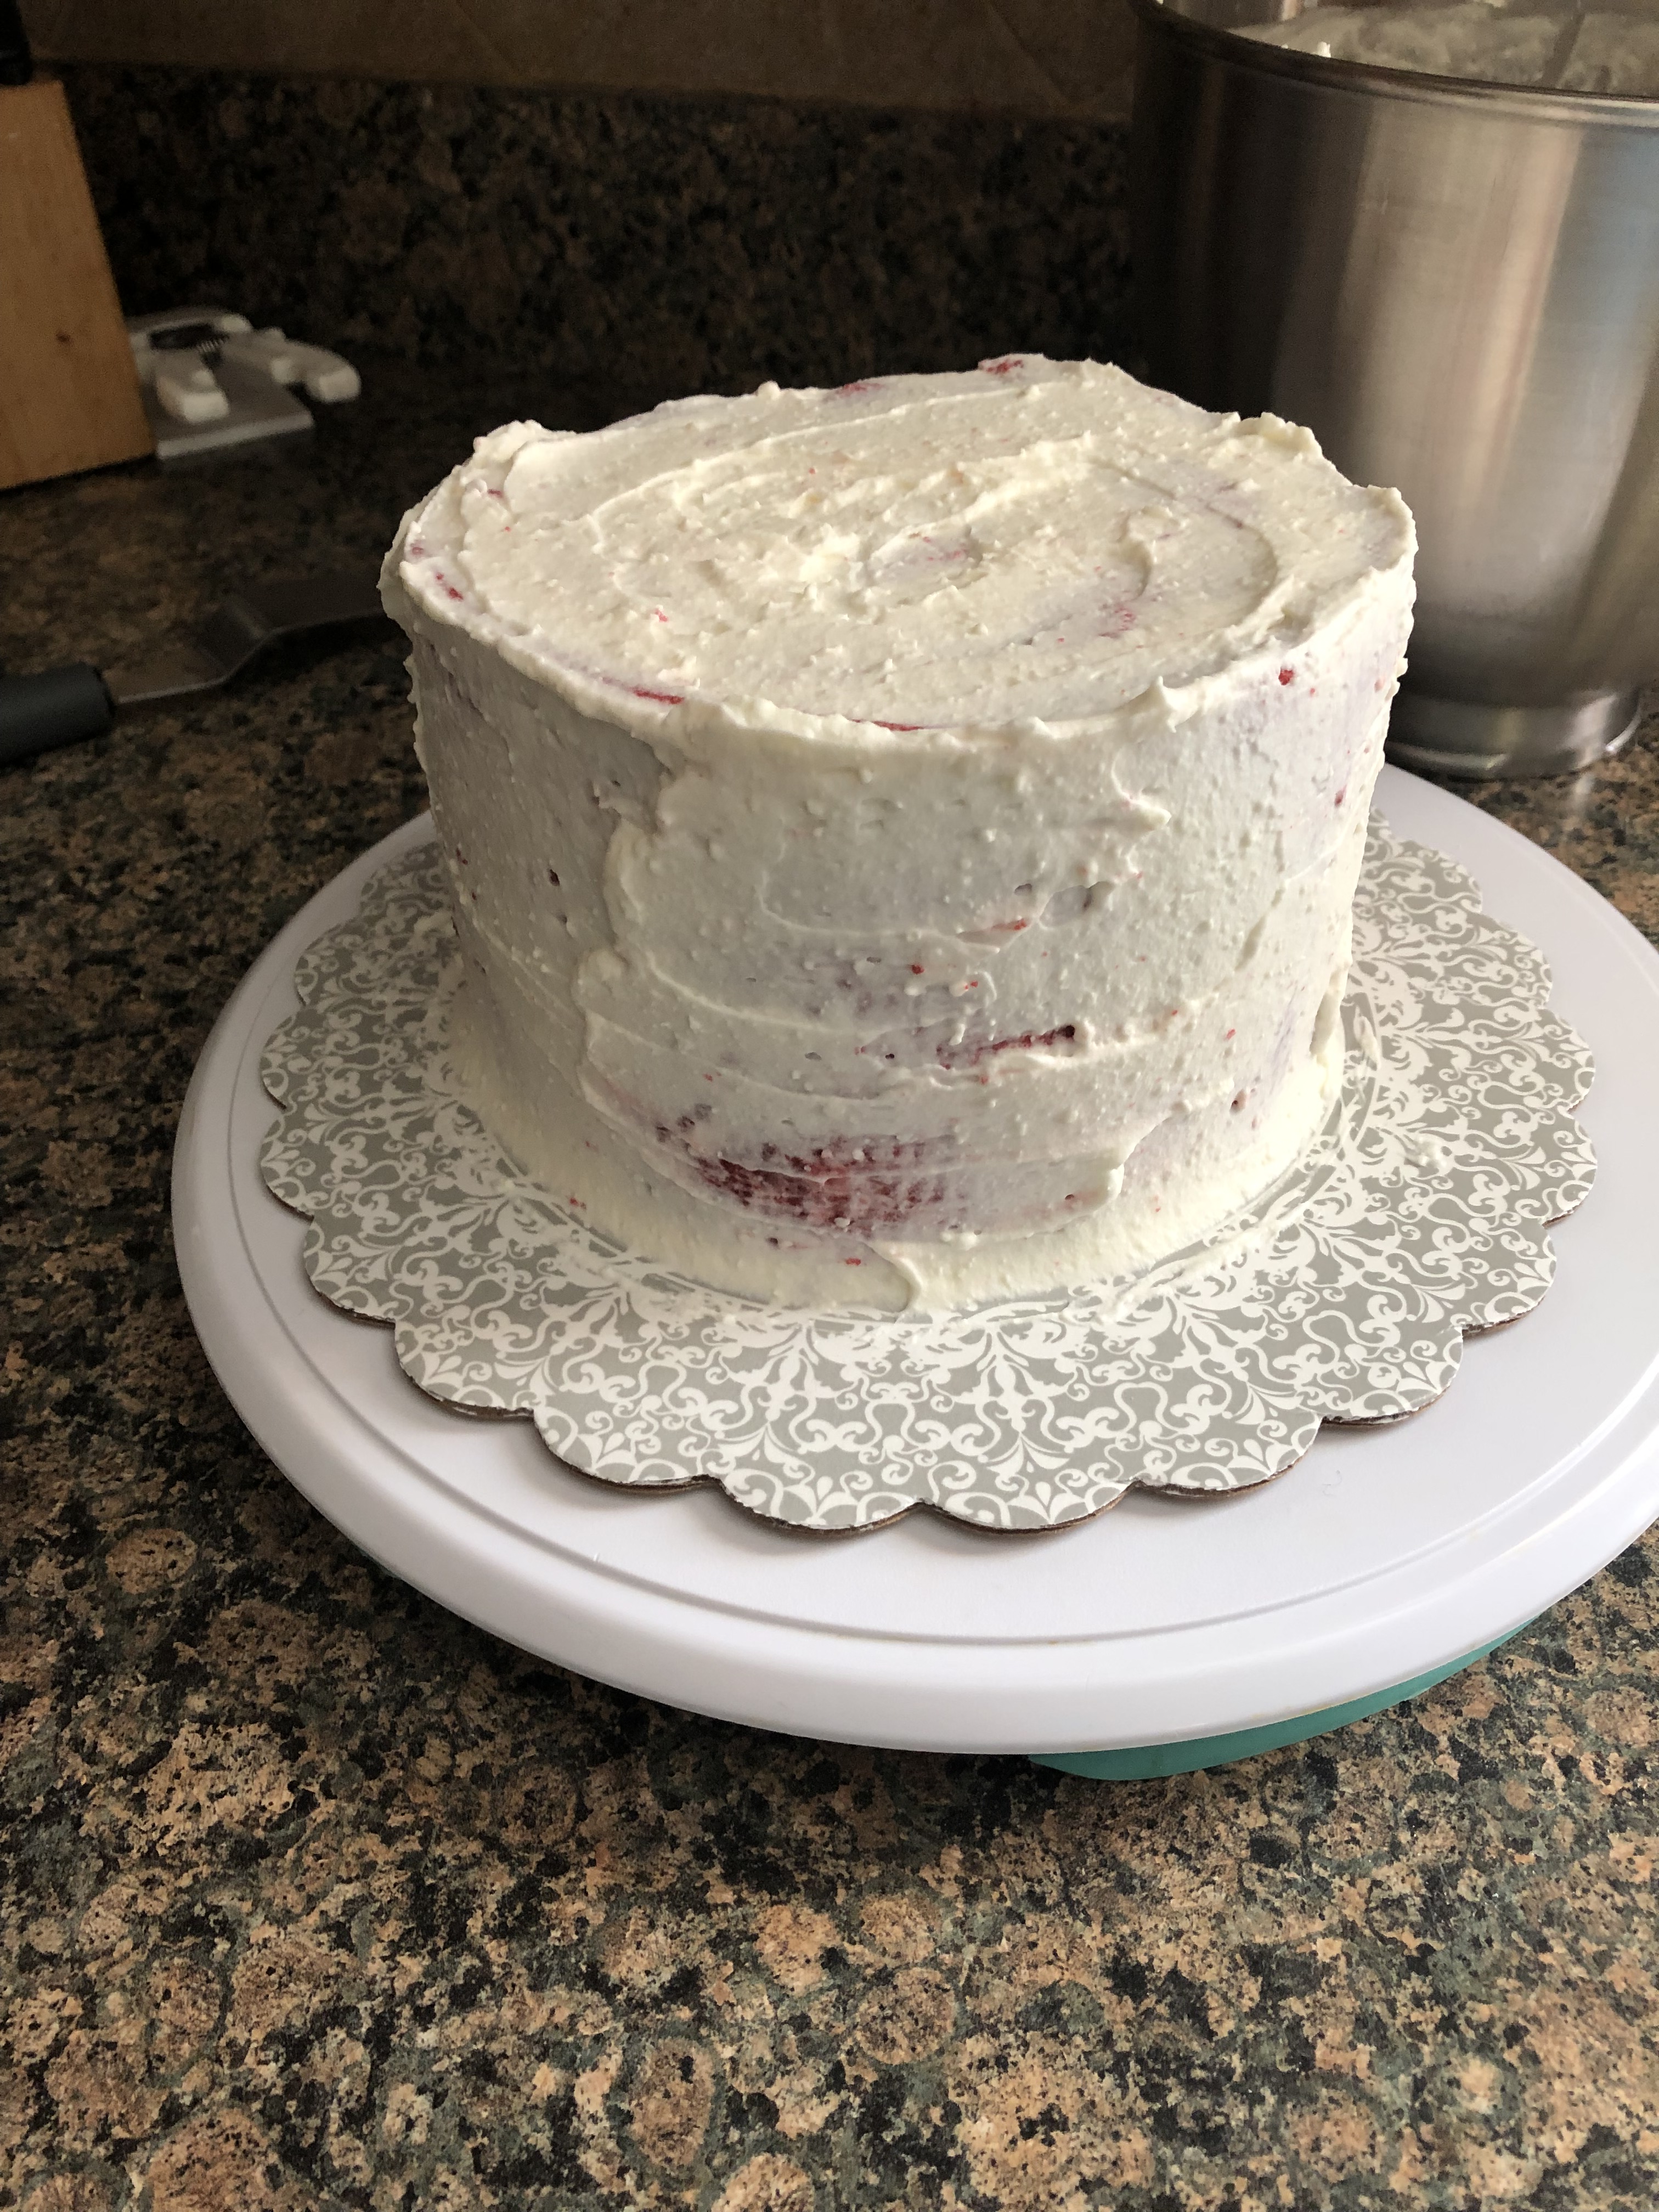
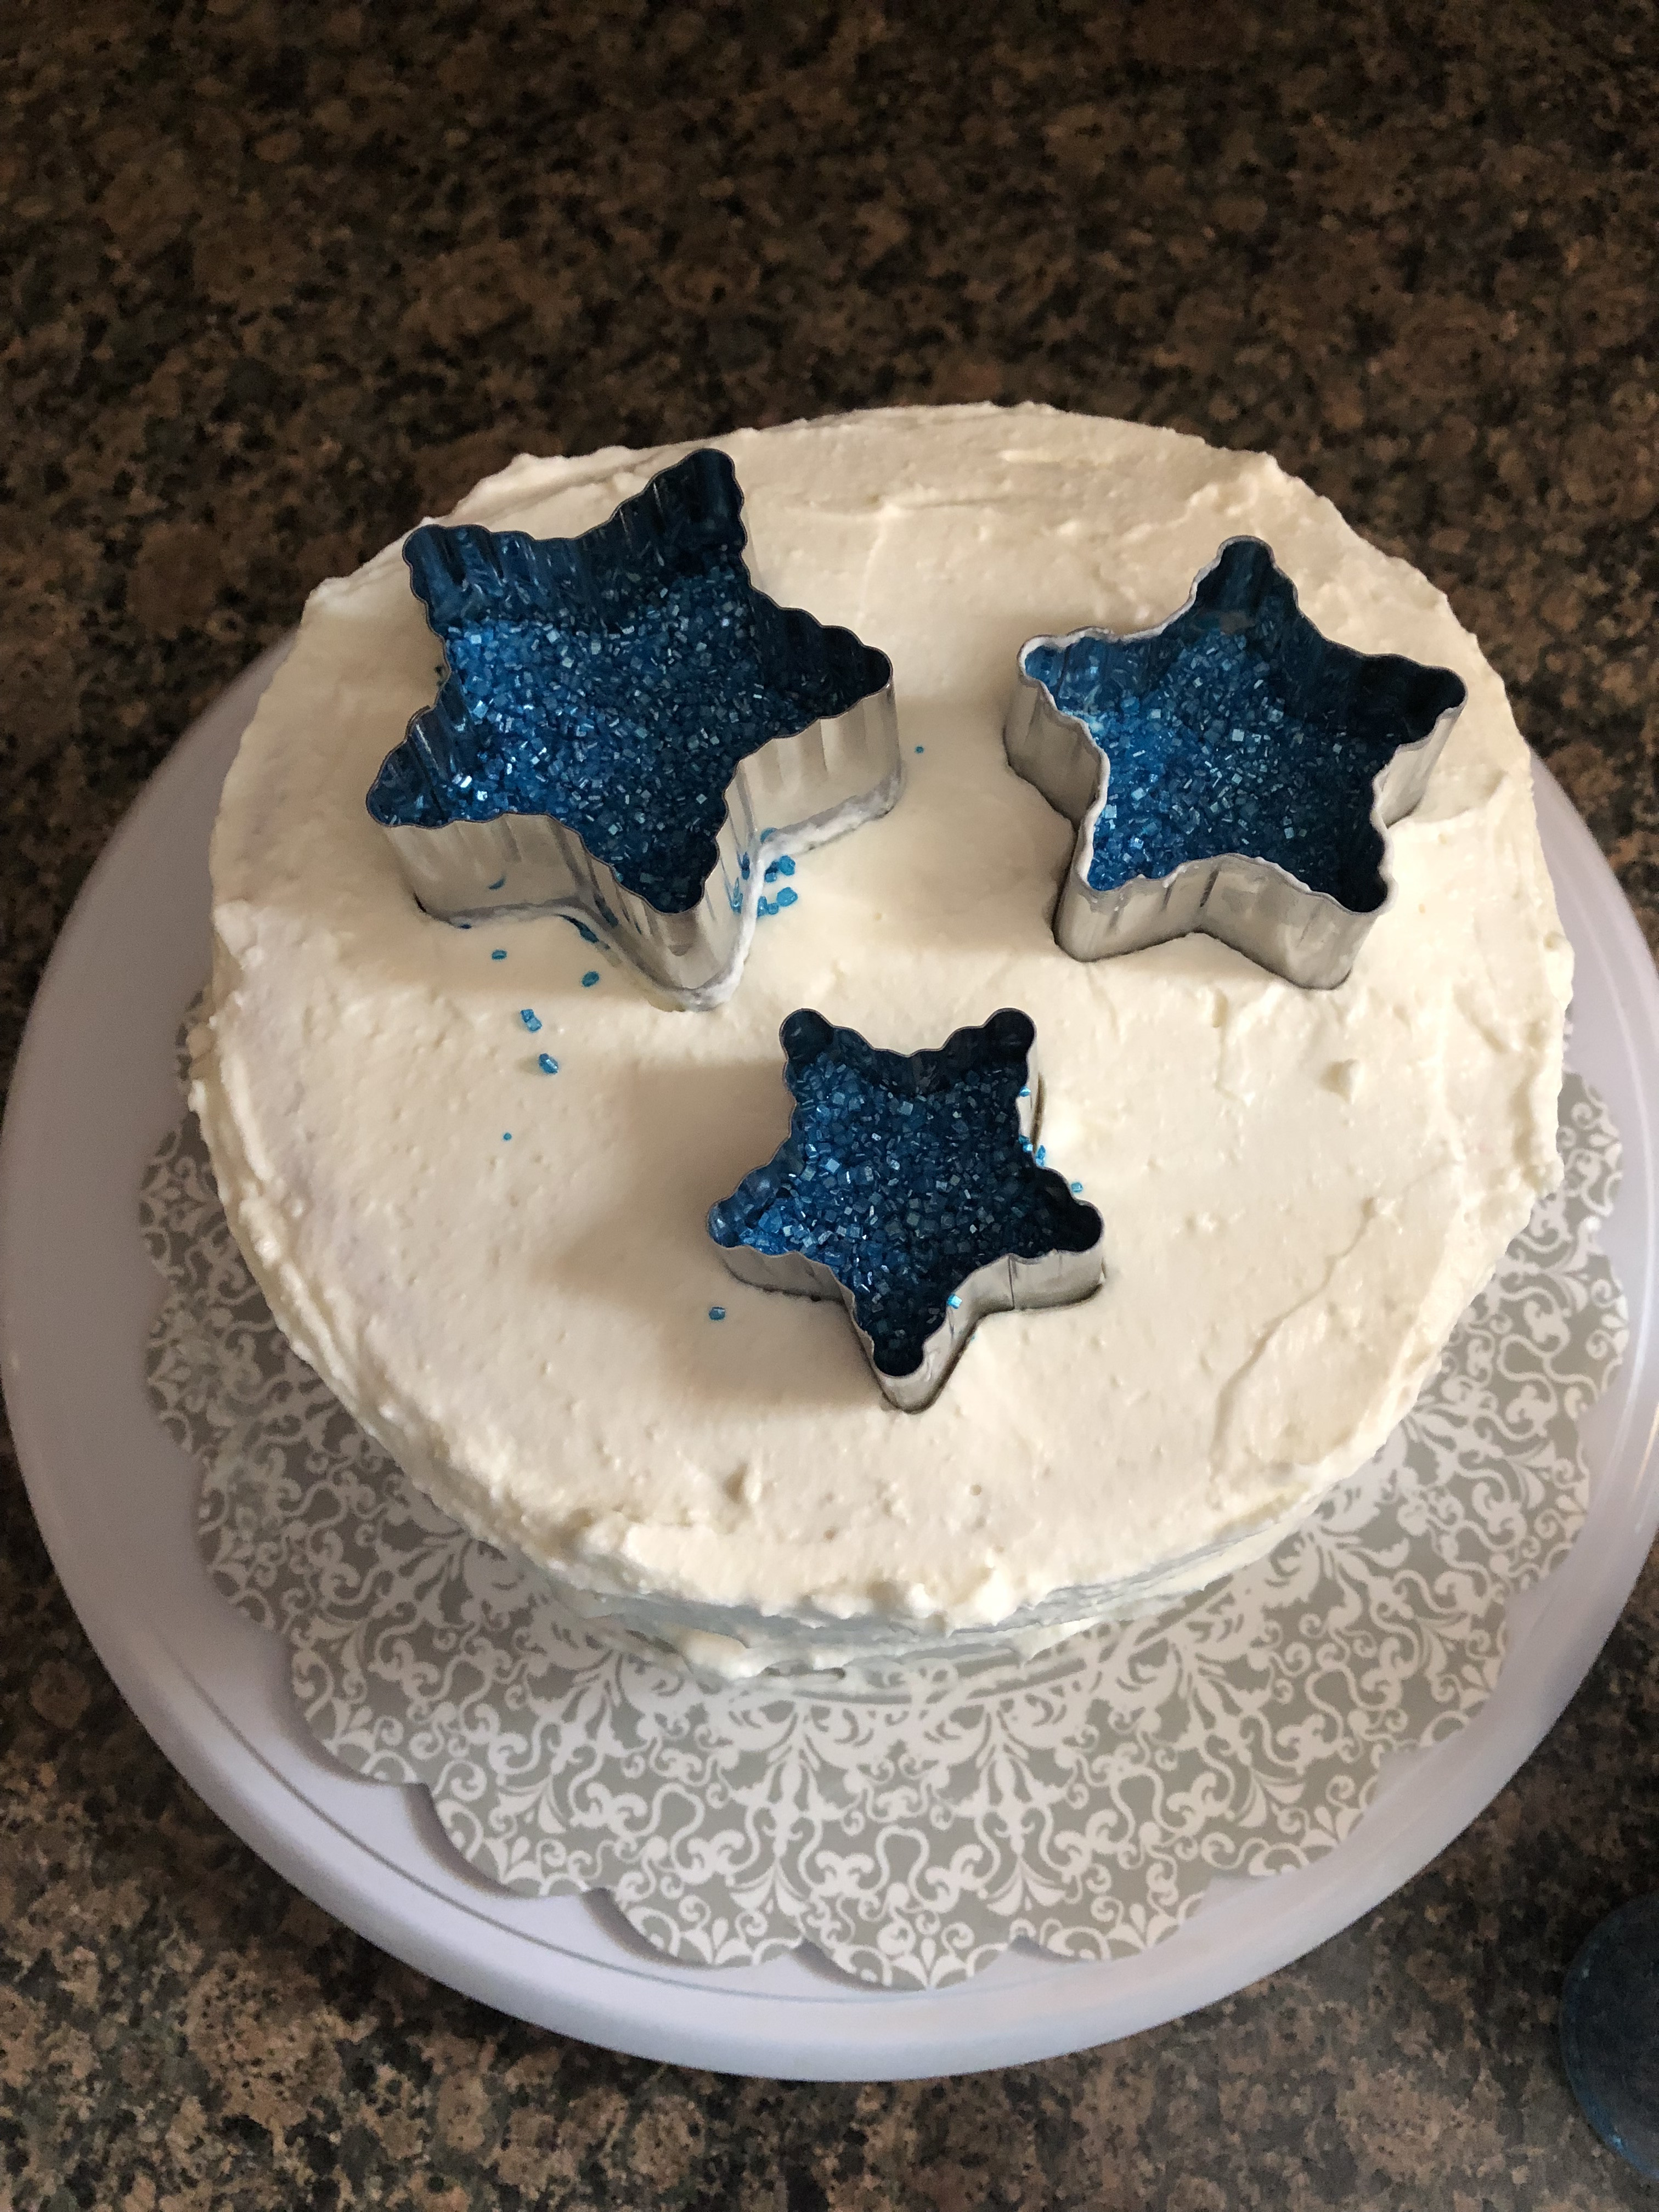
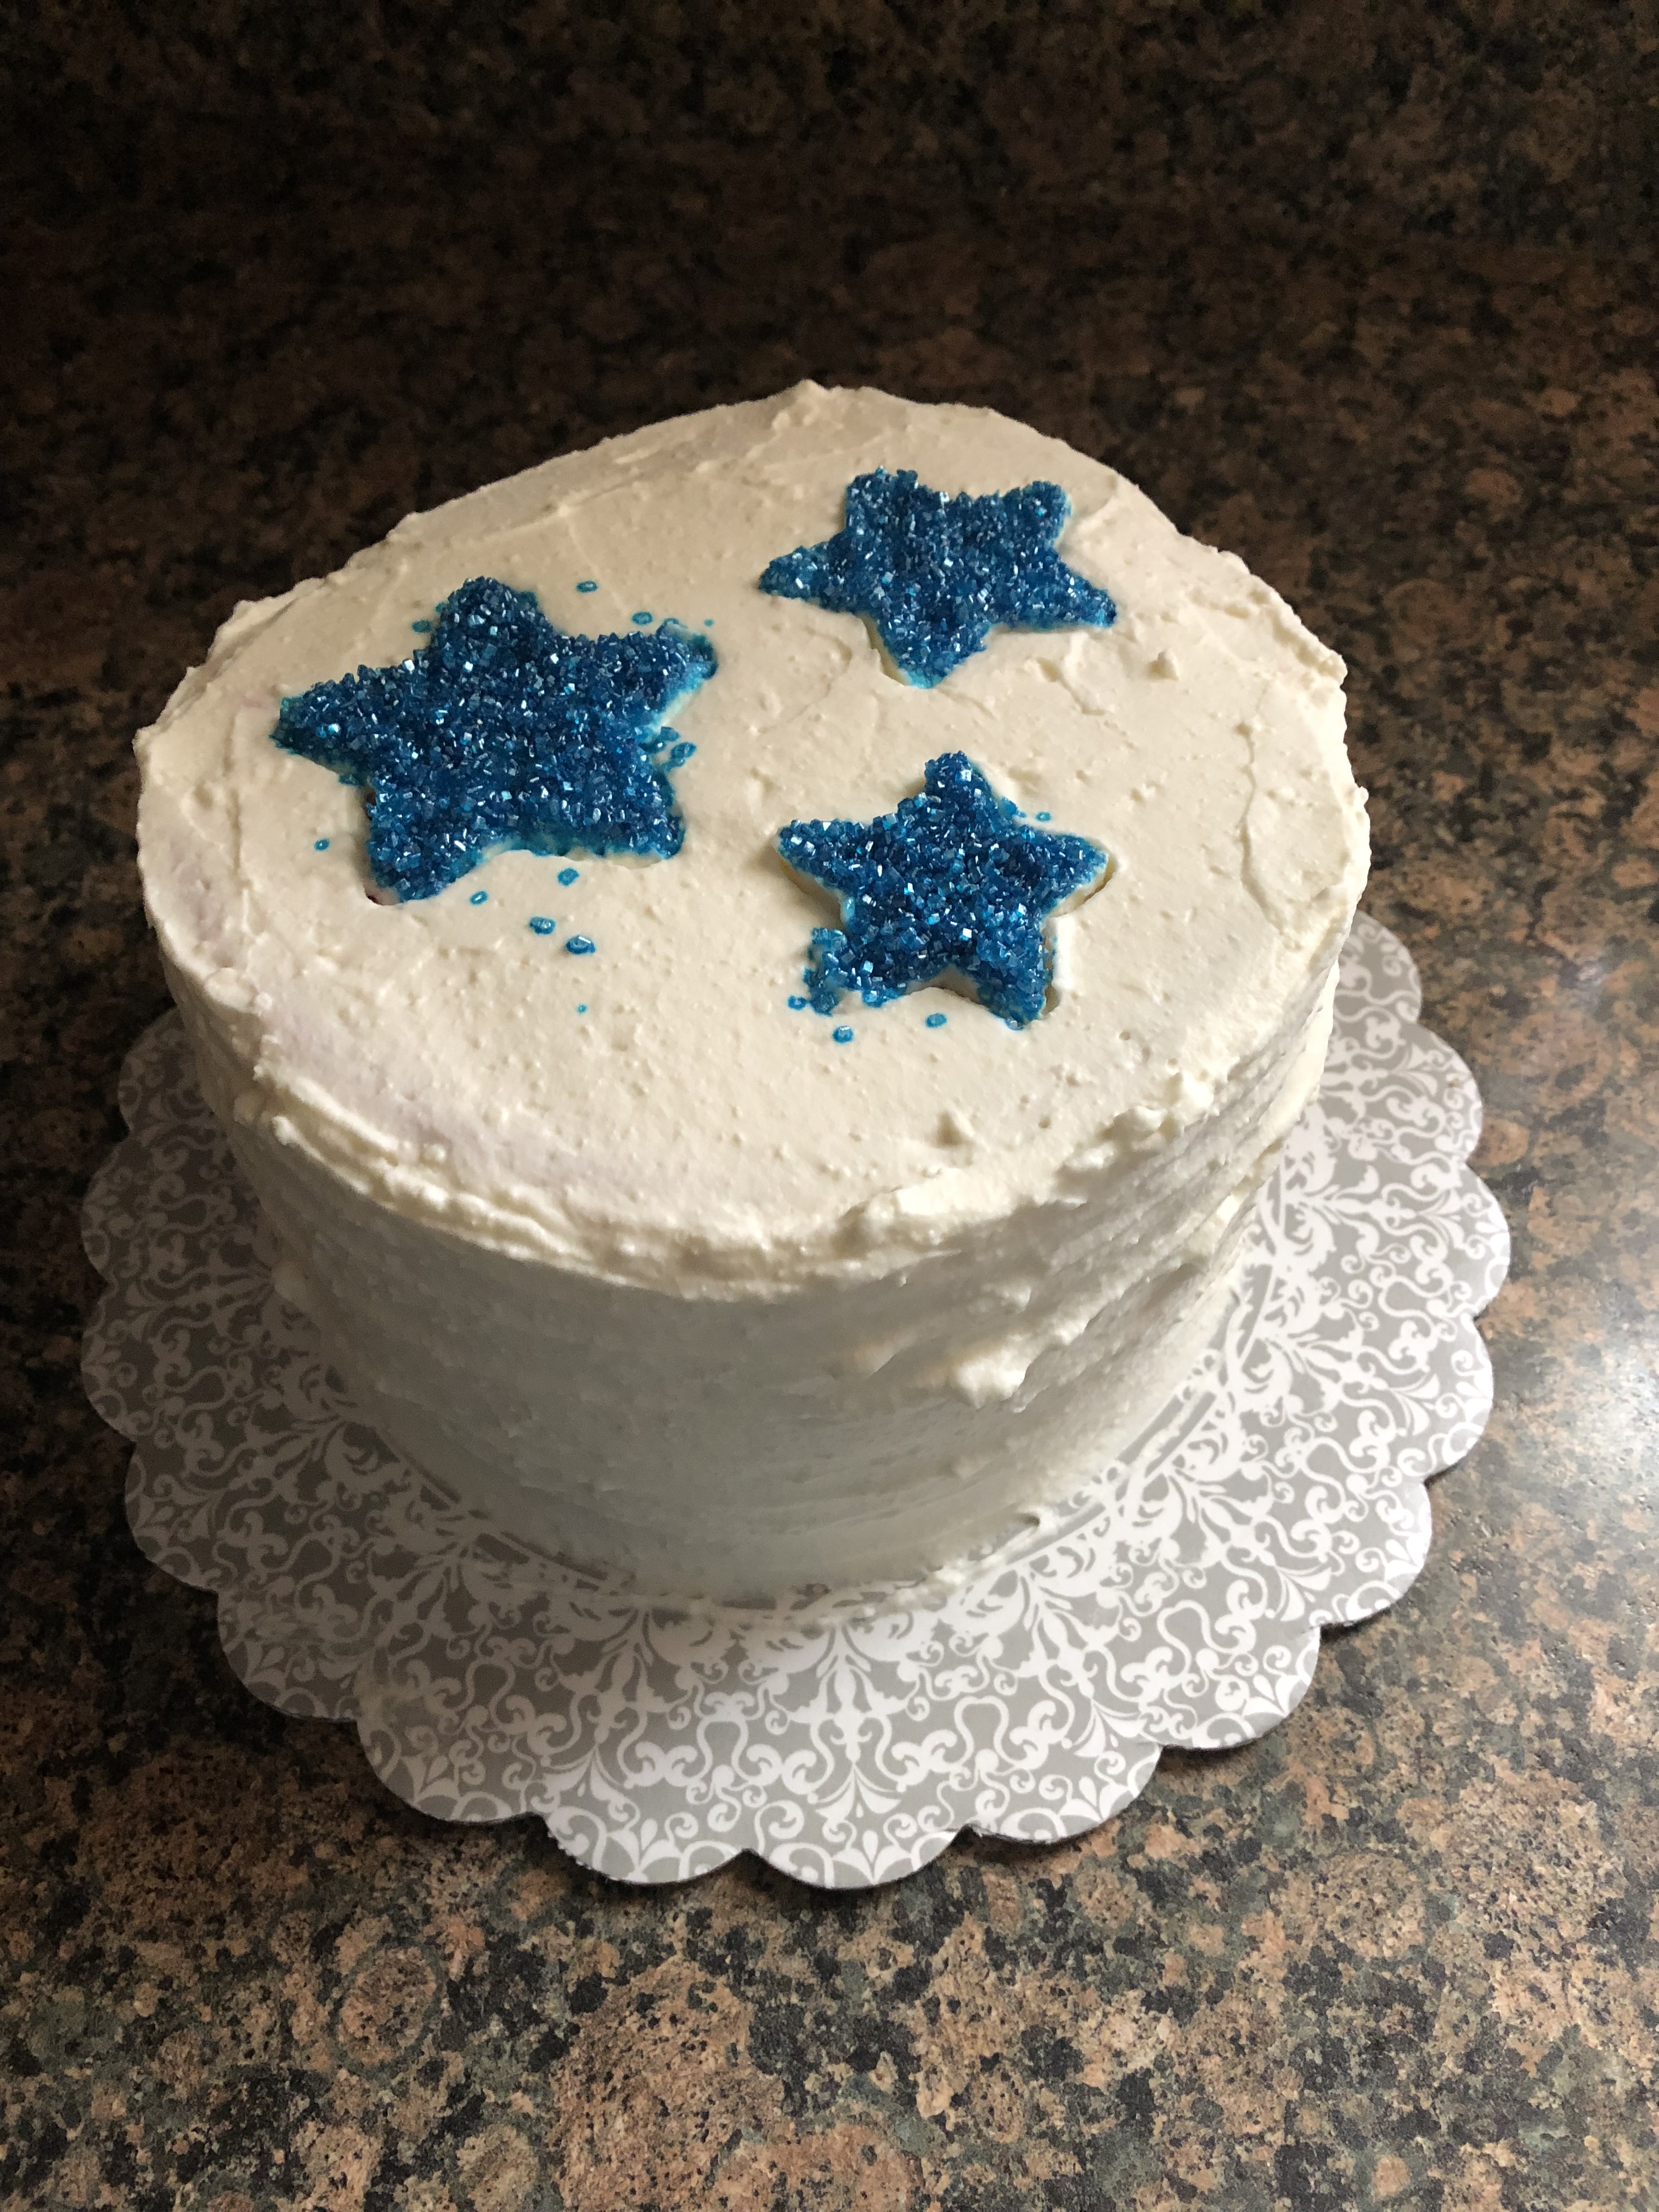
After the half hour I finished frosting the cake and used a small offset spatula to give the cake a slightly striped design. Next, I placed three different sized star cookie cutters on top of cake and sprinkled blue sanding sugar into them and I used a straw to spread the sprinkles into the corners of the cookie cutter. I carefully removed the cookie cutters and my stars and stripes cake was done.
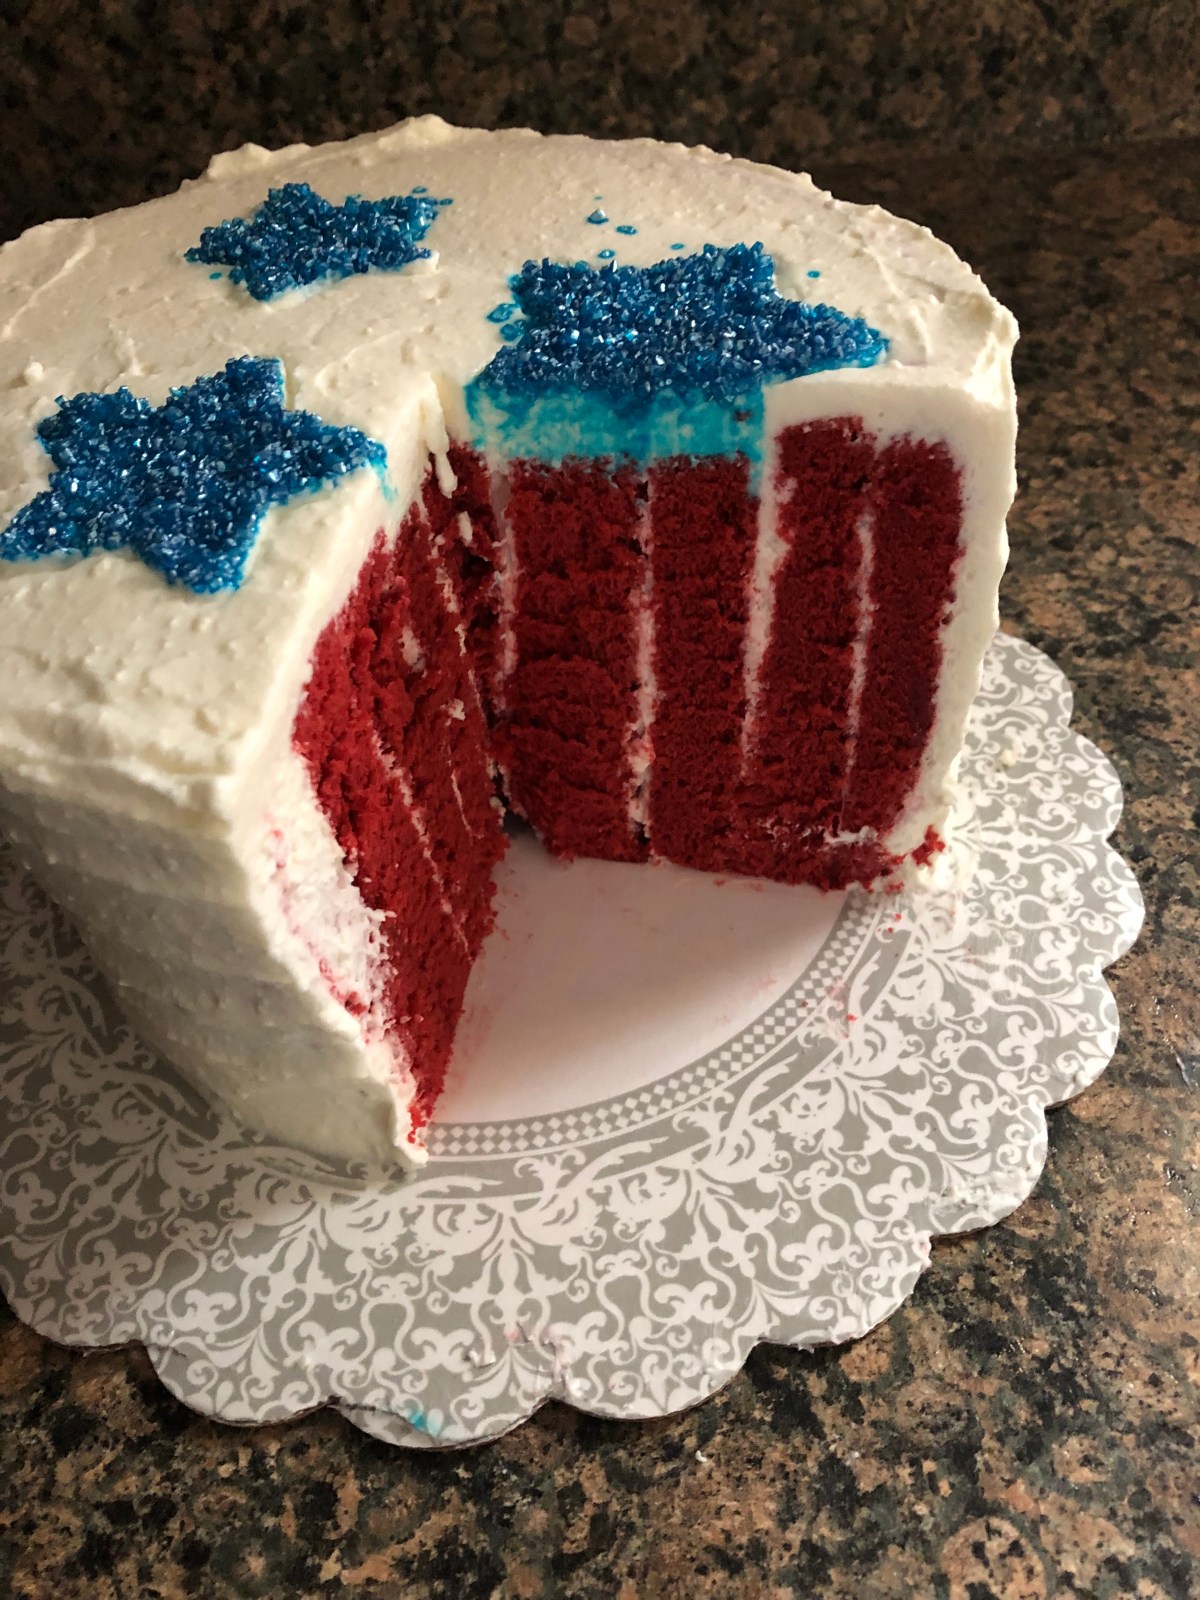
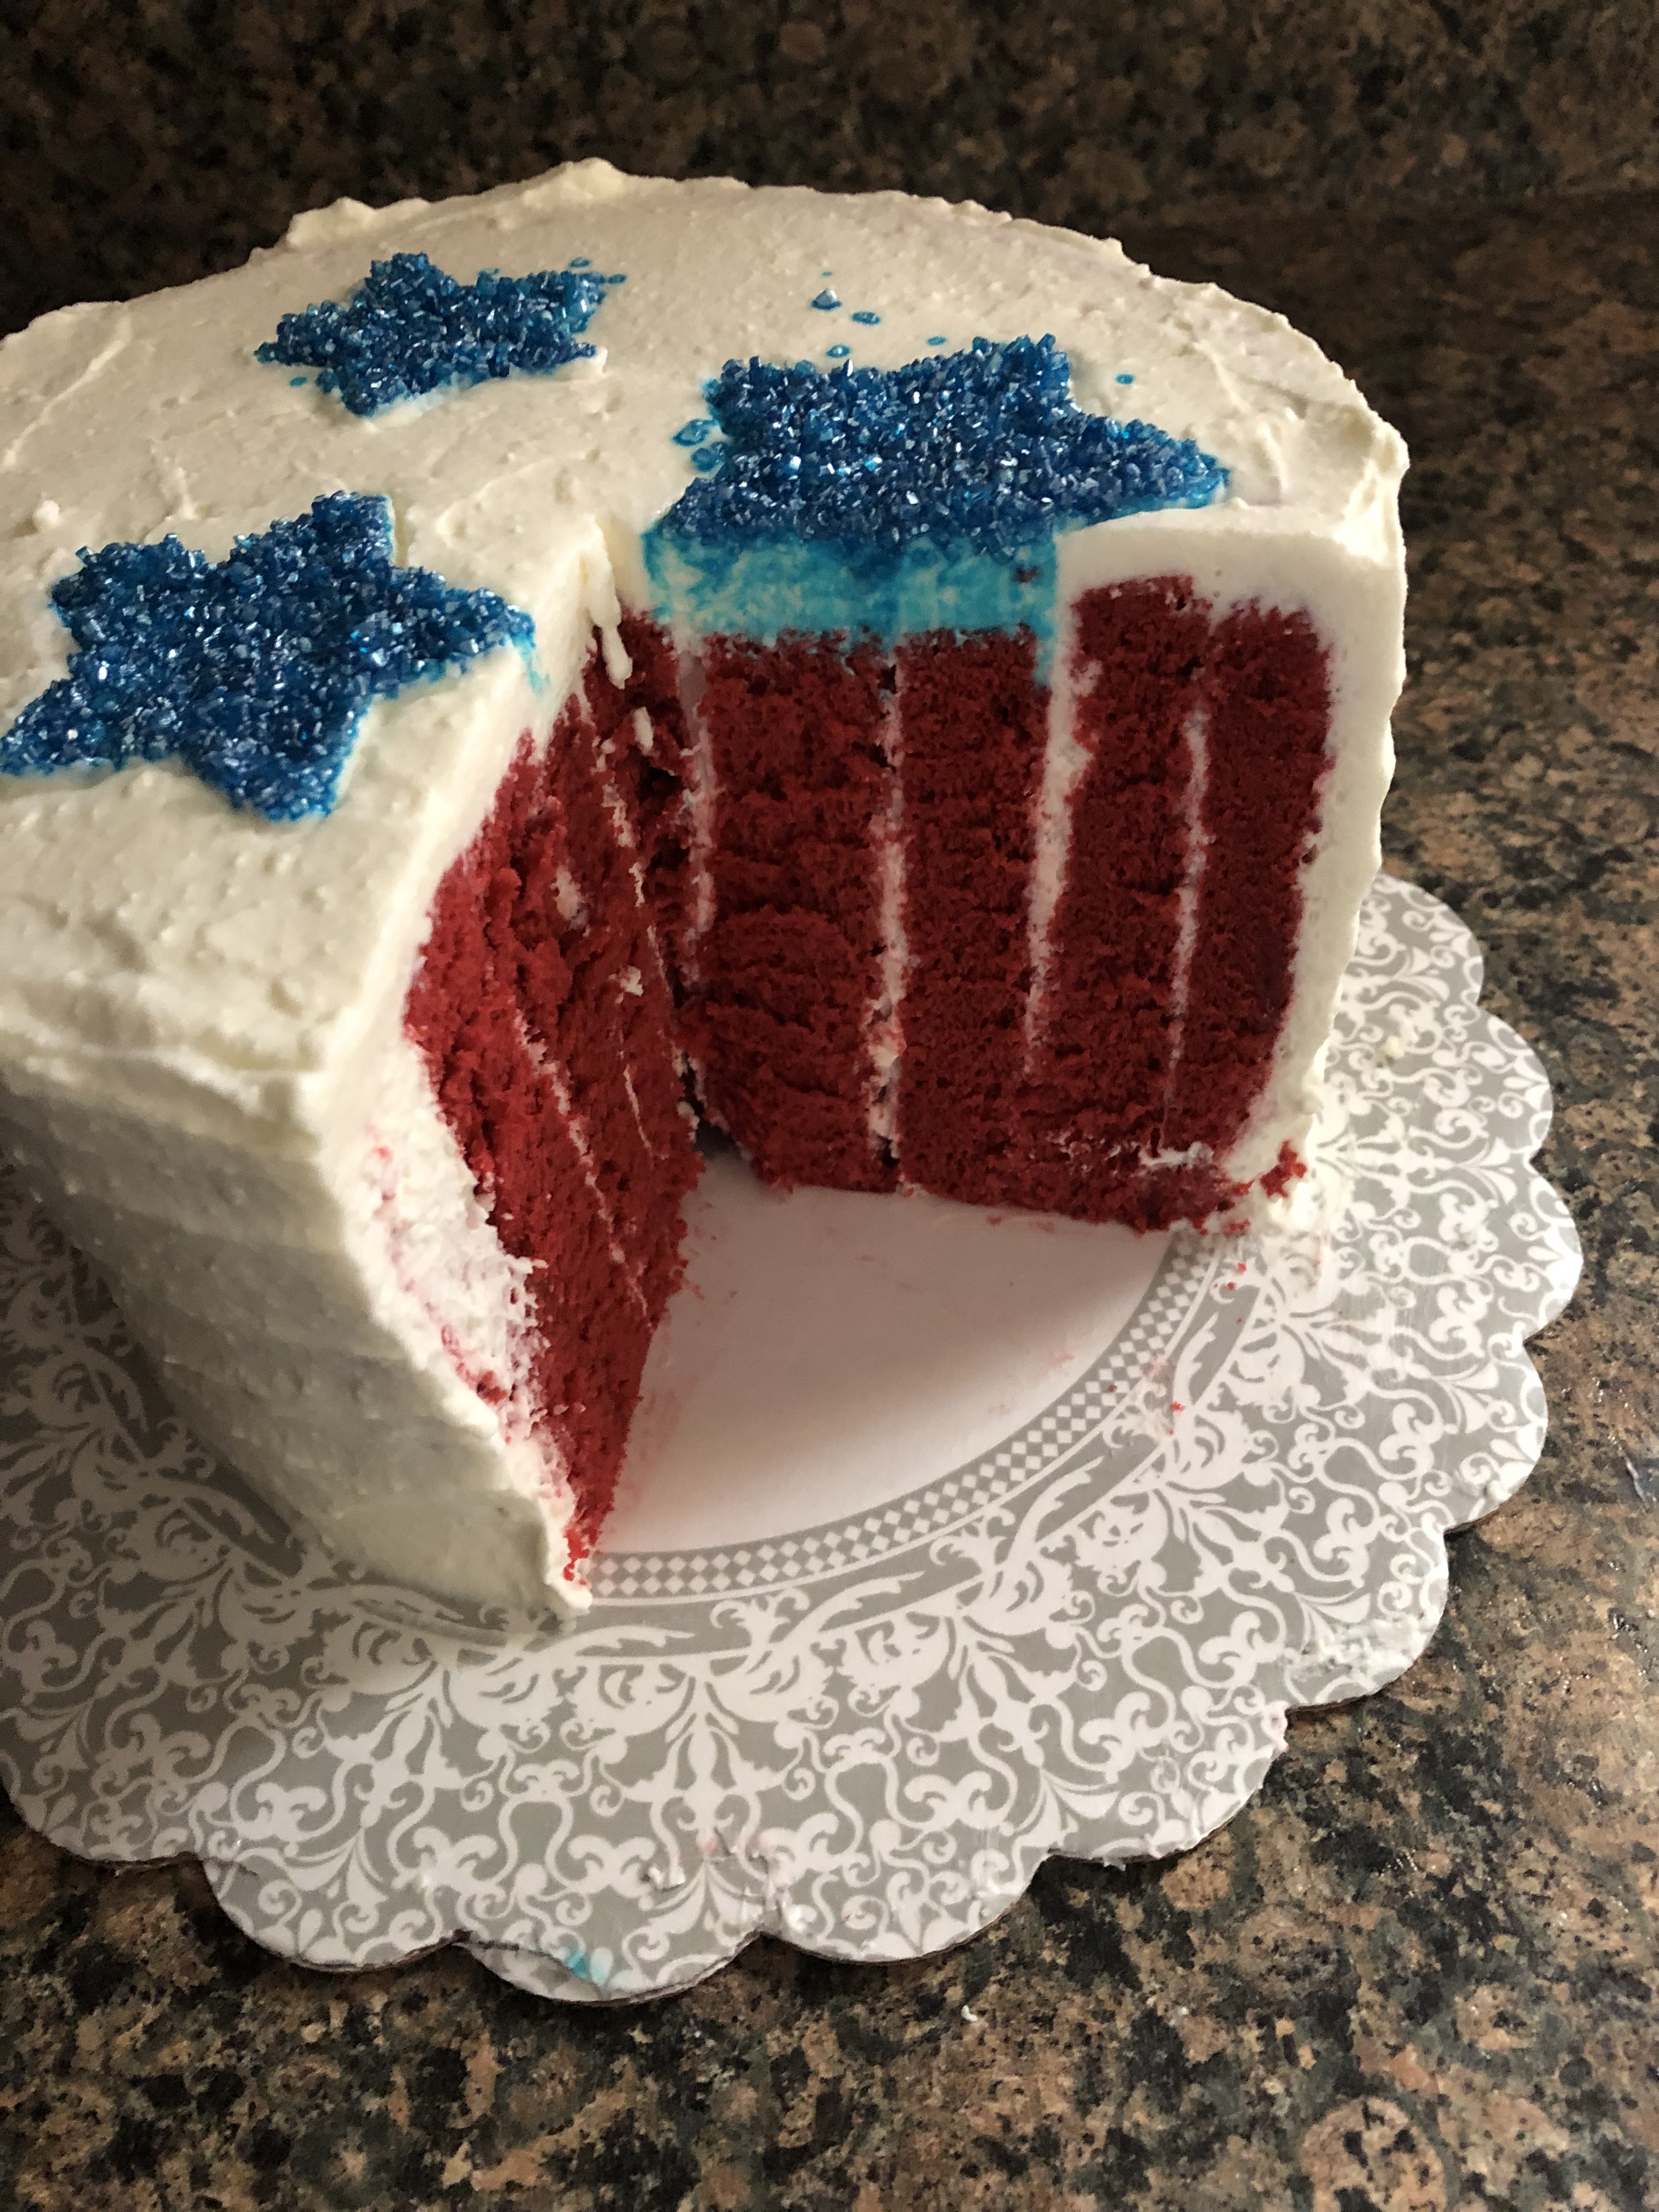
And here’s a look inside the cake once sliced.
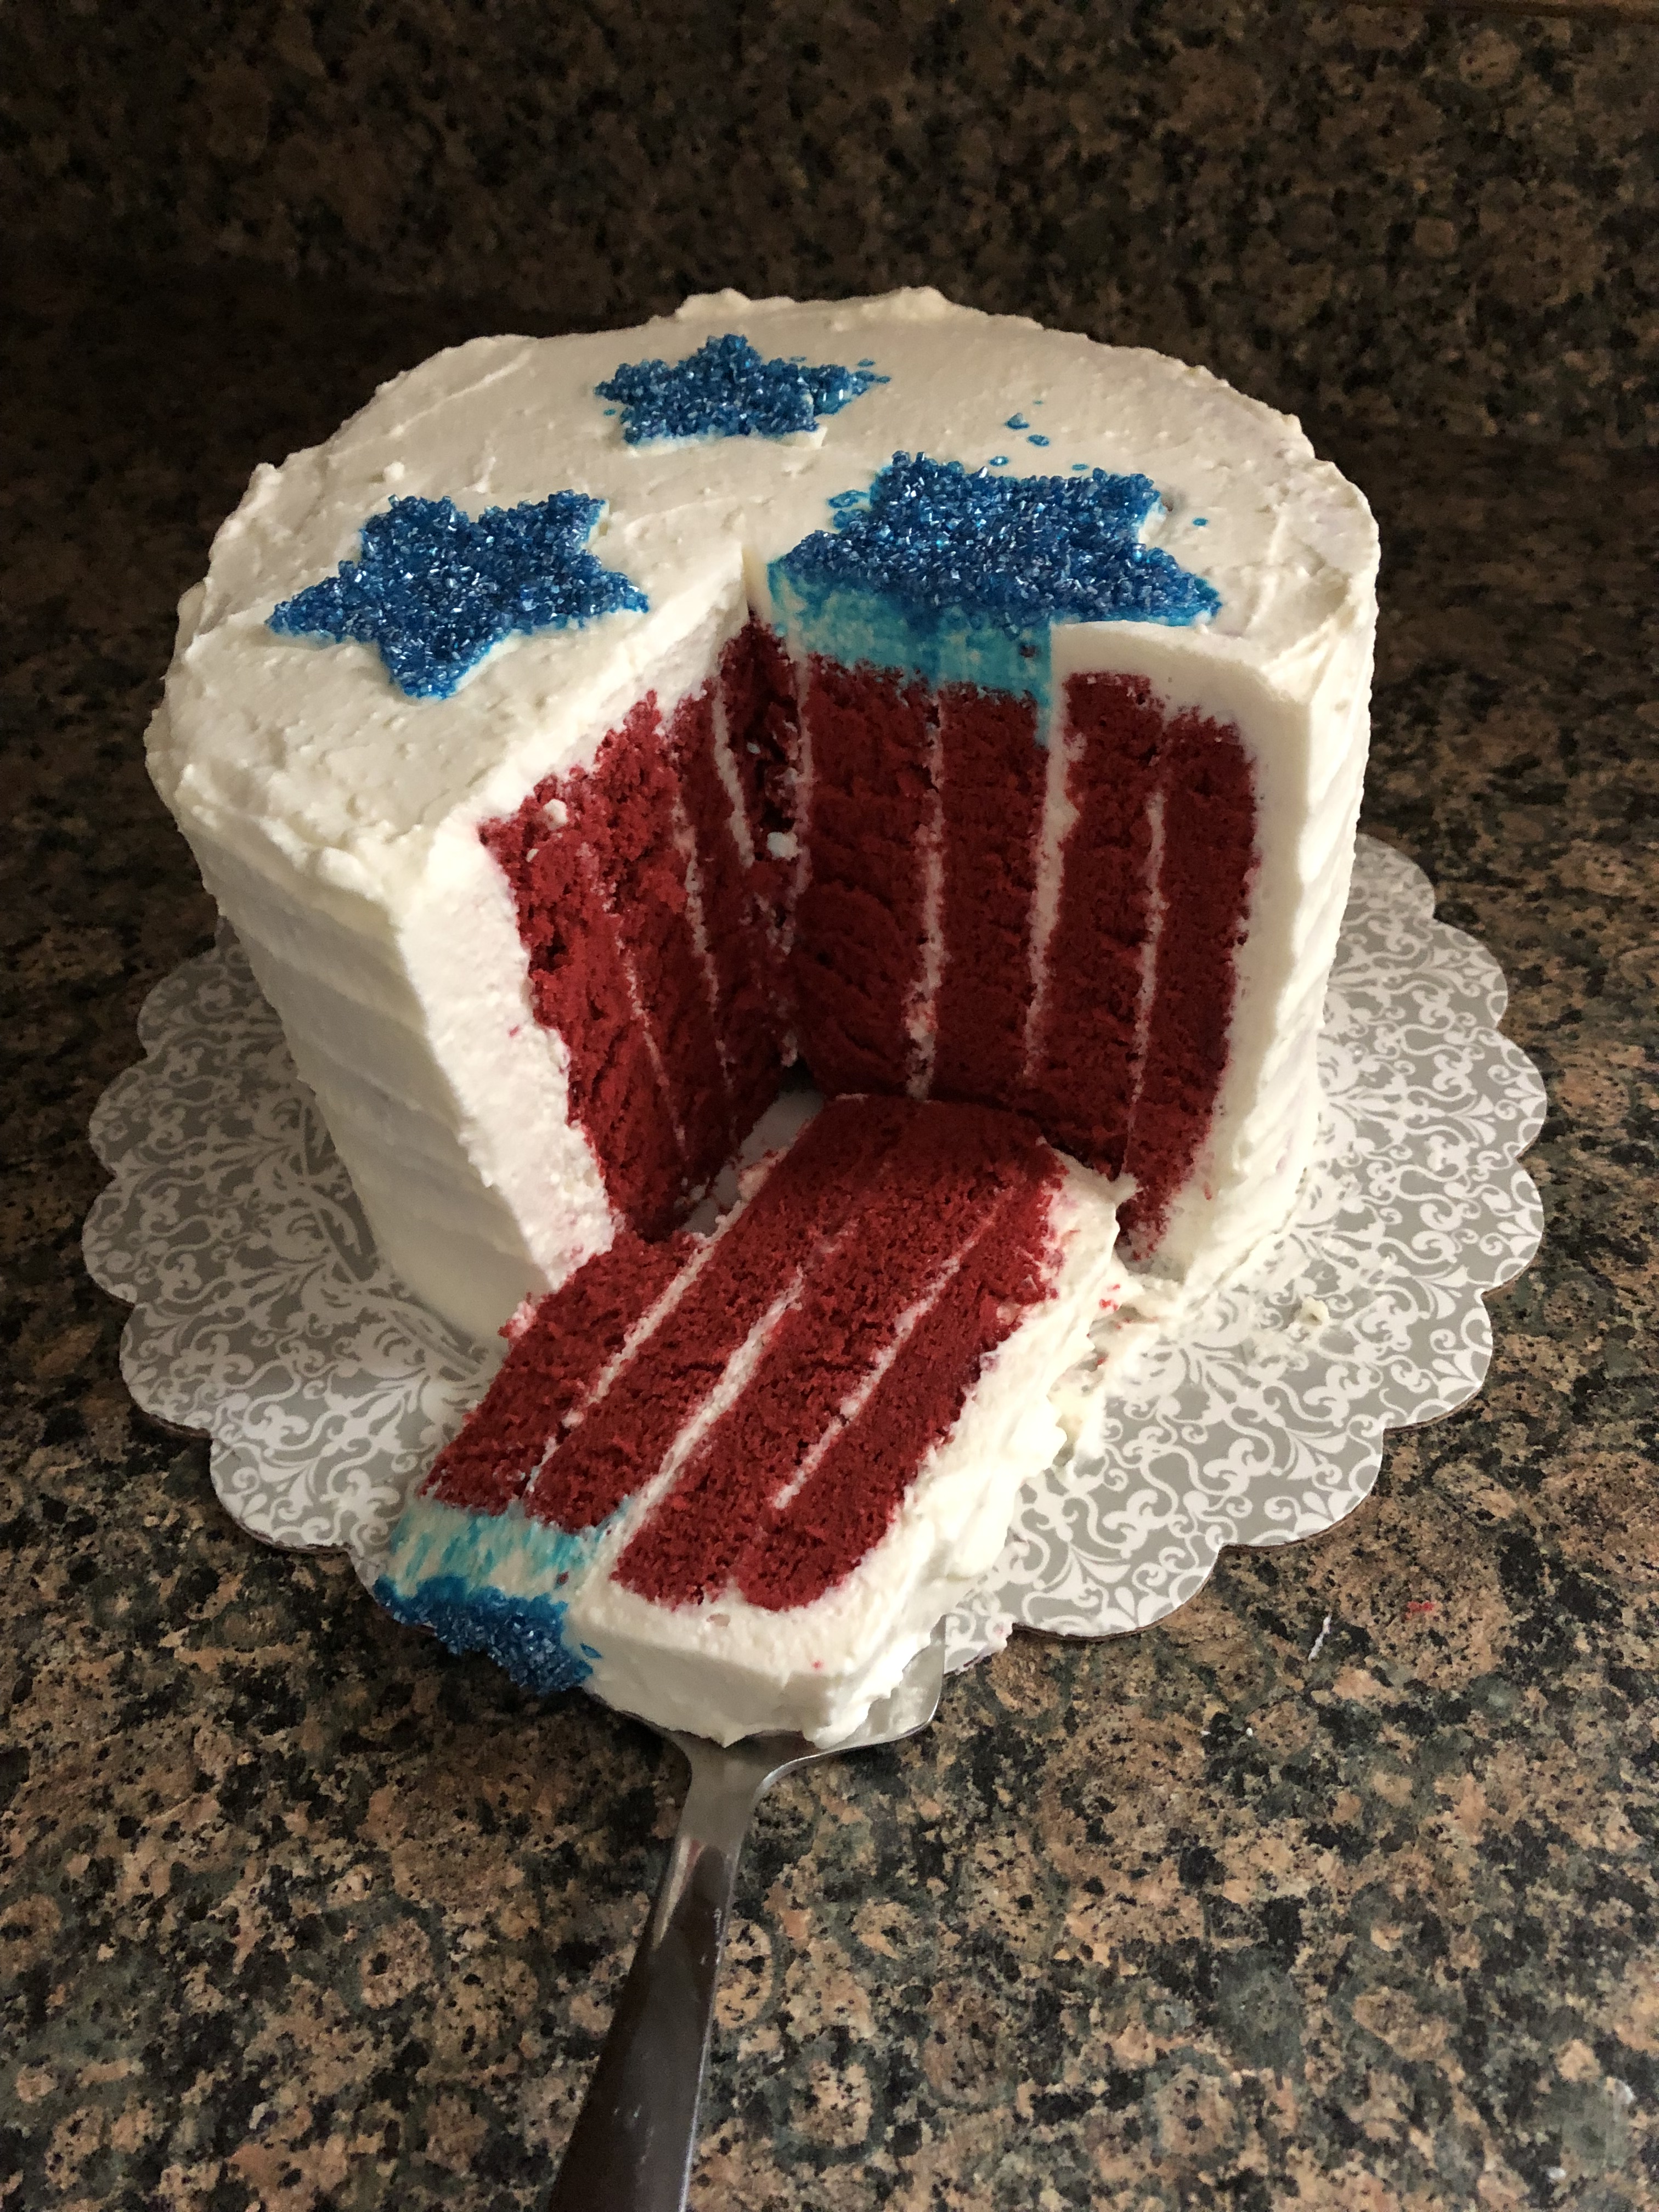
Overall this cake was delicious. Even though it’s red, it’s not quite a red velvet cake. This cake is much lighter and has a stronger chocolate flavor.
Stars and Stripes Cake
Ingredients:
For the Cake:
1 1/4 cups cake flour
1 tablespoon Dutch process cocoa powder
1/2 teaspoon baking powder
8 large eggs, separated
1/2 teaspoon cream of tartar
1/2 teaspoon salt
1 teaspoon pure vanilla extract
1/2 cup water
1/3 cup canola oil
1 – 1 1/2 tablespoons red food coloring
Confectioners’ sugar, for dusting
For the Frosting:
3 8 oz. packages cream cheese, at room temperature
1 1/2 cups confectioners’ sugar
3 cups heavy whipping cream, cold
Blue sanding sugar, for decorating
Directions:
Preheat the oven to 350 F. Spray a 13 x 18 inch baking sheet with baking spray, line with parchment paper and then spray the parchment paper with baking spray.
In a medium bowl, whisk together the flour, cocoa powder and baking powder and set aside.
In a stand mixer with the whisk attachment, beat the egg whites until foamy. Beat in the cream of tartar and salt. Reduce the mixer speed to low and slowly beat in 1/2 cup of sugar. Increase the speed to high and continues whisking until stiff shiny peak form, about 2 to 3 minutes. Transfer the meringue to a bowl and set aside.
Using the beater attachment on your stand mixer, beat the egg yolks, vanilla extract and remaining 1/2 cup of sugar in the same bowl you used for the meringue (no need to clean) on high speed until double in volume. Beat in the water and canola oil.
Sift the flour mixture into the egg yolk mixture and then stir together until just combined.
Add in the food coloring and beat on high speed until incorporated, about 1 minute.
Stir a dollop of the meringue mixture into the batter and fold in using a rubber spatula. Add the remaining meringue and continue folding together the two until no white streaks remain.
Transfer the batter to the prepared pan and using an offset spatula spread the batter evenly in the pan. Tap the pan on the counter a few times to release any air bubbles.
Bake in the preheated oven for 15 to 20 minutes, until a cake tester inserted in the middle comes out clean.
Once out of the oven, loosed the edges of the cake with a knife and dust the top of the cake with confectioners’ sugar. Place a cotton kitchen towel over the cake and then place another baking sheet on top of the towel.
Flip the cake onto the towel and remove the pan and parchment paper. Starting on the short end roll the cake and the towel together into a log. Place on a wire rack to cool completely.
While the cake cools make the frosting. In a bowl beat the cream cheese and confectioners’ sugar on medium-high speed until smooth. With the mixer on low add in the vanilla extract and whipping cream. Once incorporated, slowly increase the speed to high and continue beating until smooth.
Once the cake is cool, unroll the cake on a large baking sheet. Divide the cake into three long strips, about 4 inches each. Spread an even layer of frosting on each of the strips, use about 1/3 of the frosting. Be sure to frost under the curled ends as well.
Roll one of the strips into a tight spiral. Move the spiral over to the next strip. Make sure to line up the ends, and then roll the cake into a fatter spiral. Move this piece over to the last strip, once again lining up the ends, and roll the cake into a large spiral.
Turn the cake flat side down onto a cake cardboard or a cake platter. Spread a thin layer of frosting over the cake. You will need to use more frosting to cover up the seams. Refrigerate for 30 minutes.
Finish frosting the cake with the remaining frosting.
Place different sized star shaped cookie cutters on top of the cake and sprinkle blue sanding sugar inside the cookie cutter. Use a small brush (or straw as I did) to spread the sugar into the cookie cutter. Carefully remove the cookie cutters and refrigerate the cake until ready to serve.
Recipe from Food Network
